If you’ve ever wished you could bottle that rich, vibrant look your patio has right after a rainstorm, you’re not alone. That deep, saturated color that makes every stone pop is exactly what a high-quality sealer can achieve, giving your outdoor space a polished appearance all year long. A paver sealer wet look finish does more than just look good; it creates a permanent sheen that enhances your stonework day in and day out. But it’s not just about aesthetics. This protective coating is one of the smartest things you can do for your investment, guarding it against stains, sun fading, and pesky weeds.
Key Takeaways
- It’s about protection, not just looks: A wet look sealer provides a beautiful glossy finish, but its main job is to create a durable barrier against UV rays, stains, and moisture, which helps your pavers last longer.
- Proper preparation is non-negotiable: The secret to a flawless, even finish is starting with a completely clean and dry surface. Sealing over dirt or damp pavers is the number one cause of a cloudy or blotchy result.
- Hiring a pro protects your investment: While you can apply sealer yourself, a professional service handles the intensive prep work and uses high-quality products correctly, preventing common mistakes and ensuring a durable finish.
What Is a Wet Look Paver Sealer?
If you love how your stone pavers look right after it rains, a wet look sealer is for you. It’s a special coating designed to give your patio, walkway, or driveway that rich, glossy sheen all the time. These sealers are typically high-solids acrylic formulas that darken the pavers just enough to make their natural colors pop, creating a vibrant, polished appearance. Think of it as a permanent enhancement that brings out the best in your stonework.
Beyond the beautiful finish, these sealers are a key part of paver maintenance. They create a protective barrier on the surface of the stone, which is essential for preserving its beauty and integrity over the long term. Whether you have brand new pavers or are looking to bring older ones back to life, applying a quality sealer is one of the best ways to protect your investment. Gappsi offers professional restoration and sealing services to ensure your outdoor spaces always look their best.
How It Creates That Signature Shine
That signature wet look comes from a liquid polymer that, when applied, forms a clear, durable film over the paver surface. This film acts like a lens, deepening the colors and creating a high-gloss finish that reflects light. It essentially locks in the saturated look that water creates, but without the moisture. Products like Techniseal’s high-gloss sealer for concrete pavers are specifically formulated to achieve this effect, giving your hardscape a clean, vibrant appearance that makes the entire space feel more refined and put-together.
Why It’s More Than Just a Good Look
While the aesthetic improvement is a major draw, the protective benefits are just as important. A wet look sealer guards your pavers against all sorts of potential damage. It helps prevent stains from oil, grease, and fallen leaves, making cleanup much easier. It also provides crucial UV protection to stop the sun from fading the beautiful colors of your porcelain and natural stone pavers. Plus, it hardens the sand in the paver joints, which helps prevent weed growth and keeps the pavers from shifting over time, ensuring your patio remains stable and beautiful for years.
A Look at the Best Wet Look Paver Sealers
When you’re ready to give your patio or driveway that polished, just-rained-on look, you’ll find plenty of sealers on the market. The key is finding one that delivers a beautiful finish and offers serious protection against the elements. We’ve worked with countless products over the years, and a few consistently stand out for their performance and durability. Here are four of the best wet look paver sealers that we recommend to homeowners looking for that perfect combination of style and strength.
Gappsi’s Professional-Grade Sealers
We’ve spent decades perfecting outdoor spaces, so we know exactly what Long Island pavers need to withstand our specific climate. That’s why we developed our own line of professional-grade sealers. These products are formulated to provide a rich, wet look that deeply enhances the color of your natural stone or concrete pavers. More importantly, they create a durable shield against UV damage, which prevents fading, and protect against common stains from spills or leaves. When you want a product you know is tough enough for our local weather and designed to keep your investment looking its best, our sealers are a reliable choice.
Eagle Sealer Products
If you’re aiming for a high-impact, super-glossy appearance, Eagle’s Clear Wet Look Sealer is a popular option for homeowners. As a solvent-based acrylic, it creates a noticeable sheen that makes paver colors pop. This sealer does a great job of protecting surfaces from moisture, UV fading, and everyday stains. It’s a solid all-around performer that typically keeps its vibrant look for about two to three years before a reapplication is needed. It’s a fantastic choice for a patio or pool deck where you want that striking, reflective finish.
Techniseal Solutions
Techniseal is another trusted name in the industry, and their WL4 high-gloss sealer is a fantastic product for concrete pavers and slabs. It’s specifically designed to create what they call a “permanent wet look,” preserving that fresh, clean appearance long after it’s applied. We like it because it not only makes pavers look great but also offers excellent protection against stains from oil or grease. This makes it a practical choice for driveways and outdoor kitchen areas where spills are more likely to happen. It helps keep your surfaces beautiful and simplifies cleanup.
Seal N Lock Options
For a more advanced formula, Seal ‘n Lock’s Ultra Wet Look® paver sealer is an impressive choice. This product uses what they call Nano Technology, which allows the water-based urethane-modified acrylic to penetrate deeper into the paver’s surface. This deep penetration creates an incredibly strong and long-lasting protective barrier from within. The result is a beautiful wet look that doesn’t just sit on the surface but truly enhances the stone. It’s a top-tier option for anyone looking for maximum durability and a rich, lasting finish for their outdoor living spaces.
What Are the Pros and Cons of Wet Look Sealers?
Choosing a sealer for your pavers is a big decision that impacts both the look and longevity of your outdoor space. Wet look sealers are a popular choice for a reason, but they aren’t a one-size-fits-all solution. Understanding the benefits and potential drawbacks will help you decide if that glossy, vibrant finish is the right move for your patio, walkway, or driveway. It’s all about weighing what you gain in appearance and protection against the specific needs of your property and lifestyle.
The Advantages You’ll Love
The most obvious benefit is the stunning visual transformation. A wet look sealer deepens and enriches the color of your pavers, making them pop with a vibrant, glossy sheen. It brings out the beautiful, natural tones in the stone that might otherwise look faded. Beyond aesthetics, these sealers offer serious protection. They form a durable barrier against UV rays that cause fading, and they repel stains from spills or leaves. This protective layer also helps lock the sand in the joints between pavers, which maintains the integrity of the surface and keeps weeds from sprouting. Proper restoration and sealing can truly extend the life of your investment.
Things to Keep in Mind
While the benefits are compelling, there are a few things to consider. The biggest factor is moisture. Applying a sealer to pavers that are even slightly damp can trap water underneath, leading to a cloudy or milky appearance that ruins the finish. This is why waiting for a dry stretch of weather and ensuring the surface is completely arid is critical. Another point is that some high-gloss sealers can make the surface a bit slippery when wet, which is an important safety consideration around swimming pools or on sloped walkways. Over-applying the product can also make this issue worse. These potential problems highlight why professional application is often the best route to ensure a flawless and safe result.
How Do You Choose the Right Sealer for Your Pavers?
Picking the right sealer can feel like a big decision, but it’s pretty straightforward when you know what to look for. The goal is to find a product that not only gives you the beautiful wet look you want but also provides serious protection for your investment. It’s about finding the perfect balance between aesthetics and durability, ensuring your patio, walkway, or driveway looks fantastic for years. Let’s walk through the key factors to consider so you can choose with confidence.
What to Look for in a Sealer
Think of a high-quality sealer as a shield for your pavers. Its main job is to protect them from the elements. You’ll want a sealer that offers excellent UV protection to prevent the sun from fading your pavers’ beautiful colors. It should also be water-resistant to guard against mold, mildew, and stains from spills. Another key feature is joint stabilization. A good sealer will harden the sand between your pavers, which helps stop weeds from sprouting and keeps ants from setting up camp. The best products offer a comprehensive defense that keeps your outdoor spaces looking clean and vibrant. Gappsi’s restoration and sealing services focus on using sealers that provide this complete protection.
Matching the Sealer to Your Pavers
Not all pavers are created equal, and neither are sealers. The right choice depends entirely on the material you’re working with. Porous surfaces like natural stone and concrete pavers absorb sealer differently than dense materials like porcelain. Using a sealer that isn’t compatible with your paver type can result in a blotchy finish, a white haze, or inadequate protection. Before you buy, confirm the sealer is formulated for your specific pavers. For instance, some wet look sealers are designed to deeply penetrate and enrich the color of natural stone, while others are made to form a protective film over the top. Always read the product specifications to ensure a perfect match.
Choosing a Sealer for Long Island Weather
Here on Long Island, our pavers face a unique set of challenges. From hot, humid summers to harsh, freezing winters, the weather can take a toll. A sealer for our climate needs to be tough. Look for a product that can handle the freeze-thaw cycles of winter, which can cause pavers to crack and shift. A breathable, water-based sealer is often a great choice because it allows moisture trapped beneath the surface to escape without clouding the finish. It also needs to stand up to salt if your patio or driveway is near areas treated with de-icing products. Choosing a sealer built for our specific weather is a critical step in any masonry project to ensure long-lasting results.
What’s the Best Way to Apply a Wet Look Sealer?
Applying a wet look sealer isn’t complicated, but it does require attention to detail. The secret to a flawless, lasting finish lies in proper preparation and application. Getting these steps right ensures your pavers look stunning and stay protected. We’ll walk through the entire process, from getting your pavers ready to avoiding common slip-ups that can derail your project.
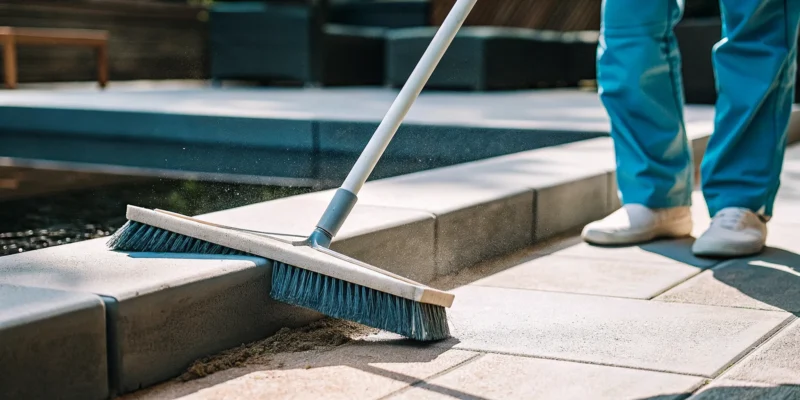
How to Prep Your Pavers
Think of this as the most important step. Applying sealer to a dirty or damp surface is a recipe for disappointment. Before you even think about opening the sealer, your pavers must be completely clean and dry. This means scrubbing away all dirt, grime, oil stains, and any of that chalky white residue called efflorescence. A pressure washer can be a great tool here, but make sure you let the pavers dry thoroughly afterward, which can take at least 24 to 48 hours. A pristine surface allows the sealer to bond correctly, giving you that beautiful, even sheen. If the prep work feels overwhelming, our restoration and sealing services can handle it for you.
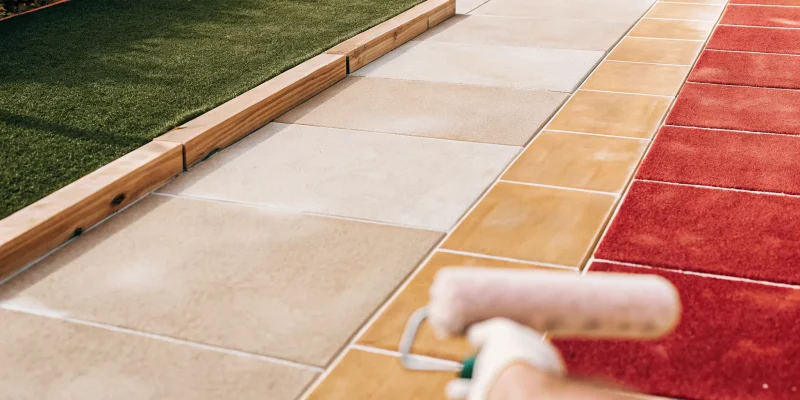
The Right Tools and How to Use Them
Once your pavers are prepped, it’s time to apply the sealer. The right tools make all the difference. For a smooth, consistent coat, use a garden sprayer that can handle solvents, a low-pressure sprayer, or a natural bristle brush. One tool you should absolutely avoid is a roller. Rollers tend to create bubbles and can leave an uneven, streaky finish on the textured surface of pavers. Also, check the weather forecast. The ideal time to apply sealer is on a mild, dry day with the temperature somewhere between 40 and 75 degrees Fahrenheit. This helps the sealer cure properly without drying too fast or too slow.
Common Application Mistakes to Avoid
A few common mistakes can turn your project into a headache, so let’s make sure you avoid them. The biggest error is applying sealer to pavers that are still damp. Even if they look dry on the surface, moisture can be trapped underneath, leading to a cloudy, milky finish that’s difficult to fix. Another major misstep is skipping the cleaning process. Sealing over dirt or stains just locks them in permanently and prevents the product from adhering properly. Be patient and give your pavers plenty of time to dry after cleaning. Taking your time ensures your beautifully sealed patio looks professional and lasts for years.
How Long Does a Wet Look Sealer Last?
One of the most common questions we get is about the longevity of a wet look sealer. It’s a great question, because you want to know your investment of time and money is going to pay off. Generally, a high-quality wet look sealer can last up to five years under the best conditions. However, “best conditions” can be a bit of a unicorn, especially here on Long Island where our patios and walkways face everything from blazing summer sun to winter ice. Think of your sealer as a hardworking shield for your beautiful pavers. Its main job is to protect against moisture, UV rays, stains, and everyday wear and tear, which is crucial for preserving the beauty of your outdoor living space.
The actual lifespan really depends on a few key variables. The amount of foot traffic your patio gets, its exposure to direct sunlight, and how well the surface was prepared before application all play a huge role. A walkway that sees constant use will naturally show wear faster than a quiet, shaded seating area. For these high-traffic spots or surfaces that get a lot of direct sun, you might find that you need to reapply a maintenance coat every couple of years to keep that rich, glossy finish looking its best. Creating a regular maintenance schedule is the best way to protect your pavers for the long haul, and our professional restoration and sealing services can help you figure out a plan that makes sense for your specific space.
What Makes Your Sealer Last Longer
Several key factors determine how long your wet look sealer will maintain its shine and protective qualities. First is the quality of the sealer itself. Products with a higher percentage of solids tend to form a thicker, more durable film, offering better protection and a longer-lasting gloss. Another major factor is the environment. A patio that’s shaded for most of the day will hold its seal longer than one that bakes in the sun. The type of porcelain and natural stone you have can also play a role, as some materials are more porous than others. Proper application on a thoroughly cleaned and completely dry surface is also critical for maximum adhesion and durability.
Signs It’s Time to Reapply
Knowing when to reapply sealer is all about observation. Your pavers will give you some clear signals. The most obvious sign is that the wet look has started to fade and the surface looks dull or dry. You might also notice that water no longer beads up on the surface when it rains; instead, it soaks in. This is a key indicator that the protective barrier is wearing down. In some cases, you might see peeling or flaking, which often points to an issue with the initial application, like moisture being trapped underneath. If your pavers are looking tired or are getting harder to clean, it’s probably time for a fresh coat.
How Do You Maintain Sealed Pavers?
Applying a wet look sealer is a fantastic way to enhance and protect your patio, walkway, or driveway. But the work doesn’t stop once the sealer is dry. To keep that beautiful, glossy finish looking its best for years to come, a little routine maintenance is essential. Proper care not only preserves the aesthetic appeal of your pavers but also extends the life of the sealant, protecting your investment against the elements. Think of it as simple upkeep that pays off big time. By following a few straightforward tips for cleaning and long-term protection, you can ensure your outdoor space remains a stunning feature of your home.
Simple Cleaning Tips
Keeping your sealed pavers clean is easier than you might think. The best approach is gentle and consistent. Start by regularly sweeping away leaves, dirt, and other debris to prevent stains and mildew from setting in. For a quick refresh, a simple rinse with a garden hose often does the trick. If you encounter spills, like from a barbecue or a dropped drink, try to clean them up right away with a mild soap and water. Avoid using harsh, acidic cleaners or a high-pressure washer, as these can strip away the sealer and damage the paver surface. For stubborn stains that won’t budge, it’s best to call in experts who offer professional cleaning and restoration.
How to Protect Your Pavers for the Long Haul
Long-term protection is all about preserving the integrity of the sealant. After the initial application, it’s crucial to let the sealer fully cure for at least 24 hours before walking on it or placing furniture. This prevents peeling and ensures a durable bond. Every season, take a walk around your patio or driveway to inspect for any signs of wear, paying close attention to high-traffic areas. Most sealers will need to be reapplied every three to five years to maintain that vibrant wet look and protective barrier. When it’s time to reapply, ensuring the surface is perfectly clean is the most important step for a lasting finish. A professional resealing will guarantee your pavers are properly prepped and sealed.
How Much Does Professional Paver Sealing Cost?
When you start looking into professional paver sealing, you’ll find that prices generally fall between $0.75 and $2.00 per square foot here on Long Island. This range can shift based on a few key things: the current condition of your pavers, the type of material they’re made from, and the total size of your patio, walkway, or driveway. For example, older pavers that need extensive cleaning or have a lot of weeds will likely be on the higher end of that scale. It’s important to remember that this price isn’t just for a can of sealer. It covers a complete service designed to protect and beautify your investment for years to come.
A professional quote typically includes a thorough power washing to remove dirt and grime, re-sanding the joints between the pavers, and the precise application of a high-quality sealer. Think of it as a full spa treatment for your outdoor surfaces. The goal is to restore their original beauty and shield them from the elements. At Gappsi, our restoration and sealing services are tailored to handle the specific challenges of our local climate, ensuring your pavers look great and last longer. Getting a professional estimate is the best way to understand the exact cost for your project and what that investment covers, giving you a clear picture of how to best protect your outdoor space.
DIY vs. Professional Application
Going the DIY route might seem like a good way to save money, and for small, simple projects, it can be. However, sealing pavers correctly involves more than just rolling on a coat of sealer. A professional job, which usually costs between $1.50 and $2.00 per square foot, includes critical prep work that makes all the difference. This means a deep, powerful cleaning to lift stubborn stains and organic growth, followed by adding new sand to the joints. This step is essential for stabilizing the pavers and preventing weeds. When you hire a professional, you’re paying for their expertise, commercial-grade equipment, and premium products that deliver a flawless, even finish that lasts.
Why Professional Sealing Pays Off
Investing in professional sealing is really about protecting your larger investment: your beautiful paver patio or driveway. A pro knows exactly how to handle different materials, from porous natural stone to durable porcelain pavers, using the right cleaning methods and sealers for each. This expertise prevents costly mistakes, like trapping moisture or creating a cloudy finish, which can be difficult and expensive to fix. Professionals also use high-quality sealants that offer superior protection against UV rays, stains, and water damage. In the long run, this expert application extends the life of your pavers, keeps them looking fantastic, and saves you money on future repairs and intensive maintenance. It’s a smart move for maintaining your home’s value and curb appeal.
Related Articles
- Paver Sealer: Everything You Need to Know
- application Archives – Gappsi Group
- acrylic Archives – Gappsi Group
Frequently Asked Questions
Will a wet look sealer make my patio slippery, especially around a pool? This is a great question, and the answer is that it can. High-gloss sealers create a smooth, non-porous film that can reduce traction, particularly when it gets wet. If you’re sealing an area around a swimming pool or a sloped walkway, safety is key. You can ask your professional installer about adding a non-slip additive to the sealer. This creates a slightly textured finish that provides more grip without significantly dulling the shine.
How often will I really need to reseal my pavers here on Long Island? While a high-quality sealer can last up to five years, the real timeline depends on your specific property. A patio that gets intense, direct sun all day or a walkway with heavy foot traffic will likely need a maintenance coat every two to three years to keep it looking its best. The key is to watch for the signs. When you notice the glossy finish has faded or that rainwater is soaking in instead of beading up, it’s time to think about resealing.
What happens if I apply the sealer and it looks cloudy or hazy? A cloudy or milky white haze is almost always caused by one thing: trapped moisture. This happens when a sealer is applied to pavers that weren’t completely dry. Unfortunately, it’s not an easy fix and usually requires stripping the sealer off with a special solvent and starting the process over. This is one of the biggest reasons we recommend professional application, as we can ensure the surface is perfectly prepped and arid before any product is applied.
Can I apply a new coat of wet look sealer over an old one? It depends on the condition of the existing sealer. If the old coat is simply faded but still intact, you can often clean the surface thoroughly and apply a new coat right on top. However, if the old sealer is peeling, flaking, or has turned cloudy, it must be completely stripped off first. Applying a new layer over a failing one will only cause the new coat to peel off as well, so a clean slate is essential for a lasting finish.
Is a solvent-based or water-based sealer better for my pavers? Both types have their advantages, and the best choice often depends on the paver material and the finish you want. Solvent-based acrylic sealers tend to penetrate deeply and create a very rich, high-gloss finish that really makes colors pop. Water-based sealers are more environmentally friendly, have a much lower odor during application, and offer excellent breathability. This breathability is a great feature for our climate, as it allows any moisture vapor from under the pavers to escape without clouding the finish.