
View Gappsi’s YouTube Channel for Videos of A Timeless Nicolock Paver Driveway Sealed and Restored in Commack, NY
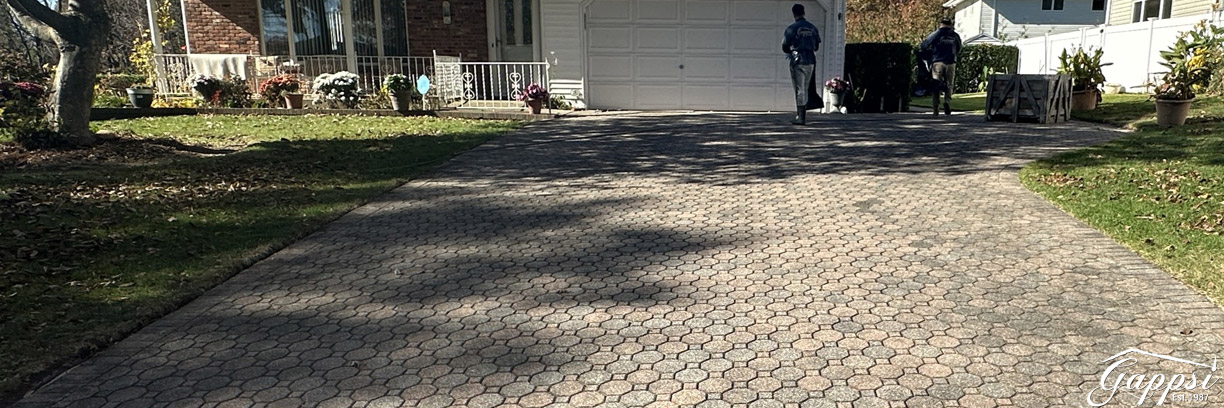
Look at our latest project, a timeless Nicolock paver driveway sealed and restored in Commack, NY. When people ask how long paver driveways last, most don’t expect to hear “over 30 years.” But that’s precisely what we’re here to show you today. In Commack, NY, a Nicolock paver driveway we originally installed 31 years ago just received a well-deserved restoration, and the results are truly stunning.
This project is close to our hearts. Not only does it represent our early work, but it also showcases the remarkable longevity of quality materials and expert craftsmanship. This particular driveway was one of the first Nicolock paver installations ever completed by us at Gappsi, back when Nicolock began manufacturing pavers.
A Look Back: The Beginning of Nicolock Pavers
In the early 1990s, Nicolock was starting in the paver manufacturing business. Known today for their vibrant color blends and durable products, Nicolock was still proving itself as a new name in the hardscaping world. At Gappsi, we recognized the potential of Nicolock’s pavers right away. This driveway, installed over three decades ago, is a testament to our confidence in their product and our commitment to excellence.
 At the time, installing pavers was still a relatively new concept for residential driveways in the area. Concrete and asphalt were the norm, but we believed in offering something better, something more beautiful, resilient, and long-lasting. This driveway was part of that early vision.
The Condition: 31 Years Later
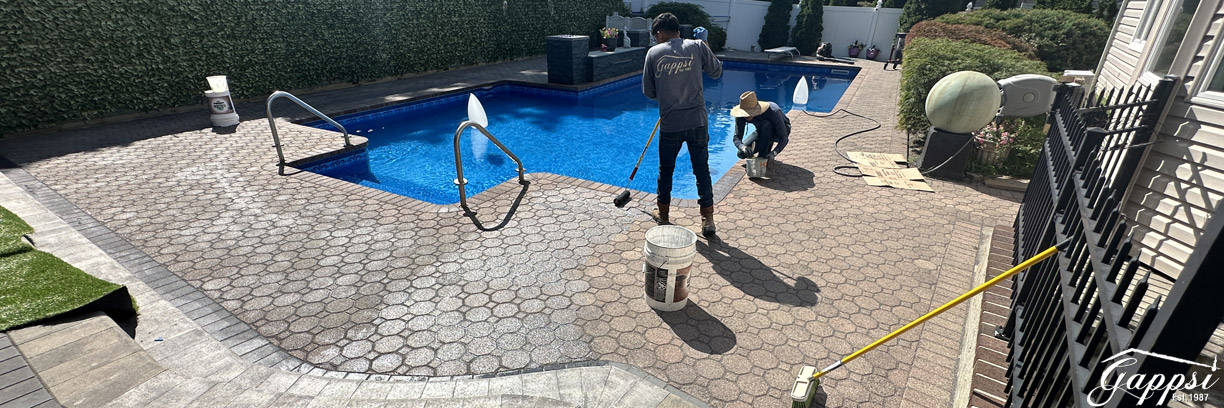
Fast forward to the present, and we’re proud to say this Nicolock driveway in Commack is still in great shape. Sure, there was some light weathering on the surface of the stones, that’s to be expected after three decades of sun, rain, snow, and regular vehicle traffic—but structurally, the driveway held up incredibly well.
We performed minor repairs to address a few settlement areas and re-level any uneven stones. However, most of the surface remained intact, indicating that proper installation techniques and premium materials improve long-term performance.
Learn More About Our Driveway Sealed and Restored Process
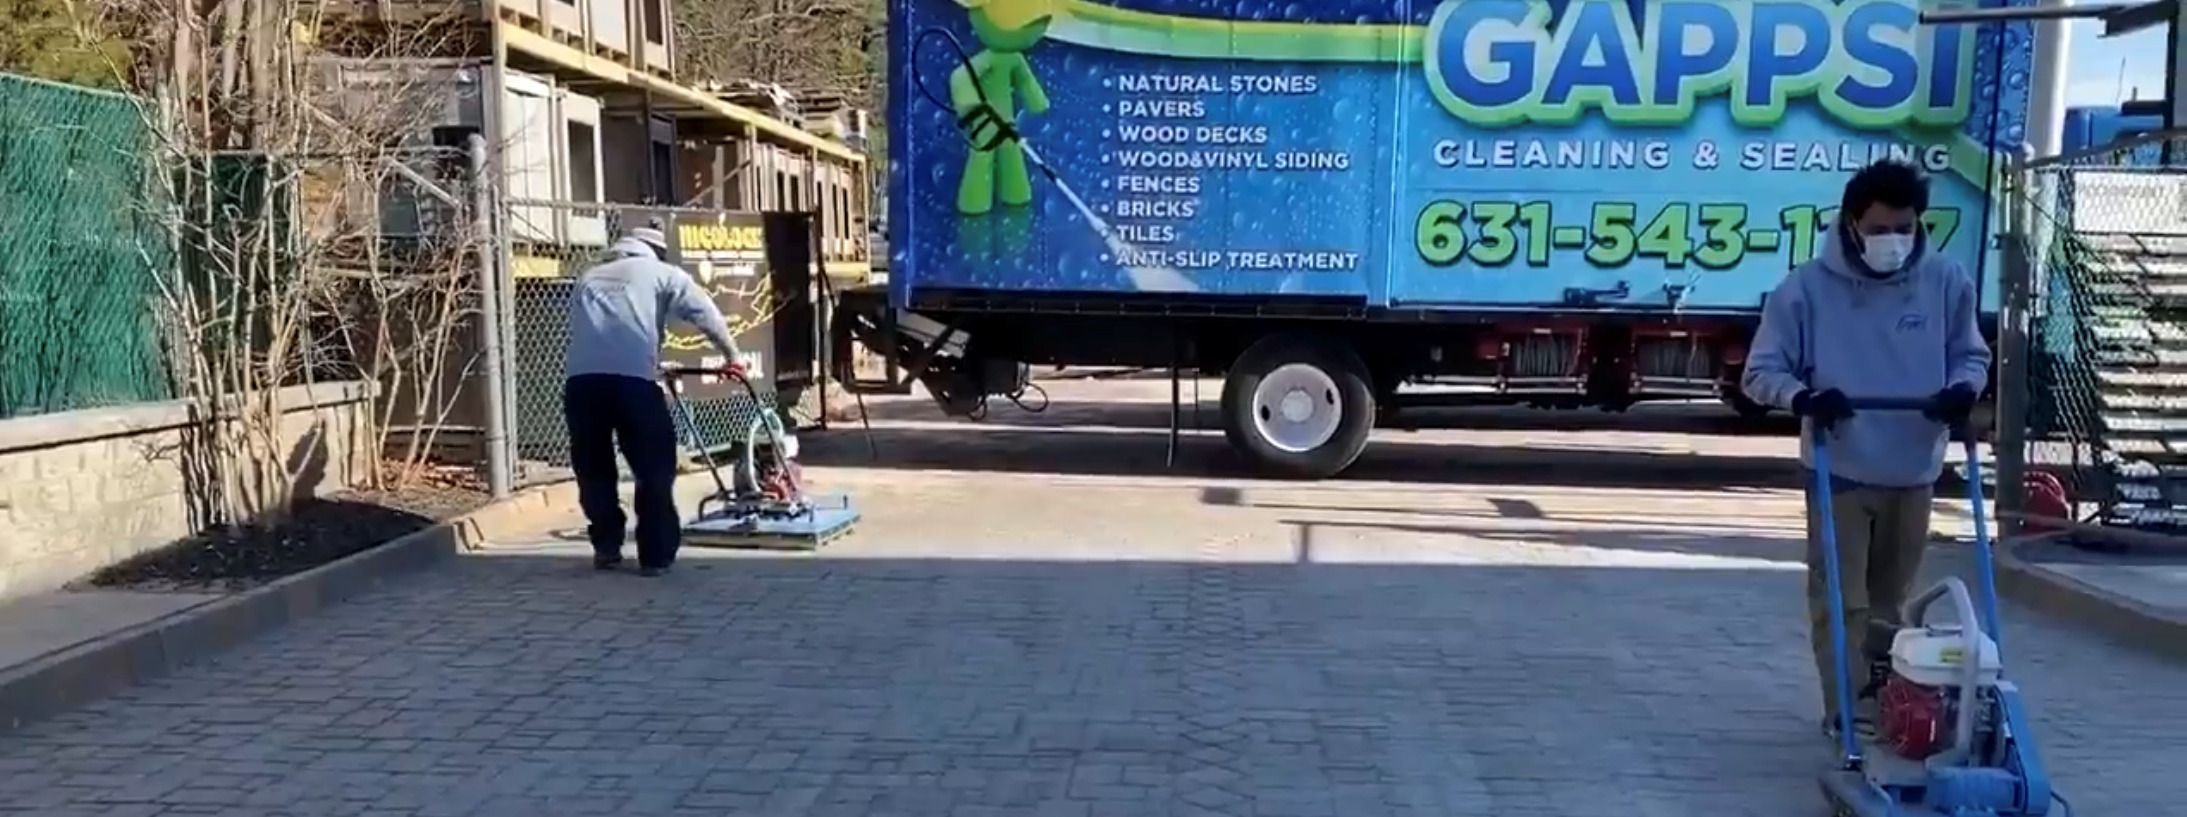
 Cleaning and Prepping the Surface
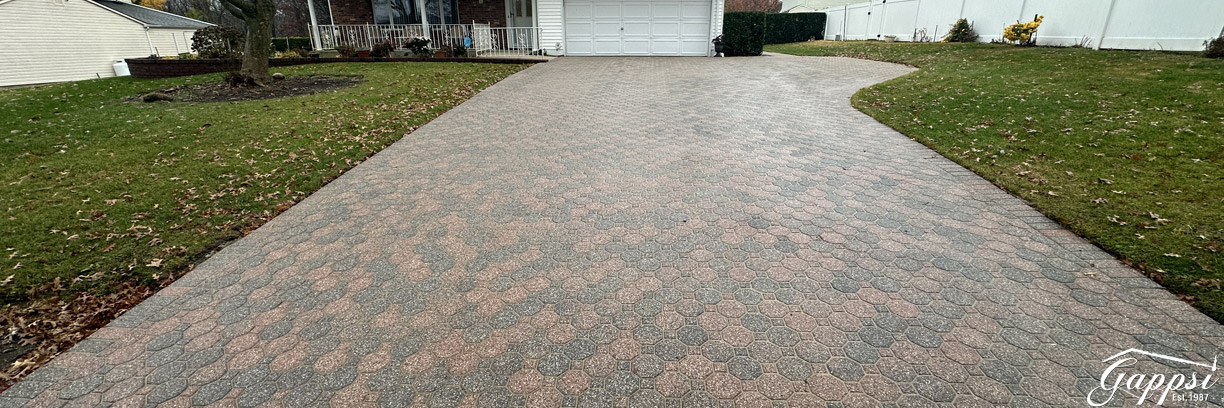
Before resealing, we thoroughly cleaned the entire driveway surface. This included power washing the pavers to remove accumulated dirt, organic growth, and any residual materials left by the environment over the years. The cleaning process is critical, not just for aesthetics but also to ensure proper adhesion of the sealant later on.
Once cleaned, the Nicolock pavers’ natural beauty began to shine through. Despite their age, the colors were still vibrant, and the texture of the stones remained solid. Rather than diminishing the look, the weathering gave the surface a more natural stone-like patina, adding character and charm to the overall appearance.
Polymeric Sand Installation
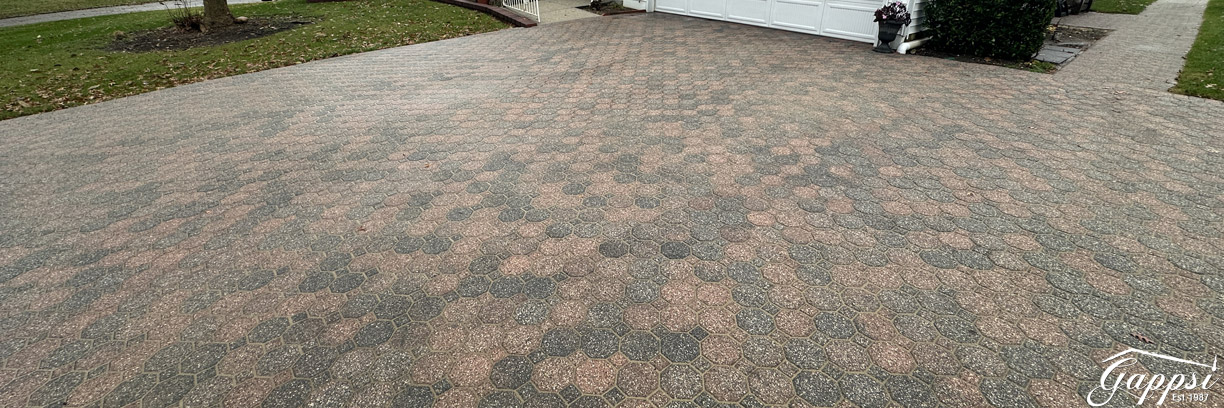
After cleaning, we applied polymeric sand between the pavers’ joints. This advanced material offers superior stability compared to traditional sand. When installed correctly and allowed to cure, polymeric sand hardens to create a strong, cohesive bond that resists weed growth, insect infestation, and erosion from rain or washing.
The sand was carefully swept into the joints, misted with water, and allowed to set for a couple of days. This tightened the structure and enhanced its visual appeal, giving the joints a clean, defined look.
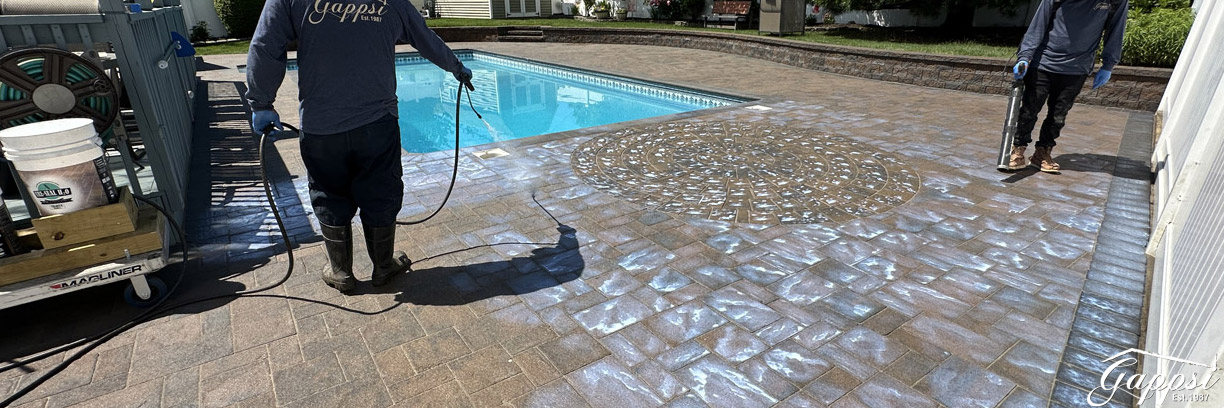
 Sealing: The Finishing Touch
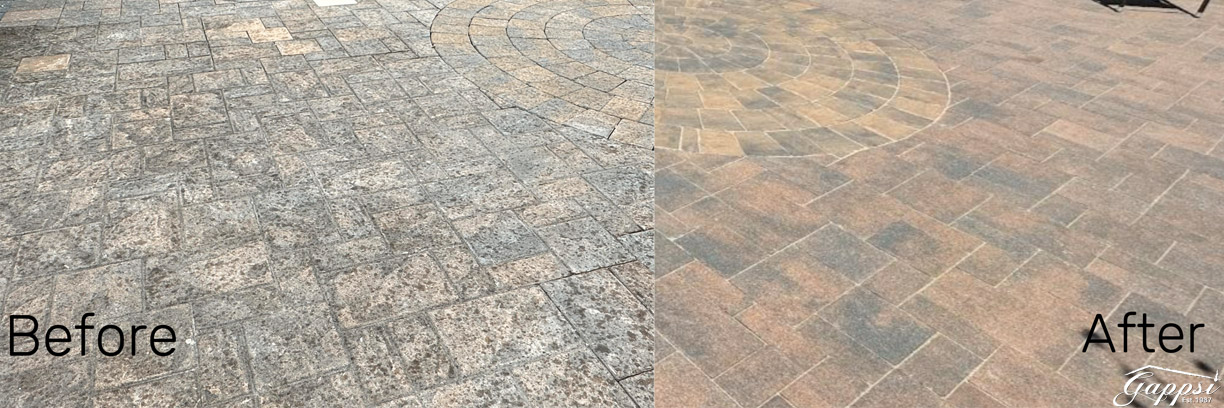
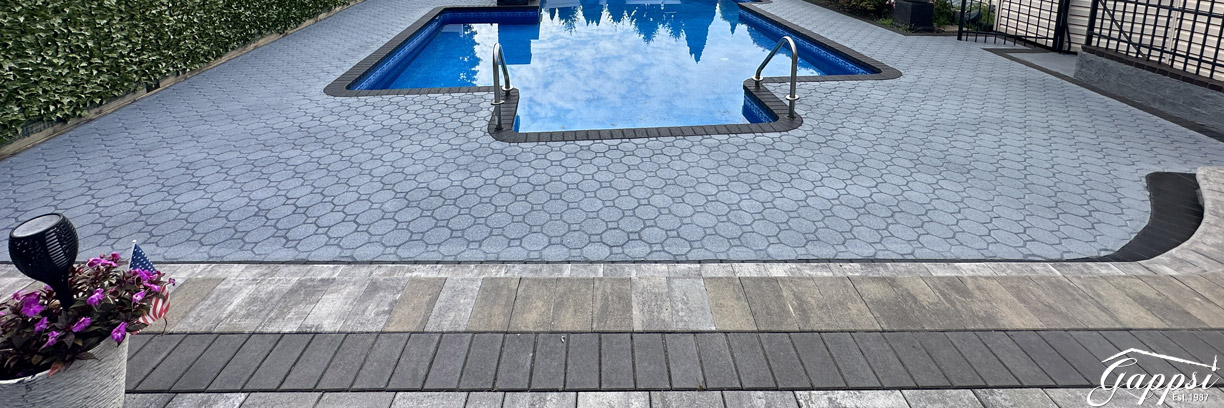
The final step was the application of a premium color-enhancing sealer. What sets this sealer apart is its ability to boost the natural tones of the pavers without making them look overly shiny or artificial. The stones don’t look “sealed”—instead, their original color appears richer and more intense, while retaining that natural matte finish that homeowners love.
As professionals, we understand that not all sealers are created equal. We use only high-quality sealers that offer long-lasting protection against the elements, UV rays, stains, and fading, all while enhancing the pavers’ natural beauty.
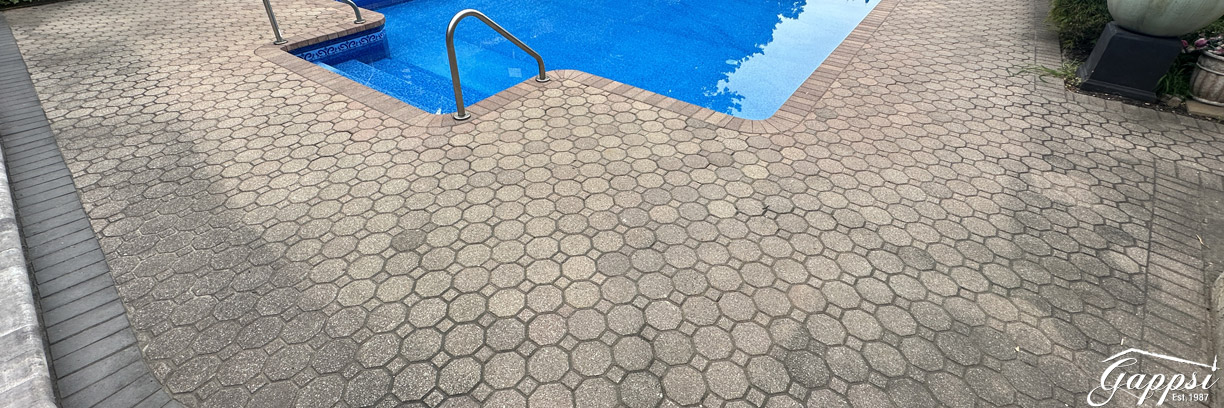
The Result: Like New After Three Decades
The transformation is impressive. What was already a well-preserved driveway now looks like it was just installed. The resealed pavers display a renewed depth of color and vibrancy, with the natural weathering adding subtle variation and depth.
It’s not just about aesthetics, either. The paver driveway sealed and restored also provides a critical layer of protection that will help it last many more years. This 31-year-old driveway could easily reach 40 or even 50 years of service with proper maintenance, including periodic cleaning and resealing every few years.
A Testament to Craftsmanship and Quality
This driveway restoration in Commack is more than just a routine job—it’s a reminder of the lasting value of quality work. At Gappsi, we take great pride in our installations, and this project illustrates the power of doing things right the first time.
 We used proper base materials from the beginning, ensured correct compaction, and adhered to best practices during installation. We chose a paver product we believed in, and Nicolock has proven to be a trusted partner in delivering quality, American-made hardscaping materials.
Why Choose Gappsi for Your Paver Driveway Sealed and Restored?
At Gappsi, we don’t just install driveways—we build long-term investments in your home. Whether it’s a driveway, patio, pool deck, or complete backyard transformation, our team is dedicated to using the best materials and techniques available. Our decades of experience mean you can trust us to deliver a finished product that’s beautiful and built to last.
This Commack project is a living case study of our philosophy. More than thirty years after we laid the first stone, the driveway remains solid, attractive, and functional. With just a little maintenance, it continues to look fantastic.
Thinking About a Paver Driveway?
Think long-term if you’re considering a new paver driveway, patio, or outdoor living space. Choose a contractor with a proven track record, select durable materials, and commit to regular maintenance. You’ll be rewarded with an outdoor surface that performs beautifully year after year.
Do you have a paver surface that needs a refresh? We can help restore it with cleaning, re-sanding, and sealing services, like this Nicolock driveway.
Contact Gappsi today to learn more about our hardscaping services in Commack and Long Island. Whether you need a brand-new installation or a touch-up for a 30-year-old driveway, we’re here to help bring out the best in your outdoor spaces.
 But we don’t stop there. Your vision for the final appearance matters just as much as the material itself. Some homeowners prefer a more natural, matte look, where the stone’s color remains unchanged but is still water- and stain-repellent. Others may want to enrich or enhance the stone’s natural tones, giving the surface a “wet look” or deeper hue. We tailor our sealing method accordingly, ensuring both aesthetic and functional goals are met.
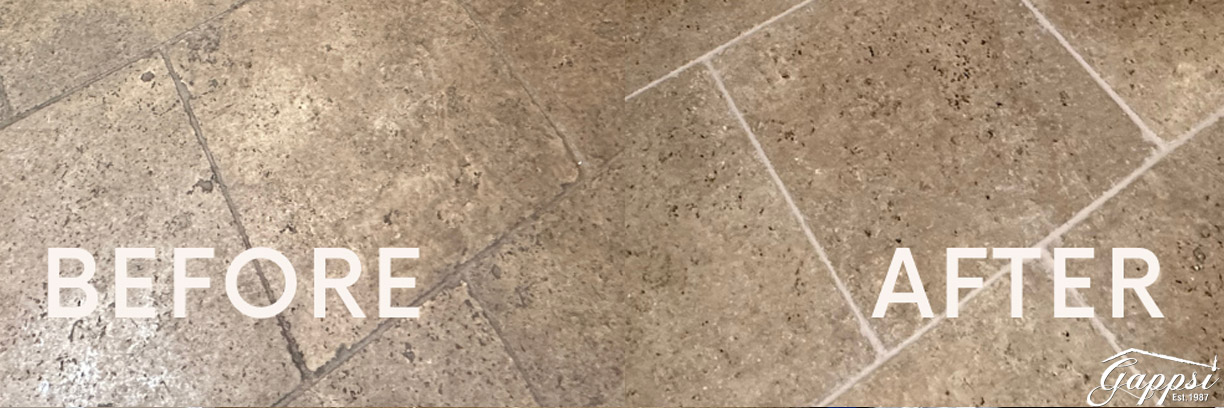 Once sealed, your grout becomes water-resistant and far easier to clean, maintaining its appearance for years to come. This is an excellent solution for both new tile installations and older surfaces that need a refresh.
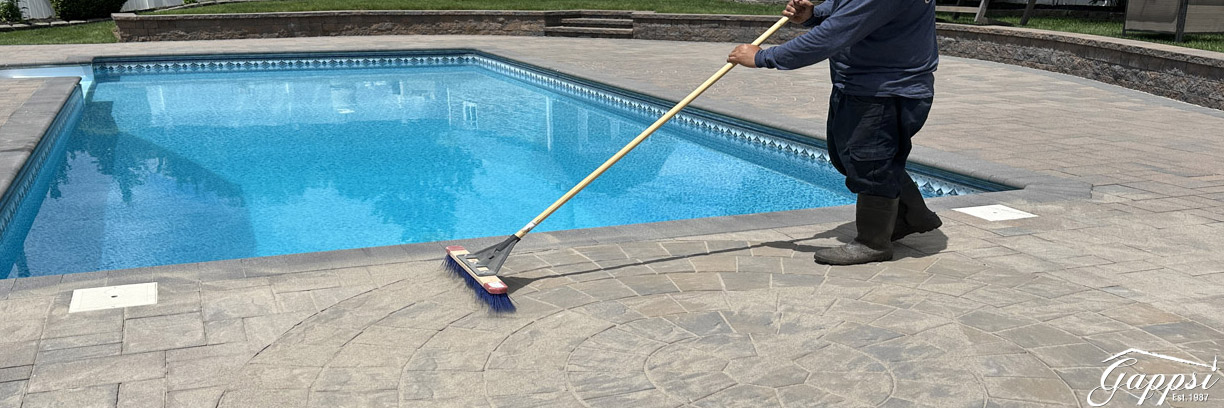
 After brushing away any excess sand, we apply the sealer, carefully selected for the specific material and finish desired. This step not only seals and protects the stone but also locks the sand in place. Our team’s deep understanding of both surface materials and sealing products ensures a flawless application, resulting in a durable and attractive finish that lasts.
 We will blend it in with the existing Cambridge patio. The color staining for this backyard in Smithtown NY has been completed.
 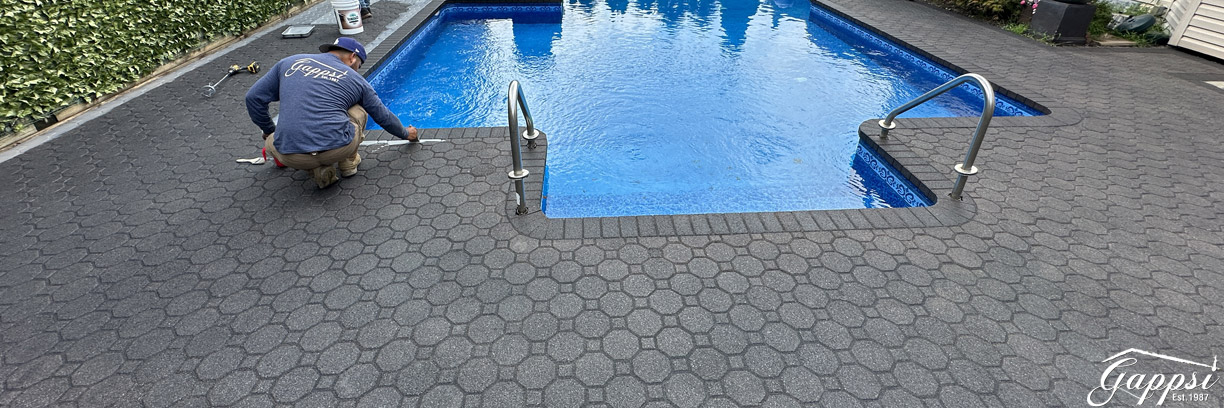 The homeowners have changed the color of the backyard to be more gray-toned throughout the years. The existing old patio did not match the style, so they decided to color stain the pavers to blend in. This color that we used is also a sealer that stains the stones. This is the latest stone staining project done by Gappsi in Smithtown, NY.
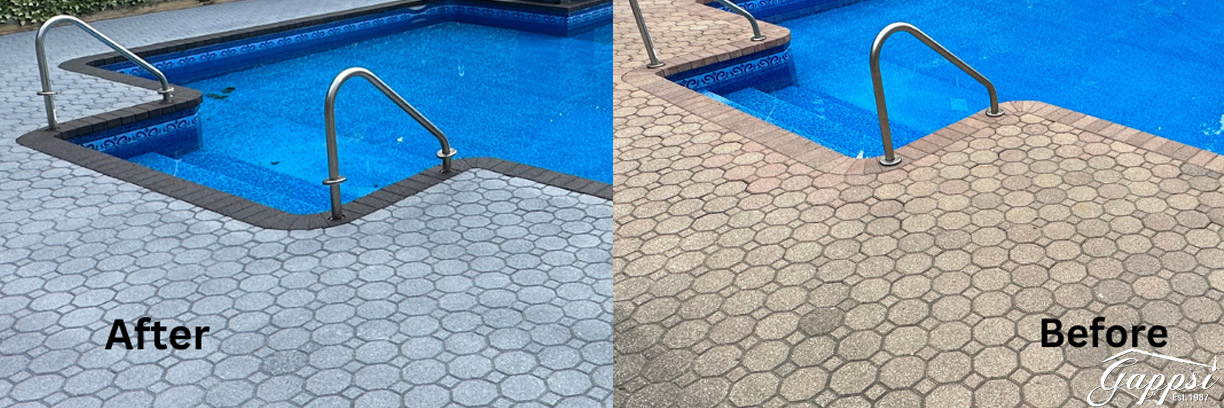
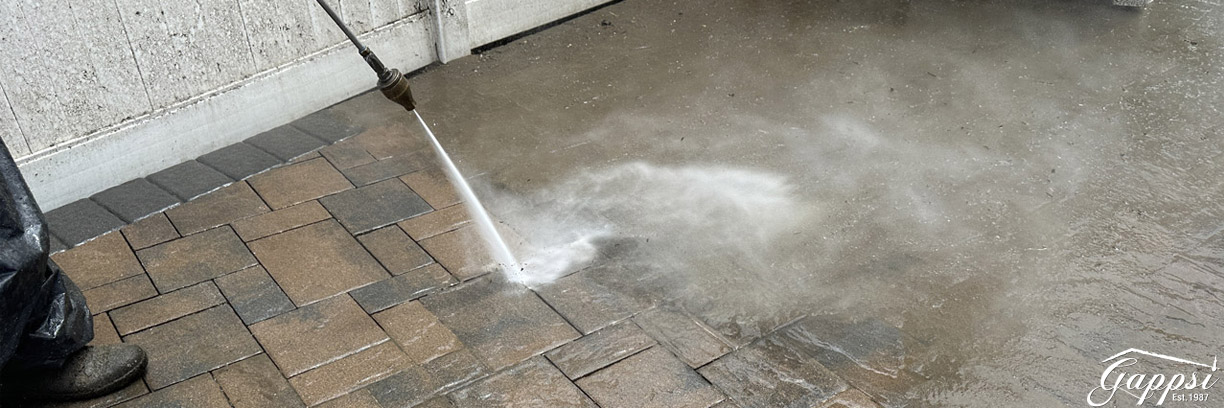 Pressure-washing concrete pavers will appear to clean them at the time. The process weathers the surface of the pavers therefore aging and expediting the aging process. As you pressure wash the concrete surface of the pavers, it becomes rougher, and in a short time dust and dirt will start to accumulate in the microscopic pores resulting in the surface being dirty again. Often people get caught up in the cycle of pressure washing their pavers every springtime. They do not realize every time it is done they worsen the problem instead of resolving it.
  We recommend sealing your pavers to ensure their longevity and the manufacturer’s finish to last. Gappsi uses a synthetic finish product to preserve the paving stones. Sealers will make the pavers surface water repellent thus making them weatherproof. When you seal your pavers you accomplish many things besides weathering protection. You bring out the colors that fade over time even though the color is through and through or even a layer of half an inch thick. The eye sees the very top of the pavement. In only a few short years they could become faded due to the weathering from the rain or sun rays.
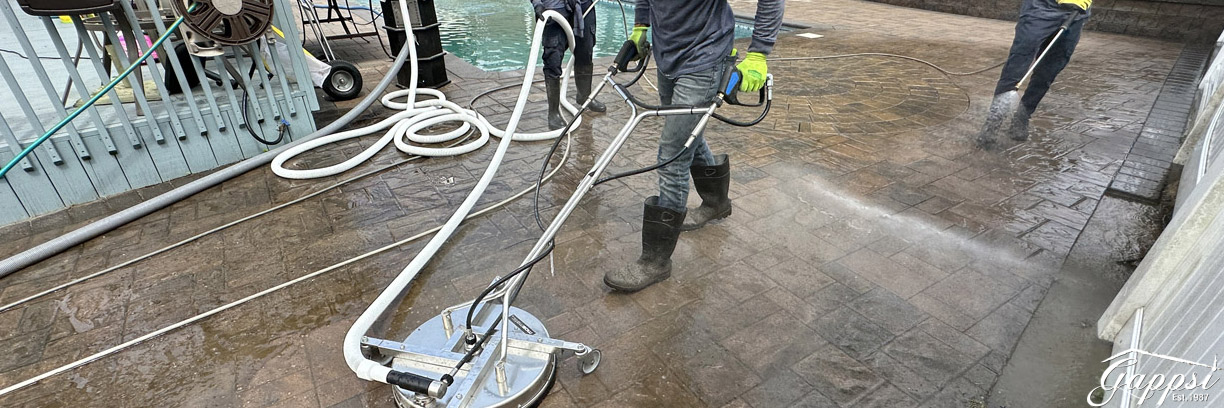
 6. How many types of sealers are there and what are the differences?
 We service all sorts of tile: stone, ceramic, porcelain, clay, and more on floors, shower walls, backsplashes, vanities, tub surrounds, hot tub surrounds, pool decks, table tops, and more throughout Long Island.
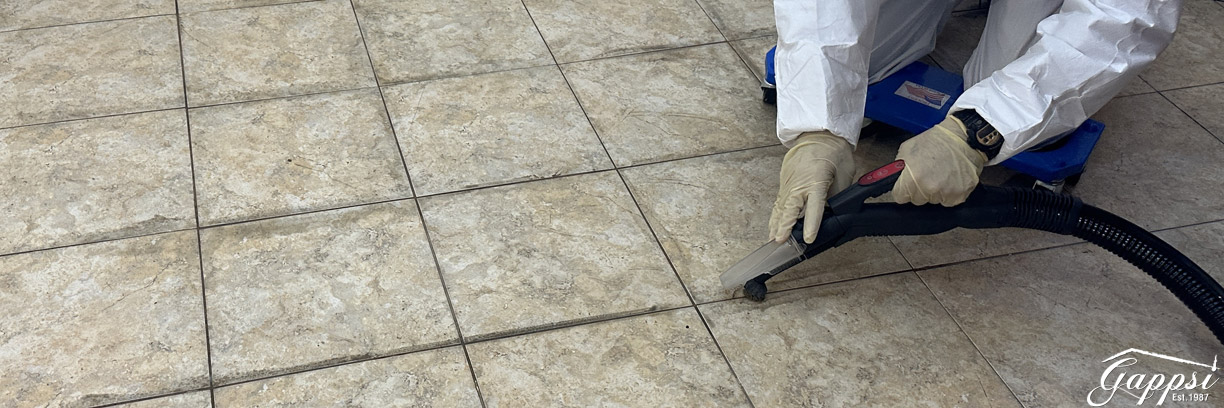 Tile and Grout Restoration Repair
 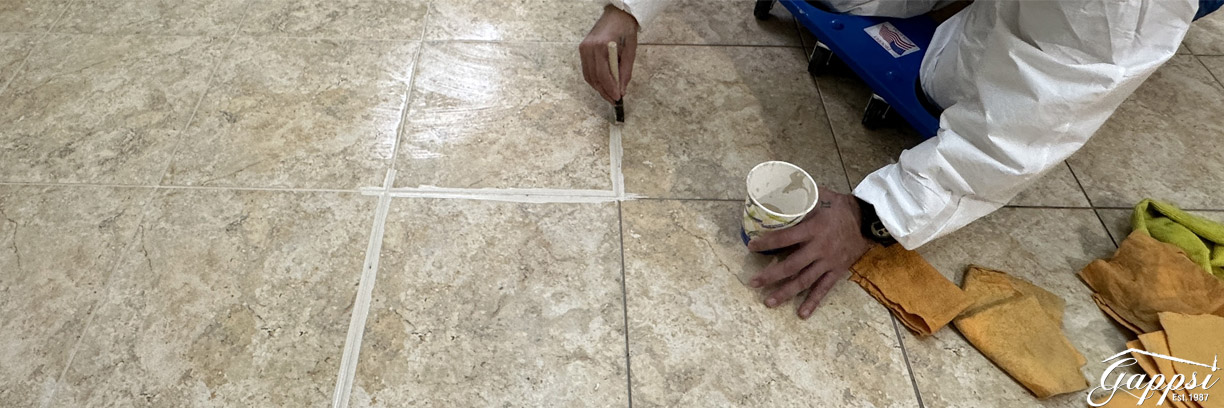 Grout Recoloring | Grout Color Sealing
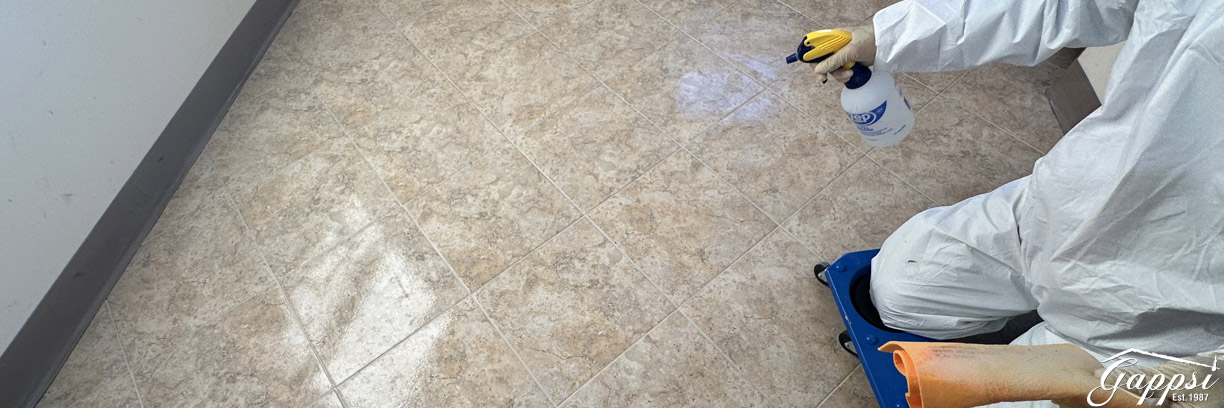 What You Can Expect from Gappsi
 Grout color sealing can break down over time and will need to be resealed to keep your grout in great condition. We recommend grout sealing once a year in areas without moisture, and as needed in high-moisture areas such as kitchens and bathrooms.