
Let’s be honest: a pool installation means your backyard will be a construction zone for a little while. It’s a reality that makes many homeowners ask, “how long to install a vinyl inground pool?” Understanding the step-by-step process makes the temporary disruption feel much more manageable. The active build, from excavation to liner installation, typically takes between four and eight weeks. However, the total timeline also includes the crucial pre-construction phases of design and permitting. Knowing what to expect each week helps you see the progress and feel confident that the temporary mess is leading to a beautiful, permanent oasis for your family.
Key Takeaways
- Look Beyond the Construction Window: Remember that the four to eight week construction estimate is just one piece of the puzzle; the total project timeline also includes the initial design phase, permit approvals, and final landscaping to complete your backyard oasis.
- Permits and Weather Are the Wildcards: The two factors most likely to affect your installation schedule are out of your contractor’s direct control: the time it takes for your town to issue permits and unpredictable Long Island weather. Factoring in this reality helps set clear expectations.
- Early Planning Is Your Best Tool: You can set your project up for success by starting the process well in advance, ideally in the fall or winter. This gives you plenty of time to finalize your design and secure a spot with a trusted professional, ensuring a more relaxed and organized experience.
How Long Does Vinyl Pool Installation Take?
One of the first questions on every homeowner’s mind is, “How long will my yard be a construction zone?” It’s a great question, and the answer depends on a few moving parts. While a vinyl inground pool is one of the quickest types to install, the full process from design to your first swim involves several distinct stages.
Understanding the timeline helps you plan your summer and manage your excitement. The good news is that with a clear plan and an experienced team, the process can be surprisingly smooth. Let’s look at the typical schedule and the key factors that can influence your project’s completion date.
Understanding the Typical Timeline
From the day we break ground, you can generally expect the construction of your vinyl liner pool to take between four to eight weeks. This timeframe covers the major steps: excavation, assembling the pool structure, plumbing, electrical work, and installing the liner. It’s a faster build compared to concrete pools, which is a major reason why so many Long Island families choose vinyl. This estimate focuses on the active construction phase, so it’s important to remember that the initial design and permitting stages happen before any digging begins. Think of it as a well-orchestrated project with a clear finish line in sight for your new swimming pool.
Key Factors That Influence Your Project’s Duration
While four to eight weeks is a solid estimate, several things can affect your specific timeline. The biggest variable is often securing permits from your local town, which can take anywhere from a few weeks to a couple of months. The complexity of your design also plays a role; a custom shape with a built-in spa or waterfall will naturally take longer than a standard rectangle. Unforeseen site conditions, like rocky soil or a high water table, can also add time to the excavation phase. And, of course, Mother Nature has a say. A string of rainy days can pause progress, but an experienced construction team knows how to work efficiently around these challenges.
Your Vinyl Pool Installation: A Step-by-Step Guide
Seeing your dream pool come to life is an exciting process, and it helps to know what to expect along the way. While every project is unique, the installation of a vinyl inground pool follows a predictable path from the initial concept to your first cannonball. Think of it as a series of milestones, each one bringing you closer to your perfect backyard oasis. We’ve broken down the entire journey into five clear steps so you can feel prepared and confident.
This guide will walk you through everything from designing your pool and securing permits to the final construction and finishing touches. Understanding this sequence helps you plan your schedule, coordinate with your installation team, and feel confident as you watch your vision take shape. Each phase has its own timeline and set of tasks, but they all work together to create a beautiful, lasting addition to your home. Let’s get started with the first, and arguably most creative, step.
Step 1: Design and Planning
This is where the fun begins. The journey to your new pool starts with a detailed design and planning session where we map out the perfect layout, size, and shape for your space. We’ll also discuss all the exciting features you want to include, from custom steps and lighting to a surrounding patio or even an outdoor kitchen. Once we’ve perfected the design together, you’ll typically provide a deposit, which officially gets your project on our installation schedule. This initial phase ensures your new swimming pool is everything you’ve imagined.
Step 2: Permits and Approvals
Before we can break ground, we need to get the green light from your local municipality. Obtaining the right permits is a critical step that ensures your pool is built safely and up to code. The timeline for this can vary quite a bit, sometimes taking just a few weeks or, in some cases, several months depending on your town’s specific requirements and workload. It’s a waiting game that requires a little patience, but it’s a non-negotiable part of the process. We handle the paperwork and submissions to keep things moving as smoothly as possible for you.
Step 3: Excavation and Site Prep
With permits in hand, it’s time for the action to start in your backyard. The excavation phase is when your pool begins to take physical form. Our crew will arrive to dig the hole according to the precise specifications of your design, which is often the moment it feels real for homeowners. This stage usually takes about one to two weeks, depending on the size of the pool and the conditions of your property. We also prepare the site for any masonry work, like the foundation for your new patio, during this time.
Step 4: Pool Build and Liner Installation
Once the hole is dug, our team gets to work building the pool’s structure. This phase typically takes between four and eight weeks. We’ll assemble the wall panels, pour the concrete footing, and smooth out the pool floor to create a perfect base. After the structure is complete, we install the plumbing and electrical systems before carefully fitting the vinyl liner. This is one of the biggest advantages of a vinyl pool, as the construction timeline is often much faster than that of a concrete pool, getting you into the water sooner.
Step 5: Finishing Touches and Startup
The pool is built, but we’re not done yet. This final step is all about bringing the entire backyard vision together. We’ll complete the surrounding patio, add any custom lighting, and integrate beautiful landscape design to create a cohesive outdoor living space. Once the finishing touches are in place, we’ll fill the pool with water, start up the equipment, and balance the chemistry. This phase can take another one to four weeks, but the result is a stunning, swim-ready backyard that’s ready for you to enjoy.
A Closer Look at the Design and Planning Phase
This is where your dream pool starts to take shape. The design and planning phase is arguably the most important part of the entire process. It’s a collaborative effort where we combine your vision with our expertise to create a detailed blueprint for your backyard oasis. Taking the time to get every detail right at this stage ensures the rest of the installation goes smoothly and results in a pool you’ll love for years. This initial phase typically takes one to two weeks, depending on how quickly decisions are made.
Your Initial Consultation and Site Measurement
Everything begins with a conversation. During your initial consultation, one of our design experts will visit your home to walk the property with you. We’ll discuss your ideas, how you plan to use the pool, and your overall budget. This is also when we take precise measurements of your yard, noting any slopes, existing structures, or access points. This detailed site assessment is crucial for creating a functional and beautiful swimming pool design that fits perfectly within your space. We’ll answer all your questions and make sure we have a clear understanding of your goals before we start designing.
Developing Your Custom Pool Design
Once we have all the information from our initial meeting, our team gets to work creating a custom design for your vinyl liner pool. We’ll present you with a visual plan that shows the pool’s shape, size, and placement in your yard. This is the fun part where you can really see it all come together. We can also discuss how the pool will integrate with other backyard features, like a new patio or landscape design. We’ll work with you to refine the design until it’s exactly what you envisioned, clearing up any questions you might have about vinyl pools along the way.
Selecting and Finalizing Materials
With the design finalized, the last step in this phase is choosing your materials. One of the best things about vinyl liner pools is the incredible variety of liner patterns available, from classic blue ripples to modern geometric designs. You’ll also select the coping that frames the pool’s edge and the material for the surrounding patio or deck. We offer a wide selection of beautiful and durable options, including elegant porcelain and natural stone pavers. Making these selections helps us create a precise quote and prepare for the next step: securing permits.
What Can Cause Delays in Your Pool Installation?
Even with the best planning, some things can pop up that affect your pool installation timeline. Knowing what these potential hurdles are ahead of time can help you set realistic expectations and feel more prepared. Most of these are completely normal parts of any major construction project, and an experienced team knows exactly how to handle them. Let’s walk through the most common reasons a project might see a delay.
Weather and Seasonal Setbacks
Here on Long Island, we know the weather can be unpredictable. A week of heavy rain can turn an excavated site into a muddy pit, making it unsafe and impractical to work. A sudden cold snap can prevent concrete from curing properly, and extreme heat can be tough on the crew. While we build a buffer into our timelines for typical weather, a prolonged storm or an unusual weather event can pause progress. Pausing work during bad weather isn’t just for comfort; it ensures the quality and safety of your new swimming pool for years to come.
Unexpected Soil or Groundwater Conditions
What lies beneath your lawn is often a mystery until the excavation begins. We might encounter unexpected conditions like large boulders, exceptionally soft soil, or a high water table. These discoveries aren’t necessarily problems, but they do require a change in strategy. For example, large rocks may need to be broken up and removed, or special drainage might be needed to manage groundwater. Our team has the masonry and construction expertise to handle these situations, but they can add time to the excavation phase of the project.
Permit and Inspection Hold-Ups
Before any work begins, we need to secure permits from your local town or village. This process is a critical step, but it’s one we don’t have direct control over. The time it takes to get a permit can range from a few weeks to a few months, depending on the municipality’s workload and specific requirements. Similarly, required inspections at various stages of the build can sometimes face scheduling delays. We manage all the paperwork and communication, but it’s important to recognize that administrative slowdowns can and do happen.
Material Sourcing and Availability
Your pool is built from many different components, from the steel walls and vinyl liner to the pumps, filters, and surrounding patio pavers. While we order materials well in advance, supply chain issues can occasionally cause delays. A specific liner pattern might be on backorder, or a particular type of natural stone paver could have a longer lead time than expected. We always keep you informed about material status and can suggest excellent alternatives if a delay becomes significant, ensuring your project keeps moving forward without compromising on style.
Site Accessibility Challenges
Getting heavy equipment and materials into your backyard is a key part of the installation process. If your property has a narrow side yard, steep slopes, or established trees and gardens, access can be tricky. These challenges don’t stop a project, but they do require more careful planning and execution. We might need to use smaller machinery, build a temporary access road, or bring in materials by hand, all of which can extend the timeline. We identify these potential issues during our initial site visit and incorporate them into our overall landscape and construction plan.
Breaking Down the Permit and Excavation Timeline
This is where your project moves from a paper plan to a tangible reality. While the permitting and excavation phase can feel like it moves at a snail’s pace, it’s foundational to a smooth and successful installation. Understanding the steps involved helps set clear expectations for what’s happening in your yard and why. Let’s walk through what this critical stage looks like.
How Long Do Permits Usually Take?
Before any dirt can be moved, we need the green light from your local town or village. Securing building permits is a non-negotiable step, and the timeline can vary quite a bit. Depending on your specific location in Long Island, this process can take anywhere from a few weeks to several months. It all comes down to the local municipality’s current workload and specific requirements. While it might feel like a waiting game, this step ensures your new swimming pool is built safely and up to code. The good news is that an experienced partner handles all the paperwork and follow-up for you, so you can relax while the administrative details are sorted out.
The Excavation and Site Prep Process
Once the permits are in hand, the real fun begins. This is the day the machinery arrives and your backyard officially becomes a construction site. The excavation and site preparation phase typically takes about one to two weeks. During this time, our team will carefully dig the hole for your pool, following the precise dimensions of your design. We also prepare the ground to ensure a stable and level foundation for the structure. It’s a messy but exciting process because you can finally see the physical footprint of your future oasis taking shape right before your eyes. This careful prep work is essential for a long-lasting installation.
Assembling the Pool’s Framework
With the hole perfectly excavated, the next step is to build the pool’s skeleton. For a vinyl liner pool, this part of the process generally takes about three to four weeks. Our crew will assemble the wall panels that form the perimeter of your pool and secure them in place with a concrete footing. We then carefully shape and smooth the pool floor, creating the perfect base for the liner. This is a period of rapid, visible progress where the structure of your pool truly comes together. It’s the foundational work that supports all the beautiful masonry and finishing touches that will follow.
What to Expect During Construction and Liner Installation
This is the part of the process where you’ll see your backyard vision truly come to life. After the groundwork is laid and the pool’s structure is in place, our team moves into the construction and installation phase. This stage is all about the technical details that transform a shell into a fully functional swimming pool. It involves carefully installing the plumbing and electrical systems that will keep your water clean and clear, fitting the beautiful vinyl liner that defines your pool’s look, and setting up all the essential equipment.
While this phase involves a lot of moving parts, our Gappsi team coordinates every step with precision. We focus on quality craftsmanship to ensure your pool is not only stunning but also built to last. You’ll see specialists working on different components, from electricians to our liner installation experts. We manage the entire process, keeping you informed as we hit key milestones. This is where the structure in your yard starts to look and feel like the oasis you’ve been dreaming of. It’s a period of significant activity, but it’s also incredibly rewarding as you watch the final pieces come together. Our goal is to make this phase as smooth and transparent as possible, so you can feel confident and excited about the progress.
Installing Plumbing and Electrical Systems
Before the liner goes in, we install the circulatory and nervous systems of your pool. Think of plumbing as the veins and arteries, carrying water to and from the filtration equipment to keep it sparkling clean. Our team strategically lays a network of pipes for the main drains, skimmers, and return jets. At the same time, licensed electricians run the necessary wiring for your pool’s pump, lighting, and any special features like heaters or automated covers. Getting the swimming pool plumbing and electrical right is critical for safety and performance, so we take meticulous care to ensure everything is installed correctly and up to code.
Fitting and Securing the Vinyl Liner
This is one of the most exciting moments in the installation process. Your custom-made vinyl liner, chosen during the design phase, is now ready to be installed. Our crew carefully unfolds the liner and hangs it from the top of the pool walls. Using specialized vacuums, we suck all the air out from behind the liner, creating a tight, smooth, and wrinkle-free fit against the pool’s structure. This step requires a great deal of precision. A perfectly fitted liner not only looks fantastic but also ensures the longevity and durability of your pool’s surface. Once it’s secured, your pool’s interior is officially complete.
Setting Up and Testing Pool Equipment
With the plumbing and liner in place, the final construction step is to install and connect your pool equipment. This includes the pump, filter, heater, and any sanitization systems you’ve chosen. We set up all the components on a sturdy equipment pad, typically located in a discrete spot near the pool. Once everything is connected, we perform a series of tests to make sure the entire system is running efficiently and effectively. This quality check confirms that your pool equipment is ready to go, ensuring a seamless transition when it’s time to fill your pool with water and start it up for the first time.
How to Set Your Project Up for Success
A new vinyl pool is a fantastic addition to your home, but a smooth installation process doesn’t happen by accident. Success isn’t just about the beautiful final product; it’s also about having a positive experience along the way. It takes a bit of foresight and the right team to bring your vision to life without unnecessary stress or costly surprises. By planning ahead, choosing a trusted professional, understanding the realities of the construction process, and knowing what to expect, you can ensure your project goes off without a hitch. This proactive approach helps manage your budget, timeline, and expectations, turning a potentially overwhelming project into an exciting one.
Think of it like building a strong foundation. When you invest time in the initial stages, the rest of the project flows much more smoothly. You’ll feel more in control and confident in your decisions, from the liner pattern to the patio pavers. A well-planned project also minimizes disruptions to your daily life and ensures the final result perfectly matches your family’s needs and lifestyle. Let’s walk through a few key steps that will put you on the path to a successful and timely pool installation, so you can focus on the fun part: enjoying your new backyard oasis.
Why You Should Start Planning Early
When it comes to installing a pool, the early bird truly gets the worm. Kicking off the planning process well in advance gives you a buffer to handle potential delays, which often come from things like securing town permits or getting on a builder’s schedule. Starting early also gives you more time to thoughtfully consider your swimming pool design and material choices without feeling rushed. You can explore different shapes, sizes, and features to create a pool that truly fits your backyard. An early start means you can book your preferred installer during their peak season and have a much more relaxed and enjoyable experience from start to finish.
Choosing the Right Pool Installation Professional
Your choice of installer is the single most important decision you’ll make for your pool project. A reputable professional does more than just dig a hole; they ensure the job is done safely, correctly, and up to local codes. Look for an experienced team with a proven track record in Long Island. A great contractor will guide you through every phase, from initial design to the final walkthrough, and will handle all the complex logistics. Entrusting your project to a seasoned home improvement company gives you peace of mind that your investment is built to last and will be a source of joy for years.
Setting Realistic Timeline Expectations
While it’s exciting to imagine swimming in your new pool, it’s important to have a realistic grasp of the installation timeline. On average, a vinyl inground pool installation takes about 8 to 12 weeks from the first day of excavation to the final fill. However, this can vary based on permit approvals, weather, and the complexity of your project. A good contractor will provide a detailed schedule and keep you informed of progress. This clarity helps you plan for other backyard elements, like new masonry for your patio or landscaping, creating a cohesive outdoor living space.
Common Installation Myths, Debunked
Let’s clear up a few misconceptions about vinyl liner pools. One common myth is that they are difficult to maintain. In reality, modern vinyl liners are incredibly durable and easier to care for than other pool surfaces. Another myth is that you can save a lot of money by installing the pool yourself. While it might seem tempting, a DIY installation is incredibly complex and risky. Professional installation is essential for ensuring the pool’s structural integrity, proper plumbing, and electrical safety. Plus, a professional build protects your warranty, which is a safety net you don’t want to give up.
The Final Stretch: Finishing and Pool Startup
With the heavy machinery gone and the pool structure in place, you’re on the home stretch. This final phase is all about transforming the construction zone into your personal backyard retreat. It’s where all the details come together, from the surrounding landscape to the crystal-clear water, making your new pool officially ready for its first splash.
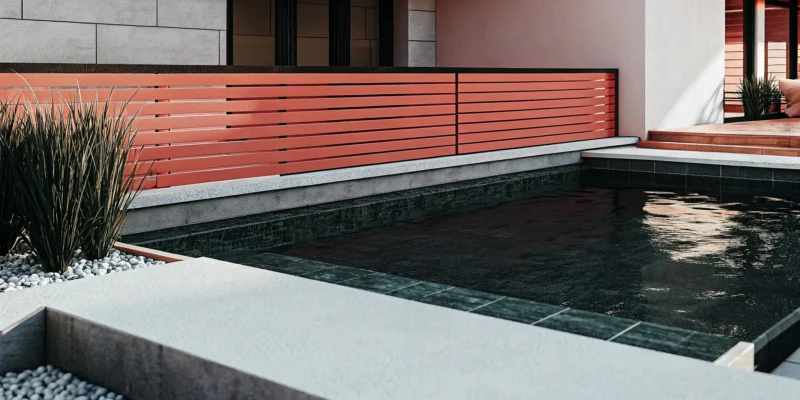
Installing Your Deck and Landscaping
Your beautiful new pool deserves an equally stunning setting. This is where we move beyond the pool itself and build out the surrounding environment. The decking or patio is installed, creating the perfect spot for lounge chairs and sunny afternoons. This stage can take anywhere from one to four weeks, as it often involves detailed masonry work with materials like natural stone or porcelain pavers.
We’ll also complete the landscaping, adding plants, lighting, and maybe even a water feature to complete the oasis feel. This is the step that truly integrates the pool into your backyard, making it feel like it has always been there. It’s all about creating a cohesive and inviting space for you to enjoy.
Filling the Pool and Balancing the Water
Seeing your pool fill with water for the first time is a major milestone. Once the vinyl liner is perfectly fitted, we begin filling it up. But before you can jump in, the water needs to be just right. This involves carefully balancing the water chemistry, a crucial step for both safety and the longevity of your pool.
Properly balanced water is comfortable for swimmers, preventing skin and eye irritation. It also stops problems like algae growth and equipment corrosion before they can start. Our team handles all the testing and adjustments, ensuring your swimming pool is perfectly balanced and ready for you to enjoy from day one. It’s the final touch that makes the water clear, safe, and inviting.
Your Final Inspection and Project Handover
Before we officially hand over your new backyard paradise, we conduct a thorough final inspection. This is our chance to walk through every detail of the project, ensuring that the installation meets all local codes and our own high standards for quality and safety. It’s a critical step that gives you complete peace of mind.
Once the inspection is complete, we’ll walk you through everything you need to know. We call this the project handover. We’ll show you how to operate your new pool equipment, explain the basic maintenance schedule, and answer any questions you have. Our goal is to make sure you feel confident and prepared to care for your investment. After that, there’s only one thing left to do: grab your swimsuit and enjoy.
How to Prepare for a Smooth Installation
A little preparation goes a long way in making your pool installation feel seamless. By thinking ahead about a few key details, you can help the entire process run on schedule and minimize surprises. From choosing the right season to getting your backyard ready for the crew, taking these steps will set your project up for success and get you swimming sooner. Let’s walk through what you can do to prepare for a smooth and exciting construction phase.
Picking the Best Time of Year to Build
Timing is everything, especially when it comes to outdoor construction on Long Island. The time of year can affect how long you wait for pool builders to start your project. Factors like weather and high seasonal demand can influence scheduling. Many homeowners aim for a spring installation to enjoy their pool all summer, which makes it the busiest season. To get ahead, consider starting your planning in the fall or winter. This gives you plenty of time for design and permits, so you can be first on the schedule when the ground thaws. An off-season start often means a more flexible timeline and a completed swimming pool ready for the first warm day.
Planning Your Budget and Financing
Vinyl liner pools are a fantastic choice, offering a great mix of affordability, beauty, and function. When you plan your budget, it’s helpful to think beyond the initial installation cost. Consider ongoing maintenance expenses and any upgrades you might want to add to create your perfect backyard oasis. This could include a beautiful new patio, ambient lighting, or lush landscaping around the pool area. Planning for these extras from the start helps you create a comprehensive budget. Many homeowners choose to enhance their new pool with elegant porcelain pavers for a durable and stylish finish that completes the look.
Getting Your Property Ready for Construction
Your pool installation involves several key stages, and getting your property ready can really help streamline the process. Before the crew arrives, take some time to clear the designated pool area of any furniture, toys, or decorative items. It’s also important to ensure there is a clear and wide path for construction equipment to access your backyard. This might mean temporarily removing a section of a fence. We will handle marking utility lines, but knowing where your septic system or sprinkler lines are is also very helpful. A little prep work on your end makes a big difference for the construction team and helps keep your project on track.
What to Expect Day-to-Day
Once construction begins, you can expect a structured timeline with specific tasks happening each day. The process is methodical, starting with the big job of excavation and then moving on to assembling the pool walls, plumbing, and electrical work. After that, the team will carefully install the vinyl liner and fill the pool. While it’s an exciting process, it’s also a construction zone. You can anticipate daily activity and noise in your backyard, but a professional team will work to keep the site as tidy as possible. You can even watch our team in action to get a better sense of the day-to-day progress and craftsmanship involved in bringing your pool to life.
Life During the Installation: What to Know
Having a construction crew in your backyard is a unique experience. While the end result is a stunning new pool, the process involves noise, equipment, and activity. Knowing what to expect makes the installation period much smoother. It’s all about clear communication, understanding the project’s rhythm, and looking ahead to life as a pool owner. By staying informed, you can watch your backyard transform with confidence, knowing every step is leading toward your dream oasis. Let’s walk through what daily life looks like during the build.
Communicating with Your Installation Team
Open communication is the key to a stress-free installation. It’s normal to have questions, especially since homeowners can face confusing information about different pool types. Your installation team is your best resource, so don’t hesitate to ask for clarification on anything from the daily schedule to specific materials. A professional crew provides regular updates and is available to address your concerns. We believe in a partnership approach, ensuring you feel heard and informed. Building a great relationship with your swimming pool installation team turns the process into a collaborative creation of your perfect backyard.
Tracking Milestones and Quality Checks
A vinyl pool installation follows a clear sequence of events, often taking four to eight weeks. Your project manager will provide a timeline with key milestones to watch for, including excavation, wall assembly, plumbing, and liner installation. Following along helps you see the progress firsthand and understand what’s happening. Our team performs quality checks at every critical point to ensure the work meets our high standards. You can see examples of our process on the Gappsi YouTube channel, which can help you visualize each exciting phase of the build and know what to expect.
Understanding Post-Installation Pool Care
As the project wraps up, our focus shifts to preparing you for pool ownership. Before the final handover, we’ll walk you through your new equipment and explain the basics of water chemistry and routine maintenance. Understanding how to care for your pool from day one is essential for its longevity. While a vinyl liner will eventually need replacement, proper care extends its life significantly. Think of it as learning the simple routines that will keep your pool sparkling. We also offer services to keep your entire patio area looking its best, including professional restoration and sealing.
Related Articles
- Outdoor Living News: Pools, Fire Pits & Renovations | Gappsi Inc
- Swimming Pools Archives – Gappsi Group
Frequently Asked Questions
What is the total timeline I should expect, from signing the contract to my first swim? While the active construction in your yard typically takes four to eight weeks, the entire process from design to completion is longer. You should plan for a total of about three to five months. This includes the initial design phase, the time it takes to secure permits from your town (which can be the most variable part), the actual build, and the final landscaping and finishing touches.
What is the most common cause of delays, and is there anything I can do about it? The most common hold-up is waiting for building permits to be approved by your local municipality, a process that can take anywhere from a few weeks to a couple of months. Since this is out of everyone’s control, the best thing you can do is start the planning process early. Beginning in the fall or winter gives you a generous buffer to get all the necessary approvals in place so construction can start as soon as the weather allows.
When is the best time of year to start planning for a new pool? The ideal time to begin planning your pool project is in the fall or early winter. This gives you plenty of time to finalize your design and get your permit applications submitted before the busy spring rush. By getting ahead of the curve, you can secure a spot on your preferred installer’s schedule and have your pool ready to enjoy for the entire summer season.
Will my entire backyard be off-limits during the installation? The immediate area around the new pool will definitely be an active construction zone and should be considered off-limits for safety, especially for children and pets. However, depending on the size and layout of your yard, other areas may still be accessible. Your installation team will establish a clear work zone and access path for their equipment to minimize disruption to the rest of your property.
What are my responsibilities once the pool installation is complete? After the final inspection and handover, you become the proud captain of your new pool. Your main responsibilities will be simple, routine maintenance tasks. This includes testing the water chemistry a couple of times a week and keeping the skimmer baskets clear of debris. We will give you a complete tutorial on how to operate your equipment and a straightforward maintenance schedule, so you’ll feel confident and prepared from day one.