


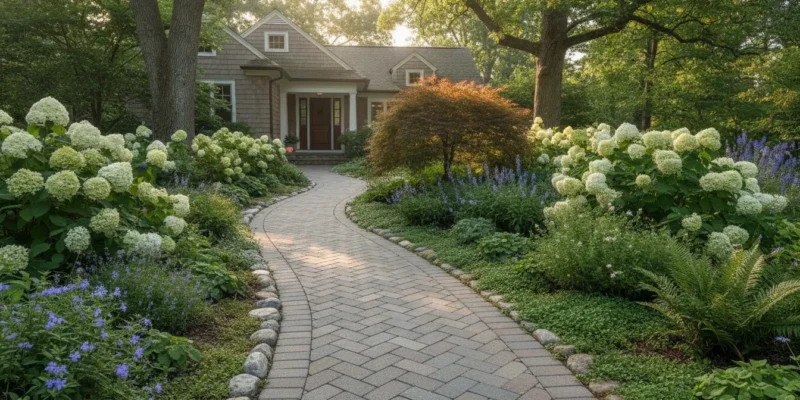
A front entry should guide visitors naturally to your door, while garden paths should feel integrated with the planting, grading, and architecture around them. On Long Island, that visual connection also depends on what happens below the surface. Sandy soils, seasonal moisture, and freeze-thaw movement can expose weak preparation through settling, uneven joints, or standing water.
Schedule a free paver walkway consultation with Gappsi at Contact Gappsi Group.
A paver walkway is a practical long-term choice when its material, pattern, drainage, and compacted base are designed for the site. Gappsi combines options such as travertine, bluestone, and concrete pavers with ICPI-standard installation and a patented edge restraint system for stable, finished paths.
The best starting point is not a single pattern or color. It is understanding how the walkway will be used, how it should complement your home, and which material and layout support that purpose.
Across Nassau and Suffolk County, paver walkways carry both daily foot traffic and seasonal weather. A well-built path stays level, drains clear of the foundation, and keeps its color for years, which makes the preparation and material choices worth reviewing before installation begins. From a straight front walk in natural bluestone to a curved garden path in concrete pavers. The same core principles apply: a compacted base, a consistent slope, secure edge restraints, and joints that resist washing out.
Gappsi has designed and installed hardscape and outdoor living projects across Long Island since 1987. The team pairs hands-on masonry craftsmanship with a vertical, design-build approach, so the walkway you plan is the walkway your crew builds.
Why Choose a Paver Walkway For Your Front Entry and Garden Paths?
A front entry or garden path does more than connect two points. It establishes how people approach your home, frames planting beds, and creates a durable transition between outdoor spaces. A paver walkway gives you control over that experience because its material, pattern, width, and edging can be coordinated with the architecture and landscape rather than treated as an afterthought.
Unlike a poured surface, individual pavers can be removed and reset if a small area needs service below it. That repairability is useful around mature trees, drainage features, and other parts of a Long Island property that may change over time. The result can feel intentional at the front door and natural through a garden, with the same installation system adapted to each setting.
How Do Different Paver Materials Shape the Design?
Travertine brings a warm, varied surface with natural movement in its color and texture. It can suit a traditional entry or soften the geometry of a formal garden. Bluestone offers a more mineral, tailored appearance, with blue-gray tones that work well alongside masonry, evergreen planting, and wood details. Its broad visual planes can also make a narrow path feel more orderly.
Concrete pavers provide the broadest range of practical design choices. They are available in different colors, shapes, textures, and laying formats, allowing a walkway to move from a rustic, old-world character to a restrained modern look. This customization can help connect the path to existing walls, steps, patios, or driveway materials without forcing every surface to match exactly. Gappsi’s porcelain and natural stone paver options offer additional material choices when the design calls for a more specific color or surface character.
Why Does the Pattern Matter on Curved Paths?
Pattern affects more than appearance. A herringbone layout uses an interlocking arrangement that increases structural stability, making it useful for walkways that receive regular foot traffic. It is also well suited to curved paths, where the pattern can help the surface follow the route without looking disconnected from the surrounding landscape. Running bond or modular layouts may create a calmer, more linear effect. But the correct choice depends on the path’s geometry and how it meets the entry steps or landing.
Material selection and pattern should be considered together with the base, edge restraint, drainage, and joint treatment. Gappsi plans those details as part of a complete walkway installation, so the visual design supports the way the path will be used. For a front entry, that may mean emphasizing a clear approach and generous landing. For garden paths, it may mean shaping a gentle curve that guides movement while preserving planting areas. The strongest result is specific to the property, not a generic pattern applied everywhere.
Paver Materials and Thickness: What to Use For a Long-Lasting Walkway
The right paver material should suit both the setting and the way your household uses the path. A short garden walkway may have different demands than an entry path that crosses a driveway, receives frequent foot traffic, or carries rolling bins and outdoor furniture. Gappsi evaluates those conditions before recommending a surface, so the finished walkway supports the architecture of the home and the realities of Long Island weather.
Travertine brings a softly textured, naturally varied appearance with warm ivory and earth-toned surfaces. Its light, gently irregular character works well around traditional homes and planted areas. Bluestone offers a more grounded look, with blue-gray tones and a distinct natural surface that can complement masonry, stone walls, and contemporary landscapes. Natural stone should be selected for the specific application, with attention to its surface, thickness, installation method, and exposure to moisture and temperature changes.
Material stability matters beyond appearance. Research on terrace pavers has documented how temperature and moisture fluctuations can contribute to environmental warping. Which is why a walkway material should be chosen for the conditions where it will be installed. A stable base and proper drainage are equally important, but the stone or manufactured paver itself still needs to be appropriate for the location. Gappsi can help compare natural stone and concrete options against the site’s slope, exposure, traffic, and surrounding materials.
Concrete pavers provide a different design range. They are available in varied colors, shapes, textures, and laying formats, from restrained modern lines to a more weathered, old-world appearance. That flexibility makes it easier to coordinate the walkway with brick, siding, retaining walls, or an existing patio without relying on a single stone profile. Concrete pavers can also be arranged in patterns such as herringbone, whose interlocking layout adds stability where a path curves or experiences heavier use.
Thickness should follow the load. For a typical pedestrian path, the installer still needs to match the paver and base system to the site rather than choosing by appearance alone. Where a walkway intersects a driveway or serves a high-traffic zone, 60mm or thicker pavers are recommended for greater resistance to pressure and cracking. The paver is only one part of that performance. Thorough subgrade preparation, a compacted aggregate base, accurate edge restraint, and correctly filled joints help keep the surface even over time.
| Material | Look | Best Use | Thickness Tip |
|---|---|---|---|
| Travertine | Warm ivory and earth tones with natural surface movement. | Traditional entries, planted gardens, and formal paths. | Select for the site, and match thickness to the load. |
| Bluestone | Blue-gray, mineral, and tailored appearance. | Masonry, stone walls, and contemporary landscapes. | Choose for stability in local moisture and temperature. |
| Concrete pavers | Varied colors, shapes, and textures. | Broad residential design range and patterns such as herringbone. | Use 60mm or thicker in high-traffic or driveway-adjacent zones. |
Planning a paver walkway? Call Gappsi at Contact Gappsi Group to schedule a consultation.
For a closer look at available surfaces, explore Gappsi’s porcelain and natural stone pavers. A material consultation can narrow the choice to a surface, thickness, and installation system that fits your home’s design and the walkway’s actual workload.
How Do You Prepare the Ground Before Laying a Paver Walkway?
A durable walkway begins below the visible pavers. On Long Island, sandy soil can shift or migrate when it is not prepared correctly, creating low spots, loose edges, and uneven joints over time. The installation team should establish a consistent subgrade first, then build a stable, free-draining base above it. This sequence gives the pavers a firm surface and helps the finished walkway handle foot traffic, seasonal moisture, and freeze-thaw conditions.
The goal is not simply to dig a trench and fill it with stone. Each layer has a specific job, and the preparation needs to match the walkway’s intended use, surrounding grades, and soil conditions. The following sequence provides the foundation for a reliable proper paver walkway foundation.
- Mark the walkway and establish finished elevations. Set the route, width, curves, and transitions before excavation begins. Confirm how the walkway will meet steps, driveways, planting beds, and entry doors. The finished grade should direct water away from the house rather than toward the foundation.
- Excavate to the required depth. Remove the existing grass, roots, organic material, and unstable soil across the full walkway area. The excavation must allow room for the pavers, bedding layer, and compacted aggregate base. A shallow excavation can leave the installation vulnerable to movement, especially where the walkway crosses a driveway or receives concentrated traffic.
- Shape and compact the subgrade. Grade the exposed soil so it follows the planned layout, then compact it thoroughly before placing any stone. This is especially important in Long Island’s sandy soils. Compaction creates a more consistent foundation and reduces the risk of future settlement or unevenness beneath the pavers.
- Install geotextile fabric where soil separation is needed. Place geotextile fabric between the subgrade and aggregate base to keep soil from migrating into the stone. This separation helps the base remain stable and free-draining instead of allowing the two materials to blend together. Proper placement also supports more consistent compaction across the walkway.
- Build the crushed-stone base in compacted lifts. Add a well-graded layer of crushed stone or gravel, compacting each lift before adding the next. The aggregate base distributes loads, supports drainage, and helps prevent the walkway from sinking or shifting. The required depth depends on soil conditions, drainage, and expected traffic, so it should be determined during the site evaluation rather than guessed from the surface appearance.
- Check the prepared base before laying pavers. Verify the elevation, slope, firmness, and transitions at every edge. Correct soft areas or low spots before the bedding material and pavers are installed. Once the surface is covered, defects in the base become harder to identify and more expensive to correct.
Careful ground preparation makes the later installation stages more predictable. Gappsi evaluates the soil, drainage, grades. And material plan together so the walkway is built as one coordinated system rather than a surface treatment placed over unresolved ground conditions.
How Are Paver Walkway Pavers Installed?
A lasting installation depends on what happens beneath and around the visible pavers. After the prepared subgrade and compacted crushed-stone base are checked, the installer establishes the final elevation and places a consistent layer of bedding sand. This sand creates a workable setting surface, but it is not a substitute for a properly compacted base. The finished paver walkway must have a stable foundation that can handle foot traffic, seasonal moisture, and Long Island’s changing weather.
How are the base and bedding layer finished?
The base is brought to the planned grade, then compacted so it does not settle unevenly beneath the walkway. A thin, even bedding layer follows. Installers use screed rails or comparable controls to maintain a consistent depth rather than relying on loose, irregular sand. This step helps the pavers sit at a uniform height and keeps the walking surface smooth. It also leaves room for the final jointing material without making the walkway unnecessarily high near doors, steps, or adjoining patios.
Drainage is built into the grade before the pavers are laid. Gappsi’s installation guidance calls for a slope of at least 1/4 inch per foot, directing water away from the home’s foundation and reducing the chance of standing water. The exact grade must also coordinate with thresholds, stairs, lawn edges, and existing masonry so water has a clear path to leave the surface.
Which laying pattern works best for a curved walkway?
Pavers are placed according to the approved layout, with each piece aligned closely to its neighbors. A herringbone pattern is often useful for walkways with curves or areas that receive heavier traffic because its interlocking arrangement increases structural stability. The pattern can be adapted at transitions and curves while preserving a cohesive appearance. Straight courses may suit a formal entry, while carefully cut border pieces can define the edges without leaving awkward gaps.
Once the field is laid, installers secure the perimeter with edge restraints. Gappsi uses its patented Gappsi Edge Restraint System to help keep the outside pavers from spreading or shifting over time. The restraint is installed to suit the base and surrounding grade, then covered or integrated into the landscape detail where appropriate. Solid edges are especially important along curves, steps, and exposed lawn borders.
How are the joints locked?
After compaction seats the pavers, polymeric sand is swept into the joints and activated with water according to the product requirements. It hardens within the joints, binds the pavers together, resists washout, and helps discourage weed growth while retaining some flexibility. For more detail, see our guide to securing your paver walkway with polymeric sand. The final inspection checks alignment, edge stability, drainage, and clean joints before the walkway is opened for use.
Permeable Paver Walkways and Long Island Drainage
Rainwater has fewer places to go when hard surfaces surround a home. A conventional walkway can direct water across the property, toward planting beds, or into areas where it collects near the foundation. A thoughtfully designed permeable paver walkway offers another approach by allowing some stormwater to move through the surface instead of relying entirely on surface runoff.
According to the U.S. Environmental Protection Agency, permeable pavement systems use a surface, base, and subbase that allow stormwater to move downward through the pavement. This infiltration can reduce runoff and help manage local water quality. The EPA explains how permeable pavement works and why it is used as a stormwater-management practice.
Why does this matter for Long Island properties?
Long Island homes face a range of drainage conditions. A site may include sandy soil, compacted areas from previous construction, planted slopes, or low points where rainwater gathers. The walkway itself is only one part of the solution. Its layout, grade, base, and surrounding landscape must work together so water can move in a controlled direction.
Permeable pavers can help reduce the volume of water moving across the surface during a rain event. Instead of treating the walkway as an uninterrupted barrier, the system gives water a route through the joints and underlying layers. That can be especially useful where a narrow side path, front entry, or garden walkway would otherwise add more impervious surface to the property.
How should a permeable walkway be planned?
Performance depends on more than selecting a paver described as permeable. The underlying assembly needs to be designed for the site. The installer should evaluate where water currently flows, how the walkway meets the house and other hardscapes, and whether the subgrade can accept infiltration. The base and subbase must remain open enough to move water while still supporting regular foot traffic.
Drainage planning should also account for overflow. During a major storm, the system may receive more water than the soil can absorb at once. Proper grading and transitions help prevent water from being redirected toward the home, steps, or neighboring areas. Edges should be stable, and the surface should remain even under normal use.
For a Long Island project, Gappsi can coordinate the walkway design with the property’s existing paving and landscape plan. The goal is a path that looks intentional, feels stable underfoot, and handles rain as part of a broader site-drainage strategy rather than creating a new runoff problem.
How Much Does a Paver Walkway Cost on Long Island?
There is no responsible one-size-fits-all price for a paver walkway in Nassau or Suffolk County. The final investment depends on the condition of the site, the materials selected, the amount of preparation required, and the design details. A short, straight garden path on stable ground has a different scope from a broad front walk that connects to a driveway. Crosses sandy soil, or includes curves, steps, borders, and drainage transitions.
What determines the cost of a paver walkway?
- Base preparation: Excavation, subgrade compaction, geotextile separation, and a properly compacted crushed-stone base take time, but they help prevent sinking and shifting. Long Island’s sandy soils make careful subgrade preparation especially important.
- Material selection: Concrete pavers, travertine, bluestone, and other natural stone options differ in sourcing, cutting, thickness, texture, and installation requirements. High-traffic areas may call for pavers measuring 60mm or more.
- Labor and access: Removing an existing walkway, moving materials through a constrained side yard, correcting grades, or working around mature landscaping can increase the installation effort.
- Pattern complexity: Straight running bond layouts are generally simpler to install than intricate borders, multiple colors, tight curves, or a herringbone pattern. Herringbone can provide added interlocking stability, particularly around curves, but requires more precise cutting and placement.
Is professional installation worth it compared with DIY?
DIY installation can reduce the labor portion of a project, but it shifts the responsibility for grading, compaction, drainage, cutting, and joint stabilization to the homeowner. A walkway that looks level at completion can develop uneven areas if the base is too thin. The subgrade is not compacted, or water cannot drain away from the house. Rebuilding those layers later can cost more than establishing them correctly from the start.
Gappsi installations follow ICPI standards for paver construction and include attention to the details that are difficult to correct after the pavers are set. Gappsi also holds the patent for its Gappsi Edge Restraint System, which helps keep the perimeter supported and the pattern aligned over time. The right scope should be based on a site evaluation, material choice, access, and intended use rather than an advertised generic rate.
For a project-specific recommendation and a clear scope of work, get a free consultation with Gappsi before choosing materials or planning a DIY installation.
Schedule your paver walkway installation consultation.
Frequently Asked Questions
Can I lay pavers straight on dirt?
No. A paver walkway needs an excavated, compacted subgrade and a well-draining crushed-stone base. On Long Island’s sandy soils, thorough subgrade compaction helps create a consistent foundation and reduces shifting or settling over time.
What is the best paver for a walkway?
The best choice depends on the home’s architecture, traffic, drainage needs, and desired appearance. Travertine, bluestone, and concrete pavers are all practical options. For high-traffic areas or locations that meet a driveway, Gappsi recommends pavers at least 60 mm thick.
What slope does a paver walkway need for drainage?
Plan for a slope of at least 1/4 inch per foot so water moves away from the house foundation instead of pooling beside it. The finished grade, base preparation, and edge restraints should be coordinated before the pavers are installed.
Are permeable pavers a good option for Long Island?
They can be, especially where managing runoff is a priority. Permeable pavement allows stormwater to move through the surface into the underlying base, which can reduce runoff and support local water-quality goals, according to the U.S. Environmental Protection Agency.
How do I keep paver walkway joints from washing out?
Fill the joints with polymeric sand and activate it correctly with water. Once set, the material helps bind the pavers, resist washout, limit weed growth, and retain some flexibility as the walkway responds to normal weather changes.
Ready to Plan Your Paver Walkway?
A thoughtful walkway plan helps connect your front entry and garden paths with materials, layout, drainage, and installation details suited to your property. Gappsi can help you evaluate the direction for your project and choose a practical next step. Whether you are replacing an uneven concrete walk or building a new garden path, a clear scope of work starts with understanding the site.
The Gappsi design-build team can review your grades, soil conditions, and preferred materials. Then recommend a layout, base, and edge restraint approach that is built to last through Long Island weather. You will know what to expect before excavation begins, with no guesswork on the foundation that keeps the walkway stable.
Schedule a free consultation for your paver walkway installation by calling Contact Gappsi Group.