Commercial Bocce Court Builders in Patchogue NY | Professional Court Construction by Gappsi

View Gappsi’s YouTube Channel to view Commercial Bocce Court Builders in Patchogue, NY | Professional Court Construction by Gappsi

Bocce ball has rapidly become one of the most in-demand recreational amenities for commercial properties, hospitality establishments, private clubs, corporate campuses, and community facilities. As organizations seek to enhance guest experiences, increase outdoor engagement, and boost property value, bocce courts have emerged as a versatile, low-maintenance solution.

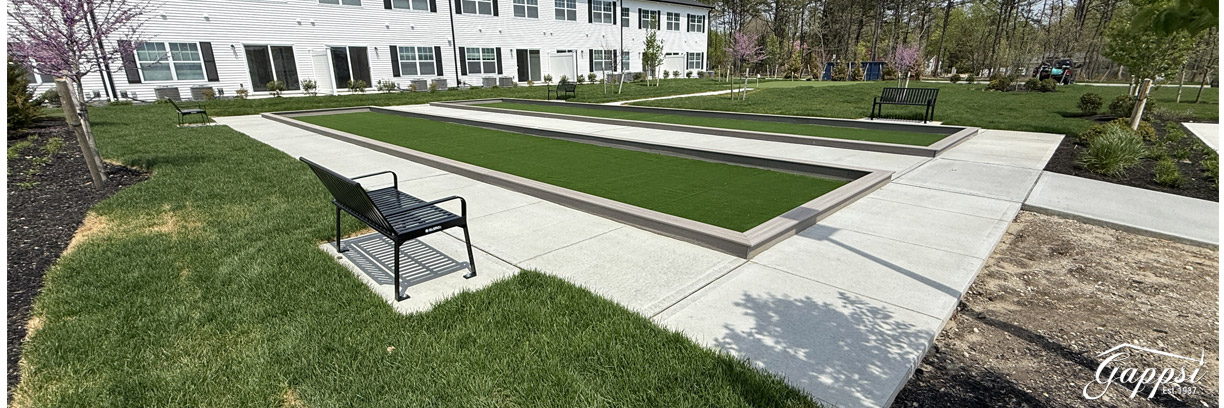
Gappsi, one of the leading commercial bocce court builders in Patchogue, NY, recently completed a professional dual-court installation specifically designed for high-traffic, multi-user environments. The project features two side-by-side bocce courts, bordered by reinforced synthetic wood walls, accessible concrete walkways, and top-grade synthetic turf engineered for bocce performance.

bocce-court-builders-in-patchogue-ny3For businesses and commercial property owners seeking a clean, modern, and durable recreational amenity, this installation represents the high standard of quality and functionality that Gappsi delivers.

A Dual-Court Layout Built for High-Traffic Commercial Use

Unlike residential installations, where a single court may suffice, commercial spaces often benefit from dual or multi-lane setups to accommodate more players and reduce wait times. For hotels, resorts, senior living communities, restaurants, bars, municipal parks, or office campuses, two courts significantly enhance guest engagement and operational flow.

The Patchogue project includes:

  • Two bocce courts installed side by side
  • A layout designed to support simultaneous games
  • Improved capacity during peak use or events
  • A streamlined, symmetrical design ideal for commercial landscaping

This setup supports tournaments, group activities, and consistent day-to-day use while maintaining a professional appearance.

Synthetic Wood Walls: A High-End, Low-Maintenance Commercial Choice

Gappsi constructed each bocce court using synthetic wood walls, professionally finished on both the interior and exterior for a clean, polished look from all angles, a significant advantage for public-facing properties.

Why commercial clients prefer synthetic wood walls:

  • Zero rot or decay, even with outdoor exposure
  • Minimal long-term maintenance, reducing operational costs
  • Consistent bounce and playability, ideal for league or event play
  • A sleek, modern aesthetic suitable for upscale venues
  • Durability for frequent, multi-user environments

For businesses, this means fewer repairs, less downtime, and a long-lasting investment that withstands heavy daily use.

Dual-Court Layout Built for High-Traffic Commercial UseConcrete Walkways for Accessibility, Cleanliness, and Professional Presentation

Commercial recreation areas must be safe, accessible, and easy to maintain. For this project, Gappsi constructed a concrete walkway surrounding the courts and running between them.

Benefits for commercial properties include:

  • ADA-friendly mobility for guests and residents
  • Defined foot traffic routes that protect landscaping
  • Slip-resistant, stable surfaces for safety
  • Low-maintenance, long-lasting durability
  • A clean, organized environment that enhances curb appeal

For businesses that value first impressions, such as hospitality venues, event spaces, and corporate campuses, these walkways add a polished, professional finish.

Professional-Grade Synthetic Bocce Turf With Gray Infill

The playing surface is one of the most critical elements of a commercial bocce court. Gappsi installed synthetic bocce turf engineered specifically for consistent ball roll, paired with a gray infill that stabilizes the surface and maintains clean aesthetics.

Commercial advantages of synthetic bocce turf:

  • Exceptionally low maintenance compared to clay or oyster blend
  • Consistent play quality, ideal for hosting tournaments or events
  • Fast drainage, allowing year-round use
  • No dust, mud, or surface spreading, keeping the property clean
  • Longevity, even with daily activity and high player volume

For commercial properties, synthetic turf significantly reduces operational labor and long-term maintenance costs while ensuring consistent user satisfaction.

Professional-Grade Synthetic Bocce Turf With Gray InfillA High-Value Amenity for Businesses in Patchogue, NY

This dual-court installation demonstrates the level of quality and precision Gappsi brings to every commercial project. Bocce courts offer tremendous value for business owners and developers looking to enhance outdoor spaces and attract customers, tenants, or employees.

Industries and properties that benefit from bocce sport game courts include:

  • Hotels & resorts
  • Breweries, wineries & restaurants
  • Apartment complexes & condos
  • Senior living communities
  • Corporate headquarters & office campuses
  • Parks & recreation facilities
  • Country clubs & golf courses
  • HOA communities
  • Event venues
  • Schools & universities

Bocce courts provide entertainment, encourage social interaction, and create an inviting outdoor space that sets your property apart.

Why Commercial Clients Choose Gappsi

Gappsi has become one of Long Island’s most trusted names in commercial court construction thanks to our expertise and commitment to superior quality.

Engineering and precision leveling for top-tier performance

Premium materials designed for longevity and heavy use

Custom layouts tailored to available space

ADA-conscious and business-friendly design options

Fast, professional commercial installation

Experience working with municipalities, HOAs, and corporate clients

Commercial bocce courts require a different level of planning and construction compared to residential projects, and Gappsi brings decades of specialized experience to ensure flawless results.

Industries and properties that benefit from bocce sport game courtsUpgrade Your Commercial Property With a Custom Bocce Court

If your business or organization is looking to add an engaging outdoor amenity that attracts customers, increases property value, and enhances user experience, Gappsi can design and build a turnkey solution to meet your needs.

This Patchogue project is the latest example of our ability to combine aesthetics, durability, and professional-grade playability, all essential for commercial environments.

Whether you need one court, two courts, or a complete bocce complex, Gappsi provides custom design, expert installation, and long-lasting materials that ensure your investment continues to deliver value for years.

SCHEDULE A MEETING TODAY WITH GAPPSI

Share this page:
Inground vinyl pool kit installed in a backyard with a stone patio and lounge chairs.

Inground Vinyl Pool Kit Price: A Full Breakdown

It’s easy to get lost in conflicting information when researching pool costs. You might hear that vinyl pools have lots of “hidden” fees or that the advertised inground vinyl pool kit price is misleading. Let’s clear the air. The truth is, the kit is just one component of your total investment. Essential steps like site preparation, professional installation, and electrical work all have their own costs. This guide is designed to give you a transparent, no-surprises breakdown of every expense. We’ll cover what’s in the kit, what’s not, and how to plan for a smooth, predictable, and stress-free project.

Key Takeaways

  • Look Beyond the Kit Price: The initial cost of a vinyl pool kit is only part of the story. Your total budget should also account for necessary expenses like excavation, professional installation, permits, and electrical work to get an accurate financial picture.
  • Customization Shapes Your Cost: The final price tag is directly influenced by your choices. Key factors include the pool’s size and shape, liner thickness, and any upgrades you add, such as heaters, lighting, or custom stone decking.
  • Budget for Future Liner Replacement: A key long-term cost of a vinyl pool is replacing the liner, which typically needs to be done every 5 to 9 years. Factoring this predictable expense into your budget from the start helps you plan for future maintenance.

What’s in an Inground Vinyl Pool Kit?

When you hear “pool kit,” you might picture a simple box, but it’s much more than that. An inground vinyl pool kit is a comprehensive package that includes nearly all the essential components you need to build a pool in your backyard. Think of it as the foundation of your future oasis. These kits are designed to streamline the building process, whether you’re a seasoned DIYer or planning to hire a professional team.

The main idea is to bundle the core structural and functional parts together. This way, you aren’t left scrambling to find a compatible pump for your filter or the right ladder for your deep end. While every kit can vary slightly, a quality package provides the bones of your pool, ready for assembly and installation. At Gappsi, we ensure our swimming pool systems are complete, taking the guesswork out of the equation so you can focus on the fun parts, like planning your first pool party.

What the Kit Includes

So, what’s actually inside the box? A standard inground vinyl pool kit typically comes with the pool’s structure, which is often a set of steel or polymer wall panels that form the perimeter. You’ll also get a durable vinyl liner—many suppliers even let you choose from various colors and patterns. Essential hardware like fiberglass steps, a handrail for safety, and a deep-end ladder are also included. Functionally, the kit provides the heart of your pool’s circulation system: a pump and filter. To round it out, you can expect to find a basic maintenance kit, skimmer, and return jets to keep the water clean and moving.

A Quick Look at the Installation Process

Getting your kit from the driveway into the ground involves a few key stages. First, the wall panels are assembled to create the pool’s shape. Next, a concrete collar is poured around the base of the walls to lock them securely in place. After that, the pool floor is carefully prepared and smoothed before the vinyl liner is hung and fitted. While it’s a more involved process than dropping in a pre-made fiberglass shell, it allows for incredible design flexibility. A significant portion of a vinyl pool’s cost comes from labor, so handling the installation yourself can lead to big savings if you’re up for the challenge.

How Much Does an Inground Vinyl Pool Kit Cost?

Figuring out the cost of an inground vinyl pool kit can feel a bit like a puzzle, but it’s simpler than you think once you break it down. The price of the kit itself is just your starting point. It covers the essential structure of your pool, but not the labor or finishing touches that bring it to life. The total cost depends on the kit’s quality, what’s included, and where you live. Think of it in three main tiers: basic kits for the budget-conscious, premium kits with all the bells and whistles, and the all-in cost that reflects local installation expenses. Understanding these different price points will help you set a realistic budget for your dream backyard oasis.

The Price Tag on Basic Kits

If you’re looking for the most straightforward entry point into pool ownership, a basic inground vinyl pool kit is where you’ll start. These kits typically run around $6,000 and provide the bare essentials to get your project underway. This usually includes the steel or polymer wall panels, the vinyl liner, a skimmer, and the coping that lines the pool’s edge. What it generally doesn’t include is a pump, filter, steps, or any of the plumbing. A basic kit is a great foundation, but remember to budget for the necessary equipment and installation costs on top of this initial price. It’s a solid choice for a DIY-savvy homeowner or someone looking to manage costs by sourcing other components separately.

What to Expect for Premium Kits

For those wanting more durability and features right out of the box, premium kits are the way to go. Prices for these more comprehensive inground swimming pool kits can range from about $12,500 to over $21,000. The higher price tag gets you significant upgrades, such as thicker, more resilient vinyl liners, stronger wall panels, and often includes built-in steps, which are a huge convenience. Many premium packages also come bundled with a high-quality pump and filter system, saving you the trouble of sourcing them separately. This is a solid choice if you want a longer-lasting pool with fewer initial hassles and a more all-inclusive starting package.

How Location Affects Your Price

The price of the kit is one thing, but the total cost to build your pool is another story, and your location plays a huge role. On average, the complete installation of a vinyl-lined pool can land around $45,000 for a standard 12’ x 24’ pool. This figure accounts for the kit, labor, excavation, electrical work, plumbing, and a basic concrete deck. Here on Long Island, factors like local labor rates and permit requirements can influence the final number. That’s why getting a detailed quote from a local expert who understands the whole process, from design to the first swim, is the best way to get an accurate picture of your total investment in a new swimming pool.

What Factors Influence the Price of a Kit?

When you start shopping for an inground vinyl pool, you’ll notice that the kit price is just a starting point. Think of it as the base model of a car—the final cost depends on the choices you make and the unique conditions of your property. Understanding these variables ahead of time helps you create a realistic budget and ensures there are no surprises down the road. The main factors that will shape your final quote are the pool’s size and shape, the quality of the liner you choose, your backyard’s specific conditions, and any extra features you decide to add. Each of these elements plays a significant role in the overall investment, so let’s break them down one by one. This way, you can feel confident about where your money is going and make informed decisions to build the perfect pool for your home.

Pool Size and Shape

It’s no surprise that the bigger the pool, the higher the price. A larger pool requires more materials for the walls, a larger liner, and more labor to assemble. The shape also plays a key role. A classic rectangle is generally the most cost-effective option, while custom freeform shapes with curves and unique angles will add to the cost due to the complexity of manufacturing and installation. One of the great advantages of vinyl is its design flexibility. Unlike fiberglass pools, which have depth limitations, vinyl swimming pools can be built to almost any depth you want, giving you complete control over your design.

Liner Quality and Thickness

The vinyl liner is the most visible part of your pool, and its quality directly impacts both the look and longevity of your investment. Liners come in various thicknesses, measured in mils. While a standard liner is perfectly suitable for many families, upgrading to a thicker one offers better resistance to tears and punctures from pool toys, pets, or debris. A thicker liner costs more upfront and can be a bit more challenging to install, but the added durability often translates to a longer lifespan, saving you money on replacements in the long run. It’s a trade-off between initial cost and long-term peace of mind.

Your Backyard’s Condition

What’s happening underground in your backyard can have a major effect on your budget. The ideal site is flat, clear, and has soft, easy-to-dig soil. However, many Long Island properties have challenges like rocky soil, clay, a high water table, or a significant slope. These conditions can make the excavation process much more difficult and expensive. Easy digging might cost as little as $2.50 per cubic yard, but tough, rocky terrain can push that figure to over $200 per cubic yard. A professional site assessment is crucial to understanding what your specific landscape will require for a smooth installation.

Optional Equipment and Features

Beyond the basic pool structure, your equipment and feature choices will round out your final cost. Some items, like a pump and filter, are mandatory for keeping your pool clean and functional. But even with these essentials, you have options that vary in price and performance. From there, you can add a range of upgrades to enhance your swimming experience. A pool heater can extend your swim season, underwater lighting creates a beautiful nighttime ambiance, and an automatic pool cover adds a layer of safety and convenience. These features, along with additions like slides or diving boards, allow you to customize your pool to fit your lifestyle.

What Costs Come After Buying the Kit?

Buying an inground vinyl pool kit is an exciting first step toward creating your backyard oasis. But it’s important to remember that the price on the kit is just that—a starting point. Several other essential costs come into play before you can start swimming. Thinking about these expenses ahead of time helps you create a realistic budget and ensures a smooth process from start to finish. Let’s break down the major costs you can expect after you have your kit in hand.

Excavation and Site Prep

Before your pool can be assembled, you need a place to put it. This means excavation—a big hole in your backyard. The cost for this can vary widely depending on what’s under your grass. Long Island soil can be sandy and easy to dig, but hitting a patch of dense clay or large rocks can make the job much more difficult and expensive. Easy digging might cost just a few dollars per cubic yard, but tough conditions can run into the hundreds. Proper site prep also involves clearing the area and ensuring the ground is perfectly level, which is critical for the pool’s structure. This foundational work is something our landscaping design teams handle every day.

Professional vs. DIY Installation

One of the biggest decisions you’ll make is whether to install the pool yourself or hire a professional. While a DIY approach can certainly save you money on labor—potentially $3,500 to $5,000—it’s a massive undertaking. The installation involves assembling the wall panels, fitting the liner perfectly, and connecting all the components. It requires precision and specialized knowledge. Hiring an experienced team ensures the job is done correctly and efficiently, preventing costly mistakes that could damage your pool down the line. A professional swimming pool installation also typically comes with a warranty, giving you peace of mind that your investment is protected.

Permits and Electrical Work

Installing a pool isn’t a simple backyard project; it’s a major construction job that requires official approval. You’ll need to secure building permits from your local town or village before any work begins, which can cost a few hundred dollars. This step is non-negotiable and ensures your pool meets all safety and building codes. Additionally, your pool’s pump, filter, and any lighting or heating systems need power. This requires a licensed electrician to run dedicated circuits from your home’s electrical panel to the pool equipment. For safety reasons, this is absolutely not a DIY task. Always hire a professional to handle the electrical work to keep your family safe and your pool up to code.

Plumbing and Equipment Setup

Your pool’s circulation system is its lifeline, and it all comes down to the plumbing. This involves connecting the skimmers, drains, pump, and filter to keep your water clean and clear. Getting this network of pipes right is crucial for your pool to function properly. The labor for plumbing and equipment setup is a significant part of the overall installation cost because it requires skill and precision. This is also when the vinyl liner is carefully set into place. The liner is durable, but it can be punctured, so it needs to be handled by someone who knows what they’re doing. Proper setup from the start prevents leaks and ensures all your equipment works together seamlessly for years to come.

Which Upgrades Add to the Final Cost?

A basic vinyl pool kit gives you the essentials, but the real transformation happens with the upgrades. Think of the kit as your blank canvas. The features you add are what turn a simple swimming hole into a stunning backyard retreat that becomes the heart of your home. These add-ons are where you can truly customize your pool to fit your lifestyle, whether you’re looking for energy efficiency, enhanced safety, or a beautiful space for entertaining friends and family. While these upgrades will increase your initial investment, many pay for themselves over time through lower maintenance needs, higher energy savings, and a more enjoyable pool experience day in and day out.

Planning for these features from the start helps you create a comprehensive budget and ensures your finished swimming pool is exactly what you dreamed of, without any surprise costs down the line. It’s about looking beyond the initial price and considering the total value and enjoyment you’ll get from your investment. From the equipment that keeps your water sparkling to the lighting that sets the mood for an evening swim, every choice contributes to the final product. Let’s look at some of the most common upgrades that will influence your final price tag and how they can improve your pool.

Better Pumps, Filters, and Heaters

The equipment that runs your pool is its heart and lungs, and this is one area where an upgrade can make a huge difference. Opting for a high-efficiency variable-speed pump, for instance, can significantly cut down on your energy bills over the life of the pool. Similarly, a better filter means cleaner, clearer water with less manual work for you. And if you want to extend your swim season into the cooler months, a reliable heater is a must. Investing in top-tier equipment from the beginning means a more functional, cost-effective, and enjoyable pool for years to come.

Pool Covers and Safety Features

A pool cover is one of the most practical upgrades you can make. Automatic covers not only provide a critical layer of safety for families with children and pets but also save you money and time. They reduce water evaporation, keep debris out (which means less cleaning), and help the water retain heat, lowering your heating costs. Beyond covers, you might also consider adding perimeter fences and netting to secure the pool area. These features are an essential part of responsible pool ownership and add peace of mind.

Lighting and Smart Systems

Want to create that perfect ambiance for an evening swim? Upgraded lighting is the way to do it. Modern LED lights come in a variety of colors and can be programmed to create different moods, turning your pool into a beautiful nighttime feature. You can also integrate smart systems that let you control everything—from the lights and temperature to the pump and water features—right from your phone. This technology adds a layer of convenience that makes managing your pool incredibly simple and is a key part of any modern home remodeling project.

Decking and Pool Edging

The area surrounding your pool is just as important as the pool itself. The right decking and edging, also known as coping, define the look and feel of your entire outdoor space. Upgrading from basic concrete to beautiful porcelain and natural stone pavers can completely change the aesthetic. A well-designed deck provides a safe, non-slip surface for walking and lounging, while high-quality coping creates a seamless and polished transition from the deck to the water. This is where you can really tie the pool into your home’s overall design.

How Do Vinyl Pools Stack Up Against Other Types?

Choosing the right type of inground pool often comes down to comparing vinyl, fiberglass, and concrete. Each has its own benefits and long-term considerations. A vinyl liner pool is a popular starting point for many homeowners due to its lower initial cost and design flexibility. To help you decide, let’s break down how these pool types differ in cost, maintenance, and overall lifespan.

Upfront Costs: Vinyl vs. Fiberglass vs. Concrete

When you’re planning your new swimming pool, the initial price is often the first thing you look at. This is where vinyl liner pools really shine. Generally, a vinyl pool is the most affordable option to install, with average costs running from $25,000 to $65,000. In comparison, fiberglass pools have a higher starting price because the shell is manufactured off-site and delivered in one piece. Concrete pools are typically the most expensive upfront due to the labor-intensive custom construction process. If your main goal is to get a beautiful pool for the lowest initial investment, a vinyl liner pool is the clear winner.

Long-Term Maintenance Differences

The lower upfront cost of a vinyl pool is balanced by its specific maintenance needs. The vinyl liner is durable but softer than fiberglass or concrete, so you’ll want to regularly check for potential tears or punctures. In contrast, concrete pools require regular brushing to prevent algae growth on their porous surface and may need acid washing every few years. Fiberglass pools are known for being low-maintenance, as their smooth, non-porous surface is algae-resistant and gentle on your feet. While vinyl requires careful attention to the liner, its day-to-day chemical maintenance is usually less intensive than a concrete pool’s.

Lifespan and Replacement Needs

This is where the long-term budget comes into play. While the structure of a vinyl pool lasts for decades, the liner itself will eventually need to be replaced. A typical vinyl liner has a lifespan of about 5 to 9 years, though some premium liners can last longer with proper care. The average replacement cost is between $3,000 and $6,000. Fiberglass and concrete shells can last for 50 years or more, but they have their own major future expenses. Concrete pools need to be completely resurfaced every 10 to 15 years, a project that can be quite costly. Our restoration and sealing services can handle these jobs, but it’s a significant undertaking.

What Are the Yearly Costs of a Vinyl Pool?

Once your beautiful new pool is installed, the fun begins. But it’s also smart to plan for the ongoing expenses that come with ownership. While vinyl pools are celebrated for their lower upfront cost compared to other types, they do have yearly maintenance needs. Thinking about these costs ahead of time means you can budget accordingly and avoid any surprises down the road. This way, you can focus less on your wallet and more on enjoying your backyard retreat.

Keeping your pool in top shape involves a few key areas of spending. You’ll have the predictable, long-term cost of replacing the liner, the routine annual upkeep for chemicals and cleaning, and a small budget set aside for any unexpected equipment repairs. Let’s break down what you can expect to spend each year to maintain your vinyl pool, ensuring it stays sparkling and swim-ready for years to come. With the right plan, these costs are completely manageable parts of enjoying your investment.

Replacing the Liner

One of the most significant long-term expenses for a vinyl pool is replacing the liner. Think of it as a predictable refresh for your pool every several years. A quality vinyl liner typically lasts between 5 and 9 years, depending on factors like sun exposure, chemical balance, and usage. When it’s time for a replacement, it’s a great opportunity to update the look of your pool with a new color or pattern. Budgeting for this expense from the start ensures you’re prepared when the time comes, making the process smooth and stress-free. Proper care can help you get the most life out of your liner before it needs to be replaced by a professional swimming pool service.

Annual Upkeep Expenses

Beyond the liner, you’ll have regular maintenance costs to keep your pool water clean, safe, and balanced. These annual upkeep expenses cover everything from chemicals like chlorine and algaecide to cleaning supplies and the costs of opening and closing your pool for the season. For many homeowners in Long Island, this can range from a few hundred to over a thousand dollars per year, depending on the pool’s size and whether you handle the maintenance yourself or hire a service. Consistent upkeep not only keeps your pool looking great but also helps protect the liner and equipment from premature wear. It’s a necessary investment for a healthy and enjoyable swimming environment.

Equipment Maintenance and Repairs

Just like any other part of your home, your pool’s equipment will need occasional attention. Your pump, filter, and heater are the workhorses that keep your pool running smoothly, and over time, they may need repairs or replacement parts. It’s also possible to get a small tear or hole in the liner that needs patching. Setting aside a small budget for these potential repairs is a wise move. Addressing minor issues quickly can prevent them from turning into bigger, more expensive problems. Quality installation helps minimize these issues, but it’s always good to be prepared for the occasional fix to keep your pool equipment in perfect working order.

Where Can You Find a Quality Pool Kit?

Once you’ve decided on a vinyl liner pool, the next big step is finding a kit that delivers on quality without creating a ton of headaches. The right kit is the foundation of your entire project, so this isn’t the place to cut corners. You’ll find plenty of options online, from basic packages to all-inclusive systems. The key is to look beyond the price tag and consider what you’re truly getting. Are you just buying a pallet of parts, or are you investing in a system from a company that will stand by its product?

For homeowners here on Long Island, it’s also important to choose a system built to handle our specific climate and soil conditions. A quality kit should come with durable components, a strong warranty, and clear instructions. Better yet, it should come with access to expert support. While the idea of a DIY pool project is appealing to many, having a team of professionals to guide you—or handle the entire installation—can be the difference between a summer of fun and a season of stress. At Gappsi, we provide complete swimming pools and installation services, ensuring every detail is handled correctly from the start.

Why We Trust Our Gappsi Pool Systems

We’ve been building backyard retreats on Long Island since 1987, so we know exactly what it takes to construct a pool that lasts. That’s why we’ve developed our own Gappsi Pool Systems. We don’t just sell you a kit; we provide a complete, high-quality solution that we stand behind. Our systems feature durable, non-corrosive polymer walls that are perfect for Long Island’s coastal environment. We pair them with top-tier liners and energy-efficient equipment to give you a beautiful, low-maintenance pool. When you choose a Gappsi pool, you’re getting more than just materials—you’re getting decades of local expertise and a dedicated team committed to bringing your vision to life.

Other Brands on the Market

As you research your options, you’ll likely come across several national brands that sell kits directly to consumers. Companies like Pool Warehouse are known for offering a wide variety of shapes and sizes, including custom designs for a unique look. You might also see EnduraPool, which markets full inground kits that include nearly everything you need to get set up. For those focused on a hands-on project, Royal Swimming Pools is another popular name that specializes in do-it-yourself packages. These brands can be a good fit for experienced DIYers who are comfortable managing a large-scale construction project on their own.

What to Look for in a Brand

Regardless of which brand you choose, there are a few key things to look for. First, examine the wall materials. Most kits come with either polymer or steel walls. While both are strong, polymer walls are often a better choice because they’re lighter, easier to work with, and completely rust-proof—a huge plus in our salty air. Next, check the liner’s thickness and warranty. A high-quality liner will last longer and resist punctures better. Finally, consider the support offered. Does the company have a responsive customer service team? A great brand doesn’t just sell you a product; it provides the resources you need for a successful installation.

Are There Common Myths About Vinyl Pool Costs?

When you start planning for a new pool, it’s easy to get tangled up in conflicting information, especially when it comes to the costs. The price of an inground vinyl pool kit can seem straightforward, but it’s just one piece of a much larger puzzle. A few common myths can lead to some unwelcome surprises in your budget, turning an exciting project into a stressful one. Many homeowners assume the kit price is the final price, that a DIY installation will automatically cut the cost in half, or that a vinyl pool won’t add any real value to their home down the line.

Let’s clear the air on these points. Getting a handle on the full financial picture from the very beginning is the key to making a confident decision. It ensures your new backyard oasis is a source of joy, not a financial headache. We’ll walk through the so-called “hidden” costs that often get overlooked, the reality of DIY savings, and what a vinyl pool truly means for your home’s long-term value. By looking past the myths, you can plan your project with a clear, realistic budget and get excited about the summers ahead.

The “Hidden” Costs to Watch For

One of the biggest myths is that the price on the pool kit is your total cost. In reality, the kit is just the starting point. Several other expenses are essential for a proper installation. For instance, every vinyl pool needs a concrete footer poured around its walls to provide stability, which is an added material and labor cost. You also need to think about the future. A vinyl liner is durable, but it doesn’t last forever. You can expect to replace the liner every 7 to 15 years, which is a significant future expense to plan for. On top of that, you have annual maintenance costs for chemicals, cleaning, and opening/closing the pool, which keep it sparkling and safe.

The Truth About DIY Savings

The idea of building your own pool to save money is tempting, and it’s true that you can cut down on labor costs by going the DIY route. However, it’s crucial to be realistic about what this project involves. Installing an inground pool is a major construction job that requires specialized skills, heavy machinery, and a deep understanding of plumbing, electrical work, and local building codes. A small mistake during excavation or installation can lead to costly repairs that quickly erase any initial savings. When you work with professionals, you’re not just paying for labor; you’re investing in expertise, efficiency, and the peace of mind that comes with knowing the job is done right the first time.

Understanding Long-Term Value

You might hear that vinyl pools don’t add as much resale value to a home as other pool types. While they may have a different ROI compared to concrete pools, they absolutely add value in other important ways. A beautiful, well-maintained pool transforms your backyard into a private resort, creating a hub for family fun, relaxation, and entertaining. This lifestyle upgrade is a huge selling point for many potential buyers. A complete and inviting outdoor living space makes your home more desirable and can help it stand out on the market. The true value isn’t just in the numbers—it’s in the countless memories you’ll make.

How Can You Finance Your New Pool?

A new swimming pool is a significant investment in your home and lifestyle, but that doesn’t mean you have to pay for it all at once. Thinking through your budget and payment options ahead of time can make the entire process smoother. Fortunately, there are several ways to manage the cost, from dedicated financing programs to smart purchasing strategies that can save you money from the start. Let’s walk through some of the most common approaches to financing your dream pool.

Financing Programs and Payment Plans

Many homeowners are surprised to learn how accessible financing can be. Most reputable pool companies understand this is a major purchase and offer financing programs to help spread out the cost. These plans can turn a large, one-time expense into manageable monthly payments. When you meet with a contractor, always ask about their financing partners and what kinds of plans are available. Beyond company-specific options, you can also look into a home equity line of credit (HELOC) or a personal loan from your bank. Exploring these avenues can help you find a payment structure that fits comfortably within your family’s budget, making it easier to invest in one of Gappsi’s swimming pools without financial strain.

Finding Promotions and Discounts

Who doesn’t love a good deal? Keep an eye out for seasonal promotions or special discounts, especially during the off-season when pool companies are less busy. Some businesses offer discounts for paying with a check instead of a credit card to avoid processing fees, passing those savings on to you. The best way to stay in the loop is to ask your pool provider directly about any current offers. You can also check company websites for promotions on products and materials. Visiting the Gappsi Store online or in person is a great way to see what’s available and find high-quality materials that might be on sale, helping you reduce the overall project cost.

Smart Ways to Save on Your Purchase

You can make strategic choices during the planning phase that have a big impact on your final bill. Opting for a vinyl liner pool is already a great start, as they are typically more affordable than concrete or fiberglass. You can also save by choosing a smaller pool or a simpler shape, which reduces material and labor costs. Another effective strategy is to schedule your installation during the fall or early spring. Demand is lower during these times, and contractors may offer more competitive pricing. Simplifying the surrounding masonry work or phasing your landscaping project can also help you manage upfront expenses while still achieving a beautiful result.

Related Articles

Frequently Asked Questions

What’s the real total cost I should budget for a vinyl pool? The kit price is your starting line, not the finish line. To get a realistic budget, you need to account for the essential work that brings the pool to life. This includes the cost of excavation, professional installation labor, plumbing, and the electrical work needed to power the pump and any lighting. You should also plan for the patio or decking that will surround your pool, as this is a key part of the final look. A comprehensive quote from a local professional is the best way to understand the full investment for your specific property.

How long does a vinyl pool actually last? The structure of a vinyl pool, meaning the steel or polymer wall panels, is incredibly durable and built to last for decades. The component with a shorter lifespan is the vinyl liner itself. With proper care and balanced water chemistry, you can expect a liner to last between 5 and 9 years. Think of replacing it as a predictable maintenance task that also gives you a great opportunity to refresh your pool’s appearance with a new color or pattern.

Is installing the pool kit myself a realistic way to save money? While you can certainly save on labor costs with a DIY installation, it’s a major construction project that requires a high level of skill. You’ll be managing excavation, assembling the structure with precision, and handling crucial plumbing connections. A small error can lead to costly repairs that could easily wipe out your initial savings. For most homeowners, hiring an experienced team provides peace of mind, ensures the job is done right, and protects your investment.

Can I get a custom-shaped pool with a vinyl kit? Absolutely! This is one of the biggest advantages of choosing a vinyl liner pool. Unlike fiberglass pools that are made from pre-set molds, vinyl offers incredible design flexibility. You can go with a classic rectangle, a curvy lagoon shape, or a completely unique freeform design that fits your backyard’s layout. You also have full control over the depth, so you can create a pool with a deep end for diving or a large shallow area for relaxing.

What’s the biggest thing people forget to budget for? The most commonly overlooked expense is the “poolscape,” which is everything that surrounds the water. This includes the patio material, the safety fencing required by local codes, and the landscaping that makes the space feel complete and beautiful. These finishing touches are what transform a simple pool into a true backyard oasis. It’s always a good idea to plan for these elements from the very beginning so your budget reflects the full scope of the project.

Share this page:
Stone accent wall installation using stacked stone veneer in a modern home.

Your Step-by-Step Stone Accent Wall Installation

Few home improvement projects offer the same dramatic impact as a stone accent wall. It introduces a natural, organic element that brings warmth and texture to any interior space. While the final result looks complex and high-end, the process itself is more straightforward than you might think. This guide demystifies the entire stone accent wall installation, breaking it down into clear, manageable steps. We’ll cover the essential prep work that guarantees a lasting bond, the right way to apply adhesive, and the techniques for cutting and placing stone for a balanced, beautiful pattern. Consider this your complete roadmap to creating a stunning feature wall with confidence.

Key Takeaways

  • Proper Prep is Non-Negotiable: The success of your accent wall depends on the prep work. A clean surface, a moisture barrier, and a cement board backing are the essential first steps for a durable, long-lasting finish.
  • A Methodical Approach Creates a Natural Look: Plan your stone layout on the floor before you begin to avoid unnatural patterns. Work from the bottom up and take your time to ensure each stone is secure and your lines are clean.
  • Know When to Call in a Professional: While a simple wall can be a great DIY project, hiring an expert for large or complex installations is a smart investment that guarantees a flawless result and helps you avoid costly mistakes.

What You’ll Need for Your Stone Accent Wall

Before you can bring that beautiful stone accent wall to life, you’ll need to gather the right supplies. Think of it as your project’s shopping list. Having everything on hand before you start makes the entire process much smoother and more enjoyable. From the star of the show—the stone itself—to the tools that will help you get that perfect finish, getting organized is the first step toward a stunning result. We’ll walk through the four main categories of materials and tools you’ll need to get the job done right.

Choosing Your Stone Veneer

The first, and most exciting, step is selecting your stone. When you’re browsing options, you’ll find that natural stone veneer comes in various thicknesses, usually between 0.4 and 1.75 inches. This isn’t just a minor detail; the thickness affects the final look and the installation method. A thicker stone might offer a more rustic, dimensional feel, while a thinner one can create a sleek, modern look. Take your time exploring Gappsi’s wide selection of porcelain and natural stone to find a style that truly fits your home’s personality and your design vision.

The Right Adhesives and Mortars

To make sure your beautiful stone veneer stays put for years to come, you need the right foundation. A common mistake is applying the stone directly to drywall. For the best adhesion and long-term durability, it’s always recommended to install a cement board over your existing wall first. This creates a solid, stable surface for the mortar to grip onto. Using the correct polymer-modified mortar is also crucial, as it’s specially formulated to handle the weight of the stone and create a powerful bond. These expert masonry techniques are what ensure a lasting, professional-quality finish.

Tools for Cutting and Shaping

Unless you’re incredibly lucky, you’ll need to cut some stones to fit perfectly around outlets, corners, and the edges of the wall. For clean, precise cuts, a wet saw and an angle grinder are your best friends. A wet saw uses water to keep the blade cool and reduce dust, making it ideal for straight cuts through the stone. An angle grinder is perfect for smaller, more intricate adjustments or shaping curves. Having both tools on hand will give you the flexibility to handle any cutting challenge and ensure every piece of stone fits just right.

Essential Safety Gear

This part is non-negotiable. Your safety should always come first. Before you even open a bag of mortar, make sure you have a good pair of gloves to protect your hands from irritation. When it’s time to cut the stone, safety goggles and a dust mask are absolute must-haves. Cutting stone creates fine dust and small chips that you definitely don’t want in your eyes or lungs. It only takes a few seconds to put on your safety gear, and it’s a simple step that protects you throughout the entire project.

How to Prep Your Wall for Stone Veneer

Before you even think about mixing mortar, let’s talk about prep work. I know it’s the least glamorous part of any project, but getting your wall ready is the single most important step to ensure your stone veneer looks amazing and lasts for decades. A properly prepared surface prevents issues like moisture damage, cracking, or stones falling off down the line. Think of it as building a solid foundation—without it, even the most beautiful stonework can fail.

The goal is to create a stable, moisture-resistant surface that can securely hold the weight of the stone and mortar. This involves a few key stages that you can’t afford to skip. First, you’ll need to completely clear and protect your work area. Then, you’ll address the wall itself by applying a moisture barrier and installing the right kind of backing material, like a cement board. Finally, you’ll want to do a quick check to make sure your wall’s structure is up to the task. While stone veneer is relatively lightweight, you still want peace of mind. Taking the time to do this right sets you up for a smooth installation and a flawless finish. If you’re feeling unsure about any of these steps, our masonry experts are always here to help.

Clear and Protect Your Workspace

First things first: clear the room. Move any furniture, rugs, and decor out of the space entirely. For items that are too big to move, cover them completely with heavy-duty plastic sheeting and tape it down. This project will create a lot of dust, and you’ll be surprised where it can end up. Cover your floors with drop cloths to protect them from scratches and mortar spills. If you have hardwood or tile floors, it’s a good idea to lay down a layer of thin cardboard or rosin paper under the drop cloths for extra protection against dropped tools or stones. Taking 30 minutes to protect your workspace will save you hours of cleanup later.

Prep the Surface and Add a Moisture Barrier

If you’re installing stone veneer over a surface like drywall or wood panels, adding a moisture barrier is a must. The mortar used to apply the stone contains a lot of water, which can seep into porous surfaces and cause rot, mold, or structural damage over time. In fact, most building codes require a moisture barrier for this type of installation. You’ll typically use a water-resistant building paper or asphalt-saturated felt, overlapping the seams and securing it to the wall with staples. This simple layer acts as a shield, protecting the integrity of your wall and ensuring your stone accent wall stands the test of time.

Install the Right Backing Material

While you can technically install stone veneer over drywall, it’s not the best approach. For a truly durable and professional-looking finish, you should apply the stone to a cement board. Drywall can degrade when exposed to the moisture in the mortar, weakening the bond over time. Cement board, on the other hand, is designed to handle wet conditions without swelling, crumbling, or losing its strength. It provides a much more stable and rigid surface for the mortar to adhere to, creating a stronger, more permanent bond for your stone. Think of it as the ideal canvas for your stonework.

Check for Structural Support

One of the great things about stone veneer is that it’s lightweight enough for most interior walls. Generally, a standard wood-framed wall built with 2×4 or 2×6 studs is perfectly capable of supporting the added weight without any extra reinforcement. Before you start, use a stud finder to locate the studs in your wall—you’ll need to screw your cement board directly into them. If you have an older home, or if you’re unsure about your wall’s construction, it’s always a good idea to consult a professional. A quick inspection can give you the confidence that your wall is ready for its beautiful new finish. Our home remodeling team can easily assess your structure.

Your Step-by-Step Installation Guide

Ready to bring your stone accent wall to life? Once your wall is prepped, the installation process can begin. Think of it like putting together a beautiful, textured puzzle. Taking your time with each step is the key to getting that professional, high-end look you’re after. We’ll walk through the process together, from laying the first stone to applying the final protective coat. With a little patience and the right technique, you’ll have a stunning feature wall that completely transforms your space.

Start from the Bottom and Work Up

The golden rule of installing stone veneer is to start at the bottom and work your way up. This method uses gravity to your advantage. Each new row of stones gets support from the row beneath it, which prevents any slipping or sliding while the adhesive sets. Starting at the base ensures your entire wall is stable and secure from the ground up. It’s a simple but crucial first step that creates a solid foundation for the rest of your project and helps you keep your lines straight and even as you build.

Apply the Adhesive Correctly

Getting the adhesive right is essential for a long-lasting wall. You’ll want to spread a thin layer of mortar or mastic adhesive, about 1/8 to 1/4 inch thick, onto a small section of the wall at a time. Then, use the notched side of your trowel to comb through the adhesive, creating grooves. These grooves create suction and help the stone grip the wall securely. It’s one of the most important parts of any masonry project. Let the adhesive get a little tacky before you start pressing the stones into place—this will give you the best hold.

Cut and Place Each Stone

This is where your artistic vision comes into play. Before you apply any adhesive, lay your stone veneer pieces out on the floor to plan your pattern. This allows you to mix and match different shapes, sizes, and colors to create a balanced, natural look. You’ll inevitably need to cut some stones to fit around outlets or at the end of a row. For clean, precise cuts, a wet tile saw is your best friend. Measure twice, mark your stone with chalk, and cut once. Placing each custom-fit piece of natural stone is incredibly satisfying as you watch your design take shape.

Finish with Clean Joints

Once all the stones are set and the adhesive has cured, it’s time to finish the joints. Depending on the style of stone you’ve chosen, you may need to apply grout in the gaps between them. This step fills in any empty spaces and gives the wall a complete, polished appearance. Some styles, like dry-stack stone, are designed to fit tightly together without visible grout lines. Always check the recommendations for your specific stone veneer. If you are grouting, use a grout bag to apply it neatly into the joints, then smooth it out for a clean finish.

Seal the Stone for Protection

The final step is to protect your beautiful new wall. Applying a quality stone sealant is a must, as it creates a protective barrier against moisture, dust, and stains. This makes cleaning much easier and helps preserve the natural color and texture of the stone for years to come. It’s a simple step that ensures your investment continues to look as good as the day you installed it. If you want to ensure it’s done perfectly, professional restoration and sealing services can provide a flawless and durable finish.

Common Installation Mistakes to Avoid

Even with the best materials, a few common slip-ups can turn your dream accent wall into a frustrating project. Knowing what to watch out for ahead of time is the best way to ensure a smooth process and a beautiful, lasting result. From the initial prep work to the final stone placement, paying attention to the details makes all the difference. Let’s walk through the most frequent mistakes so you can sidestep them completely and feel confident in the final outcome. Think of this as your friendly guide to getting it right the first time, so you can spend less time troubleshooting and more time admiring your work.

Skipping Wall Prep

This is easily the most critical mistake you can make. Applying stone veneer to a surface that isn’t ready is like building a house on a shaky foundation—it just won’t last. The wall you’re working on must be completely clean, dry, and structurally sound before you even think about mixing your mortar. Any lingering dust, grease, or moisture will prevent the adhesive from bonding properly, which can lead to loose or falling stones down the road. Taking the time to thoroughly clean the surface and make any necessary repairs isn’t just a suggestion; it’s a non-negotiable first step for a professional-looking finish that stands the test of time.

Using the Wrong Amount of Adhesive

Getting the consistency of your mortar or adhesive just right is a bit of an art form. If you mix it too stiff, you’ll struggle to apply it, and it won’t create a strong bond with the stone. On the other hand, if it’s too thin and watery, your stones will slide down the wall before they have a chance to set. The ideal mortar should be loose enough to flow easily from the tip of the bag without being runny. A great pro tip is to mix small batches as you go. This helps you maintain the perfect consistency and prevents the adhesive from drying out too quickly.

Incorrect Stone Placement and Timing

It’s tempting to jump right in, but a little planning goes a long way. Avoid the dreaded “zipper effect,” where the vertical joints line up and create an unnatural, distracting pattern. To prevent this, lay out your stones on the floor first to create a pattern that looks balanced and organic. Start your installation from the bottom corners and work your way up and in. Rushing the process can also lead to slippage, so give each row enough time to set before adding the weight of the next one. Patience is your best friend here, and a well-planned layout is key to a natural look.

Ignoring Gaps and Alignment

Small gaps and misaligned stones might not seem like a big deal up close, but they can be glaringly obvious once you step back and look at the finished wall. These little imperfections can disrupt the entire visual flow of your accent wall, making it look less polished. As you work, frequently take a few steps back to check your progress from a distance. Ensure your horizontal lines are level and that the spacing between stones is consistent. Proper masonry work is all about precision, and taking care of these small details is what separates an average job from a professional installation.

What’s the Cost of a Stone Accent Wall?

Figuring out the budget for your stone accent wall is a huge step in bringing your vision to life. While the final price tag can vary, understanding the key components will help you plan effectively and avoid surprises. Generally, you can expect a stone accent wall to cost between $650 and $3,250, with an average around $1,300. The main factors influencing this range are the size of your wall and the type of stone you choose. Let’s break down what goes into that number so you can feel confident about your investment.

Breaking Down Material Costs

The star of the show is, of course, the stone itself. Your choice of stone veneer will be the biggest driver of your material costs. Natural stone, with its unique textures and colors, often comes at a higher price point than manufactured stone veneer, which offers a consistent look and a lighter weight. At Gappsi, we have a wide selection of beautiful porcelain and natural stone options to fit different styles and budgets. Thinking about the square footage you need to cover will give you a clearer picture of your material expenses before you even begin.

Factoring in Labor and Professional Fees

Unless you’re a seasoned DIY pro, professional installation is the way to go for a flawless finish. It’s important to know that labor often makes up more than a third of the total project cost. This fee covers the expertise, precision, and efficiency of an experienced team. A professional installer ensures every stone is perfectly placed, the wall is structurally sound, and the final result is stunning and durable. When you hire a team for their masonry expertise, you’re paying for peace of mind and a wall that will look incredible for years to come.

Planning for Unexpected Costs

A smart budget always leaves a little room for the unexpected. Beyond the stone and labor, there are other potential costs to consider. These can include essential supplies like underlayment, backing materials, high-quality adhesives, and grout. You might also have delivery fees for your materials and the cost of any specialized tools needed for the job. Planning for these items from the start helps prevent budget overruns and keeps your project running smoothly. A good contractor will outline these potential costs for you upfront.

Ways to Save on Your Project

You can absolutely create a gorgeous stone wall without overspending. One of the best ways to manage your budget is to ask for an itemized quote. Avoid lump-sum estimates that don’t detail where your money is going. An itemized list breaks down the costs for labor, materials, and any other fees, giving you full transparency. You can also discuss different material options with your designer. Sometimes, a slightly different style of stone veneer can offer a similar look for a lower price, helping you achieve your dream design while staying on budget.

DIY vs. Hiring a Pro: What’s Right for You?

Deciding whether to tackle your stone accent wall yourself or bring in a professional comes down to your budget, timeline, and comfort level with home projects. While a DIY project can be incredibly rewarding, sometimes the peace of mind and flawless finish of a professional job is the better investment. There’s no single right answer, but thinking through a few key points will help you figure out the best path for your home and your sanity. Let’s break down which route might be the right one for you.

When to DIY Your Accent Wall

If you’re a hands-on person who enjoys a good weekend project, building a stone accent wall can be a great fit. With stone veneer, the process is more straightforward than you might think. Many homeowners find it’s a beginner-friendly project that can completely transform a room without a massive budget. This path is ideal for smaller, more straightforward walls where the stakes feel a little lower. If you have the patience to dedicate to proper wall prep, carefully placing each stone, and finishing the details, you can achieve a beautiful result you’ll be proud of for years. It’s a chance to put your personal touch on your space and learn a new skill along the way.

When to Call in the Professionals

While DIY is tempting, there are times when calling an expert is the smartest move. If your project is large, involves complex cuts around outlets or windows, or requires structural considerations, a professional is essential. Common DIY installation mistakes like visible gaps, improper sealing, or a poorly planned layout can ruin the final look and be difficult to fix. Our expert masonry team has the experience to handle these challenges seamlessly, ensuring a perfect and quick installation. If you’re short on time, want a guaranteed high-end finish, or just prefer to leave it to someone with a trained eye for design and detail, hiring a pro is the way to go.

The Benefits of a Professional Guarantee

Hiring a professional offers more than just a great-looking wall; it provides complete peace of mind. While labor costs are a significant part of the investment, that price includes expertise that helps you avoid expensive errors down the road. A professional team handles everything, from ensuring the wall is structurally sound to managing any necessary local permits. At Gappsi, our home remodeling experts guarantee the quality of their work, so you can be confident that your new accent wall is not only beautiful but also built to last. It’s an investment in quality, efficiency, and the assurance that the job will be done right the first time.

How to Care for Your New Stone Accent Wall

Your new stone accent wall is a showstopper, and keeping it that way is easier than you might think. With just a little routine care, you can ensure your investment stays as beautiful as the day it was installed. Proper maintenance protects the stone from dust, stains, and moisture, preserving its natural character and texture for years to come. Whether your wall is a cozy indoor feature or a striking exterior statement, these simple steps will help you maintain its integrity and appearance without a lot of fuss.

Simple Cleaning and Upkeep

For day-to-day care, a light touch is all you need. General maintenance involves dusting or using a vacuum with a brush attachment to get rid of any loose debris. For a slightly deeper clean, you can wash the surface with a mild soap and water solution. If you notice more stubborn spots, use a soft-bristle brush and clean water to gently scrub the area. For exterior walls, hosing the veneer down once or twice a year can help the stone keep its beautiful, natural appearance. This simple routine is usually enough to handle everyday dust and grime.

Resealing to Protect Your Investment

Sealing your stone wall is a key step in protecting it from the elements. A quality sealer acts as a barrier, helping to prevent moisture and stains from penetrating the stone. While not something you need to do often, periodically applying a clear sealer will go a long way in preserving your wall’s color and condition. This is especially important for walls in high-traffic areas, kitchens, or outdoor spaces exposed to weather. If you’d rather leave it to the experts, Gappsi offers professional restoration and sealing services to ensure the job is done right.

Tips for Long-Term Care

Beyond regular cleaning, a few extra tips can keep your wall looking its best. If you want to enrich the stone’s natural tones, consider using an enhancer. This product will bring out the deep color of the stone, giving it a richer, darker look while adding another layer of protection. It’s also a good idea to periodically inspect the wall for any loose stones or cracked mortar, addressing small issues before they become bigger problems. Consistent, gentle care is the best way to maintain the beauty of your natural stone for a lifetime.

Related Articles

Frequently Asked Questions

Can I install stone veneer directly over my existing drywall? While it might seem like a tempting shortcut, it’s not a good idea. The mortar used to set the stone contains a lot of moisture, which can weaken drywall over time and compromise the bond. For a truly durable and professional result, you should always install a cement board over the drywall first. This creates a stable, moisture-resistant surface that gives the mortar the best possible grip and ensures your wall will last for decades.

What’s the most common mistake that ruins a stone accent wall? Hands down, the biggest mistake is rushing or skipping the wall preparation. If the surface isn’t perfectly clean, dry, and properly backed with a material like cement board, the adhesive won’t bond correctly. This can lead to loose or even falling stones down the line. Taking the time to create a solid foundation is the single most important step for a beautiful and long-lasting finish.

Do I really need to seal an indoor stone wall? Yes, it’s a step you won’t want to skip. Even indoors, a stone wall is exposed to dust, airborne particles, and potential splashes or scuffs, especially in a high-traffic area. A quality sealer creates an invisible barrier that protects the stone from absorbing stains and makes it much easier to clean. It’s a simple final step that preserves the natural color and integrity of the stone for years to come.

How do I get the stone layout to look natural and not like a repeating pattern? The key is to plan your layout before you apply any adhesive. Lay a good number of stones out on the floor to see how the different shapes, sizes, and colors work together. Intentionally mix them up to create a balanced look. As you install, make sure to stagger your vertical joints so they don’t line up, which avoids that unnatural “zipper” look. Taking a few steps back frequently to check your work helps you see the bigger picture.

Is this a project I can realistically finish in a single weekend? For a very small and straightforward wall, a dedicated DIYer might be able to complete it in a weekend. However, for most projects, it’s better to plan for more time. The preparation, cutting stones to fit, letting the mortar set between rows, and grouting all take time and patience. Rushing the process is where mistakes happen, so it’s often a multi-day or two-weekend project to do it right.

Share this page:

A Stunning Multisport Game Court Built in Commack, NY by Gappsi

View Gappsi’s YouTube Channel to view A Stunning Multisport Game Court Built in Commack, NY by Gappsi

Creating a backyard that blends beauty, recreation, and durability is an art, and Gappsi continues to perfect it with every project. Their latest transformation in Commack, NY, is a valid showcase of craftsmanship, design innovation, and multifunctional outdoor living. This newly completed multisport game court brings together basketball, pickleball, mini golf, volleyball, badminton, and a custom-built practice wall, all in a cohesive, highly engineered layout.

Designed to offer year-round fun for the entire family, this project is more than a court.  A private recreation complex built right at home.

A Vision of Recreation From Every Angle

The centerpiece of this Commack project is a full-size, vibrant basketball court, carefully positioned to enhance playability, safety, and visual appeal through the surrounding features. The layout was designed not only for performance but also to maximize the available space and turn it into an all-ages sports retreat.

And surrounding that basketball court? A beautifully sculpted mini golf course that wraps entirely around the perimeter of the court. It’s dynamic, flowing, and brings a fun, relaxing atmosphere that balances the competitive nature of the basketball and pickleball areas.

This combination of active and leisure activities creates a space that truly offers something for everyone.

vibrant basketball courtA Fully Custom Mini Golf Course

To build the mini golf course, Gappsi used premium-grade synthetic turf selected for both performance and longevity:

Putting Green Turf

  • Installed in the main play areas
  • Provides a true-to-roll ball response
  • Designed for smooth, consistent speed

Fringe Turf

  • A slightly taller, realistic turf
  • Frames the putting surface
  • Adds visual depth and improves ball play

The entire mini golf layout includes several holes equipped with flags, offering a variety of shot types and putting challenges. What makes this installation particularly impressive is the carefully sculpted undulation throughout the mini golf floor. The elevation changes and contours create a dynamic playing experience akin to a professional putting green, adding both challenge and fun to the design.

sculpted mini golf course

A Multi-Use Basketball and Pickleball Court

At the heart of this project lies the multisport game court, built using TopCourt Mateflex tiles in a custom blend of blue and gray. These tiles offer:

  • Shock absorption
  • Slip resistance
  • Fast drainage
  • Year-round durability
  • A comfortable feel underfoot

The court is fully striped for basketball and pickleball, making it easy for players to transition between sports. With precision striping, the layout maintains the visual clarity and regulation spacing needed for both games.

TopCourt Mateflex tiles
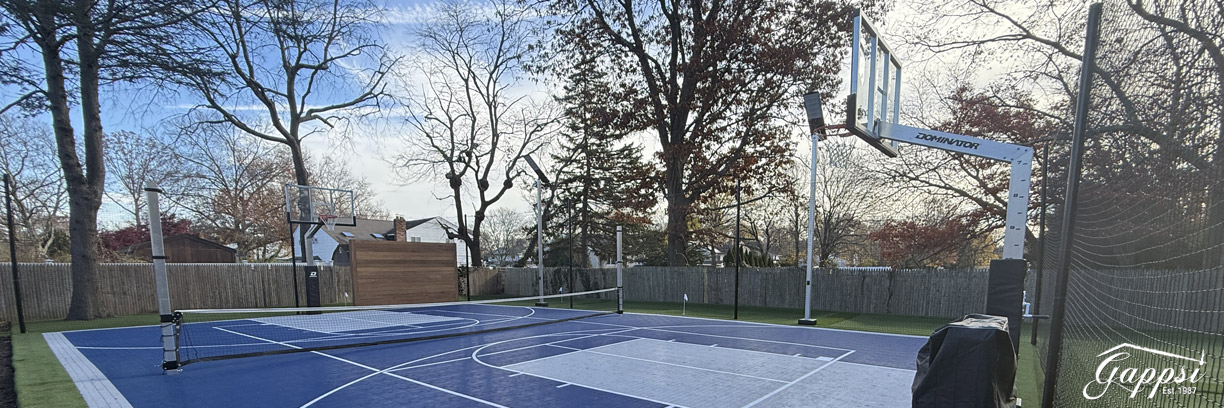
Professional Grade Basketball Hoops

The court features two Dominator basketball hoops, installed at opposite ends to support full-court play. Dominator hoops are known for:

  • Heavy-duty construction
  • Superior stability
  • Smooth, consistent rebound
  • Long-lasting outdoor performance

These premium hoops complete the professional-level feel of the basketball experience.

Multi-Sport Net System for Pickleball, Badminton & Volleyball

To expand the court’s versatility, Gappsi installed a center multisport net system. This adjustable net transforms the court for:

  • Pickleball
  • Badminton
  • Volleyball

The system is easy to raise, lower, or remove depending on the sport being played.  It makes this court one of the most flexible outdoor athletic installations available.

Multi-Sport Net System for Pickleball, Badminton & Volleyball
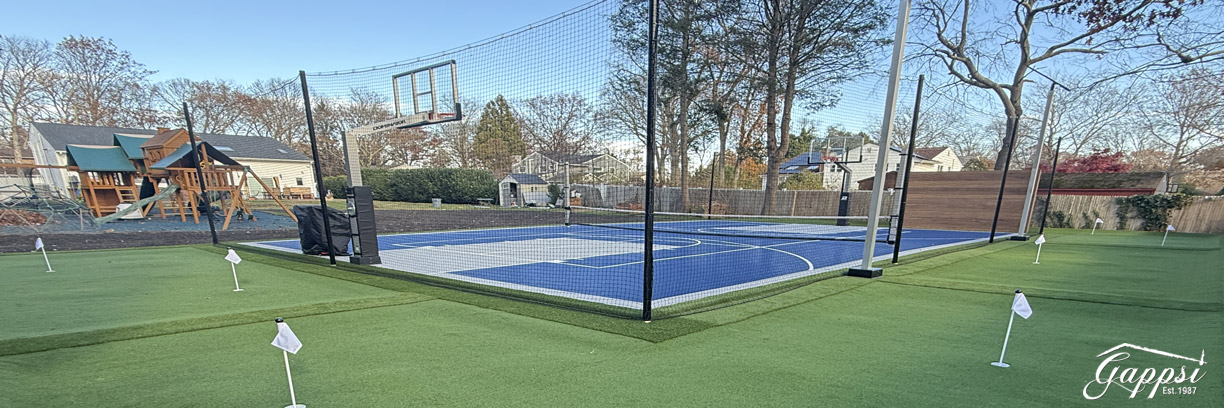
Safety & Enhanced Play with 14-Foot Out-of-Bounds Netting

Around the outer edge of the play area, Gappsi added 14-foot out-of-bounce netting, a crucial feature for both convenience and safety. This netting:

  • Keeps balls inside the court
  • Protects surrounding areas
  • Adds a professional sports-complex appearance

This installation also includes two solar-powered lights facing the house, providing nighttime visibility while maintaining energy efficiency. With solar lighting, the court remains usable long after sunset without increasing electricity costs.

A Brazilian Cumaru Wood Practice Wall

One of the standout custom features of this project is the practice wall, built with beautiful Brazilian Cumaru wood. Cumaru is prized for its:

  • Extreme durability
  • Resistance to rot, insects, and weather
  • Rich color and grain
  • Long-lasting structural strength

The practice wall is finished on both sides, offering functionality and a polished aesthetic from any viewing angle. Whether used for solo practice, drills, or warmups, it’s a high-end addition that elevates both performance and visual appeal.

Brazilian Cumaru WoodMaterials and Craftsmanship That Last

Gappsi uses only premium-grade materials and proven installation techniques for long-term performance. From the sports tiles to the turf, the wood elements, and the netting system, every component was selected to withstand heavy use and harsh New York weather while maintaining its beauty.

This multisport game court is built not only for today’s enjoyment but for many years of family memories, friendly competitions, and weekend gatherings.

A Complete Backyard Transformation in Commack, NY

This multisport game court installation is a testament to Gappsi’s ability to merge sport, leisure, and design into one harmonious space. With:

  • A full basketball/pickleball court
  • Mini golf course wrapping the perimeter
  • Adjustable multi-sport net system
  • Brazilian Cumaru practice wall
  • Premium Dominator equipment
  • Solar lighting and 14-foot containment netting
  • High-performance Mateflex sports tiles

…it’s one of the most comprehensive and visually stunning backyard recreation projects in Commack, NY.

Homeowners now enjoy a private sports oasis that supports fitness, family time, and endless fun, all crafted with the highest level of detail and expertise.

private sports oasis that supports fitness, family time, and endless funIf you’re considering a multisport game court or custom outdoor recreational area for your property, Gappsi can bring your vision to life with unmatched quality and design innovation.

SCHEDULE A MEETING TODAY WITH GAPPSI

Share this page:
A finished stone patio built on a lawn, the result of a step-by-step DIY guide.

How to Build a Stone Patio on Grass That Lasts

A great outdoor space can completely change how you experience your home, and a stone patio is the perfect foundation for that new lifestyle. It’s the anchor for your outdoor dining set, the spot for your fire pit, and the stage for countless memories. If you’ve been looking at an underused part of your lawn and dreaming of something more, you’re in the right place. This isn’t just a construction project; it’s about creating a personal retreat. Our guide on how to build a stone patio on grass step by step provides the clear, actionable instructions you need to turn that vision into a reality, ensuring your new space is not only beautiful but also built to withstand our local seasons.

Key Takeaways

  • Build a Rock-Solid Base First: The most common patio failures come from a weak foundation. Prevent sinking and shifting by properly excavating, adding materials in layers like gravel and sand, and thoroughly compacting each layer before moving on.
  • Get the Layout and Slope Right: Before placing a single stone, ensure your patio slopes gently away from your house to manage drainage. Start by setting the border stones to create a sturdy frame, then work inward, constantly checking that your stones are level.
  • Finish Strong to Ensure Durability: The final steps lock your entire patio together. Use polymeric sand to fill the joints, which hardens to prevent weeds and shifting, and install edge restraints around the perimeter to keep the structure secure for years.

Gathering Your Supplies: What You’ll Need for a Stone Patio

Before you can break ground on your beautiful new patio, you need to get organized. Having all your materials and tools ready to go will make the entire process smoother and more enjoyable. Think of it as setting yourself up for success from day one. This step involves more than just picking out pretty stones; it’s about choosing the right materials for Long Island’s climate, gathering the correct tools for the job, and creating a realistic budget. Let’s walk through exactly what you’ll need to get started.

Choosing Your Patio Materials

When it comes to selecting the stone for your patio, you have some fantastic options. Popular choices like bluestone, flagstone, and slate offer timeless appeal and durability. For a sturdy patio that lasts, aim for stones that are between 1.5 and 2 inches thick. It’s also crucial to choose a material that can handle our local weather, especially the freeze-thaw cycles we experience on Long Island. Gappsi offers a wide selection of high-quality porcelain and natural stone specifically suited for our climate, ensuring your patio looks great for years to come.

The Right Tools for the Job

Having the right equipment on hand is non-negotiable for a successful DIY patio project. Here’s a checklist of the essential tools you’ll need to gather:

  • Tape measure, stakes, and string for marking your layout
  • Shovel and pickaxe for excavation
  • Wheelbarrow for moving materials
  • 4-foot level to ensure a proper slope
  • Hand tamper or a rented plate compactor for a solid base
  • Rubber mallet for setting stones
  • Masonry saw with a diamond blade for cuts

Don’t forget to grab safety gear like goggles, a dust mask, and ear protection, especially when you’re operating power tools.

How to Estimate Material Needs and Budget

Let’s talk numbers. For a DIY project, you can generally expect to spend between $4 and $7 per square foot on materials. For a 12×16-foot patio, you’ll need about 192 square feet of stone. It’s a smart move to buy 5-10% extra to account for any cuts or mistakes. You’ll also need about 3 tons of crushed stone for a 3-inch base and 1 ton of stone dust for a 1-inch setting bed. If you’d rather leave the heavy lifting and complex calculations to the pros, our masonry design and construction team is always here to help create a detailed plan and estimate for you.

Prepping the Ground: How to Prepare Your Lawn for a Patio

A beautiful stone patio starts from the ground up. The secret to a patio that stays level and looks great for years isn’t just the stone you choose—it’s the solid foundation you build beneath it. Skipping or rushing the prep work is the number one reason patios sink, shift, or become uneven over time. Taking the time to properly prepare your lawn creates a stable base that can handle foot traffic, patio furniture, and Long Island’s changing seasons without budging.

Think of it like building a house; you wouldn’t start without a solid foundation, and your patio is no different. This process involves four key stages: marking your layout, clearing the area, digging out the base, and compacting the soil. Each step builds on the last to ensure a durable, professional-looking result. While it requires some muscle, getting the groundwork right is the most important investment you can make in your new outdoor space. For intricate designs or large-scale projects, our masonry experts are always here to help build the perfect foundation.

Step 1: Mark Your Patio’s Layout

First things first, you need to define the exact shape and size of your future patio. Grab some wooden stakes and a ball of string to outline the perimeter right on your lawn. This visual guide helps you see the final footprint and ensures your lines are straight and your curves are smooth. Once you have the shape marked, double-check your measurements.

Now for a crucial detail: drainage. You need to plan for a slight slope that directs water away from your house’s foundation. A good rule of thumb is to create a grade of about a quarter-inch for every foot of patio. For example, a 12-foot patio should be about three inches lower on the side farthest from your home. This simple step prevents pooling water, ice buildup, and potential water damage to your house.

Step 2: Clear Away Grass and Plants

With your layout marked, it’s time to clear the area. You’ll need to remove every bit of grass, weeds, and other vegetation within the staked-out perimeter. For smaller patios, a sharp spade or shovel will do the trick. If you’re working with a larger space, consider renting a sod cutter to make the job faster and easier.

Be thorough here. Make sure you dig up the roots, not just the surface greenery. Any roots left behind can decompose and create air pockets, causing the ground to settle unevenly later. They can also sprout new weeds that push up through the joints of your patio. Once everything is removed, use a rake to clear away loose debris and create a relatively flat surface for the next step. A clean slate is essential for a professional landscape design.

Step 3: Dig Out the Foundation

Now it’s time to start digging. You need to excavate the entire patio area to a consistent depth to make room for the base materials. The total depth depends on the layers you’ll be adding. A standard patio base requires about four to six inches for a gravel layer, one inch for a sand layer, plus the thickness of your pavers.

For example, if you’re using two-inch-thick pavers, you’ll need to dig down about seven to nine inches total. This ensures your finished patio will sit flush with the surrounding lawn. Use a tape measure to check the depth as you go to keep it uniform across the entire area. This excavation creates the basin that will hold the crushed stone and sand that form your patio’s unshakeable support system for your chosen porcelain or natural stone.

Step 4: Compact the Soil for a Solid Base

After you’ve finished digging, you’re left with exposed soil, also known as the subgrade. Before you add any base material, this soil needs to be tightly compacted. This step is absolutely critical because it prevents the pavers from sinking or shifting over time. Any loose soil will settle eventually, creating dips and uneven spots in your beautiful new patio.

For small areas, you can use a hand tamper—a tool with a heavy, flat metal base and a long handle—to firmly press the soil down. For larger patios, it’s worth renting a plate compactor from a local tool rental shop. Go over the entire area several times until the ground is firm, level, and solid underfoot. A properly compacted subgrade is the bedrock of a patio that will last a lifetime.

How to Build a Rock-Solid Patio Base

Now that you’ve prepped the ground, it’s time to build the foundation. Think of the base as the unsung hero of your patio—you’ll never see it, but it does all the heavy lifting. A strong, well-compacted base is what prevents your beautiful stones from shifting, sinking, or becoming uneven over time. Skipping or rushing these steps is the number one reason patios fail, so give this stage the attention it deserves. It’s the difference between a patio that looks great for a season and one that lasts for decades.

Building a solid base involves creating a few distinct layers that lock together to form a stable platform. You’ll start with a weed barrier, add a thick layer of crushed stone for drainage and support, and finish with a thin layer of sand to create a perfectly level bed for your pavers. While it requires some muscle, getting the base right is completely achievable. If you’d rather leave the heavy lifting to the pros, our masonry experts are always here to build a foundation that stands the test of time.

Lay Down Landscape Fabric

First, roll out a layer of landscape fabric over the entire excavated area. This simple step serves two important purposes: it acts as a barrier to stop weeds from growing up through the joints of your patio, and it keeps your gravel base from mixing with the soil underneath. Make sure to overlap any seams by at least six inches to ensure there are no gaps. The fabric is permeable, so it will still allow water to drain through while keeping your layers separate and clean. This small detail goes a long way in maintaining the integrity of your patio base for years to come.

Add and Level the Crushed Stone Layer

Next comes the crushed stone, which will make up the bulk of your patio’s foundation. You’ll want to use ¾-inch crushed stone, also known as crusher run. Don’t just dump it all in at once. The key to a stable base is to add the stone in 2- to 3-inch layers, compacting each one thoroughly before adding the next. For the best results, rent a plate compactor—it will save you a ton of time and effort. Your goal is to build a firm, interlocking base that is between 4 and 6 inches thick after compaction.

Spread the Sand or Stone Dust

Once your crushed stone base is compacted and level, it’s time for the final layer: about one inch of coarse sand or stone dust. This layer acts as a setting bed, creating a smooth, cushioned surface that makes it easier to set your stones perfectly flat. To get it perfectly level, you can lay two pipes or 1-inch wooden dowels on either side of the area and drag a straight 2×4 across them. This technique, called “screeding,” removes any high spots and fills in low ones, giving you an ideal surface to work with.

Compact Each Layer for Maximum Stability

Compaction is not a step you can afford to skip. It’s what locks all the base materials together and removes air pockets that could lead to settling later on. You already compacted the soil after digging, and you need to apply that same diligence here. Each 2- to 3-inch layer of crushed stone must be compacted until it’s solid before you add the next. A properly compacted base won’t have any give when you walk on it. This meticulous process ensures your patio remains stable and level through freezing winters and hot Long Island summers.

Choosing Your Stones: What Are the Best Options for Your Patio?

Selecting the right stone is one of the most exciting parts of planning your patio. This isn’t just about picking a durable surface; it’s about choosing the foundation for your future outdoor memories. The material you choose sets the entire mood for your space, influencing everything from its style and color palette to its long-term durability. Think of your patio as an extension of your home’s interior—the right stone will create a seamless flow between indoors and out, adding both beauty and value to your property.

Your decision will likely come down to three things: the look you want to achieve, your budget, and how you plan to use the patio. Are you dreaming of a rustic, charming retreat for quiet mornings, or a sleek, modern entertainment area for hosting friends and family? Do you need a surface that can stand up to heavy foot traffic and poolside splashes? Answering these questions will help narrow down your options. Let’s walk through some of the best and most popular choices to help you find the perfect fit for your Long Island home.

Classic Charm: Bluestone and Natural Stone

If you’re aiming for a timeless, elegant look, you can’t go wrong with natural stone. Materials like bluestone and flagstone offer an authentic, organic beauty that manufactured products can’t replicate. Each stone is unique, with subtle variations in color and texture that add character and depth to your patio. Bluestone is a local favorite for its rich, blue-gray tones that feel right at home in any landscape. For the best results, look for stones that are between 1.5 and 2 inches thick to ensure they’re sturdy enough for foot traffic. Exploring different natural stone options can help you find the perfect material to create a classic outdoor living space.

Modern & Durable: Concrete and Porcelain Pavers

For those who prefer a more modern aesthetic or need a highly durable surface, concrete and porcelain pavers are excellent choices. Concrete pavers are incredibly versatile, coming in a huge range of shapes, colors, and sizes that allow for complete creative control. They are also a cost-effective option. Just be sure to choose a textured finish to provide good grip and prevent slips. Porcelain pavers are a premium choice known for their incredible strength and low-maintenance qualities. They resist stains, mold, and fading, and their non-slip surface makes them a safe and stylish option for any patio or walkway. Gappsi’s masonry experts can help design and install a paver patio that lasts for decades.

Elegant Choices: Travertine and Slate

Travertine and slate are two other natural stones that bring a touch of luxury to any backyard. Travertine offers a warm, earthy look with beautiful swirling patterns that evoke Mediterranean villas. One of its best features is that it stays cool to the touch even in direct sun, making it an amazing choice for patios around swimming pools. It’s naturally non-slip, but sealing it is a good idea to protect it from stains. Slate provides a sophisticated, layered look with deep, rich colors. While it’s a stunning choice for a patio, it can be more brittle than other stones, so it’s best reserved for areas with foot traffic rather than driveways.

A Quick Guide to Stone Size and Thickness

The size and thickness of your stones are just as important as the material itself. The general rule is that the amount of weight the surface needs to bear determines its thickness. For a standard patio that will only see foot traffic and patio furniture, stones that are around 1.5 inches thick are usually sufficient. However, if your patio might need to support something heavier, or if it’s adjacent to a driveway, opting for a thickness of at least 2 inches is a safer bet. This extra thickness provides the strength needed to prevent cracking and shifting over time, ensuring your patio remains a beautiful and stable feature of your home.

Laying the Stones: A Step-by-Step Guide

With a solid base in place, you’re ready for the most satisfying part of the project: laying the stones. This is where your vision for an outdoor oasis truly comes to life. While the foundation you just built is the unsung hero, the pattern and placement of your stones are what everyone will see and admire. Taking your time here is key to achieving a professional, long-lasting finish. The process isn’t complicated, but it does require attention to detail, especially when it comes to slope, borders, and leveling.

Whether you’ve chosen classic bluestone or modern porcelain pavers, the basic principles are the same. You’ll want to work methodically, checking your work as you go. Think of it like putting together a large, heavy puzzle. Each piece needs to fit just right to create a beautiful and stable surface. If you’re feeling unsure about getting the details perfect, remember that this is where expert masonry craftsmanship really shines. But if you’re ready to tackle it yourself, let’s walk through the steps to lay a patio that looks great and stands the test of time.

Get the Slope Right for Proper Drainage

Before you lay a single stone, you need to think about water. Proper drainage is non-negotiable for a durable patio. Without it, water can pool on the surface, seep into your home’s foundation, or create icy patches in the winter. To prevent this, your patio must slope away from your house at a rate of about 1/8 to 1/4 inch for every foot of distance. For example, a 10-foot patio should be about 1.25 to 2.5 inches lower at the outer edge than it is against your house. You can set this slope using guide strings tied to stakes to ensure your entire patio follows this gentle grade.

Begin with the Border Stones

Every great picture needs a frame, and your patio is no different. Installing the border stones first creates a sturdy perimeter that holds everything else in place. This frame prevents the interior stones from shifting or spreading apart over time, a common issue known as “creep.” Start by laying the stones along your guideline, tapping them firmly into the sand base with a rubber mallet. Once the border is set, you can install paver edging—typically made of plastic or metal—along the outside edge. Secure this edging into the ground with heavy-duty landscape spikes to lock your border stones in place.

Lay the Interior Stones

Now you can start filling in the main area of your patio. Begin at a corner, preferably against the house, and work your way outward. Place each stone gently onto the sand bed, leaving a small, consistent gap of about 1/4 inch between them for jointing sand later. Don’t press or slide them into place, as this can disrupt the smooth sand layer underneath. Use a level to check each stone as you go. If a stone is too high, tap it down with a rubber mallet. If it’s too low, lift it and add a small amount of sand underneath until it’s perfectly even with its neighbors.

Keep Gaps and Levels Consistent

As you continue laying stones, consistency is your best friend. Use a long level across several stones at once to check for evenness and ensure you’re maintaining the correct slope. Small inconsistencies can become major tripping hazards, so take the time to get it right. Pay close attention to the gaps between the stones, keeping them as uniform as possible for a clean, professional look. Don’t worry if you have to lift and reset a stone a few times to get it perfect—patience during this stage will pay off for years to come.

The Finishing Touches: How to Fill Joints and Secure Edges

You’ve laid the last stone, and your patio is finally starting to look like the real deal. Now it’s time for the final steps that will lock everything together and ensure your hard work stands the test of time. Filling the joints and securing the edges are what separate a good patio from a great one. This stage is all about creating stability, preventing weeds from creeping in, and giving your patio a clean, professional finish. Taking your time here will prevent shifting, wobbling, and other issues down the road. Whether you’re using classic bluestone or modern porcelain pavers, these finishing touches are essential for a durable and beautiful outdoor space.

Filling Joints with Sand

Once your stones are perfectly placed, the next step is to fill the gaps between them. This does more than just fill a void; it creates friction that locks the stones together. For a classic approach, stone dust is an excellent choice. It packs down tightly, helps deter weed growth, and still allows for the tiny, natural movements a patio needs to make with the changing seasons. It’s a much better option than regular sand, which can wash away easily and attract ants. Simply sweep the stone dust across the surface of your patio, using a push broom to work it into every joint until they are completely full.

Using Polymeric Sand for a Stronger Hold

If you want an even stronger, more low-maintenance finish, consider using polymeric sand. This is a special blend of sand with a polymer additive that hardens when you add water. It creates a firm, durable bond between the stones that’s fantastic at preventing weeds and protecting against insect damage. Applying it is straightforward: you sweep it into the joints just like regular sand, but it’s crucial to use a leaf blower to remove every last grain from the surface of the stones before misting with water. This prevents a hazy film from forming. For a perfect application and long-term protection, professional restoration and sealing services can ensure your patio is sealed correctly from day one.

Secure the Perimeter with Edge Restraints

Your patio’s perimeter is its first line of defense against shifting and spreading. Without a strong edge, the outer stones can slowly move outward under pressure, creating gaps and an unstable surface. This is where edge restraints come in. These are sturdy strips of plastic, steel, or aluminum that you install around the entire border of the patio. You’ll want to secure them firmly into the ground with heavy-duty landscape spikes. This creates an invisible frame that holds everything tightly in place. Proper installation of these restraints is a key part of professional masonry work and is a non-negotiable step for a long-lasting patio.

Keeping Your Patio Perfect: A Simple Maintenance Guide

Your beautiful new stone patio is finished, and now it’s time to enjoy it. With just a little regular care, you can keep it looking as good as the day you laid the last stone. A simple maintenance routine protects your investment and prevents small issues from becoming big headaches, ensuring your outdoor space remains a stunning retreat for years. From quick clean-ups to seasonal tasks, staying on top of patio care is straightforward and rewarding. Here’s a simple guide to help you keep your patio in pristine condition through every season.

Routine Cleaning and Weed Prevention

The easiest way to keep your patio looking fresh is with regular cleaning. A quick sweep every few days clears away leaves and debris before they can stain the stone, and a rinse with a garden hose washes away surface grime. Pay close attention to the joints between stones, as this is where weeds love to sprout. Pull them immediately before their roots get established and shift your pavers. Filling the joints with sand or fine gravel is a great way to discourage weed growth from the start, making your upkeep even easier.

Seasonal Care and Sealing

To give your patio an extra layer of defense, consider sealing it. A quality sealer protects your porcelain and natural stone pavers from stains, harsh weather, and UV rays, and it can even make the stone’s colors appear more vibrant. This isn’t a monthly task—applying a sealer every few years is usually enough. If you’d rather leave it to the experts, professional restoration and sealing services can ensure the job is done perfectly, giving you long-lasting protection. Always follow the product instructions for the best results.

How to Handle Minor Repairs and Settling

Even with a perfectly installed base, it’s a good idea to check on your patio stones occasionally. Every few months, look for any pavers that have shifted or settled, creating an uneven surface. Catching a wobbly stone early is a simple fix—you can often lift it, add a little more sand underneath to level it, and set it back in place. Addressing these minor adjustments as they appear prevents them from turning into larger, more complicated repairs. Consistent care is key to keeping your patio safe, stable, and beautiful.

Common Pitfalls: Mistakes to Avoid When Building Your Patio

Building a stone patio is an exciting project that can completely transform your backyard. But after putting in all that effort, the last thing you want is to see your beautiful new space sink, shift, or hold puddles of water. A few common missteps, especially in the early stages, can lead to major headaches down the road. Let’s walk through the biggest mistakes people make so you can be sure your patio is built to last. Getting these details right from the start is the secret to a patio that looks great and stays stable for years to come. When done correctly, a patio becomes a lasting feature of your home, which is why professional masonry services focus so heavily on getting the foundation right.

Skipping Steps in Base Preparation

Think of your patio’s base as its foundation—it’s the most important part of the entire project. Rushing this step is a recipe for disaster. A solid base prevents the stones from sinking and shifting, ensuring a level surface that lasts. This involves more than just digging out some dirt. You need to build up the base in layers, typically starting with a layer of ¾-inch gravel. Each layer must be compacted thoroughly before adding the next. It might feel tedious, but this process creates the stable, unshakeable support your beautiful natural stone pavers need. Cutting corners here will almost certainly lead to an uneven, wobbly patio in just a season or two.

Ignoring Compaction and Drainage

Two other critical elements that often get overlooked are compaction and drainage. First, let’s talk drainage. Your patio must have a slight slope—about 1/8 to 1/4 inch per foot—leading away from your house. This gentle grade ensures that rainwater runs off instead of pooling on the surface or seeping into your home’s foundation. Second, proper compaction is non-negotiable. Every layer of your base, from the soil at the very bottom to the final layer of sand, needs to be tightly compacted. This removes air pockets and creates a dense, solid ground that won’t settle over time. Ignoring this can cause your pavers to sink and become uneven, creating tripping hazards and requiring costly restoration and sealing services later on.

Related Articles

Frequently Asked Questions

How deep do I actually need to dig for my patio foundation? A good rule of thumb is to add up the layers. You’ll need about 4 to 6 inches for your compacted crushed stone base, 1 inch for the sand or stone dust layer, plus the thickness of your chosen stone. So, if you’re using 2-inch thick pavers, you should plan to dig down about 7 to 9 inches. This depth is crucial for creating a stable foundation that can withstand Long Island’s freeze-thaw cycles without shifting.

Can I skip the crushed stone base and just use sand? I would strongly advise against it. While it might seem like a tempting shortcut, using only sand will almost certainly lead to a patio that sinks and becomes uneven over time. The crushed stone layer is what provides the real structural support and drainage. Sand alone doesn’t lock together to create a stable base, meaning your beautiful stones will shift and settle with foot traffic and weather changes.

What’s the big deal about polymeric sand versus regular sand for the joints? Think of polymeric sand as a super-powered version of regular sand. It contains a polymer that hardens when you add water, effectively locking your stones together like a flexible grout. This creates a much stronger surface that helps prevent weeds from growing through the cracks and stops ants from setting up shop. Regular sand can wash out during heavy rain and doesn’t offer the same level of stability.

How do I handle cutting stones for the edges or around obstacles? For clean, precise cuts, you’ll want to rent a wet masonry saw with a diamond blade. Trying to use other tools can result in cracked stones and a lot of frustration. Always wear your safety gear, including goggles and a mask, as cutting stone creates a lot of dust. For tricky curves or shapes, you can create a template out of cardboard first, trace it onto the stone, and then carefully follow the line with the saw.

Is sealing my new stone patio really necessary? While it’s not strictly mandatory, sealing your patio is a smart move to protect your investment. A good quality sealer acts as a shield, helping to prevent stains from things like spilled drinks or grill grease. It also protects the stone from weather damage and UV rays, which can cause fading over time. Sealing makes routine cleaning much easier and keeps your patio looking vibrant for years to come.

Share this page: