A custom indoor sports game court with a basketball hoop and polished hardwood floor.

Custom Sports Game Courts: Cost & Process

A basketball hoop in the driveway is a classic, but it can’t compare to the safety, performance, and versatility of a professionally installed court. The difference lies in the details: a properly graded foundation that prevents cracks, a high-performance surface that’s easier on your joints, and crisp, accurate lines for your favorite games. A dedicated court provides a level, predictable playing area that enhances every game and minimizes the risk of injury. In this article, we’ll explore what sets a professional build apart and cover all the key elements that go into creating top-tier Custom Sports Game Courts that are built to last.

Key Takeaways

  • Prioritize the Foundation First: A successful project starts with the groundwork. Before choosing colors or accessories, confirm you have adequate space, understand local permit rules, and have a solid plan for site preparation and drainage to ensure your court lasts.
  • Match the Court to Your Game: The best court is one designed for how your family plays. Select a surface material, such as durable acrylic or versatile modular tiles, that suits your favorite sports, and consider features like adjustable hoops or lighting to maximize its use.
  • Invest in Expertise and Upkeep: Choosing a licensed contractor who specializes in athletic court construction is critical for a high-quality result. After the build, simple, regular maintenance like sweeping debris and inspecting the surface will protect your investment for years to come.

What is a Custom Sports Game Court?

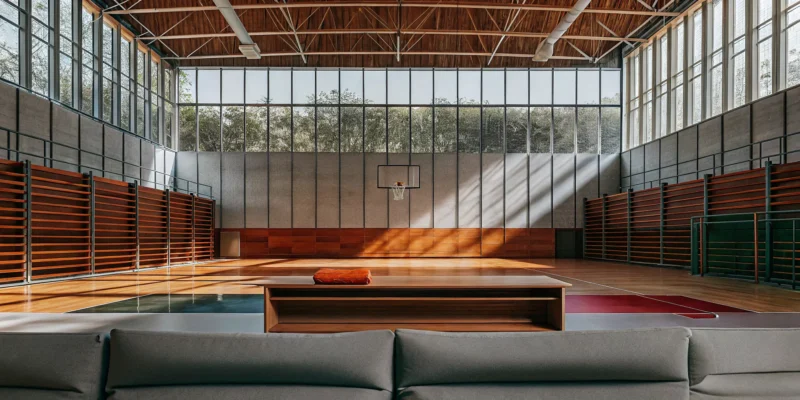
A custom sports game court is much more than just a patch of pavement in your backyard. It’s a high-performance athletic surface, designed and built specifically for your property and the sports your family loves to play. Think of it as a personalized arena tailored to your space, whether you dream of a half-court for basketball, a dedicated pickleball court, or a versatile surface for multiple games. The process involves creating a durable, safe, and attractive area that fits perfectly into your overall landscape design.

Unlike a public park, a custom court is built with professional-grade materials and precision. From the initial site preparation and foundation work to the final surface installation and line painting, every step is handled to ensure optimal playability and longevity. You get to choose the dimensions, colors, and features, creating a unique space that encourages everyone to get outside and play. Gappsi specializes in building these custom synthetic turf and sports games courts, turning your vision for at-home recreation into a reality. It’s an investment in your home, your health, and countless hours of family fun.

Common Types of Game Courts

When it comes to building your court, you have several excellent surface materials to choose from. Modular tiles are a popular favorite because they are incredibly versatile and offer great shock absorption, which is easier on the joints. These interlocking tiles come in various colors and can be configured for almost any sport. Another great option is a classic concrete or asphalt base with an acrylic coating, which provides the consistent ball bounce needed for tennis and basketball. For a softer feel underfoot, synthetic turf can be a fantastic choice, especially for multi-sport areas where you might also play soccer or other field games. Each material has its own unique benefits for performance and maintenance.

Benefits of a Custom Court

Adding a sports game court to your home offers so many advantages beyond just having a place to play. First, there’s the incredible convenience. Your court is always open, so you can practice your free throws or start a pickleball match whenever you feel like it, no reservations required. It’s a wonderful way to encourage a more active lifestyle for the entire family, making daily exercise feel less like a chore and more like fun. A custom court also becomes a natural gathering spot, perfect for creating lasting memories with family and friends. It seamlessly integrates into your backyard, enhancing your entire outdoor living space and adding significant value to your property.

What to Consider Before Building Your Court

Bringing a custom game court to your backyard is an exciting project. Before you break ground, it’s important to think through a few key details to ensure the final result is what you envisioned. From the size of your yard to the sports your family loves, considering these factors upfront will streamline the entire process.

Space and Dimensions

First, look at your available space. Your yard’s size dictates the court’s dimensions. A full-size basketball court requires significant room, but you can easily scale down for a half-court. Think about which sports you’ll play most and measure your area to see what’s feasible, remembering to add safety buffer zones. Proper site preparation is key, and the project size influences the installation timeline for your custom Sports Games Courts, which typically takes a few weeks.

Surface Material Options

Your court’s surface is a critical decision, affecting ball bounce, comfort, and durability. Popular options include concrete, rubber, and synthetic turf. A top choice for outdoor Sports Games Courts is modular polypropylene tile, which snaps together over a hard base. This surface offers excellent drainage and a bit of give underfoot, making it comfortable for players. Each material has its own benefits, so consider what feels best and fits your budget. We can help you explore the best materials for your custom game court to match your performance needs.

Single vs. Multi-Sport Use

Will your court be for one sport, or do you want the flexibility to play several? A multi-sport game court is a fantastic way to get more use out of your space. With blended lines for basketball, pickleball, and volleyball, you can switch games in minutes. A multipurpose design is often more cost-effective than building separate courts. This approach maximizes your investment and creates a versatile hub for family fun. Just plan for adjustable nets to make switching between sports easy.

Factoring in Your Climate

On Long Island, our weather can be tough on outdoor surfaces. From hot summers to freezing winters, your game court needs to be built to last. Choosing weatherproof materials and UV-resistant coatings is essential to prevent fading, peeling, and cracking. The right surface will perform better and require less upkeep. Proper drainage is also critical to handle rain and snowmelt. If your court needs a refresh, professional restoration and sealing services can bring it back to life.

How Much Does a Custom Game Court Cost?

Figuring out the budget for your dream backyard court is a big first step. The total cost can vary quite a bit, depending on the size, materials, and all the fun extras you decide to include. Think of it less as a single price tag and more as a custom project tailored to your family and your space. To give you a clearer picture, let’s break down the main factors that influence the final price of your custom sports games court.

Material Costs

The core of your court’s cost lies in the materials. Generally, you can expect a custom backyard court to fall in the range of $25 to $35 per square foot. For a standard half-court size, this often translates to a total project cost between $20,000 and $25,000. The specific surface you choose is the biggest variable here. Whether you opt for classic acrylic, versatile modular tiles, or another high-performance material will directly impact the budget. Our team can walk you through the pros and cons of each option to find the perfect fit. We offer a wide selection of synthetic turf and game court surfaces to match any design.

Installation and Labor

Beyond the materials, professional installation is a crucial part of your investment. This isn’t just about laying down the surface; it includes essential site preparation like excavation, grading, and ensuring proper drainage. Depending on the design, it may also involve pouring a concrete or asphalt base, which is a job for skilled professionals. A typical installation can take anywhere from two to six weeks, depending on the project’s complexity and weather conditions. This timeline reflects the detailed work required for a durable, high-quality court. Our experienced masonry and construction teams handle every step, guaranteeing a solid foundation for years of play.

Optional Features and Accessories

This is where you can truly personalize your court. While the surface is the main event, accessories are what make it your family’s go-to spot for fun. You can add features like adjustable basketball hoops, multi-sport net systems for tennis or volleyball, and rebounders for solo practice. Ball containment fencing is a popular and practical choice to keep the game going without chasing stray shots. For evening games, consider adding integrated LED lighting. You can even add custom logos or game lines for a professional touch. These upgrades and features can be planned from the start or added later to enhance your backyard entertainment space.

Do You Need a Permit for Your Game Court?

The short answer is almost always yes. Think of a permit as your project’s official green light from your local town. For a project as significant as a custom Sports Games Court, which often involves excavation, a concrete base, and a permanent structure, a permit is a standard requirement. This isn’t just about paperwork; it’s about ensuring your court is built safely, meets local codes, and doesn’t cause any issues with property lines or drainage.

Navigating the world of permits can feel intimidating, but it’s a crucial step in protecting your investment. A properly permitted project ensures your court is recognized as a legitimate, valuable addition to your property, which is important for both insurance and resale value. The good news is that you don’t have to do it alone. An experienced contractor will handle the entire process for you, from preparing the initial plans for your custom court to securing the final approvals. Here on Long Island, every town from the Hamptons to Nassau County has its own set of rules. Working with a team that has deep experience with these local requirements is key to keeping your project on track and stress-free.

Zoning and Setback Rules

Before any construction begins, your project needs to comply with local zoning and setback regulations. Zoning laws dictate how your property can be used, while setback rules define how far your new court must be from property lines, your house, and other structures. You can’t, for example, build a basketball court right up against your neighbor’s fence. These regulations exist to ensure safety, privacy, and a cohesive look within the community. Our design process always starts with a careful review of your town’s specific codes to create a plan that fits perfectly within these guidelines.

The Building Permit Process

Once your design respects all zoning and setback rules, the next step is the formal application. This involves submitting detailed plans of your proposed Sports Games Court to your local building department. An official will review everything to confirm it aligns with building codes, safety standards, and environmental regulations. They’ll check details like the court’s foundation, drainage plan, and any fencing or lighting you plan to add. As your contractor, we manage all of these submissions and communications with the town, ensuring every detail is correct so you can get your permit without any hassle.

HOA and Neighborhood Rules

If you live in a community with a Homeowners’ Association (HOA), you’ll have an extra layer of guidelines to follow. Town approval is essential, but your HOA has its own rulebook. These covenants can influence everything from the color of your court’s surface to the height of the surrounding fence and whether you can install lights for night games. It’s always a good idea to review your HOA documents before finalizing your design. We can help you create a plan that satisfies both the town and your HOA, ensuring your new court is a welcome addition to the neighborhood.

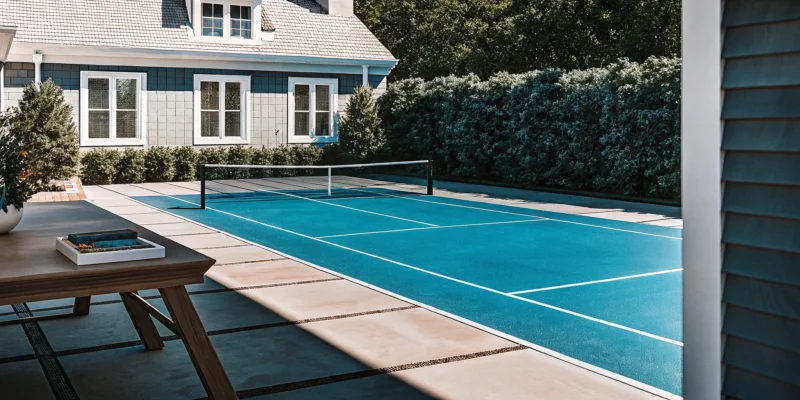
Choosing the Best Surface for Your Favorite Sports

The surface of your sports games court is just as important as its size and layout. The right material affects everything from ball bounce and player safety to long-term maintenance. Your choice will depend on which sports you plan to play, your budget, and how much upkeep you’re willing to do. Whether you’re dreaming of a dedicated basketball court or a versatile space for the whole family, understanding your options is the first step. At Gappsi, we specialize in installing a variety of synthetic turf and sports game courts to match your specific needs.

Acrylic for Basketball and Tennis

If you’re a serious basketball or tennis player, an acrylic hard court is a classic choice for a reason. This surface provides the consistent, true ball bounce that these sports demand. It offers excellent grip and a predictable playing experience, allowing you to perfect your game. Acrylic surfaces are also incredibly durable and stand up well to the elements, requiring minimal maintenance beyond occasional cleaning. Plus, they come in a wide range of vibrant colors, so you can customize the look of your court to match your home’s aesthetic. It’s a reliable, high-performance option for dedicated athletes.

Modular Tiles for Multi-Sport Fun

For families who want a court that can do it all, modular tiles are a fantastic solution. These interlocking polypropylene tiles snap together over a concrete base, creating a versatile and resilient surface. Their slight give provides excellent shock absorption, which is easier on joints and helps reduce injuries, making it a safer choice for kids. Modular tiles are perfect for multi-sport use, easily accommodating everything from basketball and volleyball to roller hockey. They are also extremely durable, low-maintenance, and drain quickly after it rains, so you can get back to playing sooner.

Post-Tension Concrete for Durability

When you want the most durable and long-lasting foundation for your court, post-tension concrete is the top-tier option. This method involves reinforcing the concrete slab with steel cables that are tightened after the concrete is poured. This process creates a stronger, more stable surface that is highly resistant to cracking and shifting over time. While it is a bigger initial investment, a post-tension concrete court can last for decades with very little structural maintenance. It’s the ultimate choice for a permanent, high-quality installation, reflecting the kind of expert masonry and construction we pride ourselves on.

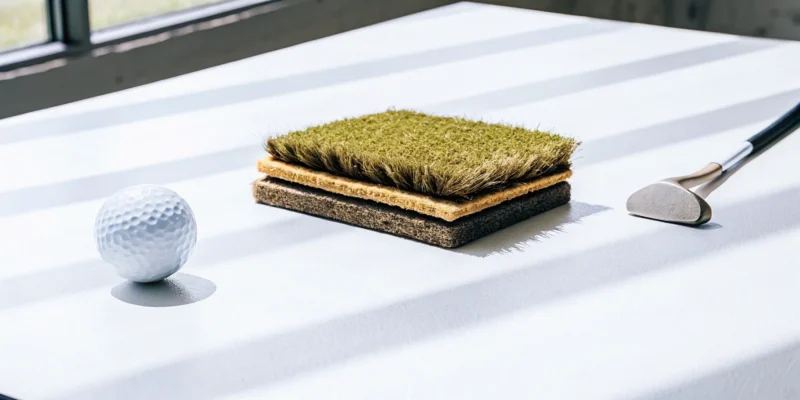
Specialty Surfaces for Pickleball and Volleyball

With the rise of sports like pickleball, specialty surfaces have become more popular. While you can play these games on standard acrylic or modular tile courts, cushioned surfaces can provide a more comfortable, high-end feel. These layered systems offer extra shock absorption, which is great for competitive play and long matches. For sports like volleyball, a synthetic turf or even a sand court might be the perfect fit. Thinking about the specific needs of your favorite game allows you to create a truly customized space that enhances every moment of play.

What’s the Installation Timeline?

You’ve designed your dream court, and now you’re probably wondering how long it will take to build. Generally, a custom sports games court installation takes between two and six weeks. This timeline can shift depending on a few key factors, including how much site preparation is needed, the type of surface you choose, and the overall size of your project. Understanding the process step by step helps set clear expectations, so you know exactly what’s happening in your backyard and when you can plan your first game.

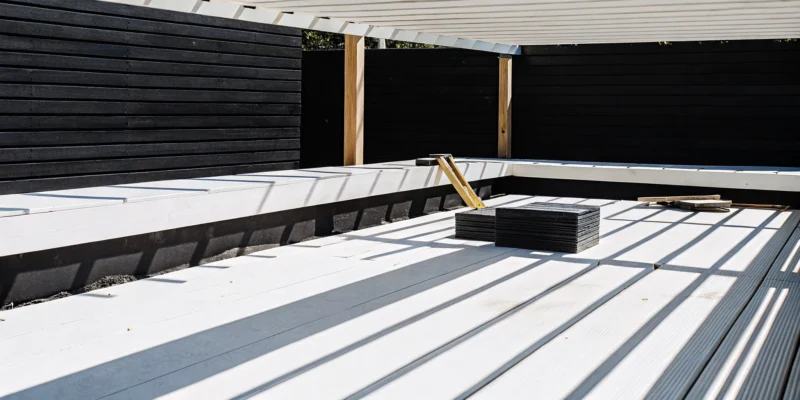
Site Prep and Base Construction

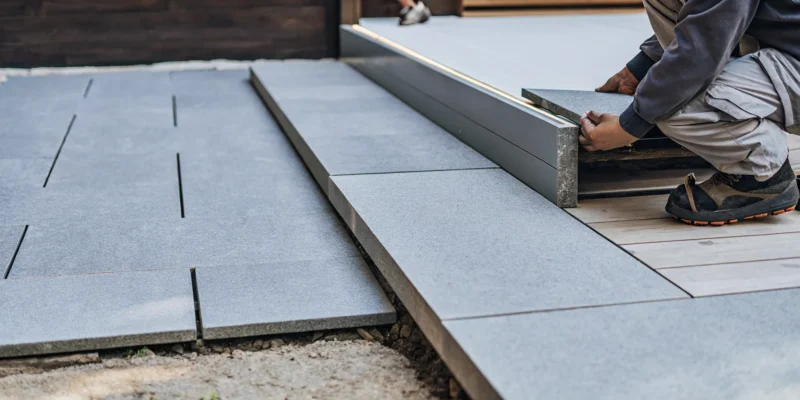
The first and most critical phase is preparing the ground. This isn’t just about clearing a space; it involves detailed grading to ensure the area is perfectly level and has proper drainage. A solid base is essential for the longevity and safety of your court. Depending on your property, this could involve excavation and building a retaining wall. Our team handles all the necessary masonry work to create a stable foundation that prevents cracks and uneven surfaces. This foundational work is the most important part of the entire build.

Installing the Foundation and Surface

Once the site is prepped, we construct the foundation, which is typically a concrete slab. After the concrete is poured, it needs time to cure properly to ensure maximum strength. This step can’t be rushed. After the base has fully cured, we apply your chosen playing surface, whether it’s acrylic paint or interlocking modular tiles. Finally, we paint the lines for your favorite sports and install permanent fixtures like basketball hoop anchors or net posts. This is when your court really starts to take shape and look like the finished product.

Potential Delays: Weather and Permits

While we stick to a tight schedule, some things are out of our control. Weather is the most common reason for delays on Long Island. A heavy rainstorm can pause excavation or prevent us from pouring concrete or painting surfaces. We always watch the forecast to work efficiently. Another factor is the permit process. Each town has its own requirements, and securing a building permit can take time. We manage the entire permit and construction process, but it’s always wise to factor in a little buffer time for these variables.

Popular Features and Upgrades

Once you have the foundation of your court planned, you can start thinking about the features that will make it truly yours. The right upgrades can transform a simple playing surface into a versatile and professional-looking entertainment hub for your family and friends. From practical additions that extend your playing time to custom details that show off your style, these features are what make your custom court a perfect fit for your home. Gappsi offers a wide range of options for custom Sports Games Courts to match your vision.

Adjustable Nets and Hoops

If you have a multi-sport household, adjustable equipment is a must. An adjustable basketball hoop allows players of all ages and sizes to get in on the action, from young kids learning to shoot to adults playing a competitive game. The same goes for nets. A system that can easily be raised for volleyball or badminton and lowered for tennis or pickleball gives you incredible versatility. This flexibility ensures your court grows with your family and can accommodate any game you feel like playing, making it a smart, long-term investment for years of fun.

LED Lighting for Night Games

Why let the sunset end your game? Installing LED lighting is one of the best ways to maximize the use of your court, especially during those beautiful Long Island summer evenings or after school and work in the fall. Good lighting makes nighttime play safe and enjoyable. A key tip is to plan for this feature from the very beginning. By installing the necessary electrical conduit during the initial construction phase, you save yourself the headache and expense of trying to add it later. It’s a simple step that ensures your court is ready for action anytime, day or night.

Fencing and Safety Features

Safety and convenience are just as important as the playing surface itself. A high-quality fence is essential for containing stray balls, preventing them from rolling into your garden, the street, or a neighbor’s yard. It also helps create a secure and enclosed area for kids to play in. Beyond fences and netting, proper drainage is another critical safety feature. A well-designed system prevents water from pooling on the surface, which can cause slips and long-term damage. A professional installation will account for this, ensuring your court is safe and durable.

Custom Logos, Lines, and Seating

This is where you can really let your personality shine. Make your court one-of-a-kind by adding custom logos, like a family initial or the emblem of your favorite sports team. You can also choose from a wide palette of colors for the surface and have crisp, professional lines painted for all your favorite sports. Don’t forget about the spectators. Integrating a seating area, like a simple bench or a small masonry sitting wall, makes the court a more inviting and social space for everyone, turning game time into a true community event.

Common Mistakes to Avoid

Building your dream backyard court is an exciting project, but a few common missteps can quickly turn it into a costly headache. A well-planned court is an investment that brings years of enjoyment, so it pays to get the details right from the start. Thinking through the entire process, from the ground up, helps ensure your court is safe, durable, and perfectly suited to your family’s needs.

Many homeowners get caught up in the fun parts, like picking out colors and custom logos, but they sometimes overlook the foundational elements that determine the court’s longevity and playability. Simple planning mistakes can lead to major issues like surface cracking, poor performance, or a layout that feels cramped and impractical. A beautiful court that puddles after every rain or cracks within a year isn’t much fun for anyone. By learning about these potential pitfalls ahead of time, you can work with your contractor to make informed decisions and create a space that truly enhances your home and lifestyle. Let’s walk through the most frequent errors we see so you can steer clear of them and get the most out of your new court.

Ignoring Base and Drainage Issues

The success of your sports games court starts with what’s underneath. A weak or uneven base is one of the biggest reasons for premature failure. Without a properly compacted and leveled foundation, your court surface can crack, develop low spots where water pools, and wear out far too soon. We always ensure a solid concrete or asphalt base is installed to provide the stability your court needs. Equally important is drainage. A court without a plan for water runoff will become a puddle-filled mess after every rainstorm. Proper grading and a slight slope, typically one inch for every 10 feet, allow water to drain away naturally, protecting your investment and keeping the surface ready for play.

Choosing the Wrong Size or Material

It’s easy to underestimate how much space you really need. A court that’s too small can feel cramped and limit the types of games you can play. Before you build, map out the dimensions and consider the necessary buffer space around the perimeter for safe play. The surface material is another critical choice. Using the wrong material can create a surface that’s too slippery or rough, increasing the risk of injury. Each sport has ideal surfaces, from acrylics for tennis to modular tiles for multi-sport use. We can help you select the perfect surface material that balances performance, safety, and your budget.

Forgetting Utilities and Layout

A great court layout considers more than just the playing lines. Think about how the court fits into your overall landscape and how you’ll use the space around it. You’ll want to leave enough room for future additions like seating, fencing, or even a small patio. It’s also important to plan for utilities. Do you want lighting for night games? You’ll need to run electrical wiring. Will you need a water source nearby for cleaning? Planning for these elements from the beginning is far easier and more cost-effective than trying to add them later. A thoughtful landscape design integrates your court seamlessly into your yard, making it a functional and beautiful feature.

How to Choose the Right Contractor

Your custom sports games court is a significant investment, and the success of your project hinges on finding the right team to build it. The contractor you choose will influence everything from the initial design to the final bounce of the ball. Taking the time to vet professionals ensures your court is built safely, correctly, and to your exact specifications, giving you a space your family will enjoy for years.

Look for Specialized Experience

Building a high-quality sports games court requires a specific skill set that most general contractors don’t have. You’ll want to find a team that specializes in athletic court construction. These professionals understand the unique requirements for proper grading, sub-base preparation, and surface installation that are critical for performance and longevity. Ask to see a portfolio of their completed projects. A contractor with a proven track record in building custom sports games courts will be able to guide you through material selection and design choices with confidence, ensuring the final product meets your needs.

Verify Licenses, Insurance, and Warranties

Before signing any contracts, do your homework. A reputable contractor will be fully licensed and insured in New York. This is non-negotiable, as it protects you from liability in case of accidents on your property during construction. Unskilled installers can lead to uneven surfaces and a shorter court life, so verifying credentials is a key step. Also, ask about warranties. A professional company will stand behind its work with a solid warranty covering both materials and labor. This gives you peace of mind knowing your investment is protected against defects and installation issues.

Questions to Ask a Potential Contractor

When you meet with potential contractors, come prepared with a list of questions. This will help you compare your options and choose the best fit for your project. Start with the basics, like asking for references and seeing examples of their work on their YouTube channel or website. Then, get more specific. Ask them, “How will you manage drainage to keep water off the playing surface?” Proper drainage is essential to prevent cracks and surface damage. You should also inquire about their recommended materials for your chosen sports, the projected timeline for completion, and what factors might cause delays. Their answers will reveal their level of expertise and professionalism.

Maintaining Your Custom Court

You’ve invested in a beautiful custom sports games court, and a little upkeep will ensure it stays ready for play season after season. Consistent maintenance helps prevent small issues from turning into costly repairs, preserving both the safety and appearance of your court. Think of it as part of the game plan. By staying on top of cleaning, seasonal prep, and protecting the surface, you guarantee your court remains a premier spot for family fun and friendly competition for years to come.

Regular Cleaning and Inspections

The easiest way to protect your court is to keep it clean. Make it a habit to sweep away leaves, dirt, and other debris weekly with a push broom or leaf blower. This prevents buildup that can stain the surface or become slippery when wet. While you’re cleaning, take a quick walk around to inspect the court. Look for any small cracks, signs of wear on the lines, or areas where water might be pooling. Catching these things early makes them much easier to fix. A proactive approach with regular cleaning and inspections is the key to your court’s long-term health and performance.

Seasonal Care and Resurfacing

Here on Long Island, our weather shifts dramatically from season to season, and your court needs to be ready. Before winter, give the court a thorough cleaning to remove any grime that could freeze and cause damage. In the spring, inspect for any cracks that may have formed during freeze-thaw cycles. While daily care is crucial, keep in mind that all surfaces have a lifespan. Depending on the material, you may need to plan for resurfacing every several years to keep it in optimal condition. This isn’t a sign of failure, but a normal part of maintaining a high-quality sports games court.

Protecting Your Court from the Elements

The sun’s UV rays and constant exposure to moisture can take a toll on your court’s surface, leading to fading, peeling, and cracking over time. Using high-quality, weatherproof materials from the start is your best defense. During installation, we use UV-resistant coatings and durable paints that act as a shield against the elements. To maintain this protection, consider having a professional restore and seal the surface every few years. This simple step can dramatically extend the life of the court, keeping the colors vibrant and the material resilient against whatever the New York weather throws its way.

Related Articles

Frequently Asked Questions

How much space do I actually need for a sports games court? You might be surprised to learn you don’t need a massive estate to build a great court. While a full-size tennis court requires a lot of room, many families opt for more compact designs like a basketball half-court or a dedicated pickleball court. We can customize the dimensions to fit your specific yard, ensuring you have a fantastic playing area while still leaving room for your garden and patio. The key is smart design that maximizes your available space.

What is the most versatile court surface for a family with different interests? For families that want to play everything, modular tiles are usually the best choice. These interlocking tiles create a surface that’s great for basketball, pickleball, volleyball, and even roller hockey. They also offer a bit of shock absorption, which is gentler on the joints than traditional concrete, making it a safer option for players of all ages. Plus, they drain quickly after rain, so you can get back outside to play much faster.

How much upkeep is really involved with a backyard court? Maintaining your court is simpler than you might think. The most important task is keeping it clean with a weekly sweep or blow to remove leaves and debris. This prevents stains and keeps the surface from getting slippery. Beyond that, a quick inspection in the spring and fall to check for any minor issues is a good habit. With a little routine care, your court will stay in top shape for years.

Do I have to handle the complicated permit process on my own? Absolutely not. Navigating town codes and permit applications can be a real headache, and it’s a part of the project we handle for you. An experienced contractor knows the specific requirements for each town on Long Island. We manage all the paperwork, submit the plans, and communicate with the building department to ensure your project is fully approved and up to code, making the process smooth and stress-free for you.

What’s the one thing I should prioritize when planning my budget? If you have to prioritize one area of your budget, make it the foundation. The success and longevity of your entire court depend on proper site preparation, a solid base (like concrete), and excellent drainage. While features like lighting and custom logos are exciting, they can often be added later. A strong, professionally installed foundation is not something you can fix easily, so investing in it from the start is the smartest decision you can make.

Best porcelain paver installation by expert installers on Long Island, NY.

Who Are the Best Porcelain Paver Installers on Long Island?

You have a clear vision for your backyard: a beautiful, modern patio for entertaining, a sleek walkway, or a safe, stylish surface around the pool. Porcelain pavers are the perfect material to make it happen. But turning that vision into a reality requires a true partner, not just a laborer. The installation process is a craft that demands precision, technical knowledge, and an eye for design. A poor installation can lead to shifting pavers, drainage problems, and endless frustration. To avoid these issues, you need to find the best porcelain pavers installers on Long Island, NY. We’ll cover the key questions to ask and the common mistakes to avoid, so you can hire with confidence and create the outdoor oasis you’ve been dreaming of.

Key Takeaways

  • Vet your installer thoroughly: Before signing anything, confirm the contractor has proper licensing and insurance. Review their portfolio of past porcelain projects and speak directly with recent, local references to get honest feedback on their work and professionalism.
  • Prioritize porcelain-specific expertise: Installing porcelain pavers is a specialized skill that requires different tools and techniques than other materials. Choosing a team with proven experience ensures they understand the correct base preparation and methods needed to prevent future cracking or shifting.
  • Get a clear plan and warranty in writing: A reputable installer will provide a detailed proposal outlining the project scope, timeline, and costs, leaving no room for surprises. Ensure they also offer a clear warranty on their workmanship to protect your investment for years to come.

What Makes a Great Porcelain Paver Installer?

Choosing the right installer for your porcelain paver project is just as important as picking out the pavers themselves. The right team doesn’t just lay stones; they create a foundation for your outdoor living space that will last for years. A great installer combines technical skill with a creative eye and professional integrity. They understand that this is a significant investment in your home and treat the project with the care it deserves. From the initial design conversation to the final cleanup, a top-tier professional ensures a smooth, transparent, and satisfying experience. Let’s look at the key qualities that separate the best installers from the rest.

Specialized Porcelain Experience

Porcelain pavers are not the same as traditional concrete or stone, and they require a specific skill set to install correctly. A seasoned contractor knows how to handle the material to prevent chips and cracks and understands the precise base preparation needed for Long Island’s soil and weather conditions. This specialized experience means they can anticipate potential challenges with drainage or grading and address them before they become problems. An expert in porcelain and natural stone will ensure your patio, walkway, or pool deck is perfectly level, stable, and built to withstand freeze-thaw cycles without shifting or settling over time.

Proper Licensing and Insurance

Before you even discuss designs or timelines, make sure any potential installer is fully licensed and insured to work in your area of Long Island. This is a critical step that protects you, your property, and the workers on site. Proper licensing proves the contractor meets local and state requirements, while comprehensive insurance coverage (including liability and workers’ compensation) shields you from financial risk in the event of an accident. Any reputable masonry design and construction company will readily provide this documentation. Think of it as the essential foundation for a trustworthy partnership.

Design Skills and Material Options

The best installers are more than just technicians; they are design partners who can help bring your vision to life. They should offer a wide selection of high-quality porcelain pavers and guide you through the options to find the perfect style for your home. A great contractor will listen to your ideas, understand your aesthetic, and suggest creative layouts or complementary features that enhance the overall project. Whether you’re designing a sleek modern patio or a rustic poolside retreat, their expertise helps ensure the final result is both beautiful and functional, perfectly integrating with your landscape design.

Clear Communication and Project Management

A smooth installation process depends on clear and consistent communication. A professional installer will provide a detailed proposal that outlines the project scope, timeline, and costs, so there are no surprises along the way. They should assign a dedicated project manager or point of contact who keeps you informed about progress and is available to answer your questions. From the initial site prep to the final walkthrough, you should feel confident and respected. This commitment to professionalism ensures your project is handled with care and completed to your total satisfaction.

How to Find the Best Installers on Long Island

Finding the right team for your porcelain paver project on Long Island goes beyond a quick online search. You’re looking for a partner who understands the local environment and can bring your vision to life with skill and precision. Start by looking for installers with a strong local reputation. A company that has been serving Nassau and Suffolk counties for years will have a deep understanding of regional building codes, soil conditions, and weather patterns that can impact your project’s longevity.

Next, take a close look at their portfolio. Don’t just glance at the hero shots on their homepage; look for a wide range of projects that show their versatility. Do they have experience with intricate patterns, large-scale patios, or poolside installations? A robust portfolio of masonry work demonstrates a high level of craftsmanship and attention to detail. Always verify that any potential installer is fully licensed and insured. This is a non-negotiable step that protects you and your property from liability.

Reading online reviews is helpful, but don’t stop there. Ask for references from recent projects in your area. Speaking directly with a past client can give you invaluable insight into the company’s communication, timeliness, and overall process. If possible, visit a showroom. Seeing and touching the materials in person can make a huge difference in your final decision. A visit to a physical location like the Gappsi Store allows you to explore different paver options and speak with experts who can guide you through the selection process.

Why Gappsi is a Premier Choice for Outdoor Living

When you’re looking for an installer that checks all the boxes, Gappsi stands out. With a history of transforming Long Island homes since 1987, our team brings decades of specialized experience to every project. We don’t just install pavers; we design and construct complete outdoor living spaces. This integrated approach means your new porcelain patio will perfectly complement your landscaping, pool, or outdoor kitchen, creating a seamless and beautiful environment.

Our expertise is backed by a commitment to using only the highest quality materials. We offer an extensive selection of premium porcelain and natural stone pavers, ensuring you find the perfect style for your home. Our team manages every detail, from initial design to final installation, providing clear communication and professional project management. We combine artistry with technical skill to deliver a finished product that is not only stunning but also built to last.

How Much Does Porcelain Paver Installation Cost?

Figuring out the budget for your new patio or walkway is a huge part of the planning process. While it’s tempting to look for a simple square-foot price, the final cost of a porcelain paver installation depends on several key factors. Understanding these variables will help you get a realistic idea of the investment and ensure there are no surprises along the way. From the specific pavers you fall in love with to the condition of your property, every detail plays a role in the final quote.

What Affects the Final Price?

When you’re planning your project, it’s helpful to think beyond the initial price tag of the pavers. The total cost is a combination of materials, site conditions, and labor. The specific style and brand of porcelain pavers you choose will be the starting point. After that, the biggest variable is site preparation. If your yard needs significant excavation, grading, or a complex base to be built, this will impact the cost. The complexity of your design, like curved edges or intricate patterns, also requires more time and skill from the installation team, which is reflected in the price.

Typical Costs by Project Size

To give you a general idea, porcelain pavers themselves often range from $7 to $9 per square foot. Installation costs can add another $5 to $10 per square foot, depending on the method used. This means you can expect a total project cost of around $12 to $19 per square foot. For a smaller, 100-square-foot patio, the total investment might be around $3,000. A more expansive 400-square-foot space could be over $18,000, especially when you factor in the necessary groundwork. These figures are estimates, but they provide a solid baseline for your budget.

How to Get an Accurate Estimate

The best way to determine the exact cost for your project is to get a detailed, written estimate from a professional installer. A reputable masonry contractor will visit your property to assess the site, discuss your vision, and measure the area. Their quote should clearly break down all the costs, including materials, labor, site preparation, and any other fees. Don’t hesitate to ask questions. A trustworthy installer will have a clear, structured process and will be happy to walk you through every line item so you feel confident in your decision.

Your Installer Checklist: What to Verify Before Hiring

Once you have a shortlist of potential installers, it’s time to do your homework. This final verification step is crucial for ensuring you partner with a true professional who will respect your home and your investment. A great installer will be transparent and happy to provide all the information you need to feel comfortable. This checklist covers the essential items you should confirm before signing any contracts. Going through these steps will help you avoid common pitfalls and ensure your project runs smoothly, resulting in a beautiful outdoor space you’ll love for years.

Review Their Portfolio and Past Work

Before you hire anyone, you need to see their work. A portfolio is more than just a collection of pretty pictures; it’s proof of their skill and experience. Look specifically for projects featuring porcelain pavers, as they require different installation techniques than traditional materials. Does their style align with your vision? Pay close attention to the details, like the precision of the cuts and the evenness of the grout lines. A strong portfolio demonstrates a history of quality craftsmanship and successful projects, giving you a clear idea of what they can do for your home.

Check Customer Reviews and Local References

What past clients have to say is incredibly valuable. Look for reviews on Google, Houzz, and other third-party sites to get an unbiased perspective. While a few negative reviews aren’t always a deal-breaker, especially if the company responded professionally, a pattern of complaints is a major red flag. Don’t be afraid to ask for local references you can contact or even drive by to see their work in person. A confident installer with a great reputation will have no problem connecting you with happy customers in your area.

Understand Their Warranty and Guarantees

Your new porcelain paver patio is a significant investment, and you want to know it’s protected. A reputable contractor will stand behind their work with a clear warranty. Make sure you understand exactly what it covers. Is there a warranty on the materials from the manufacturer? What about the labor and workmanship from the installer? Get the terms in writing and clarify how long the coverage lasts. This guarantee provides peace of mind and shows that the company is committed to quality and long-term customer satisfaction, including any future restoration or sealing needs.

Clarify the Installation Process and Timeline

A professional installer should be able to walk you through their entire process, from site preparation to the final cleanup. Ask for a detailed project plan and a realistic timeline. When do they expect to start and finish? What are the key milestones? Understanding the workflow helps you know what to expect and minimizes disruptions to your daily life. Clear communication about the process is a sign of good project management and shows that the contractor is organized and respects your time. It also helps ensure there are no surprises along the way.

Key Questions to Ask Potential Installers

Once you have a shortlist of potential installers, it’s time to start the interview process. Think of it like hiring a key team member for your home improvement project, because that’s exactly what it is. The right questions will help you separate the true professionals from the rest. Asking detailed questions about their process, timeline, and credentials gives you a clear picture of what to expect and helps ensure there are no surprises down the road. Here are the essential questions to ask every potential installer.

Ask About Their Experience and Process

This might seem obvious, but you want to get specific. Ask, “How many porcelain paver projects have you completed in the last year?” and “What challenges have you encountered with installations in Long Island?” A contractor with deep experience in porcelain and natural stone will have confident, detailed answers. They should be able to walk you through their entire installation process, from the initial site assessment to the final cleanup. This conversation will reveal their expertise and show you whether they can anticipate potential issues specific to your property’s layout and our local climate, ensuring a high-quality, lasting result.

Ask About the Timeline and Prep Work

A great project starts with a solid plan. Ask for a detailed project timeline, including start and end dates. More importantly, ask them to explain their preparation process. What kind of base will they install? How will they ensure proper drainage? A reputable contractor will emphasize the importance of prep work, as it’s the foundation for a durable patio or walkway. A vague answer is a red flag. You want a team that provides a clear schedule and outlines every step, showing they are organized and committed to a successful installation from the ground up. This level of planning is a hallmark of professional masonry design.

Ask About Permits and Code Compliance

Navigating local building codes and permits can be a headache, so make sure your installer is an expert. Ask them directly, “Are you familiar with the local permit requirements for this type of project, and will you be responsible for securing them?” A professional installer should handle all necessary permits and ensure the project complies with all town and village regulations on Long Island. This isn’t just about avoiding fines; it’s about making sure your new outdoor space is safe and built to last. An experienced local company will have this process down to a science, saving you from potential legal issues and delays.

Ask About Maintenance and Ongoing Support

Your relationship with an installer shouldn’t end when they pack up their tools. Ask what kind of maintenance your new porcelain pavers will require and if they provide a care guide. While porcelain is incredibly durable, knowing the best cleaning practices is helpful. Also, inquire about their post-project support. Do they offer a warranty on their workmanship? What happens if an issue arises a year from now? A contractor who stands behind their work will have clear answers and may even offer services like professional cleaning and sealing to keep your investment looking its best for years to come.

Why Choose Porcelain Pavers?

When you’re planning a new patio, walkway, or pool deck, the material you choose makes all the difference. While traditional options have their place, porcelain pavers have become a go-to for Long Island homeowners who want a perfect blend of style, strength, and simplicity. They offer a modern, sophisticated look without the demanding upkeep of other materials. If you’re looking for a surface that can handle busy family life and unpredictable weather while still looking incredible, porcelain is worth a serious look.

Unmatched Durability and Weather Resistance

Let’s be honest, Long Island weather can be tough on outdoor surfaces. From freezing winters to humid summers, you need a material that won’t crack under pressure. This is where porcelain truly shines. These pavers are incredibly dense and non-porous, which means they absorb very little water. As a result, they resist damage from freeze-thaw cycles that can destroy other materials. They’re also exceptionally strong and resistant to scratches, stains, and fading from the sun. Your beautiful patio will keep its color and integrity for years, no sealing required. This makes them a smart, long-term investment for any outdoor space.

Low-Maintenance and Easy to Clean

Who wants to spend their weekends scrubbing a patio? With porcelain, you don’t have to. Because the surface is non-porous, spills like wine, oil, or grill grease sit on the surface instead of soaking in, making cleanup simple. A quick sweep and a wash with mild soap and water are usually all it takes to keep them looking new. They are also naturally resistant to mold, mildew, and moss growth, which is a huge plus during our damp seasons. This low-maintenance quality means you get to spend more time enjoying your backyard and less time working on it.

Versatile and Beautiful Design Options

Your outdoor space should be an extension of your home’s personality, and porcelain pavers offer the design flexibility to make that happen. Whether you love the rustic look of natural wood, the classic elegance of travertine, or the sleek feel of modern concrete, there’s a porcelain style for you. Gappsi offers a wide selection of porcelain and natural stone pavers in various colors, textures, and sizes. This versatility allows you to create a cohesive design that flows from your patio to your pool deck and walkways, tying your entire outdoor living area together beautifully.

Avoid These Common Mistakes When Choosing an Installer

Choosing the right installer for your porcelain paver project is just as important as picking out the perfect style for your home. The right team will bring your vision to life beautifully, while the wrong one can lead to headaches and costly repairs. It’s easy to get overwhelmed by quotes and promises, but if you know what common pitfalls to look out for, you can move forward with confidence.

Many homeowners make simple mistakes during the hiring process, like focusing too much on the price tag or forgetting to check for the right credentials. These oversights can turn an exciting home upgrade into a stressful ordeal. By taking a little extra time to vet your options and ask the right questions, you’re not just hiring a contractor; you’re investing in a lasting, high-quality addition to your home. Let’s walk through the key mistakes to avoid so your project is a success from start to finish.

Don’t Focus Only on the Lowest Price

We all love a good deal, and it’s tempting to jump on the lowest quote when you’re managing a project budget. However, when it comes to home improvement, the cheapest option is rarely the best. An unusually low bid can be a red flag for cut corners, inexperienced labor, or subpar materials. A cheaper installation might look fine at first, but it could lead to more expensive repairs and maintenance down the road. Think of it as an investment. Paying a little more for an experienced, reputable installer ensures the job is done right the first time, saving you money and stress in the long run.

Always Check References and Past Projects

A picture is worth a thousand words, and a portfolio of past work can tell you a lot about an installer’s quality and style. Any reputable contractor will be happy to show you their completed projects. Ask to see a gallery of their work, specifically focusing on porcelain paver installations similar to what you have in mind. Don’t stop there, though. Ask for a list of recent references you can contact. Speaking directly with past clients gives you unfiltered insight into their experience, from communication and professionalism to how the project held up over time. You can also check out their online presence, like a YouTube channel, to see their work in action.

Never Ignore Insurance and Warranty Details

This is a non-negotiable step that protects you, your home, and the workers on your property. Always ask a potential installer for proof of liability insurance and worker’s compensation. Without it, you could be held financially responsible for any accidents that happen during the project. Equally important is the warranty. A confident installer will stand behind their work with a clear, written guarantee that covers their craftsmanship. Make sure you understand what is covered and for how long before you sign a contract. This commitment shows that the company values quality and is dedicated to your long-term satisfaction with their masonry work.

Prioritize Porcelain-Specific Experience

Installing porcelain pavers is a specialized skill. It’s not the same as working with traditional concrete or stone pavers. Porcelain is denser, less porous, and requires specific tools and techniques for cutting and setting. An installer without direct experience may not understand the unique requirements for the base preparation or the right type of jointing compound to use. A seasoned contractor will know how to handle these materials properly and anticipate potential challenges. When interviewing installers, ask them directly about their experience with porcelain pavers and request to see examples of their completed porcelain projects. This ensures they have the expertise to deliver a flawless, durable finish.

Popular Porcelain Paver Styles on Long Island

One of the best things about choosing porcelain pavers is the sheer variety of styles available. You aren’t just picking a color; you’re setting the entire mood for your outdoor space. On Long Island, homeowners are gravitating toward a few key trends that perfectly balance beauty with our local landscape. Whether you’re dreaming of a rustic retreat or a sleek, modern patio, there’s a porcelain paver style that will bring your vision to life. These options let you create a truly custom look that reflects your personal taste while standing up to the elements.

Natural Stone and Earth Tones

If you want your patio or walkway to feel like a natural extension of your garden, you can’t go wrong with stone-look porcelain in earthy tones. These styles are incredibly popular across Long Island because they blend so well with our natural environment. Think of pavers that mimic the rich texture of slate, the warm hues of travertine, or the classic look of bluestone. These colors create a seamless transition between your home and its surroundings, making your outdoor space feel grounded and serene. Gappsi offers a wide selection of porcelain and natural stone pavers that capture this timeless, organic aesthetic perfectly.

Realistic Wood-Look Porcelain

There’s something so warm and inviting about a wooden deck, but the constant maintenance can be a real headache. That’s where wood-look porcelain comes in. This style gives you the beautiful, rustic appearance of natural wood without the risk of splinters, rot, or fading. It’s an ideal choice for creating a cozy atmosphere on a patio or a safe, slip-resistant surface around swimming pools. You get the warmth and character of a classic wood plank design, but with the unmatched durability and low-maintenance benefits of porcelain. It’s truly the best of both worlds for a busy homeowner.

Contemporary Large-Format Pavers

For a clean, sophisticated look, large-format pavers are the top choice. These oversized tiles create a sense of spaciousness, making smaller patios feel larger and more open. With fewer grout lines, the overall look is sleek, seamless, and distinctly modern. Soft shades of gray, beige, or crisp white are perfect for this style, providing a neutral foundation that lets your outdoor furniture and landscaping shine. These pavers are the perfect base for modern outdoor structures like pavilions and pergolas, tying your entire outdoor living area together with a polished, cohesive design.

What Does the Installation Process Involve?

Knowing what to expect during installation can make the entire experience smoother. A professional installer doesn’t just start laying pavers; they follow a meticulous process to ensure your new patio or walkway looks beautiful and lasts for decades. From the initial site check to the final touches, every step is crucial. Let’s walk through the key phases of a professional porcelain paver installation so you know what a quality job looks like.

Site Assessment and Surface Preparation

Every successful project starts with a solid foundation. Before any work begins, a skilled team will conduct a thorough site assessment. This means evaluating your property’s grading, soil type, and drainage to prevent future issues like water pooling or shifting pavers. Proper surface preparation is the most critical phase. It involves excavating the area to the correct depth and ensuring the ground is perfectly compacted and leveled. This careful prep work is what separates a short-term fix from a long-lasting investment in your home’s outdoor living space.

Base Requirements and Installation Methods

One of the great things about porcelain is its versatility. Depending on your project, pavers can be installed over several different bases. Common methods include laying them on a compacted gravel and sand base, over a concrete slab, or on raised pedestals for rooftop decks. The best method depends entirely on the application. An experienced installer will recommend the right approach, whether it’s for a driveway that needs to support vehicles or a simple garden path. They’ll choose the ideal base to ensure stability and longevity for your chosen porcelain pavers.

Project Phases and Timeline Expectations

Once the base is prepared, the installation moves into its final phases. This is when you’ll see your vision come to life as the crew lays the pavers according to the design plan. This stage includes making precise cuts, often with a wet saw designed for porcelain, to ensure clean lines and a perfect fit. After the pavers are set, the team fills the joints with polymeric sand or another material to lock them in place. A professional contractor will give you a clear timeline and keep you updated throughout the entire process, ensuring the project stays on track with minimal disruption.

How to Prepare Your Property for Installation

Once you’ve chosen your installer, the next step is getting your home ready for the transformation. A little bit of prep work can make a huge difference, ensuring the installation process is seamless for both you and the construction crew. A professional team will handle the heavy lifting, but knowing what to do ahead of time helps everything run smoothly. Here’s how you can prepare your property for your new porcelain paver installation.

Plan for Site Access and Logistics

Your installation team will need a clear path to the work area for their equipment and materials. Before they arrive, take a moment to clear your driveway and any walkways they’ll need to use. This might mean moving cars, patio furniture, or garden planters. It’s also a good idea to inform your neighbors about the upcoming work, as there will be some noise. A professional contractor will have a structured process, but ensuring easy access helps them stay on schedule. Securing pets indoors is another small but important step to keep everyone safe and the project moving forward without any furry interruptions.

Address Drainage and Site Plans

Proper drainage is one of the most critical aspects of a successful paver installation. Without it, you could end up with pooling water, shifting pavers, or even foundation issues down the line. Before any work begins, have a detailed conversation with your installer about their plan for water management. They should explain how they’ll grade the area to direct water away from your home. A reputable installer will provide a comprehensive site plan that outlines these details. This is your chance to ask questions and ensure the final design is both beautiful and functional for your Long Island landscape.

What to Expect on Installation Day

Installation day is exciting, but it can also be a bit disruptive. Knowing the general flow can help you feel more prepared. Your crew will likely arrive early to begin preparing the site. Expect a fair amount of noise from machinery and tools throughout the day. The great thing about porcelain pavers is that their installation is often more straightforward than other materials, and sometimes they can even be installed over an existing concrete patio. Your project manager should give you a clear timeline, but feel free to ask questions. Understanding the process allows you to sit back and watch your new outdoor space come to life.

Related Articles

Frequently Asked Questions

How long does a typical porcelain paver installation take? The timeline for a project can vary quite a bit depending on the size and complexity of the job. A straightforward, smaller patio might only take a few days, while a larger, more intricate project with extensive site preparation could take a week or more. A professional installer will give you a clear and realistic schedule before any work begins, outlining each phase from excavation to the final cleanup.

Can porcelain pavers be installed directly over my existing concrete patio? In many cases, yes, you can install porcelain pavers over an existing concrete slab, which can save time and money on demolition. However, this is only possible if the concrete is in good condition, meaning it’s stable and free of major cracks. An experienced installer will need to assess the slab first to ensure it provides a suitable foundation for a lasting installation.

Are porcelain pavers slippery when wet, especially for a pool deck? This is a great question and a common concern. High-quality outdoor porcelain pavers are manufactured with a textured, anti-slip finish specifically for this reason. They are designed to provide good traction even when wet, making them an excellent and safe choice for pool surrounds, walkways, and patios where water might be present.

What kind of maintenance do porcelain pavers actually need? Porcelain is incredibly low-maintenance. Because the pavers are non-porous, they resist stains, mold, and mildew. For general cleaning, a simple sweep to remove debris and an occasional wash with water and a mild detergent is all you need to keep them looking brand new. Unlike natural stone, they do not require any sealing to maintain their color or durability.

Why is professional installation so important for porcelain pavers? While porcelain is a durable material, its longevity depends entirely on a proper installation. Professionals understand the specific requirements for creating a stable base that allows for proper drainage, which is critical for preventing shifting and cracking in Long Island’s climate. They also have the specialized tools and skills to cut the dense material precisely, ensuring a clean, beautiful finish that a general contractor might not achieve.

Custom pergola builders constructing a modern pergola with built-in seating.

How to Find the Best Custom Pergola Builders

When you decide to add a pergola, you have two main paths: a one-size-fits-all kit or a completely custom design. While a kit might seem like an easy solution, it rarely fits your home’s unique style or your family’s specific needs. A custom-built pergola, however, is designed from the ground up to be a seamless extension of your property. This is the specialty of experienced custom pergola builders. They work with you to create a structure that perfectly matches your home’s architecture, fits your backyard’s layout, and provides the exact functionality you want, whether for shade, privacy, or architectural beauty. Let’s explore the benefits of a tailored approach.

Key Takeaways

  • Think of a builder as your project partner: A professional custom builder does more than just construct; they guide you through the entire process, including design, material selection, permits, and installation.
  • Your material choice impacts more than just looks: The material you select, whether it’s wood, composite, or metal, determines your pergola’s long-term durability and how much maintenance it will require.
  • A little homework prevents major headaches: Always protect your investment by verifying a builder’s license and insurance, reviewing their portfolio, and getting a detailed, itemized quote to ensure there are no surprises.

What Do Custom Pergola Builders Provide?

When you decide to build a custom pergola, you’re not just hiring someone to put up a structure. You’re partnering with a team of experts who manage the entire project from a simple idea to a beautiful, functional outdoor space. A professional builder handles every detail, ensuring the final product is exactly what you envisioned, built to last, and perfectly suited to your home and lifestyle. They bring design expertise, material knowledge, and skilled craftsmanship to the table, turning a complex construction project into a smooth and rewarding experience.

This comprehensive approach is what sets a custom builder apart. They don’t just follow a pre-made plan; they create a plan with you. From securing the right permits to integrating lighting and other features, a dedicated builder provides end-to-end service. They are your single point of contact, responsible for coordinating all aspects of the job so you can relax and watch your dream backyard take shape. They also understand the specific building codes and environmental factors on Long Island, ensuring your project is not only beautiful but also compliant and built to withstand local weather conditions. This expertise saves you from potential headaches and ensures a seamless process from start to finish.

Custom Design and Planning

A custom pergola builder starts by listening. They work with you to understand your vision, how you plan to use the space, and the specific style of your home. This collaborative process ensures your new pergola isn’t just an add-on but a natural extension of your living area. They provide tailored design services that translate your ideas into a functional and beautiful plan. Whether you want a cozy nook for reading or a large, airy structure for entertaining, they will design a pergola that fits your property and your needs perfectly.

Material Selection and Sourcing

With so many materials available, choosing the right one can feel overwhelming. A professional builder guides you through the options, explaining the benefits of everything from classic wood to modern aluminum and durable composites. They have deep knowledge of which materials perform best in the Long Island climate and can source high-quality products that match your design goals and budget. They can also suggest unique combinations, like pairing wood beams with beautiful natural stone bases, to create a truly custom look that requires the right amount of maintenance for your lifestyle.

Expert Construction and Installation

This is where skill and experience truly matter. A professional builder ensures your pergola is constructed with precision and care. Their team handles everything from laying a solid foundation to making sure every joint is secure. Proper installation is critical for the safety, stability, and longevity of your pergola. With expert masonry and construction techniques, they build a structure that not only looks stunning but can also withstand the elements for years to come, giving you a lasting return on your investment.

Integrating Custom Features

A pergola is often the centerpiece of a larger outdoor living area. A great builder can seamlessly integrate other features to create a complete and cohesive space. This could include built-in lighting for evening ambiance, ceiling fans for a comfortable breeze, or even the framework for an outdoor kitchen. By planning for these elements from the start, they ensure all the necessary wiring and structural supports are in place. This thoughtful approach to home remodeling transforms a simple pergola into a fully equipped outdoor room for you and your family to enjoy.

What Are the Best Materials for a Custom Pergola?

Choosing the right material for your pergola is one of the most important decisions you’ll make. It influences the structure’s appearance, durability, and how much maintenance it will need down the road. Your choice depends on your personal style, your home’s architecture, and your budget. Whether you envision a classic wooden frame draped in vines or a sleek metal structure for a modern patio, there’s a perfect material to bring your vision to life. Let’s walk through the most popular options to help you find the best fit for your Long Island backyard.

Classic Wood: Cedar, Redwood, and Pine

There’s a reason wood is a timeless choice for outdoor structures. It offers a warm, natural beauty that blends seamlessly into any landscape design. Materials like cedar and redwood are especially popular because they contain natural oils that make them resistant to rot and insects, giving them a longer lifespan. Pine is a more budget-friendly option that can be pressure-treated to withstand the elements. A wooden pergola gives you the flexibility to stain it to match your deck or paint it a classic white. While wood requires some upkeep, like periodic sealing, its classic charm is hard to beat for creating a cozy and inviting outdoor retreat.

Low-Maintenance Vinyl and Composite

If you love the look of a classic pergola but want to spend more time relaxing under it and less time maintaining it, vinyl or composite materials are excellent alternatives. Vinyl is incredibly durable and easy to care for since it never needs painting or staining. It resists moisture and won’t rot, warp, or fade. Composite materials, which are a blend of wood fibers and recycled plastic, offer the look of real wood without the demanding upkeep. Both options are fantastic for busy homeowners who want a beautiful, long-lasting structure that can handle Long Island’s weather with minimal fuss.

Durable Aluminum and Steel

For a modern, minimalist aesthetic, metal is an outstanding choice. Aluminum pergolas are lightweight, rust-proof, and require very little maintenance, making them ideal for coastal areas. They can be finished in various colors to match your home’s exterior. If you need maximum strength and durability, steel is the top contender. A steel frame can support a larger structure and withstand high winds and heavy snow loads. While it’s a premium option that requires professional installation, a steel pergola offers unmatched longevity and a bold, contemporary look for your outdoor living space.

Stone and Masonry Accents

You don’t have to stick to just one material. Combining different elements can create a truly custom and luxurious look. Imagine a beautiful cedar pergola supported by stately masonry columns made of brick or stone. This approach adds architectural interest and a sense of permanence to your outdoor space. Integrating natural stone not only enhances the pergola’s stability but also allows you to tie it in with other hardscape features like a patio, retaining walls, or an outdoor kitchen. This blend of materials is perfect for creating a high-end, cohesive design that feels like a natural extension of your home.

How Much Does a Custom Pergola Cost?

Figuring out the budget for your dream pergola is one of the most important first steps. The final cost can vary quite a bit because a custom project is tailored specifically to your home, style, and needs. Unlike a one-size-fits-all kit from a big-box store, a custom build involves unique design choices, specific materials, and professional craftsmanship.

The price tag depends on several key elements, including the pergola’s size, the complexity of its design, the materials you choose, and any special features you want to add, like lighting or retractable canopies. While it’s helpful to look at average costs to get a general idea, the best way to understand your investment is to see how these different factors come together. Breaking down the costs will help you plan effectively and ensure your new outdoor structure is everything you hoped for.

Understanding Average Project Costs

To give you a starting point, a new pergola can range from around $2,000 for a simple kit you assemble yourself to over $15,000 for a large, high-end custom structure. Most homeowners find their projects land somewhere between $4,000 and $7,000. This range typically covers a professionally installed, quality pergola that fits well in a standard backyard. Think of this as a general ballpark figure. Your final cost will be unique to your project, reflecting the specific pavilions and pergolas you envision for your Long Island home.

What Affects the Final Price?

Three main things will influence your pergola’s final price: size, design, and materials. A larger pergola naturally requires more materials and labor, which increases the cost. Similarly, a simple square design will be more affordable than a complex, multi-level structure or one that attaches directly to your house. The biggest factor, however, is your choice of materials. Classic wood is often less expensive upfront but requires more maintenance. On the other hand, durable materials like vinyl, composite, or aluminum may cost more initially but can save you time and money on upkeep down the road. You can even incorporate beautiful stone and masonry accents for a truly custom look.

How to Get an Accurate Quote

The only way to know the true cost of your project is to get a detailed quote from a professional builder. Professional installation can add anywhere from $500 to $3,000 to the total, with most homeowners paying around $1,500 for labor. A trustworthy quote should be more than just a single number; it should provide a clear breakdown of expenses. Look for itemized costs covering materials, labor, permits, and any additional features you’ve requested. This transparency ensures there are no surprises. When you’re ready, a detailed consultation with an expert can give you a precise and reliable estimate for your specific vision.

How to Choose the Right Pergola Builder

Finding the right builder is just as important as picking the perfect design for your pergola. You need a partner who understands your vision, has the technical skill to execute it flawlessly, and communicates clearly every step of the way. A great builder ensures your new outdoor structure is not only beautiful but also safe and built to last. Taking the time to vet your options thoroughly will save you from potential headaches and guarantee you end up with a space you’ll love for years.

Check Their Credentials and Experience

Before you fall in love with a builder’s portfolio, do a quick background check. Your first step is to confirm they are a licensed and insured contractor in Long Island. This is non-negotiable. A proper license ensures your builder follows local codes and construction standards, which protects both your safety and your investment. Experience is just as critical. Look for a company with a long history of building pavilions and pergolas, as they will have the expertise to handle unique challenges and deliver a high-quality result. An established company has a reputation to uphold and a proven process for getting the job done right.

Review Their Portfolio and Client Testimonials

A picture is worth a thousand words, especially when it comes to construction. Spend time looking through a builder’s portfolio to see the quality and style of their previous projects. Do their designs resonate with your aesthetic? Look for high-resolution photos that show off fine details and craftsmanship. Beyond pictures, see what past clients have to say. Testimonials and online reviews can give you honest insight into the company’s professionalism, responsiveness, and overall customer experience. You can often find project videos on platforms like the Gappsi YouTube channel, which provide an even better sense of the finished product.

Key Questions to Ask Before Hiring

Once you’ve narrowed down your list, it’s time to start asking questions. Being prepared for your initial consultation helps you compare builders effectively. Start with the basics, like asking about their project timeline and communication process. Then, get into the specifics of your pergola. Ask, “What materials do you recommend for our climate, and what are the pros and cons of each?” and “How long can I expect the different material options to last?” A knowledgeable builder will be able to explain why they might suggest certain natural stones or composite materials over others, helping you make an informed decision that balances beauty with durability.

Understand Warranties and Aftercare

A beautiful new pergola is a significant addition to your home, so you want to make sure it’s protected. Always ask a potential builder what kind of warranties they offer. A reputable company will stand behind their work with a warranty that covers both the structure itself and the installation. This gives you peace of mind knowing that if any issues arise, the builder will be there to resolve them. It’s also a good idea to ask about aftercare. Some materials require more maintenance than others, and a good builder will be upfront about this. They may even offer restoration and sealing services to keep your pergola looking its best.

Common Hiring Mistakes to Avoid

Choosing the right builder is just as important as picking the perfect design for your pergola. The right partner will make the process smooth and enjoyable, while the wrong one can turn your dream project into a headache. To help you find a true professional, let’s walk through some common hiring mistakes and, more importantly, how you can steer clear of them. A little awareness upfront can save you a lot of time, money, and frustration later on.

Skipping the Vetting Process

It’s easy to get excited and rush into a project, but taking the time to properly vet your builder is a step you can’t afford to skip. A great pergola creates a comfortable and inviting outdoor living area, and that starts with a qualified professional. Don’t just take their word for it; do your homework. Check for proper licensing and insurance to protect yourself from liability. Ask for a list of recent references and actually call them. A reputable builder will be happy to share their credentials and connect you with satisfied clients. This due diligence ensures you’re hiring a team that values quality and has a proven track record of success.

Accepting a Vague Estimate

If a builder gives you a single, round number on a handshake, consider it a red flag. A vague estimate is often a sign of inexperience or a tactic to hide future costs. You should always ask for a detailed, itemized quote that breaks down every expense, including materials, labor, permits, and any other potential charges. This document should clearly outline the project scope, preventing misunderstandings down the road. A professional quote will account for crucial steps like proper site preparation and building a solid foundation, ensuring your pergola is built correctly from the start to avoid costly repairs later.

Mismatching Design Styles

Your new pergola should feel like a natural extension of your home, not an afterthought. A common mistake is hiring a builder who doesn’t consider your property’s existing architectural style. Whether your pergola is attached to the house or a standalone feature in the yard, its design should complement your home’s aesthetic. A skilled builder will work with you to tailor the size, shape, and materials to create a cohesive look. Before hiring, review a builder’s portfolio to see if they have experience with various styles. This will help you find a partner who can bring your specific vision for pavilions and pergolas to life.

Forgetting About Future Maintenance

When you’re focused on the excitement of building something new, it’s easy to overlook what it will take to maintain it. Some builders cut corners by using materials that aren’t suited for the Long Island climate, skipping protective sealants, or ignoring proper drainage. These shortcuts can lead to issues like rot, rust, and water damage over time. Be sure to discuss long-term care with your builder. Ask about the durability of the proposed materials and what kind of maintenance will be required. A quality builder uses superior construction techniques and can even offer restoration and sealing services to keep your investment looking beautiful for years to come.

What to Expect During the Construction Process

Once you’ve chosen your builder, you can get excited for the transformation to begin. Knowing what’s ahead can make the entire experience feel smoother and more enjoyable. A professional team will guide you through every step, but it’s always helpful to have a roadmap of the journey. From the first design conversation to the final walkthrough, each phase is designed to bring your vision to life with precision and care. This isn’t just about adding a structure to your yard; it’s about creating a new hub for family gatherings, quiet mornings, and everything in between.

The construction process is a partnership between you and your builder. Clear communication is key, so you should always feel comfortable asking questions and staying informed about your project’s progress. A great builder will be transparent about timelines, next steps, and any decisions needed from you along the way. Think of it less as a construction zone and more as a collaboration that results in a beautiful new outdoor space you’ll love for years. We’ll walk through the typical phases so you know exactly what to expect when building your custom pergola, from initial sketches to the final, beautiful result.

The Initial Consultation and Design Phase

This first meeting is all about your vision. It’s a collaborative session where you’ll discuss your ideas, goals, and the overall feel you want for your outdoor space. Your builder will listen to your needs, talk through different materials, and help refine your plans. This is your chance to share inspiration photos and ask every question you can think of. At Gappsi, we use this time to create a detailed plan for your custom pavilion or pergola, ensuring the final design perfectly matches your home’s style and your family’s lifestyle.

Site Prep and Securing Permits

Before any building begins, your team will prepare the construction site and handle all the necessary paperwork. This might involve clearing and leveling the area, marking utility lines, and securing permits from your local municipality. If your pergola is attached to your house, it will likely require specific permits and inspections to ensure it’s structurally sound and compliant with local codes. A professional builder manages this entire process for you, so you don’t have to worry about the logistics. This step ensures a safe and solid foundation for your new structure.

Your Project’s Construction Timeline

With the plans and permits in place, the physical construction can start. You might be surprised at how quickly your pergola takes shape. For most standard designs, the installation can be completed within one to two weeks. Of course, more complex projects or unpredictable weather can extend this timeline slightly. Your builder will provide a clear schedule and keep you updated on the progress. You can watch the transformation happen day by day as the posts, beams, and rafters go up, turning a patch of your yard into a stunning outdoor retreat.

Understanding Payment Schedules and Financing

A trustworthy builder will be completely transparent about the cost of your project and the payment schedule. Typically, you’ll see a payment plan outlined in your contract, which may include a deposit to start the work, followed by milestone payments as the project progresses. Be sure to read your contract carefully so you understand when payments are due. Some companies may also discuss financing options to help you manage the investment. The most important thing is to have a clear, written agreement that details all costs before any work begins, ensuring there are no surprises along the way.

Related Articles

Frequently Asked Questions

How long does the entire pergola project take from start to finish? The full timeline can vary, but a good estimate is anywhere from a few weeks to a couple of months. The initial design and material selection phase depends on how quickly you make decisions. After that, securing permits can take several weeks. Once everything is approved, the actual on-site construction is surprisingly fast, often taking just one to two weeks for a standard project.

Do I really need a permit to build a pergola on Long Island? In most cases, yes. Whether you need a permit often depends on the pergola’s size, height, and if it’s attached to your house. Local regulations in towns across Nassau and Suffolk County have specific requirements. A professional builder will know exactly what’s needed and will manage the entire permitting process for you, which saves you from the headache of dealing with paperwork and inspections.

Can a pergola be installed on my existing deck or stone patio? Absolutely, this is a very common request. A pergola can be a fantastic addition to an existing outdoor surface. The most important factor is ensuring your deck or patio foundation is strong enough to support the weight of the new structure. A professional builder will assess the site to confirm its stability before starting any work.

What kind of maintenance should I expect with a new pergola? The maintenance really depends on the material you choose. A classic wood pergola will need the most care, requiring a new coat of sealant or stain every couple of years to protect it from the weather. Low-maintenance options like vinyl or aluminum are much easier; they just need an occasional cleaning with soap and water to look their best.

How can I get more shade or rain protection from my pergola? You have several great options to make your pergola more functional in different weather. Retractable fabric canopies are a popular choice, allowing you to control the amount of sun or shade you get. For rain protection, you can add clear or tinted polycarbonate roof panels. For the ultimate control, you might consider an adjustable louvered roof that can open and close as needed.

Putter and golf ball beside a sample showing the construction of putting green turf.

How to Select the Right Putting Green Turf

A backyard putting green can be a fantastic addition to your home, but a few common missteps can turn your dream project into a costly frustration. Issues like poor drainage, an uneven surface, or visible seams often trace back to mistakes made in the very beginning, starting with the turf selection. Using landscape grass instead of a specialized product or underestimating the importance of a proper base can ruin the experience. This guide is designed to help you avoid those pitfalls. We’ll explore the most common mistakes homeowners make when buying putting green turf and show you how to get every detail right, ensuring your investment results in a flawless, high-performance green.

Key Takeaways

  • Choose specialized putting green turf, not landscape grass: The performance of your green depends on turf with a short pile height and dense construction, which is specifically engineered to give you a true and predictable ball roll every time.
  • A professional installation is essential for a lasting green: The most critical work happens beneath the surface. A properly compacted base and a solid drainage plan are non-negotiable for preventing future problems and guaranteeing a smooth, playable surface for years.
  • Pay attention to the technical details to avoid common mistakes: Factors like pile height, face weight, and the right amount of infill directly impact your green’s speed and durability, so understanding these specs helps you select a high-quality product and avoid a disappointing result.

What Are the Different Types of Putting Green Turf?

When you decide to install a putting green in your backyard, one of the first things you’ll discover is that not all turf is created equal. The lush, green grass you might use for a lawn is completely different from the specialized surface needed for a true-rolling putt. Choosing the right turf is the most critical step in creating a green that plays like one you’d find at the local country club.

The world of synthetic turf can seem complex, but it really comes down to a few key characteristics. Understanding the differences in material, grade, texture, and performance will help you select a surface that matches your skill level, aesthetic preferences, and how you plan to use your green. Think of it as choosing the right club for a shot; the right turf will give you the consistency and reliability you need to sink more putts and truly enjoy your practice time. Let’s walk through the main types so you can make a confident and informed decision for your home.

Material: Polyethylene, Nylon, and Polypropylene

The material of the turf fibers plays a huge role in how your putting green looks, feels, and performs. The three main options are nylon, polypropylene, and polyethylene. Nylon is the most durable and resilient of the three, making it an excellent choice for the main putting surface. It holds its shape under heavy foot traffic and provides a consistent ball roll. Polyethylene is softer and has a more realistic appearance, so it’s often used for the fringe or collar around the green. Polypropylene is a less expensive option but is also less durable, so it’s typically reserved for lower-traffic home greens. Many of the best synthetic turf products use a blend of these materials to offer the perfect balance of performance and realism.

Residential vs. Commercial Grade

It’s easy to assume that all artificial grass is basically the same, but that’s a common mistake. Turf designed for general landscaping is built for aesthetics and a soft feel underfoot, not for athletic performance. Putting green turf, on the other hand, is specifically engineered to provide a smooth, true, and consistent ball roll. Within this category, you’ll find residential and commercial-grade options. For most backyard setups, a high-quality residential turf is more than sufficient. It’s designed to withstand regular play and the elements. Commercial-grade turf is built for extreme durability, meant for high-traffic environments like public courses or sports facilities. Unless you’re planning on hosting a PGA tour event in your backyard, a premium residential turf will deliver the performance you’re looking for.

Texture and Pile Height

Two terms you’ll hear a lot are “pile height” and “texture.” Pile height simply refers to the length of the turf blades. For a putting green, you want a very short pile height. Longer blades would slow the ball down and create an unpredictable roll. A short, dense pile allows the ball to glide smoothly across the surface, mimicking the conditions of a well-manicured natural green. Texture relates to the density and construction of the fibers. A tightly woven, texturized turf prevents the ball from bouncing or skidding, ensuring it rolls true from the moment it leaves your putter. These two factors are essential for creating a realistic and challenging practice surface.

Stimp Rating and Performance

If you’re a golfer, you’ve probably heard of a “Stimp rating.” This is simply a measurement of how fast a putting green is. A higher Stimp rating means a faster green. Different turf products are designed to achieve different speed ranges, from leisurely to tournament-fast. The final speed of your green isn’t just determined by the turf itself; it’s also influenced by the amount of sand infill used and the techniques used during installation, like rolling the surface. This is where professional expertise makes a world of difference. An experienced installer can help you choose a turf that matches your desired speed and then fine-tune the installation to get the performance just right, ensuring your backyard green plays exactly how you want it to.

How to Choose the Best Putting Green Turf

Picking the right turf is the most important step in creating a backyard putting green you’ll love for years. The look, feel, and performance all come down to the material you choose. With so many options available, it’s easy to feel a bit lost. But don’t worry, I’m here to walk you through it. By focusing on a few key factors like your space, local climate, and how you plan to use the green, you can confidently select a turf that gives you a true and consistent roll every time you practice your short game.

Assess Your Space and Needs

First things first, let’s think about your specific situation. How big is the area you’re working with? Are you a scratch golfer looking to shave strokes off your score, or is this more for casual family fun? Your answers will guide your turf selection. It’s essential to choose a product specifically designed for putting greens, not just any landscape turf. Putting green turf has a shorter pile height and a denser construction to ensure a smooth, predictable ball roll. A general-purpose artificial grass will be too long and slow for a realistic putting experience. Thinking about these details upfront helps ensure your new green meets your expectations.

Consider Durability for High-Traffic Areas

Your putting green is going to see a lot of action, so you need a turf that can handle the foot traffic. Durability comes down to the quality of the turf fibers and the amount of infill used. Infill is the granular material, usually sand, that’s brushed into the turf fibers. It helps the blades stand up straight, provides stability, and protects the backing from UV rays. Using the right amount of infill is critical. Too little, and your green can become lumpy and uneven over time. A high-quality, durable turf will ensure your investment holds up beautifully through countless practice sessions and family competitions.

Account for Climate and Weather

Here on Long Island, we get a little bit of everything: hot, sunny summers and cold, snowy winters. Your putting green turf needs to be tough enough to handle it all. Look for turf with excellent UV resistance to prevent the vibrant green from fading under the summer sun. It also needs a permeable backing that allows water to drain through efficiently, preventing puddles after a rainstorm and damage during freeze-thaw cycles. A professional synthetic turf installation will include a properly prepared base to manage drainage, but the turf itself plays a huge role in long-term weather resistance.

Check Density and Ball Roll Performance

Now for the fun part: how the ball actually plays on the surface. The two main specs to look at are pile height and face weight. For a putting green, you want a short, dense pile for a fast and true roll. Face weight refers to the weight of the yarn in a square yard of turf; a higher face weight often indicates a denser, more durable product. These factors determine the green’s “stimp speed,” which is just a measure of how fast the ball rolls. A professional installer can help you select a turf that mimics the speed of your favorite golf course and ensure the installation has the proper slope for a challenging, realistic practice experience.

How Much Does Putting Green Turf Cost?

Thinking about adding a putting green to your backyard is exciting, and one of the first questions that comes to mind is usually about the cost. The price of installing a putting green is an investment in your home and your enjoyment, and it can vary quite a bit. The final cost depends on the quality of the materials, the complexity of the design, and the specifics of your space. Let’s break down what you can expect so you can plan your project with confidence.

Typical Cost: $3-$10 Per Square Foot

When you start looking at putting green turf, you’ll often see prices listed per square foot. Generally, the turf material itself can range from $3 to $10 per square foot. However, it’s important to remember this price is just for the turf. The total project cost includes much more, like base preparation, materials, labor, and any special features. For a complete professional installation, a medium-sized putting green of around 200 square feet typically averages about $4,300. This all-in price gives you a more realistic picture of the investment for a high-performing, long-lasting green.

Factors That Affect Price

Several key factors will influence the final price tag for your backyard putting green. The size is the most obvious one; a larger green will require more materials and labor. The complexity of the design also plays a big role. A simple, flat, rectangular green will cost less than a custom-shaped one with undulations, multiple holes, and fringe grass. The condition of your site matters, too. If your yard needs significant grading or excavation to ensure proper drainage, that will add to the cost. Finally, the quality of the synthetic turf and game courts you choose will impact the price, with premium options offering better performance and durability.

Professional Installation vs. DIY

While a DIY putting green project might seem like a way to save money, it’s a highly technical job that requires specialized skills and equipment. Proper installation is critical for performance. The process involves creating a compacted base, ensuring perfect drainage, laying the turf without wrinkles, and applying the right amount of infill for a true ball roll. Without expertise, you risk creating a surface that doesn’t play well or wears out quickly. Professional installation ensures your putting green is built to last and performs like one you’d find on a golf course, protecting your investment and giving you a surface you can be proud of.

Long-Term Savings

While the upfront cost is a key consideration, it’s also helpful to think about the long-term value. A natural grass putting green requires constant maintenance, including regular mowing, watering, fertilizing, and pest control. These costs and the time spent on upkeep add up season after season. An artificial turf putting green, on the other hand, eliminates nearly all of that work. You won’t have a water bill for it, and you can put away the mower and chemicals for good. This means more time enjoying your green and less time working on it, offering significant savings over the life of the turf.

Why Choose Artificial Turf Over Natural Grass?

A pristine putting green is a dream, but maintaining natural grass can feel like a full-time job. Artificial turf offers a fantastic alternative, delivering the lush look of real grass with unmatched durability and convenience. It gives you a beautiful, functional space you can enjoy year-round without the constant upkeep.

Year-Round Playability

Imagine practicing your putt in early spring or late fall on a perfectly green surface. With artificial turf, that’s your reality. Natural grass is at the mercy of Long Island’s seasons, turning brown in the summer heat or going dormant in the winter. Synthetic turf, however, stays vibrant and ready for play 365 days a year, rain or shine. You get a consistently beautiful lawn without ever needing to use harsh pesticides or fertilizers to keep it looking its best. It’s always ready for a game.

Low Maintenance

One of the biggest advantages of artificial turf is reclaiming your free time. Say goodbye to the constant cycle of mowing, fertilizing, and aerating that a natural grass putting green demands. With a synthetic surface, your maintenance is incredibly simple. An occasional rinse to clear away debris is usually all it takes. A professionally installed synthetic turf putting green is built to last for 15 years or more, giving you a beautiful, hassle-free space for years to come.

Consistent Performance

For any golfer, consistency is key. Natural grass can be unpredictable, with bumps and bare spots affecting how your ball rolls. Artificial turf provides a perfectly smooth and reliable surface every single time you step out to practice. It’s engineered to mimic the performance of a high-end golf course green, ensuring a true and predictable ball roll. This means you can focus entirely on your technique, knowing the surface beneath your feet is flawless and ready for every shot.

Water Conservation

Maintaining a natural grass lawn, especially during Long Island’s dry summers, requires a tremendous amount of water. Switching to artificial turf is a smart choice that significantly cuts down on your water consumption. You’ll see the savings on your monthly water bill while also contributing to local conservation efforts. It’s an investment that not only makes your life easier but also reduces your environmental footprint. You get a stunning green space without the constant need for watering, making it a practical solution.

What Does the Turf Installation Process Involve?

A high-performance putting green is much more than just a roll of artificial grass. The magic lies in what’s underneath and how it’s all put together. A professional installation is a meticulous, multi-step process designed to give you a durable, perfectly smooth surface that plays true for years. Each stage, from excavating the ground to brushing in the final grain of sand, is critical for performance and longevity. Skipping a step or cutting a corner can lead to issues like poor drainage, uneven surfaces, or premature wear.

Understanding the process helps you appreciate the craftsmanship involved and ensures you know what to expect when our team arrives. We handle every detail with precision, transforming your backyard into a golfer’s paradise. From creating a stable foundation to ensuring every seam is invisible, our goal is to build a putting green that not only looks incredible but also helps you sharpen your short game. The entire installation is a blend of landscape design and technical skill, resulting in a flawless finish.

Preparing the Site and Ensuring Drainage

The first step to a great putting green is creating a solid foundation. This begins with site preparation, where we clear the designated area of any existing grass, rocks, and debris. Once the space is clear, we excavate the soil to the proper depth. A common mistake in DIY projects is neglecting proper drainage, which can cause water to pool and damage the turf over time. To prevent this, we carefully grade the area to create a subtle slope that allows water to run off effectively. This ensures your putting green remains playable even after a classic Long Island rain shower and protects the integrity of the base for years to come.

Installing and Compacting the Base

With the site prepared, the next step is to build the base. A putting green’s performance often comes down to the quality of its foundation, and an inadequate base is a frequent cause of problems. We install a layer of crushed stone aggregate, which provides both excellent drainage and a stable footing for the turf. This material is spread evenly across the graded area and then thoroughly compacted using professional-grade equipment. This compaction process is vital, as it creates a firm, level surface that won’t shift or settle over time, ensuring your putting green remains smooth and true for every putt.

Laying the Turf and Applying Infill

Now for the fun part: laying the green. We carefully roll out the putting green turf over the compacted base, making sure it’s positioned perfectly. Once the turf is in place, we apply the infill. Infill, typically a specialized type of sand, is a crucial component for creating a realistic playing experience. It helps the turf fibers stand up straight, provides cushioning, and ensures a consistent ball roll speed. Using the right amount of infill is key; too little can cause the surface to become lumpy and wear out quickly. We meticulously spread the infill and brush it deep into the fibers for optimal performance and durability.

Aligning Seams and Smoothing the Surface

If your putting green requires multiple pieces of turf, making the seams disappear is an art form. This step is essential for a smooth, seamless surface that won’t interfere with your ball’s path to the cup. We carefully trim and align the edges of each turf piece, then secure them with a strong adhesive and specialized seaming tape. The result is a connection that is virtually invisible and incredibly durable. Finally, we give the entire surface a final roll and brush to smooth everything out, ensuring every inch of your new synthetic turf is ready for play.

How to Maintain Your Putting Green Turf

One of the best parts of owning an artificial putting green is how little work it takes to keep it in pristine condition. While you can say goodbye to mowing, watering, and fertilizing, a little routine care will ensure your green performs beautifully for years to come. Following a few simple steps will protect your investment, maintain a consistent ball roll, and keep your backyard looking sharp. Think of it less as a chore and more as a way to get your green ready for its next round.

Daily and Weekly Care

Keeping your putting green in top shape starts with simple, consistent habits. The most important task is to keep the surface clear of leaves and other debris. A quick sweep with a leaf blower or a stiff, non-metal broom a few times a week is usually all it takes. This prevents organic matter from breaking down and getting embedded in the turf fibers, which can affect drainage and the smoothness of your putt. Think of it as a quick tidying-up that pays off by preserving the playability and look of your green.

Managing Infill

Infill is the sand or specialized material spread between the turf blades, and it’s a vital component of your putting green. It helps the turf fibers stand up, provides a realistic feel underfoot, and ensures a true ball roll. Over time, infill can shift or become compacted in high-traffic areas, like around the holes. To manage this, simply use a stiff broom to brush the fibers and redistribute the infill evenly across the surface. This quick task helps maintain the green’s durability and consistent performance for every putt.

Cleaning and Removing Debris

For anything beyond leaves and twigs, a little spot cleaning will do the trick. If you have a spill, just rinse the area with a hose. For more stubborn spots or pet messes, you can use a simple mix of mild soap and water, then rinse thoroughly. It’s best to clean up any messes as soon as you spot them to prevent staining. For a deeper seasonal clean or to handle tougher stains, you might consider professional restoration services to keep your turf looking brand new.

Rolling and Brushing for a Perfect Surface

Did you know you can adjust the speed of your green? You can change how fast the ball rolls by simply brushing and rolling the surface. Brushing the turf fibers up against the grain will slow the ball down for a more challenging practice session. For a faster, tournament-style speed, brush the fibers so they lay flat and then use a lawn roller to smooth the surface. This regular grooming not only customizes your playing experience but also prevents the fibers from matting down, ensuring your synthetic turf stays resilient.

Common Mistakes to Avoid When Buying Turf

A backyard putting green is an amazing feature, but a few common missteps can turn your dream project into a frustrating experience. Getting the details right from the start is key to creating a surface that plays true for years to come. Let’s walk through some of the most frequent mistakes homeowners make when choosing and installing turf, so you can be sure your investment is a hole-in-one.

Using Landscape Turf Instead of Putting Green Turf

This is probably the biggest mistake you can make. While landscape turf looks great in your yard, it’s not engineered for the demands of golf. It’s designed to be soft and lush, not to provide the smooth, consistent ball roll a putting green requires. Putting green turf has shorter, denser fibers that allow the ball to glide true to the cup. Using the wrong type will leave you with a bumpy, unpredictable surface that’s more frustrating than fun. When you’re planning your project, make sure you’re looking specifically at specialized turf for game courts to get the performance you expect. It’s a different product for a different purpose.

Forgetting Proper Drainage

What’s underneath your turf is just as important as the turf itself. Without a proper drainage system, rainwater will have nowhere to go. It will pool on the surface, creating a soggy, unplayable mess and potentially leading to mold or mildew issues. A professional installation always starts with excavating the area and laying a base of crushed stone that allows water to filter through and drain away from the green. Overlooking this crucial step can completely ruin your putting surface and lead to costly repairs down the road. Proper landscape design and construction ensures your green is built on a solid, well-draining foundation from the very beginning.

Applying Too Little Infill

Infill is the granular material, usually sand, that’s brushed in between the turf fibers after it’s laid down. It might seem like a minor detail, but it’s essential for performance and longevity. Infill helps weigh the turf down, protects the backing from UV rays, and keeps the fibers standing upright for a consistent playing surface. When you don’t use enough, the turf can become lumpy, show wear patterns from foot traffic, and won’t hold up over time. Skimping on infill is a classic DIY mistake that compromises the entire project. A professional will know the exact amount and type of infill needed to give your green the right firmness and durability.

Ignoring Pile Height and Face Weight

These technical terms can seem intimidating, but they are critical to how your putting green will play. Pile height refers to the length of the turf blades, while face weight is the density of the turf fibers. For a putting green, you generally want a low pile height for a fast, smooth ball roll. A higher face weight indicates a denser, more durable turf that feels more like a natural green. Ignoring these specifications can leave you with a surface that’s too slow or wears out quickly. Discussing these factors with an expert will help you select the perfect synthetic turf that matches your desired speed and feel for the ultimate practice experience.

How to Find the Right Installation Professional

Choosing the right turf is only half the battle; the quality of your installation will ultimately determine how your putting green performs and how long it lasts. A flawless installation creates a smooth, consistent surface that mimics a real golf course green. A poor one can lead to drainage issues, uneven ball roll, and visible seams. You need a team that understands the specific demands of a putting green, from creating the perfect sub-base to getting the infill just right.

Finding an installer you can trust is crucial. This is a significant addition to your home, and the right partner will guide you through the process, answer your questions, and deliver a final product you’ll be proud of. A professional team specializing in synthetic turf and game courts will have the expertise to ensure your green is built for performance and durability, giving you a beautiful practice area for years to come.

Look for Key Qualifications and Experience

When you start looking for an installer, focus on teams with specific experience in putting greens, not just general landscaping. Installing a putting green is a specialized skill. It requires a deep understanding of site preparation, proper grading for drainage, and techniques for creating subtle contours that challenge your short game. A seasoned professional will know how to compact the base correctly to prevent settling and how to secure the turf so the seams are invisible.

Ask to see a portfolio of their previous putting green projects. This will give you a clear idea of their workmanship and design capabilities. An experienced installer will have the right tools and a proven process to ensure your green plays true from day one. This expertise is what protects your investment and guarantees a professional-grade finish.

Ask the Right Questions

Before you commit to an installer, make sure you have a conversation about your project. This is your chance to gauge their expertise and see if they’re the right fit. Don’t hesitate to ask detailed questions about their process and materials. A knowledgeable professional will be happy to walk you through their approach and explain their recommendations.

Here are a few key questions to ask:

  • What type of turf do you recommend for my goals and budget?
  • Can you explain your base preparation and installation process?
  • How do you ensure proper drainage for the green?
  • Do you have past clients I can speak with or projects I can see?

You can often get a great sense of a company’s work by watching their process. Check to see if they have videos of their projects, like the ones on the Gappsi YouTube channel, to see their team in action.

Verify Quality and Warranties

A reputable installation professional will always stand behind their work with a solid warranty. This is a critical detail that gives you peace of mind. Make sure you get the warranty details in writing and that you understand exactly what is covered. A comprehensive warranty should cover both the turf material itself and the installation labor.

For the turf, look for coverage against things like UV degradation, discoloration, and manufacturing defects. For the installation, the warranty should cover issues like seams coming apart, improper drainage, or problems with the base. High-quality products, like those available from the Gappsi Store, often come with strong manufacturer warranties, and a professional installer will add their own guarantee for the workmanship. This dual protection ensures your investment is secure.

What to Look For in High-Quality Putting Green Turf

Choosing the right turf is the most critical step in creating a backyard putting green that you’ll love for years. Not all artificial grass is created equal, and what works for a lawn won’t give you the performance you need for practicing your short game. High-quality turf provides a consistent, realistic ball roll and can withstand frequent use and changing weather. When you invest in the right materials from the start, you get a durable, beautiful green that enhances your home and your golf skills. Let’s walk through the key features to look for so you can make a confident choice.

Texture and Fiber Construction

The feel and performance of your putting green come down to the turf’s texture and how its fibers are constructed. You’ll want to select a product specifically engineered for golf, not a generic landscape turf. Putting green turf has shorter, denser fibers that allow the ball to roll smoothly and consistently, mimicking the conditions of a real course. The fibers are typically made from materials like polyethylene or nylon, which are designed to be non-abrasive and resilient, so they spring back into place after every putt. When you install a putting green, paying close attention to the fiber construction ensures you get that true roll you’re looking for.

Ideal Height Specifications

Pile height, or the length of the turf blades, is a crucial factor for realistic play. If the blades are too long, the ball will drag; if they’re too short, the surface can feel too fast or unforgiving. For putting greens, the ideal pile height is typically between 0.5 and 1 inch. This range provides the perfect balance, allowing the golf ball to roll smoothly across the surface without sinking or bouncing. A shorter pile height creates a faster green, while a slightly taller one can slow it down. Considering your personal preference for speed will help you and your installer select the perfect specifications for your practice needs.

Durability and UV Resistance

Your backyard putting green needs to stand up to Long Island’s four distinct seasons, from hot summer sun to winter snow. Look for turf made from high-quality, durable materials with built-in UV resistance. This protection prevents the vibrant green color from fading over time and keeps the fibers from becoming brittle and breaking down. A durable turf will maintain its performance and appearance for years, making it a worthwhile investment. Choosing a product that can withstand the elements means less worry about wear and tear and more time enjoying your green. This is why professional restoration and sealing services are also important for maintaining outdoor surfaces.

Color and Aesthetic Appeal

A great putting green should perform well and look beautiful in your yard. High-quality turf comes in various shades of green to mimic the look of natural grass and blend seamlessly with your existing landscape. Some products even incorporate a mix of green tones for a more realistic appearance. The right color and texture can make your putting green a stunning focal point. When designed thoughtfully, it becomes more than just a practice area; it’s an integrated part of your overall landscape design, adding value and visual appeal to your property.

Related Articles

Frequently Asked Questions

Can I customize the shape and difficulty of my putting green? Absolutely. A backyard putting green is not a one-size-fits-all product. The entire design can be tailored to fit your specific space and skill level. You can work with a designer to create a unique shape that flows with your landscape, and you can add features like undulations, tiers, and slopes to mimic the challenges of your favorite golf course.

How long does a typical putting green installation take? The timeline for installation can vary, but most residential putting greens are completed within a few days to a week. The exact duration depends on the size of the green, the amount of site preparation needed, and of course, the weather. A professional team works efficiently to transform your space with minimal disruption, handling everything from the initial excavation to the final grooming of the turf.

Is artificial putting green turf safe for children and pets? Yes, modern high-quality synthetic turf is designed with safety in mind. The materials used are non-toxic and do not contain harmful chemicals, making the surface perfectly safe for the whole family, including your furry friends. The turf and infill also create a soft, cushioned surface that is much more forgiving than hard-packed dirt or pavement.

How does the turf hold up during a Long Island winter? Synthetic turf is built to withstand all kinds of weather, including the cold, snow, and ice we get here on Long Island. The materials are UV-stabilized to prevent fading and durable enough to handle freeze-thaw cycles without cracking. Snow can be left to melt naturally, and the system’s excellent drainage will handle the runoff. Just be sure to avoid using sharp metal shovels or harsh ice melts on the surface.

Can I change the speed of my green after it’s installed? You can. One of the great features of a synthetic putting green is the ability to adjust its speed to suit your practice needs. You can make the green faster by brushing the turf fibers so they lay flat and using a lawn roller to smooth the surface. To slow it down for a more challenging roll, you can simply brush the fibers up against the grain. This gives you the flexibility to change your practice conditions whenever you like.

New sports game court built by a Hamptons builder on a Long Island, New York property.

How to Hire a Hamptons Sports Game Courts Builder

Your Hamptons home is a reflection of your personal style, and your sports game court should be no different. This isn’t about installing a generic, one-size-fits-all slab of concrete. It’s about creating a bespoke athletic space that complements your landscape, matches your home’s aesthetic, and is designed for the specific ways you love to play. Whether you envision a multi-sport surface with custom colors and logos or a classic tennis court with elegant surroundings, the possibilities for personalization are endless. Achieving this level of detail requires a builder with both technical skill and design vision. Finding a dedicated Hamptons Long Island new york sports game courts builder company is the key to transforming your unique ideas into a beautifully crafted, functional reality.

Key Takeaways

  • Explore All Your Court Options: Your Hamptons property can host more than just tennis; consider the social fun of pickleball, the family-friendly nature of a multi-sport games court, or the classic appeal of basketball to find the perfect fit for your lifestyle.
  • Choose a Builder Who Knows the Hamptons: A successful project requires a builder with deep local knowledge of Hamptons zoning laws, coastal climate challenges, and soil conditions, ensuring your sports games court is built correctly and without delays.
  • Plan for the Entire Project, Not Just the Court: A smooth construction process involves more than just the surface; factor in costs and time for site preparation, permits, custom features like lighting, and long-term maintenance from the very beginning.

What Kind of Sports Game Court Can You Build in the Hamptons?

When you decide to add a sports games court to your Hamptons property, you have more options than you might think. It’s not just about choosing a sport; it’s about creating a space that fits your lifestyle, whether you’re looking for intense competition, family fun, or a relaxed social activity. From classic tennis to the fast-growing sport of pickleball, the right court can transform your backyard into a personal resort. The key is to match the court to how you plan to use it. Let’s look at some of the most popular choices for Hamptons homes.

Basketball Courts

A backyard basketball court is a timeless addition, perfect for everything from a serious pickup game to a casual shoot-around with the kids. These sports games courts can be customized to fit your available space, with popular sizes like a 25×30 foot half-court being a great fit for many properties. Modern surfaces, such as high-performance modular tiles over a recycled concrete base, provide excellent durability and playability with great shock absorption. You can also personalize your court with custom colors and logos to match your home’s aesthetic. A well-built basketball court becomes a natural gathering spot for friends and family, offering endless hours of active entertainment right outside your door.

Tennis Courts

Tennis has long been a staple of the Hamptons lifestyle, and having your own private court is the ultimate luxury. A personal tennis court allows you to play whenever you want, without booking times or paying club fees. Proper construction and surfacing are critical for a great playing experience and longevity. Whether you prefer a classic clay court, a hard court, or a synthetic grass surface, professional installation ensures the right slope for drainage and a perfectly flat playing area. Regular maintenance and resurfacing will keep your court in top condition, providing a professional-grade experience for years of enjoyment.

Pickleball Courts

Pickleball has taken the Hamptons by storm, and for good reason. It’s easy to learn, fun for all ages, and has a very social atmosphere. Because a pickleball court is smaller than a tennis court, it’s a fantastic option for properties where space is a consideration. Many homeowners are even converting underused tennis courts into multiple pickleball courts. The sport’s popularity means that adding a pickleball court can also be a smart investment for your property. With towns like East Hampton adding more public courts to meet demand, having a private one gives you a convenient way to join in on the fun.

Multi-Sport Game Courts

Why choose just one sport when you can have several? A multi-sport games court is the ultimate solution for active families with varied interests. These versatile spaces can be designed to accommodate basketball, pickleball, volleyball, badminton, and even street hockey all in one area. Using adjustable nets and painted lines for different games, you can switch from one activity to another in minutes. This is an incredibly efficient way to use your backyard space, ensuring there’s always something for everyone to do. Gappsi can help you design a custom multi-sport games court that meets your family’s specific needs.

Bocce Ball Courts

For a more relaxed and social form of backyard entertainment, a bocce ball court is an excellent choice. This classic Italian game is simple to play, making it perfect for guests of all ages during parties and family gatherings. A bocce court adds a touch of European elegance to your landscape design and requires relatively little space. You can choose between a traditional surface of crushed stone or a modern, low-maintenance synthetic turf that stays green and pristine all year round. A bocce court provides a wonderful focal point for your outdoor living area, encouraging friendly competition and leisurely afternoons spent with loved ones.

How to Choose a Hamptons Sports Game Court Builder

Choosing the right builder for your Hamptons Sports Games Court is one of the most important decisions you’ll make. This isn’t just about finding someone who can pour concrete and paint lines; it’s about partnering with a team that understands your vision and has the expertise to bring it to life. A great builder acts as your guide, helping you select the right materials, create a functional design, and handle all the logistical details that come with a major construction project.

Think of your builder as the foundation of your project. The right one will ensure your court is not only beautiful and fun but also safe, durable, and compliant with local regulations. They should be a trusted advisor who can answer your questions, anticipate challenges, and deliver a finished product that exceeds your expectations. To help you find that perfect partner, let’s walk through the key qualities you should look for in a Hamptons Sports Games Court builder.

Expertise in Local Conditions

Building in the Hamptons comes with its own unique set of challenges. The coastal environment, with its salty air and specific soil conditions, requires a builder with deep local knowledge. A contractor who understands the area will know how to properly prepare the site for optimal drainage and stability, preventing issues like cracking or pooling water down the line. They will also be familiar with local zoning laws and permitting processes, which can save you from headaches and delays. Ask potential builders about their experience with projects specifically in the Hamptons to ensure they have the specialized knowledge needed for a high-quality, long-lasting court.

High-Quality Materials and Construction

A Sports Games Court is a significant investment, and its lifespan depends entirely on the quality of the materials and the craftsmanship of the installation. Your builder should use top-tier resurfacing materials and construction techniques to guarantee durability and performance. This means using products designed to withstand intense sun, moisture, and frequent use. Don’t hesitate to ask about the specific materials they recommend and why. A reputable builder will be transparent about their suppliers and confident in the quality of their work, from the sub-base to the final acrylic coating. High-quality porcelain and natural stone can also be integrated into the surrounding landscape for a cohesive design.

Custom Design Options

Your Sports Games Court should reflect your family’s lifestyle and aesthetic preferences. A one-size-fits-all approach just won’t do. Look for a builder who offers custom design solutions tailored to your needs. Whether you want a dedicated pickleball court, a tennis court conversion, or a versatile multi-sport design, your builder should be able to create a plan that fits your space and your vision. This includes everything from court dimensions and color schemes to fencing and lighting. A company with a strong design background can help you create a court that is not only functional but also a beautiful addition to your property.

Proper Licensing and Insurance

This is a critical step you can’t afford to skip. Before hiring anyone, verify that they have the necessary licenses and insurance. Proper licensing ensures the builder meets state and local standards for construction, while comprehensive insurance protects you from liability in case of accidents or property damage during the project. A professional contractor will readily provide you with their credentials. Asking for this information is a standard part of the vetting process, and any hesitation from a builder should be a major red flag. It’s a simple way to protect yourself and your investment.

Knowledge of Official Standards

Whether you’re a casual player or a serious athlete, you want your court to be built correctly. A knowledgeable builder will be well-versed in the official standards for any sport you choose, from the exact dimensions of a pickleball court to the net height for tennis. Building to these specifications is essential for safety, fair play, and overall enjoyment. An expert contractor knows how to avoid common construction mistakes that can impact the game, such as improper slope or incorrect line placement. This attention to detail ensures your court is ready for friendly matches and competitive play alike.

Full-Service Project Management

A Sports Games Court project involves more than just construction. It includes design, site preparation, permit applications, and coordinating different trades. Choosing a builder who offers full-service project management can make the entire process much smoother and less stressful. A company like Gappsi can help with the entire project, from initial design consultations and creating architectural drawings to securing permits and managing the build. This integrated approach ensures all the pieces come together seamlessly, keeping your project on schedule and on budget without you having to juggle multiple contractors.

Ongoing Maintenance and Support

Your relationship with your builder shouldn’t end once the final line is painted. A great Sports Games Court requires regular maintenance to stay in top condition. Look for a builder who offers ongoing support, including services like power washing, crack repair, and resurfacing. This shows that the company stands behind its work and is committed to the long-term performance of your court. Having a trusted partner you can call for inspections and repairs will help you protect your investment and ensure your court provides years of enjoyment for your family and friends. Gappsi’s restoration and sealing services are a great example of this long-term commitment.

What Does a Sports Game Court Cost in the Hamptons?

Figuring out the budget for a new sports game court in your Hamptons home involves more than just a single price tag. The final cost is a blend of your vision, your property’s specific needs, and the materials you choose. Because every project is unique, the price is tailored to match. A custom builder will walk you through each component of the cost, from the initial design to the final installation, ensuring there are no surprises. Think of it as an investment in your home and lifestyle, where each choice you make helps shape the final outcome and price.

Key Pricing Factors

The cost of your sports game court is influenced by several key elements. The biggest factors are the court’s size, the type of surface you select, and any site preparation needed. A larger, multi-sport court will naturally cost more than a smaller, single-purpose one. Similarly, if your backyard needs significant grading or drainage work before construction can begin, that will be factored into the budget. At Gappsi, we design and install custom synthetic turf and sports game courts that are completely tailored to your space and how you plan to use it, ensuring the final price reflects your exact needs.

How Surface Materials Affect Cost

Your choice of surface material is one of the most significant decisions affecting both the cost and the playability of your court. We offer several high-quality options, including durable Matflex tiles, classic asphalt, or versatile synthetic turf. Each material has a different price point and brings its own set of benefits for performance and maintenance. For example, interlocking tiles offer excellent drainage and can be customized with colors and logos, while synthetic turf provides a softer, more forgiving surface. We can help you compare the initial investment against the long-term durability and upkeep for each option, so you can make a confident choice.

The Cost of Upgrades and Features

Beyond the court surface itself, a variety of upgrades and features can personalize your space and add to the overall cost. This is where you can truly make the court your own. Popular additions include professional-grade basketball hoops, adjustable nets for tennis or pickleball, and rebounders for solo practice. You might also consider adding proper fencing and netting for safety and convenience, or installing lighting so you can play after sunset. These features allow you to create a complete athletic environment that suits your family’s favorite activities and fits perfectly into your backyard design.

Permit and Compliance Costs

Building a permanent structure like a sports game court in the Hamptons requires working with local zoning regulations and securing the right permits. This process is a critical part of the project and has associated costs, including fees for applications and architectural drawings. A reputable builder will handle this entire process for you, ensuring your court is fully compliant with all local codes. While it adds to the initial budget, professional management of permits protects your investment and prevents potential legal issues or delays down the road. It’s a necessary step for a smooth and successful project.

Long-Term Maintenance Costs

When planning your budget, it’s wise to think about the long-term cost of ownership. The maintenance needs of your sports game court will depend heavily on the surface material you choose. Some surfaces may require periodic deep cleaning, while others might need crack repairs or resurfacing after several years of use. We can help you understand the specific upkeep involved for each material. Investing in quality materials from the start often reduces long-term maintenance expenses. Our restoration and sealing services can also help keep your court in top condition for years to come.

Common Challenges in Hamptons Court Construction

Building a custom sports games court in your Hamptons backyard is an exciting project, but it’s one that comes with a unique set of challenges. From navigating local regulations to battling the coastal weather, there are several hurdles that can pop up along the way. Being aware of these potential issues from the start is the best way to ensure your project runs smoothly and stays on track.

An experienced builder will anticipate these challenges and have a clear plan to manage them. They’ll know the local landscape, both literally and figuratively, and can guide you through the process with confidence. Understanding what to expect helps you ask the right questions and choose a partner who is truly prepared for the job. At Gappsi, we’ve managed countless sports games courts projects in the Hamptons, so we know exactly what it takes to turn a potential headache into a seamless experience. Let’s walk through some of the most common challenges you might face.

Managing Project Timelines

In the Hamptons, everyone wants their outdoor spaces ready for summer. This creates a short and busy construction season, making project timelines a critical factor. Since many organized sports are seasonal, there are often firm deadlines to get a court ready for play. This requires meticulous planning and flawless execution to make sure your project is completed on time. A reliable builder will provide a realistic schedule from day one, factoring in every step from excavation to the final line painting. They will also have the project management skills to keep everything moving forward efficiently, so you can start enjoying your new court as planned.

Handling Local Permits and Zoning

Each town in the Hamptons has its own specific zoning laws and building codes, and they can be quite strict. Navigating the local permit process can be complex and time-consuming if you’re not familiar with it. An inexperienced contractor might face significant delays trying to get the right approvals, pushing your entire project back. That’s why it’s so important to work with a builder who has extensive experience in your specific area. They will understand the local regulations and have established relationships with town officials, which helps streamline the permitting process and avoid any frustrating and costly hold-ups.

Site Prep and Drainage Solutions

The success of your sports games court starts from the ground up. Proper site preparation is absolutely essential, and any mistakes made during this phase can lead to expensive repairs, an unsafe playing surface, and a poor athletic experience. The soil conditions and water table in the Hamptons require expert handling to create a stable foundation. Implementing the right drainage solutions is also crucial to prevent water damage and ensure the longevity of your court. A professional builder will conduct a thorough site analysis and design a preparation and drainage plan tailored to your property’s specific needs.

Preparing for Weather Delays

Coastal weather is famously unpredictable. A week of rain or a period of high humidity can bring construction to a halt, especially during critical phases like pouring concrete or applying surface coatings. One of the most common mistakes in building a sports games court is failing to prepare for these potential weather delays. A seasoned Hamptons builder knows this and will build a buffer into the project timeline. They’ll communicate openly with you about how weather is impacting the schedule and have a contingency plan to get work back on track as soon as conditions allow, managing expectations every step of the way.

Choosing Materials for a Coastal Climate

The salt air and humidity in the Hamptons can be harsh on building materials. Choosing products that can withstand this corrosive environment is key to ensuring your court remains safe, functional, and beautiful for years to come. This applies to everything from the playing surface and base layers to the fencing, nets, and lighting fixtures. Selecting the right high-quality materials designed for a coastal climate is essential for performance and durability. An expert local builder will have the knowledge to recommend materials that have a proven track record of holding up to the unique weather conditions in the Hamptons.

How to Start Your Sports Game Court Project

Turning your backyard into a hub for family fun and friendly competition is an exciting process. Once you have a vision for your Sports Games Court, the next step is to bring it to life. A well-planned project ensures your court is built to last and provides years of enjoyment. Here’s a look at the key stages, from the first conversation to the final installation.

Your First Consultation and Site Visit

The journey begins with an initial consultation. This is your opportunity to share your ideas, discuss which sports you want to play, and ask any questions you have. A professional builder will schedule a site visit to your Hamptons home to assess the proposed area. They’ll take measurements, evaluate the terrain for proper drainage, and consider factors like sun exposure and accessibility. This is also the perfect time to discuss the builder’s qualifications. You’ll want to confirm they are fully licensed and insured and that they are committed to using high-quality materials that ensure your court will play well and last for years.

Designing Your Court and Selecting Materials

After the site visit, the design phase starts. Your builder will work with you to create a custom plan that fits your space and suits your athletic needs. This is where you’ll make important decisions about the court’s surface. Gappsi offers several high-quality options, including professional-grade synthetic turf, interlocking Matflex tiles, classic asphalt, or durable concrete. Each material offers a different feel and aesthetic, and your builder can explain the benefits of each one. Whether you’re dreaming of a lush green multi-sport surface or a classic hard court, the right materials will make all the difference.

Understanding the Construction Timeline

A professional builder will provide a clear and realistic project timeline. The total time can vary based on several factors, including the complexity of the design, the materials selected, and the site preparation required. It’s also important to account for the time needed to secure local permits, which can sometimes take a few weeks. Weather can also play a role, especially during excavation and base preparation. If you want your court ready for a specific season, like summer, it’s best to start the planning process well in advance. Open communication with your builder will help you stay informed every step of the way.

The Installation Process

With a solid plan in place, the installation can begin. This process is handled by a skilled crew that manages every detail. The first step is site preparation, which involves excavating the area and laying a stable base. Next, the chosen surface material is installed, followed by the finishing touches. This includes painting precise game lines, installing net posts, and adding any other features like fencing or lighting. A full-service company like Gappsi handles the entire project, from creating architectural drawings to securing all necessary permits, making the experience seamless and stress-free for you.

Partnering with Gappsi for Your Project

Choosing the right builder is the most critical decision you’ll make. An experienced partner does more than just construct a court; they guide you through the process, offering expert advice to help you avoid common mistakes. Partnering with Gappsi means you benefit from decades of experience in creating custom Sports Games Courts across Long Island. We focus on saving you time and money by getting the job done right the first time, ensuring your new court exceeds your expectations and becomes a favorite family gathering spot for years to come.

Related Articles

Frequently Asked Questions

How much space do I actually need for a sports games court? You might be surprised by how flexible sports games courts can be. While a regulation tennis court requires a large footprint, many other options can fit into more compact yards. A half-court for basketball, a dedicated pickleball court, or a classic bocce ball lane are all fantastic choices for smaller spaces. The key is custom design, which allows us to tailor the court’s dimensions to your specific property while ensuring it’s still perfectly suited for play.

Can I convert my old tennis court into pickleball courts? Absolutely. Converting an underused tennis court into several pickleball courts is one of the most popular projects we handle. Since a pickleball court is significantly smaller, you can often fit two, or even four, pickleball courts into the space of one tennis court. The process involves resurfacing the area and painting the new, correct lines, transforming your old court into a modern hub for this incredibly social and fun sport.

How long does the entire process take, from the first call to the first game? The timeline for building a sports games court can vary quite a bit. It really depends on the project’s complexity, how much site preparation is needed, and the local permitting process, which can sometimes take several weeks on its own. A straightforward project might be completed in a few weeks, while a more intricate design could take longer. We provide a realistic schedule upfront so you know exactly what to expect.

What kind of upkeep should I expect after my court is built? The long-term maintenance depends largely on the surface material you choose. Most surfaces simply require being kept clean from leaves and debris to ensure proper drainage and a safe playing area. Beyond that, some materials may benefit from a professional power washing every few years. High-quality materials are designed for durability, so major upkeep like resurfacing is something you would only need to consider many years down the road.

How do I choose the best surface material for my family? Choosing a surface comes down to how you plan to use the court. Think about who will be playing: are they serious athletes who need high-performance bounce, or young kids who might benefit from a more forgiving, shock-absorbent surface like modular tiles? You should also consider aesthetics and which material best complements your landscape design. We can walk you through the pros and cons of each option, from synthetic turf to classic asphalt, to find the perfect fit for your family’s needs.