
As a Long Island homeowner, you know our local climate presents unique challenges, from humid summers to freezing winters. These conditions have a real impact on how a paver driveway should be built and, consequently, how much it costs. A proper installation needs to account for our region’s freeze-thaw cycles to prevent shifting and heaving for years to come. That’s why local expertise is so important. This guide will cover all the factors that influence cost, with a special focus on what matters right here in Suffolk and Nassau County. Before you get a quote for paver driveway services, learn what it takes to build one that lasts.
Key Takeaways
- Understand What Shapes Your Budget: Your final paver driveway cost is a blend of several key elements. The price is determined by your choice of materials, the driveway’s size and layout, the amount of ground preparation required, and any custom design features you add.
- Do Your Homework for Accurate Quotes: You’ll get much clearer and more useful estimates by preparing a few things first. Measure your driveway’s square footage, gather some ideas for paver styles and designs, and set a realistic budget before you start calling contractors.
- Analyze Quotes for Value, Not Just Price: The lowest bid isn’t always the best choice. A professional quote should be a detailed roadmap, itemizing all costs for materials, labor, and site prep, and it should always include clear warranty information.
What Determines Your Paver Driveway Cost?
When you start thinking about a new paver driveway, one of the first questions that comes to mind is, “How much will this cost?” The truth is, there’s no single price tag. The final cost is a blend of several key factors, from the materials you fall in love with to the unique characteristics of your property. Think of it less like buying a product off the shelf and more like commissioning a custom piece of work.
Understanding these variables will help you set a realistic budget and make informed decisions when you start collecting quotes. Each choice you make, from a simple, classic layout to an intricate, multi-toned pattern, will influence the bottom line. Let’s walk through the five main elements that shape the cost of a paver driveway, so you know exactly what to expect.
Your Choice of Materials
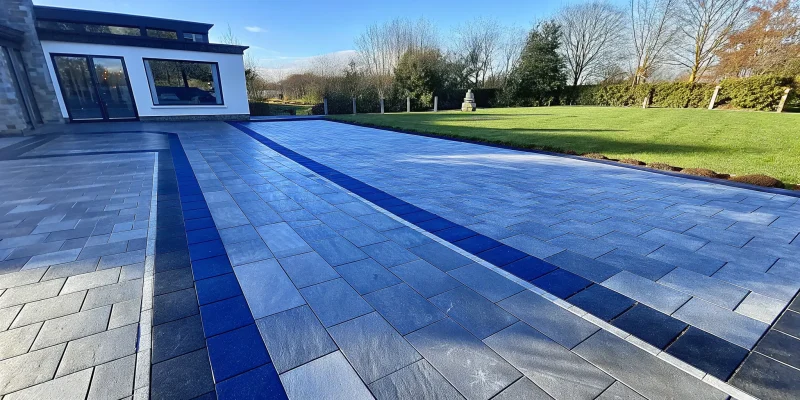
The type of paver you choose is one of the biggest factors in your project’s total cost. There’s a wide world of options out there, each with its own price point and aesthetic. For example, concrete pavers are often a more budget-friendly choice, while classic brick pavers can carry a higher price tag, partly because they require specialized installation. High-end materials like natural stone or premium porcelain pavers will be at the top of the price range but offer unparalleled durability and a luxurious look. Your material choice sets the foundation for both the style and the budget of your new driveway.
Driveway Size and Layout
It might seem obvious, but the bigger your driveway, the more it will cost. A larger surface area requires more pavers, more base material, and more hours of labor to install. It’s a straightforward calculation: more square footage equals a higher price. But it’s not just about size; the layout matters, too. A simple rectangular driveway is less complex to install than one with sweeping curves, multiple angles, or a circular inlay. These more intricate designs require extra time for precise cuts and placement, which adds to the labor costs.
Ground Preparation Needs
A beautiful paver driveway is only as good as the foundation it’s built on. Proper ground preparation is absolutely essential for a long-lasting result, and the condition of your existing property plays a big role in the cost. If your land is sloped, uneven, or has poor drainage, your contractor will need to do extra work to create a stable base. This could involve extensive excavation, grading the soil, or adding materials to manage water flow. Addressing issues like large tree roots or soft soil is critical to prevent shifting and cracking down the line, making expert masonry and site prep a worthwhile investment.
Design Complexity and Custom Features
This is where you can really let your personal style shine, but it’s also where costs can climb. Simple, straightforward paver patterns are the most cost-effective. If you want to add custom features like decorative borders in a contrasting color, intricate patterns like herringbone or basketweave, or built-in elements like steps or retaining walls, expect the price to increase. These details require more planning, precision, and time from the installation crew. While custom features create a stunning, one-of-a-kind look, they add a layer of complexity that is reflected in the final quote.
Long Island’s Climate and Soil
Living on Long Island means dealing with specific environmental conditions that can impact your driveway’s longevity. Our region’s freeze-thaw cycles are particularly tough on paved surfaces. In winter, moisture in the ground freezes and expands, and then thaws and contracts, which can cause pavers to shift, heave, and become uneven over time. A contractor with local expertise will understand Long Island’s unique soil conditions and build a robust base designed to withstand these seasonal changes. This specialized knowledge is crucial for ensuring your investment lasts for years without needing constant repairs.
How to Prepare Before Requesting Quotes
Getting ready to ask for quotes is about more than just picking up the phone. A little preparation on your end helps contractors provide a much more accurate and detailed estimate right from the start. When you have a clear idea of your project’s scope, materials, and budget, you can have more productive conversations and compare your options with confidence. Taking these five steps will streamline the entire process, ensuring you find the right team for your new paver driveway.
Measure Your Driveway Area
Before you can get a realistic estimate, you need to know the size of the space you’re working with. Grab a tape measure and calculate the total square footage of your driveway. To do this, simply multiply the length by the width. If your driveway has an irregular shape, break it down into smaller rectangles or squares, measure each one, and add the totals together. Having this number handy is the first piece of information any contractor will ask for, as it’s the foundation for calculating material and labor costs. This simple step helps set a baseline for your project and makes initial conversations much more efficient.
Research Paver and Design Options
The materials and design you choose have the biggest impact on your final cost. Do you envision classic cobblestone, sleek porcelain, or durable concrete pavers? Spend some time exploring different paver materials and colors to find a style that complements your home. Think about design complexity, too. Simple layouts are more budget-friendly, while custom patterns, intricate borders, or built-in steps will add to the overall investment. Having a few ideas or inspiration photos ready will help a designer understand your vision and quote the project accurately.
Find Qualified Local Contractors
Your driveway is a long-term investment, so you want to partner with a contractor you can trust. Look for local companies with a strong portfolio of paver projects and positive client reviews. A qualified professional should be fully licensed and insured, protecting you from any potential issues. Don’t hesitate to ask for references so you can hear directly from past customers about their experience. The goal is to find an experienced team that not only does great work but also communicates clearly and respects your home.
Prep Your Property for a Site Visit
Once you’ve narrowed down your list of contractors, they’ll need to visit your property to assess the site. Before they arrive, make sure the driveway area is clear of cars, equipment, or debris so they can get a good look. Be prepared to discuss any known issues with the land. For example, if your yard has poor drainage, is on a steep slope, or has large tree roots nearby, it will likely require more extensive ground preparation. Pointing these things out ensures the contractor can account for any extra excavation or grading work in their quote, preventing surprises later on.
Set a Realistic Budget
Knowing your budget is essential before you start collecting quotes. While online calculators can give you a rough idea—often between $18 and $24 per square foot for basic installation—your actual costs will vary based on materials, design, and site conditions. Having a clear budget helps you and your contractor make decisions about which materials and features are the best fit for your project. It also allows you to compare quotes effectively, as you’ll be able to see how each company proposes to bring your vision to life within your financial plan.
What Should Be in a Paver Driveway Quote?
Think of your quote as the roadmap for your project. It’s more than just a final price; it’s a detailed breakdown that shows you exactly what you’re paying for. A thorough, transparent quote is the hallmark of a professional contractor and your best tool for avoiding surprise costs and misunderstandings down the road. When you receive an estimate, it should be clear, comprehensive, and easy to understand. It should leave you feeling confident about the investment you’re making in your home.
A great quote itemizes every aspect of the job, from the specific pavers you’ve chosen to the warranty that protects your new driveway. It ensures that you and your contractor are on the same page before any work begins. At Gappsi, we believe this transparency is non-negotiable. We want you to be fully informed about every detail of your project. Let’s walk through the key components you should always look for in a paver driveway quote to ensure you’re getting a complete picture.
A Breakdown of Material Costs
Your quote should start with a clear, itemized list of all materials. This isn’t just about the pavers themselves; it should include everything needed to build a lasting driveway. Look for specifics like the type of paver (e.g., concrete, brick, or natural stone), the manufacturer, style, and color. The quote should also list the costs for the base aggregate, bedding sand, joint sand, and edge restraints. Having this level of detail allows you to see exactly how your material choices impact the total cost and makes it easier to compare different options if you’re still deciding between a few porcelain and natural stone styles.
Labor and Installation Fees
Labor is a significant portion of your driveway’s cost, and the quote should reflect what that investment covers. A vague “labor” line item isn’t enough. A professional quote will break down the labor costs associated with each major step of the installation process: excavation of the old surface, preparation of the base, the precise laying of each paver, and the finishing touches. The cost of labor often reflects the experience and skill of the crew. A team of expert masonry craftsmen ensures your driveway is not only beautiful but also engineered to withstand Long Island’s weather for years to come.
Site Prep and Excavation Expenses
The long-term durability of your paver driveway depends entirely on what’s underneath it. That’s why site preparation is so critical. Your quote must detail all the work involved in getting the ground ready. This includes the cost of removing and disposing of your old driveway, excavating soil to the proper depth, and grading the area to ensure correct water drainage away from your home. If your property has unique challenges, like poor soil or a steep slope, the quote should specify any additional steps and costs required to create a stable foundation for your pavers.
Permits, Timelines, and Additional Costs
A comprehensive quote looks beyond just materials and labor. It should also address the administrative side of the project. Check if the contractor includes the cost and responsibility of securing any necessary permits from your local town or village. The quote should also provide a clear, realistic project timeline, outlining the start date and estimated completion. Finally, be sure to clarify any potential extra costs. Ask if the price includes debris removal, sales tax on materials, and any other fees. Getting these details in writing upfront helps you stick to your budget and prevents last-minute surprises.
Warranty and Guarantee Details
Your new driveway is a major investment, and it should be protected. A reputable contractor will always stand behind their work with a solid warranty. Your quote or contract should clearly outline the details of this guarantee. Typically, there are two parts: a manufacturer’s warranty on the pavers themselves against defects, and a contractor’s warranty on the workmanship. The workmanship guarantee is your assurance that the driveway was installed correctly and protects you from issues like sinking or shifting pavers. A strong warranty is a sign that the contractor is confident in their materials and installation quality.
How to Compare Quotes from Different Contractors
Once you have a few quotes in hand, it’s time to compare them. This isn’t just about finding the lowest number; it’s about finding the best value and the right partner for your project. A paver driveway is a significant investment in your home’s curb appeal and functionality, so choosing a contractor who is transparent, qualified, and reliable is just as important as the final price. A thorough comparison will help you spot potential issues before they become expensive problems, ensuring your project runs smoothly from start to finish and that you’ll love the results for years to come.
Look for Transparency and Completeness
A trustworthy quote is a detailed one. Be wary of any contractor who gives you a single “flat rate” without explaining what it covers. A professional quote should break down the costs clearly, including the specific types of pavers, base materials, labor, site preparation, and the projected timeline. If a contractor isn’t forthcoming with these details, it could be a sign that they might cut corners later. A transparent contractor will be happy to walk you through their estimate and answer any questions you have about their masonry construction process, ensuring you know exactly what you’re paying for.
Verify Credentials and Insurance
Before you even think about signing a contract, do a little homework. Confirm that the contractor has the proper licensing to work in your area of Long Island and, most importantly, that they carry both liability insurance and workers’ compensation. This isn’t just a formality; it protects you. If an accident happens on your property and the contractor isn’t insured, you could be held financially responsible. You can verify a contractor’s license through official state resources. Any reputable company will readily provide proof of their credentials and insurance coverage upon request.
Spot Pricing Red Flags
While a competitive price is great, an unusually low bid should make you pause. A quote that drastically undercuts all the others might indicate that the contractor is using subpar materials, inexperienced labor, or is simply desperate for work. These are major red flags. Scams are also a real concern, so look for signs of a legitimate business operation. Does the company have a physical address you can visit? Do they have branded vehicles and professional communication? A well-established company with a solid local reputation is often the safer, more reliable choice for your home.
Check References and Past Projects
A contractor’s past work is the best indicator of their future performance. Ask for a list of recent clients you can speak with and don’t be shy about calling them. Ask about their experience with the crew, the project timeline, and how the final result has held up. A great contractor will be proud of their work and happy to provide references. You should also ask to see a portfolio of their completed projects. Reviewing a gallery of their work, like the projects on the Gappsi YouTube channel, gives you a clear idea of their design style and craftsmanship.
What to Ask Before You Hire a Contractor
You’ve gathered the quotes, and now you’re close to making a final decision. This is the crucial last step: a final round of questions to make sure you’re choosing a partner, not just a paver installer. A reputable contractor will be happy to answer these questions and provide the details you need to feel confident. Think of this as a final interview to ensure they’re the right fit for you and your home. Asking the right questions now can save you from major headaches down the road and ensure your project runs smoothly from start to finish.
Their Experience and Expertise
First things first, you need to confirm they have the right experience for your specific project. Don’t just ask if they’ve installed driveways before; ask to see a portfolio of paver driveways they’ve completed right here on Long Island. A contractor with deep local experience will understand the soil conditions and weather patterns that can affect your installation. When you’re vetting a company, look for proper licensing and insurance to protect yourself. Any professional masonry designer will have this readily available. Ask them about their team’s training and what makes their installation process stand out from the competition.
The Project Timeline and Schedule
Getting a clear timeline is about more than just knowing when you can park on your new driveway. It’s about understanding the entire flow of the project. An experienced contractor should be transparent about the schedule and what to expect each day. Ask for an estimated start and completion date, but also dig a little deeper. How will they handle potential weather delays? Who will be on-site managing the crew? Understanding the project schedule helps you plan your life around the work and sets realistic expectations for everyone involved, ensuring there are no surprises once the work begins.
Payment Terms and Change Order Policies
Talking about money upfront is essential for a healthy working relationship. A clear contract should outline the total cost and a detailed payment schedule. Typically, this involves a deposit, one or more payments at key milestones, and a final payment upon completion. It’s also smart to ask how they handle changes. What happens if you decide you want to add a walkway halfway through? Or what if they discover an unexpected issue during excavation? Understanding their process for change orders will help you avoid unexpected costs and keep your project on budget.
Their Communication and Material Sourcing Process
Clear communication is the glue that holds a project together. Ask who your primary point of contact will be and how they’ll keep you updated on progress—will it be through daily check-ins, texts, or emails? You should feel comfortable with their communication style. Equally important is where they get their materials. The durability and beauty of your driveway depend on the quality of the pavers. Ask where they source their porcelain and natural stone and why they trust those suppliers. A contractor who is proud of their materials is a good sign they’re committed to a high-quality result.
Related Articles
- Driveways Archives – Gappsi Group
- Masonry contractor Archives – Gappsi Group
- Latest News – Gappsi Group
Frequently Asked Questions
Is there a general price per square foot I can use for my initial budget? While the blog mentions a starting range of $18 to $24 per square foot, it’s best to think of that as a baseline for a straightforward project with standard materials. Your final cost will really depend on your specific choices. If you opt for premium materials like natural stone or a complex herringbone pattern, or if your property requires significant grading, the price will be higher. The most reliable way to budget is to get a detailed, custom quote based on your unique site and vision.
How long can I expect a professionally installed paver driveway to last? A paver driveway is a fantastic long-term investment for your home. When it’s built on a properly prepared foundation by an experienced crew, you can expect it to last for 25 years or even longer. The key to this longevity isn’t just the pavers themselves, but the expert installation underneath that prevents sinking and shifting over time, ensuring it looks great for decades.
Why is the base preparation so critical, especially here on Long Island? On Long Island, we deal with freeze-thaw cycles every year. When moisture in the ground freezes, it expands and pushes upward; when it thaws, it contracts. Without a deep, properly compacted base, this constant movement will heave and shift your pavers, creating an uneven and unsafe surface. A professional installation accounts for this by building a robust foundation that remains stable through our changing seasons, protecting your investment.
What kind of maintenance will my new paver driveway require? Paver driveways are refreshingly low-maintenance. For the most part, you’ll just need to sweep it regularly to keep it clear of debris and occasionally rinse it with a hose. If a weed happens to pop up in a joint, it’s easy to remove. To keep it looking its best, you can also have it professionally cleaned and sealed every few years, which helps protect the pavers from stains and weather.
Can I save money by doing some of the work, like demolition, myself? It can be tempting to handle the demolition of an old driveway yourself to cut costs, but it often creates more problems than it solves. Proper excavation and base preparation are technical skills that set the stage for the entire project’s success. If the ground isn’t prepared correctly, it can lead to drainage issues or an unstable foundation that will cost more to fix later. It’s usually best to let a professional team manage the entire process to ensure every layer is built to last.