
If you’re looking for a weekend project that delivers a huge visual impact, look no further than your paver patio or driveway. Giving your hardscape a fresh look doesn’t have to be complicated or expensive. With the right preparation and materials, you can achieve a finish that looks like it was done by a professional. This guide is designed to empower you with the knowledge to do it yourself. We’ll cover everything from the essential prep work to the best application techniques, giving you a clear roadmap on how to stain and seal pavers for a finish you can be proud of.
Key Takeaways
- Start with a perfectly clean surface: The success of your project depends on proper preparation. Before staining, you must thoroughly clean your pavers to remove all dirt and grime, then let them dry completely to ensure the stain absorbs evenly for a flawless finish. For an evaluation of older pavers, stains, or existing coatings, Long Island paver sealing specialists can recommend the right preparation and finish.
- Apply products with the right technique: For a professional look, always test your stain color in an inconspicuous spot first. Apply both the stain and sealer in thin, even coats using a sprayer or roller, as this prevents the streaking and pooling that can happen with a single heavy layer.
- Protect your work with sealing and upkeep: The final sealer coat is crucial; it locks in the color and protects your pavers from weather, spills, and UV damage. A simple routine of regular sweeping and resealing every three to five years will keep your hardscape looking beautiful.
Why Stain and Seal Your Pavers?
Your paver patio, walkway, or driveway is a major investment in your home’s beauty and function. Just like any other part of your home, it needs proper care to stay in top condition. Staining and sealing are two of the most effective ways to protect your pavers and keep them looking fantastic for years. Think of it as the finishing touch that locks in the beauty of your outdoor space and defends it against the elements. By taking this extra step, you ensure your beautiful hardscape remains a source of pride.
Get a Beautiful, Custom Look
Staining and sealing can make your outdoor areas look brand new. If your existing pavers have faded over time, a fresh coat of stain can revive their original color or give them a completely different look. With a wide range of shades available, you can customize the appearance of your patio to perfectly match your home’s exterior or your new outdoor furniture. This process enhances the natural texture of the stone and can add a rich, vibrant finish, transforming a tired-looking surface into a stunning feature of your landscape design. It’s an easy way to get a high-end, custom look without a complete replacement.
Protect Pavers from Weather and Spills
Sealing pavers helps protect your outdoor patio from stains, harsh weather, and pesky weeds. On Long Island, our pavers endure everything from hot summer sun to freezing winter snow, which can cause colors to fade and surfaces to wear down. A quality sealer creates a protective barrier that repels water, oil, and other spills, making cleanup much easier. It also helps prevent weeds from growing in the joints between pavers and protects against color fading from UV rays. Our professional restoration and sealing services are designed to shield your investment from the elements.
Make Your Patio or Driveway Last Longer
Beyond looking great, sealing your pavers is crucial for their longevity. Sealing helps them last longer and protects them from water damage and daily wear. Water is one of the biggest threats to paver installations. When it seeps into porous stone and freezes, it expands and can cause cracks. A sealer prevents this water penetration, which is especially important during Long Island’s freeze-thaw cycles. It also helps lock the jointing sand in place, maintaining the structural integrity of your entire masonry installation. Skipping this step can leave your pavers vulnerable to damage that can be costly to repair.
What You’ll Need to Stain and Seal Pavers
Getting a professional-looking finish on your pavers comes down to having the right supplies before you start. Gathering everything you need ahead of time makes the entire process smoother and helps you avoid any mid-project scrambles to the store. Think of it as setting up your workspace for success. From cleaning agents that prep the surface to the specific rollers that ensure an even coat, each item plays a crucial role. With the right tools and materials in hand, you’ll be well on your way to transforming your patio, walkway, or driveway.
Gather Your Cleaning Supplies
You can’t get a beautiful, lasting finish on a dirty surface. Before you even think about opening a can of stain or sealer, your pavers need to be completely clean. Start with a stiff-bristled broom to sweep away loose leaves and dirt. For a deeper clean, a power washer is your best friend, effectively removing ground-in grime and any of that white, powdery buildup called efflorescence. After a thorough wash, patience is key. You must let the pavers dry completely, which usually takes a full 24 to 48 hours. If this initial prep work feels overwhelming, our restoration and sealing services can handle the deep cleaning for you.
Choose the Right Paver Stain
Paver stain is a fantastic way to refresh faded colors or give your hardscape a completely new look. Unlike paint, which sits on the surface, a quality stain penetrates the concrete to create a rich, durable color. When you’re choosing a stain, remember that the final result will be influenced by the paver’s original color, its material, and how porous it is. Because of this, it’s always a smart idea to test the stain on a spare paver or in a hidden spot first to make sure you love the color. This simple step can save you from any surprises and ensure the final look matches your vision.
Find a High-Quality Paver Sealer
The sealer is your project’s finishing touch and long-term protector. It shields your freshly stained pavers from UV rays, water damage, and stains, all while making them easier to clean. Sealers come in various finishes, from a natural, matte look to a high-gloss, wet look that really makes the colors pop. For the best durability, look for a sealer that contains at least 25% acrylic solids. This ensures a strong, protective layer that will last for years. You can find professional-grade products at the Gappsi Store that will give your project the resilience it needs.
Get the Right Tools for the Job
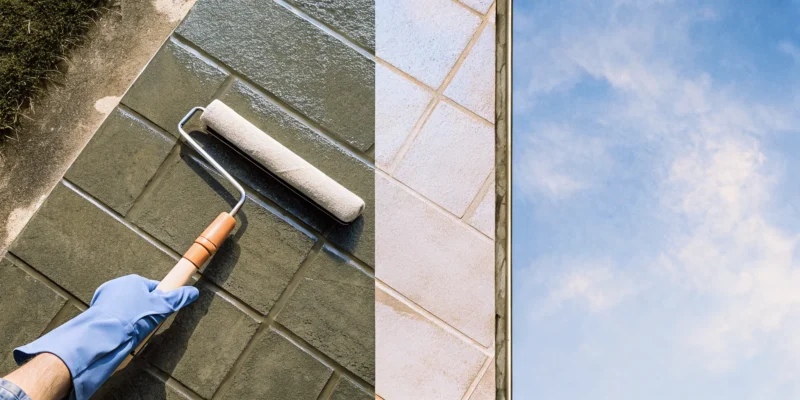
Applying stain and sealer correctly requires the right applicators. Using the wrong tools can lead to a blotchy, uneven finish. For the best results, use a low-pressure garden sprayer to apply thin, even coats of both the stain and the sealer. This method helps prevent streaks and puddles. If you prefer using a roller, make sure it’s a high-quality, sponge-type roller designed for semi-smooth surfaces. You’ll also want to have painter’s tape and plastic sheeting on hand to protect your house and plants from overspray. And of course, don’t forget safety gear like gloves and glasses.
How to Prep Your Pavers for a Flawless Finish
Before you even think about opening a can of stain, let’s talk about prep work. I know, it’s not the most exciting part, but getting your pavers ready is the single most important thing you can do to guarantee a beautiful, long-lasting finish. A pristine surface allows the stain to absorb evenly and the sealer to bond correctly, giving you that professional look you’re after.
Think of it like painting a room in your house. You wouldn’t just paint over dirty, dusty walls, right? The same principle applies here. Taking the time to properly clean and prepare your patio, walkway, or driveway will make all the difference. If the prep work feels like too much to handle, our team offers expert restoration and sealing services to get your project started on the right foot. Ready to do it yourself? Let’s walk through the three essential steps to get your pavers perfectly prepped.
Step 1: Clear and Clean the Surface
First things first, you need a completely clear space to work. Move all your patio furniture, planters, grills, and anything else sitting on the pavers to another area. Once the surface is clear, grab a stiff-bristled broom and give the entire area a thorough sweep. You want to get rid of all the loose debris like leaves, dirt, and twigs. This initial sweep makes the deep cleaning process much more effective. A clean slate is non-negotiable for achieving an even stain, so don’t rush this step. It sets the stage for everything that comes next.
Step 2: Remove Tough Stains and Buildup
Now it’s time for a deep clean. For general grime, a pressure washer is your best friend. Work methodically in sections to lift away embedded dirt. Pay close attention to any stubborn spots, like oil drips or rust marks, which may require a specialized paver cleaner. You might also notice a white, chalky substance on the surface. This is called efflorescence, and it’s basically salt deposits rising out of the pavers. It’s crucial to remove this, as it can prevent the stain from adhering properly. Proper masonry care ensures these issues are handled correctly from the start.
Step 3: Let Pavers Dry Completely
Patience is key for this final prep step. After all that cleaning, your pavers will be saturated with water, and you absolutely cannot apply stain to a damp surface. Moisture will block the stain from penetrating the pores of the stone, resulting in a splotchy, uneven finish that won’t last. You need to let the pavers dry completely. This typically takes at least 24 to 48 hours, but it can vary depending on the humidity and sunlight. Before you start staining, make sure the pavers and the sand in the joints are bone dry to the touch.
How to Apply Paver Stain: A Step-by-Step Guide
Now for the fun part: applying the stain and watching your pavers transform. With all the prep work behind you, this stage is all about technique and patience. Applying stain isn’t difficult, but a few key steps will ensure you get that professional, even finish you’re looking for. Rushing the process can lead to blotchy results, so take your time and follow these guidelines carefully. From testing your color to picking the right day for the job, each step plays a crucial role in the final outcome. This is where you bring your vision to life, whether you’re aiming for a subtle color enhancement or a dramatic new look for your patio or walkway. The right application will not only look great but will also help the stain penetrate properly for long-lasting color. Remember, the goal is a uniform color that looks like it’s part of the stone, not just a layer of paint sitting on top. This process can completely rejuvenate an old patio, making it the centerpiece of your backyard again. If you’re ever unsure or just want a guaranteed perfect finish, the experts at Gappsi offer professional restoration and sealing services to handle the job for you. Let’s walk through how to apply paver stain correctly.
Test Your Stain Color First
Before you commit to staining your entire patio or driveway, it’s essential to test the color. Always apply a small amount of stain to an inconspicuous area first to see exactly how it will look. Pick a spot that’s usually hidden, like behind a large planter or against the foundation of your house. The color on the can might look slightly different once it’s on your specific pavers because of their unique porosity and texture. Let the test patch dry completely, as the color can change as it cures. This simple step saves you from any potential color surprises and ensures the final result is one you’ll love for years.
Apply Thin, Even Coats
For a smooth, uniform finish, the key is to apply the stain in thin, even coats. Pour your paver stain into a pump sprayer and apply it using a steady, circular motion to avoid streaks. It’s much better to apply two light coats than one heavy one, which can lead to pooling and an uneven appearance. Be careful not to apply more than three layers, as too much stain can have trouble adhering to the surface. Start at the farthest corner of your project and work your way backward so you don’t have to step on any freshly stained areas. This methodical approach ensures every paver in your masonry project gets consistent coverage.
Check the Weather Forecast
The weather plays a huge role in how well your paver stain applies and cures. The ideal time to stain is on a mild, overcast day with no wind. You’ll want to avoid applying stain in direct, hot sunlight (over 90°F), as it can cause the stain to dry too quickly and leave behind streaks. Rain is also a major issue, as it can wash away the stain before it has a chance to set. Before you start, check the forecast to make sure you have at least a 24-hour window of clear, dry weather. This gives the stain enough time to penetrate the pavers and cure properly, giving you a durable and beautiful finish.
How to Seal Pavers After Staining
Once your stain has fully dried, it’s time for the final step: sealing. This is what locks in that beautiful new color and gives your pavers a durable shield against the elements. Sealing protects your investment from moisture, UV rays, and everyday spills, ensuring your patio or driveway looks fantastic for years. While this is a manageable DIY project, applying sealer correctly is crucial for a professional-looking finish. If you prefer to leave it to the experts, Gappsi offers restoration and sealing services to guarantee a perfect result.
Pick the Right Application Method
Your two main tools for applying sealer are a low-pressure garden sprayer or a simple paint roller. A sprayer is excellent for covering large areas quickly and applying a consistent, even coat. A roller, especially one with a thicker nap, is great for working the sealer into the texture of the pavers and ensuring you get full coverage in the joints. Whichever you choose, the goal is to apply thin layers. This prevents the sealer from pooling, which can lead to a cloudy or uneven finish. Always read the instructions on your chosen sealer, as the manufacturer will have the best advice for their specific product.
Apply the Sealer for Full Protection
Start by applying one generous, even coat of sealer across the entire surface. As you work, pay close attention to the joints between the pavers. You want to make sure plenty of sealer soaks into the sand to help lock the pavers in place and prevent weed growth. If you notice any excess sealer puddling on the surface, simply use your roller or a brush to push it into the joints. For an extra layer of defense and a richer, glossier look, you can apply a second coat after the first one is dry to the touch. This second application deepens the color and provides maximum protection, similar to what you see on beautifully finished natural stone.
Let the Sealer Cure Completely
Patience is key during this final phase. The sealer needs time to cure, which means it’s chemically hardening and bonding to the paver surface. It might feel dry to the touch after a few hours, but it isn’t ready for use just yet. You should avoid walking on the sealed pavers for at least 24 to 48 hours. Wait even longer, typically three to four days, before driving a car on a sealed driveway or placing heavy patio furniture back on the surface. Always check the sealer’s instructions for specific curing times, as they can vary based on the formula and weather conditions. Giving it the proper time to cure ensures a tough, long-lasting finish.
How to Maintain Your Stained and Sealed Pavers
You’ve put in the work to stain and seal your pavers, and they look fantastic. Now, let’s talk about how to keep them that way. With a simple maintenance routine, you can protect your investment and enjoy your beautiful outdoor space for years to come. It’s all about consistent, gentle care and knowing what to look for.
Keep Your Pavers Looking New
The secret to keeping your pavers looking fresh is regular, light cleaning. Make it a habit to sweep your patio, walkway, or driveway once a week. This simple step prevents leaves, dirt, and other debris from building up and causing stains. For a deeper clean, plan to wash the surface once a year with a paver-specific cleaner or a pressure washer on a low setting. If you notice a spill, like from a barbecue or a car, try to treat it right away before it has a chance to set. For stubborn grime or a professional touch-up, our restoration and sealing services can make your pavers look brand new again.
Know When to Reseal
Think of paver sealer as a protective shield that wears down over time. To keep your pavers safe from weather damage, stains, and color fading, you’ll need to reapply a coat of sealer every three to five years. The exact timing depends on factors like how much direct sun the area gets and how much foot traffic it handles. An easy way to check is to sprinkle some water on the surface. If it beads up, your sealer is still doing its job. If the water soaks in and darkens the paver, it’s time to reseal. A fresh coat will revive the color and maintain the integrity of your beautiful natural stone pavers.
Avoid These Common Maintenance Mistakes
A little know-how can help you avoid some common maintenance mistakes. One of the biggest is improper surface preparation. Before you clean or reseal, make sure your pavers are completely clear of debris and totally dry. Applying sealer over a damp or dirty surface can trap moisture and grime, leading to a cloudy finish. Another mistake is ignoring small issues. A few weeds or a minor stain can become a much bigger problem if left untreated. Deal with these little things as soon as you spot them. Finally, avoid using harsh chemicals not designed for pavers, as they can damage the sealer and stain. If you encounter an issue you’re not sure how to fix, our masonry experts are always ready to help.
Related Articles
- Sealing Natural Stone Pavers: A Step-by-Step Guide
- cleaning and sealing pavers suffolk county Archives – Gappsi Group
- paver stone sealing Archives – Gappsi Group
Frequently Asked Questions
How often should I stain and seal my pavers? For sealing, a good rule of thumb is to reapply a coat every three to five years. This keeps the protective barrier strong. Staining, however, is more about aesthetics. You only need to restain when you notice the color has faded significantly or if you simply want to update the look of your patio or walkway.
Can I just seal my pavers without staining them first? Absolutely. If you love the current color of your pavers, you can skip the stain and apply a clear sealer directly. Sealing is the essential step for protection. It will still enrich the natural color of the stone and give it that clean, finished look while protecting it from weather and spills.
What happens if I don’t seal my pavers? Leaving your pavers unsealed makes them vulnerable to the elements. They will be more likely to develop stains from things like oil or fallen leaves, and their color can fade from sun exposure. More importantly, unsealed pavers absorb water, which can lead to cracking when it freezes and expands during Long Island’s winters.
Should I seal brand new pavers right away? It’s actually better to wait a few months after your pavers are installed before sealing them for the first time. New pavers often release natural salts, a process that creates a white, chalky film called efflorescence. Waiting allows this process to finish so you can clean it off completely before locking it under a coat of sealer.
What’s the biggest mistake people make when doing this themselves? The most common mistake is rushing the preparation stage. You absolutely must start with a perfectly clean and completely dry surface. Applying stain or sealer over hidden dirt or damp pavers will trap grime and moisture, resulting in a cloudy, blotchy finish that won’t last. Patience during prep makes all the difference.