


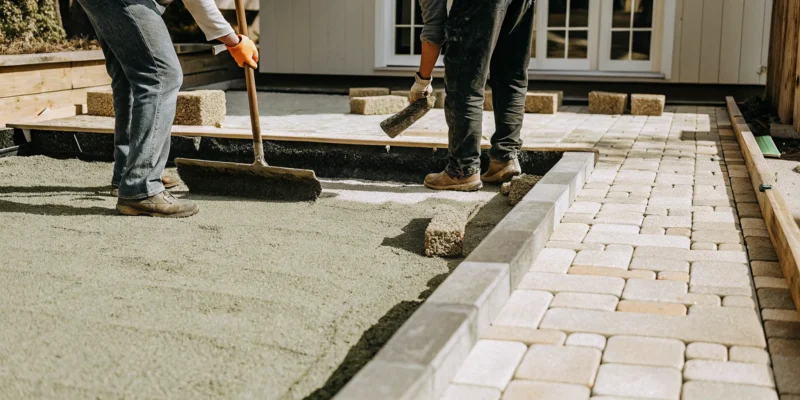
A paver patio is easier to enjoy when the decisions are made before excavation begins. Start by defining how your household will use the space, then account for drainage, property lines, access, materials, and the base needed for Long Island’s freeze-thaw conditions. A clear plan helps prevent costly changes after installation begins.
Contact Gappsi for a free consultation.
A complete paver patio installation Long Island plan covers design, material selection, site preparation, an 8- to 10-inch excavation, a compacted crushed-stone base, laying patterns, edge restraints, joint sand, and sealing. Depending on the patio’s size and complexity, installation commonly takes about 3 to 14 days.
From concrete pavers and Italian porcelain to natural bluestone, granite, travertine, limestone, or sandstone, each material affects the patio’s appearance, maintenance, and construction details. The first step is matching those choices to your space, daily use, and overall property design.
Step 1: Designing Your Paver Patio and Selecting Materials
Begin by measuring the proposed patio area, noting property lines, existing trees, doors, steps, drainage paths, and the transition from the house to the yard. Then define how your household will use the space. A dining patio needs room for chairs and circulation, while a lounge area may be organized around seating, a pool view, or a fire pit. Sketching these uses before selecting a pattern helps create a layout that works in daily life, not just on paper.
Call Gappsi at 631-543-1177 to discuss your patio plans and schedule a design consultation.
Allow for the actual footprint of furniture, grills, planting beds, and walkways. When estimating material quantities, add about 5% to the measured square footage for cuts around curves and irregular spaces, as recommended by Oregon State University Extension (paver planning guidance). Your plan should also account for a gradual slope that directs water away from the home and prevents pooling.
Gappsi can develop a 3D design so you can review proportions, circulation, colors, borders, and material combinations before construction begins. The design-build-supply model keeps planning, product selection, and installation coordinated through one provider. Homeowners can also visit the Gappsi showroom at 1015 W Jericho Turnpike in Smithtown to compare samples in person and see how surface texture and color change under different lighting. For broader guidance, review these best patio materials for Long Island.
Material selection should reflect the patio’s use, exposure, maintenance expectations, and architectural style. Natural bluestone provides a distinctive blue-gray surface and works well for formal entertaining areas. Travertine offers a textured natural-stone appearance that is often used around pools and outdoor living spaces. For flexible color, shape, and pattern choices, consider concrete pavers from manufacturers such as Cambridge, Nicolock, Techo-bloc, or Belgard. Italian porcelain pavers provide another option for homeowners seeking a crisp, contemporary surface with large-format design possibilities.
Gappsi also supplies other natural stone choices, including granite, limestone, and sandstone. Its masonry design and construction services on Long Island can coordinate the patio with retaining walls, outdoor kitchens, steps, or other masonry features. Confirm the selected material, pattern, edge detail, drainage plan, and any town permit requirements before moving to excavation.
Step 2: Preparing the Site and Building a Solid Paver Base
A paver patio performs only as well as the surface beneath it. On Long Island, the base must support the patio while managing water and seasonal movement. Careful layout, excavation, and compaction help reduce the risk of settling, pooling, and uneven pavers after repeated freeze-thaw cycles.
- Mark the patio area. Use stakes, string lines, or marking paint to define the finished footprint, including curves, steps, seating areas, and transitions to existing walkways. Check the measurements before excavation and confirm that the planned patio will direct water away from the house. The layout should include a deliberate slope because standing water can damage a paver surface over time. Oregon State University Extension explains why paver areas need a gradient for runoff.
- Excavate to the required depth. Remove topsoil, roots, organic material, and unstable soil from the marked area. For a typical patio, excavation should reach approximately 8 to 10 inches, allowing room for the compacted stone base, bedding layer, and pavers. The exact depth can vary with soil conditions, drainage needs, and the selected paver thickness. A shallow excavation may leave the patio vulnerable to movement when wet soil freezes and expands.
- Build the crushed-stone foundation. Install approximately 6 inches of 3/4-inch crushed stone across the excavated area. Spread the material evenly rather than placing the full depth in one loose layer. The stone should be compacted in lifts, with each lift thoroughly consolidated before the next is added. A plate compactor helps lock the angular stone together and creates a stable foundation for the bedding material.
- Verify drainage and grade. Check the slope with a level and string line as the base is shaped and compacted. Direct runoff away from the foundation and avoid creating low spots that can hold water. Proper drainage is especially important for Long Island’s freeze-thaw cycles because trapped moisture can contribute to heaving, shifting, and joint deterioration. For a deeper material overview, review Gappsi’s guide on how to install a paver base.
- Inspect the finished base before moving on. The surface should be firm, evenly graded, and free of soft areas. Correct weak spots before installing bedding sand and pavers. Gappsi’s patented Edge Restraint System is also planned as part of the installation, helping define and secure the patio perimeter once the pavers are laid.
How Do You Choose the Right Paver Pattern for Your Patio?
The pattern you select should fit the patio’s shape, intended use, and the material you want to see underfoot. Start by measuring the space and marking key features, such as a dining area, walkway, steps, or fire pit. A simple layout helps reveal where full pavers will work and where cuts will be necessary. For curves and unusual corners, plan for about 5% extra material to cover required cuts.
Match the pattern to the patio’s style
Running bond uses rows with each joint offset from the next. Its straightforward lines can make a narrow patio feel longer and work well with rectangular concrete pavers or brick-shaped units. Herringbone places pavers at a repeating angle, usually 45 or 90 degrees. The interlocking layout gives the surface a more directional appearance and is a practical choice for concrete pavers, especially where the patio connects to a frequently used walkway.
Basket weave groups pairs of rectangular pavers into repeating blocks. It creates a traditional look that suits older homes and smaller sitting areas without adding a complicated visual grid. Ashlar, sometimes called a random rectangular pattern, combines several rectangular sizes for a more varied layout. It is especially well suited to natural bluestone, where variations in color and texture can complement the changing sizes.
Consider material size before finalizing the layout
Material choice limits or expands the patterns available. Concrete pavers are manufactured in coordinated sizes that support running bond, herringbone, and basket weave. Bluestone can be cut into an ashlar arrangement or installed in more uniform courses. Travertine and porcelain may also be available in coordinated modular sizes, but the supplier should confirm the exact dimensions before the design is finalized.
For a cleaner contemporary patio, consider large-format 24×24 pavers. Fewer joints create a calmer visual field, while careful base preparation and precise installation remain essential because larger units make unevenness more noticeable. Review these large-format paver options before choosing a layout.
During a paver patio installation on Long Island, the pattern should also account for drainage, property lines, and transitions to the home. A design-build team can test several layouts in a plan, then confirm the pattern works with the selected stone or paver before ordering materials.
Step 3: Installing Edge Restraints and Laying the Pavers
Once the base is compacted and the layout is confirmed, the installation moves from preparation to precision. This stage determines whether the patio keeps its lines, joint spacing, and level surface over time. Gappsi’s patented Edge Restraint System, developed in 2000, provides a defined perimeter that helps hold the pavers in position.
-
Install the perimeter restraint
Set the Edge Restraint System along the planned patio boundary, including curves, corners, and transitions to walkways or steps. Secure the restraint according to the site conditions and confirm that its top edge matches the planned paver elevation. A stable perimeter limits lateral movement when the patio is exposed to foot traffic, water, and seasonal freeze-thaw cycles. For homeowners comparing installation approaches, Gappsi’s masonry design and construction services on Long Island include the planning and construction details that support this step.
-
Establish reference lines and elevations
Run string lines across the work area to establish the intended direction, slope, and finished height. Use a level or laser level to check the lines against fixed points such as the house, drainage structures, and adjoining paving. The surface should shed water appropriately without creating abrupt changes in elevation. Check the lines throughout installation rather than waiting until the final pavers are in place.
-
Lay the field pavers
Place each paver on the compacted bedding layer, following the approved pattern. Set pavers carefully instead of dragging them across the base, which can disturb the prepared surface. Maintain consistent joint spacing as you work, and use a rubber mallet for minor adjustments. Periodically check several rows with a straightedge and level. Small corrections made early prevent uneven joints or a visible alignment problem across the finished patio.
-
Cut the perimeter pieces
Measure and mark pavers for edges, curves, posts, steps, drains, and other obstacles only after the surrounding field pattern is established. A wet saw produces controlled cuts through many paver materials, while a paver splitter may suit certain concrete units. Keep cut edges oriented toward the restraint or another less visible boundary when the layout allows. Order approximately 5% extra material to account for these cuts and normal installation breakage.
Step 4: Applying Joint Sand and Sealing the Patio
Once the pavers are set and the edge restraints are secure, the joints need to be filled and stabilized. This finishing stage helps keep the surface connected, limits movement, and prepares the patio for routine maintenance.
How is polymeric sand applied?
Polymeric sand is swept across the dry patio so it settles into every joint between the pavers. The installer works in multiple directions and uses a broom to remove excess material from the surface. Any remaining sand on top of the pavers should be cleared before water is added, because residue can harden and leave a visible film.
After the joints are filled, a plate compactor passes over the patio to settle the sand deeper into the joint spaces. A protective pad may be used to reduce the risk of scratching the paver surface. The joints are then topped up where needed and lightly activated with water according to the sand manufacturer’s instructions. Controlled watering allows the binding agents to set without washing sand out of the joints.
Regular sand can shift, wash away, and leave open spaces where weeds can take hold. In contrast, polymeric sand helps stabilize the joints after activation and reduces weed growth when it is installed correctly. For a closer look at the material and its use, see this guide to polymeric sand for pavers.
What type of sealer should you choose?
Sealing is a finish decision as well as a maintenance consideration. A wet-look sealer deepens color and creates a more pronounced appearance, while a natural-look sealer preserves a subtler, closer-to-original finish. The right choice depends on the paver material, exposure, desired appearance, and whether the patio needs added resistance to staining.
Sealer should be applied only after the joint sand has fully set and the surface is clean and dry. On Long Island, many homeowners plan for a resealing cycle of approximately two to three years, although weather exposure, foot traffic, drainage, and the product used can change that timing. Review the process for sealing concrete pavers before selecting a product or scheduling maintenance.
What Permits Do You Need for a Paver Patio on Long Island?
Permit requirements for a paver patio can change from one Long Island municipality to another. A project in a Nassau County village may follow different procedures than one in a Suffolk County town. So homeowners should confirm requirements with the local building department before excavation begins.
Which patio projects may require approval?
Local officials commonly evaluate the patio’s total square footage, its distance from property lines, and whether the work changes existing drainage patterns. A larger patio, a patio close to a side or rear property line, or a design that redirects water may require a permit, site plan, or additional review. Rules can also depend on whether the project includes related features such as retaining walls, steps, covered structures, lighting, or changes to grading.
Do not assume that a patio is automatically exempt because it sits at ground level. The applicable building code, zoning rules, setbacks, drainage requirements, and village or town procedures all matter. The building department may also ask for a property survey or drawing showing the proposed layout and distances from lot lines.
How can a contractor help with the permit process?
An experienced local contractor can identify the approvals that may apply, prepare the project information, and coordinate questions with the appropriate municipality. This local knowledge helps prevent avoidable delays, especially when the design includes grading changes or sits near a setback. Gappsi includes permit expediting within its design-build service, helping homeowners move from the initial patio plan to a properly reviewed installation.
Before choosing materials or finalizing the layout, ask who will verify approvals and coordinate submissions. Gappsi’s masonry design and construction services on Long Island bring design, construction, and permit coordination into one process. That approach gives the project team a clearer view of site conditions and local requirements before work starts.
How Much Does a Paver Patio Installation Cost on Long Island?
For homeowners comparing paver patio installation on Long Island, a practical installed range is about $20 to $35 per square foot. The final estimate depends on the material, layout, access, and condition of the site. These planning ranges can help you compare options before scheduling a detailed design consultation.
| Tier | Typical materials | Estimated installed cost |
|---|---|---|
| Basic or classic | Standard concrete pavers with a straightforward layout | $20 to $24 per square foot |
| Mid-range | Natural stone or travertine with added color and texture options | $24 to $29 per square foot |
| Large-format | Large-format pavers, multi-pattern fields, or more detailed layouts | $29 to $35 per square foot |
What changes the cost of a patio?
Patio size affects the total investment, but square footage is only one part of the estimate. A compact patio with several curves, steps, or borders can require more labor per square foot than a larger, simple rectangle. Material choice also matters. Concrete pavers, travertine, natural bluestone, and large-format products each have different material and installation requirements.
Site preparation is another major variable. The crew may need to remove an existing concrete slab or patio, excavate unsuitable soil, address drainage, or correct grading before installing the base. Poor access for equipment, steep changes in elevation, retaining elements, fire features, and outdoor kitchen pads can also increase labor and preparation costs. A proper slope helps move water away from the patio and reduces the risk of long-term pooling.
How does Gappsi’s design-build-supply model help?
Gappsi manages design, material supply, and installation through one design-build-supply model. That means homeowners work with one provider instead of coordinating separate designers, suppliers, and installers, which helps reduce handoff problems and middleman markup. Gappsi also provides free consultations so the team can review measurements, access, grading, material preferences, and demolition needs before preparing an accurate quote.
How Do You Maintain Your Paver Patio After Installation?
Consistent care keeps a paver patio attractive and helps protect the joints, surface, and drainage system through Long Island’s changing seasons. A simple maintenance routine is usually enough when it is performed before small problems become larger repairs.
Start with regular sweeping using a stiff outdoor broom. Removing leaves, soil, and food debris prevents buildup in the joints and reduces the conditions that encourage weeds or staining. Sweep more often during fall and after storms, especially beneath trees. For stuck-on dirt, use occasional power washing on a gentle setting. Keep the spray at a reasonable distance and avoid directing high pressure straight into the joints, because it can wash out the sand that supports the pavers.
Inspect the joints periodically. If heavy rain, cleaning, or normal wear has removed sand, reapply polymeric sand according to the product instructions. The joints should be clean and dry before new sand is installed and activated. Polymeric sand helps lock the pavers together while limiting weed growth, but it is not a substitute for correcting drainage or movement beneath the patio.
Sealing every two to three years can help protect the patio from moisture, staining, and repeated freeze-thaw exposure during Long Island winters. The right schedule depends on the paver material, traffic, shade, and condition of the existing sealer. Review the process for sealing concrete pavers before choosing a product or application method.
How Should You Protect Pavers in Winter?
Use a plastic shovel or a broom to clear snow without scraping the surface. Avoid deicing salt when possible, since it can damage some pavers and affect nearby landscaping. For traction, use clean sand instead. After the season, sweep away the remaining sand and inspect for loose joints, cracked pieces, or areas where water collects. Addressing those issues in spring helps keep the patio stable before the next cycle of heavy use and weather.
Frequently Asked Questions
How much does a paver patio cost on Long Island?
The total cost depends on the patio’s size, layout, material, access to the site, drainage needs, excavation, and base preparation. Concrete pavers, natural stone, and porcelain pavers each have different material and installation considerations. A site review and itemized design-build estimate provide a more useful figure than a broad online average.
What is the best base material for a paver patio?
A properly compacted base of 3/4-inch crushed stone is a practical choice for patio construction. The stone should be installed in compacted lifts over the prepared subgrade, with drainage planned before the surface materials are placed. Base depth depends on site conditions, soil, drainage, and the intended use of the patio.
Do I need a permit for a paver patio installation?
Permit requirements vary by town in Nassau and Suffolk Counties. Setbacks, patio size, grading, drainage, and proximity to property lines can affect the review. Check with the local building department before construction, or work with a contractor who can confirm the requirements and coordinate permit expediting.
How long does a paver patio installation take?
The schedule depends on the patio’s size, design complexity, excavation, material availability, weather, and any permit requirements. The work typically includes layout, excavation, base preparation, paver installation, joint sand, and finishing. Your contractor should provide a project schedule after reviewing the property and design.
Is polymeric sand better than regular sand for paver joints?
Polymeric sand is generally better suited to finished paver joints because it helps stabilize the joints when properly installed and activated. The joints must be clean and dry, and the product must be compacted and watered according to its instructions. Routine maintenance still helps protect the joint system over time.
Ready to start planning your paver patio installation on Long Island? Call Gappsi at 631-543-1177 to schedule a free consultation and discuss your project.