


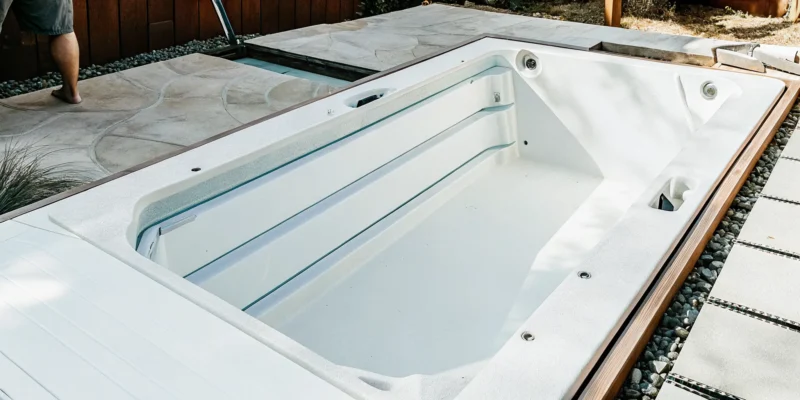
An in-ground swim spa can be the stunning centerpiece of a complete backyard transformation. It’s not just about the spa itself, but how it connects with your entire outdoor living space. A professional swim spa in-ground installation considers the surrounding patio, the flow of your garden, and features like privacy screens or a nearby pergola. This is where a simple installation becomes a cohesive design. This article explains the technical steps of the installation while also showing you how to integrate it with beautiful masonry, landscaping, and lighting to create a truly unified and luxurious personal retreat.
Key Takeaways
- A successful project starts with a solid plan: Before breaking ground, you need to secure permits, choose a location that balances sun and privacy, and confirm a clear path for delivery to avoid costly delays.
- Your spa needs a concrete vault for support: An in-ground swim spa requires a custom-built concrete vault, which provides the structural foundation to hold its weight and creates vital space for future maintenance access.
- Prioritize electrical safety and proper drainage: A safe installation depends on a licensed electrician installing a dedicated 240V GFCI circuit, and a smart drainage system is necessary to protect your spa’s mechanical parts from water damage.
What Is an In-Ground Swim Spa?
An in-ground swim spa is a fantastic way to get the best of both worlds: the fitness benefits of a lap pool and the relaxation of a hot tub, all in one compact unit. Unlike a standard above-ground model, an in-ground swim spa is built directly into the ground, creating a seamless and elegant look that blends perfectly with your backyard design. You can have it installed completely flush with your patio or partially recessed to create a unique multi-level outdoor living space. This built-in appearance makes it feel like a custom feature of your home, much like our custom swimming pools.
The magic of a swim spa lies in its powerful jets, which create a continuous current you can swim against for an incredible workout. When you’re ready to unwind, you can switch to the hydrotherapy seats and let the warm, bubbling water soothe your muscles. Because they are designed to be a permanent fixture, in-ground installations require careful planning, including excavation and the construction of a concrete vault. This process ensures your swim spa is stable, secure, and beautifully integrated into your landscape for years of enjoyment. It’s a project that transforms your backyard into a personal wellness retreat, combining exercise, relaxation, and family fun in a single, stylish package.
In-Ground vs. Above-Ground and Semi-Inground Spas
When you decide on a swim spa, you have a few installation options. An in-ground installation sits completely flush with your patio or deck, offering the most integrated and high-end look. A semi-inground installation is a great alternative, especially for sloped yards. Here, the spa is partially buried, which can make it easier to access and create interesting design levels. Finally, an above-ground spa is the simplest to install, as it sits on a prepared concrete pad. While swim spas are a great choice for smaller yards, you still need to plan for a unit that is typically 17 to 19 feet long.
Why You Need a Concrete Vault
A concrete vault is the hidden hero of any in-ground swim spa installation. This isn’t just a suggestion; it’s a structural necessity. The vault is a custom-built concrete box that sits in the excavated hole, and its job is to support the immense weight of the swim spa when it’s filled with water and people. A proper in-ground swim spa installation depends on this strong foundation to prevent shifting or damage over time. Beyond providing support, the vault also creates essential space around the spa’s shell, allowing service technicians to access the plumbing and mechanical components for any future maintenance or repairs without having to dig up your yard.
Plan Your Project Before Breaking Ground
The dream of stepping into your own in-ground swim spa is exciting, but the key to a successful installation is a solid plan. Before you even think about picking up a shovel, taking the time to map out every detail will save you from unexpected costs and delays down the road. A thoughtful approach ensures your project runs smoothly and the final result is a beautiful, functional addition to your home. Proper planning involves more than just picking a spot in the yard; it means coordinating permits, assessing your site’s unique conditions, and thinking through the logistics of delivery and installation.
At Gappsi, our design and construction expertise is built on a foundation of meticulous planning. We work with you to consider every angle, from how the morning sun will hit your spa to where the electrical equipment will live. This initial phase is where your vision starts to take shape. By addressing all the critical questions upfront, you can move forward with confidence, knowing that every aspect of your in-ground swim spa installation has been carefully considered. This preparation is the most important step in transforming your backyard into the personal retreat you’ve always wanted.
Secure Permits and Follow Local Codes
Before any work begins, it’s essential to handle the paperwork. An in-ground swim spa is a permanent structure, which means you will likely need to secure permits from your local town or village here on Long Island. Building codes and zoning regulations can vary significantly between Nassau and Suffolk counties, and even from one town to the next. These rules dictate everything from how far the spa must be from your property line to the type of safety barriers required.
Checking with your local building department is a critical first step. The process can feel a bit overwhelming, but it’s a non-negotiable part of the project. Working with an experienced installer who is familiar with local requirements can make this much easier. We handle the permit process for our clients, ensuring every swimming pool and spa installation is fully compliant.
Choose the Right Spot: Sunlight, Privacy, and Access
Deciding where to place your swim spa is about finding the perfect blend of practicality and ambiance. Think about how you plan to use it. Do you envision a morning workout in the full sun or a relaxing evening soak in a more shaded, private corner of your yard? Consider the spa’s proximity to your house, as a shorter walk is always appreciated during cooler weather. You’ll also want to think about privacy from neighbors and any views you want to highlight or hide.
The right location should feel like a natural extension of your home. A professional can help you integrate the spa into your overall backyard plan, ensuring it complements your existing patio, garden, and outdoor living areas. Our landscape design team specializes in creating cohesive outdoor spaces where every element works together in harmony.
Assess Your Site’s Conditions and Space
Your chosen location must be structurally sound enough to support the immense weight of a swim spa filled with water, which can be tens of thousands of pounds. A thorough site assessment is necessary to ensure the ground is stable and properly prepared. For an in-ground installation, this involves creating a concrete vault, which is essentially a strong, reinforced box built into the ground to house the spa.
This vault provides the solid foundation needed to hold the swim spa securely and prevent any shifting or settling over time. The construction of this vault requires precision and expertise, as it must be perfectly level and built to withstand constant pressure. This is where having a team with deep masonry experience is invaluable, as they can build a durable foundation that protects your investment for years to come.
Plan for Delivery and Equipment Access
Getting your swim spa into your backyard is a major logistical step. These are large, heavy units that often require a crane to lift them from a delivery truck and place them into the prepared vault. You’ll need to measure the entire path from the street to the installation site, checking for any obstacles like narrow gates, overhead wires, or tree branches that could get in the way.
It’s also crucial to plan for long-term access. You should leave at least three feet of clear space around all sides of the swim spa within the vault. This provides essential room for a technician to access the mechanical components for any future service or maintenance. Planning for this access from the start will save you major headaches later on. You can see examples of our installation process on the Gappsi YouTube channel.
Your Step-by-Step Installation Guide
Bringing a swim spa into your backyard is an exciting project, but an in-ground installation is a serious construction job that requires precision and expertise. Unlike a simple above-ground setup, this process involves excavation, concrete work, plumbing, and electrical wiring. It’s a project where professional planning and execution make all the difference between a lasting backyard oasis and a future headache.
Understanding the major steps can help you feel confident as you work with a contractor. Here’s a look at what a professional in-ground swim spa installation involves, from breaking ground to the final beautiful details.
Step 1: Excavate and Pour the Concrete Slab
The first physical step is excavation. Your installation team will dig a hole that’s sized not just for the swim spa itself, but with an extra 18 to 24 inches of clearance on all sides. This space is essential for the construction of the vault and for giving technicians access for future service. Once the site is excavated, the team will pour a reinforced concrete slab at the bottom. This isn’t just any slab; it must be perfectly level and engineered to support the immense weight of the spa when it’s filled with water and people. This foundation is the most critical part of ensuring your spa remains stable for years to come.
Step 2: Build the Concrete Vault and Retaining Walls
With the foundation in place, the next step is to build the structure that will house your swim spa. This is often called a concrete vault. This vault acts as a sturdy container, holding the spa securely and preventing the surrounding earth from shifting or collapsing inward over time. The walls of the vault are typically built using solid concrete or expert masonry techniques to withstand constant pressure from the soil. This protective structure is what truly separates a professional in-ground installation from a spa simply placed in a hole, ensuring the longevity and safety of your investment.
Step 3: Set the Swim Spa in Place
This is the moment it starts to feel real. Once the concrete vault has cured and is ready, a crane or other heavy machinery is used to carefully lower your new swim spa into its final position. The process requires a skilled crew to ensure the spa is set down gently and perfectly centered within the vault. After the spa is securely in place, the team will carefully backfill the area around the outside of the vault. This adds another layer of stability and helps integrate the entire structure into the surrounding landscape, preparing it for the next phases of plumbing and electrical work.
Step 4: Install Plumbing and Drainage Systems
Proper water management is key to protecting your swim spa and the surrounding structure. An in-ground vault can easily collect rainwater or groundwater, so a robust drainage system is not optional, it’s essential. Your installation team will plan for this by installing a solution like a French drain or a sump pump inside the vault. An automatic sump pump is often recommended, as it will actively pump out any water that accumulates, keeping the area around your spa’s mechanical components dry. This foresight prevents water damage and ensures your hot tubs and swim spas operate reliably.
Step 5: Add Insulation, Backfill, and Landscaping
Before closing everything up, it’s wise to add insulation to the vault walls to help the spa retain heat and operate more efficiently. Your team will also finalize the access points for maintenance. With the technical work done, you can focus on the aesthetics. This is where you can integrate the spa into a complete outdoor living area. You can surround it with beautiful porcelain and natural stone pavers, build a multi-level deck, or add landscape lighting and privacy plantings. This final step transforms your swim spa from a standalone feature into the centerpiece of your dream backyard.
Understand the Electrical Requirements
Getting the electrical setup right for your in-ground swim spa is not just about making sure the jets and lights work; it’s about ensuring the safety of your family and friends. Swim spas are powerful machines that require a dedicated and professionally installed electrical connection. This isn’t a DIY project or a task for a general handyman. It involves specific wiring, safety devices, and knowledge of local codes to ensure everything is safe and compliant. Think of it as the central nervous system of your new backyard oasis. Without a proper and safe power supply, nothing else works, and you could be putting your home and loved ones at risk.
Before any work begins, your installation team will coordinate with a licensed electrician to map out the entire electrical plan. This includes determining the best path for the electrical conduit from your home’s main panel to the spa’s location, identifying the exact placement for the emergency shut-off, and confirming that your home’s electrical system can handle the additional load. This planning phase is critical for a smooth installation and for avoiding costly surprises down the road. We’ll walk through the key electrical components you need to plan for with your contractor and a licensed electrician, so you feel confident and informed every step of the way.
The 240V/50-Amp Connection
Your swim spa needs a lot more power than a standard household appliance. Most models require a dedicated 240-volt, 50-amp circuit. Think of it as a private, high-speed lane of electricity running directly from your home’s main electrical panel just for your spa. This robust connection is essential to power the strong pumps that create the swim current, run the heater, and operate the massage jets, often all at once. Trying to run a swim spa on a standard outlet simply won’t work and is extremely dangerous. A licensed electrician will install this dedicated line, ensuring your spa has the consistent power it needs to operate efficiently and safely without overloading your home’s electrical system.
Ensure GFCI Protection and Safety Compliance
Because water and electricity are in close proximity, safety is the top priority. Every swim spa installation must include a GFCI, or Ground Fault Circuit Interrupter. A GFCI is a smart, fast-acting safety device that constantly monitors the flow of electricity. If it detects even the slightest imbalance, which could indicate a potential shock risk, it instantly shuts off the power. This is a non-negotiable safety feature and a legal requirement for all swimming pools and spas. Your electrician will install a GFCI breaker at the power source, providing a critical layer of protection and giving you peace of mind every time you use your spa.
Work With a Licensed Electrician
I can’t stress this enough: always hire a licensed electrician for your swim spa installation. This is a specialized job that requires expertise in wiring for wet environments and a deep understanding of local building codes here on Long Island. A qualified electrician will know exactly how to run the conduit, install the GFCI, and make the final connection to the spa’s control box. They will also secure any necessary permits and ensure the work passes inspection. Partnering with a professional who has experience with hot tubs and swim spas ensures your project is completed safely, correctly, and in full compliance with all regulations, protecting your investment and your family.
Plan for Drainage and Maintenance Access
Thinking about water and future repairs might not be the most exciting part of your swim spa project, but it’s one of the most important. Proper planning at this stage prevents major headaches and costly repairs down the road. An in-ground installation is a permanent structure, so you want to ensure that both water and service technicians can get where they need to go without any issues. A well-designed vault considers drainage to protect your equipment and provides enough space for routine maintenance, keeping your swim spa in top condition for years.
Why Proper Drainage Is Crucial
Water is the biggest threat to your swim spa’s mechanical components. Rain, snowmelt, or even small leaks can collect in the underground vault if there’s no escape route. This standing water can quickly damage the spa’s expensive pumps, heaters, and electronics, leading to frustrating and avoidable repairs. A professional installation always includes a robust drainage plan to channel water away from the equipment. At Gappsi, our expert masonry services ensure your swim spa’s foundation and vault are built to manage water effectively, protecting your investment from the start.
Explore Drainage Solutions: French Drains, Sump Pumps, and Grading
You have a few effective options for keeping your swim spa vault dry. The best solution often depends on your property’s specific conditions. Grading the floor of the vault to slope toward a drain is a fundamental first step. From there, many homeowners install a French drain around the perimeter to collect groundwater. A more active solution is a sump pit with an automatic submersible pump. This system detects and pumps out any water that collects in the pit, offering reliable protection. Our team can assess your site and recommend the ideal drainage strategy as part of our comprehensive swimming pool installation process.
Create Easy Access for Mechanical Components
Once your swim spa is in the ground, you can’t just slide it over to fix a leaky jet. That’s why planning for maintenance access is non-negotiable. A properly constructed vault should leave at least three feet of clear space around all sides of the spa. This gives a technician room to work comfortably and safely. Without this access, a simple repair could become a major project involving excavation. An underground leak can go unnoticed for a long time, potentially causing significant damage to the spa and the surrounding ground, so easy access for inspections is key.
Protect Your Spa from Long-Term Moisture
Beyond active drainage, protecting your spa from constant dampness is vital for its longevity. The concrete vault acts as the first line of defense, but it needs to be built correctly to prevent moisture from seeping through. Ensuring the vault is strong enough to support a full spa is just the beginning. We also recommend professional restoration and sealing services to waterproof the vault itself. Combining a well-built, sealed vault with smart drainage and easy maintenance access creates a secure, dry environment that will protect your swim spa for years of enjoyment.
Add Finishing Touches and Plan for Maintenance
With your swim spa securely in the ground, it’s time for the fun part: bringing your backyard vision to life. The final details are what transform your project from a construction site into a personal retreat. This is where you’ll add the textures, colors, and features that make the space uniquely yours. Just as important is planning for routine care, which will protect your investment and ensure your swim spa is always ready for you to enjoy.
Select Your Surround: Decking, Pavers, and Stone
The area around your swim spa sets the stage for your entire outdoor oasis. After backfilling the vault, you can create a beautiful and functional patio surface. This not only provides a clean, stable area for getting in and out of the spa but also integrates it seamlessly into your landscape. Consider using high-quality porcelain and natural stone pavers for a sophisticated and durable finish. Materials like travertine or porcelain offer a non-slip surface that stays cooler in the sun. Our expert masonry team can help you design a custom patio layout that complements your home’s architecture and provides ample space for seating and entertaining.
Install Essential Safety Features and Barriers
Safety is always a top priority, especially around water. While most swim spas come with a lockable safety cover, which is a great first line of defense, you should also consider additional measures. Your local building codes may have specific requirements for barriers around a swim spa. We can help you understand these regulations. Installing stylish fences and netting can provide peace of mind, especially for families with children or pets. A fence doesn’t have to be an eyesore; modern aluminum or wood designs can add to your backyard’s aesthetic while clearly defining the spa area and enhancing privacy.
Integrate Landscaping, Lighting, and Privacy Screens
This is where your personal style truly shines. Thoughtful landscaping softens the edges of the hardscaping and makes the spa feel like a natural part of your yard. Use a mix of plants and shrubs to add color, texture, and privacy. Outdoor lighting is also essential, allowing you to enjoy your spa after dark while improving safety. For ultimate privacy and a resort-like feel, consider adding a structure like one of our custom pavilions and pergolas. These can be positioned to screen views from neighbors and create an intimate, shaded space for relaxation. Our landscape design team can help you pull all these elements together.
Follow a Routine Maintenance Schedule to Protect Your Investment
Keeping your swim spa in pristine condition is easier than you might think. Simple, regular care will ensure clean water and protect your equipment for years to come. Plan to add a small amount of sanitizer after each use and “shock” the water weekly or bi-weekly to keep it clear. You should also clean the filters about once a month, a task that usually takes just a few minutes. A full water change is typically only needed once or twice a year. Protecting the surrounding patio is also key, and our restoration and sealing services can keep your pavers looking brand new.
Related Articles
- In-Ground Swim Spa Cost: A Complete Price Breakdown
- Outdoor Living News: Pools, Fire Pits & Renovations | Gappsi Inc
Frequently Asked Questions
How long does a typical in-ground swim spa installation take? The full process is more of a marathon than a sprint, so it’s best to plan for several weeks from start to finish. The timeline depends on a few key stages, including securing permits from your town, which can take some time. After that, the physical work of excavation, pouring the concrete foundation, and building the vault can take a week or more, especially since the concrete needs time to cure properly. Once the site is ready, the actual placement and connection of the spa is relatively quick, but the final landscaping and patio work will add to the overall schedule.
Is a concrete vault absolutely necessary for an in-ground installation? Yes, it is a non-negotiable part of a safe and lasting installation. A swim spa filled with water and people can weigh tens of thousands of pounds, and the concrete vault provides the structural support needed to hold that weight without shifting or settling over time. Just as importantly, it creates a dry, accessible space around the spa’s shell. This allows technicians to service the pumps, plumbing, and electrical components in the future without having to dig up your beautiful new patio. Think of it as essential insurance for your investment.
Can I use my swim spa during the winter on Long Island? Absolutely! That’s one of the best parts of owning a swim spa. They are designed for year-round use, and soaking in the warm, bubbling water on a crisp winter day is an incredible experience. To use it efficiently in the cold, a high-quality, well-fitting cover is essential to trap heat and keep debris out. Proper insulation within the spa cabinet and around the vault itself, which we plan for during installation, also makes a big difference in keeping energy costs down while you enjoy your spa in every season.
What’s the most common mistake homeowners make with this type of project? The biggest mistake is underestimating the importance of planning for access and drainage. It’s easy to get focused on the spa itself and forget about the hidden necessities. Some people try to save space by not leaving enough clearance around the spa in the vault, which can turn a simple repair into a major, costly project later on. Similarly, skimping on a proper drainage system, like a sump pump, can lead to water damage to the spa’s expensive mechanical parts. A little extra planning for these details at the start saves huge headaches down the road.
Do I need to coordinate all the different contractors myself, like the excavator, mason, and electrician? You certainly could act as your own general contractor, but it can be a complex and stressful role. Juggling the schedules and responsibilities of multiple independent trades is a huge undertaking. The beauty of working with a comprehensive design and construction company is that we manage the entire project for you. We coordinate our in-house teams and trusted partners, from the initial design and permits to the final landscaping touches, ensuring every step is executed seamlessly and correctly. This allows you to enjoy the process without the logistical burden.