


A fence is only as strong as the posts that hold it up, especially when dealing with concrete. Unlike a typical installation in dirt, you can’t rely on a deep hole and a bag of cement to do the heavy lifting. Installing vinyl fence post on concrete slab is a technical task that demands a different kind of strength, one that comes from a secure mechanical bond. Whether you use surface-mount brackets or the core drilling method, the goal is the same: to create an anchor point that is absolutely immovable. We’ll show you how the pros do it, from selecting the right hardware to avoiding common mistakes.
Key Takeaways
- Choose the Right Installation Method: Your project’s needs determine the best approach. Surface-mount brackets are great for a simpler installation on shorter fences, while core drilling provides superior strength for taller fences or in windy locations.
- Precision is Key for a Professional Finish: A straight, sturdy fence comes from careful execution. Use a string line for perfect alignment, a level to make sure every post is plumb, and the right tools, like a hammer drill, for clean and accurate work.
- Build a Strong Foundation to Avoid Common Failures: Your fence’s longevity depends on its base. Always use long, corrosion-resistant anchors, drill at least four inches from any concrete edge, and patiently allow anchoring cement to cure fully before adding weight.
What to Gather Before You Begin
A smooth installation day starts long before you drill the first hole. Taking the time to gather all your tools, materials, and safety gear upfront means you can focus on the job without making extra trips to the hardware store. Think of it as setting yourself up for a successful, stress-free project. Getting organized is the first step toward a beautiful, sturdy vinyl fence that you can be proud of. This checklist will walk you through everything you need to have on hand before you get started.
Your Materials List
First, let’s talk materials. You will obviously need your vinyl posts and fence panels. Depending on the installation method you choose, you will also need either surface-mount brackets or anchoring cement. For setting posts, a quality concrete mix is essential. When working with vinyl, you can’t just rely on rainwater to set the concrete; you’ll need to mix it properly to ensure a solid foundation. A good tip is to pour some water in the hole before and after the concrete, then mix it with a stick. If a post feels a little light, you can also pour a cup of dry concrete mix and a bit of water directly inside for added weight and stability. Using the right fences and netting materials from the start prevents wobbly posts and ensures your fence remains secure for years.
Your Tool Kit
Having the right tools makes all the difference, especially when working with concrete. The most important tool for this job is a hammer drill. Unlike a standard drill, a hammer drill combines rotation with a rapid hammering action, which is necessary to create clean holes in concrete. You can often rent one if you don’t own one. You will also need masonry drill bits in the correct size for your anchors, a tape measure, a level, and a string line to keep your posts perfectly aligned. A shop vacuum is also incredibly helpful for cleaning dust and debris out of the drilled holes, ensuring your anchors set properly. These are the same basic tools our home remodeling teams use for precision work.
Essential Safety Gear
Your safety is the most important part of any DIY project, so please don’t skip this step. Working with concrete and power tools requires a few key pieces of safety equipment. First and foremost, you need a dust mask. Drilling into concrete creates fine silica dust, which is harmful to your lungs. Always wear a good-quality mask. Next, protect your hearing. A hammer drill is loud, so hearing protection like earplugs or earmuffs is a must. Finally, wear safety glasses to shield your eyes from flying debris and heavy-duty gloves to protect your hands. Taking these simple precautions ensures you can complete your project safely and enjoy the results without any issues.
Two Ways to Install a Vinyl Fence on Concrete
When you’re working with a concrete patio, walkway, or slab, you have two solid options for installing your vinyl fence posts. The first involves using surface-mount brackets, which attach directly to the top of the concrete. The second is core drilling, a more intensive method where you drill a hole into the concrete and set the post inside it. Each approach has its place, and the right one for you will depend on your concrete’s condition, the height of your fence, and your comfort level with the tools required. Let’s walk through what each method involves so you can make a confident choice for your project.
Method 1: Using Surface-Mount Brackets
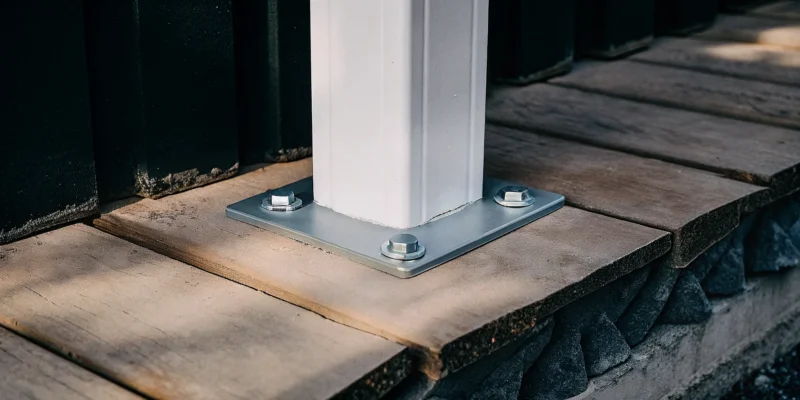
Think of surface-mount brackets as sturdy metal feet for your fence posts. This method is often preferred for its relative simplicity. You’ll start by marking a straight line on the concrete where your fence will go, measuring out the post locations, which are typically six to eight feet apart. After selecting brackets that fit your vinyl posts, you’ll use a hammer drill to create holes for the concrete anchors. Once the holes are drilled and cleared of dust, you can insert the anchors, place the brackets, and secure them. The final step is simply sliding the hollow vinyl post over the bracket. This approach is a great way to install a beautiful vinyl fence without majorly altering your existing concrete slab.
Method 2: Core Drilling
If you’re looking for maximum stability, especially for a taller fence or in a high-wind area, core drilling is the way to go. This technique involves using a specialized core drill to cut a clean, round hole into the concrete. The hole should be about one to two inches wider than your post and at least six to eight inches deep. After clearing out any debris, you’ll mix a fast-setting cement and pour it into the hole. You need to work quickly to set the vinyl post into the wet cement, using a level to make sure it’s perfectly straight while the compound hardens. This method creates an incredibly strong bond, integrating the post directly into the concrete foundation for a professional-grade installation similar to what you see in high-end masonry construction.
How to Choose the Right Method for Your Project
Deciding between surface-mount brackets and core drilling isn’t just about preference; it’s about matching the installation method to your specific situation. The right choice ensures your fence is not only beautiful but also secure and long-lasting. While both approaches can lead to a great result, one is usually a better fit than the other depending on your concrete slab, the type of fence you’re building, and your project goals. Taking a moment to evaluate these factors will help you move forward with confidence and prevent future headaches. Let’s walk through the three key areas to consider before you drill a single hole.
Assess Your Concrete’s Condition
The success of your fence installation starts with the foundation it’s built on. Before you do anything else, take a hard look at your concrete patio or walkway. For either installation method to work, the concrete must be strong, flat, and free of major cracks or crumbling. If your slab is damaged, the anchors for a surface mount won’t hold securely, and the pressure from core drilling could make existing cracks worse. A weak slab simply cannot provide the stable base a fence needs to withstand the elements over time. If you find that your concrete is in poor shape, your best first step might be a repair. A professional masonry expert can assess the damage and recommend the best course of action.
Consider Wind Load and Fence Height
A fence acts like a sail in the wind, and the taller it is, the more force it has to endure. This is especially true for solid privacy fences in open, windy areas, which are common across Long Island. For taller fences (typically those over five feet), core drilling is almost always the superior method. Setting the post deep into the concrete creates a much stronger and more rigid anchor point that can resist high winds. Surface mounts are generally suitable for shorter, decorative fences that don’t catch as much wind. Thinking about the long-term stability of your fence installation will help you choose the most durable method.
Factor in Your Budget, Timeline, and Style
Finally, practical considerations like your budget, timeline, and desired aesthetic play a big role. Surface mounting is typically faster and less expensive, especially for a DIY project, as it doesn’t require renting a heavy-duty core drill. If you need a fence up quickly and are working with a tight budget, this might be the way to go. On the other hand, core drilling offers a cleaner, more professional look. The post emerges directly from the concrete, with no visible brackets at the base. This method takes more time and specialized equipment, but the seamless result is often worth the extra effort and cost for a high-end finish.
How to Install a Fence with Surface-Mount Brackets
Using surface-mount brackets is a popular and effective way to install a vinyl fence directly onto an existing concrete surface, like a patio or walkway. This method is a fantastic choice because it avoids the need for heavy digging or pouring new concrete footings, which saves you a lot of time and mess. The process is logical: you secure sturdy metal brackets to the concrete with anchors, and then your hollow vinyl posts simply slide right over them. This creates a strong, stable base for your fence. While it’s a straightforward approach, precision is absolutely key. Taking your time to measure and level correctly will ensure your fence is sturdy, straight, and looks professionally installed. Follow these steps carefully, and you’ll have a beautiful fence that lasts for years.
Step 1: Mark Your Layout and Check Local Codes
First, map out your fence line. Use a string line stretched taut between stakes to create a perfectly straight guide. Measure and mark the exact center for each post, typically every six to eight feet, depending on your fence panel length. Before you drill any holes, it’s essential to check your local building codes and homeowner’s association rules for Long Island. There are often regulations about fence height, placement, and style. A quick check now can save you from a major headache later. If you’re unsure, getting professional advice on your fencing project is always a smart move.
Step 2: Drill the Anchor Holes
With your post locations marked, it’s time to drill. For concrete, you’ll need a hammer drill, which is specially designed to power through masonry. Use a concrete drill bit that matches the diameter of your concrete anchors. Mark the required depth on your drill bit with a piece of tape to ensure each hole is consistent. Hold the drill steady and perpendicular to the surface to create clean, straight holes for your surface-mount brackets. Wear your safety glasses, as drilling concrete can send small chips flying. Take your time with this step, as properly drilled holes are the foundation of a secure fence post.
Step 3: Clean the Holes and Set the Anchors
This step is more important than it sounds. After drilling, the holes will be full of concrete dust. You must clean them out completely. A shop vacuum or a can of compressed air works best, but a leaf blower can also do the job. If you leave dust in the holes, it creates a weak spot that can prevent the anchors from gripping securely, causing them to loosen over time. A clean hole ensures a tight fit and a strong hold for your fence. This same attention to detail is why professional surface cleaning and sealing is so effective; it all starts with a clean base.
Step 4: Attach and Level the Base Plate
Place the surface-mount bracket over the clean holes and insert your concrete anchors. Before you tighten them down completely, make sure the base plate is perfectly square with your fence line. You don’t want it to look diamond-shaped, as the corners might stick out from under the vinyl post skirt, creating an unfinished look. Use a level to ensure the vertical post mount is perfectly plumb (straight up and down). You can use metal shims under the base plate to make small adjustments. Once everything is level and aligned, tighten the anchor bolts securely according to the manufacturer’s instructions.
Step 5: Slide the Vinyl Post into Place
Here comes the satisfying part. Simply slide your hollow vinyl post down over the metal upright of the surface-mount bracket. The post should fit snugly. This design gives you the clean, seamless look of vinyl with the hidden strength of a metal core anchored to the concrete. Once the post is in place, you can secure it to the metal insert with screws if your system requires it, though many are designed for a pressure fit. With your first post installed, you can move on to the next, repeating the process until all your posts are standing tall, straight, and ready for the fence panels.
How to Install a Fence with Core Drilling
Core drilling is the professional’s choice for installing a fence on concrete, and for good reason. This method involves cutting a precise hole directly into the concrete slab, allowing you to set the fence post inside it with anchoring cement. The result is an incredibly strong, stable, and seamless installation that looks clean and can withstand significant force, including Long Island’s coastal winds.
While it requires more effort and specialized tools than using surface mounts, core drilling provides superior strength. It’s the ideal method for taller privacy fences, pool safety fences, or any project where durability is your top priority. By embedding the post into the concrete, you create a unified structure that offers the best long-term performance. If you’re looking for a flawless finish, our team has years of experience with all types of fences and netting to ensure your project is done right.
Step 1: Measure and Mark Your Post Layout
A straight fence starts with precise measurements. Begin by running a string line along the intended path of your fence to create a visual guide. This simple step helps you maintain a perfectly straight line from start to finish. Next, use a tape measure and marking chalk to indicate the center of each post location. Most vinyl fence panels require posts to be spaced six or eight feet apart, but it’s always best to confirm with your specific product’s instructions. Taking the time to measure twice and mark clearly will prevent alignment issues down the road.
Step 2: Drill the Core Hole
This step requires a specialized tool: a wet core drill. You can typically rent one from a local equipment supplier. This machine is designed to cut a clean, cylindrical hole in concrete without causing cracks. The hole’s diameter should be about one to two inches wider than your vinyl post to allow space for the anchoring cement. For depth, aim for at least six to eight inches to ensure the post has enough embedment to be stable. Using water during drilling is essential, as it cools the diamond bit and controls dust, making the process safer and more efficient.
Step 3: Clean and Prepare the Hole
For the anchoring cement to work effectively, the hole must be completely free of debris. After drilling, you’ll have a concrete slurry and dust left inside. Use a shop vacuum to thoroughly remove all loose material and water from the hole. Any remaining residue can compromise the bond and weaken the installation. Once vacuumed, you can wipe the inside with a dry rag or let it air dry for a few minutes. A clean and dry surface is critical for achieving a rock-solid hold that will last for years.
Step 4: Plug the Bottom of the Post
Water is a fence’s enemy, and you want to prevent it from collecting inside your hollow vinyl posts. Trapped water can lead to damage, especially during the winter when freezing and thawing can cause cracking. A simple solution is to plug the bottom of the post before setting it. You can do this by pouring a thin layer of gravel into the bottom of the drilled hole for the post to rest on, which allows for drainage. This small but important detail helps protect the integrity of your posts and extends the life of your fence.
Step 5: Set the Post with Anchoring Cement
With your hole prepped, it’s time to set the post. You’ll need a fast-setting anchoring cement, which is specifically designed for this purpose. Mix the cement according to the package directions, working quickly as it begins to set within minutes. Pour the mixture into the hole, filling it about halfway. Immediately insert the vinyl post, pushing it down to the bottom. Use a level to make sure the post is perfectly plumb on two adjacent sides. Once it’s straight, carefully pour the remaining cement into the gap around the post.
Step 6: Brace the Post While It Cures
Even though anchoring cement sets quickly, it still needs time to fully cure and reach maximum strength. While it’s hardening, the post is vulnerable to being knocked out of alignment. Use braces, like scrap pieces of wood, to hold the post securely in its perfectly level position. This is especially important if you’re working on a windy day or if the post could be bumped. Check the cement’s instructions for cure times, but it’s often best to let it set for at least 24 hours before installing the fence panels.
How to Keep Your Fence Posts Straight and Level
A wobbly, crooked fence is a telltale sign of a rushed installation. Taking the time to get your posts perfectly straight and level is the secret to a professional-looking fence that stands strong for years. It’s not about being a perfectionist; it’s about building something you can be proud of. These simple techniques will help you get it right from the start, ensuring your fence looks fantastic and functions flawlessly. Getting these details right is a core part of any professional fencing project.
Use a String Line for Perfect Alignment
Think of a string line as your guide for a perfectly straight fence. Before you drill a single hole, run a string between two stakes at either end of your planned fence line, pulling it taut. This line is your reference for placing each post. As you mark your post locations, typically every six to eight feet, make sure each mark is perfectly aligned with the string. This simple step ensures your posts don’t wander, creating a clean, straight line that looks professionally installed. For a truly level installation, you can even use a line level to check that your string is perfectly horizontal from end to end.
Know When and How to Use Shims
Even the most carefully poured concrete can have slight imperfections. That’s where shims come in. These small, thin wedges, often made of composite material or simple washers, are your best friend for leveling surface-mount brackets on an uneven surface. If your bracket wobbles after you place it, slide shims underneath one side until it’s stable and your level shows it’s perfectly plumb. This small adjustment prevents your posts from leaning and ensures the entire fence structure is secure. It’s a technique often used in expert masonry to achieve a flawless finish on any surface.
Account for Vinyl Expansion
Vinyl is a fantastic, low-maintenance material, but it does have one quirk: it expands in the heat and contracts in the cold. If you don’t account for this natural movement, your fence could warp or buckle over time. Always follow the manufacturer’s instructions for spacing between posts and panels. These guidelines are designed to leave just enough room for the vinyl to shift with Long Island’s changing temperatures without causing stress on the fence. Properly accounting for expansion is a key part of ensuring your fence’s long-term durability and appearance, much like the restoration and sealing work that protects other outdoor surfaces.
How to Choose the Best Concrete Anchors
Choosing the right concrete anchors is one of the most important steps for a secure and long-lasting vinyl fence. These small pieces of hardware are what physically connect your fence posts to the concrete patio or walkway, so their strength determines the stability of your entire fence line. It might seem like a minor detail, but using the wrong anchor can lead to wobbly posts and potential failure, especially during strong winds. To get it right, you need to consider the anchor’s type, its size, and the material it’s made from. Let’s walk through how to select the perfect anchors for your project.
Wedge Anchors vs. Sleeve Anchors
When you’re at the hardware store, you’ll likely see two main options for this job: wedge anchors and sleeve anchors. For installing a vinyl fence, wedge anchors are almost always the better choice. They are designed for heavy-duty jobs and provide an incredibly strong hold in solid concrete. Once you tighten the nut, the anchor expands and wedges itself tightly into the hole, creating a secure connection that’s perfect for supporting a fence post. Sleeve anchors are more of a general-purpose fastener and, while useful for other things, they just don’t offer the same level of structural strength you need for a fence installation.
Select the Right Anchor Size and Length
Once you’ve decided on wedge anchors, you need to pick the right size. First, check the diameter of the pre-drilled holes in your surface-mount brackets; your anchors need to match. Most brackets use 3/8-inch or 1/2-inch anchors. Next, consider the length. This is critical for a secure hold. A good rule of thumb is to choose an anchor long enough to penetrate the concrete by at least 1.5 to 2 inches. Anything less, and the anchor won’t have enough grip to handle the forces from wind and weather. Taking the time to get the right size ensures your fence is built on a solid foundation, just like with any professional masonry project.
Why Corrosion Resistance Is a Must
Since your fence will be outside, exposed to rain, humidity, and changing temperatures, you must choose anchors that can resist rust. Using standard steel anchors is a recipe for trouble. Over time, moisture will cause them to corrode, which not only looks unsightly but also weakens the anchor itself. A rusted anchor can fail, compromising the stability of your fence post. To avoid this, always choose anchors made from stainless steel or ones that are hot-dip galvanized. These materials are designed for outdoor use and will ensure your fence installation remains strong and secure for years. Protecting your investment from the elements is key, much like our restoration and sealing services do for patios and driveways.
Common Installation Mistakes to Avoid
Installing a vinyl fence on concrete requires precision. Even a small mistake can affect the final look and long-term stability of your fence. Taking your time and paying attention to the details will help you get a professional result that lasts for years. Let’s walk through some of the most common errors people make during this process and, more importantly, how you can steer clear of them. By avoiding these pitfalls, you ensure your fence is not only beautiful but also safe and secure.
Using Anchors That Are Too Short
One of the quickest ways to undermine your fence project is by using anchors that are too short. An anchor’s job is to secure the post mount firmly to the concrete, but it can only do that if it has enough length to get a solid grip deep inside the slab. Short anchors only engage with the very top layer of concrete, which can lead to wobbly posts. Over time, wind and general wear can cause these loose posts to fail, compromising the entire fence system. Always choose anchors that are long enough to provide the deep, secure hold your fence needs to stand strong against the elements.
Drilling Too Close to the Concrete’s Edge
It can be tempting to maximize your yard space by placing posts as close to the edge of a concrete patio or walkway as possible. However, drilling too near the edge is a serious mistake. This can cause the concrete to crack, chip, or break off entirely, a problem known as spalling. When the edge of the concrete fails, your anchor has nothing secure to hold onto, making the post unstable. As a rule of thumb, keep your drill holes at least four inches away from any edge. This simple step preserves the integrity of your masonry and provides a solid foundation for your fence post.
Rushing the Curing Process
If you are using the core drilling method, patience is essential. The anchoring cement that holds your posts in place doesn’t dry; it cures through a chemical reaction called hydration. This process takes time and is critical for developing maximum strength. If you rush it and start attaching fence panels too soon, you risk pulling the posts out of alignment before the cement has fully hardened. Wind can also push a post out of plumb while the cement is still soft. Always follow the manufacturer’s instructions for curing time and make sure your posts are braced securely until the cement is rock solid.
Forgetting to Check Alignment
Proper alignment is what separates a professional-looking fence from an amateur one. Before you even begin, you should run a string line to ensure all your posts will form a perfectly straight line. When using the core-drilling method, after placing the post in the hole with wet cement, it’s a good idea to lift it just slightly. This allows some of the cement to flow underneath the post, creating a solid footing and preventing it from sinking later. Double-check that each post is perfectly plumb with a level on two adjacent sides before bracing it to cure. Remember, you can always adjust a post upward, but you can’t fix one that has sunk too low.
Screwing Directly into the Vinyl
Never screw directly through the vinyl post sleeve into the wood post or mount inside. Vinyl is a plastic material that needs to expand and contract with temperature changes. If you fasten it with screws, you restrict this natural movement. This can cause the vinyl to warp, buckle, or even crack over time, especially during seasons with dramatic temperature swings. The post sleeve is designed to slide over the structural mount, which provides all the necessary stability. This detail is a key part of a successful home improvement project and ensures your fence remains in great condition for years to come.
How to Maintain Your Vinyl Fence
One of the best things about a vinyl fence is how little maintenance it requires. Unlike wood, you won’t have to worry about staining or painting. However, a few simple upkeep habits will ensure your fence looks fantastic and stays structurally sound for decades. Taking a little time for cleaning and inspection a couple of times a year protects your investment and keeps your property looking its best. It’s all about sealing the base, keeping it clean, and checking for stability.
Seal the Base of Each Post
For core-drilled posts, it’s important to seal the small gap where the vinyl meets the concrete. Concrete doesn’t actually bind to vinyl, so a tiny space is left behind after installation. Over time, water can seep into this gap, and in our Long Island winters, that water can freeze, expand, and potentially damage the concrete or loosen the post. Sealing this gap is a simple preventative step.
All you need is a quality exterior-grade silicone caulk. Apply a clean, even bead around the base of each post to create a watertight seal. This simple task is a key part of long-term care and is often included in professional restoration and sealing services.
Perform Regular Cleaning and Inspections
Keeping your vinyl fence looking new is incredibly easy. For most dirt and grime, a simple mix of mild detergent and water is all you need. Use a soft cloth or sponge to gently wash the surface, then rinse it clean with a garden hose. Avoid abrasive cleaners or stiff brushes, as they can scratch the vinyl finish. While you clean, it’s a great opportunity to inspect the panels and caps for any signs of wear or damage.
For tougher spots like mildew or algae, a solution of water and white vinegar often does the trick. Regular cleaning not only maintains your home’s curb appeal but also helps you spot small issues before they become bigger problems for your vinyl fence.
Check for Stability Over Time
Even a perfectly installed fence can be affected by shifting ground and harsh weather over the years. Once or twice a year, walk your fence line and give each post a gentle push. You’re checking for any significant wobble or lean. Loose fence posts can compromise the security and durability of the entire structure, so it’s best to catch them early.
If you find a loose post, the fix depends on the installation. A surface-mounted post may just need its anchor bolts tightened. A core-drilled post might require more extensive work. If a post feels very unstable, it’s a good idea to call in a professional for a masonry repair to ensure it’s properly reinforced.
DIY or Hire a Pro: What’s the Right Call?
Tackling a home improvement project yourself can be incredibly rewarding. There’s a real sense of pride in seeing your hard work pay off. When it comes to installing a vinyl fence on concrete, however, the decision between DIY and hiring a professional deserves careful thought. This isn’t just about digging holes in the dirt; it involves precision drilling and anchoring into an unforgiving surface.
Installing a fence on concrete is more technical than a standard installation. A successful outcome depends on getting several key details exactly right. Professionals have the experience to drill holes with precision, set anchors securely, and ensure every post is perfectly plumb. Even small mistakes, like a slightly loose post, can compromise the security and durability of the entire fence over time. There’s also the science of the materials to consider. For example, professionals understand the nuances of the concrete curing process, knowing how to brace posts against wind and prevent them from shifting before the cement fully hardens through hydration.
Hiring an expert is about more than just saving yourself the labor. It’s an investment in a secure, beautiful, and long-lasting result. An experienced team arrives with specialized tools, a deep understanding of local building codes, and the skill to handle any surprises your concrete slab might present. They take on the responsibility of ensuring the structural integrity of your fence, giving you peace of mind that the job is done correctly from the start. If you want a flawless finish without the stress of a steep learning curve, bringing in a professional fencing installer is often the smartest path.
Frequently Asked Questions
Which installation method is better for my project, surface mounting or core drilling? The best method really depends on your specific fence and location. Surface mounting with brackets is a great option for shorter, decorative fences under five feet tall. It’s generally faster and more budget-friendly for a DIY project. However, for taller privacy fences or fences in very windy areas, core drilling is the superior choice. Setting the post directly into the concrete provides unmatched strength and a cleaner, more professional finish.
My concrete patio has a few small cracks. Can I still install a fence on it? You need to be very careful here. While tiny, hairline cracks might not be an issue, you should never drill or anchor into any concrete that is actively crumbling, flaking, or has significant cracks. Doing so will only make the damage worse and will create an unstable foundation for your post. If you have any doubt about your concrete’s condition, it’s always best to have a masonry professional take a look before you begin.
Do I really need a special hammer drill, or can I use my regular drill? Yes, you absolutely need a hammer drill for this project. A regular drill just isn’t powerful enough to get through concrete effectively. A hammer drill combines a spinning action with a rapid hammering motion, which is what allows it to create clean holes in masonry. Trying to use a standard drill will be incredibly slow, frustrating, and you could easily burn out the motor.
How can I prevent my vinyl fence from looking dirty or getting moldy over time? The good news is that vinyl is very low-maintenance. A simple wash with mild soap and water a couple of times a year will remove most dirt and grime. For any mildew that appears, a solution of water and white vinegar is usually effective. The most important preventative step for core-drilled posts is to apply a bead of exterior silicone caulk around the base of the post. This seals the gap and stops water from getting trapped, which is a primary cause of mildew and potential freeze damage.
Is core drilling something I can realistically do myself, or should I hire a professional for that? Core drilling is a more advanced project that requires renting a heavy, specialized wet core drill. While it is certainly possible for a confident and skilled DIYer to tackle, it demands a lot of precision and physical effort to handle the equipment correctly. If you’re not comfortable with heavy machinery or if you want to guarantee a flawless and secure result without the learning curve, hiring a professional is often the wisest choice.