When you picture your perfect pool day, you probably see friends and family laughing, relaxing, and having fun. The foundation for all those great moments is a safe and comfortable patio. The right surface prevents slips and falls, feels good underfoot, and creates a welcoming environment for everyone. This is why selecting the best paving material for a pool patio and coping is about much more than just aesthetics. It’s about creating a secure space where you can relax without worry. Let’s explore the top materials that deliver on safety, comfort, and style, so you can build the perfect poolside retreat.
Key Takeaways
- Focus on safety and comfort first: Your best material choice will have a non-slip texture to prevent accidents and a lighter color to keep bare feet comfortable on hot days.
- Match your material to your home and climate: Select a paver that complements your home’s architecture and is durable enough to withstand pool chemicals and New York’s freeze-thaw cycles for a beautiful, long-lasting patio.
- Remember that professional installation is key: The right material can fail without proper installation. Critical details like drainage, secure coping, and expansion joints are what make a patio safe, durable, and worth the investment.
What Are the Best Materials for Your Pool Patio?
Choosing the right material for your pool patio is one of the most important decisions you’ll make for your backyard oasis. The surface you select sets the tone for the entire space and plays a huge role in safety and comfort. You want something that looks beautiful, feels good under bare feet, and can stand up to splashes and sunshine. Let’s walk through the top three materials that homeowners love, so you can find the perfect match for your new swimming pool.
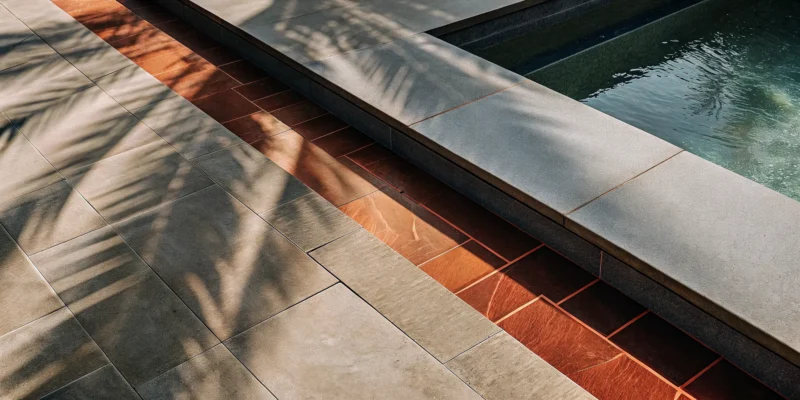
Natural Stone
If you’re dreaming of a rich, textured look with timeless appeal, natural stone is a wonderful option. Materials like travertine, bluestone, and flagstone offer unique patterns and colors that create a one-of-a-kind patio. Travertine is especially popular for pool areas because its porous nature helps with drainage and it stays surprisingly cool in the summer sun. While natural stone is a premium choice and can be more of an investment, its organic beauty is unmatched. A tumbled or brushed finish can also add extra grip, making it a safer surface for wet feet.
Porcelain Pavers
For a combination of modern style and incredible durability, porcelain pavers are hard to beat. They are specifically engineered for outdoor use, making them resistant to water, chlorine, salt, and fading from UV rays. This means your patio will look great for years with very little fuss. Porcelain is also a top choice for safety, as it offers excellent slip resistance. Plus, it doesn’t require sealing and is simple to clean. Choosing lighter-colored porcelain and natural stone pavers will also help keep the surface cooler for a more comfortable poolside experience.
Concrete Pavers
Concrete pavers are a fantastic all-around choice, giving you a great balance of style, durability, and value. They offer the strength of solid concrete but come in a huge variety of colors, shapes, and sizes, often designed to mimic the elegant look of natural stone. This versatility makes it easy to find a style that complements your home and landscape design. A key benefit for pool areas is their non-slip surface, which provides a safe and secure footing for family and guests. Concrete pavers are a practical and attractive solution that can bring your vision to life without stretching your budget.
What Makes a Great Pool Paving Material?
Choosing the right material for your pool patio goes far beyond aesthetics. While you definitely want a surface that looks beautiful, the best choices also deliver on safety, comfort, and long-term durability. Think about it: this is where your family and friends will spend countless summer days walking, playing, and relaxing. The right paving material creates a secure and enjoyable environment that can handle everything from cannonballs to cookouts.
When you start exploring your options, you’ll find that the best materials share a few key characteristics. They provide excellent grip, stay comfortable under bare feet, stand up to harsh pool chemicals, and manage water effectively. Let’s look at what makes a paving material truly great for a Long Island pool patio.
Prioritize Slip Resistance for Safety
Safety should always be your top priority around a swimming pool. Wet surfaces can be incredibly slippery, so choosing a non-slip material is essential for preventing accidents. The texture of the paver plays a huge role here. Materials with a slightly rough or matte finish, like tumbled travertine or brushed porcelain, offer much better traction than smooth, polished surfaces. When we design a pool patio, we select materials that meet or exceed industry safety standards for wet walking surfaces. This ensures your pool area is a safe space for everyone, from toddlers taking their first steps to grandparents enjoying the sun.
Ensure Comfort with Heat-Resistant Surfaces
We’ve all done the hot-pavement-dance on a scorching summer day. The material you choose for your pool deck can make the difference between a comfortable stroll and a mad dash for the shade. Dark, dense materials tend to absorb and hold onto heat, becoming uncomfortably hot for bare feet. Lighter-colored pavers are a great choice because they reflect more sunlight. Certain materials, like travertine, are naturally cooler to the touch, making them a popular and comfortable option. A heat-resistant surface ensures your patio remains a pleasant and usable space even during the peak of a Long Island summer.
Find Materials That Withstand Weather and Chemicals
Your pool patio has a tough job. It’s constantly exposed to direct sunlight, chlorinated or saltwater splashes, and the full range of New York’s four-season climate, including freeze-thaw cycles in the winter. You need a material that won’t fade, stain, or crack under pressure. High-quality porcelain and natural stone pavers are specifically designed for this environment. Materials like granite and certain types of concrete are incredibly dense and non-porous, which means they resist damage from both chemicals and weather, ensuring your investment looks great for years to come.
Understand Water Absorption and Drainage
Proper water management is critical for the safety and longevity of your pool patio. You want a surface that discourages water from pooling, which can create slipping hazards and lead to mildew growth. Textured pavers help water drain away more effectively than perfectly flat ones. However, the material itself is only part of the equation. A professional installation with a proper drainage system is just as important. Our masonry and construction teams ensure your patio is graded correctly, so water flows away from the pool and your home’s foundation, protecting your entire outdoor living space.
Comparing Your Top Material Choices
Now that you know what to look for in a pool paving material, let’s weigh the pros and cons of the top three contenders. Each one offers a unique blend of style, durability, and maintenance requirements, so thinking through your priorities will help you land on the perfect fit for your home.
The Pros and Cons of Natural Stone
Natural stone is a classic choice for a reason. Materials like travertine, bluestone, and flagstone bring an unmatched richness and texture to a pool patio. Because each stone is unique, you get a one-of-a-kind look with endless variations in pattern, shape, and color. This makes it easy to find natural stone options that feel like a true extension of your home. The biggest consideration with natural stone is the investment. It’s a premium material, and the cost reflects the intensive process of quarrying, finishing, and transporting it. While some stones like travertine are famous for staying cool on hot summer days, others can absorb more heat, so it’s important to choose wisely for a comfortable poolside experience.
The Pros and Cons of Porcelain Pavers
Porcelain pavers have become a go-to for modern pool patios, and it’s easy to see why. They offer incredible durability and a clean, sophisticated look. We especially recommend textured porcelain pavers because they provide a comfortable, slip-resistant surface that’s perfect for bare feet. One of the best things about porcelain is its resilience. It stands up to water, chlorine, salt, and harsh UV rays without fading or degrading. This means your patio will look great for years with very little effort. In fact, porcelain typically doesn’t require sealing, which is a huge plus for anyone who prefers low-maintenance outdoor living. It’s a practical and beautiful choice for any poolside design.
The Pros and Cons of Concrete Pavers
If you’re looking for a material that balances cost, style, and performance, concrete pavers are an excellent option. They give you the high-end look of natural stone without the premium price tag, making them a very popular choice for pool decks. You can find them in a huge variety of colors, sizes, and shapes, which gives you the creative freedom to design a patio that perfectly matches your vision. Textured concrete pavers also offer a reliable non-slip surface, keeping your pool area safe for family and friends. To get the most out of them, proper sealing and expert installation are key. When done right, they create a durable and stunning poolside retreat that will last for years.
Everything to Know About Pool Coping
Pool coping is one of those details that makes a huge difference in the final look and feel of your backyard oasis. It’s the finishing touch that frames your pool, but it does more than just look pretty. Think of it as the bridge between your pool and your patio. It provides a safe edge, a comfortable seat, and a protective cap for your pool’s structure. Choosing the right coping is a key step in designing a pool area that is both beautiful and functional.
What Is Pool Coping and What Does It Do?
So, what exactly is pool coping? It’s the material used to cap the edge of your pool shell. This cap serves a few important jobs. It protects the pool structure from the elements and prevents water from getting behind the shell, which could cause damage over time. It also creates a smooth, rounded edge that’s safe for swimmers to hold onto. Finally, it helps direct water that splashes out of the pool toward deck drains. Properly installed coping is essential for the longevity and safety of your swimming pool.
Popular Coping Edge Styles to Consider
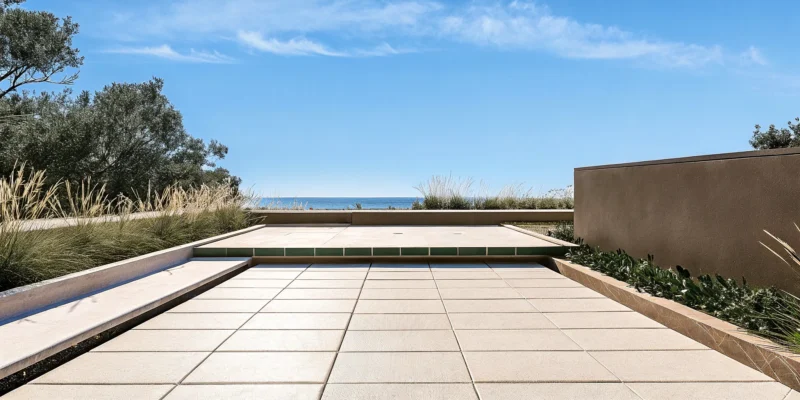
Coping comes in several edge styles, and your choice influences both the safety and aesthetic of your pool. One of the most popular options is the bullnose edge, which is rounded and smooth. This style is comfortable to sit on and easy to grip, making it great for families. Another option is a rough-cut or chiseled edge, which offers a more rustic, natural look. You could also opt for a cantilevered edge, where the patio material extends slightly over the pool’s edge for a clean, modern finish. The style you select should complement your porcelain or natural stone patio.
How to Match Coping with Your Patio
Your pool coping should feel like a natural extension of your patio, not an afterthought. The key is creating a cohesive design that ties your outdoor space together. You can achieve a seamless look by using the same material for both your coping and your patio. Alternatively, you can create a beautiful visual contrast by choosing a coping material that complements your pavers in a different color or texture. For example, a dark gray coping can create a stunning frame around a light-colored patio. Our masonry design experts can help you find the perfect combination.
Breaking Down the Cost and Maintenance
Creating your dream pool patio is an exciting project, but it’s also a significant investment. To make the best choice for your home and budget, it’s helpful to look beyond the initial price tag and consider the full picture. This includes the upfront cost of materials and installation, the long-term upkeep required to keep your patio looking beautiful, and the importance of avoiding common installation errors that can lead to expensive repairs down the road. Thinking about these factors now will ensure you can relax and enjoy your poolside oasis for many years to come.
Your Initial Investment
The material you choose for your pool patio is the biggest factor in your initial cost. Natural stone, like travertine or bluestone, sits at the higher end of the price spectrum. This is because it’s expensive to quarry, finish, and transport these beautiful, one-of-a-kind materials. On the other hand, concrete pavers offer a more budget-friendly alternative. They give you the sophisticated look of natural stone without the premium price, making them a popular choice for achieving a high-end aesthetic. Exploring a wide selection of porcelain and natural stone options can help you find the perfect balance between your vision and your budget.
Planning for Long-Term Upkeep
To keep your pool patio looking its best season after season, a little maintenance goes a long way. Sealing your pavers is one of the most important steps, especially for natural stone. A quality sealant protects the stone from pool chemicals, stains, and the effects of Long Island’s weather. While most natural stone requires this protective layer, porcelain pavers are a fantastic low-maintenance option that usually doesn’t need sealing. Factoring in periodic cleaning and resealing will protect your investment and preserve its beauty. Gappsi offers professional restoration and sealing services to keep your patio in top condition.
Common Installation Mistakes to Avoid
Proper installation is just as important as choosing the right material. A professional installation prevents future headaches and ensures your patio lasts. One common mistake is mixing different paver sizes and shapes without a cohesive design, which can create a chaotic look. Another critical error is failing to install expansion joints where the pavers meet the pool coping. These joints allow the materials to expand and contract with temperature changes, preventing cracks and damage. Working with an experienced masonry and construction company ensures these crucial details are handled correctly from the start.
Design Tips for a Beautiful and Safe Pool Patio
Once you’ve narrowed down your material choices, it’s time for the fun part: designing a space that’s both stunning and secure. The right design choices go beyond just picking a pretty paver. They create a cohesive look that complements your home and a safe environment for your family and friends to enjoy all summer long. From the color palette to the surface texture, every detail plays a role in building your perfect poolside retreat.
A well-thought-out design ensures your patio is not only beautiful on day one but also functional and durable for years to come. Think about how you plan to use the space. Will it be a quiet spot for sunbathing, a lively area for kids to play, or an elegant setting for outdoor dining? Your answers will influence the layout, the type of pavers you choose, and even the patterns you incorporate. For example, a large, open pattern can make a small space feel bigger, while intricate designs can define different zones for lounging and dining. We help homeowners explore a wide range of porcelain and natural stone options to find the perfect fit for their vision and lifestyle. Getting these details right from the start is the key to creating an outdoor oasis you’ll love.
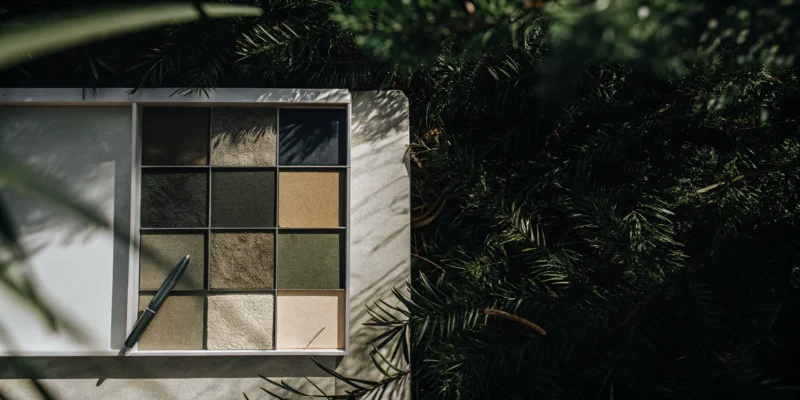
Choose Colors and Patterns You’ll Love
Your pool patio is an extension of your home, so its color scheme should feel personal and inviting. Pavers come in a huge range of colors, from warm, earthy tones that create a natural, rustic vibe to cool grays and blues for a more modern look. White pavers are a classic choice because they reflect sunlight, helping to keep the surface cooler on hot days. Beyond color, the pattern you choose can add a lot of personality. A simple running bond is timeless, while a herringbone or basketweave pattern can add a touch of custom detail. Think about what style best matches your home’s architecture and your personal taste.
Select the Right Texture for Safety and Style
When it comes to pool patios, safety is just as important as style. A wet surface can be a major slipping hazard, which is why texture is a critical consideration. Pavers with a naturally rough, tumbled, or brushed finish provide much better grip underfoot. Materials like travertine and textured concrete are excellent choices for this reason. They also help water drain away instead of pooling on the surface. This doesn’t mean you have to sacrifice looks for safety. The right texture can add visual depth and character to your patio, creating a rich, layered look that feels both elegant and secure. Our masonry design team can help you find the perfect balance.
Learn How to Seal and Protect Your Pavers
To keep your new pool patio looking its best, a little protection goes a long way. Sealing your pavers is a crucial step, especially for natural stone. A quality sealant protects the stone from stains, harsh pool chemicals, and fading caused by the sun. It also makes cleaning up spills much easier. While most natural stone benefits from sealing, high-density materials like porcelain pavers usually don’t need it, which is a great low-maintenance perk. Applying a sealant is a key part of long-term care that preserves the beauty and integrity of your investment. If you need help, our restoration and sealing services can ensure your patio stays in top condition.
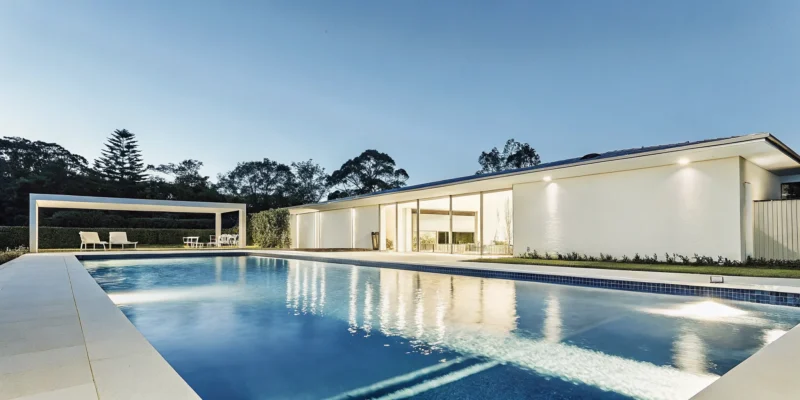
How to Choose the Right Material for Your Long Island Home
Now that you know the top material options, let’s narrow down the perfect choice for your Long Island property. Your home’s location, style, and your family’s safety are all key factors in making a decision you’ll love for years to come. Thinking through these elements will help you select a material that is not only beautiful but also practical for our unique environment.
Consider New York’s Four-Season Climate
Living on Long Island means your outdoor patio has to endure everything from humid summer days to freezing winter nights. The constant freeze-thaw cycle can cause some materials to crack and degrade over time. That’s why it’s so important to choose durable options like dense natural stone or porcelain pavers, which are built to withstand these temperature swings. Beyond durability, think about safety. Materials with a bit of texture, like travertine or brushed concrete, provide better grip around the pool, reducing the risk of slips and falls during a summer splash or after a rainstorm.
Match Your Patio to Your Home’s Architecture
Your new pool patio should feel like a natural extension of your home, not an afterthought. Take a look at your home’s architectural style. Is it a classic colonial, a coastal cottage, or a modern build? The materials you choose should complement that aesthetic. For example, the profile of your pool coping can make a big impact. A rounded bullnose edge creates a soft, traditional look, while a sharp, drop-face edge offers a clean, contemporary feel. Our masonry design experts can help you select colors, patterns, and textures that harmonize with your home’s existing character.
Make Your Final Decision with Confidence
With your ideal material and style in mind, the final step is ensuring a safe and professional installation. Safety around a pool is non-negotiable. Industry standards require a minimum coefficient of friction for wet walking surfaces, a technical detail a professional installer will handle for you. It’s also critical that all pavers, especially the coping around the pool’s edge, are installed securely and perfectly level to prevent tripping hazards. Working with an experienced team on your swimming pool project guarantees that every detail is managed correctly, giving you a stunning and secure patio built to last.
Frequently Asked Questions
Which material is the safest for a family with young children? Safety is all about texture. For a pool area with lots of activity, you want a paver with a non-slip surface that provides excellent grip for wet feet. Textured materials like tumbled travertine, brushed porcelain, and certain concrete pavers are all fantastic choices. They offer much better traction than smooth or polished surfaces, which helps prevent slips and falls and gives you peace of mind.
My backyard gets a lot of direct sun. Which pavers will stay the coolest? To avoid a hot-pavement-dance, your best bet is to choose lighter-colored pavers, as they reflect more sunlight and absorb less heat. White, beige, or light gray options will feel much more comfortable underfoot on a hot day. If you love the look of natural stone, travertine is famous for staying naturally cooler to the touch, making it a premium and very comfortable choice for sunny pool decks.
How much maintenance does a new pool patio really need? The level of upkeep depends on the material you choose. Porcelain pavers are the easiest to care for since they are non-porous and don’t require sealing. Natural stone and concrete pavers, however, benefit greatly from being sealed. A quality sealant protects them from chlorine, salt, stains, and weather damage. Beyond that, regular sweeping and occasional washing will keep any patio looking its best.
Is it better to use the same material for the coping and the patio? There is no right or wrong answer here; it really comes down to the look you want to achieve. Using the same material for both the coping and the patio creates a seamless, uniform design that feels very cohesive. On the other hand, choosing a contrasting coping material, perhaps in a darker or complementary color, can create a beautiful frame around your pool and add a custom design element.
What’s the biggest mistake people make when choosing patio materials? A common mistake is focusing only on appearance while overlooking function. It’s easy to fall in love with a beautiful, sleek paver, but if it gets dangerously slippery when wet or scorching hot in the sun, you won’t be happy with it long-term. The best approach is to find a material that balances the style you want with the safety, comfort, and durability your family needs for a poolside space.