Building a retaining wall on Long Island requires more than just stacking stones against a slope. A wall that lacks engineering will fail in the end under the weight of wet soil and shifting grades. The right expert ensures your landscape stays safe for decades.
A retaining wall contractor Long Island homeowners can trust must provide more than just basic masonry skills. They should offer a complete design and build model that manages everything from structural plans to building permits. Gappsi specializes in structural masonry, ensuring that every project meets the specific soil and slope needs found across Nassau and Suffolk Counties. According to retaining wall services experts, expert engineering is vital for long-term safety and following local town codes. By choosing a team with 38 years of experience, you get a wall that stands up to heavy water pressure and shifting earth. This expert approach creates strong and beautiful outdoor living areas for your home.
Understanding the full scope of work helps you spot the difference between a simple installer and a true expert. Before starting your backyard project, you should ask What Does a Retaining Wall Contractor on Long Island Do? The answer begins with
Retaining Wall Contractor Long Island: What Does a Retaining Wall Contractor on Long Island Do?
A professional retaining wall contractor on Long Island manages the full life of earth retention projects. Their main role is to design and build walls that hold back soil and stop erosion on sloped land. This work is key for yards with steep hills where soil shifts could hurt home bases or yard features. Gappsi has given these expert services since 1987. We use three generations of Italian masonry skill to ensure walls last for many years.
Structural design and soil control
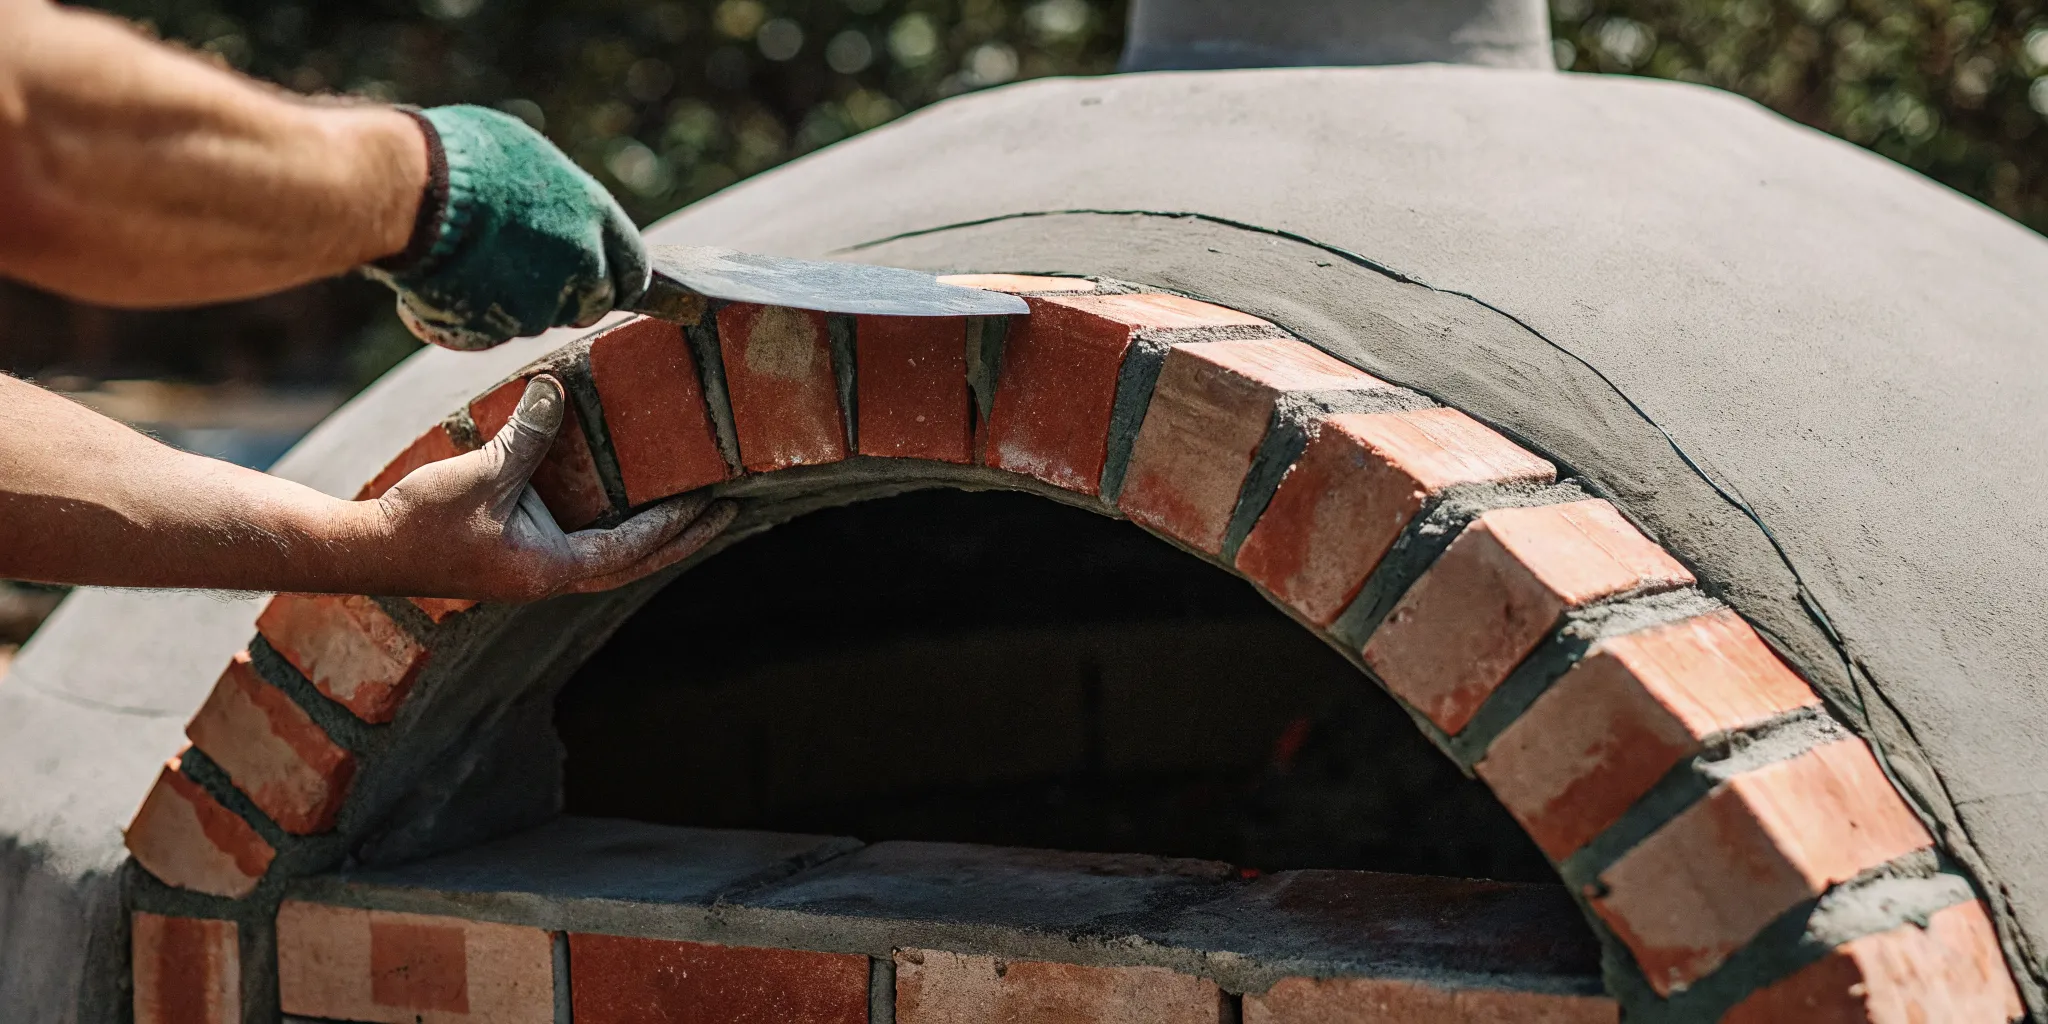
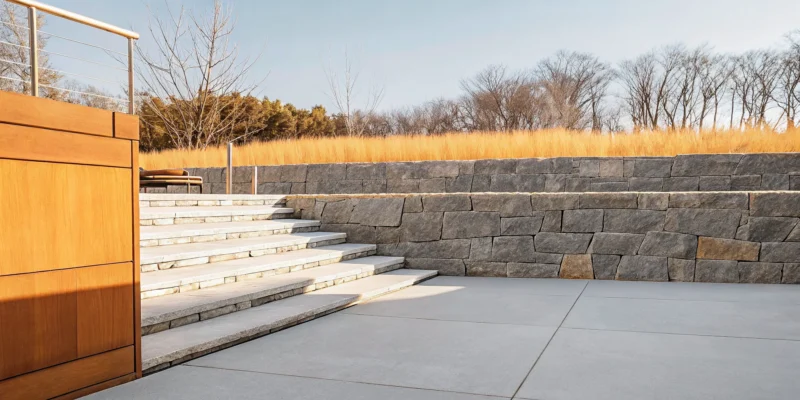
Contractors first check the site to find the best wall type for the slope. Common choices include gravity walls that use their own weight and segmental walls made of locking blocks. A skilled masonry contractor makes sure the wall can stand up to heavy soil pressure. This work often starts with a retaining wall construction portfolio review to match the wall look with the home style.
Good soil control also needs clear site grading. The builder must change the land shape to manage how water moves on the ground. This helps stop water from pooling and keeps it away from the house. Per the Town of Huntington, any structure change needs a building permit to meet safety codes. Expert teams use these rules to plan walls that work well with the soil found in Nassau and Suffolk counties.
Drainage paths and wall strength
A big part of the job involves parts you do not see. Like drain pipes and gravel fill. Without a way for water to leave, pressure can build up behind a wall. This force can cause a wall to lean or fall down. Builders put in pipes and stone to let water drain out in a safe way. This step is a must for structural masonry to stay strong through many winter cycles.
Wall strength also comes from deep footers and base prep. The builder digs down and packs the soil to create a firm base. This stops the wall from moving as the ground shifts or gets wet. Gappsi uses 3D tools to map out these parts before any work starts. This lets owners see how the drain paths and base parts fit into the full yard plan.
Engineering Requirements for Retaining Walls on Long Island
Building a wall to hold back soil takes more than just stacking blocks. A professional retaining wall contractor on Long Island must plan for the sand and clay found in local soil. These soil types change by town, which makes proper permits and expert engineering a must for a safe project. Based on rules from the Town of Islip. Walls must hold the weight of the earth so they do not lean or shift over time.
Soil and drainage needs
Drainage is the most vital part of any wall design. Without it, water builds up behind the stones and puts heavy pressure on the structure. Most plans use weep holes, gravel backfill, and a drain pipe to move water away from the base. A skilled retaining wall designer and construction company will check your yard for steep slopes or poor grading first. These facts help find if your wall needs extra support to stay stable in all types of weather.
Structural math and seals
For many homes. The law says a professional engineer or architect must seal and sign the plans. These experts use math to make sure the wall can hold the specific weight of your yard. For instance, Huntington regulations ask for sets of plans that prove the design follows the New York State Building Code. Using a firm with structural masonry skills ensures that these steps are done right from the start.
Visualizing complex walls
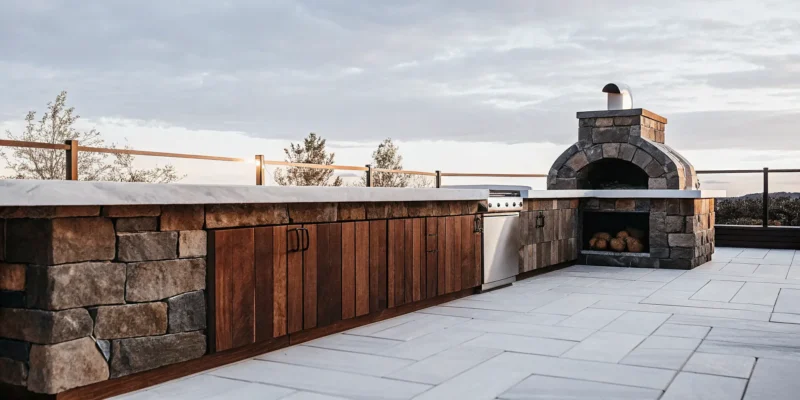
Big projects often benefit from seeing the final look before the first stone is set. Gappsi uses 3D tools to help you plan large hardscape layouts. This tech lets you see how the wall fits with your home and other features like pools or patios. It also helps the team find any issues with yard access or grading before work starts. Seeing the plan in three dimensions makes it easy to pick the right premium retaining wall paver systems for both look and strength.
Navigating Long Island Building Permits and Codes for Retaining Walls
Every town on Long Island has its own set of rules for building on your land. These rules keep your home safe and protect the local soil. If you plan to build a new wall, you must follow the local building code. A skilled retaining wall contractor Long Island can help you with these laws. They will handle the forms and make sure your project meets all legal steps.
Building codes are not just for safety. They also help manage how water flows through your yard. Building without a permit can lead to big fines or having to tear the wall down. Smart planning and proper permits are needed because the soil and grade change so much across the island. Using pros like Gappsi helps you stop these bad costs.
Building Codes in the Town of Islip
In the Town of Islip, the height of your wall is a big deal. Any wall higher than 18 inches at any point needs a permit before you start work. This rule applies to any spot above the main grade of the land. You can find more facts on this rule in the main Town of Islip engineering guide. Getting this permit makes sure the wall is safe for your yard.
Islip also has strict rules about where you can place a wall. You must set back any wall over 18 inches from your property line. The gap must be at least four feet or the height of the wall, whichever is larger. This space protects the land next door from weight and leaves room for future repairs. It means the structure does not crowd the edge of your lot.
Requirements for the Town of Huntington
The Town of Huntington has other rules for big changes. You need a building permit to build, change, or fix any structure on your site. This includes all types of retaining walls. You must show that your plans follow the New York State Building Code. To get a pass, your plans must have a seal and sign from a pro who knows the trade. You can see the full list of steps on the Huntington town website.
Huntington also cares about hills and slopes. If your land is steep, you must follow the Steep Slope Ordinance. Your site plan must show the old and new land shapes clearly. You need to use 2-foot gaps to mark these changes on the map. This level of detail helps town staff see how the wall will hold back the earth. It also shows how the project will affect the flow of rain water.
Working with a Skilled Contractor
Local rules change often and can be hard to track. A pro knows the local laws for every town in Nassau and Suffolk. They will find out if you need a permit and what forms to file. This help saves you time and stress during the build. You can look at a retaining wall construction portfolio to see how pros handle these tough jobs.
When you hire a pro, they act as your guide. They talk to town staff and handle the site visits. They also make sure the wall is built to last for a long time. This includes drains to stop water buildup. Good design protects your home and your budget while a pro makes the permit process fast for you.
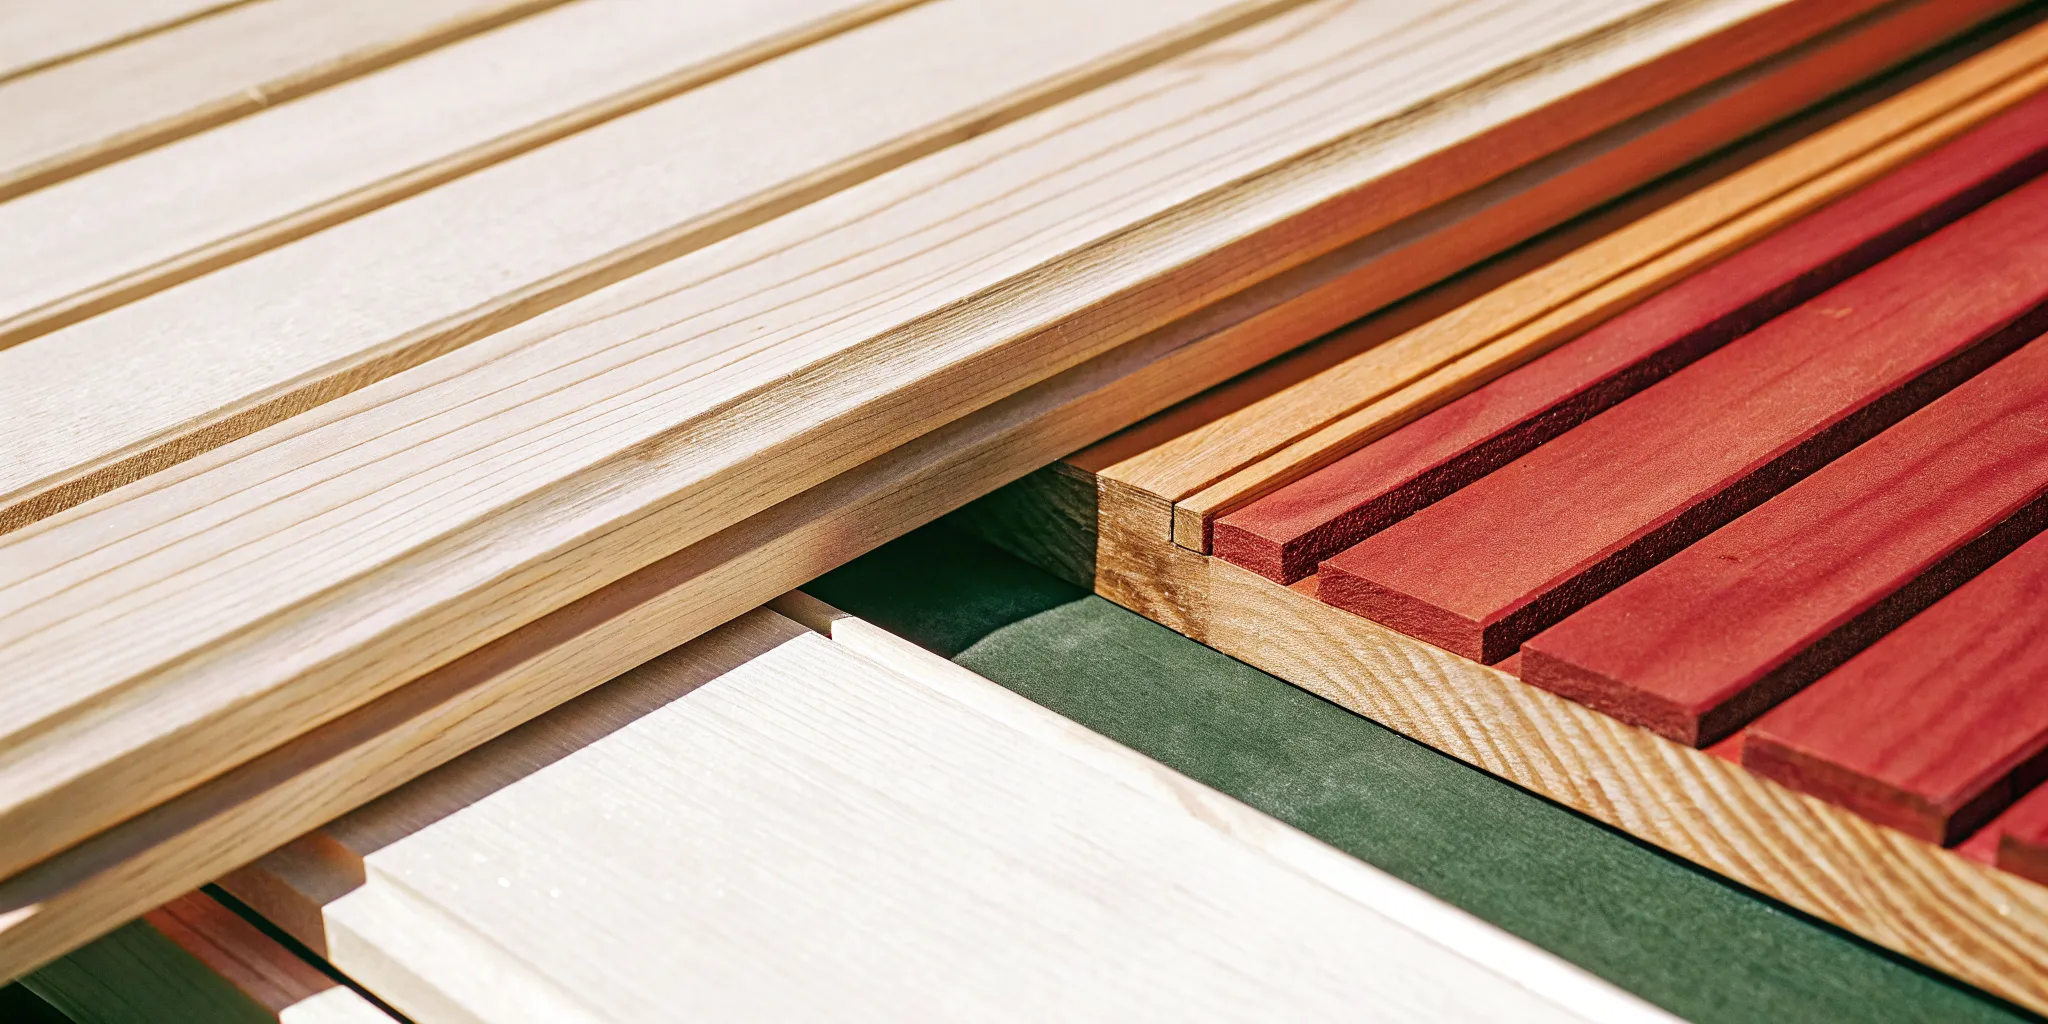
Choosing the Best Stones for Your Retaining Wall: Techo-Bloc. Cambridge, Nicolock, and Natural Stone
Finding the right stone or block is a key step for your home project. A retaining wall contractor Long Island must know how local soil affects these choices. Gappsi uses a linked model to give you the best options for your yard. We import our own top-grade stones and blocks to ensure the best value. This helps us build walls that last for many years. Our team handles every part of the work from start to finish.
Strong Concrete Wall Systems
Many people choose concrete block systems for their great strength. They are also easy for crews to set up in a short time. Brands like Techo-Bloc, Cambridge, and Nicolock offer big value for local yards. The Nicolock Verona system is a top pick for many owners who want a clean look. You can find a premium retaining wall paver systems expert at Gappsi to help you plan. These blocks come in many colors and styles to match your home.
Concrete blocks are made to lock together in a tight way. This creates a solid wall that can hold back heavy soil and water. These systems also have built-in ways to help with drainage. This stops water from building up behind the wall. Most of these blocks do not fade or crack even in cold winter weather. They are a smart choice for a wall that stays strong without much care.
The Beauty of Natural Stone
Natural stone offers a look that man-made blocks cannot match. It fits well with the classic style of Long Island homes. Each stone is unique in its own shape and shade. This makes every wall a one-of-a-kind work of art for your lawn. While stone may cost more to build, the high-end look is worth the price for many. It adds a sense of luxury to any outdoor living space.
These walls need skilled hands to set each piece just right. Gappsi brings three generations of Italian masonry skill to every site we visit. We know how to pick the right stones to create a wall that looks natural and stays safe. You can choose from many types of stone like granite, limestone, or bluestone. Each type has its own feel and level of strength. We can help you find the one that fits your style and budget.
How to Pick the Best Fit
You should think about your budget and the look you want to reach. Some towns have strict rules for wall height and safety. For example, the Town of Islip needs a permit for any wall that is 18 inches or higher. Your wall must be strong enough to meet these safety codes. We ensure all our work meets the local rules for Huntington and other nearby towns.
You should visit our Smithtown showroom to see these wall stones in person. It is much easier to choose when you can touch the stone and see the colors in the sun. Our team can show you how each block looks when it is all set up. We also use 3D plans so you can see your new wall before we start to dig. This helps you feel sure about your choice before the work begins.
| Stone Type | Wall Style | Total Cost | Care Needed | Lifespan |
|---|---|---|---|---|
| Techo-Bloc | Modern and sleek | Mid to High | Low | 50+ Years |
| Cambridge | Classic and clean | Mid | Low | 50+ Years |
| Nicolock Verona | Rustic and textured | Mid | Low | 50+ Years |
| Natural Stone | Unique and luxury | High | Low to Mid | 100+ Years |
Why Design-Build Beats the Traditional Approach for Retaining Wall Projects
When you start a home project. You often have to hire a designer first. Then you must find a separate team to build the wall. This split path can lead to many mistakes. One group might not know what the other is doing. At Gappsi, we use a single-source model for every masonry contractor job we do. This means you work with just one team from start to finish.
Streamlining your wall project with one team
We have twelve expert groups that work as one unit. Our team handles the first plan and the final stone. This keeps things simple and cuts down on errors. We catch small problems before they turn into big costs. Our family brings three generations of Italian masonry history to every task. We have been a leading retaining wall contractor Long Island homeowners trust since 1987.
Planning with 3D models and design
Smart planning is the key to a strong wall. We use clear 3D models to show you the work before we dig. You can see how the wall sits in your yard. You can also see how it moves water and holds back soil. This helps us get every detail right in the early stages. It also gives you peace of mind about the final look.
Most local towns have strict rules for these tall structures. For example, walls over 18 inches high in the Town of Islip require a permit before any building starts. Our team handles all the plans and files the forms for you. We make sure your wall meets every local law and safety code.
Sourcing stones from our Smithtown showroom
Many builders wait for weeks to get stones or blocks. We solve this by bringing in our own high-quality goods. We keep a large stock of premium stones ready to use. This helps us stay on track and keep our rates fair. You can see these stone options at the Gappsi Showroom in Smithtown. Picking your materials in person helps you get the exact look you want.
Our all-in-house design-build-supply model lets us lead every step of the path. We do not rely on outside sellers for our main stones. This ensures that every block we use is of the highest grade. By managing the design and the supply. We give you a better wall with much less stress.
7 Questions to Ask Before Hiring a Retaining Wall Contractor on Long Island
Choosing the right retaining wall contractor Long Island homeowners trust involves more than just a price quote. You need a partner who understands the local soil, town codes, and the science of a stable wall. Before you sign any contract. Ask these key questions to protect your home and your budget.
Essential hiring questions
- Do you work with a professional engineer? In many parts of Nassau and Suffolk, structural masonry needs expert oversight. For example, Huntington needs plans signed by a professional engineer for structural changes. This ensures your wall is safe and meets all state codes.
- Do you handle the permit application process? Local towns have strict rules that can slow down your project if you ignore them. In Islip, walls taller than 18 inches need a permit before any work starts. A good builder should manage these filings for you.
- What drainage systems do you include? Water pressure is the most common cause of wall failure. Ask how the builder plans to manage water behind the stone. Proper grading and drainage are key to prevent soil from pushing against the wall and causing it to lean or crack.
- Do you provide 3D design visualizations? It can be hard to see how a new wall will look against your home. Ask if the team uses 3D tools to help you plan the project. Seeing the design first lets you make changes before the materials arrive. Which saves you time and money.
- What materials do you recommend for my site? Not every stone or block is right for every yard. A pro should explain why they suggest certain premium retaining wall paver systems over others. Factors like wall height and soil type will guide the best choice for long-term strength.
- Can I visit a showroom to see the materials? Photos online do not always show true colors. Ask if the company has a shop where you can touch the stones. Visiting a Gappsi Showroom lets you see how different materials look in person before you choose.
- Can you show me a portfolio of local projects? A history of good work on the island is a great sign of quality. Look for a retaining wall construction portfolio that shows walls similar in size to your own. This proves the team has the skills to handle your specific site needs.
Ensuring structural integrity
Beyond these questions, check that the builder knows structural masonry rather than just simple gardening. The soil and grade on Long Island vary from town to town. A team with deep roots in the area will know how to adjust for these factors to build a wall that lasts for a very long time.
Frequently Asked Questions
How do I know if I need a permit for a retaining wall on Long Island?
Most towns on Long Island have strict rules for wall heights. In the Town of Islip, you need a building permit if your wall is at least 18 inches tall. The Town of Huntington requires a permit for any structural change to your land. Since rules vary by town, you should check with your local building office before you start any work. A licensed builder can help you find the right local codes for your yard.
What is the 1/3 rule for retaining walls?
The 1/3 rule often refers to how deep you should bury the base of your wall. For a stable structure, about one-third of the total height of the wall should be below the ground. This part is called the embedment. It helps the wall resist the push from the soil behind it. If you build a three-foot wall, you should put at least one foot of it under the soil. This step is vital to stop the wall from sliding or tipping over.
Do I need a professional engineer for a retaining wall?
You often need an engineer for walls that are tall or hold a lot of weight. In the Town of Huntington, construction plans must have a seal from a skilled engineer or a registered architect. Engineering is also a must for walls built on steep slopes or near land lines. Proper plans ensure the wall will stay safe for many years. Gappsi uses skilled engineering to handle the unique soil and grade conditions found across Long Island homes.
What is the average labor cost to install a retaining wall?
Labor costs for a retaining wall on Long Island often range from 20 to 60 dollars for each square foot of the wall face. The final price depends on the site access and the type of stone you choose. Complex projects that need 3D design and site grading will cost more. According to Gappsi, using a design-build model can help you plan your budget better. This model handles every step from the first plan to the final block.
How far should a retaining wall be set back from my property line?
Setback rules depend on your local town laws and the height of your wall. In the Town of Islip, walls taller than 18 inches must be set back at least four feet from the land line. Some towns require a setback that is equal to the height of the wall. These rules help prevent drainage issues for your neighbors. It is best to check with a local pro who knows the specific rules for your village or county.
Ready to build a safe and beautiful retaining wall for your yard?
A weak wall can fall and cause big damage to your yard because soil moves and water builds up fast in a heavy storm. If you wait to fix the problem now, you may have to pay for a much more costly and hard job later on this year. When you start your project today, you can get your permits and plans set in time so your new wall is ready for next season. Our team helps you pick the best stones and builds a strong base so your land stays safe and flat for many years to come.
Ready to build? Call (631) 543-1177 to schedule a free consultation at the Smithtown showroom and talk to a pro about your plans.