A Guide to Custom Pickleball Court Installations NY

Pickleball-Sports-Game-Court-and-Putting-Green-in-Peconic-NY22

Your backyard can be so much more than just grass. It can be the go-to spot for family fun and friendly competition. We recently brought that vision to life with a stunning Pickleball Sports Games Court and putting green in Peconic, NY. This project is a perfect example of the custom pickleball court installations NY families are dreaming of. As leading custom pickleball court installers NY, the Gappsi team managed every detail from the ground up. We even handled the final, vibrant Long Island pickleball court painting to create the ultimate backyard escape.

Would You Like to be the HANGOUT House?

Make your backyard the center court where your family plays, bonds, and is active together creating life-long memories. Neighborhood kids drop by for a friendly afternoon competition and your young athletes take their games to the next level. When you install a sports game court by Gappsi, you will know your kids are safe, close to home, active, and happy.

Benefits of a Home Sports Game Court

  • Fun. Family. Fitness
  • Build Confidence
  • Stay Healthy
  • Endless Number of Games to Play
  • Know Where Your Kids Are
  • Be the Ultimate Host
  • Sharpen Skills
  • Less Screen Time, More Family Time
  • Create Life-Long Memories

Design Your Ultimate Sport Experience

Gappsi will work with you to create a custom court and color design that fits your experience: contemporary, nature-inspired, home-matching, official team, school colors, or traditional. From inspiration to installation, we will work with you every step of the way. Choose the sport. We’ll build the court.

Pickleball-Sports-Game-Court-and-Putting-Green-in-Peconic-NY11Sport and Game Line Options

We can paint lines for just about any sport or game one can imagine and can even adjust the sizes of courts to the space available. Our customers often start with the desire to build a backyard basketball court and end up with a court for tennis and pickleball as well as games like shuffleboard, 4-square, and hopscotch.

♦ 4-Square ♦ Badminton ♦ Hopscotch ♦ Basketball ♦ Tennis ♦ Pickleball ♦ Shuffleboard ♦ Volleyball ♦ Futsal ♦ Batter’s Box ♦ 

Pickleball Sports Game Courts

Take your pickleball game to the next level with a custom indoor and outdoor pickleball court from Gappsi. Our material and quick construction make it possible to create high-performing courts for the recreational player or the seasoned pickleball competitor.

Create the home pickleball court of your dreams, or install a versatile pickleballball surface in a communal area to attract spectators for the perfect game.

Athletic court systems ensure safety, comfort, playability, and ultimate performance by utilizing the latest technological advancements. Significant research shows that sports game courts have amazing health benefits compared to the damaging effects of cement and asphalt surfaces as they offer the necessary lateral and vertical give to alleviate stress on the joints.

Gappsi tiles are also shock-absorbent, which reduces fatigue, provides better ball bounce, and increases jumping and turning safety.

The surface also helps to protect against concussions and serious injuries from falls as it is much softer and safer than concrete or asphalt. The addition of a Gappsi Sports Game Court not only enhances the appearance of your home or business, but it will also provide an architectural focal point and help to increase the value of your property.

Whether you are trying to build a cutting­edge facility or the perfect backyard basketball court, Gappsi is the sports construction company that can provide you with quality service and installation. Gappsi helps create your vision and give it your personal touch with customizable sizes, unique logos, and a large variety of custom colors. We also offer all the standard accessories a family or facility would need, including game lines, custom logos, basketball goals, tennis nets, containment netting, fencing, lighting, and more.

The Rise of Pickleball in New York

If you’ve noticed a sudden explosion of pickleball paddles and wiffle balls around Long Island, you’re not alone. Pickleball has become one of the fastest-growing sports across New York, and for good reason. It’s incredibly easy to learn, making it accessible for all ages and fitness levels. The game is social, fast-paced, and a fantastic way to get the whole family moving. This surge in popularity has many homeowners dreaming of adding a personal court to their backyard, creating a convenient and fun space for practice, play, and friendly competition without ever having to leave home.

Imagine stepping outside to a professionally built court, ready for a spontaneous match with family or neighbors. At Gappsi, we specialize in turning that vision into a reality. We design and install high-quality, custom sports games courts that are built to last. Whether you’re a seasoned player looking to sharpen your skills or a family seeking a new way to spend time together, a dedicated pickleball court can become the heart of your outdoor living space, providing endless hours of entertainment and activity.

The Gappsi Construction Process Explained

Building a sports game court is more than just pouring concrete and painting lines. It requires careful planning, precision, and expertise to ensure a safe, durable, and high-performing playing surface. That’s why we’ve developed a comprehensive construction process that covers every detail from the ground up. Our goal is to make the entire experience seamless and stress-free for you. We handle every phase of the project, from the initial site assessment to the final installation of accessories, so you can focus on planning your first match.

Our team of experienced professionals combines top-tier materials with proven construction techniques to deliver a court that not only looks amazing but also stands up to years of play and Long Island weather. We believe in clear communication and collaboration, working closely with you to ensure the final result perfectly matches your expectations. Let’s walk through the key steps we take to bring your dream court to life.

Step 1: Site Evaluation and Planning

The foundation of a great court begins long before the first tile is laid. Our process starts with a thorough site evaluation at your home. A Gappsi expert will assess your property to identify the ideal location for your new court. We consider several critical factors, including ground composition, potential drainage issues, and the court’s orientation relative to the sun. Proper planning at this stage is essential for the longevity and playability of your court. We handle all the technical details, from ensuring the sub-base is perfectly level to planning for fencing and lighting, creating a complete and professional plan for your project.

Proper Water Drainage and Court Orientation

Two of the most important technical aspects we address are water drainage and court orientation. A court without proper drainage can lead to puddles, surface damage, and premature wear. We engineer a subtle slope and drainage system to ensure water runs off efficiently, keeping your court ready for play. We also orient the court, typically on a north-south axis, to minimize sun glare for players during morning and afternoon games. By using the highest quality materials and adhering to official court regulations, we build a surface that is both safe and built for peak performance.

Step 2: Design, Get an Estimate, and Finalize

This is where your vision truly starts to take shape. We work with you to design a court that reflects your personal style and meets your family’s needs. You have complete creative control over the customization. You can choose from a wide variety of colors to match your home’s exterior, add custom logos of your favorite team, or design a multi-sport layout that includes lines for basketball or volleyball. We can also incorporate essential accessories like high-performance lighting for night games, containment fencing, and professional-grade nets. Once the design is perfected, we provide a detailed and transparent estimate so you know exactly what to expect.

Step 3: Schedule Your Installation

With your design finalized and approved, the last step is to get your project on the calendar. Our team will coordinate with you to schedule the installation at a time that is convenient for your family. We pride ourselves on our professionalism and efficiency, working diligently to complete the construction with minimal disruption to your daily life. Our skilled installers handle every aspect of the build with precision and care, ensuring that each component is perfectly placed. Before you know it, you’ll be ready to grab your paddle and enjoy the incredible fun and fitness that a home sports game court provides. You can even watch our team in action on past projects.

Court Materials and Surface Options

The surface you choose for your pickleball court directly impacts everything from ball bounce and game speed to player comfort and long-term safety. While asphalt and concrete are common base materials, the actual playing surface on top is what defines the experience. Modern solutions offer significant advantages over playing on bare, unforgiving hardscapes. Understanding these options is key to building a court that you’ll love for years to come. At Gappsi, we help Long Island homeowners navigate these choices to find the perfect fit for their backyard and playing style, ensuring a high-quality, durable, and safe environment for every match.

Asphalt, Concrete, and Specialized Court Tiles

Asphalt and concrete are common choices for court bases, but playing directly on these unforgiving surfaces can take a toll on your body. That’s why specialized court tiles are such a game-changer. We recommend and install advanced sports game court tiles that are specifically engineered to provide vertical and lateral give. This design significantly reduces stress on your joints, particularly your knees and ankles, making for a much more comfortable and safer playing experience. Unlike the harsh impact of concrete, these tiles offer a cushioned response that allows you to play longer and with less risk of strain or injury.

All-Weather Durability

A backyard court should be ready for a game whenever you are, regardless of the weather. Our court tiles are built for all-weather durability, resisting fading from the sun and allowing for quick drainage after rain. They are also shock-absorbent, which not only reduces player fatigue but also ensures a more consistent and predictable ball bounce. This feature enhances safety during quick pivots and jumps, giving you the confidence to play your best. The surface is also much softer than concrete, which helps protect against scrapes and more serious injuries from falls, making it a family-friendly choice.

Built to Official USAPA Standards

For an authentic pickleball experience, your court needs to be more than just a flat surface with a net. It should be built to the official standards set by the USA Pickleball Association (USAPA). This ensures that every aspect of the court, from the overall dimensions (44 feet long by 20 feet wide) to the net height and line markings, is accurate. Playing on a regulation court means you’re practicing the way you’d play in a competitive setting, which is perfect for sharpening your skills. It also guarantees a fair and consistent game for everyone who plays in your backyard.

At Gappsi, we construct every pickleball court with meticulous attention to these official guidelines. We handle the precise layout, including the non-volley zone (the “kitchen”), baselines, and sidelines, so you can be confident your court is ready for serious play. Adhering to USAPA standards not only legitimizes your home court but also protects your investment by ensuring it’s built correctly from the ground up. This commitment to quality means you get a professional-grade playing surface right in your own backyard, ready for friendly matches or tournament-level practice.

Choosing Your Net System

The net is the centerpiece of your pickleball court, and selecting the right system is a crucial decision that affects both gameplay and the versatility of your space. It’s more than just a divider; a quality net system ensures proper tension for authentic play. Your choice will depend on how you plan to use the court. Are you creating a dedicated, single-purpose pickleball court, or do you want a multi-sport area that can be adapted for other games? The two main options, permanent and portable nets, each offer distinct advantages. We can help you find a solution that aligns with your vision for your backyard entertainment space.

Permanent and Portable Nets

Permanent net systems are installed directly into the court surface with in-ground posts. This is the ideal choice for a dedicated pickleball court, as it provides superior tension and durability, just like you’d find at a professional facility. Portable nets, on the other hand, offer incredible flexibility. They can be set up and taken down in minutes, allowing you to easily convert your court for other activities. As part of your court design, we can also integrate other essential features, such as containment fencing to keep the ball in play and lighting systems for evening games.

Pickleball-Sports-Game-Court-and-Putting-Green-in-Peconic-NY0Putting Green with Synthetic Turf

Refine your putting stroke in your backyard putting green. Our natural breaks and slopes can mimic those on your favorite course; it’s like having a country club right outside your back door. The accuracy you develop on a putting green will transfer effortlessly onto all the greens of your favorite courses.  Next to the sports game court, we added a Putting Green with synthetic turf.  The putting green includes 4 holes, flags, and a sand bunker.

Gappsi Installed a Pickleball Sports Game Court in Peconic NY.

The pickleball court was built with an asphalt base, primed, and painted in two different colors.  The customer chose a lighter blue for the field and a darker blue for the pickleball court inlay. We striped the court with white lines and installed a removable pickleball netting in the center of the court. The Dominator Rolling Portable Pickleball Net is a completely rust-proof aluminum net with locking wheels on the frame that meets USA Pickleball’s official regulations. This net only takes about 5 minutes to assemble and the carrying bag makes transportation and storage a breeze. Every piece of the net system has a place to be kept when not in use!

Multi-Sport Game Court | Basketball Hoop – Half Court

In the center of the court, our team installed a basketball hoop.  A Pro Dunk Professional adjustable basketball hoop with a light attachment on top. The basketball court was striped with a black line, a full 3-point line as well as the key in the center.

Basketball is one of the most popular sports in the US and worldwide. Shooting hoops give you a great workout. You also -socialize with others when playing basketball, which is a great team-building exercise. Having a basketball hoop installed at home allows you to shoot hoops whenever you want. Whether you want your children to have a great time playing basketball right at home or if you’re up to shooting some hoops yourself, it can be an amazing investment.  This is the latest sports game court built by Gappsi in Peconic NY on the North Fork of Long Island.

SCHEDULE A MEETING TODAY WITH GAPPSI

View Gappsi’s YouTube Channel for Videos of Pickleball Sports Game Court and Putting Green in Peconic NY

https://youtu.be/Rf4OQDVHFW4

Understanding the Cost of a Pickleball Court

One of the first questions on everyone’s mind is about the investment. Building a personal pickleball court is a significant home improvement project, and the cost can vary quite a bit. The final price tag depends on several factors, including the amount of site preparation needed, the type of court surface you choose, and any additional features you want to include. Things like professional lighting for nighttime play, perimeter fencing to keep the ball in play, and custom color schemes all play a role in the total cost. Think of it as creating a custom outdoor space tailored specifically to your family’s needs and your property’s unique layout.

While there’s a general price range, the best way to get a clear picture of the cost for your specific project is to get a detailed estimate. At Gappsi, we provide transparent quotes that break down every aspect of the installation. We’ll assess your property, discuss your vision for the court, and walk you through the material and feature options. This ensures you understand exactly what you’re investing in, with no surprises along the way. A well-built court not only provides endless entertainment but can also increase your property value, making it a worthwhile addition to your home.

Average Cost to Build in New York

So, what can you expect to invest in a pickleball court here on Long Island? Generally, the average cost to build a pickleball court in New York falls between $20,000 and $50,000. This range accounts for the diverse options available. A basic court on a pre-leveled surface will be on the lower end, while a project requiring significant excavation, retaining walls, premium surfacing, and high-end accessories like professional lighting will be at the higher end. The size of the court and the specific materials you select are the primary drivers of the final cost, making each project unique.

Financing Options for Your Project

We understand that a new sports game court is a major investment in your home and family’s lifestyle. To make this dream more accessible, many homeowners explore financing options to help manage the cost. Spreading the payments over time can make it easier to get the court you’ve always wanted without a significant upfront expense. During our consultation, we can discuss the different avenues available to help you fund your project. Think of it as an investment in countless hours of fun, fitness, and family memories right in your own backyard.

Our Comprehensive Sports Game Court Services

At Gappsi, we offer a full suite of services to bring your backyard sports game court vision to life. Our expertise isn’t limited to just one type of installation; we handle everything from brand-new constructions to breathing new life into older courts. We manage the entire process, from the initial design consultation and site preparation to the final surfacing and line painting. Our team is equipped to build a variety of sports games courts, including multi-sport surfaces that can accommodate basketball, volleyball, and of course, pickleball. We work with you to customize the design, ensuring it fits perfectly with your landscape and meets your family’s athletic interests.

Our commitment extends beyond just the playing surface. We also install all the necessary accessories to complete your court, such as high-quality netting, adjustable basketball hoops, and containment fencing. We can even integrate professional-grade lighting systems so the fun doesn’t have to stop when the sun goes down. Whether you’re starting from scratch with an empty patch of lawn or looking to upgrade an existing space, our team has the experience and resources to deliver a high-performance court that will be the centerpiece of your backyard for years to come.

New Installations for Residential and Commercial Clients

We build and install custom pickleball courts across Long Island for a wide range of clients. While we specialize in creating stunning backyard courts for private homes, our experience also extends to commercial and community projects. We’ve worked with schools, private clubs, and community centers to design and construct courts that serve a larger audience. Each project, regardless of its scale, receives the same meticulous attention to detail and commitment to quality, ensuring a durable and professional-grade playing surface that meets the specific needs of its users.

Serving Homeowners, Parks, Schools, and Private Clubs

Our team is experienced in tailoring sports game court installations for different environments. For homeowners, we focus on creating a seamless integration with your existing landscape and outdoor living areas. For public spaces like parks and schools, we prioritize durability and safety to withstand heavy use. Private clubs and community centers often require courts built to specific regulations for competitive play, and we have the expertise to deliver precisely that. No matter the client, our goal is to build a court that fosters community, encourages activity, and provides a top-tier playing experience.

Existing Court Resurfacing and Repair

Is your existing court showing its age? Over time, even the best-built courts can develop cracks, faded lines, or an uneven surface due to weather and regular use. We offer comprehensive resurfacing and repair services to restore your court to its former glory. Our team can fix structural issues, apply a fresh, high-performance surface, and make your court look and play like new again. This is a great way to protect your initial investment and ensure your court remains a safe and enjoyable place to play for many more years.

Services like Patching Cracks and Repainting Lines

Our repair services cover all the common issues that affect sports game courts. We specialize in patching and filling cracks to prevent further damage and eliminate tripping hazards. We can also apply a new acrylic surface layer, which not only improves the court’s appearance with vibrant color but also enhances playability and traction. To finish the job, we’ll repaint all the game lines with precision, ensuring they are crisp, clear, and accurate for whatever sports you play. Our restoration services can make an old court feel brand new.

Our Long Island Service Area

As a proud Long Island company, we are dedicated to serving homeowners and organizations throughout our community. Our service area covers both Nassau and Suffolk County, from the western border with Queens all the way to the East End. Our deep local knowledge means we understand the specific environmental factors and building codes relevant to our area. Whether you’re in Manhasset, the Hamptons, or anywhere in between, the Gappsi team is ready to bring our expertise and craftsmanship to your home improvement project.

How to Care for Your New Court

Once your beautiful new pickleball court is installed, a little routine care will keep it in top condition for years of enjoyment. Proper maintenance is simple and doesn’t require a lot of time, but it makes a huge difference in the longevity and safety of the playing surface. The main goals are to keep the court clean, dry, and free of debris. Leaves, dirt, and standing water can not only make the surface slippery but can also contribute to premature wear and staining over time. By incorporating a few easy steps into your regular yard work routine, you can ensure your court is always ready for a game.

Post-Installation Maintenance Recommendations

To keep your court in prime condition, we recommend a few simple practices. First, sweep the court regularly with a soft-bristle broom to clear away any leaves, dust, or other debris. If you notice dirt or spills, it’s a good idea to rinse the court with a garden hose to prevent buildup. It’s also wise to periodically inspect the surface for any small cracks or chips that may appear over time. Catching these minor issues early and having them repaired quickly will prevent them from becoming larger problems down the road.

Sweeping, Rinsing, and Crack Repair

Regularly sweeping your court is the easiest way to protect the surface. Debris can be abrasive underfoot and can clog the pores of the court surface, which affects water drainage. Rinsing with water helps wash away fine particles that sweeping might miss. When you do your inspections, pay close attention to the areas that get the most play. If you spot a small crack, give us a call. Promptly addressing minor imperfections is the most effective way to ensure the structural integrity and flawless appearance of your court for the long term.

Why Partner with Gappsi?

Choosing the right partner for your home improvement project is the most important decision you’ll make. With Gappsi, you’re choosing a company with a long-standing reputation for excellence and a deep commitment to our clients. We are more than just contractors; we are designers and craftsmen who take immense pride in transforming your property. Our comprehensive approach means we handle every detail, from creating the initial design to laying the final line on your new court. We use only high-quality materials and proven construction techniques to ensure your project is built to last and exceeds your expectations.

Our team lives and works right here on Long Island, and we treat every client like a neighbor. We believe in building lasting relationships based on trust, transparency, and exceptional results. You can see the quality of our work and the breadth of our capabilities on our YouTube channel, where we showcase completed projects. When you partner with Gappsi, you’re not just getting a new pickleball court; you’re getting a dedicated team of professionals committed to bringing your vision for the perfect outdoor living space to life.

Our Company History and Experience

Gappsi has been a premier home improvement company serving Long Island since 1987. For over three decades, we have been helping homeowners build exceptional outdoor living and entertainment spaces. Our extensive experience in all aspects of construction, from masonry and landscaping to swimming pools and sports games courts, gives us a unique perspective on how to create cohesive and beautiful properties. This long history is a testament to our craftsmanship, reliability, and the trust we’ve earned from thousands of clients across Nassau and Suffolk counties.

Serving Long Island Since 1987

Our deep roots in the Long Island community are a core part of our identity. Being a family-owned business for over 35 years means we have a personal stake in upholding our reputation for quality and integrity. We’ve seen trends come and go, but our commitment to superior workmanship and customer satisfaction has never wavered. We understand the local landscape, climate, and lifestyle, allowing us to design and build outdoor spaces that are not only beautiful but also perfectly suited for life on Long Island.

Our Customer Service Promise

We believe the construction process should be as smooth and enjoyable as the final product. That’s why we make clear communication and customer satisfaction our top priorities. From your very first inquiry, we make it easy to get started. We are committed to providing quick, detailed estimates and maintaining open lines of communication throughout the entire project. You will always know the status of your installation and will have a dedicated point of contact to answer any questions that arise along the way.

Quick Estimates and Project Updates

Our process is designed to be straightforward and transparent. We provide prompt and thorough estimates so you have a clear understanding of the project scope and cost from the outset. Once the project begins, we keep you informed with regular updates on our progress. Our goal is to manage all the details so you can relax and get excited about your new court. We handle the logistics, scheduling, and execution, ensuring a seamless and stress-free experience from inspiration to installation.

Frequently Asked Questions

How long does it take to build a pickleball court? The timeline for building your sports game court can vary depending on a few factors, like how much site preparation is needed and, of course, the weather. However, once we finalize the design and break ground, our team works efficiently to bring it to life. During our initial planning phase, we will provide you with a clear and realistic schedule so you know exactly what to expect.

My backyard isn’t perfectly level. Is a court still possible? Yes, absolutely. It’s very common for yards to have slopes or uneven areas. Our first step is always a thorough site evaluation where we assess your property’s specific needs. We handle all the necessary excavation and grading to create a perfectly stable and level base, ensuring your new court has the proper foundation for years of safe play.

What makes your court tiles better than just playing on concrete? The biggest difference is player comfort and safety. While concrete is a hard, unforgiving surface that can be tough on your knees and ankles, our specialized sports game court tiles are engineered to absorb impact. This cushioning effect reduces stress on your joints, allowing you to play longer and more comfortably. The tiles also provide a more consistent ball bounce and drain water quickly, so you can get back to playing sooner after it rains.

Can I use the court for other sports besides pickleball? Of course. We design our sports games courts to be versatile hubs for all kinds of activities. During the design phase, we can easily add lines for basketball, volleyball, shuffleboard, or any other game your family enjoys. We can also install features like adjustable basketball hoops and portable net systems to make switching between sports simple and fast.

What kind of maintenance does a new court require? Keeping your court in top shape is surprisingly simple. We recommend regularly sweeping the surface with a soft broom to clear away leaves and debris. An occasional rinse with a garden hose can also help keep it clean. If you ever notice a small crack or need more significant work down the road, our team offers complete repair and resurfacing services to make your court feel brand new again.

Key Takeaways

  • Plan your court from the ground up: A successful installation starts with a professional site evaluation to manage drainage and sun exposure, followed by a collaborative design process where you choose everything from colors and logos to lighting and fencing.
  • Prioritize safety with the right surface: Modern sports game court tiles offer significant advantages over plain concrete or asphalt by providing shock absorption that reduces stress on joints, making play more comfortable and helping to prevent injuries.
  • Protect your investment for long-term fun: A new court adds value to your home, and you can keep it in top condition for years with simple maintenance like regular sweeping and rinsing, along with professional support for any necessary repairs.

Related Articles

Share this page:

Free-Formed Vinyl Pool and Travertine Patio Installation in Smithtown

Free-Formed-Vinyl-Pool-and-Travertine-Patio-Installation-in-Smithtown3Free-formed vinyl pool and travertine patio installation in Smithtown that looks as good as it did when it was first installed 13 years ago.  Travertine pavers and tiles have been a popular choice for centuries, and with good reason. Travertine has a timeless elegance that seamlessly matches almost any decor and never goes out of style. Plus, thanks to its natural stone properties, it’s perfect for outdoor areas, driveways, patios, pools, hardscapes, stair treads, and more.

Travertine is one of the most popular natural stone products (along with flagstone, limestone, and marble) that are used for large outdoor paving stones. Travertine is naturally slip-resistant, making it great for outdoor flooring, pool decks, and pool coping.

It’s also durable and long-lasting in exterior applications. If you live in a climate with freeze/thaw cycles, exterior travertine tile is a smart choice since it can handle temperature extremes.

And since it comes in a variety of natural hues and colors, it looks right at home in the outdoors next to other surfaces like wood, grass, and natural stone products.  Here are a few things to consider when planning your design.

Free-Formed-Vinyl-Pool-and-Travertine-Patio-Installation-in-SmithtownChiseled & Tumbled Finish

Chiseled and tumbled finishes are popular for outdoor areas due to their rustic look. Honed tile has a more polished finish and can be great for grill areas, outdoor kitchens, or anywhere else you want a refined look.

  • Indoor flooring tile will have a smoother and more polished finish.
  • Exterior pavers are much thicker, with a more rustic finish.

Choosing The Best Pattern

The pattern can also make a big difference in the overall look of the outdoor floor. Some of the most common patterns are:

  • Running Bond: A running bond pattern with silver or grey pavers is a nice choice for a cool modern look.
  • Basket Weave
  • Herringbone
  • French Pattern: The French pattern with chiseled pavers gives a refined, old-world look to your patio.

Custom Free-form Vinyl Pools

Custom in-ground pools are attractive and have features with endless customization options. With your pool installation, you can add lighting, fountains, and decorative tile or stone.  All while creating a surrounding landscaping that evokes a tropical paradise! Each time you step outside, it will be like stepping out of your home into a luxury resort.

As a homeowner, you want to do everything you can to improve your home’s value.  Custom pools on Long Island are highly sought-after amenities that will attract buyers and boost your home’s value. An inground pool can last for decades, so even if you’re not going anywhere for a while, you’ll get years of enjoyment from your pool, and then you can look forward to a return on your investment when it’s time to sell.

Free-Formed-Vinyl-Pool-and-Travertine-Patio-Installation-in-Smithtown2At Gappsi, we provide comprehensive services related to both the design and construction of vinyl liner pools.  It all starts by helping you design the right pool for the size and shape of your yard, budget, and even HOA guidelines. We’ll combine those boundaries with your design preferences to create the perfect in-ground pool and surroundings.

Our pool builders at Gappsi have a thorough, step-by-step building process to make the installation as quick, efficient, and hassle-free as possible. From the time we receive the permit and start outlining your space, to the setup of the initial chemical treatment.  Once the pool is ready, you can depend on us to do the job right!

Make Your Pool Area Look Timeless and Stylish with Travertine Pavers

Free-Formed Vinyl Pool and Travertine Pavers in Smithtown, NY

This backyard was designed and built by Gappsi in 2010 over 13 years ago.  Jeff happened to stop by and visit recently the home. As you can see this project is just as nice as the day it was installed by Gappsi. Our team built a free-form vinyl pool with concrete walls and a bench in the deep end.

The homeowner chose a mocha-colored full-nose travertine stone for the pool’s coping. The patio was installed with Classico Travertine a lighter version of the moca travertine.

The raised patio was built with Hanover Chapel Stones for the wall and steps.  We also used Hanover Chapel Stones for the raised wall structure and the caps for the wall. The raised patio area uses the same travertine stone for the sitting wall and the radius section that surrounds the dining table.

Free-Formed-Vinyl-Pool-and-Travertine-Patio-Installation-in-Smithtown1We installed a water feature with a sheer descent wallfall that is self-contained.  A captivating waterfall for any new, remodeled, or existing pool area.  The waterfall faces the back door to the home and is in the center between the outdoor kitchen and seating area.
Outdoor Kitchen and Grill

Gappsi installed an outdoor kitchen that includes a Wolf Grill, bar sink, and an outdoor refrigerator. The backyard was kept immaculate with the beautiful natural backdrop setting of evergreens and manicured landscape.

For over 35 years, we have been designing, installing, and updating pools on Long Island through Suffolk and Nassau County. We know how to build a pool to look great and last for years, and we do our work with pride! Check out our swimming pool gallery.  Our gallery shows the pride and dedication we take in our work to ensure we exceed homeowners’ expectations.  Gappsi achieves the highest levels of quality and precision in every job. Our goal is to help you transform your yard into a personal paradise, and we are dedicated to making sure you are 100 percent satisfied!

SCHEDULE A MEETING TODAY WITH GAPPSI

View Gappsi’s YouTube Channel for Videos of Free-Formed Vinyl Pool and Travertine Patio Installation in Smithtown

Share this page:

Grout Color Restoration: A Simple DIY Guide

Before you start planning a costly and messy tile renovation, take a closer look at what’s really making your room feel dated. Often, it’s not the tiles themselves but the discolored, stained grout between them. There’s a powerful secret for achieving a dramatic refresh without the headache of a remodel. This guide is your complete resource for grout care, from simple DIY cleaning solutions to the transformative process of grout color restoration. This technique doesn’t just clean; it applies a new, durable layer of color that seals and protects, giving your entire room a brand-new look and feel.

What is Grout and Why Does It Get Dirty?

If you have tile in your home, you have grout. It’s that stuff in between the tiles that seems to have a magnetic attraction to dirt. But what exactly is it? Grout is a dense mixture, typically made of cement, water, and sand, that fills the gaps between tiles. Its main jobs are to hold your tiles securely in place and prevent moisture from seeping underneath them. While it’s a crucial part of any tile installation, its porous nature is what makes it a challenge to keep clean. Think of it like a tiny sponge that’s ready to soak up any dirt, spills, or grime it comes into contact with. This is why a pristine tile floor can still look dingy if the grout lines are stained. Keeping your grout clean not only makes your space look brighter but also helps protect the longevity of your tile work.

Understanding the type of grout you’re dealing with can also make a difference in your cleaning approach. Different types are used depending on the tile and location. For homeowners with beautiful porcelain or natural stone, knowing your grout is the first step to proper care. While you can tackle surface-level cleaning yourself, sometimes deep-set stains or widespread discoloration require a professional touch. For a truly transformative result, especially on outdoor patios or high-traffic indoor areas, our restoration and sealing services can bring your grout and tile back to life, ensuring it stays beautiful for years to come.

Understanding Grout Composition and Types

At its core, grout is a simple but effective material. It’s a thick paste that acts as the glue and sealant between your tiles. Because it’s made with cement and sand, it has a naturally porous texture. This means it’s filled with tiny, microscopic holes that are perfect for trapping dirt, soap scum, and mildew. According to experts at Lioli Ceramica, this porosity is the primary reason grout gets dirty so easily. Regularly cleaning your grout isn’t just about looks; it helps maintain the integrity of your tile installation by preventing grime from breaking down the material over time. A little bit of maintenance goes a long way in keeping your tiled surfaces looking fresh and new.

Why Grout Collects Dirt

The porous nature of grout is its biggest weakness when it comes to cleanliness. Those tiny holes and rough texture act like a net, catching everything from spilled coffee to muddy footprints. In bathrooms, this porosity allows soap scum and moisture to settle in, creating a perfect environment for mold and mildew to grow. In kitchens, it’s food splatters and grease. Over time, this buildup doesn’t just sit on the surface; it works its way deep into the grout, leading to stubborn discoloration that can’t be wiped away. That’s why a quick mop doesn’t always do the trick for grout lines, and a more targeted cleaning approach is often necessary to lift that embedded grime.

Common Grout Types

Not all grout is created equal. The most common type you’ll find is sanded grout, which contains fine sand to provide extra strength. It’s used for wider grout lines (more than 1/8 inch) and is a go-to for flooring because of its durability. For more delicate tile or smaller gaps, unsanded grout is used. It has a smoother texture and adheres better to vertical surfaces, like a shower wall. Then there’s epoxy grout, a powerhouse option that is non-porous and resistant to stains and water. It’s more difficult to install but offers superior durability, making it a great choice for high-traffic or wet environments. Knowing which type you have can help you choose the right cleaning method.

A Homeowner’s Guide to Cleaning Grout

Ready to roll up your sleeves and get that grout sparkling again? With a few common household items and a little bit of elbow grease, you can make a huge difference in the appearance of your tile. The key is to use the right tools and techniques to lift stains without damaging the grout itself. Before you start, gather everything you need so you’re not running around mid-project. You’ll want a good grout brush or an old toothbrush, a spray bottle, microfiber cloths, and gloves to protect your hands. Most of the cleaning agents you’ll need are probably already in your pantry, like baking soda and vinegar. This DIY approach is perfect for routine maintenance and tackling minor stains before they become a major headache.

Essential Tools and Supplies for a DIY Project

Let’s get your grout cleaning kit together. You don’t need a lot of fancy equipment to get the job done right. Here’s a simple checklist of items to gather: a stiff-bristled grout brush (an old toothbrush works in a pinch), a spray bottle for your cleaning solution, and some microfiber cloths or rags for wiping. For the cleaning solution itself, you’ll want baking soda, white vinegar, and hydrogen peroxide. A pair of rubber gloves is also a must to protect your skin from irritation. Having these simple tools on hand will make the process smooth and effective, turning a dreaded chore into a satisfying project with brilliant results.

DIY Grout Cleaning Solutions

You don’t need harsh, expensive chemicals to get your grout clean. Some of the most effective cleaners can be made from simple ingredients you likely already have at home. These DIY solutions are not only budget-friendly but also gentler on your grout and home environment. We’ll walk through two of the most popular and effective methods: a paste made from baking soda and hydrogen peroxide, and a foaming combination of baking soda and vinegar. Both are fantastic for lifting everyday grime and mild stains, helping you restore that clean, fresh look to your tile floors, backsplashes, and showers without the overwhelming fumes of commercial cleaners.

Baking Soda and Hydrogen Peroxide Paste

This combination is a powerhouse for whitening stained grout. Simply mix baking soda and hydrogen peroxide together until you have a thick, spreadable paste. Apply the paste directly onto the grout lines, making sure to cover all the discolored areas. Let it sit for about 10 minutes; this gives the mixture time to work its magic, bubbling away and lifting stains from the porous surface. After waiting, grab your grout brush and scrub the lines thoroughly. You’ll be amazed at how much grime comes up. Once you’re done scrubbing, rinse the area with plain water and wipe it dry with a clean cloth.

Baking Soda and Vinegar Method

This method creates a satisfying fizzing action that helps dislodge dirt. First, make a paste using baking soda and a little water, and apply it to your grout lines. Next, fill a spray bottle with a 50/50 solution of white vinegar and warm water. Spray the vinegar solution directly onto the baking soda paste. It will immediately start to foam and bubble. This chemical reaction is what helps to break down grime and stains. Once the foaming stops, scrub the grout with your brush and then rinse the entire area with water to wash away all the residue, revealing cleaner, brighter grout lines.

Important Safety Precautions

Even when you’re using common household ingredients, it’s smart to take a few safety precautions. Always wear rubber gloves to protect your hands, as ingredients like hydrogen peroxide and even vinegar can cause skin irritation with prolonged contact. It’s also a good idea to ensure the area is well-ventilated, so open a window or turn on a fan, especially when working in a small space like a bathroom. Never mix cleaning agents unless a method specifically calls for it; for example, mixing bleach and ammonia creates toxic gas. Stick to the proven recipes and you’ll have a safe and successful cleaning session.

Chemicals and Cleaners to Avoid

When you’re faced with really tough grout stains, it can be tempting to reach for the strongest cleaner you can find, like bleach. However, many experts advise against it. Using bleach on grout can be a big mistake. While it might seem to whiten the grout initially, it can actually weaken the cement-based material over time, causing it to become brittle and crack. It can also lead to permanent discoloration, leaving you with blotchy, uneven grout lines. It’s best to stick with safer alternatives like baking soda, vinegar, or pH-neutral cleaners specifically designed for grout. Your grout will thank you in the long run.

DIY Grout Coloring and Sealing

Sometimes, no matter how much you scrub, the grout just won’t come clean. Years of foot traffic, spills, and moisture can lead to permanent staining that cleaning alone can’t fix. But don’t despair and start thinking about a total retile just yet. There’s another option: grout colorant. A grout colorant, like the popular Polyblend Grout Renew, is essentially a special paint for your grout. It not only covers up old, stubborn stains but also comes in a variety of colors, allowing you to completely refresh or change the look of your tile. Even better, it acts as a sealant, creating a protective barrier that makes the grout resistant to future stains and moisture. It’s a fantastic way to get a like-new finish without a major renovation.

Step-by-Step Grout Coloring Process

Using a grout colorant is a game-changer for stained grout. As detailed by Southern Home and Hospitality, this product is a combination of color and sealant that can completely transform your tile’s appearance. Instead of just cleaning, you’re applying a fresh, new surface that’s durable and stain-resistant. The process is straightforward but requires a bit of patience and a steady hand. You’ll need to thoroughly clean the grout first, then carefully apply the colorant to the grout lines. The result is a uniform, clean look that not only hides old stains but also protects against new ones, making future cleanup much easier.

Preparation

Proper preparation is the key to a professional-looking finish. Before you even think about opening the grout colorant, you need to give your grout a deep clean. Use your preferred cleaning method to scrub away any surface dirt, grease, or soap scum. This ensures the colorant will adhere properly to the grout and not to the grime on top of it. After cleaning, rinse the area well with water to remove any cleaning residue. Then, the most important step: let the grout dry completely. Applying colorant to damp grout can lead to a patchy, uneven finish, so give it at least 24 hours to air dry.

Application and Drying

Once your grout is clean and completely dry, it’s time to apply the colorant. Most grout colorant kits come with an applicator brush, but a small, stiff artist’s paintbrush also works well. Work in small, manageable sections. Carefully paint the colorant onto the grout line, trying your best to stay within the lines. Don’t worry if you get some on the tile; the trick is to wipe it off quickly. Keep a damp cloth or paper towel handy and wipe any excess colorant off the tile surface immediately after you paint each section. This prevents the colorant from drying on your tile. Continue this process section by section until you’re done.

Maintaining Your Grout for Lasting Results

You’ve put in the work, and your grout looks fantastic. Now, how do you keep it that way? The secret to long-lasting, clean grout is all about sealing and regular maintenance. Cleaning is only half the battle; protecting the grout from future stains is what will save you from having to do a deep scrub every few months. A simple sealing step after you clean can make a world of difference, creating an invisible shield that repels dirt and moisture. This is especially crucial for high-traffic areas or outdoor spaces exposed to the elements. A little proactive care will ensure your hard work pays off and your tile continues to look its best.

For homeowners on Long Island who want to ensure their outdoor living spaces remain in pristine condition, professional maintenance is a great option. After investing in a beautiful masonry patio or poolside area, you want it to last. At Gappsi, our restoration and sealing services are designed to do just that. We use high-quality sealants and expert techniques to protect your investment from the harsh New York weather, preventing staining and deterioration. This professional sealing service ensures your grout and stone stay clean and stable, allowing you to spend more time enjoying your backyard and less time worrying about its upkeep.

Long-Term Grout Care

After you’ve cleaned your grout, letting it dry completely and then applying a sealant is the most important step for long-term protection. As many DIYers on Reddit will tell you, skipping the sealant is a recipe for having to repeat the deep cleaning process all over again in a few months. A good quality, water-based grout sealant soaks into the porous grout and creates a protective barrier. This barrier prevents dirt, water, and other grime from penetrating the grout, making routine cleanups as easy as a quick wipe. You’ll need to reapply the sealant every year or so, but it’s a small task that pays huge dividends in keeping your grout looking new.

Setting Realistic Expectations

It’s important to have realistic expectations, especially when dealing with old grout. While the cleaning and coloring methods we’ve discussed can create dramatic improvements, some grout may have permanent discoloration that’s impossible to remove completely. This is often the case in areas with constant moisture, like around a toilet base or in the corners of a shower. Even with the best cleaning efforts, you might notice some slight shadowing remains. In these situations, grout colorant is your best friend for achieving a uniform look. Understanding that “like new” might not mean 100% perfect helps you appreciate the massive improvement your efforts have made.

View Gappsi’s YouTube Channel for Videos of Grout and Tiles Cleaning, Coloring, and Sealing Bathrooms and Kitchen Walls and Floors

https://youtu.be/Z1Fti0HmG_c

Tile & Grout – Restoration Cleaning Coloring Sealing only at Gappsi.  Tile cleaning is tough work. Grout cleaning is even harder. Over time, tile floors and surfaces lose their shine and luster. Scrubbing and mopping do not generally yield the results needed for a deep clean. Because grout is porous and absorbs all the dirt and debris on it, mopping only removes surface soil and not the embedded dirt that causes the grout to become dull.

Our residential tile and grout cleaning and grout-sealing product helps maintain the cleaned grout for months and makes your regular home maintenance more effective. Also, if your grout is discolored or you want to update the look, we offer grout re-coloring services in a variety of colors to suit your style.

Gappsi Tile and Grout Deep Cleaning

Gappsi has trained technicians who use specialized equipment.  It extracts deeply embedded dirt and grime, thoroughly cleaning and sanitizing your tile, grout, and baseboards. We use nonabrasive yet effective methods with adjustable heat and pressure for deep-down cleaning.

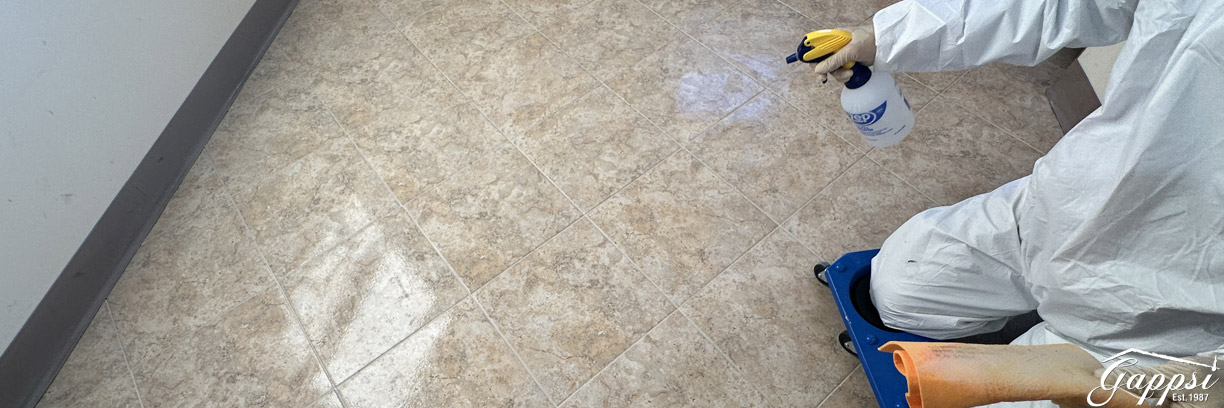
1-Tile-and-grout-cleaning-applying-cleanersWe service all sorts of tile: stone, ceramic, porcelain, clay, and more on floors, shower walls, backsplashes, vanities, tub surrounds, hot tub surrounds, pool decks, table tops, and more throughout Long Island.
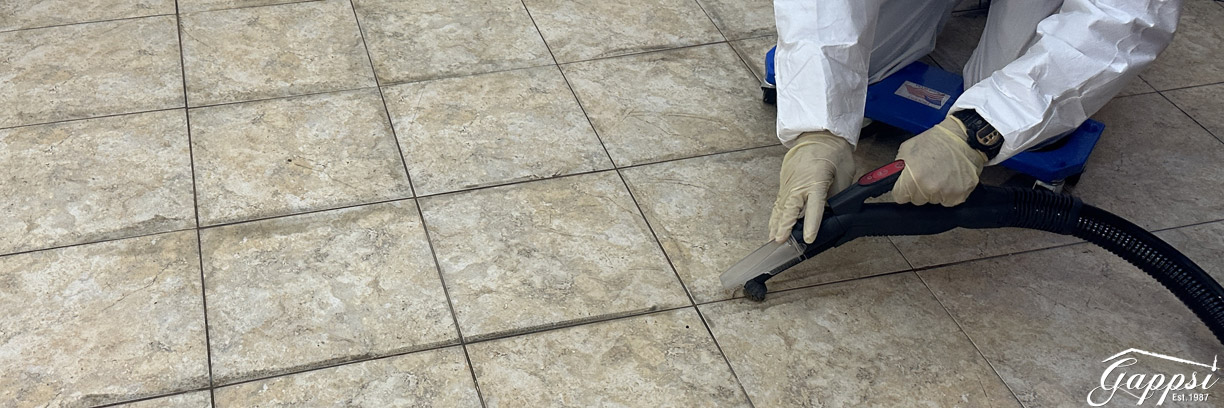
Our steam cleaning yields stunning results! If you have soiled grout it can respond to steam cleaning as suddenly as what happens when you spill bleach on black cloths.  The grout is often restored to a uniform color and sanitized the very second the steam wand runs across the tile and grout surface.

2-Tile-and-grout-cleaning-steam-washing-and-brusching-grout-jointsTile and Grout Restoration Repair 

  • Shower Restoration, Cleaning & Caulking​ – We offer a variety of shower restoration services. We use alkaline cleaners or acid cleaners to remove soap scum, calcium deposits, and dead skin cells. We also provide caulking services and grout repairs for damaged areas of the tile floor. We can apply sealants to protect your grout from future damage.
  • Tile & Grout Repairs – When grout is cracked, crumbling, or stained over time there are several repair options. If only certain areas of the grout are damaged, we may be able to add more grout material or re-grout those areas. If the entire floor needs repair, we can either re-grout the entire floor or color your existing grout to match the original color.

4-Tile-and-grout-cleaning-and-coloring-grout-jointsGrout Recoloring | Grout Color Sealing

After thoroughly cleaning your grout, we can apply a pigmented sealer that seals your grout and covers up the stains.

With recoloring, we can change the color of your grout to a lighter or darker color or match the original color. We will work with you to choose the right color for your grout. Changing the color of the grout in a bathroom, kitchen, or any tiled area can give the room a new look and feel!

If your sanded grout has cracked due to loose tiles, broken thresholds, or other causes, we can repair it before color sealing.

Grout recoloring will save you time and effort by repelling soil and stains, making cleaning easier. The pigmented sealer will also last up to ten times longer than standard sealer; this offers the highest protection level. Grout recoloring can change your tile’s look, saving you money on costly remodels. Color-sealed grout is easy to clean, saving you time and money by eliminating the need for harsh cleaners. Give new life to your existing tile and grout by having your local Grout Doctor color seal it for you!

Color-sealed grout is easy to clean because you simply wipe down the tiles with a clean cloth or mop. There is no scrubbing needed.  The color seal protects your grout from the dirt, grime, and liquids that caused the stains in the first place.

Tile & Grout – Restoration Cleaning Coloring Sealing

6-Applying-final-coat-of-clear-sealerWhat You Can Expect from Gappsi

When you choose Gappsi for professional grout cleaning and color sealing you will receive 100% Satisfaction

Step One – Prep Existing Floor – our professionals have perfected tile and grout restoration. We can make dirty, discolored grout lines look like new regardless of the choice of color. If you prefer the original appearance, we can restore, clean, repair, and seal your existing grout. If you prefer to add something special to your existing tile floor, Gappsi can help you mix and match the tile and grout line colors.

Step Two – Select Color for Grout – Gappsi can turn dingy, dark grout lines into clean, white grout lines.  We can apply a color sealer that will also provide lasting protection. Our color matching system allows our customers to choose a new grout color for a customized appearance.

Step Three – Apply New Grout – Grout is a concrete and sand mixture.  When you have your renovated grout color sealed it protects it from accidents.  All those unexpected spills, foot traffic, and day-to-day life.  Having unprotected grout lines can absorb the stains leaving discoloration and/or create a breeding ground for odor-causing bacteria as in pet-related accidents. Protective sealant allows for a quick mop and your tile floor is as good as new.

Step Four – Tile & Grout Sealed for Protection – Our proven process for grout restoration and color sealing means you no longer have to face the dilemma of ugly, unsanitary grout lines in your bathrooms, kitchen, or family room. Don’t waste your time scrubbing discolored grout lines with harsh chemicals.

7-Wiping-off-the-access-sealer-off-the-tiles-and-spreading-it-into-the-grout-jointsGrout color sealing can break down over time and will need to be resealed to keep your grout in great condition. We recommend grout sealing once a year in areas without moisture, and as needed in high-moisture areas such as kitchens and bathrooms.

SCHEDULE A MEETING TODAY WITH GAPPSI

https://youtu.be/Z1Fti0HmG_c

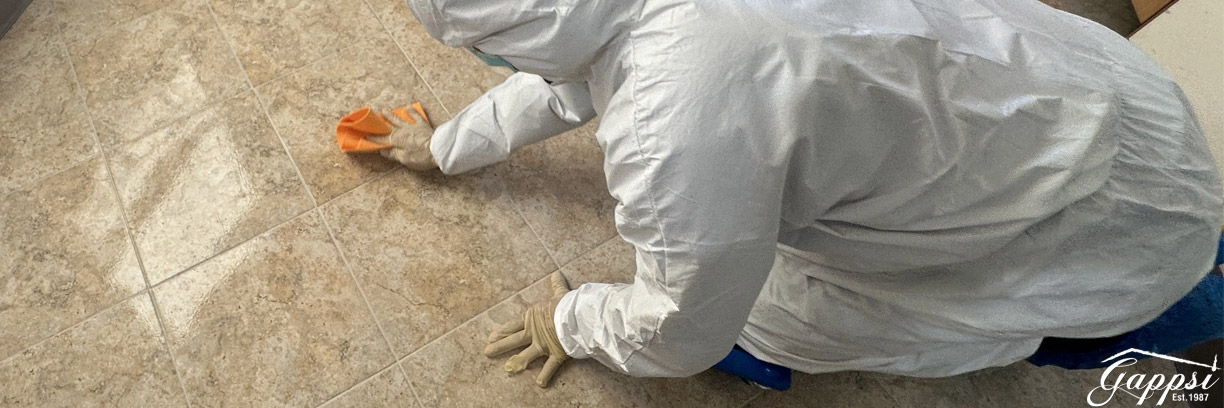
In this video, you can view the process of cleaning and coloring the grout from this demonstration floor.  You can see the difference in the before and after.  We start by applying the grout and tile cleaner over the tiles and the grout joints.  We allow it to sit for a few minutes.  Next, we steam-wash the entire floor. Then, we start the cleaning process of the joints with hot steam and a brass brush.  We use a vacuum to remove leftover dirt from the grout joints for the final general cleaning of the tiles and grout.

Gappsi Coloring Process for Grout

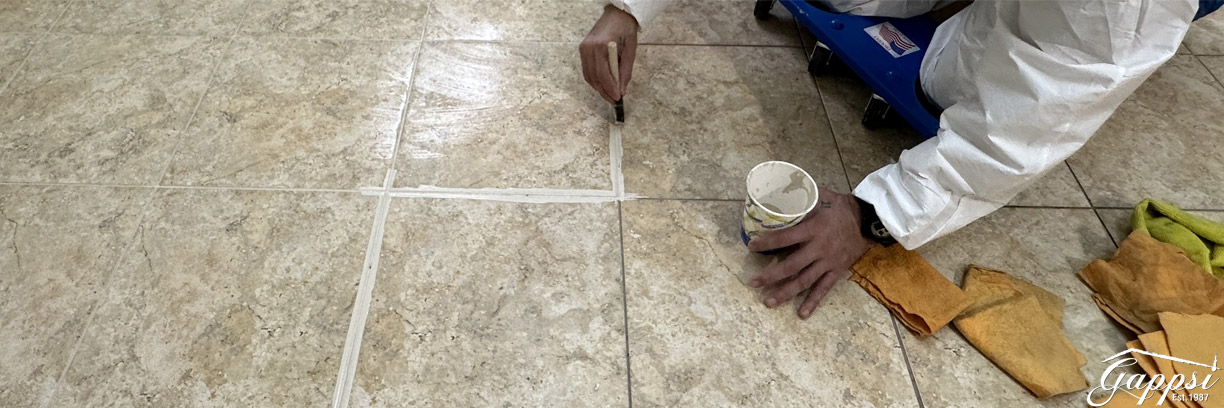
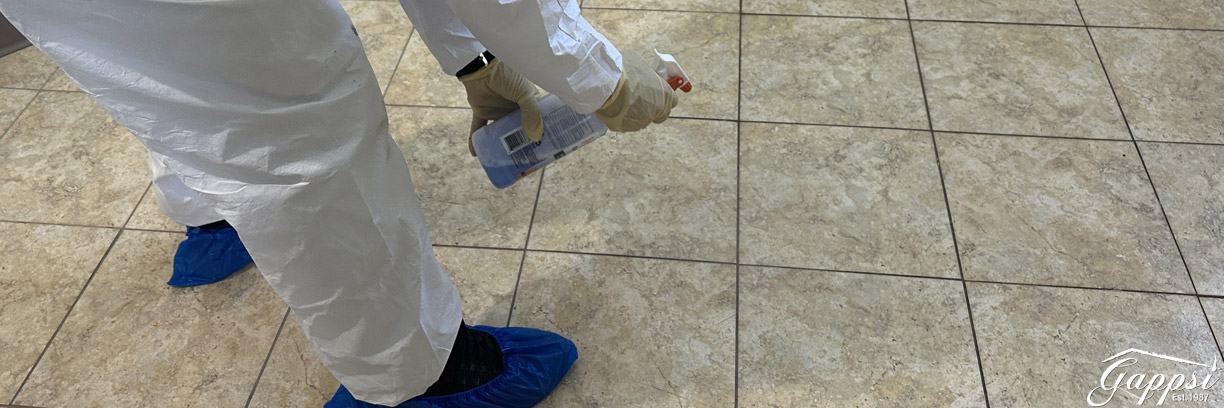
Next is the process of coloring the grout after they have been cleaned.  There is a huge transformation from before, as you can see in the part of the floor that has not been cleaned yet.  The joints have not been colored before.  After the next step, we will apply a protective sealer on the grout and tiles. Now, when applying the final coat of clear sealer, this sealer will not enhance the color of the grout or the tiles but will prevent it from getting dirty.  We wipe off the excess sealer and get the sealer into the grout and joints and off the tile surface for a clean finish.


Frequently Asked Questions

My grout is permanently stained. Do I have to replace my tile? Not at all. Before you consider a full renovation, look into grout colorant. This product is like a durable paint for your grout lines that covers up old, stubborn stains and seals the grout from future dirt and moisture. It allows you to completely refresh the look of your tile by choosing a new, uniform color for the grout, giving the entire room a facelift without the cost and mess of a remodel.

Are DIY grout cleaners like baking soda and vinegar really effective? Yes, for routine cleaning and mild to moderate stains, DIY solutions can be very effective. A paste of baking soda and hydrogen peroxide is great for whitening, while the foaming action of baking soda and vinegar helps lift dirt from the porous grout. These methods are budget-friendly and safer than harsh chemicals, but they do require some scrubbing. For deep-set, long-term stains, a professional cleaning or a grout colorant might be necessary.

How often should I seal my grout? Sealing is the key to keeping your grout looking clean long-term. As a general rule, you should reseal your grout about once a year for most areas. However, for high-traffic zones like entryways or high-moisture areas like showers and kitchen backsplashes, you might need to reseal more frequently, perhaps every six months. A simple test is to sprinkle a few drops of water on the grout line; if it soaks in and darkens, it’s time to reseal.

Can I use bleach to get my grout white again? It’s best to avoid using bleach on your grout. While it might seem like a quick fix for whitening, bleach is a harsh chemical that can weaken the cement-based structure of the grout over time, causing it to become brittle and crack. It can also lead to uneven, blotchy discoloration. Sticking to gentler, pH-neutral cleaners or DIY solutions is a much safer and more effective long-term strategy.

What’s the difference between cleaning grout and coloring it? Cleaning removes the surface-level dirt, grime, and mildew from your grout lines, which can significantly brighten up your tile. Grout coloring, or color sealing, is a restorative process for when cleaning isn’t enough. It involves applying a pigmented sealant that creates a new, colored surface over the old grout. This not only covers permanent stains but also provides a powerful seal against future dirt and moisture, making it a more transformative and long-lasting solution.

Key Takeaways

  • Clean Before You Replace: You can often refresh your tile’s appearance without a full renovation by deep cleaning the grout. Simple, effective DIY solutions like a baking soda and hydrogen peroxide paste can remove years of built-up grime and brighten your grout lines.
  • Use Grout Colorant for Stubborn Stains: When cleaning isn’t enough to fix deep-set discoloration, grout colorant is a transformative alternative. It applies a new, durable layer of color that covers old stains and simultaneously seals the grout, offering a fresh look and added protection.
  • Seal Your Grout for Lasting Results: The most important step for long-term maintenance is applying a grout sealant after cleaning. This creates a protective barrier against dirt and moisture, which makes future cleanups much easier and prevents stains from setting in.

Related Articles

Share this page:

Basketball Court Design and Construction Sports Game Court East Hampton NY

Basketball-Court-Design-and-Construction-Sports-Game-Court-East-Hampton-NYOur latest Basketball Court Design and Construction is in East Hampton, NY.  The family that plays together, stays together. Nothing is better after a long day of work, school, and errands than gathering together for a family pick-up game. It’s quality time that keeps you healthy and happy.
Let Gappsi bring the GAME to you with a backyard court!

Whether you want a safe place for the kids to play or are training a future NBA star, Mateflex Court Tiles is the premier choice for backyard sports game courts. At Gappsi we can assist with all elements of incorporating a basketball court into your backyard design.  Our team can also make the court into a multi-sport game court so you have more choices.

Every family is unique. What’s best for your family may not be what’s best for someone else. Gappsi’s dedicated and personalized approach helps you find the best court for your family. We have an extensive range of customizable features that will make your backyard court or home gym unlike any other.

Gappsi Home Court Designs Include:

  • Athletic Flooring: indoor and outdoor.
  • Sports Components: adjustable basketball hoops, variable-height net systems, volleyball and tennis nets, sports equipment packages, and rebounders.
  • Lighting: light poles with LED and incandescent bulb options.
  • Ball Containment: wall padding and fencing.
  • Court Complements Batting cages and golf nets.

Kids can play safely, players can play longer and professionals can teach longer on Sports Game Courts because of the impact-reducing tiles.  Whether retrofitting or resurfacing an existing court or maybe building a new stand-alone court.  Dedicated to providing you with a long-lasting, low-maintenance tennis court.

Basketball-Court-Design-and-Construction-Sports-Game-Court-East-Hampton-NY1We custom build 36’, 60’, or full-sized 78’ sports game courts where you can enjoy tennis, pickleball, or other racquet sports at home with your family. We are ready to customize any court to match your needs.

Matelfex is the most innovative basketball court system on the market today. It provides an exceptionally uniform and durable surface, which allows for intensive activity.

Mateflex Sports Game Court Key Features

  1. Low Maintenance – Easy to clean with broom, hose – or leaf blower
  2. Superior Grip – Unique surface profile offers superior grip and traction
  3. Up to 50% Cooler – Tile surface stays up to 50% cooler than concrete or asphalt
  4. Unmatched Durability – Will stand up to aggressive play and harsh weather conditions
  5. Safe – Provides forgiveness for players’ knees, joints, and lower backs
  6. Customizable – Unlimited sizes, numerous color options, and custom logos
  7. Multi-Functional – Add your favorite game lines and designs

Expansion Joint Technology – Why is this so important?

Why are expansion joints so important in outdoor modular sport flooring surfaces? The main reason is that when plastic is put out into the elements, it will expand and contract with varying temperatures and sun conditions. If this is not accommodated in the design and installation of the modular tile surface, several issues can arise. The surface can shift over time, buckle in extreme heat, and cause inaccurate game line dimensions just to name a few. Mateflex accounts for all of this with its unique Expansion Joint Technology.

The Expansion Joint Technology behind Mateflex tiles is what sets their outdoor court surfaces above the competition for all sports. The expansion joints allow the tiles to be flexible and conform better to uneven sub-surfaces, providing more consistent ball bounces than any other outdoor tile on the market.

The expansion joints also allow for the court to be fastened to the subsurface around the perimeter of the court. This is done for several practical reasons, the first being to prevent physical or thermal movement of the surface throughout its long service life. When properly fastened, the tiles are designed to expand and contract within their footprint, eliminating any concerns with thermal expansion. This allows the tiles to be trimmed tight to any vertical obstruction, giving the court a very clean and finished look. It also ensures that your game line dimensions will be accurate regardless of temperature and sun conditions.

The Expansion Joint Technology is one of many reasons that makes Mateflex Sport Surfaces the perfect balance of performance and durability for your next outdoor court project.  Gappsi is a trusted partner of Mateflex.

Basketball-Court-Design-and-Construction-Sports-Game-Court-East-Hampton-NY2What can Gappsi design for you?  You do not have to pick just 1 anymore!

Gappsi is a full-service sports game court designer and installer.  We specialize in custom backyard athletic sports game courts for residential and commercial locations.  Our game courts include Basketball, Street/deck Hockey, Tennis, Futsal, Volleyball, Inline/roller hockey, Paddle tennis, Soccer, Badminton, Floor hockey, Pickleball, Dodgeball, Roller skating, Kickball, Shuffleboard, Hopscotch, Four Square, Handball, Whiffle ball, Tot play, Scooters/trikes, Skateboarding, Parties, Dances, Soccer, Tennis, and more.

For all the ice hockey and ice skating fans out there we also design for cold climates.  Many families design their courts for winter sports and flood the court in the winter making a personal ice rink!

Basketball Court Design and Construction Sports Game Court East Hampton NY

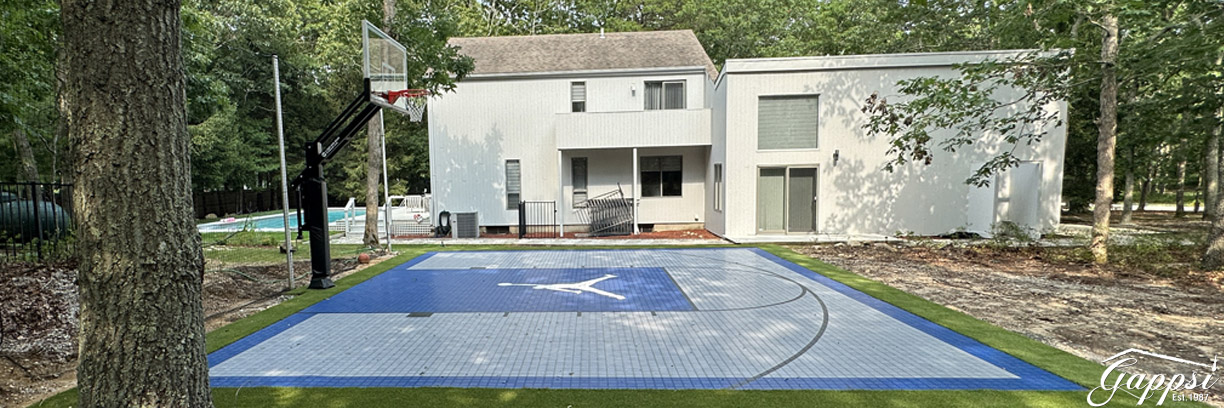
Our team completed a 25×30 basketball court in East Hampton NY.  The basketball sports game court built on a recycled concrete base with Mateflex tiles on top is the perfect home edition.

The customer chose blue for the key and a border with gray for the field color. Black-colored lines striped the court.  In addition, Gappsi added a synthetic turf fringe surrounding the entire court.  As per a customer request, we custom-printed a Jordan logo in the court.

A Pro Dunk adjustable professional basketball hoop and an out-of-bounce netting were installed behind the hoop with removable aluminum poles. This is the latest basketball court built with Metaflex tiles designed by Gappsi in East Hampton NY. 

SCHEDULE A MEETING TODAY WITH GAPPSI

View Gappsi’s YouTube Channel for Videos of Basketball Court Design and Construction Sports Game Court East Hampton NY

Share this page:

Cement Wall Liner Pool Contractors: A Complete Guide

Your backyard should be a personal retreat, a space that reflects your style and is perfect for making memories. If your existing concrete pool doesn’t fit that vision, a renovation can change everything. Installing a vinyl liner isn’t just a repair; it’s a complete redesign opportunity. You can choose from endless patterns and colors to create a custom look. Plus, this is the perfect time to add features like built-in benches, stylish stairs, or even a tanning ledge. You can finally have the pool you’ve always wanted. To bring these ideas to life, you need a skilled team. As expert cement wall liner pool contractors, we specialize in turning basic pools into bespoke backyard paradises with features tailored to your lifestyle.

Concrete-Pool-with-Vinyl-Liner-and-Backyard-Design-Smithtown-NYGappsi is your choice when it comes to concrete pool with vinyl liner renovations in Long Island NY.  When looking for a pool company you want one that delivers high-quality work and exceptional results. Gappsi has the expertise and know-how to transform your tired, outdated concrete pool into a stunning outdoor paradise. Our team of professionals is equipped with the latest tools and techniques to handle a variety of concrete pool renovations or new installations.

Gappsi will help you choose the right pool for your backyard and your budget. A vinyl liner pool reinforced with concrete walls is a great, affordable option that enables you to achieve a distinctive look for your poolscape. Giuseppe gives you all the details to help you design the pool of your dreams and provides you with the expertise to create the backyard you have always wanted.

Can you put a liner inside a concrete pool?  A vinyl pool liner is a fantastic and affordable way to completely renovate your concrete pool. It is flexible and will help with future structural declines within your pool shell. 

Concrete wall inground pools allow you to customize the size and shape of your in-ground pool and, offer the durability to make your investment last a lifetime.  We offer custom vinyl liner inground pool stairs and seating. Our custom liner benches and seats are a stylish and practical upgrade for any inground swimming pool.

Whether you’re looking for the perfect height to sit and relax with a jet massaging your back, a shallower area for lounging and sun tanning, or a safe, shallow play zone for children, our custom options cater to all these needs and more.  The convenience of a swim-out bench is that it does not take up the surface area that pool steps require, yet you can enter the pool comfortably as opposed to jumping in. You will find that the swim-out bench is often the area of the pool where you most often spend time restfully sitting in the water – it is also a visually enriching pool design feature!

Concrete-Pool-with-Vinyl-Liner-and-Backyard-Design-Smithtown-NY2Our products include:

  • corner
  • recessed
  • wall-to-wall stairs
  • custom benches.

Ideal for new installations or updating older pools, these stylish options enhance functionality and aesthetics, fitting seamlessly with automatic covers. Consider our tailored solutions for a unique pool upgrade.

Adding a Fence to Your Concrete Pool with Vinyl Liner

What about a fence for your new or existing pool? Most municipalities require a fence anytime pools are installed. The Association of Pool & Spa Professionals recommends that pool owners use “layers of protection”.  This ensures that any swimming or poolside experience is completely safe. A recommended minimum four-foot-high barrier should surround the pool.  A variety of fencing materials are available from basic safety fencing to decorative wood, iron, aluminum, or vinyl. Gappsi can help you decide what will best fit into your budget and complement your poolscape.

Concrete-Pool-with-Vinyl-Liner-and-Backyard-Design-Smithtown-NY3Color Changing LED Pool Lights

Save energy, add stunning outdoor illumination, and extend your hours of fun.  Simply by turning your backyard resort into an after-dark entertainment showplace. You can with LED (light emitting diodes) technology. Ideal for full pool and spa lighting, energy-efficient light systems will dress up your pool & spa in a full spectrum of vibrant, jewel-tone colors.

  • Ultra-low operating costs—save up to 86 percent on electricity use over incandescent bulbs.
  • 5 to 10* fixed colors and seven dynamic, color-changing light shows.
  • The industry’s brightest, longest-performing LEDs
  • High-intensity illumination—100% brighter than any other 12-volt LED light (white model only)
  • A lifespan up to 10 times longer than incandescent bulbs.

Concrete-Pool-with-Vinyl-Liner-and-Backyard-Design-Smithtown-NY4LED WaterBowls: Overflowing with Sophistication

With their gentle spillover effect and flickering interior, Hayward LED WaterBowls are beautiful.  They replicate the soft glow of fire to create a warm, inviting centerpiece. Available in two base shapes (square or round) and seven gorgeous finish colors, LED WaterBowls are easy to install and add an instant visual appeal to any new build or renovation. Each bowl is sculpted from a durable, UV-resistant, semi-transparent material, allowing you to see the effect of each color produced by the advanced Hayward LED lights inside. This also allows the bowls to transition effortlessly from day to night, letting pool owners make a stylish statement at whatever time the need arises for them.

Smithtown Vinyl Swimming Pool and Backyard Design

This backyard was designed and built by Gappsi in Smithtown NY. Our team built an L-shaped pool with concrete walls and a vinyl liner. We installed corner stairs and benches in the corner of the pool. Gappsi built a sitting area also inside the pool, which consists of a granite table that extends into the pool with 6 stools; 3 on each side.

We built a raised area in the deeper part of the pool for a sitting area that included the water features. The LED sheer descends and LED water balls add a beautiful look and feel to the backyard. They have lights that come on and are more visible in the nighttime. The patio was completed using Cambridge paving stones, including Charcoal Fullnose 6 x 12 for the patio edge around the pool. The patio consists of a Cambridge Excel smooth corner and a very large sitting area. The umbrella was installed in the center of the table to shade the people sitting in the pool. This is the Gappsi latest project in Smithtown NY.

Why Renovate a Concrete Pool with a Vinyl Liner?

If your old concrete pool is showing its age with cracks, stains, or a rough surface that’s no fun for your feet, you might think a complete tear-out is your only option. Thankfully, there’s a much smarter and more affordable solution. Retrofitting your existing concrete shell with a vinyl liner is an excellent way to give your pool a complete makeover. This approach not only addresses cosmetic issues but also adds a flexible, waterproof barrier that can help manage future structural shifts in the pool shell. It’s a practical renovation that breathes new life into your backyard oasis without the massive expense and disruption of a total rebuild.

This renovation method combines the best of both worlds. You get to keep the strong, durable foundation of your concrete pool, which provides excellent structural integrity, while gaining the smooth, comfortable, and easy-to-maintain surface of a modern vinyl liner. It’s a transformation that updates the look and feel of your pool, making it more inviting and enjoyable for everyone. Plus, with today’s variety of liner colors and patterns, you have a fantastic opportunity to completely redesign your pool’s aesthetic to match your current style. It’s a powerful way to get a brand-new-looking pool for a fraction of the cost and hassle.

Benefits of a Vinyl Liner

A Smoother, More Comfortable Surface

One of the most immediate benefits you’ll notice after installing a vinyl liner is the feel. Concrete or plaster surfaces can become rough and abrasive over time, a condition often called “pool rash.” This can be uncomfortable on swimmers’ feet and skin. A vinyl liner provides a silky-smooth, non-porous surface that is gentle to the touch, making your swimming experience much more pleasant. This is especially great for families with young children who spend hours playing in the pool. The smooth surface also has a practical advantage: it’s less prone to algae growth, making your pool cleaning routine a little bit easier.

Cost-Effective Renovation

When it comes to your budget, renovating with a vinyl liner is a clear winner. The cost to re-plaster a concrete pool can be significant, and a full demolition and rebuild is a major financial undertaking. A vinyl liner offers a fantastic and affordable way to completely remodel your pool. At Gappsi, we find that a vinyl liner pool reinforced with concrete walls is a great option that allows homeowners to achieve a distinctive, high-end look for their poolscape without the high-end price tag. This approach lets you allocate more of your budget to other backyard features, like a new patio or landscaping.

Comparing Pool Surfaces and Lifespan

Concrete vs. Vinyl Liner Longevity

A common question is how a vinyl liner compares to a traditional concrete surface in terms of lifespan. Concrete wall inground pools are built to last, offering the durability to make your investment last a lifetime. When you add a vinyl liner, you aren’t replacing that strength; you’re protecting it. The concrete shell provides the permanent structure, while the liner acts as a replaceable surface. A quality vinyl liner can last for many years, and when it’s time for a replacement, the process is far simpler and less expensive than a full concrete resurfacing. This combination gives you a durable foundation with a flexible, modern finish.

Planning Your Pool Liner Installation

Proper planning is the key to a smooth and successful pool renovation. Before the work begins, it’s important to think through the logistics, from local regulations to your final budget. Taking the time to plan upfront ensures there are no surprises along the way and helps you create a clear roadmap for the project. You’ll want to consider the overall design, check for any required permits, and get a firm grasp on all the potential costs involved. This phase is all about setting clear expectations and making informed decisions so that your final result is exactly what you envisioned for your backyard.

Initial Planning and Zoning Checks

Before you get too deep into design, your first step should be to check local municipal requirements. Most towns on Long Island have specific rules regarding pool renovations, especially concerning safety. For instance, nearly all municipalities require a fence of a certain height to surround the pool area. The Association of Pool & Spa Professionals recommends using “layers of protection” to ensure a safe swimming environment. Gappsi can help you understand these local codes and design a compliant and beautiful fencing solution that complements your poolscape and fits your budget, whether it’s aluminum, vinyl, or wood.

Budgeting for Your Renovation

Key Costs to Consider

When budgeting for your liner installation, it’s important to look beyond the price of the liner itself. The total cost will include the liner, professional labor for installation, and any necessary preparation of the concrete shell, which might involve patching cracks. You should also factor in the cost of new water to refill the pool, as well as any plumbing or electrical updates you might want to make at the same time. We also recommend replacing gaskets and faceplates for skimmers and returns to ensure a perfect seal. Considering these elements will give you a more accurate and realistic budget for your project.

Financing Your Project

A pool renovation is a significant investment in your home, and there are several ways to finance it. Some homeowners use personal savings, while others opt for a home equity line of credit (HELOC) or a personal loan. A HELOC can be a good option because it often comes with a lower interest rate and the interest may be tax-deductible. It’s a good idea to speak with your bank or a financial advisor to explore the best options for your situation. At Gappsi, we provide clear, detailed estimates to help you secure any financing you may need for your project.

Understanding the Project Timeline

A typical concrete-to-vinyl liner conversion is a fairly quick process, but the exact timeline can vary. After the initial consultation and design phase, the work itself usually begins with draining the pool and preparing the concrete surface. This can take a day or two. Next, any necessary repairs or plumbing updates are made before the new liner is professionally installed. Once the liner is set, the pool is refilled, and the new components are installed. Generally, you can expect the entire on-site process to take about a week, depending on the scope of work and weather conditions.

The Installation Process Step-by-Step

Seeing your old pool transform is an exciting process. While every project is unique, the installation of a vinyl liner over a concrete shell follows a clear, methodical sequence to ensure a perfect fit and lasting performance. From the initial design conversation to the final moment when the water starts filling your new-and-improved pool, each step is crucial. Our team at Gappsi has refined this process over decades of experience, ensuring every detail is handled with precision. Understanding these steps can help you know what to expect as we bring your vision for a beautiful, revitalized pool to life.

1. Consultation and Design

The first step is always a conversation. This is where we discuss your vision, needs, and budget. We’ll evaluate your existing pool structure and help you explore the vast array of liner patterns and thicknesses available. This is also the perfect time to consider adding custom features. For example, we can build custom vinyl-covered stairs, benches, or even a tanning ledge to enhance your pool’s functionality and style. Our goal is to design a comprehensive solution that transforms your tired, outdated concrete pool into a stunning outdoor paradise you’ll love for years to come.

2. Preparing the Concrete Shell

Once the design is finalized and the pool is drained, our team gets to work preparing the concrete shell. This is a critical step for a flawless finish. We start by removing old fittings and grinding down any sharp or rough spots on the concrete surface. Any cracks or damage to the shell are carefully repaired to create a solid, stable foundation for the new liner. Finally, we wash the entire surface and often add a thin layer of foam padding to the walls and floor. This provides an extra layer of protection for the liner and adds a softer feel underfoot.

3. Plumbing and Electrical Updates

With the pool empty and the shell exposed, it’s the ideal time to address any plumbing or electrical needs. We inspect all the existing lines for leaks or damage and can upgrade your system for better efficiency. This is also when many homeowners choose to add modern features like color-changing LED lights, which can dramatically enhance the ambiance of your pool at night. We can also install new, more efficient pumps or filters. Taking care of these updates during the renovation process is efficient and ensures all your pool’s systems are in top condition for the new season.

4. Liner Installation and Finishing Touches

This is where the magic happens. Our skilled installers carefully place the new vinyl liner into the pool. Using a special vacuum, we suck all the air out from behind the liner, which ensures it fits snugly against the walls and floor without any wrinkles. As the pool begins to fill with water, the pressure holds the liner perfectly in place. Once the water level is high enough, we install new faceplates and gaskets on all the fittings, like the skimmers and returns, creating a watertight seal. The final step is balancing the water chemistry and getting your beautiful new pool ready for you to enjoy.

Choosing the Right Materials

The success of your pool renovation depends heavily on the quality of the materials you choose. This is especially true for the vinyl liner itself, which is the part of the pool you’ll see and feel the most. However, the smaller components that you don’t see are just as important for the longevity and performance of your pool. From the type of liner to the gaskets and faceplates, selecting high-quality materials is a non-negotiable part of a professional installation. It’s the difference between a renovation that looks good for a season and one that provides years of worry-free enjoyment for your family.

Types of Vinyl Liners

When you start looking at vinyl liners, you’ll find a wide range of colors, patterns, and thicknesses. Thickness is measured in mils (1/1000 of an inch), with thicker liners generally offering more durability and puncture resistance. You can choose from patterns that mimic the look of classic tile, natural stone, or shimmering water to completely customize your pool’s appearance. At Gappsi, we can show you samples and help you select a high-quality liner from trusted manufacturers that will not only look beautiful but also stand up to UV rays, chemicals, and years of fun in your swimming pool.

Beaded, Unibead, and Overlap Liners

There are three main types of liners, categorized by how they attach to the pool wall. Overlap liners are the most basic; they are draped over the pool wall and held in place by coping. Beaded liners have a small groove, or bead, along the top edge that snaps into a track on the pool wall. This often allows for more intricate patterns near the waterline. Unibead liners are versatile; they can function as a standard beaded liner or, with the bead portion removed, can be hooked over the wall like a J-hook liner. We typically recommend beaded liners for concrete-to-vinyl conversions for a clean, professional finish.

The Importance of Quality Components

Why We Replace Gaskets and Faceplates

It might seem like a small detail, but replacing the gaskets and faceplates on your skimmers, main drains, and return jets is one of the most important parts of a liner replacement. These components create the waterproof seal between the liner and your pool’s plumbing. Over time, the old plastic can become brittle and the gaskets can compress and dry out, making them prone to leaks. Installing a brand-new liner without replacing these inexpensive parts is a risk we’re not willing to take. At Gappsi, we replace all gaskets and faceplates every time we install a new liner to ensure a secure, leak-free fit for years to come.

Features to Enhance Your Renovated Pool

When you decide to renovate your concrete pool with a vinyl liner, you’re doing more than just a simple update. This is the perfect moment to think about the features that will truly transform your backyard into a personal retreat. By incorporating a few key additions during the renovation process, you can improve not only the look of your pool but also its functionality and overall enjoyment. From custom seating to ambient lighting, these enhancements can turn a standard pool into the centerpiece of your outdoor living space, making it a place where family and friends will love to gather for years to come.

Customizable Design and Shape

One of the greatest advantages of a concrete wall pool is the freedom it gives you in design. You are not limited to a standard oval or rectangle. Instead, you can create a pool that perfectly complements your backyard’s layout and your personal style. This flexibility allows you to design a truly unique swimming experience. Because of their robust construction, “Concrete wall inground pools allow you to customize the size and shape of your in-ground pool and offer the durability to make your investment last a lifetime.” This means your custom swimming pool is not just a beautiful addition but a lasting investment in your home’s value and your family’s enjoyment.

Stylish Seating and Stairs

Think of your pool as more than just a place for swimming; it is a space for relaxation and connection. Adding custom seating options can completely change how you use your pool. “Our custom liner benches and seats are a stylish and practical upgrade for any inground swimming pool.” Imagine having a built-in bench where you can sit and unwind with your feet in the water or a large, shallow sun shelf perfect for lounging on a hot day. These features create comfortable, designated spots for socializing, making your pool the go-to destination for everyone, whether they want to swim laps or simply relax and chat.

Essential Safety Features

A beautiful pool is wonderful, but a safe pool provides true peace of mind. Installing a fence is a critical step in ensuring the safety of your family, guests, and pets. Many municipalities require it, and for good reason. As a guideline, “A recommended minimum four-foot-high barrier should surround the pool.” The good news is that safety does not have to compromise your backyard’s aesthetic. “A variety of fencing materials are available from basic safety fencing to decorative wood, iron, aluminum, or vinyl.” You can choose a design that seamlessly integrates with your landscape, providing security while enhancing your property’s look. Gappsi offers many fencing options to match your style.

Energy-Efficient Lighting

Why limit your pool enjoyment to daylight hours? With the right lighting, your pool can become a stunning focal point after the sun goes down. Modern LED lighting is an excellent choice for both new and renovated pools. “Ideal for full pool and spa lighting, energy-efficient light systems will dress up your pool & spa in a full spectrum of vibrant, jewel-tone colors.” Not only do these systems use significantly less energy than traditional bulbs, but they also offer a dazzling array of colors and light shows. You can set a tranquil blue for a relaxing evening swim or a dynamic, color-changing sequence for a lively poolside party.

Stunning Water Features

If you want to add a touch of luxury and create a resort-like atmosphere, consider incorporating water features. The sound and sight of moving water can be incredibly soothing and visually captivating. Features like LED WaterBowls can make a dramatic impact. With their gentle spillover, “They replicate the soft glow of fire to create a warm, inviting centerpiece.” The combination of flowing water and integrated lighting creates a sophisticated and dynamic element that transforms your pool area into a luxurious escape, making every day feel like a vacation.

How a Renovated Pool Increases Home Value

A pool renovation is more than just a facelift for your backyard; it’s an investment in your home’s overall market appeal. When potential buyers tour a property, a modern, well-maintained pool can be a significant selling point, transforming the backyard from a simple lawn into a luxurious retreat. It suggests a lifestyle of relaxation and entertainment that is hard to resist. A dated or deteriorating pool, however, can have the opposite effect, signaling costly repairs and maintenance headaches. By updating your pool, you not only get to enjoy the benefits yourself but also create a compelling feature that can add tangible value when it’s time to sell your home.

Attractive Features for Potential Buyers

When buyers see a pool, they’re not just looking at a body of water. They’re imagining how they will use it. Features that extend the swimming season or add a touch of luxury can make your pool stand out. Think about what makes a pool more inviting and functional. Simple additions can transform a standard pool into a resort-like experience, making it a memorable part of your property. These enhancements show that the pool has been thoughtfully designed and cared for, which gives buyers confidence in the home as a whole.

The Appeal of an Attached Spa or Heater

Adding features like a heater or an attached spa can dramatically increase your pool’s usability and appeal. A heater extends your swimming season into the cooler months of spring and fall, a huge plus for anyone living on Long Island. An integrated spa offers a perfect spot for relaxation after a long day. These additions make the pool more versatile, catering to different needs and preferences. While it’s important to choose features that fit your budget, these kinds of upgrades often resonate strongly with potential buyers, making your home the one they remember.

The Value of Energy-Efficient Upgrades

Modernizing your pool isn’t just about looks; it’s also about performance and efficiency. Upgrading to energy-efficient equipment is a smart move that pays off for both you and a future owner. For instance, new LED lighting systems can completely change the nighttime ambiance of your backyard. They offer a full spectrum of vibrant colors and can save you up to 86 percent on electricity use compared to old incandescent bulbs. These upgrades demonstrate a commitment to quality and sustainability, which are attractive qualities in any home. At Gappsi, we can help you select and install a swimming pool with the latest energy-saving technology.

Why Experience Matters: Choosing Your Contractor

Embarking on a pool renovation is a significant project, and the contractor you choose will determine the quality of the outcome and the smoothness of the process. An experienced contractor brings more than just tools and a crew; they bring years of problem-solving, design expertise, and knowledge of local regulations. They can anticipate challenges before they become costly problems and guide you toward the best materials and designs for your specific needs and budget. Choosing a well-established company with a proven track record in your area provides peace of mind, ensuring your investment is in capable hands and will last for years to come.

Gappsi’s Decades of Long Island Expertise

With a project as important as your pool, you want a team that knows exactly what they’re doing. Since 1987, Gappsi has been transforming backyards across Long Island. We have the specialized expertise to turn a tired, outdated concrete pool into a stunning outdoor paradise that becomes the centerpiece of your home. Our professional team uses the latest tools and techniques for every renovation and new installation. We understand the unique landscape and building requirements of Long Island, ensuring your project is not only beautiful but also built to last through our distinct seasons.

Our Commitment to Quality Since 1987

Our long history is built on a foundation of quality and customer satisfaction. We work with you to choose the right pool for your backyard and your budget. For many homeowners, a vinyl liner pool reinforced with concrete walls is an excellent, affordable option that doesn’t compromise on durability or style. This approach allows for custom shapes and sizes, giving you a distinctive look for your poolscape. From the initial design consultation to the final touches, Gappsi is dedicated to helping you create the backyard you’ve always wanted with craftsmanship you can trust.

Completing Your Backyard Transformation

A beautiful pool is just one part of the equation. To create a truly exceptional outdoor living space, you need to consider the entire environment. The areas surrounding your pool, from the patio under your feet to the structures that provide shade and comfort, all play a role in the overall design and functionality. A cohesive plan ties everything together, turning your backyard into a seamless extension of your home. This is where you can really let your style shine and create a space for making memories, whether you’re hosting a summer barbecue or enjoying a quiet morning coffee.

Patios and Landscaping

The right patio material and landscape design frame your pool and tie it into the rest of your yard. A worn-out or basic concrete slab can detract from even the most beautiful pool. Upgrading your pool deck with high-quality materials like porcelain or natural stone pavers enhances both the look and feel of the space. These stylish options are perfect for new installations or for updating an older pool, improving functionality and aesthetics. Thoughtful landscaping softens the edges and adds color and texture, creating a private oasis you’ll never want to leave.

Outdoor Living Structures

To make your backyard a true destination, consider adding structures that provide comfort and expand your entertainment options. This can start right inside the pool with custom-built vinyl liner benches and seats, perfect for lounging in the water. Beyond the pool, a pergola can create a shaded seating area, while a fully equipped pavilion can house an outdoor kitchen and dining space for entertaining guests. These structures define different “rooms” in your outdoor space, making it more functional and inviting. At Gappsi, we design and build custom pavilions and pergolas to complete your backyard vision.

SCHEDULE A MEETING TODAY WITH GAPPSI

View Gappsi’s YouTube Channel for Videos of Concrete Pool with Vinyl Liner and Backyard Design in Smithtown NY

https://youtu.be/SaUi72gKmhw

Frequently Asked Questions

Why should I put a vinyl liner in my concrete pool instead of just re-plastering it? Installing a vinyl liner is a fantastic way to completely refresh your pool’s look and feel. It provides a smooth, comfortable surface that’s gentle on your feet, unlike older concrete that can become rough. It’s also a very cost-effective renovation, often more affordable than re-plastering, and it gives you the chance to choose from hundreds of modern colors and patterns to completely redesign your pool’s style.

How long does a vinyl liner last, and is it as durable as a concrete surface? A high-quality vinyl liner can last for many years with proper care. While the concrete shell of your pool provides the permanent, durable structure, the liner acts as a beautiful and replaceable surface. Think of it as getting the best of both worlds: the strength of concrete with the smooth, modern finish of vinyl. When it’s eventually time to replace the liner, the process is much simpler and less expensive than a major concrete resurfacing.

Can I add features like benches or stairs during a liner renovation? Absolutely. The best time to add custom features is during the renovation process. We can build stylish and practical elements like built-in benches for relaxing, a shallow tanning ledge for lounging, or new, more modern stairs. These features are then covered with the vinyl liner for a seamless, integrated look that completely transforms how you use and enjoy your pool.

What is the installation process like and how long will my pool be out of commission? The process is quite efficient. After our initial design consultation, we drain the pool and carefully prepare the concrete surface by making repairs and smoothing it out. We then handle any plumbing or electrical updates before professionally installing the new liner. From start to finish, the on-site work typically takes about a week, depending on the project’s scope and the weather.

Besides the liner itself, what other costs should I plan for? When budgeting, it’s wise to consider the complete project. Key costs include the liner, professional installation labor, and any necessary repairs to the concrete shell. You should also account for the cost of refilling the pool with water and any upgrades you choose, like new LED lighting. We always include replacing the gaskets and faceplates for all fittings to ensure a perfect, leak-free seal, which is a crucial part of a quality installation.

Key Takeaways

  • Modernize Your Concrete Pool with a Vinyl Liner: You can give an old concrete pool a complete makeover by installing a vinyl liner. This is a cost-effective solution that provides a smooth, comfortable surface and fixes cosmetic issues like cracks or stains without requiring a total demolition.
  • Enhance Your Pool with Custom Features: A renovation is the perfect time to add functional and stylish upgrades. You can incorporate built-in benches for relaxing, custom stairs for easy entry, energy-efficient LED lighting for nighttime ambiance, or elegant water features for a resort-like feel.
  • Create a Cohesive Backyard Design: Think beyond just the pool itself to create a complete outdoor oasis. Integrating a new paver patio, proper safety fencing, and thoughtful landscaping will tie the whole space together, improving your home’s value and creating a more enjoyable environment.

Related Articles

Share this page: