Country Lane Pavilion and Outdoor Kitchen Built in Dix Hills, NY

Outdoor living is now one of the most popular home upgrades on Long Island. More homeowners are choosing to entertain outside, creating comfortable, beautiful spaces they can use year-round.
Our latest project in Dix Hills, NY, demonstrates how good design and high-quality materials can transform a backyard into a luxury retreat. This custom Country Lane pavilion and outdoor kitchen combine classic craftsmanship with modern features, making it a great place to relax, entertain, and dine outdoors.

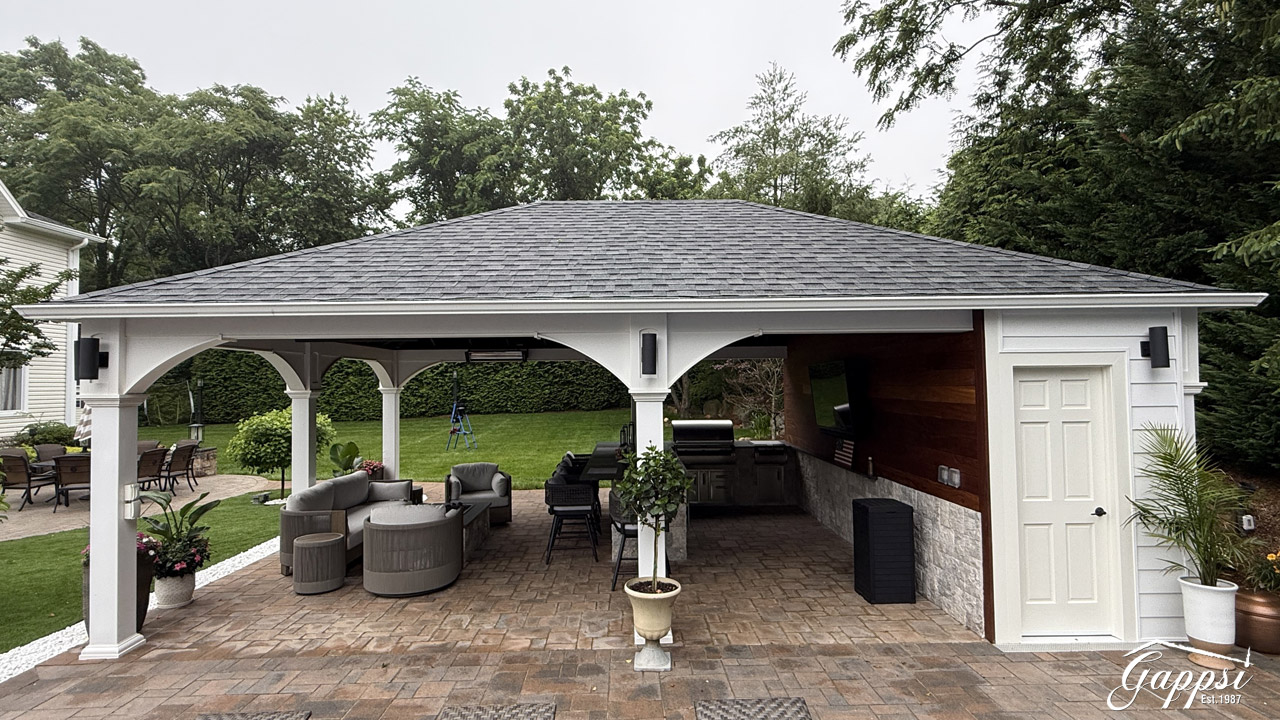
A Traditional Pavilion with Custom Design Features

The main feature of this backyard is a 20×28 pavilion with six strong columns. Its size provides ample space for cooking, dining, and relaxing while remaining open and welcoming.
We added a storage area at the back of the pavilion, hidden but easy to reach. There are also two side entrances, making it easy to move between the patio, pool, and yard. This layout keeps the pavilion practical and balanced.  The ceiling is bare wood, stained a deep mahogany, adding warmth and a rustic feel. Two ceiling fans help keep the space cool and comfortable on warm days.

Statement Wall with Premium Stone Veneers

One of the most striking features of this pavilion is the custom back wall. We used Cameroon wood-stain panels and silver travertine stone veneers in various sizes. This mix adds depth and texture, making the wall a dramatic focal point. Throughout the pavilion, to maintain design continuity. The random sizing gives the stone a natural, organic feel, while the soft silver tones keep the space light and elegant.
This wall not only enhances the pavilion’s aesthetic but also provides a great backdrop for gatherings, photos, and evening events. The pavilion features a fully custom kitchen island equipped with all FireMagic appliances. FireMagic is known for its premium performance, durability, and sleek design, making it the perfect choice for a high-end outdoor kitchen.
The island was veneered in silver travertine to match the pavilion walls, ensuring a cohesive look. For the countertops, we selected a leather-finish Block Tiger Marble, which adds a bold visual statement while remaining highly durable for outdoor use.
This outdoor kitchen is built for serious cooking and entertaining, with lots of prep space, storage, and top-quality grilling options.
country-lane-pavilion-and-outdoor-kitchen-built-in-dix-hills-ny

Coordinated Gas Firepit for Year-Round Enjoyment

To make the pavilion usable even on cooler evenings, we installed a custom gas fire pit. This connects the cooking and seating areas, adding warmth and atmosphere.o extend the outdoor season well into fall and winter. Whether hosting friends or enjoying a quiet evening outdoors, this pavilion is comfortable in almost any weather.

A gas firepit is more than a design feature, it’s a practical investment that turns your outdoor space into a four-season retreat. Unlike traditional wood-burning fire pits, gas fire pits offer instant warmth, clean operation, and effortless control, making them the ideal choice for modern outdoor living.

1. Instant On, Instant Ambiance – With the push of a button, a gas firepit ignites immediately, no chopping wood, no smoke, and no waiting. This makes it perfect for spontaneous gatherings or relaxing evenings after a long day.

2. Clean and Low Maintenance – Gas firepits produce no ash, soot, or embers, so there’s nothing to sweep or dispose of. This means less mess, less maintenance, and a consistently clean outdoor space.

3. Safe and Easy to Control – You can adjust the flame height and heat output with a simple control valve or switch. There are no flying sparks or burning logs, making gas firepits a safer option, especially in family-friendly backyards.

4. Use Your Pavilion in Every Season – Paired with outdoor heaters, a gas firepit extends your pavilion’s usability well into fall and winter. You can entertain, relax, and dine outdoors even when temperatures drop.

5. Sleek, Modern Design – Gas fire pits integrate seamlessly with custom stone islands, seating walls, and pavilions. Their clean flame and contemporary look elevate the overall design of any outdoor living space.

6. Reliable in Any Weather – Unlike wood, gas won’t get damp or hard to light. Rain, wind, or cold temperatures won’t stop you from enjoying a warm fire whenever you want.

A gas firepit adds warmth, style, convenience, and year-round functionality, making your outdoor living space feel like a true extension of your home.

Custom Lighting for Evening Ambiance

Lighting plays a major role in how an outdoor space feels at night. For this project, we added custom downlights along the pavilion columns to softly illuminate the structure and highlight its details, creating a glow that enhances safety and ambiance without overpowering the space. At night, the pavilion becomes a glowing focal point in the yard—perfect for entertaining or relaxing under the stars.

The Country Lane Pavilion

This project is a great example of a Country Lane pavilion, blending rustic charm with modern luxury. The wood ceiling, classic stone, and rich colors give it a timeless look that feels both elegant and welcoming. Traditional craftsmanship, combined with high-end materials and technology, makes this pavilion feel like a natural extension of the home rather than a separate structure.

Designed for Entertaining and Everyday Living

From weekend barbecues to family dinners to evening get-togethers, this Dix Hills pavilion was designed to be versatile. The layout supports cooking, dining, relaxing, and conversation in one connected space, while the open design keeps everyone connected. Whether hosting a large party or enjoying a quiet night by the fire, this pavilion adapts to every occasion.

A Standout Pavilion Installation in Dix Hills, NY

This Country Lane Pavilion and Outdoor Kitchen is one of our best installations so far. Every detail, from the stone veneers and marble countertops to the lighting, heating, and FireMagic appliances, was chosen for beauty, durability, and function.  If you’re considering upgrading your backyard, this project demonstrates what can happen when design, skill, and high-quality materials are combined.

Contact Gappsi Today

📍 Serving all of Long Island, NY — Nassau & Suffolk Counties
🌐 www.gappsi.com
📞 Call now for a free consultation and estimate!

SCHEDULE A MEETING TODAY WITH GAPPSI

Share this page:
A small paver driveway with a modern pattern and contrasting border for big curb appeal.

9 Small Paver Driveway Ideas for Big Curb Appeal

The right design can completely change the perception of your driveway, making a small space feel much larger and more impressive. It’s all about using visual tricks to your advantage. Lighter-colored pavers, for example, reflect sunlight and create a bright, open feeling. Laying pavers in a diagonal pattern, like a herringbone, can draw the eye outward, giving the illusion of a wider and longer area. This is where smart design meets style. We’ve gathered our favorite small paver driveway ideas to show you how strategic choices in color, pattern, and texture can maximize your space and create a grand entrance, no matter the square footage.

Key Takeaways

  • Use Strategic Design to Maximize Your Space: Select lighter paver colors to create a bright, open feel, and choose patterns like herringbone to draw the eye outward, making the driveway appear wider and longer.
  • Select a Paver Material That Fits Your Home and Lifestyle: Consider the trade-offs between different materials—concrete offers versatility and value, brick provides timeless charm, and natural stone delivers a premium, one-of-a-kind look.
  • Prioritize Professional Installation for a Lasting Driveway: The most critical factor for a long-lasting paver driveway is a solid foundation. Proper site prep, drainage, and secure edging prevent common issues like sinking, shifting, and water damage.

Why Choose Pavers for a Small Driveway?

When you have a small driveway, every square foot counts. You might think your options are limited to a simple slab of concrete or asphalt, but that’s where pavers come in. Choosing pavers for your driveway is one of the smartest upgrades you can make, transforming a purely functional space into a standout feature that enhances your home’s entire exterior. They offer a level of design flexibility that other materials just can’t match. With a huge range of colors, shapes, and materials—from classic brick to sleek porcelain and natural stone—you can create a custom look that perfectly complements your home’s style.

Beyond their good looks, pavers are incredibly durable. Unlike poured concrete or asphalt that can crack under pressure and weathering, pavers are individual units that can shift with the ground and handle heavy loads without breaking. If a paver does get damaged or stained, you can simply replace that single piece instead of redoing the entire driveway. This makes maintenance much simpler and more cost-effective over the long run. A professional masonry designer can also install permeable pavers, which allow rainwater to seep into the ground instead of creating puddles or runoff. This is a fantastic, eco-friendly solution for managing drainage in a compact space. All these benefits—stunning curb appeal, lasting strength, and smart function—add up to a significant increase in your property value.

Find the Best Paver Material for Your Space

Choosing the right paver material is about finding the perfect balance between your home’s style, your budget, and the demands of a Long Island climate. The material you select will define your driveway’s look, durability, and maintenance needs for years to come. From the classic appeal of brick to the modern edge of porcelain, each option offers a unique set of benefits. Let’s walk through the most popular choices to help you find the ideal fit for your home.

Concrete: The Versatile and Budget-Friendly Choice

If you’re looking for a dependable and stylish option that won’t break the bank, concrete pavers are an excellent choice. They are incredibly durable, easy to install, and come in a huge variety of shapes, sizes, and colors. This versatility allows you to create a look that’s uniquely yours, whether you prefer a simple, clean layout or a more intricate design. Because they are manufactured, they offer a consistent and uniform appearance. Concrete pavers are a practical solution for enhancing your curb appeal, giving you a high-end look with a more accessible price tag.

Brick: Timeless Charm with Unbeatable Durability

For a classic, traditional look, nothing beats the warmth and character of brick. Brick pavers bring a sense of history and elegance to any driveway, complementing architectural styles from colonial to cottage. They are known for their exceptional durability and color retention, meaning they won’t fade from sun exposure over time. While the color palette is more limited than concrete, the rich, earthy tones of brick are timeless. Installation can be more intensive, but the result is a charming and long-lasting surface that adds significant character to your home’s exterior.

Natural Stone: A Premium Look for Maximum Curb Appeal

If you want to make a statement, natural stone pavers deliver an unmatched level of beauty and luxury. Each stone is completely unique, with its own distinct colors, textures, and patterns, creating a one-of-a-kind driveway. Materials like granite, bluestone, and travertine offer a sophisticated and organic aesthetic that blends beautifully with natural surroundings. While natural stone is a premium investment and may have a more uneven surface, its durability and timeless appeal provide lasting value and breathtaking curb appeal for your property.

Porcelain: Modern, Stylish, and Built to Last

For a sleek, contemporary driveway, porcelain pavers are the top choice. They offer a clean, high-end finish that can mimic the look of other materials like natural stone or wood, but with superior performance. Porcelain is incredibly dense and non-porous, making it highly resistant to stains, scratches, and moisture—a huge plus for a high-traffic area like a driveway. It’s also frost-proof and fade-resistant, ensuring it will look great for years with minimal maintenance. Porcelain pavers are perfect for creating a modern, polished entrance to your home.

Permeable Pavers: The Eco-Friendly Drainage Solution

Permeable pavers are a smart and sustainable choice, especially if your property deals with drainage issues or local regulations limit solid surfaces. These pavers are designed with special gaps that allow rainwater to filter through the surface and into the ground below, rather than running off into storm drains. This eco-friendly system helps reduce flooding, prevent puddles and ice spots, and replenish local groundwater. Available in a variety of styles, permeable pavers offer a functional and attractive solution that’s both beautiful and environmentally responsible.

Select Colors and Patterns to Maximize Your Space

The right colors and patterns can completely transform a small driveway, making it feel more spacious and intentional. Think of it like choosing an outfit—certain styles can create a more streamlined and flattering look. The same principle applies to your home’s exterior. By being strategic with your paver selection, you can trick the eye into seeing a larger, more impressive entrance. It’s not about magic; it’s about smart design.

Choosing lighter colors, for instance, can reflect more light and create an open, airy feeling. Similarly, laying pavers in a specific pattern can draw the eye outward, giving the illusion of a wider or longer space. This is your chance to get creative and add a personal touch that not only complements your home’s architecture but also makes the most of every square foot. Let’s look at a few ways you can use these design elements to your advantage.

Use Patterns to Create the Illusion of Space

The pattern in which you lay your pavers has a huge impact on the perception of space. Diagonal patterns, like herringbone, are fantastic for small driveways because they create lines that lead the eye outward, making the area feel wider and longer. A herringbone pattern is also a practical choice because its interlocking design helps pavers stay firmly in place under the pressure of tires. Other patterns, like a running bond laid perpendicular to the length of the driveway, can also create a sense of width. The key is to choose a design that adds visual movement and avoids making the space feel boxed in.

Pick Colors That Make Your Driveway Look Bigger

Color choice is one of the simplest ways to influence the feel of your driveway. Lighter shades like beige, light gray, or sand-colored pavers are excellent for small spaces because they reflect sunlight and create a bright, open atmosphere. This doesn’t mean you have to stick to a single color, though. Mixing different materials, such as combining sleek porcelain pavers with decorative gravel accents, can add texture and depth without creating clutter. This approach helps break up the surface visually, giving your driveway a custom, expansive look while maintaining a clean and cohesive design.

Add Borders and Accents for a Polished Finish

A border acts like a frame for your driveway, giving it a crisp, defined edge that instantly looks more polished and complete. For a small driveway, a border in a contrasting color can be particularly effective. For example, if you have a light-colored paver field, a darker border will draw attention to the main area and make it pop. This simple addition provides a high-end finish and helps contain the paver field, preventing shifting over time. You can customize your driveway with endless combinations of paver colors, patterns, and borders to perfectly match your home’s unique style.

Our Favorite Small Paver Driveway Designs

The right design can transform a small driveway from a purely functional space into a stunning feature that enhances your home’s curb appeal. It’s all about choosing a pattern and style that not only fits your aesthetic but also makes the most of your available square footage. A well-thought-out design can create the illusion of a larger, more dynamic area, proving that you don’t need a massive driveway to make a big impact.

From timeless patterns that exude classic charm to modern layouts that incorporate natural elements, the possibilities are endless. Your driveway is the first impression your home makes, so why not make it a great one? Let’s explore five of our favorite design ideas that work beautifully for smaller spaces, giving you the inspiration you need to create a driveway you’ll love coming home to.

Create Classic Elegance with a Herringbone Pattern

If you’re aiming for a look that’s both sophisticated and timeless, the herringbone pattern is a fantastic choice. This design features pavers laid in a V-shape, creating a beautiful, interlocking arrangement that immediately draws the eye. It’s a classic for a reason—it adds a sense of movement and depth, which can make a narrow driveway feel wider and more interesting.

Beyond its good looks, the herringbone pattern is also incredibly practical. The interlocking design is a great choice for driveways because it helps the pavers stay in place under the pressure of vehicle traffic, ensuring your driveway remains stable and durable for years. Our masonry experts can help you select the perfect pavers to bring this elegant and resilient design to life.

Achieve Simple Sophistication with a Running Bond Layout

Sometimes, the simplest designs are the most effective. The running bond layout, where pavers are laid in a simple, staggered pattern like bricks on a wall, offers a clean and uncluttered look. This timeless design is a popular choice for many homeowners because it provides a sense of order and sophistication without overwhelming a small space.

This layout is especially effective for making a short driveway appear longer, as the linear pattern guides the eye forward. It’s a versatile choice that complements a wide range of home styles, from modern to traditional. Whether you opt for sleek porcelain or classic brick, the running bond pattern creates a polished and cohesive look that stands the test of time.

Add Textural Interest with a Basketweave Design

For a touch of old-world charm and visual texture, consider a basketweave design. This pattern arranges pavers in pairs, alternating their direction to create a square grid that resembles a woven basket. It’s a wonderful way to add character and a sense of history to your driveway, making it feel more like a custom-designed feature.

The basketweave design is perfect for breaking up the monotony of a small, plain surface. It introduces a unique texture that adds visual interest and can make the space feel more inviting and dynamic. This pattern works especially well with brick or cobblestone-style pavers, enhancing the rustic and welcoming vibe of cottage or traditional Long Island homes.

Introduce Curves and Mix Materials for a Custom Look

Who says driveways have to be straight and narrow? Introducing gentle curves can soften the hard lines of your property and create a more organic, flowing entrance. A curved driveway feels more natural and can be a great way to work around existing landscape features, integrating your driveway seamlessly into your yard.

You can also create a custom look by mixing materials. Consider adding a border of contrasting pavers to frame your driveway or incorporating a section of natural gravel for a textural shift. Using curved shapes and combining different materials can give your driveway a truly unique and inviting appearance that reflects your personal style.

Incorporate Greenery with Grass-Infused Pavers

If you love the idea of a lush, green landscape, why not extend it to your driveway? Permeable pavers, also known as grass-grid pavers, are designed with open spaces that allow grass to grow through them. This creates a beautiful, living driveway that blends perfectly with your lawn while providing a solid surface for your car.

This eco-friendly option is not only beautiful but also functional. Using pavers that allow grass to grow through them helps with stormwater management by allowing rainwater to soak naturally into the ground. It’s a sustainable choice that reduces runoff and keeps your property looking green and vibrant, proving that your driveway can be both practical and beautiful.

Which Paver Brands Should You Consider?

Once you have a material in mind, the next step is choosing a brand. The right manufacturer can make all the difference in quality, style, and long-term performance. Different brands specialize in different materials and aesthetics, so it’s helpful to know who the key players are. To get you started, here are a few of the top paver brands we trust and recommend for driveway projects on Long Island.

Gappsi: Premium Porcelain and Natural Stone

If you’re aiming for a truly luxurious and high-end finish, Gappsi is the perfect place to start. We specialize in premium porcelain and natural stone pavers that bring an unmatched level of elegance to any driveway. Our curated selection is designed for durability and timeless beauty, ensuring your investment not only looks incredible but also stands up to the elements. Choosing Gappsi means you’re opting for top-tier materials that create a sophisticated and polished first impression for your home.

Unilock: Custom Colors and Innovative Designs

Unilock is a fantastic choice for homeowners who want to put a personal stamp on their driveway design. They are well-known for their innovative manufacturing technologies and a vast array of custom colors, patterns, and finishes. With Unilock, you can create a truly unique look that perfectly complements your home’s architecture and your personal style. Their products are engineered for exceptional strength and are resistant to fading, making them a reliable and stylish option for any driveway project.

Belgard: A Wide Variety of Styles and Textures

For those who love having plenty of options, Belgard delivers. This brand offers an extensive collection of pavers in countless styles, shapes, and textures, from the rustic look of classic cobblestone to the clean lines of modern slabs. Belgard makes it easy to find the perfect paver to match your vision, whether you’re creating a charming, traditional entrance or a sleek, contemporary one. Their commitment to quality ensures you’ll find a durable and beautiful solution that fits your home’s aesthetic.

County Materials: Durable Concrete and Permeable Options

County Materials is a go-to for strong, dependable, and attractive concrete pavers. They are recognized for producing high-performance products that are built to last, making them an excellent choice for a high-traffic area like a driveway. A major advantage is their focus on permeable paver systems, which are designed to help manage stormwater runoff. This makes them a smart, eco-friendly choice for homeowners looking for a practical and sustainable driveway solution that is also easy to maintain.

How Much Does a Small Paver Driveway Cost?

Let’s talk numbers. A new paver driveway is an investment, but it’s one that pays off in curb appeal, durability, and home value. The final price tag can vary quite a bit, but you can generally expect the cost to range from $10 to $70 per square foot. That’s a wide gap, I know, but most projects land somewhere between $10 and $30 per square foot.

So, what causes that price to swing? It really comes down to three main things: the materials you choose, the complexity of your design, and the specific labor required for your property. A simple, straight driveway using budget-friendly concrete pavers will be on the lower end, while a custom-designed driveway with premium natural stone will be at the higher end. Understanding these factors will help you set a realistic budget and make choices that align with your vision and your wallet. Below, we’ll break down exactly where your money goes.

Breaking Down Material Costs

The type of paver you select is the single biggest factor influencing your project’s cost. Think of it like choosing countertops for your kitchen—granite will cost more than laminate, and the same principle applies here. Concrete pavers are typically the most budget-friendly option, offering a huge variety of colors and styles without a hefty price tag. Brick pavers fall in the middle, providing a classic, timeless look. If you’re aiming for a high-end, luxurious finish, premium materials like porcelain and natural stone are the way to go. These options deliver unparalleled beauty and durability, making them a worthwhile long-term investment.

What Affects Labor and Installation Costs?

Beyond the pavers themselves, labor makes up a significant portion of the budget. A professional installation is critical for a driveway that lasts, and the cost of that expertise can range from $10 to $20 per square foot. Several factors influence this price. A complex pattern like herringbone or a basketweave requires more intricate cuts and time, increasing labor costs compared to a simple running bond. Site preparation is another key element; if your existing driveway needs to be removed or the ground requires significant grading to ensure proper drainage, that will add to the final bill. Our expert masonry team handles all of this to ensure a flawless foundation for your new driveway.

How to Save Money on Your Driveway Project

Want that gorgeous paver look without breaking the bank? You have options. The easiest way to manage costs is by choosing a simpler design. Straight lines and basic patterns like a running bond require less labor and fewer custom cuts, which translates directly into savings. Opting for high-quality concrete pavers can also give you a beautiful result at a more accessible price point. Finally, getting a clear, detailed quote is essential. This helps you understand every line item and allows you to estimate expenses accurately, ensuring there are no surprises along the way. Planning ahead can make a big difference in keeping your project on budget.

Avoid These Common Small Driveway Design Mistakes

A beautiful paver driveway is about more than just picking a great design; it’s about a solid execution from the ground up. Even the most stunning pattern can be undermined by a few common, yet avoidable, mistakes. Getting the fundamentals right ensures your investment not only looks fantastic on day one but also stands up to years of use and Long Island weather. A little extra attention to detail during the planning and installation phases makes all the difference between a driveway that lasts a few years and one that lasts for decades.

The three biggest areas where projects can go wrong are site preparation, drainage planning, and paver selection. Rushing the prep work can lead to a lumpy, unstable surface, while ignoring water flow can cause serious damage over time. Similarly, choosing a paver size or pattern that isn’t suited for a small space can make your driveway feel cramped instead of curated. By understanding these potential pitfalls, you can make sure your project goes smoothly. A professional team can help you sidestep these issues entirely, handling everything from initial masonry design and construction to the final finishing touches.

Don’t Skimp on Site Prep and Base Installation

Think of your driveway’s base as its foundation—if it isn’t solid, nothing you put on top will be either. One of the most significant mistakes homeowners make is underestimating the importance of proper site preparation. This isn’t the place to cut corners. A successful installation starts with a comprehensive layout plan to map out the entire project. The process involves excavating the area to the correct depth, thoroughly compacting the soil, and installing a sturdy, layered base of aggregate material. This creates a stable, level surface that prevents pavers from shifting, sinking, or becoming uneven over time. Without this crucial step, your beautiful new driveway could quickly turn into a bumpy, frustrating problem.

Plan for Proper Drainage and Secure Edging

Water is a paver driveway’s biggest enemy. Without a proper drainage plan, rainwater and snowmelt can pool on the surface, seep into the base, and cause major issues. During Long Island’s freeze-thaw cycles, trapped water can expand and heave pavers out of place. That’s why every driveway needs to be installed with a slight, carefully calculated slope that directs water away from your home’s foundation and off the paved surface. Just as important is secure edging. These restraints are installed along the perimeter of the driveway to lock the pavers in place, preventing them from spreading apart under the weight of vehicles. Together, proper drainage and strong edging frame and protect your driveway for the long haul.

Choose the Right Paver Size and Pattern for Your Space

When you’re working with a small driveway, the size and pattern of your pavers have a huge impact on the final look. While large-format pavers are trendy, they can sometimes overwhelm a compact area and make it feel even smaller. Conversely, very small pavers can create a busy pattern that feels cluttered. It’s all about finding the right scale. Planning your paver pattern ahead of time is essential for avoiding awkward cuts and uneven spacing. Simple, linear patterns like a running bond can create an illusion of length, while a classic herringbone adds elegance without being distracting. We always recommend looking at a variety of porcelain and natural stone pavers to find the perfect fit for your home’s style.

How to Maintain Your Small Paver Driveway

A paver driveway is a fantastic investment in your home’s curb appeal, and the good news is that keeping it looking its best doesn’t require a ton of work. With a little routine care and seasonal attention, you can protect your driveway for years. It all comes down to a simple cleaning schedule, knowing how to handle minor issues, and preparing for whatever the Long Island weather throws your way.

Follow a Simple Cleaning and Sealing Routine

Keeping your driveway looking fresh starts with basic cleaning. A regular sweep to clear away leaves and dirt will prevent stains from setting in. For tougher spots, a simple scrub with soap and water is usually all you need. The most important step for long-term protection is sealing. Applying a quality sealer every few years shields your pavers from stains, harsh weather, and UV rays that can cause fading. If you’d rather leave it to the experts, Gappsi offers professional restoration and sealing services to keep your investment in top condition.

How to Prevent and Fix Common Paver Issues

The best way to deal with paver problems is to prevent them from happening in the first place. A solid, properly installed base is critical to avoid sinking or shifting pavers. But if a paver does get cracked or stained, you’re in luck. One of the biggest advantages of a paver system is that you can simply lift out the damaged stone and replace it—no ugly patches like you’d get with asphalt. You should also keep an eye on the sand in the joints between pavers. If it looks low, sweeping in new polymeric sand will help keep everything locked tightly in place and prevent weed growth.

Protect Your Driveway Through the Seasons

Long Island winters can be tough, but your driveway can handle them with the right care. Avoid using harsh de-icing salts, as these chemicals can eat away at the surface of your pavers and damage the sealant. Instead, opt for sand to get better traction on icy days. Another key element for longevity is strong edge restraints. These are the hidden borders that hold all the pavers in place, preventing them from spreading apart due to traffic or the natural freeze-thaw cycles we experience. A properly installed paver driveway will always include robust edging, ensuring your beautiful pattern stays put season after season.

Take Your Driveway to the Next Level with These Features

Your driveway is more than just a path to your garage—it’s the first impression your home makes. With a little creative thinking, you can transform this functional area into a standout feature that adds value and personality to your property. Even a small driveway has the potential to be a beautifully designed space that complements your home’s architecture and landscaping. By incorporating thoughtful details, you can improve its utility, safety, and overall aesthetic appeal.

Think about adding elements that serve a dual purpose. Smart drainage systems can solve water pooling issues while contributing to a cleaner look. Integrated lighting not only makes your driveway safer to use after dark but also creates a warm, welcoming ambiance. You can even design the space to be multi-functional, blending different materials to create zones for parking, walking, or even a small garden. These enhancements turn a simple slab of pavement into an integral part of your home’s design. A well-planned driveway is a testament to great landscape design, showing that every inch of your property has been considered.

Incorporate Smart Drainage Solutions

Puddles and water runoff can be a constant headache, especially on a small driveway where every square foot counts. A smart drainage solution not only fixes this problem but also adds a sophisticated, eco-friendly touch. Permeable pavers are an excellent choice because they allow rainwater to seep through the surface and into the ground below. This prevents pooling, reduces runoff into storm drains, and helps replenish groundwater. By managing water right where it falls, you create a more sustainable and low-maintenance driveway. Gappsi offers a range of porcelain and natural stone options that can be installed as part of a permeable system, giving you both function and style.

Integrate Lighting for Safety and Style

Good lighting can completely change the look and feel of your driveway at night. It’s a practical addition that guides you safely to your door and a design feature that adds instant curb appeal. You can install subtle in-ground lights along the edges of the driveway to define its borders or place fixtures within adjacent garden walls to cast a soft, ambient glow. This not only illuminates the path but also highlights the beautiful texture and pattern of your pavers. Well-placed lighting makes your home feel more inviting and secure, creating a stunning effect that you’ll appreciate every time you come home after dark.

Design a Multi-Functional Space

Who says a driveway has to be just for parking? By getting creative with materials and layout, you can design a space that serves multiple purposes. Consider mixing pavers with strips of grass for a “ribbon” driveway that adds a touch of green and helps with drainage. You could also combine pavers with decorative gravel to create textural contrast and define different areas. This approach allows you to build a visually interesting driveway that can double as extra patio space or a play area. Expert masonry services can help you blend these materials seamlessly for a custom look that is both beautiful and practical.

Related Articles

Frequently Asked Questions

How long will a paver driveway last, especially with Long Island’s weather? A professionally installed paver driveway is built for the long haul and can easily last for decades—often 30 years or more. Unlike solid asphalt or concrete that can develop large cracks from our freeze-thaw cycles, the individual pavers have joints that allow for slight movement. This flexibility prevents widespread damage, making them an incredibly resilient choice for our climate.

Are pavers slippery when they get wet or icy? This is a great question and a common concern. Most pavers have a naturally textured surface that provides better traction than smooth, poured concrete. The real key to preventing a slippery driveway, however, is proper drainage. A correctly installed driveway is sloped to prevent water from pooling and turning into ice sheets, which is the main cause of slick winter surfaces.

Is it really that simple to replace a single damaged paver? Yes, it absolutely is, and it’s one of the best features of a paver driveway. If a paver gets cracked or badly stained, a professional can carefully lift out the single damaged piece, check that the base underneath is still level, and fit a new paver right into place. This is a quick and seamless fix compared to patching asphalt or living with a crack in a concrete slab.

How long does a typical small driveway installation take? For most small driveways, the entire process usually takes between two to five days from start to finish. The timeline depends on the amount of prep work needed, like removing an old driveway, and the complexity of the design you choose. The process involves excavating the area, building a solid base, laying the pavers, and finishing the joints and edges.

My property has some drainage issues. Are permeable pavers my only option? Permeable pavers are an excellent, eco-friendly solution for managing water, but they aren’t your only choice. A standard paver driveway, when installed correctly by an expert, is designed with a precise slope. This slight grade is often unnoticeable to the eye but is very effective at directing rainwater and snowmelt away from your home and off the driveway surface, preventing puddles and water damage.

Share this page:
Getting a quote for turf installation with tools on a prepped lawn.

How to Get a Quote for Turf Installation

Installing artificial turf on Long Island isn’t the same as installing it anywhere else. Our local soil conditions and weather patterns present unique challenges that demand real expertise. A successful, long-lasting installation here requires a deep understanding of proper ground preparation and drainage solutions specific to our area. The cost reflects not just the materials, but the skill needed to create a lawn that can handle our seasons beautifully. Before you get a quote for turf installation, it’s important to know what a quality local job entails. We’ll break down the factors that matter most for Long Island homeowners, ensuring your investment stands the test of time.

Key Takeaways

  • Understand What Shapes Your Quote: The final cost of your project is determined by more than just square footage; it’s a blend of the turf quality you select, the amount of site preparation needed, and your yard’s unique terrain.
  • Prioritize a Quality Local Installer: A beautiful, long-lasting lawn depends on expert installation. Look for a company with proven local experience, strong product and workmanship warranties, and a portfolio of successful projects.
  • View Turf as a Long-Term Home Investment: Look beyond the initial price and consider the long-term savings. Artificial turf eliminates recurring costs for watering, mowing, and fertilizing, adding lasting value and usability to your property.

What Affects Your Turf Installation Cost?

When you start planning for a new artificial lawn, one of the first questions you’ll have is about the price. The truth is, there’s no one-size-fits-all answer. The final cost of your turf installation depends on a handful of key factors, from the size of your yard to the specific materials you choose. Understanding these variables will help you set a realistic budget and know exactly what you’re paying for. Think of it less like buying a product off the shelf and more like a custom home improvement project—every detail is tailored to your space and needs. Let’s walk through the main elements that will shape your quote.

The Size and Scope of Your Project

The biggest factor influencing your total cost is the square footage of the area you want to cover. Simply put, a larger lawn requires more material and more labor. While pricing can vary, a general range for professional installation often starts between $8 and $11 per square foot. It’s also worth noting that smaller projects—think under 500 square feet—can sometimes have a higher price per square foot. This is because fixed costs, like getting the crew and equipment to your home, are spread over a smaller area. For larger projects, you benefit from economies of scale, which can bring the per-foot cost down.

The Type of Turf You Choose

Not all artificial grass is created equal. The type of synthetic turf you select plays a major role in the overall price. A standard turf designed for a typical lawn or a dog run will have a different price point than a specialty product, like a professional-grade putting green. Higher-quality turf with a more realistic look, better durability, and a longer warranty will cost more upfront. While it might be tempting to go with a cheaper option, investing in a premium product often pays off with a lawn that looks better and lasts longer, giving you more value over time.

Yard Prep and Excavation Needs

A perfect turf installation starts with a solid foundation. Before any green is rolled out, your existing lawn needs to be properly prepared. This involves removing the old grass, weeds, rocks, and any other debris. The ground is then graded to ensure proper drainage, and a weed barrier is laid down to prevent anything from growing through your new lawn. If your yard has challenging conditions, like compacted soil, large tree roots, or significant slopes, the prep work will be more intensive and will add to the labor costs. A smooth, clear area requires less work than a yard that needs a complete overhaul.

Your Yard’s Accessibility and Terrain

How easy is it for a crew to get to the installation area? The accessibility of your yard can directly impact the cost. If your backyard is easy to reach with machinery and materials, the process is more efficient. However, if the crew has to carry everything through narrow pathways, up or down stairs, or around obstacles, the project will require more manual labor and time. Similarly, a flat, level yard is simpler to work on than a hilly or uneven one. The unique terrain of your property is a key consideration when a contractor puts together your quote.

Add-Ons Like Drainage and Edging

Beyond the turf itself, you can customize your project with a variety of add-ons that affect the final price. An advanced drainage system might be necessary if your yard is prone to holding water. You can also choose custom edging to create a clean, finished border around your lawn, using materials like natural stone or composite boards. Other popular additions include pet-friendly infill, which helps with odors, or specialized features for sports courts, like cups for a putting green. These features allow you to tailor the project perfectly to your lifestyle.

How to Get an Accurate Turf Installation Quote

Getting a quote you can trust is the first step toward your new lawn. While it might seem like a simple calculation of square footage, several factors can influence the final price. To avoid surprises and ensure you’re getting a fair estimate, it helps to do a little prep work. By understanding what contractors look for and having the right information ready, you can make the process smoother for everyone and get a quote that accurately reflects your project’s unique needs.

Measure Your Space Correctly

Before you even pick up the phone, grab a measuring tape. Knowing the approximate size of your project area is the most important piece of information you can provide. Measure the length and width of the space to calculate the total square footage. Don’t forget to also measure the perimeter—the total length around the edges—as this helps determine the amount of materials needed for securing the turf. If your yard has curves or irregular shapes, do your best to break it down into smaller, manageable rectangles or squares and add them up. A simple sketch with your measurements can be incredibly helpful when you discuss your project with our team.

Prep Your Yard Before the Assessment

To help a contractor give you the most accurate quote possible, it’s a good idea to tidy up the area beforehand. A clear space allows the installation team to get a true sense of the terrain, identify any potential grading or drainage issues, and take precise measurements. Before your scheduled site evaluation, take a little time to clear away any furniture, toys, fallen branches, or other debris. Giving the lawn a quick mow can also help reveal the ground’s true condition. This simple step ensures there are no hidden surprises and helps the Gappsi team assess your yard’s specific needs for a flawless synthetic turf installation.

What to Expect During a Site Evaluation

A professional site evaluation is much more than a quick look at your yard. Quoting a synthetic turf project isn’t as simple as multiplying square footage by a rate; it’s a detailed assessment. When a Gappsi expert visits your home, they will evaluate several key factors. This includes checking your soil type, assessing the current drainage situation, and determining the accessibility of the site for equipment and materials. We’ll discuss how you plan to use the space—whether it’s for kids, pets, or a personal putting green—to recommend the right products. This is your opportunity to share your vision and ask questions so we can provide a comprehensive and accurate quote tailored to you.

Key Questions to Ask Your Contractor

Not all turf installations are created equal. The quality of materials, the installation technique, and the company’s experience all play a huge role in the final result. To ensure you’re working with a reputable professional, come prepared with a few key questions. Ask about the types of turf they recommend for your specific needs and why. Inquire about their installation process, especially the kind of base material they use and how they plan to address drainage. It’s also crucial to understand the warranty—what it covers and for how long. Don’t hesitate to ask for a portfolio of their work; you can even see our projects to get a feel for our quality craftsmanship.

Common Myths That Inflate Quotes

Some homeowners worry that turf installation is an overly complex or expensive process, but that’s often not the case. One common myth is that it’s too expensive to be a smart investment. While the upfront cost is higher than natural sod, artificial turf pays for itself over time by eliminating expenses for watering, mowing, and fertilizing. Another misconception is that the installation itself is a huge, disruptive undertaking. With an experienced team, the process is streamlined and efficient, transforming your yard with minimal interruption to your daily life. At Gappsi, we’re committed to transparency and will walk you through every aspect of the cost and process, ensuring you see the long-term value.

Breaking Down the Average Cost of Turf Installation

Let’s talk numbers. While every project is unique, understanding the average cost of turf installation can help you set a realistic budget. The final price tag depends on several key factors, from the size of your yard to the specific type of turf you fall in love with. Think of it less as a single price and more as a range that we can narrow down once we know exactly what you’re looking for.

Here’s a breakdown of what goes into the cost, so you can feel confident about your investment.

Cost Per Square Foot by Turf Type

The biggest factor in your total cost is the price per square foot, which covers both the turf and installation. Generally, you can expect to pay between $7 and $12 per square foot for high-quality artificial turf. This range reflects the variety of synthetic turf options available, from standard choices to premium, ultra-realistic materials that vary in softness and durability. The good news is that this one-time investment pays off over a 15+ year lifespan with almost no maintenance required.

Pricing for Lawns vs. Specialty Turf

The purpose of your turf also plays a role. A beautiful, low-maintenance lawn or a dog run typically costs between $4 and $8 per square foot. If you’re dreaming of a custom putting green or a personal sports field, the price will be higher. These specialty game courts require different materials and a more intricate installation, often ranging from $8.50 to $12.50 per square foot. The specialized base layers and precise techniques contribute to the higher cost for these custom projects.

How Extra Services Affect the Final Price

Your base installation is just the beginning. Many homeowners include extra features that can affect the final price. If your yard has poor drainage, we might recommend a specialized system to keep your turf pristine. Other popular add-ons include custom edging for clean lines, pet-friendly infill, or integrating the turf with existing patios and walkways. These elements ensure your new lawn is not only beautiful but also perfectly suited to your lifestyle and property.

Budgeting for Unexpected Costs

When planning your budget, it’s smart to set aside a little extra for costs not in the initial estimate. Smaller projects under 500 square feet can sometimes have a higher cost per square foot because fixed costs are spread over a smaller area. Also, make sure your quote is comprehensive. Ask if it includes taxes, delivery fees, and the complete cost of labor. A transparent contractor will walk you through every line item, ensuring there are no surprises on the final bill.

How to Choose the Right Turf Installation Company

Selecting the right company for your turf installation is just as important as picking the turf itself. The quality of the installation determines how your new lawn will look, feel, and perform for years to come. A great installer ensures proper drainage, seamless connections, and a foundation that stands up to Long Island weather and backyard fun. Not all turf installations are the same—the team’s experience, materials, and process matter far more than price alone. Making a thoughtful choice here means you’ll have a beautiful, low-maintenance yard you can enjoy without worry.

Look for Proven Local Experience

When it comes to turf, local expertise is key. A company familiar with Long Island’s specific soil conditions, climate, and drainage challenges will deliver a much better result than a generic national chain. An experienced local installer can anticipate and solve site-specific issues, like grading complexities or tricky yard shapes, that a less seasoned crew might overlook. Look for a company with a deep portfolio of local projects. Seeing their work in your area gives you confidence that they understand what it takes to create a lasting, beautiful synthetic turf lawn right here at home.

Check Their Materials and Warranty

The quality of the artificial grass itself will define your experience. Ask potential installers about the turf products they use. High-quality turf should be durable, realistic, and completely safe for kids and pets—meaning it’s free from lead and other harmful chemicals. A reputable company will be transparent about its materials and stand behind them with a solid warranty. Look for a product warranty of around 15 years, which signals a long-lasting product. Just as important, ask about the workmanship warranty. This covers the installation itself and shows the company is confident in its team’s skills and process.

Read Customer Reviews and Testimonials

Reviews are your window into a company’s true customer experience. Go beyond the testimonials featured on their website and check third-party platforms like Google and Yelp for unbiased feedback. Look for comments that mention specifics, like whether the team was professional, knowledgeable, and detailed during the consultation process. Pay attention to how the company communicates and if they stick to their proposed timeline. Seeing a long history of positive feedback, like on the Gappsi YouTube channel, is a great sign that you’re dealing with a reliable and respected local business that consistently delivers for its clients.

Verify Their Licensing and Insurance

This step is a simple but crucial checkpoint. Any contractor working on your property must have the proper licensing for your locality and carry comprehensive insurance. This includes general liability to cover any potential damage to your property and worker’s compensation to protect their crew in case of an accident. Don’t just take their word for it—ask to see proof. A professional and trustworthy company will have this documentation ready and will be happy to provide it. This protects you from liability and ensures the company adheres to professional standards for all its home improvement projects.

Red Flags to Watch Out For

As you gather quotes, keep an eye out for a few warning signs. Be cautious of any quote that seems unusually low, as it could indicate subpar materials or inexperienced labor. A vague or incomplete quote that doesn’t detail the scope of work, materials, and site prep is another red flag. You should also feel wary of any high-pressure sales tactics designed to rush your decision. A quality contractor will give you the space and information you need to feel confident. Finally, a lack of a professional online presence, a physical address, or a refusal to provide references should make you think twice.

What Are Your Payment and Financing Options?

A new turf installation is a significant upgrade to your home, and it’s important to understand how you can make this investment work for your budget. The good news is that you have several options to make the project more affordable. From seasonal deals to flexible payment plans, you can find a path to getting the beautiful, low-maintenance yard you’ve always wanted. Let’s walk through the different ways you can manage the cost.

Seasonal Discounts and Special Offers

Timing your project strategically can lead to some great savings. While spring and summer are peak seasons for outdoor projects, consider scheduling your installation during the off-season, like late fall or winter. Companies often have more availability and may offer better pricing during these slower months. It’s also a good idea to keep an eye out for holiday promotions. The best approach is to simply ask. When you connect with us about your project, be sure to inquire about any current specials we have for synthetic turf installations. We’re always happy to help you find the best value for your home.

Available Payment Plans and Financing

You don’t have to pay for the entire project upfront. Many installers offer financing to help spread the cost over time, making it much more manageable. These plans can turn a large one-time expense into predictable monthly payments that fit comfortably into your budget. Some financing options even include promotional periods with 0% interest for those who qualify, which is a fantastic way to get your new lawn now without the added cost. Exploring home improvement financing can be a smart way to fund your project without dipping into your savings, allowing you to move forward with your dream yard sooner rather than later.

Budget-Friendly Alternatives

If a full-service, professional installation feels like a stretch, you might be wondering about other ways to save. Some homeowners consider a DIY approach to cut down on labor costs. While this can save money, it’s important to know that installing turf correctly requires specialized tools, experience, and a lot of heavy lifting. Mistakes can be costly and may void your turf’s warranty. Another option is to complete your project in phases, perhaps starting with a smaller, high-traffic area. You can find high-quality materials at the Gappsi Store if you decide to explore a partial DIY or phased approach for certain elements of your outdoor space.

The Long-Term Value of Your Investment

It’s helpful to think of turf installation not as a cost, but as a long-term investment in your property and lifestyle. Your new lawn will start paying you back from day one. Think of the money you’ll save on watering, fertilizer, and lawn care services year after year. Beyond the financial return, a beautiful and functional yard significantly increases your home’s curb appeal and overall property value. More importantly, it gives you a pristine, evergreen space to relax and make memories with family and friends without the constant weekend work. It’s an upgrade that truly keeps on giving.

What to Expect From Your Turf Installation Project

Once you’ve chosen the perfect turf and received your quote, the real excitement begins. Understanding the installation process helps you know what’s happening in your yard and when. At Gappsi, we manage every detail to ensure a smooth transformation of your space, turning your vision into a durable, beautiful reality with minimal disruption to your life. Here’s a look at what you can expect from start to finish.

Your Project Timeline, From Start to Finish

Every project starts with a clear plan. After you approve your personalized quote, we’ll establish a project timeline that works for your schedule. The duration depends on the size and complexity of the area, but a typical residential lawn installation is often completed within a few days. We’ll begin by scheduling the delivery of materials and the start date for our crew. Our team will keep you informed at every stage, from the initial ground preparation to the final inspection, ensuring you know exactly what’s happening and when to expect your stunning new lawn.

Getting Ready for Installation Day

Preparation is key to a flawless finish. Before installation day, our first step is to clear the site. This involves removing the existing lawn, along with any weeds, rocks, or other debris to create a clean slate. Next, we excavate the area to the proper depth and install a sturdy base layer, typically using a combination of paver base gravel and leveling sand. This foundation is crucial for ensuring proper drainage and a perfectly smooth, stable surface. Our professional installation services handle all of this heavy lifting for you.

How to Care for Your New Turf

One of the best parts of having artificial turf is how little maintenance it requires. Forget about mowing, watering, and fertilizing. To keep your new lawn looking its best, simply rinse it with a hose periodically to wash away dust and pollen. For high-traffic areas, you can use a stiff-bristled broom to brush the fibers and keep them standing upright. This durability and all-weather playability make it a fantastic alternative to natural grass. You can see how our finished projects hold up over time in our videos, which showcase the long-lasting quality of our installations.

Frequently Asked Questions

How long will my new artificial turf last? You can expect a high-quality, professionally installed turf lawn to last for 15 years or even longer. The lifespan really depends on the quality of the materials and the skill of the installation team. A solid base preparation and proper installation techniques are just as important as the turf itself for ensuring it holds up beautifully through years of backyard parties, kids’ games, and Long Island seasons.

Is artificial turf safe for children and pets? Absolutely. Reputable modern turf is made from non-toxic materials and is completely free of lead and other harmful chemicals. In fact, it can create a safer play area because it eliminates the need for chemical fertilizers, pesticides, and weed killers. It also provides a soft, consistent surface that can help cushion falls better than hard, patchy dirt.

Will the turf get too hot during Long Island summers? While synthetic turf can get warmer than natural grass in direct sunlight, today’s premium products are designed with technology to help minimize heat absorption. If you find it gets too warm on a particularly hot day, a quick spray with a garden hose will cool it down instantly. We can also discuss different types of infill, as some are designed to stay cooler than others.

What kind of maintenance does artificial turf really need? The maintenance is truly minimal compared to a traditional lawn. Your main tasks will be to rinse it with a hose occasionally to clear off dust or pollen and to use a stiff-bristled broom to fluff up the fibers in areas that get a lot of foot traffic. If you have pets, you’ll just need to pick up solid waste and rinse the area. That’s it—no more mowing, watering, or weeding.

Can I install turf over my existing concrete patio or deck? Yes, you can. Installing turf over a hardscape like a concrete patio, balcony, or old deck is a fantastic way to soften the space and create a lush, green area without a major demolition project. The installation process is a bit different than on soil, as it involves ensuring proper drainage and often adding a shock-absorbing under-padding, but it’s a great solution for transforming an underused hard surface.

Share this page:

A Complete Backyard Transformation in Massapequa, NY

A Complete Backyard Transformation in Massapequa, NY, designed and installed by Gappsi.  When a new home is built, the outdoor space should be just as carefully designed as the inside. For this Massapequa, NY residence, Gappsi was trusted to create a custom backyard that maximizes every inch for comfort, style, and function. The finished space combines luxury materials, a smart layout, and features you can enjoy year-round.  Although the property footprint is modest, every element of this backyard was carefully planned to serve a purpose. From a low-maintenance synthetic turf play area to a resort-style swimming pool, a limestone patio, and a fully equipped outdoor kitchen pavilion, this space now functions as a true extension of the home.

Designing With Purpose: Making the Most of Every Inch

Because this was a newly built house, Gappsi had the opportunity to start from scratch. The design goal was clear: use all available space efficiently while maintaining an unbroken flow between zones. Rather than crowding the yard, each area was positioned to complement the others, creating a layout that feels open, balanced, and practical.
The side of the house was transformed into a playground with high-quality synthetic turf sourced from the Gappsi showroom. This turf offers the look of natural grass without the maintenance, watering, or mud. It also dries quickly after rain, making it a dependable space for children to play year-round.  Using the side area for play means the main backyard can focus on entertaining, relaxing, and enjoying the pool. This holds the whole layout neat and organized.

Pavilion Living: Outdoor Kitchen, Fire Pit & Lounge

At the heart of the backyard is a 16×16 traditional pavilion with a classic metal roof supported by four columns. This structure grounds the space and creates a comfortable, shaded environment for cooking, dining, and gathering.  Under the pavilion, there is a full outdoor kitchen finished with silver travertine in a mixed-size pattern for extra depth and texture. The kitchen features Fire Magic appliances and cabinets, a top brand recognized for its durability, high performance, and style.
The large island features a black leather-finish granite countertop, supplying a striking contrast to the lighter stone finishes while providing a durable, weather-resistant surface. One side of the pavilion features bar seating for casual dining, while the other side transitions into a snug lounge area.
A gas fire pit surrounded by plush couches creates a warm, pleasant space that extends usability into cooler evenings. When hosting friends, enjoying family dinners, or relaxing after a long day, this pavilion serves as the backyard’s social hub.

Resort-Style Swimming Pool With Safety Features

The backyard also features a 16×36 concrete wall vinyl swimming pool, perfectly proportioned to the yard’s size. The pool serves as a visual centerpiece and a refreshing escape during the summer months.
Facing the house is a sheer descent water wall, capped with G045 24×24 limestone, which adds a modern water-feature element while enhancing sound and movement. This wall becomes a focal point both day and night, especially when the pool is illuminated.
a-complete-backyard-transformation-in-massapequa-ny
The pool is equipped with an outcover automatic safety cover, a valuable solution for properties where customary fencing is not an option. The cover provides:
  • Safety for children and pets
  • Heat retention supports maintaining water temperature
  • Energy efficiency, reducing the heater workload
  • Resale value, as buyers increasingly look for embedded safety features
This feature alone significantly extends the swimming season and adds peace of mind.

G045 Limestone Patio and Coping: Natural Beauty & Comfort

The entire patio area surrounding the pool and pavilion is paved with G045 limestone from the Gappsi natural stone collection. This stone was chosen for both its rustic appearance and soft, comfortable texture underfoot. The pool coping is also made of G045 limestone, which keeps the look consistent throughout the space. Its gentle color changes and natural finish give the area a classic, elegant style that suits the home.
The stoop leading to the sliding door was also constructed with G045 coping limestone and a silver travertine veneer, tying the home’s entry point directly into the patio and pavilion materials for an integrated design.

Privacy and Greenery: Evergreen Screening

To finish the backyard, Gappsi planted 10-foot-tall evergreen trees along the property’s edge. These trees offer:
  • Natural privacy
  • Wind protection
  • Year-round greenery
  • A softer visual boundary than fencing
This living border transforms the yard into a private retreat, making it feel like a hidden oasis even in a suburban neighborhood.

A Small Yard That Lives Large

This Massapequa backyard shows that even a small space can have a big impact. With prudent planning, top-quality materials, and skilled installation, Gappsi transformed a modest yard into a complete luxury retreat.
Every part of the yard has a purpose, and all materials were chosen for both strength and beauty. The layout moves seamlessly from one area to the next, making the backyard not just beautiful but also useful, safe, and enjoyable year-round.
This project is Gappsi’s latest backyard design and installation. It shows how skill, creativity, and careful attention to detail can completely change a home’s outdoor living space.

Contact Gappsi Today

📍 Serving all of Long Island, NY — Nassau & Suffolk Counties
🌐 www.gappsi.com
📞 Call now for a free consultation and estimate!

SCHEDULE A MEETING TODAY WITH GAPPSI

Share this page:
A modern bathroom renovation with a freestanding tub, the result of hiring local services.

Find the Best Local Bathroom Renovation Services

You’ve spent hours scrolling through inspiration photos, pinning images of serene, spa-like bathrooms and sleek, modern designs. Now it’s time to turn that vision into a reality. The bridge between your dream bathroom and the finished product is a skilled, trustworthy contractor. But finding the right fit among the many local bathroom renovation services is a project in itself. This guide is your practical roadmap to navigating the hiring process. We’ll break down how to check credentials, compare quotes without just focusing on price, and communicate your expectations clearly to ensure the final result is just as beautiful as you envisioned.

Key Takeaways

  • Your Project’s Success Hinges on Your Contractor: Do your homework before hiring. A great contractor will have a verifiable license, proof of insurance, a strong portfolio of similar bathroom projects, and a consistent pattern of positive, recent reviews.
  • Plan Your Budget Beyond the Big-Ticket Items: The final cost is a mix of materials, labor, and location. Always factor in a contingency fund of 10-20% to handle unexpected issues like hidden water damage, which can prevent project delays and stress.
  • Protect Your Project with Clear Communication: A detailed written contract is your best tool for avoiding misunderstandings. It should outline the full scope, timeline, and costs, ensuring your vision is executed correctly from start to finish.

What Services Do Bathroom Remodelers Offer?

When you decide to update your bathroom, you’ll find that remodeling contractors offer a wide spectrum of services. Whether you’re dreaming of a complete spa-like overhaul or just want to refresh a few key features, a professional team can handle the job. A great contractor manages every detail, from the initial design concepts to the final installation, ensuring a smooth process and a beautiful result.

Understanding the different services available helps you clarify your own vision and budget. Some projects involve moving walls and reconfiguring the entire layout, while others focus on cosmetic updates like new tile or fixtures. A full-service company like Gappsi provides comprehensive home remodeling solutions, which means we can coordinate every aspect of your project. This includes bringing in licensed plumbers and electricians, sourcing high-quality materials, and managing the construction timeline so you don’t have to juggle multiple contractors. From a simple powder room refresh to a luxurious master bath transformation, the right team has the skills to bring your ideas to life.

Full-Scale Bathroom Remodels

A full-scale bathroom remodel is a complete transformation from the ground up. This is the best option when you want to change the room’s layout, move plumbing fixtures like the toilet or shower, or take everything down to the studs and start fresh. This type of project involves a comprehensive plan that covers everything from demolition to the final touches. A full-service remodeler handles the entire process, including initial design, material selection, and all construction phases. It’s an intensive process, but the result is a brand-new bathroom tailored exactly to your needs and style, which can significantly improve your home’s value and your daily routine.

Partial Renovations

If you’re generally happy with your bathroom’s layout but feel it needs a modern touch, a partial renovation is a fantastic choice. This approach focuses on updating specific elements without the cost and time commitment of a full gut job. You might choose to replace an old bathtub with a sleek walk-in shower, install a new vanity and countertop, or update the lighting. Partial renovations allow you to address the most dated or inefficient parts of your bathroom, making a big impact on a smaller budget. It’s a flexible option that lets you refresh the space in stages or all at once, depending on your priorities and financial plan.

Upgrading Fixtures and Hardware

Sometimes, the smallest changes make the biggest difference. Upgrading your bathroom’s fixtures and hardware is a simple yet effective way to give the space an instant facelift. This can include installing a new faucet with a modern finish, replacing the toilet with a more efficient model, or swapping out old cabinet pulls and towel racks. New lighting can completely change the room’s ambiance, while a new mirror can make the space feel larger and brighter. These updates don’t require major construction but can dramatically alter the look and feel of your bathroom, making it feel more current and personalized.

Installing New Tile and Flooring

New tile and flooring can completely redefine your bathroom’s style. Whether you’re drawn to classic subway tile, intricate mosaics, or large-format porcelain, the right choice can set the tone for the entire room. Professional remodelers handle the installation for floors, shower walls, and backsplashes, ensuring everything is perfectly placed and properly waterproofed to prevent future issues. With so many durable and beautiful materials available, including a wide range of porcelain and natural stone, you can create a look that’s both timeless and easy to maintain. A professional installation guarantees a flawless finish that will last for years to come.

Essential Plumbing and Electrical Work

Any bathroom remodel that involves moving fixtures or adding new lighting requires skilled plumbing and electrical work. This is not a place to cut corners. Licensed professionals are essential for tasks like rerouting water lines for a new shower, installing a new vanity with a sink, or adding outlets and recessed lighting. A qualified remodeling contractor will manage these critical services, ensuring all work is done safely and up to code. This protects your home from potential hazards like leaks or electrical faults and gives you peace of mind that the job was done right. Proper plumbing and electrical work is the hidden foundation of a functional and safe bathroom.

How to Choose the Right Bathroom Contractor

Finding the right contractor is the single most important step in your bathroom renovation journey. This is the person or team you’re trusting to come into your home, tear things apart, and put them back together beautifully and functionally. The right partner makes the process smooth and exciting, while the wrong one can turn your dream project into a stressful, costly nightmare. So, how do you sort through the options and find a true professional you can rely on? It comes down to doing a bit of homework upfront.

Think of it like hiring for an important job—because you are. You’re looking for someone with the right skills, a proven track record, and a professional approach. This means checking their credentials, seeing what past clients have to say, and making sure their work aligns with your vision. It also means ensuring they have the proper protections in place, like insurance, to safeguard your home and your investment. Taking these steps will give you the confidence that you’re working with a reputable company that values quality and customer satisfaction. A great home remodeling expert will be happy to provide all this information, making the decision process that much easier.

Verify Their Credentials and License

First things first: make sure any contractor you consider is properly licensed to work in your area. A license isn’t just a piece of paper; it’s proof that they’ve met local and state requirements and are accountable for their work. Hiring an unlicensed contractor can leave you with little recourse if something goes wrong. You can typically verify a license through your local consumer affairs or licensing board’s website. It’s a quick check that provides a fundamental layer of protection and peace of mind before you even start talking about tile choices or bathtub styles.

Read Recent Reviews and Testimonials

Reviews from past clients are your window into what it’s actually like to work with a contractor. Don’t just look at the star rating; read the comments to understand the specifics. Were they on time? Did they communicate well? How did they handle unexpected issues? Pay close attention to recent reviews, as they reflect the company’s current performance. A consistent pattern of positive feedback about professionalism, quality, and communication is a great sign. This feedback gives you a much clearer picture than a sales pitch ever could.

Review Their Portfolio and Experience

You wouldn’t hire a portrait artist who only paints landscapes, right? The same logic applies here. Make sure the contractor has specific, proven experience with bathroom remodels. Ask to see a portfolio of their completed projects. As you look through their work, check for quality craftsmanship and attention to detail. Does their style match the vision you have for your own space? Gappsi’s YouTube channel is a great example of how you can see a contractor’s work in action, giving you a feel for their capabilities and the scope of their projects before you even pick up the phone.

Compare Quotes from a Few Professionals

It’s wise to get detailed, written quotes from at least three different contractors. This isn’t just about finding the cheapest price. Comparing quotes helps you understand the market rate and see what each contractor includes in their proposal. A quote should clearly break down the costs for labor, materials, and any permits. Be wary of a bid that’s significantly lower than the others—it could be a red flag for subpar materials or hidden costs down the line. Your goal is to find the best value, which is the ideal balance of cost, quality, and service.

Confirm They Have Insurance Coverage

This is a non-negotiable. Your contractor must have both general liability insurance and worker’s compensation coverage. General liability protects your property from any accidental damage that might occur during the renovation. Worker’s compensation covers the contractor’s employees if they get injured on the job, so you aren’t held liable. Don’t just take their word for it; ask to see a certificate of insurance. A professional contractor will expect this question and will have their documentation ready to share. This simple step protects you from major financial and legal risks.

What Factors Influence Your Renovation Cost?

Setting a budget for your bathroom renovation is one of the first steps, but it’s important to know what goes into that final number. The total cost isn’t just about the new tub or tiles; it’s a combination of several key factors. Understanding these variables will help you create a realistic budget, make informed decisions, and avoid surprises along the way. From your specific Long Island location to the complexity of the work, here’s a breakdown of what shapes your project’s price tag.

Your Location and Local Market Rates

Where you live plays a significant role in your renovation costs. Just as home prices vary by neighborhood, so do the rates for labor and materials. Here on Long Island, costs can differ between Nassau and Suffolk counties due to local market demand and operational expenses for contractors. The company you hire also matters, as different builders have different pricing structures based on their experience, crew size, and overhead. A well-established firm with a strong local reputation may have a different rate than a smaller, newer operation, reflecting their level of service and quality guarantees.

The Quality of Materials You Choose

Your taste in materials and fixtures is one of the biggest drivers of your budget. Every choice, from the floor tiles to the sink faucet, comes with a price range. For example, a standard bathtub might cost a few hundred dollars, while a high-end freestanding soaking tub can easily run into the thousands. The same goes for vanities, lighting, and countertops. Opting for luxury materials like custom cabinetry or premium porcelain and natural stone will naturally increase the overall cost compared to more standard, budget-friendly options. It’s all about balancing your aesthetic vision with your financial plan.

Project Scope and Labor Complexity

What are you planning to change? A simple cosmetic update is much less expensive than a full gut renovation. Labor is often the largest single expense in a remodel, typically accounting for 30% to 50% of the total budget. If your project involves moving walls, reconfiguring the plumbing, or updating electrical wiring, the labor costs will be higher due to the increased complexity and need for specialized trades. A straightforward fixture-for-fixture swap requires less time and expertise, keeping labor costs down. The more ambitious your home remodeling plans, the more you should allocate for skilled labor.

Planning for Unexpected Issues

Even with the most careful planning, renovations can uncover surprises. Once the walls and floors are opened up, you might find hidden problems like water damage, mold, outdated wiring, or pest issues that need to be addressed before the new work can begin. These unexpected repairs can quickly add to your costs. That’s why it’s smart to build a contingency fund into your budget—typically 10% to 20% of the total project cost. This financial cushion ensures that unforeseen issues don’t derail your project or force you to compromise on your design choices later on.

Local Building Permits and Requirements

Depending on the scope of your renovation, you may need to secure permits from your local municipality. Projects that involve altering the structure of your home, moving plumbing, or changing electrical systems almost always require a permit to ensure the work meets safety and building codes. The cost of permits and any required inspections will add to your total expenses. A professional contractor will know exactly which permits are needed for your project and can manage the application process for you, ensuring everything is done correctly and legally. This is a crucial step that protects your home’s value and safety.

How Much Does a Bathroom Renovation Cost?

Let’s talk numbers. Setting a realistic budget is one of the most important first steps in any renovation, and it’s often the hardest. Bathroom remodeling costs can vary widely based on the size of your space, the materials you select, and how much you change the existing layout. To give you a clearer picture of what to expect here on Long Island, we can break down the costs into a few common tiers.

Think of these numbers as a starting point. A small powder room refresh will naturally cost less than a full-scale primary bathroom overhaul that involves moving plumbing and electrical lines. The key is to align your vision with your budget. Whether you’re planning a simple cosmetic update or a complete spa-like transformation, understanding these price ranges will help you plan your project with confidence. At Gappsi, our home remodeling team works with you to design a bathroom that fits your financial comfort zone without compromising on quality or style.

Budget-Friendly Updates ($5,000-$10,000)

Yes, you can absolutely give your bathroom a significant facelift for under $10,000. The secret to staying in this range is to work with your bathroom’s existing footprint—meaning no moving toilets or showers. This budget is perfect for cosmetic changes that make a huge impact. Think a fresh coat of paint, a new vanity and sink, updated light fixtures, a modern toilet, and a reglazed tub. By making smart, high-impact choices, you can create a space that feels brand new and adds real value to your home without breaking the bank.

Mid-Range Remodels ($10,000-$20,000)

This is the sweet spot for many homeowners. In this range, you have more flexibility to upgrade materials and make more substantial changes. You could invest in a beautiful new tiled shower, install a semi-custom vanity with a stone countertop, or upgrade your flooring with high-quality porcelain and natural stone. You might even have enough room in the budget to move a fixture or two. A mid-range remodel allows for a more personalized design and better-quality materials that not only look great but also stand the test of time, often recouping a good portion of the cost when you sell your home.

High-End Transformations ($20,000+)

If you’re dreaming of a true luxury retreat, this is the budget for you. A high-end renovation opens the door to a complete transformation. We’re talking about custom cabinetry, premium materials like marble, heated floors, a steam shower, or a freestanding soaking tub. This budget allows for significant layout changes, like expanding the room’s footprint or moving all the plumbing to create a more functional and spacious design. This is where you can incorporate high-end technology and designer fixtures to build the custom, spa-like bathroom you’ve always wanted.

A Quick Cost Breakdown by Feature

Wondering where all that money goes? A bathroom renovation quote is a sum of many parts. Labor is a major component, covering the skilled work of plumbers, electricians, tilers, and installers. Materials are the next big piece of the puzzle. This includes everything from the bathtub and toilet to the vanity, faucets, and tile. For example, a standard tub might cost a few hundred dollars, while a high-end freestanding model can be several thousand. Tiling costs also vary based on the material you choose and the complexity of the design. Understanding these individual costs helps you see exactly how your budget is being allocated.

Key Questions to Ask a Potential Contractor

Choosing the right contractor is the most important decision you’ll make for your bathroom renovation. A great partnership leads to a smooth process and a beautiful result, while the wrong one can cause major headaches. Before you sign any contracts, it’s essential to have a detailed conversation with any potential hire. A professional and experienced contractor will welcome your questions and provide clear, confident answers. Think of this as an interview—you’re hiring them for a critical job. Use these questions to guide your conversation and find a team you can trust to bring your vision to life.

Project Timelines and Scheduling

One of the first things you’ll want to know is how long the project will take. Ask for a detailed project timeline, including start and estimated completion dates. A professional contractor should be able to provide a schedule that outlines each phase, from demolition to final inspection. Also, ask how they handle potential delays, which can happen due to material backorders or unexpected issues. Understanding their process for managing the schedule and communicating updates will help you set realistic expectations. This conversation will show you how organized they are and how they value your time, ensuring everyone is on the same page before the work begins.

Material Sourcing and Warranties

Discussing materials and warranties upfront can save you from costly surprises later. Ask your contractor where they source their materials and whether you’ll be selecting them together. Some contractors have preferred suppliers, which can sometimes lead to better pricing. At Gappsi, we guide homeowners through selecting high-quality materials like durable porcelain and natural stone to ensure a lasting finish. It’s also crucial to ask about warranties. You should clarify what is covered under their workmanship warranty and what manufacturer warranties apply to the products being installed. A reputable contractor will stand by their work and be transparent about all guarantees.

Policies for Changes and Communication

Even with the best planning, you might want to make a change mid-project, or an unexpected issue might require a pivot. Ask potential contractors how they handle these situations. They should have a formal process for “change orders,” which are written documents that detail the changes in scope, cost, and timeline. This protects both you and the contractor. You should also establish a communication plan. Will you have a dedicated point of contact? How often can you expect updates? Clear communication is the foundation of a successful home remodeling project, so make sure their style aligns with your expectations.

Proof of Insurance and Licensing

This is a non-negotiable step. Always ask a contractor for proof of their license and insurance before hiring them. They should be able to provide a copy of their state or local license, as well as certificates for general liability insurance and workers’ compensation. General liability protects your property from damage, while workers’ compensation covers any injuries that might happen on the job site, protecting you from liability. Verifying these credentials ensures the contractor operates legally and professionally. Any hesitation to provide this information is a major red flag, and you should move on to the next candidate.

Specific Experience with Bathroom Projects

Not all renovations are the same, and bathrooms come with unique challenges like intricate plumbing, waterproofing, and ventilation. Ask contractors to share their portfolio of recent bathroom projects. Look for examples that are similar in style and scope to what you have in mind. This is your chance to see the quality of their work firsthand. Ask them about a particularly challenging bathroom project they completed and how they handled it. Their answer will give you insight into their problem-solving skills and expertise. A contractor with a proven track record in bathroom remodels will be better equipped to handle the specific demands of your project.

Their Process for Handling Surprises

In any renovation, there’s always a chance of uncovering something unexpected, like hidden water damage, mold, or outdated electrical wiring behind the walls. A seasoned contractor knows this and has a plan. Ask them how they approach these discoveries. A good contractor will stop work, inform you immediately, and clearly explain the problem and your options for addressing it. They should provide a detailed change order outlining the additional work and costs required. This question helps you gauge their transparency, honesty, and ability to manage unforeseen challenges without causing unnecessary stress or blowing your budget without your approval.

How to Avoid Common Renovation Mistakes

A bathroom renovation is an exciting project, but it also comes with its fair share of potential headaches. The good news is that most common mistakes are entirely avoidable with a bit of planning. Taking the time to prepare before the first tile is laid will save you from budget overruns, timeline delays, and a finished product that doesn’t quite match your vision. The key is to find a partner you can trust and to stay involved in the process from start to finish.

When you work with an experienced team, they guide you through every step, from initial design to final installation. A professional home remodeling company will anticipate challenges and communicate clearly, ensuring your project runs smoothly. By following a few simple guidelines, you can protect your investment and make sure your renovation experience is a positive one.

Do Your Research Before You Hire

One of the biggest missteps you can make is hiring the wrong contractor. A team that is hard to reach, goes over budget, or delivers subpar work can turn your dream project into a nightmare. Before you sign any contracts, do your homework. Look for a company with a strong presence in Long Island and a long history of satisfied clients. Check their online portfolio, read reviews on multiple platforms, and ask for references you can actually speak with. A trustworthy contractor will be proud to show off their previous work and connect you with happy homeowners.

Get a Detailed Contract in Writing

A handshake and a verbal agreement aren’t enough when it comes to your home. Always ask for a detailed contract that outlines the complete scope of work. This document should be your project’s roadmap, clearly defining everything from the specific materials being used to the project timeline and payment schedule. A thorough contract protects both you and the contractor by setting clear expectations and preventing misunderstandings down the road. It ensures everyone is on the same page about deliverables and costs. If a contractor is hesitant to put everything in writing, consider it a major red flag and walk away.

Don’t Choose Based on Price Alone

It’s always tempting to go with the lowest bid, but this can be a costly mistake. An unusually low price often signals inexperience, low-quality materials, or a contractor who plans to cut corners. Instead of focusing only on the final number, evaluate the overall value. Consider the contractor’s experience, the quality of the porcelain and stones they use, and their reputation for craftsmanship. Investing a little more in a reputable company often means a better-finished product and fewer expensive repairs in the future. A quality job is an investment that pays off for years to come.

Know the Red Flags of Unprofessionalism

Learning to spot the warning signs of an unreliable contractor can save you a lot of trouble. Be wary of anyone who asks for a large cash deposit upfront, lacks proper licensing and insurance, or can’t provide you with references. Poor communication is another major red flag; if they are difficult to get in touch with before the project even starts, imagine what it will be like once they’ve begun demolition. A professional team will be transparent, responsive, and eager to answer all of your questions, making you feel confident and informed every step of the way.

Communicate Your Expectations Clearly

Your contractor can’t bring your vision to life if they don’t know what it is. Clear communication is essential for a successful renovation. Before the project begins, gather inspiration photos, make a list of your must-haves, and discuss your goals in detail with your contractor. The more specific you can be about what you want, the better. A great contractor will listen to your ideas and use their expertise to make recommendations, ensuring the final result not only looks beautiful but is also functional for your family’s needs. Don’t be afraid to speak up and ask questions throughout the process.

How to Read Customer Reviews Like a Pro

Reading customer reviews is one of the most important steps in finding the right contractor, but it’s about more than just scanning star ratings. To get a true feel for a company, you need to know how to read between the lines. A glowing five-star review and a frustrated one-star complaint are both just pieces of a larger puzzle. By looking for specific details, patterns, and even how a business handles criticism, you can get a much clearer picture of what it would actually be like to work with them on your bathroom renovation.

Check the Volume and Date of Reviews

When you start looking at reviews, the first things to check are how many there are and how old they are. A contractor with hundreds of reviews has a long track record, which gives you a lot more information to work with than a company with only a handful. But volume alone isn’t enough. You want to see a steady stream of recent feedback. A glowing review from five years ago doesn’t tell you much about the quality of their work today. Look for reviews from the last few months to get an accurate sense of their current performance, crew, and project management. Consistent, recent praise is a great sign you’re looking at a reliable company.

Look for Specific, Detailed Feedback

Vague comments like “great job” or “highly recommend” are nice, but they don’t give you much to go on. The most helpful reviews are the ones that get specific. Look for feedback that details the experience, mentioning things like the team’s communication style, their punctuality, how they kept the workspace clean, and how they handled unexpected issues. Did they stick to the timeline? Was the final cost in line with the initial quote? These details paint a vivid picture of the customer experience. When you’re planning a major project like a home remodel, this kind of specific insight is incredibly valuable for setting your own expectations.

See How the Business Responds to Concerns

No company is perfect, and even the best contractors might get a negative review from time to time. What really matters is how they respond. A professional and thoughtful reply to a complaint shows that the company values customer feedback and is committed to making things right. It’s a sign of accountability. On the other hand, a defensive or dismissive response—or worse, no response at all—is a major red flag. How a business handles criticism tells you a lot about their character and how they’ll likely communicate with you if a problem comes up during your project. Look for a contractor who listens and takes ownership.

Identify Overall Patterns and Sentiment

Instead of getting hung up on a single amazing review or one really bad one, take a step back and look for patterns. Are multiple customers praising the same project manager? Do several reviews mention how respectful the crew was of their home? These are strong positive indicators. Conversely, if you see recurring complaints about the same issue—like poor communication, messy job sites, or scheduling delays—take them seriously. One person’s bad experience could be an outlier, but the same complaint from three or four different people points to a real problem. Identifying these trends will give you a much more reliable understanding of a company’s strengths and weaknesses.

Watch Out for Red Flags in Comments

As you read, keep an eye out for specific red flags that could signal future headaches. Comments about poor communication, missed deadlines without any explanation, or unprofessional behavior from the crew are serious warnings. Another major red flag is any mention of surprise costs or feeling pressured to agree to extra work that wasn’t in the original contract. Your home renovation should be an exciting process, not a stressful one. Paying attention to these warning signs in reviews can help you avoid a contractor who might create problems down the road, ensuring your swimming pool or patio project goes smoothly from start to finish.

Where to Find a Great Local Contractor

Finding the right contractor can feel like a huge task, but it doesn’t have to be. With the right approach, you can connect with skilled professionals in your area who can bring your vision to life. These reliable methods will help you narrow down your options and find a partner you can trust for your bathroom renovation.

Online Directories and Review Sites

Online platforms are a great starting point. Websites like Houzz, Angi, and Google Maps gather local contractors in one place, letting you sort through them based on customer reviews and project photos. Pay close attention to recent reviews to get a current picture of their performance and how they interact with clients. These sites help you find reputable services, as contractors know a strong online presence and positive feedback are key to connecting with homeowners like you. A well-managed profile is often a good sign of a professional operation.

Referrals from Friends and Neighbors

Don’t underestimate the power of a good recommendation. Asking friends, family, and neighbors for referrals is one of the most trusted ways to find a great contractor. They can give you an honest, firsthand account of their experience—from communication and cleanliness to sticking to the budget and timeline. A personal recommendation means you’re finding a professional who has already earned trust in your community, giving you peace of mind as you move forward.

Local Trade Shows and Associations

If you prefer to meet professionals face-to-face, local home and garden shows are fantastic opportunities. These events allow you to see a contractor’s work up close and have a direct conversation about your project. You can get a feel for their personality and professionalism right away. Also, check if a contractor belongs to a professional organization like the National Association of the Remodeling Industry (NARI). Membership often indicates a commitment to high standards and ethical business practices.

Social Media and Professional Portfolios

A contractor’s social media profile or website portfolio is their digital showroom. Platforms like Instagram and Pinterest are perfect for browsing high-quality photos and getting inspiration. Look for detailed project galleries with before-and-after shots that show the transformations they can achieve. This is your chance to see if their style aligns with yours and to get a clear idea of the quality of their home remodeling work before you pick up the phone. A strong portfolio showcases everything from custom tile work to complete outdoor living spaces.

Related Articles

Frequently Asked Questions

How long will my bathroom renovation actually take? The timeline for a bathroom remodel really depends on the scope of the project. A simple cosmetic update, like replacing a vanity and fixtures, might only take a few days. A more involved, mid-range renovation could take two to three weeks. For a full-scale gut renovation that involves moving walls or plumbing, you should plan for the project to last anywhere from four to six weeks or more, factoring in inspections and any custom orders.

Can I stay in my home during the remodel? Absolutely. For most bathroom projects, you can comfortably live in your home while the work is being done. If you only have one bathroom, we can work with you to set up temporary solutions or plan the work in phases to minimize disruption. A professional crew will always make sure to clean up the work area at the end of each day and seal it off to contain dust and debris as much as possible.

What happens if you find a surprise problem like mold or a leak? It’s not uncommon to uncover hidden issues like old water damage or outdated wiring once we open up the walls. A professional contractor has a clear process for this. We immediately stop work in that area, show you exactly what we’ve found, and explain your options. We then provide a written change order that details the necessary repairs and any associated costs, so you can approve everything before we move forward.

What’s the best way to save money on my project without cutting corners? The smartest way to manage your budget is to keep your bathroom’s existing layout. Moving plumbing and electrical lines is one of the most significant labor costs in a renovation. You can also make a big impact by investing in a few high-quality focal points, like a beautiful vanity or custom tile in the shower, while choosing more standard, budget-friendly options for other elements.

Do I need to hire my own plumber or electrician? When you work with a full-service remodeling company, you don’t have to worry about coordinating different tradespeople. We manage the entire project for you, which includes bringing in our trusted and licensed plumbers, electricians, and other specialists as needed. This ensures every part of the job is done correctly, up to code, and on schedule, simplifying the entire process for you.

Share this page: