Rooftop porcelain pavers installed in Long Island, NY, by professional suppliers and installers.

Rooftop Porcelain Pavers: A Long Island Buyer’s Guide

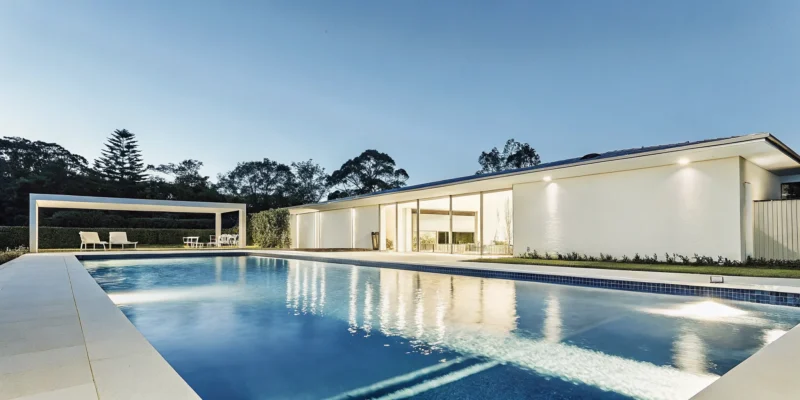
When you’re planning a home improvement project, adding usable square footage is always a top priority. A rooftop deck transforms empty space into a valuable asset for relaxing and entertaining. To get it right, you need a material that is both beautiful and practical. Porcelain pavers provide a sleek, high-end finish without the structural weight or maintenance headaches of traditional stone or concrete. This guide breaks down the entire process, from understanding the costs to the key technical details of a proper installation. We’ll give you the confidence to move forward and help you find the most qualified Roof top porcelain pavers suppliers and installers Long Island ny for the job.

Key Takeaways

  • Opt for porcelain pavers for their winning combination of style and strength: They are lightweight enough for rooftop structures, tough enough for Long Island weather, and incredibly low-maintenance.
  • Your installer is as important as your materials: Hire a licensed and insured professional with specific rooftop experience to ensure proper drainage and compliance with local codes.
  • Plan your budget with the long game in mind: Porcelain’s upfront cost is a smart investment that pays off through years of durability and minimal upkeep, adding lasting value to your home.

Why Choose Porcelain Pavers for Your Rooftop?

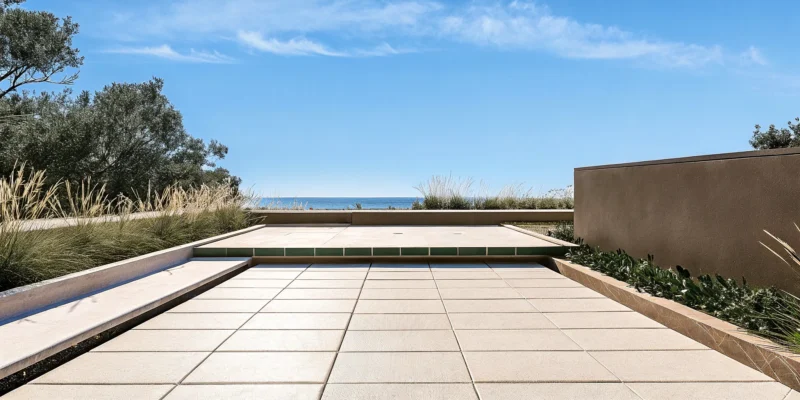
If you’re thinking about transforming your unused rooftop into a stunning outdoor living area, porcelain pavers are an excellent choice. They offer a perfect blend of sophisticated style and practical performance, especially for a unique space like a roof. Unlike other materials, porcelain gives you a clean, modern look without the headaches of constant upkeep, letting you spend more time enjoying your new retreat.

The Benefits of a Porcelain Rooftop Oasis

So, what exactly are porcelain pavers? Think of them as a super-powered ceramic tile. They’re crafted from a refined mix of clay and minerals, then fired at extremely high temperatures. This process creates a paver that is incredibly dense, hard, and non-porous. For you, this means you get a surface that resists stains, mold, and mildew, making it a fantastic low-maintenance option for your rooftop oasis. With a wide variety of colors and styles, you can find the perfect porcelain and natural stone to match your home’s aesthetic and create a truly personalized space.

Lightweight Design for Structural Peace of Mind

One of the biggest concerns with any rooftop project is weight. Your building’s structure can only handle so much, which is why material choice is critical. Porcelain pavers are significantly lighter than traditional options like concrete or natural stone. This lightweight design reduces the structural load on your roof, giving you peace of mind that your new deck is both beautiful and safe. Their lighter weight also simplifies the installation process, as the materials are easier to transport and handle, which can be a major advantage for a project several stories up.

All-Weather Durability and Non-Slip Safety

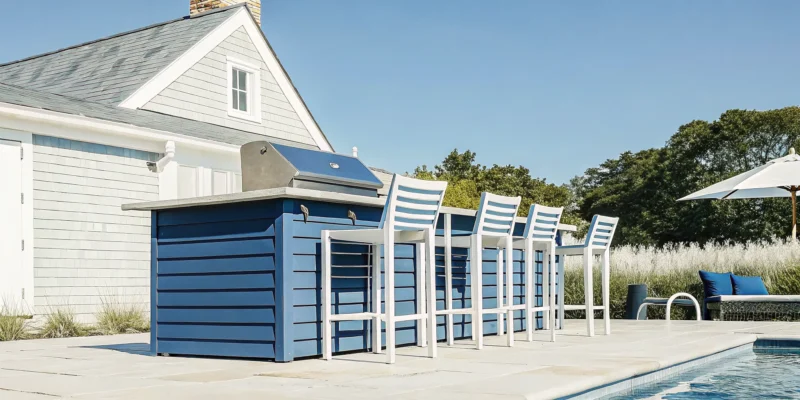
A rooftop is exposed to everything Long Island weather can throw at it, from blazing summer sun to freezing winter ice. Porcelain pavers are built to withstand it all. They are exceptionally durable, resisting scratches from patio furniture and wear from foot traffic. The color won’t fade under harsh UV rays, and because they absorb very little water, they won’t crack during freeze-thaw cycles. Many porcelain pavers also feature a non-slip texture, which is a crucial safety feature for any outdoor area exposed to rain. This makes your rooftop a safer place for family and friends to gather, no matter the weather.

Finding the Best Porcelain Paver Suppliers in Long Island

Once you’ve decided on porcelain pavers, the next step is finding the right partner to bring your vision to life. Choosing a supplier is about more than just picking out tiles; it’s about finding an expert who understands the unique demands of a rooftop project on Long Island. Here’s what to focus on to make sure you find the best fit.

Why Gappsi is Your Go-To Source for Premium Pavers

When sourcing materials, you want a team that sees the big picture. With over 30 years of experience, Gappsi doesn’t just sell pavers; we design entire outdoor living spaces. This means we know how your rooftop terrace should connect with your home’s aesthetic. Our deep knowledge of Long Island’s climate helps us select the perfect porcelain and natural stone products that withstand our specific weather patterns, from summer sun to winter ice. We ensure your rooftop oasis is beautiful and built to last. You can even see our curated selection firsthand at the Gappsi Store.

What to Look for in a Local Supplier

Your supplier should have proven local expertise. Long Island’s weather, with its freeze-thaw cycles, can be tough on outdoor installations. A knowledgeable supplier understands this and will recommend pavers and installation methods designed for durability. They can explain how their masonry techniques create a stable foundation that prevents shifting and cracking. Always prioritize suppliers who are transparent about where they source their materials. High-quality pavers are an investment, and a reputable company will be proud to show you why their products are worth it, ensuring your rooftop space remains a stunning retreat for years.

Key Questions to Ask Before You Buy

Before you commit, have a few key questions ready. Think of it as a mini-interview to ensure you’re working with a professional. Start by asking if they are fully licensed and insured; this is non-negotiable and protects you from liability. Next, inquire about warranties for both the pavers and the installation workmanship. A confident installer will stand behind their work. Finally, ask for a detailed, written estimate to understand all costs and prevent surprises. A trustworthy home improvement company will happily provide clear answers to all these questions, giving you peace of mind.

How to Choose the Right Paver Installer

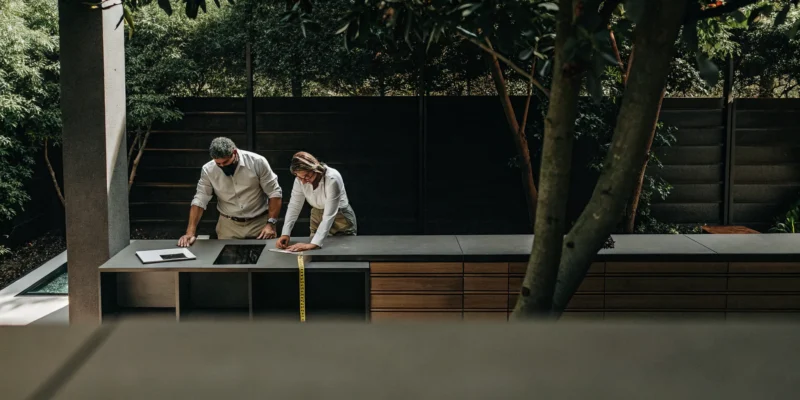
Selecting the perfect porcelain pavers is only half the battle. The quality of your installation is just as important as the pavers themselves, because a great installer ensures your rooftop oasis is beautiful, safe, and built to last. Choosing your installer carefully is one of the most critical decisions you’ll make. You need a team that not only understands paver installation but also gets the specific challenges of working on a rooftop, especially with Long Island’s unique climate. A proper installation from an experienced team of masonry professionals will prevent issues like shifting, poor drainage, and water damage down the road.

Vet Their Experience with Rooftop Projects

A rooftop paver project isn’t the same as a ground-level patio. It requires specialized knowledge of structural loads, waterproofing, and pedestal systems that elevate the pavers to create a level surface. When you interview potential installers, ask specifically about their experience with rooftop projects. An installer familiar with Long Island’s weather, including its freeze-thaw cycles, will know how to build a system that can withstand the elements without failing. Don’t be shy about asking to see a portfolio of their completed rooftop work. This will give you a clear idea of their capabilities and whether their style aligns with your vision.

Check for Proper Licensing, Insurance, and Reviews

This step is non-negotiable for your protection and peace of mind. Before hiring anyone, confirm they have the proper licensing and insurance. A valid license shows they meet local and state requirements, while adequate insurance protects you from liability in case of accidents on your property. Next, do a little homework by reading online reviews. See what other homeowners in the Long Island area have to say about their experience. A contractor’s reputation is built on their past work, and reviews can offer honest insight into their professionalism, communication, and the quality of the final product.

Ask About Their Installation Process and Foundation Prep

A strong, well-prepared base is the key to a long-lasting paver installation. For a rooftop, this means ensuring the underlying surface is properly waterproofed and that the pedestal system is installed correctly to provide a stable and level foundation. A professional installer should be able to walk you through their entire process, from protecting the roof membrane to ensuring proper drainage. Ask them what kind of pedestal system they use and how they account for water runoff. The right porcelain and natural stone installation is an investment, and understanding the process will help you feel confident you’ve chosen the right team for the job.

Budgeting for Your Rooftop Paver Project

Creating a budget is one of the most practical first steps you can take when planning your rooftop oasis. Understanding the costs upfront helps you make confident decisions and ensures your project goes smoothly from start to finish. The total price tag for a rooftop paver installation is a combination of three main things: the pavers themselves, the professional labor to install them, and any site-specific preparations needed to get your roof ready. By breaking down these costs, you can get a clear picture of the total investment and plan accordingly for a beautiful, long-lasting space.

Understanding Material Costs

When you start shopping, you’ll find that high-quality porcelain pavers typically range from $7 to $9 per square foot. This price reflects the incredible value they offer. You’re not just paying for a tile; you’re investing in a material that is dense, highly durable, and resistant to stains, frost, and fading. The cost also covers the sophisticated designs and finishes available, allowing you to achieve a high-end look. At Gappsi, we offer a wide selection of premium porcelain and natural stone to fit any aesthetic, ensuring you find the perfect match for your home.

Factoring in Labor and Additional Expenses

Professional installation is key to a successful rooftop project, and labor costs generally fall between $5 to $10 per square foot. This range depends on the complexity of your project. A simple, straightforward layout will be on the lower end, while a more intricate design with many cuts or difficult roof access may cost more. Beyond the installation itself, remember to account for other potential expenses. This could include specialized pedestal systems for leveling, waterproofing membranes, or specific drainage solutions. Our expert masonry teams can assess your space and outline any additional requirements.

Estimating Your Total Investment

When you combine materials and labor, you can estimate a total investment of roughly $12 to $19 per square foot. While the initial cost for porcelain might be higher than for basic concrete pavers, it’s a smarter long-term investment. Porcelain’s incredible toughness means you won’t be spending money on frequent repairs or replacements down the line. Its low-maintenance surface also saves you time and money on upkeep. Think of it as a one-time investment for decades of enjoyment, adding both functional living space and significant value to your Long Island home.

Key Technicals for a Rooftop Installation

Turning your rooftop into a beautiful, functional space is an exciting project, but it comes with a unique set of technical requirements that set it apart from any ground-level patio. A rooftop installation needs careful, professional planning to ensure it’s safe, durable, and compliant with local regulations. Getting these details right from the start is the key to a successful project that you can enjoy for years without any worries. This isn’t a weekend DIY job; it’s a serious structural addition to your home that involves complex factors like weight distribution, water management, and weather resistance.

It’s about working with your home’s existing structure, not against it. This isn’t just about following rules; it’s about ensuring your new oasis is a secure and lasting asset, a place where you can relax and entertain without a second thought about what’s happening underneath. Before any design work begins, you and your contractor need to have a clear plan for the structural, drainage, and legal aspects of the build. Let’s walk through the three most important technical considerations you’ll need to address to make sure your rooftop retreat is built to last.

Checking Structural Load Limits

Before you fall in love with a specific paver, the first step is to confirm what your roof can actually handle. Every building has a structural load limit, which is the maximum weight it can safely support. This is a non-negotiable safety check that requires a professional assessment, often by a structural engineer. The great news is that porcelain pavers are an excellent choice for rooftops precisely because they are significantly lighter than concrete or natural stone. This lightweight design often makes them a viable option without requiring extensive structural reinforcement, giving you peace of mind while you create your sky-high retreat.

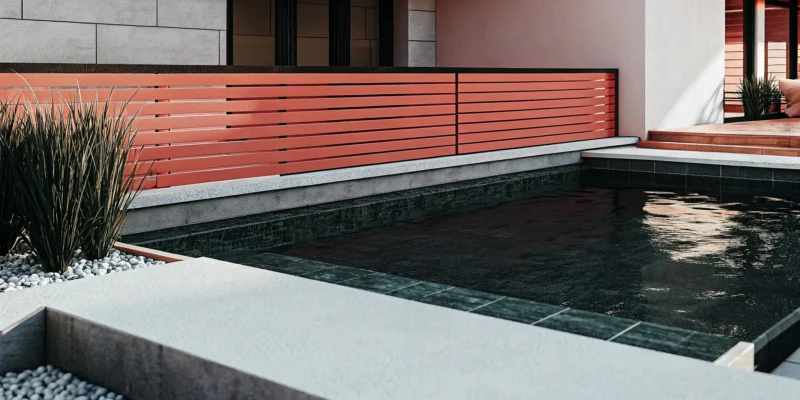
Planning for Proper Drainage and Waterproofing

Proper water management is absolutely critical for any rooftop project. You need a solid plan for where rain and melting snow will go to prevent pooling, leaks, and long-term damage to your roof’s membrane. An experienced installer will use a pedestal system, which raises the pavers off the roof surface. This method creates a space for water to flow freely to existing drains and allows for air circulation. It also provides easy access for future maintenance or repairs to the roof underneath. This smart installation technique is essential for protecting the integrity of your home and ensuring the longevity of your new outdoor space.

Understanding Local Building Codes and Permits

Every construction project needs to follow local rules, and rooftop installations are no exception. Here on Long Island, our building codes account for specific weather conditions, like our freeze-thaw cycles, which can impact how a foundation needs to be prepared. Working with a contractor who has deep experience in Nassau and Suffolk counties is vital. A local expert will understand the permit process, ensuring your project is fully compliant from day one. This is a critical part of any major home remodeling project, protecting your investment and your home not just from fines, but from the safety risks of improper construction in our unique climate.

Common Rooftop Paver Mistakes to Avoid

A rooftop paver project is an exciting way to transform unused space into a beautiful outdoor retreat. But even the best materials can lead to disappointment if the installation isn’t handled correctly. A few common missteps can turn your dream deck into a costly problem. Knowing what to watch for is the first step toward creating a stunning and durable rooftop oasis that you can enjoy for years to come.

By avoiding these pitfalls, you can ensure your investment is protected and your new space is built to last. From choosing the right team to getting the foundation just right, every detail matters. Let’s walk through the most frequent mistakes homeowners make so you can sidestep them with confidence.

Hiring an Inexperienced Installer

Choosing an installer is one of the most critical decisions you’ll make. It’s tempting to go with the lowest bid, but a lack of experience can lead to major issues down the road. Long Island has unique weather patterns, including freeze-thaw cycles that can wreak havoc on improperly installed surfaces. An installer who understands these local conditions will know how to build a foundation that can withstand the elements. A true professional will have a portfolio of successful rooftop and masonry projects and can explain exactly how they’ll protect your investment from our specific climate challenges.

Skipping Proper Base Preparation

The long-term success of your rooftop deck depends entirely on what’s underneath it. A strong, well-prepared base is the most important part of a lasting installation. For rooftops, this often involves using a pedestal system, which raises the pavers off the roof surface. This method creates a perfectly level deck while allowing for easy drainage and access to the roof membrane for any future repairs. While some paver projects can be laid on sand or grass, a rooftop installation requires specialized preparation to ensure stability and protect the structure of your home. Proper base prep is a non-negotiable step for a safe and beautiful finish.

Forgetting About Drainage and Future Upkeep

Water management is crucial on any rooftop. If water can’t drain properly, it can lead to pooling, leaks, and damage to your home. Using a pedestal system is a smart way to manage this, as it allows water to flow freely underneath the pavers and away from the surface. This setup also makes future upkeep much simpler. If you ever need to access the roof for repairs, you can easily lift a few pavers instead of tearing up the entire deck. Thankfully, porcelain pavers themselves are incredibly low-maintenance. They don’t absorb much water, which makes them naturally resistant to stains and mold.

Debunking Myths About Rooftop Porcelain Pavers

When you’re considering a material for your rooftop patio, you want to be sure you’re making the right choice. Porcelain pavers are a fantastic option, but a few common myths might give you pause. Let’s clear the air and look at the facts so you can feel confident in your decision. Many of these misconceptions come from a lack of familiarity with how modern porcelain pavers are designed and installed, especially for unique spaces like rooftops where every detail matters. It’s easy to hear a rumor about weight or installation and second-guess your plans, but the technology and materials have come a long way.

The truth is, porcelain offers a combination of beauty, durability, and practicality that’s hard to beat for creating a rooftop oasis. From concerns about weight stressing your home’s structure to worries about complicated upkeep, we’ll break down the most persistent myths one by one. These pavers are engineered to perform beautifully in challenging environments, providing a safe, stylish, and functional surface. Understanding the reality behind these pavers will show you why they are a leading choice for creating stunning and long-lasting outdoor living areas on Long Island rooftops. Let’s separate fact from fiction so you can move forward with your project.

Myth: They’re Too Heavy for a Roof

One of the biggest worries homeowners have is whether their roof can handle the weight of pavers. It’s a valid concern, but the idea that porcelain is too heavy is simply not true. In fact, porcelain pavers are significantly lighter than traditional materials like concrete slabs or many types of natural stone. This lower weight makes them an excellent material for rooftop applications where structural load is a primary consideration. Their lightweight nature not only puts less stress on your home’s structure but also makes them easier to transport and install, which is a huge plus for an elevated project.

Myth: Installation is Overly Complex and Costly

You might think that installing pavers on a roof is a complicated and expensive job, but that’s another misconception. Thanks to modern installation techniques, like adjustable pedestal systems, laying porcelain pavers on a rooftop is a streamlined process. These systems allow installers to create a perfectly level surface over a sloped roof while also providing a crucial gap for drainage underneath. While you should always hire a professional with rooftop experience, the installation itself isn’t necessarily more complex than other premium paving projects. Gappsi’s expert masonry team has the experience to handle these specific installations efficiently.

Myth: They’re Difficult to Maintain

If you’re picturing hours of scrubbing and sealing, you can relax. Porcelain pavers are incredibly easy to care for, making them perfect for a low-maintenance lifestyle. Because porcelain is non-porous, it naturally resists stains from spills, mold, and mildew. Unlike natural stone that often requires regular sealing, porcelain keeps its good looks with just a simple cleaning using soap and water. This durability means your rooftop oasis will continue to look beautiful for years with minimal effort. This resistance to the elements is a key reason why so many Long Islanders choose porcelain pavers for their outdoor spaces.

Your Rooftop Paver Project Checklist

With the big decisions made, it’s time to get organized. A clear plan helps ensure your rooftop project runs smoothly from the first paver to the final finishing touch. This simple checklist will guide you through the final planning stages, so you can move forward with confidence and get ready to enjoy your beautiful new outdoor space.

Finalize Your Design and Layout

This is where your vision really starts to take shape. Porcelain pavers are a fantastic, low-maintenance choice for rooftop spaces, offering a stylish look that’s more affordable than natural stone. With so many colors and textures available, you can create a look that’s uniquely yours. Take some time to browse different porcelain and natural stone options to find the perfect match for your home’s aesthetic. Once you’ve chosen your pavers, think about the layout. A simple grid pattern creates a clean, modern feel, while a herringbone pattern can add classic elegance. Sketch out your rooftop area and consider where furniture will go to create a functional and inviting oasis.

Map Out Your Project Timeline

A realistic timeline is your best friend for a stress-free project. Work with your installer to outline each phase, from ordering materials to the final walkthrough. A typical project includes site preparation, foundation work, and paver installation. Remember, a strong, well-prepared base is the most important part of a long-lasting project, so make sure enough time is dedicated to this crucial step. It’s also smart to build a little buffer into your schedule for potential weather delays. Clear communication with your masonry and construction team will help you stay informed and manage expectations.

Plan for Long-Term Care and Maintenance

One of the best things about porcelain pavers is how easy they are to maintain. They don’t absorb much water, which makes them incredibly resistant to stains, mold, and mildew. You won’t have to worry about spilled drinks causing permanent damage. For routine cleaning, all you typically need is a simple sweep and an occasional wash with water and a mild cleaner to keep them looking fresh. Unlike many other materials, porcelain pavers don’t require sealing. While Gappsi offers expert restoration and sealing services for other surfaces, you’ll be glad to know your porcelain rooftop won’t need it. Just plan to periodically check that the pavers are stable.

Related Articles

Frequently Asked Questions

Are porcelain pavers slippery when they get wet? This is a great question, as safety is always a top priority. Many high-quality porcelain pavers are specifically designed with a textured, non-slip surface to provide excellent traction, even in rainy conditions. When you’re choosing your pavers, we can show you options that are rated for outdoor and wet area use, ensuring your rooftop is a secure place for you and your guests to enjoy.

Is the higher initial cost of porcelain pavers really worth it compared to other options? While porcelain pavers can have a higher upfront cost than some basic materials, they are a smarter long-term investment. Their incredible durability means you won’t be spending money on frequent repairs or replacements. Plus, they are so low-maintenance (no sealing required) that you save time and money on upkeep year after year. You are paying for a beautiful surface that will last for decades.

My roof has a slight slope for drainage. How do you create a level surface with pavers? This is a common and important consideration for any rooftop project. We use an adjustable pedestal system that elevates the pavers off the roof’s surface. These pedestals can be individually adjusted for height, allowing us to create a perfectly level and stable floor over the existing slope. This method also has the added benefit of allowing water to drain freely underneath, protecting your roof membrane.

Can I install rooftop pavers myself to save money? A rooftop installation is much more complex than a simple ground-level patio. It involves critical factors like structural weight limits, waterproofing, and specific building codes that protect your home’s integrity. Because of these safety and structural risks, this is one project that should always be left to experienced professionals who understand the unique technical requirements.

How do porcelain pavers handle Long Island’s harsh winters? Porcelain pavers are exceptionally well-suited for our climate. Because they are non-porous, they absorb very little water. This is a huge advantage during our freeze-thaw cycles, as it prevents the pavers from cracking under the pressure of expanding ice. Their durability ensures they will withstand cold winters and hot summers without fading or deteriorating.

Share this page:
Custom swimming pool and backyard patio by East West Pools, a Gappsi Group division.

Your Guide to East West Pools by Gappsi Group

A new swimming pool is the heart of a dream backyard, but creating a truly stunning outdoor oasis involves more than just the water. It’s about how the pool integrates with your patio, your landscaping, and your home’s overall style. Juggling different contractors for masonry, design, and installation can be a major headache. That’s why we offer a complete, all-in-one solution. As a full-service design and construction company, we see the bigger picture. Our dedicated team, East West Pools, Gappsi Group Swimming pool Division, specializes in crafting the perfect pool while our other in-house experts design the surrounding environment, ensuring every element works together in perfect harmony for a cohesive and beautiful result.

Key Takeaways

  • Work with One Expert Team for Everything: Gappsi provides a single, reliable partner for your entire project. Our specialized pool division handles the water, while our comprehensive teams design the surrounding patio, landscaping, and other features for a seamless result.
  • Customize Your Pool to Fit Your Lifestyle: You can choose the right pool type for your family, whether it’s a flexible gunite, versatile vinyl, or low-maintenance fiberglass design. We then help you integrate custom features like waterfalls or safety covers to create a space that is uniquely yours.
  • Enjoy a Stress-Free Construction Process: We manage the entire project from start to finish, which includes securing all necessary permits and providing a clear timeline. This allows you to relax and watch your vision come to life without the usual headaches.

What is East West Pools?

If you’ve been researching pool builders on Long Island, you may have come across the name East West Pools. Simply put, East West Pools is the dedicated, expert swimming pool division of Gappsi. It’s our specialized team of designers, builders, and technicians who live and breathe pool construction. When you partner with us for a pool project, you get the focused expertise of the East West Pools team, backed by the comprehensive home improvement power and reputation of the entire Gappsi family. This structure allows us to provide an incredibly specialized service while still offering a seamless, all-in-one solution for your entire backyard transformation. You get the best of both worlds: a dedicated pool expert and a master backyard contractor.

This approach means you don’t have to juggle multiple companies for one project. Your pool construction is managed under one roof, ensuring clear communication and a cohesive design that integrates perfectly with your patio, landscaping, and other outdoor features. We created East West Pools to give our clients a boutique experience focused solely on creating the perfect pool, while still providing the stability and wide-ranging capabilities that Gappsi is known for. It’s our way of guaranteeing that every detail of your pool, from the initial sketch to the first swim, is handled with the highest level of professional care and attention.

Meet Gappsi’s Expert Pool Division

Our East West Pools team is who you’ll work with to bring your dream pool to life. We design and build custom swimming pools for clients all across Long Island, New York. The process is entirely collaborative. Our expert team works closely with you to create a design that is a perfect fit for your property’s unique layout and your family’s lifestyle. Whether you’re dreaming of a serene retreat for quiet afternoons or a vibrant hub for summer parties and family fun, we tailor every element to match your vision. We handle everything, ensuring your new pool is a beautiful and functional centerpiece for your home.

Over 30 Years of Pool Building Excellence

Experience matters, especially with a project as significant as a new pool. Gappsi has been creating beautiful and functional outdoor living spaces since 1987. With over three decades in the industry, we have established a solid reputation for quality, artistry, and craftsmanship in pool building. This long history means we’ve seen it all and have refined our processes to deliver outstanding results every time. Our commitment has always been to enhance the homes and lives of our clients. That legacy of excellence is the foundation upon which every single Gappsi pool is built, giving you peace of mind and a backyard you’ll love for years.

What Types of Pools Do We Build?

Choosing the right type of pool is one of the biggest decisions you’ll make for your backyard. At Gappsi, we want you to have all the information you need to pick the perfect fit for your family, lifestyle, and property. We specialize in three main types of in-ground pools: gunite, vinyl liner, and fiberglass. Each one offers unique benefits, from complete design freedom to speedy installation and easy upkeep. Our team is here to walk you through the options and help you find the pool that will bring your backyard vision to life. Let’s explore what makes each type special.

Custom Gunite Pools

If you can dream it, we can build it with gunite. These pools are constructed with a rebar framework and a sprayed concrete mixture, giving you unlimited possibilities for shape, size, and depth. This flexibility makes gunite the ideal choice for complex, high-end projects. We often design our custom swimming pools to seamlessly integrate with other backyard features, like attached spas, cascading waterfalls, tanning ledges, and even outdoor kitchens. Gunite pools are incredibly durable and built to last, creating a permanent, beautiful centerpiece for your outdoor living space that will be enjoyed for generations.

Versatile Vinyl Liner Pools

Vinyl liner pools are a fantastic and popular option, offering a great balance of beauty, comfort, and value. These pools are built with a durable vinyl membrane that fits perfectly into a prepared structure, providing a silky-smooth surface that’s gentle on your feet. One of the best things about vinyl liners is the sheer variety of colors and patterns available, allowing you to customize the look of your water. We not only build new vinyl liner pools but also specialize in pool renovations, which can include converting an older gunite pool to a modern vinyl liner system. They are a versatile choice for any Long Island backyard.

Low-Maintenance Fiberglass Pools

For homeowners who want a stunning pool without the extensive upkeep, fiberglass is an excellent choice. These pools are crafted from a pre-molded fiberglass shell that is delivered to your home and set in place, making for a remarkably fast installation, often in just a few days. The smooth, non-porous surface of a fiberglass pool is its superpower. It naturally resists algae growth, which means you’ll spend less time cleaning and more time swimming. This surface also requires fewer chemicals to maintain water balance. You can see examples of our efficient installations on our YouTube channel, where we showcase our projects from start to finish.

Why Choose Gappsi for Your Pool Project?

Choosing the right partner to build your swimming pool is one of the most important decisions you’ll make for your home. It’s not just about digging a hole and filling it with water; it’s about creating a beautiful, functional, and safe centerpiece for your backyard that will bring joy for years to come. A pool is a significant investment, and the process can feel overwhelming. You need a team you can trust to handle every detail with care, from the initial design concepts to the final, sparkling finish. At Gappsi, we understand this completely. We’ve spent over 30 years helping Long Island homeowners create their dream backyards, and we know what it takes to deliver an exceptional experience. We combine our deep expertise with a genuine passion for design and an unwavering commitment to quality that sets us apart. Our approach is built on four key pillars: custom design, seamless project management, high-quality materials, and superior workmanship. By focusing on these areas, we make the entire process smooth, transparent, and rewarding for you. We don’t just build pools; we build relationships and create outdoor living spaces where memories are made.

Custom Designs and Full Backyard Transformations

Your backyard should be a reflection of your lifestyle, and your pool is the main attraction. We don’t believe in one-size-fits-all solutions. Instead, we specialize in creating custom swimming pools that are perfectly tailored to your space and your family’s needs. Whether you envision a classic rectangular pool for swimming laps or a freeform oasis with cascading waterfalls, our design team works with you to bring that dream to life. We look at the bigger picture, designing complete backyard transformations that integrate your new pool with patios, landscaping, and outdoor living areas. The result is a cohesive and stunning environment where every element works in harmony.

Seamless Project Management and Permitting

One of the biggest challenges of any major home improvement project is coordinating different contractors. With Gappsi, that stress disappears. We are a comprehensive design and construction company, which means our in-house teams handle everything from the initial excavation and masonry to the final landscaping touches. This integrated approach ensures a smooth workflow, consistent quality, and a single point of contact for you throughout the project. We also manage the entire permitting process, which can often be complex and time-consuming. Our experience with local regulations means we can secure the necessary approvals efficiently, keeping your project on track and saving you the headache.

High-Quality Materials and Automated Safety

A beautiful pool should also be a safe and efficient one. We build with only the highest quality materials, from durable gunite and vinyl liners to elegant porcelain and natural stone pavers for your pool deck. Our commitment to quality extends to the features we recommend, especially when it comes to safety. We are strong advocates for automatic retractable safety covers, which provide peace of mind for families with children and pets. These covers not only secure your pool when it’s not in use but also help conserve heat, reduce water evaporation, and minimize chemical usage, saving you money in the long run.

Lasting Durability and Superior Workmanship

A Gappsi pool is an investment in your home and your family’s happiness, and we build it to last. With over 30 years of experience, our team’s craftsmanship is second to none. We pride ourselves on our meticulous attention to detail and our unwavering commitment to building structures that stand the test of time. Our clients consistently praise our professionalism, trustworthiness, and the quality of our work. We combine proven construction techniques with modern technology to deliver a pool that is not only beautiful on day one but remains a source of pride and enjoyment for decades.

What Other Services Does Gappsi Offer?

While we’re known for creating stunning swimming pools, our expertise doesn’t stop at the water’s edge. We see your home as a complete canvas, and our goal is to help you create a seamless, beautiful, and functional space both inside and out. Think of us as your single partner for a total home transformation. From lush garden designs to cozy indoor retreats, we offer a full range of services to bring your entire vision to life, ensuring every element works together in perfect harmony.

Landscaping and Outdoor Living

A beautiful pool deserves an equally beautiful setting. We specialize in creating cohesive backyard environments where the pool is the centerpiece of a larger outdoor living area. Our team can design and build everything you need to complete your oasis, including elegant patios perfect for lounging and custom outdoor kitchens for entertaining. We handle all the details of your landscape design, from planting lush gardens to installing ambient lighting, ensuring your new backyard is a true extension of your home. A thoughtful landscape not only frames your pool beautifully but also creates distinct zones for dining, relaxing, and playing.

Home Remodeling and Masonry

Our passion for design and quality craftsmanship extends into your home. We offer comprehensive home remodeling services to create a smooth transition from your indoor spaces to your outdoor retreat. Whether you’re dreaming of a new kitchen that opens onto the patio or a bathroom that feels like a spa, we can make it happen. Our expert masonry team also crafts stunning stone features, including fireplaces, walkways, and retaining walls that add timeless character and value to your entire property. This unified approach ensures the style of your home flows effortlessly from the inside out.

Game Courts and Pavilions

Ready to make your backyard the ultimate destination for fun and relaxation? We design and install custom Sports Games Courts for families who love to stay active, providing a perfect space for everything from basketball to pickleball. To round out your entertainment options, consider adding one of our beautiful pavilions or pergolas. These structures offer a stylish, shaded retreat for hosting gatherings, dining outdoors, or simply relaxing by the pool. They create a defined “outdoor room” that makes your yard more versatile and enjoyable for family and friends throughout the seasons.

Saunas and Restoration

Bring the spa experience home with a personal sauna. We offer a variety of options, from traditional outdoor barrel saunas to modern indoor infrared models, creating a perfect sanctuary for wellness and relaxation right on your property. Beyond new installations, we are also here to care for your existing outdoor features. Our restoration and sealing services can breathe new life into weathered patios and pool surrounds. We also handle major projects like converting gunite pools to vinyl, ensuring your backyard investments remain beautiful and functional for years to come.

How Does Our Pool Construction Process Work?

Bringing a new swimming pool to life is an exciting process, and our goal is to make it as smooth and enjoyable as possible for you. We’ve refined our construction process over decades to ensure every project is managed with precision, transparency, and a deep respect for your home and vision. From the first sketch to the first swim, we handle every detail so you can focus on the fun parts. Our approach is built on clear communication and collaboration, ensuring you’re informed and confident at every stage.

We break the journey down into three main phases: design, planning, and installation. It all starts with a conversation where we listen to your ideas and help shape them into a functional, beautiful design. Next, our team manages all the technical details, including securing permits and creating a realistic project timeline. Finally, our skilled craftsmen get to work, building your pool with the highest quality materials and attention to detail. As a full-service home improvement company, we see your pool as the centerpiece of a complete backyard transformation, and our process reflects that holistic vision. We coordinate everything, so you have one trusted partner from start to finish.

Your Initial Consultation and Design

Everything begins with your vision. During our initial consultation, we sit down with you to understand exactly what you’re looking for in a backyard pool. We discuss how you plan to use the space, your aesthetic preferences, and your budget. As a company that designs and builds custom swimming pools across Long Island, we specialize in creating unique designs tailored to your property and lifestyle. Our designers will help you visualize the final result with detailed plans, showing you how the pool will integrate with your home and landscape. This is also when we’ll explore materials, from the pool’s interior finish to the beautiful porcelain and natural stone options for your patio and coping.

Handling Permits and Project Timelines

One of the most complex parts of any major home improvement project is dealing with the paperwork. We take that entire burden off your shoulders. Our experienced team handles the process of securing all necessary building permits from your local town or village, ensuring your project complies with all safety codes and regulations. Once the permits are approved, we establish a clear and detailed project timeline. We believe in keeping you informed every step of the way, so you’ll always know what’s happening and what to expect next. Our project managers provide regular updates, making the entire process feel organized and completely under control.

Final Installation and Quality Checks

This is where your vision truly comes to life. Our construction crews are masters of their craft, and they work efficiently and respectfully to build your pool to the highest standards. From the initial excavation to the final plumbing and electrical work, every step is executed with precision. Because we are a full backyard design company, we ensure the pool installation fits perfectly within the larger landscape design. Before we consider the project complete, we conduct a series of rigorous quality checks to ensure every feature is working perfectly and the entire installation is flawless. We’ll walk you through your new pool, show you how to operate the equipment, and make sure you are 100% satisfied.

What Pool Features and Upgrades Can You Add?

A swimming pool is the heart of your backyard, but the features you add are what truly bring it to life. Think of your pool as the foundation and the upgrades as the details that reflect your personal style and how you want to live. At Gappsi, we don’t just build pools; we create complete, cohesive outdoor environments. We see every project as an opportunity to design a space that flows seamlessly from your home to your patio and into the water. Whether you dream of a serene, spa-like retreat or a fun-filled family resort, the right features can make all the difference.

From the soothing sound of a waterfall to the convenience of a fully automated system, we can help you explore all the possibilities. We specialize in integrating custom elements that enhance both the beauty and functionality of your swimming pool. This includes everything from dramatic lighting and integrated spas to practical additions like heaters and automatic safety covers. Our design process is all about understanding your vision and then bringing it to life with high-quality materials and expert craftsmanship. We can incorporate unique finishes, built-in sundecks, and even thrilling slides to match your family’s lifestyle. Let’s look at some of the most popular features you can add to create your perfect backyard oasis.

Water Features and Custom Lighting

Water features and lighting are what transform a beautiful pool into a breathtaking one. Imagine the gentle sound of a waterfall cascading over natural stone, or sleek deck jets creating elegant arcs of water across the surface. These elements add movement, sound, and a touch of luxury to your backyard. We can design anything from a thrilling waterslide for the kids to a tranquil sundeck for lounging.

Custom lighting extends the enjoyment of your pool long after the sun goes down. Modern LED systems can illuminate your pool with a spectrum of colors, allowing you to set the mood for a quiet evening swim or a lively backyard party. By combining these features with thoughtful landscape design, we create an immersive experience that feels like your own private resort.

Pool Heating and Automation

Why limit your swim season to just a few months? A pool heater is one of the most practical upgrades you can make, allowing you to comfortably enjoy the water from early spring through late fall. It maximizes your investment and gives you more time to make memories with family and friends.

Pool automation adds another layer of convenience, making pool ownership simpler than ever. With a modern control system, you can manage everything from your smartphone or tablet. Adjust the temperature, turn on the lights, activate the spa jets, and monitor your water chemistry with just a few taps. This technology takes the daily work out of owning a swimming pool, so you can spend less time on maintenance and more time relaxing.

Automatic Safety Covers

An automatic safety cover is one of the most important features you can add to your pool, offering both peace of mind and long-term savings. For families with children or pets, it provides an essential layer of protection by creating a barrier that completely seals off the water’s surface when the pool is not in use.

Beyond safety, these covers are a smart financial investment. They significantly reduce water evaporation, which saves on water bills. They also help retain heat, lowering your heating costs and keeping your pool warmer naturally. By keeping leaves, dirt, and other debris out, an automatic cover reduces the time you spend cleaning and the amount of chemicals you need. It’s a feature that protects your family and your investment.

What Are Our Customers Saying?

Choosing a partner for a major home project like a new pool is a big decision. While we can tell you all about our process and quality, sometimes the most helpful insights come from homeowners who have already worked with us. We’re proud of the relationships we build and the backyards we transform. Here’s what some of our clients have to say about their experience with the Gappsi team.

Our Quality and Attention to Detail

When you invest in a custom pool, you want every detail to be perfect. We believe that exceptional results come from a hands-on approach. Our clients often tell us they appreciate this focus. One homeowner shared, “What was most impressive about working with Gappsi was the level of attention to detail Giuseppe personally put into while his company had many big jobs.” This commitment means we treat every project, big or small, with the same high standard of care, ensuring your final oasis is exactly as you envisioned it. You can read more customer testimonials to see what others have experienced.

Our Commitment to Service and Reliability

A smooth and stress-free process is just as important as the final product. We aim to provide clear communication and dependable service from your first consultation to the final walkthrough. A happy customer noted, “If you’re looking for a company that delivers top-notch workmanship, fair pricing, and exceptional customer service, I highly recommend The Gappsi Group.” For us, great service means being a reliable partner you can trust to bring your vision to life. We manage all the moving parts so you can simply get excited for your new swimming pool.

Ensuring Your Long-Term Satisfaction

Your backyard is meant to be enjoyed for years, so we build our pools and patios to last. We use high-quality materials and proven construction techniques to ensure your investment stands the test of time. One of our long-time clients said, “Gappsi installed my patio and pool deck about 15 years ago and it still looks as good as the day it was installed.” This kind of lasting quality is our goal for every project. We want you to feel confident that your beautiful new space will be the backdrop for family memories for many seasons to come.

How Much Does a Gappsi Pool Cost?

One of the first questions on everyone’s mind is, “What will my new pool cost?” While there isn’t a single price tag, understanding the factors that shape the final cost helps you plan your budget. The total investment for your Gappsi swimming pool depends entirely on your vision. Everything from the pool’s size and shape to the materials for the surrounding patio and any custom features will play a role. We believe in complete transparency and want you to feel confident and informed. Our team is here to guide you through the process, ensuring your project aligns with your financial comfort zone.

What Determines Your Pool’s Price?

Your pool’s final price is a reflection of your personal choices. Key factors include the type of pool you select, its dimensions, and the design’s complexity. The materials for your patio and coping also have a big impact. Beyond the pool itself, the equipment you choose is a significant part of the budget. For instance, Gappsi can provide you financing on all your pool equipment from our house brand, Jandy. Another option to consider is using home equity to fund your project. These choices give you control over the final cost and functionality of your new backyard.

Our Financing and Payment Options

We know a new pool is a significant investment. To make the process more manageable, we offer flexible payment solutions. As we often explain to our clients, Gappsi offers financing options for pool and home improvement projects. This financing allows you to get started on your project without paying the full cost up front. Our goal is to help you bring your vision to life on a timeline and budget that feels comfortable for you and your family, so you can start enjoying your new space sooner.

Ask About Current Promotions

Before finalizing your plans, it’s always a great idea to check in with us about any special offers. We encourage you to ask about current promotions when you connect with our design team. These specials can provide extra savings or unique financing opportunities that make adding that extra feature, like custom lighting or a waterfall, even more attainable. We’re always happy to share the latest deals to help you get the most value from your investment in a beautiful Gappsi pool project.

Do You Offer Pool Maintenance and Renovations?

Absolutely. A swimming pool is a long-term addition to your home, and our relationship with you doesn’t end once the construction is complete. We’re here to help you keep your pool in pristine condition for years to come, whether that means giving it a modern facelift or providing guidance on seasonal upkeep. We believe in protecting your investment and ensuring your backyard oasis remains a source of joy and relaxation for your family.

Pool Renovations and Conversions

Is your existing pool showing its age or no longer matching your style? We specialize in comprehensive pool renovations that breathe new life into outdated designs. We can transform your space with modern features, new finishes, and even structural changes. For example, we can convert an old gunite pool to a beautiful, low-maintenance vinyl liner pool, giving you a fresh look without a complete rebuild. A renovation is also the perfect opportunity to reimagine your entire backyard. We can integrate your updated pool with a stunning new patio, an outdoor kitchen, or lush landscaping to create a completely cohesive and functional outdoor living area.

Seasonal Care and Equipment Service

Proper care is essential for protecting your pool and keeping it clean and safe through every season. We highly recommend automatic retractable safety covers, which are fantastic for keeping out leaves and debris, reducing your cleaning time significantly. They also provide an essential layer of security for your family. To ensure your pool weathers the winter months, it’s important to check on your cover about once a month. Make sure snow or water isn’t accumulating too heavily, and double-check that the cover’s pump is working correctly to drain excess moisture. This simple, proactive approach helps prevent damage and ensures your pool is ready to go when warm weather returns.

Related Articles

Frequently Asked Questions

Do I work with Gappsi or East West Pools for my project? You get the expertise of both. East West Pools is our dedicated swimming pool division, so you’ll work directly with these specialists to design and build your perfect pool. At the same time, your project is managed under the Gappsi name, giving you access to our full range of services and the assurance of our 30-year reputation. This structure provides the focused skill of a boutique pool builder with the comprehensive power of a full-service home improvement company.

How do I choose the right type of pool for my family? The best choice really depends on your priorities. If you want complete creative freedom for a one-of-a-kind shape with features like built-in spas or tanning ledges, a gunite pool is your answer. For a great balance of design variety and value with a smooth, comfortable surface, a vinyl liner pool is a fantastic option. If your main goals are a speedy installation and the lowest possible maintenance, a pre-molded fiberglass pool is an excellent choice.

Why is it better to have one company handle my pool, patio, and landscaping? Using one company for your entire backyard transformation creates a seamless and stress-free experience. It ensures a cohesive design where your pool, patio, and plantings all work together beautifully. More importantly, it means you have a single point of contact. You won’t have to coordinate schedules between a pool builder, a mason, and a landscaper. Our integrated team handles everything, which prevents delays and communication issues, leading to a smoother project from start to finish.

What does the timeline for a pool project typically look like? The total timeline can vary depending on the type of pool you choose, the complexity of the design, and the local permitting process. The initial design and approval phase is the first step. Once permits are secured, the actual construction can begin. A fiberglass pool installation can be quite fast, while a custom gunite project will take longer. We provide a clear and detailed timeline for your specific project once the design is finalized so you know exactly what to expect.

What are the main benefits of an automatic safety cover besides security? While providing peace of mind is its most important job, an automatic cover offers incredible practical benefits. It saves you money by significantly reducing water evaporation and chemical use. It also acts like a giant solar blanket, retaining heat to lower your heating costs and naturally keep the water warmer. Finally, it keeps your pool much cleaner by preventing leaves and debris from falling in, which means you’ll spend a lot less time skimming and more time swimming.

Share this page:
Outdoor kitchen design by Long Island contractors featuring blue cabinetry, a stainless grill, and poolside seating.

How to Vet Outdoor Kitchen Contractors on Long Island

Building a true outdoor kitchen is far more complex than setting up a grill on a patio. A fully functional space requires careful planning for gas lines, electrical wiring, and plumbing, all of which must meet strict local building codes. It also involves expert masonry, proper site grading for drainage, and selecting materials that won’t crack or fade after one Long Island winter. This is where a professional makes all the difference. The most skilled outdoor kitchen designers contractors Long Island NY act as your project’s central command, coordinating every trade and technical detail seamlessly. This guide breaks down what a great contractor actually does, so you can find a partner who can handle the complexity with ease.

Key Takeaways

  • Partner with a full-service contractor: The right professional will guide you through every phase, from creating a custom design and handling utility hookups to seamlessly integrating the new kitchen with your existing landscape.
  • Focus on long-term value, not just price: Select durable, weather-resistant materials that can handle Long Island’s seasons, and insist on a detailed, itemized quote that accounts for all costs, including permits and utilities, to avoid unexpected expenses.
  • Thoroughly vet every potential contractor: Protect your investment by verifying their license and insurance, reviewing a portfolio of their completed outdoor kitchens, and checking recent customer reviews on independent websites before making a final decision.

What Does an Outdoor Kitchen Contractor Actually Do?

Before you hire someone to build your dream outdoor kitchen, it helps to know what a great contractor actually brings to the table. Their job goes far beyond just stacking stones and installing a grill. A true professional manages every detail, from the first sketch to the final cleanup, ensuring your project is beautiful, functional, and built to last. Understanding their full scope of work will help you ask the right questions and find the perfect partner for your Long Island home.

Custom Design and Planning

This is where your vision starts to become a reality. A skilled contractor works with you to create a detailed blueprint for your outdoor kitchen. They’ll help you think through the layout, making sure there’s a natural flow between the grill, sink, prep areas, and seating. They consider everything from the size of your space to how you plan to use it. This collaborative process ensures the final design is not only stunning but also perfectly tailored to your cooking and entertaining style, turning your initial ideas into a workable plan.

Construction and Installation

Once the design is finalized, your contractor gets to work on the physical build. This phase involves everything from preparing the site and pouring a foundation to constructing the kitchen’s framework. They handle all the masonry work, whether you’ve chosen natural stone, brick, or modern porcelain pavers. A reputable contractor uses expert craftsmanship to ensure every element is level, secure, and built to withstand Long Island’s weather. They manage the entire construction process, coordinating materials and labor to bring the design to life right in your backyard.

Appliance and Utility Hookups

An outdoor kitchen is more than just a pretty structure; it needs power, water, and gas to function. A qualified contractor manages these critical connections safely and correctly. This includes running electrical lines for refrigerators, lighting, and outlets, as well as plumbing for sinks and gas lines for grills and side burners. They understand local building codes and ensure all utility hookups are done to standard, preventing future problems. This technical expertise is non-negotiable, as it guarantees your kitchen is not only convenient but also completely safe for your family and friends to enjoy.

Landscaping and Hardscape Integration

The best outdoor kitchens look like they’ve always been a part of the backyard. A great contractor doesn’t just build a standalone island; they integrate it seamlessly with your existing environment. This means matching new patios and walkways with your current hardscaping and ensuring the kitchen complements your overall landscape design. They can help you choose materials and a layout that create a cohesive outdoor living area. This thoughtful integration transforms your project from a simple cooking station into a true extension of your home.

How to Choose Materials and Features for Your Outdoor Kitchen

Once you have a vision for your outdoor kitchen, the next step is bringing it to life with the right materials and features. This is where function meets style. Your choices will determine not only how your kitchen looks but also how well it holds up to the elements and how much you enjoy using it. Think about durability, your personal cooking style, and the overall aesthetic you want to create in your backyard oasis.

Pick Weather-Resistant Materials for Long Island’s Climate

Living on Long Island means we get to enjoy all four seasons, but our outdoor spaces have to endure them, too. From humid summer days to freezing winter nights, your kitchen materials need to be tough. Opting for weather-resistant surfaces is one of the smartest investments you can make. For countertops, materials like granite, quartzite, and high-quality porcelain pavers are excellent choices because they resist staining, fading, and cracking. The kitchen’s base should be just as durable. A structure built with concrete block and finished with stone veneer is a classic, long-lasting option that our masonry experts often recommend to handle anything our climate throws at it.

Select Essential Appliances and Features

The heart of any kitchen is its appliances, and an outdoor kitchen is no different. Think about how you love to cook. Are you a classic grill master, or do you dream of pulling a perfect pizza from a wood-fired oven? Your cooking style should guide your appliance selection. A high-performance built-in grill is a must-have for most, but you can also add features like a side burner for sauces, a smoker for ribs, or an outdoor-rated refrigerator to keep drinks cold. Don’t forget practical elements like a sink for easy cleanup and stainless steel drawers for storage. Investing in quality, outdoor-rated appliances from the Gappsi Store ensures they’ll perform beautifully for years to come.

Explore Popular Design Trends and Smart Tech

Your outdoor kitchen should be an extension of your home’s style. A popular trend right now is mixing materials to create visual interest, like pairing sleek stainless steel appliances with the rustic texture of natural stone. You can also incorporate smart technology for added convenience and ambiance. Imagine adjusting your landscape lighting from your phone or playing your favorite playlist through integrated, weatherproof speakers. Even the structures that house your kitchen can make a statement. A custom pavilion or pergola not only provides shelter but also adds an architectural element, creating a true outdoor room that feels both functional and inviting.

Consider Sustainable and Modular Designs

Creating a beautiful outdoor space can also be an eco-conscious choice. Sustainable design is becoming more popular, focusing on using recycled or locally sourced materials and energy-efficient features like solar-powered lighting. Another smart approach is a modular design. Modular outdoor kitchens offer flexibility, allowing you to create a custom layout that perfectly fits your space and needs. This approach can also be more efficient, sometimes reducing construction time and waste. A thoughtful design doesn’t need a massive footprint to be highly functional. With smart planning, even a more compact kitchen can provide all the features you need for incredible outdoor entertaining, reflecting the same care we put into our home remodeling projects.

How to Find the Right Outdoor Kitchen Contractor on Long Island

Choosing the right contractor is the most critical decision you’ll make for your outdoor kitchen project. This is the team that will turn your vision into a reality, so you want to find a partner you can trust. A great contractor brings not only technical skill but also design expertise, clear communication, and a commitment to quality. Taking the time to properly vet your options will save you from headaches down the road and ensure your new space is everything you dreamed it would be. Here’s a straightforward guide to finding the best outdoor kitchen builder for your Long Island home.

Review Their Experience and Portfolio

Before you even pick up the phone, take a good look at a contractor’s past work. A robust portfolio is more than just a collection of pretty pictures; it’s proof of their experience, quality, and design versatility. Look for a wide range of projects that show they can handle different styles and scales. A contractor with a deep portfolio has likely encountered and solved a variety of construction challenges. Also, pay attention to the materials and appliance brands they use. A top-tier contractor will have access to a diverse selection of high-quality porcelain and natural stone and won’t push you toward a single brand just because it’s easier for them.

Verify Licensing and Insurance

This step is non-negotiable. One of the biggest mistakes homeowners make is failing to confirm that a contractor is properly licensed and insured. In New York, specific licenses are required for home improvement contractors, and this ensures they meet local and state standards. More importantly, proper insurance protects you from liability if an accident happens on your property during construction. Don’t just take their word for it. Ask for copies of their license and certificates of insurance, and make sure they are current. You can verify a license with your local county office to be absolutely certain you’re working with a legitimate professional.

Assess Their Communication and Project Style

A successful project depends on clear and consistent communication. From the very first conversation, pay attention to how a contractor interacts with you. Are they responsive to your calls and emails? Do they listen to your ideas and answer your questions thoroughly? A great partner will walk you through their process, set realistic timelines, and be transparent about budget management. During your consultation, ask how they handle unexpected issues or changes to the plan. Understanding their project style and problem-solving abilities upfront will help you feel confident and informed every step of the way. This is especially important for complex home remodeling projects that involve multiple stages.

Read Customer Reviews and Testimonials

Customer reviews offer a real-world glimpse into what it’s like to work with a contractor. While it’s helpful to read testimonials on their website, be sure to check third-party platforms like Google, Houzz, and Yelp for a more balanced perspective. Look for patterns in the feedback. Do clients consistently praise their craftsmanship, professionalism, and reliability? How does the contractor respond to any negative comments? Seeing how they handle criticism can be just as telling as a five-star review. You can also check for video testimonials, which often provide a more personal and detailed account of a client’s experience with projects you can watch on YouTube.

Avoid Common Hiring Mistakes

A great contractor will help you steer clear of common pitfalls. Many outdoor kitchen mistakes stem from poor planning, like underestimating the space needed or choosing materials that can’t withstand Long Island’s weather. A seasoned professional will guide you through these decisions, ensuring you don’t overlook crucial utilities like plumbing, gas, and electrical lines. Be wary of any contractor whose main selling point is an unusually low price. While budget is important, choosing a builder based on the lowest bid often leads to cut corners, subpar materials, and a final product that doesn’t last. Instead, focus on value and expertise to ensure your investment in an outdoor kitchen is a lasting one.

How Much Does an Outdoor Kitchen Cost on Long Island?

Pinning down an exact price for an outdoor kitchen is tricky because every project is unique. The final cost depends on a mix of factors, from the size of your space to the appliances you choose. Think of it like building a custom home, but for your backyard. A simple setup with a built-in grill and some counter space will cost significantly less than a gourmet kitchen with a pizza oven, refrigerator, and sink. At Gappsi, we believe in transparency, which is why we work with you to create a detailed plan that aligns with your vision and your budget, ensuring there are no surprises along the way.

Understand What Affects the Price

The biggest drivers of your outdoor kitchen’s cost are its size, the materials you select, and the appliances you install. A larger kitchen with more counter space will naturally require more materials and labor. High-end finishes like granite countertops or custom stone veneers will also influence the price compared to more standard options. Most outdoor kitchen mistakes stem from poor planning or underestimating costs, especially when it comes to overlooking utilities. We can help you select durable, weather-resistant porcelain and natural stone that looks incredible and stands up to Long Island’s climate, giving you the best value for your investment.

Get Accurate Quotes and Estimates

When you start getting quotes, look for clarity and detail. A vague estimate that doesn’t mention utilities or permits is a major red flag. A trustworthy contractor will provide an itemized proposal that breaks down the costs for every component: labor, materials, appliances, and any necessary site work. This transparency is key to managing your budget effectively. You should always ask to see examples of outdoor kitchens they’ve built. A detailed quote from an experienced masonry designer not only gives you a clear financial picture but also reflects the contractor’s professionalism and attention to detail, setting the stage for a smooth project from start to finish.

Budget for Upgrades and Add-Ons

It’s easy to get excited and want every possible feature, but it’s smart to prioritize. Start by creating a detailed blueprint of your ideal space, considering the placement of essentials like the grill, countertops, and storage. Then, think about the add-ons that would truly enhance your experience. Do you dream of a wood-fired pizza oven or a full-service bar? What about a sound system or custom lighting? You might also want to include a covered structure like one of our custom pavilions and pergolas for shade and comfort. Planning for these upgrades from the beginning, even if you add them later, can save you money on future construction.

Plan for Permits and Utility Costs

Beyond the visible elements like grills and countertops, there are essential background costs to consider. Hooking up gas lines, plumbing for a sink, and electrical wiring for refrigerators and lighting all require licensed professionals and local permits. These are not areas to cut corners on. Proper site preparation is also critical; for example, you need to ensure proper grading to direct water away from the structure. An experienced home improvement company will manage all these details, from securing permits to coordinating with electricians and plumbers, ensuring your outdoor kitchen is not only beautiful but also safe and fully compliant with local codes.

How to Vet Potential Contractors

Once you have a list of potential contractors, it’s time to do your homework. Choosing the right partner for your outdoor kitchen project is just as important as picking the right materials. This vetting process is your chance to look beyond the sales pitch and find a team that is reliable, skilled, and a good fit for your vision. A great contractor will be transparent, experienced, and able to guide you through every step with confidence. Taking the time to thoroughly check their background, ask detailed questions, and look for any potential red flags will save you from headaches down the road and ensure your project is a success. Think of it as building the foundation for a great working relationship.

Use Online Reviews and Local Resources

Before you pick up the phone, start with a simple online search. Reading through online reviews can give you a clear picture of what past clients have experienced. Look for patterns in the feedback. Do people consistently praise the contractor’s communication and professionalism? Did they stick to the timeline and budget? A contractor’s digital footprint is a great first impression. You can also check out their project galleries and videos to see the quality of their work firsthand. Don’t just look at the finished product; pay attention to the details and craftsmanship shown in their YouTube videos and portfolio. This initial research helps you create a shortlist of contractors who have a proven track record of happy clients.

Ask These Questions During Your Consultation

Your consultation is more than just getting a quote; it’s an interview. Come prepared with a list of questions to understand their process and expertise. Ask about their experience building outdoor kitchens specifically on Long Island and what materials they recommend for our climate. A well-versed contractor should be able to discuss the pros and cons of different options, from durable porcelain pavers for your patio to the best countertops for outdoor use. Inquire about their access to different appliance brands and whether they handle all aspects of the project, including plumbing and electrical work. This conversation will reveal their depth of knowledge and help you gauge if they can truly bring your vision to life.

Watch Out for These Red Flags

As you speak with contractors, keep an eye out for warning signs. A major red flag is a contractor who can’t show you a portfolio of outdoor kitchens they’ve personally built. If they’re hesitant to share examples or references, it’s best to move on. Be cautious of vague estimates that don’t break down the costs or fail to mention necessary permits and utility work. High-pressure sales tactics or demands for a large upfront cash payment are also causes for concern. A professional and trustworthy contractor will provide a detailed, transparent quote and will never pressure you into making a quick decision. Trust your gut; if something feels off, it probably is.

Check Their Credentials and References

Finally, always verify a contractor’s credentials. One of the biggest mistakes homeowners make is hiring someone without the proper qualifications. Ask for proof of their license and insurance; this protects you in case of accidents or property damage. Don’t just ask for references, actually call them. Speak to a few past clients about their experience. Were they happy with the final result? Was the project completed on time and on budget? Would they hire the contractor again? A reputable company like Gappsi will be proud to provide this information. This final step confirms you’re hiring a true professional who stands by their work and values their clients.

Related Articles

Frequently Asked Questions

How long does it typically take to build an outdoor kitchen? The timeline for building an outdoor kitchen can vary quite a bit. A straightforward project might take a few weeks, while a more complex design with custom features and extensive utility work could take a couple of months. Factors like the project’s scale, material availability, and the local permit process all play a role. A professional contractor will give you a realistic schedule upfront so you know exactly what to expect.

What kind of maintenance is involved with an outdoor kitchen? The best part about a well-built outdoor kitchen is that it doesn’t require a lot of upkeep, especially when you use durable materials. Your main tasks will be routine cleaning of countertops and grill grates, just like you would with an indoor kitchen. You will also need to properly winterize the space by covering your appliances and shutting off water lines to prevent freezing. A little seasonal care goes a long way in protecting your investment for years of enjoyment.

Can an outdoor kitchen be built on my existing patio? Yes, it’s often possible to build an outdoor kitchen on an existing patio. The most important step is having a professional assess the patio’s foundation to make sure it can handle the weight of the new structure and appliances. A skilled contractor can also seamlessly integrate the new masonry with your current hardscape, making the kitchen look like it was always part of the original design.

Do I really need permits for an outdoor kitchen on Long Island? In almost every case, yes. Permits are required for projects that involve running new gas, electrical, or plumbing lines, which are essential components of a functional outdoor kitchen. This process isn’t just about following rules; it’s a critical safety measure that ensures all work is done correctly and to code. A reputable contractor will manage the entire permitting process for you, so you don’t have to worry about the paperwork.

What’s the biggest mistake to avoid when planning my outdoor kitchen? The most common mistake is underestimating the importance of a good layout. People often focus on the appliances but forget to plan for adequate counter space, storage, and a natural flow between the cooking, prepping, and social areas. This can lead to a space that looks great but is frustrating to use. Working with an experienced designer ensures your kitchen is not only beautiful but also perfectly functional for how you want to cook and entertain.

Share this page:
A contractor and client planning a custom outdoor kitchen construction project.

How to Hire a Custom Outdoor Kitchen Construction Company

A custom outdoor kitchen is a symphony of different trades. You need a designer for the layout, a mason for the structure, a plumber for the sink, and an electrician for the refrigerator and lights. For a homeowner, trying to coordinate all these moving parts can quickly become a logistical nightmare. This is where a dedicated builder comes in. They act as the conductor, ensuring every element works in harmony. Hiring a professional custom outdoor kitchen construction company isn’t just about getting the work done; it’s about having a single, accountable expert manage the entire project. This guide will help you understand what to look for in a contractor, ensuring you find a team that can deliver a seamless experience from the first sketch to the final cleanup.

Key Takeaways

  • Your builder is your project manager: A professional outdoor kitchen builder acts as your single point of contact, managing the entire project from design and material selection to permits and installation, which saves you from coordinating it all yourself.
  • Choose your partner with confidence: To find the right fit, look beyond the sales pitch. Review a company’s portfolio for specific outdoor kitchen experience, confirm they are licensed and insured, and always call past clients for honest feedback on their work.
  • Invest in materials that last: An outdoor kitchen is constantly exposed to the elements, so material choice is critical. Opt for durable, weather-resistant options like natural stone, porcelain, and stainless steel to protect your investment and minimize future maintenance.

What Does an Outdoor Kitchen Builder Do?

An outdoor kitchen builder does much more than just place a grill on your patio. Think of them as the master conductor for your entire backyard project. They are the single point of contact who manages every detail, from the initial sketch to the final cleanup. A great builder combines the skills of a designer, a project manager, a materials expert, and a construction foreman. They ensure your new outdoor living space is not only beautiful but also functional, safe, and built to last.

Hiring a professional team means you have an expert guiding you through every decision. They help you avoid common pitfalls, like poor layouts or materials that can’t withstand the elements. Their job is to handle the complex logistics, including coordinating different tradespeople like plumbers, electricians, and masons. With a dedicated home remodeling expert at the helm, you can focus on the fun parts, like planning your first cookout, instead of worrying about permits and construction schedules. They transform your vision into a tangible, high-quality addition to your home.

Designing Your Space

A great outdoor kitchen starts with a smart design. Your builder’s first role is to help you create a layout that fits your lifestyle and cooking habits. They’ll discuss how you plan to use the space, considering everything from food prep areas and appliance placement to seating and traffic flow. A functional design ensures you aren’t running back and forth to your indoor kitchen for supplies. By creating a detailed blueprint, your builder helps you visualize the final product and makes sure every inch is used effectively, creating a space that is a true extension of your home’s landscape design.

Sourcing Quality Materials

Choosing the right materials is critical for an outdoor kitchen that can handle Long Island’s weather. An experienced builder knows which materials will stand up to sun, rain, and snow. They will guide you through selecting durable options for every surface. This includes weather-resistant cabinetry that won’t warp, non-porous countertops that resist stains, and structural elements built from high-quality stone or brick. Your builder uses their industry connections to source the best porcelain and natural stone and other materials, ensuring your investment looks great for years to come.

Managing Construction and Installation

Once the design is finalized and materials are chosen, your builder takes on the role of project manager. They oversee the entire construction process, from preparing the site and pouring the foundation to the final installation. This involves scheduling and managing the entire crew, ensuring that the masonry work is solid and the appliances are installed correctly. They are on-site to solve any problems that arise and make sure the project stays on track and adheres to the blueprint. This hands-on management is what ensures a smooth process and a high-quality result.

Connecting Appliances and Utilities

One of the most technical parts of building an outdoor kitchen is connecting the utilities. Your builder is responsible for safely and correctly running gas lines for the grill, plumbing for the sink, and electrical wiring for refrigerators, lighting, and outlets. This work requires licensed professionals to ensure everything is up to code and functions properly. A professional builder manages the coordination of these specialized trades, making sure all connections are seamless and safe. This expertise is crucial for creating a fully functional outdoor kitchen where everything works at the flip of a switch or the turn of a knob.

How to Choose the Right Outdoor Kitchen Company

Choosing a company to build your outdoor kitchen is a big decision. You’re not just hiring someone to lay bricks; you’re trusting a team to create a central part of your home’s outdoor life for years to come. An outdoor kitchen is a complex project that involves much more than just setting up a grill. It requires careful planning for plumbing, gas lines, and electrical wiring, all while using materials that can withstand Long Island’s weather. The right partner will understand your vision, respect your budget, and have the specialized expertise to handle every detail, from the foundation to the final faucet. They act as your guide, helping you select the right appliances and finishes that match your lifestyle. Taking the time to properly vet potential builders is the most important step you can take to ensure your project is a success. Think of it as building a relationship as much as building a kitchen. Here’s what to focus on to find the best fit for your home.

Review Their Portfolio and Past Projects

Before you even pick up the phone, spend some time with a company’s portfolio. This is your first real look into their experience and style. You want to see a builder with a deep and specific history in creating outdoor kitchens. Look for a company that has completed at least 25 outdoor kitchens and has several years of dedicated experience. As you browse their past work, pay attention to the details. Do they showcase a variety of styles? Is the masonry work clean and precise? Do the appliances fit seamlessly into the design? A strong portfolio demonstrates not just what they can do, but also the quality and care they put into every project.

Verify Licensing and Insurance

This step is simple, but it’s one you absolutely cannot skip. Any professional and reputable outdoor kitchen builder must be fully licensed and insured in New York. Don’t be afraid to ask for proof. A license shows they meet state and local requirements to perform the work, while insurance protects you, your home, and the construction crew from any potential accidents or damage during the project. A contractor who hesitates to provide these documents is a major red flag. This is a basic requirement that ensures you are working with a legitimate business that takes its responsibility to its clients seriously.

Read Customer Reviews and Ask for References

Online reviews are a great starting point for getting a feel for a company’s reputation. See what past clients are saying on Google and other platforms. But don’t stop there. The best way to understand the client experience is to speak directly with previous customers. Ask a potential builder for a list of references you can call. When you speak with them, ask specific questions: Was the project completed on time and within budget? How did the team communicate throughout the process? How did they handle any unexpected issues that came up? Hearing firsthand accounts from other homeowners will give you invaluable insight into what it’s really like to work with their team.

Assess Their Communication Style

From the very first conversation, pay close attention to how a company communicates. Are they responsive, clear, and willing to listen to your ideas? A great builder makes you feel like a partner in the process. They should provide a detailed, written estimate that clearly breaks down the costs for labor, materials, and any potential contingencies. They should also be able to give you a realistic project schedule and explain each phase of construction. Clear and consistent communication is the key to a smooth, stress-free project. It ensures everyone is on the same page and helps prevent misunderstandings or budget surprises down the road.

Choosing the Best Materials and Appliances

An outdoor kitchen is an investment in your home and lifestyle, so selecting materials that can handle Long Island’s changing seasons is crucial. The right choices will not only look beautiful but will also stand up to sun, rain, and snow for years to come. From the countertops to the cabinets and the grill itself, every component needs to be rated for outdoor use. This ensures your kitchen remains a functional and inviting space for countless family barbecues and get-togethers.

Working with an experienced builder simplifies this process. They can guide you toward materials that fit your aesthetic and budget while offering the durability you need. For example, while some woods look great initially, they might require significant upkeep to prevent rot and warping. On the other hand, materials like stainless steel and natural stone offer incredible longevity with minimal maintenance. We help you weigh these options, explaining the pros and cons of each so you can make an informed decision. The goal is to create a kitchen that not only serves as the heart of your backyard but also endures as a lasting feature of your home.

Durable Countertops

Your countertops are the primary work surface in your outdoor kitchen, so they need to be tough. They’ll face everything from hot pans and sharp knives to spilled marinades and direct sunlight. Natural stone is an excellent choice because of its resilience. Granite and quartzite are popular options that resist heat, scratches, and stains. We also specialize in high-quality porcelain and natural stone that can be used for stunning, non-porous countertops. These materials won’t fade under UV rays and are easy to clean, keeping your kitchen looking pristine season after season.

Weather-Resistant Cabinetry

Outdoor kitchen cabinetry needs to do more than just store your tools and supplies; it has to protect them from the elements. That’s why material selection is so important. Stainless steel cabinets are a go-to for a sleek, modern look and are incredibly durable, resisting rust and corrosion. For a warmer aesthetic, you might consider marine-grade polymer cabinets, which won’t warp, fade, or crack. Choosing weather-resistant materials from the start means you can avoid the hassle and expense of replacing warped doors or rusted hardware down the line, ensuring your kitchen is usable for years to come.

Essential Grills, Sinks, and Features

The grill is the centerpiece of any outdoor kitchen, so it’s worth investing in a high-quality, built-in model. Look for stainless steel construction for maximum durability. Beyond the grill, a sink with running water is a game-changer, making food prep and cleanup so much easier. Other popular additions include outdoor refrigerators for keeping drinks cold, side burners for cooking sauces, and even pizza ovens for fun family nights. You can find a wide selection of top-tier appliances at the Gappsi Store to complete your setup and create a truly functional outdoor cooking space.

Structural Materials like Stone and Brick

The foundation of your outdoor kitchen sets the tone for its entire look and feel. The structural materials you choose, like stone, brick, or concrete, provide the base for your countertops and appliances. These materials are incredibly durable and well-suited for outdoor environments. Our expertise in masonry allows us to build a solid and beautiful structure that complements your home’s architecture. Whether you prefer the rustic charm of stacked stone or the classic appeal of brick, the right structural materials will ensure your outdoor kitchen is built to last.

The Construction Process: A Step-by-Step Guide

Once you’ve chosen a builder, the real fun begins. Understanding the construction process helps you know what to expect and ensures a smooth journey from concept to completion. A professional team will guide you through each phase, but having a roadmap makes you a more confident and prepared homeowner. Every project is unique, but they all follow a similar path involving initial planning, detailed design, necessary approvals, and the final build. Let’s walk through the typical steps of bringing your custom outdoor kitchen to life.

Initial Consultation and Site Visit

The first step is an initial consultation and a visit to your property. This is where you’ll share your vision, ideas, and budget with the project manager. They will assess your backyard space, take measurements, and discuss potential layouts and features. It’s a good idea to come prepared with inspiration photos and a list of must-have appliances. Before this meeting, a simple online search can give you insight into a contractor’s work and what’s possible. This initial conversation is all about making sure your goals align with the builder’s expertise and capabilities. It sets the foundation for a successful partnership and a beautiful final product.

Design Development and Final Selections

After the initial meeting, your builder will start creating a detailed design plan. This often includes 3D renderings that help you visualize the finished space. During this phase, you’ll make key decisions on materials, finishes, and appliances. A reputable outdoor kitchen builder should be able to show you examples of completed projects and provide a wide selection of materials. You’ll choose everything from the stone for your countertops to the type of grill you want. This is your chance to finalize every detail, ensuring the design perfectly matches your aesthetic and functional needs before any construction begins.

Permits and Local Approvals

Building an outdoor kitchen often requires permits from your local municipality. A professional contractor will handle the entire permitting process for you, from submitting the plans to scheduling inspections. They understand local building codes and regulations, ensuring your project is compliant and safe. This includes technical aspects you might not think about, like making sure there is proper grading around the outdoor kitchen to direct water away from the structure. Handling permits correctly from the start prevents costly delays and legal issues down the road, giving you peace of mind that your investment is built to last.

Construction, Installation, and Final Walk-Through

With the design approved and permits in hand, construction can begin. The crew will prepare the site, lay the foundation, and start building the structure. They will install the cabinetry, countertops, and all your chosen appliances, connecting the necessary gas, water, and electrical lines. Throughout this process, clear communication about the schedule and progress is key. Once the work is complete, you’ll do a final walk-through with the project manager. This is your opportunity to inspect every detail, ask any remaining questions, and officially sign off on your brand-new outdoor kitchen.

Key Questions to Ask a Potential Contractor

Once you have a shortlist of potential builders, it’s time to start the interview process. Asking the right questions upfront helps you find a partner who can bring your vision to life smoothly and professionally. Think of this as a two-way conversation to ensure they’re the right fit for you and your home.

Their Experience with Outdoor Kitchens

You wouldn’t hire a plumber to do your electrical work, right? The same logic applies here. Ask contractors specifically about their experience building outdoor kitchens. A seasoned pro should have a solid portfolio of completed projects and several years of focused experience. This background is important because outdoor construction involves unique challenges, like weatherproofing and proper ventilation. An experienced team will know how to handle these details, ensuring your kitchen is not only beautiful but also safe and durable. Their custom masonry work should give you a clear idea of their craftsmanship and attention to detail.

Material Sourcing and Warranties

A great outdoor kitchen is a blend of high-performance appliances and durable materials. Ask a potential contractor where they source their products. They should offer a wide selection of brands and materials, not lock you into a single option. This flexibility allows you to choose finishes and features that fit your style and budget. Gappsi, for example, offers a vast selection of porcelain and natural stone for this very reason. Also, be sure to ask about warranties. You’ll want to know what’s covered for both the materials used and the labor performed, giving you peace of mind long after the project is complete.

Project Timelines and Payment Schedules

Clear communication about timing and money is non-negotiable. Ask for a detailed written estimate that breaks down all the costs, including materials, labor, permits, and any other potential fees. This transparency helps prevent surprise expenses down the road. You should also get a clear project timeline that outlines each phase of construction, from groundbreaking to the final walk-through. A professional contractor will be able to provide a realistic schedule and explain the payment structure, so you know exactly what to expect and when.

Their Crew and On-Site Management

Knowing who will be working at your home every day can make the construction process much more comfortable. Ask the contractor about their team. Will you have a dedicated project manager? Will it be the same crew on-site from start to finish, or will different subcontractors be coming and going? Understanding the on-site plan helps set expectations for daily activity in your backyard. A consistent, professional team is often a sign of a well-managed company that values quality control and clear communication with its clients.

Common Mistakes to Avoid When Hiring a Builder

Choosing the right builder is the most critical step in bringing your dream outdoor kitchen to life. While it’s exciting to jump into design and material selection, rushing the hiring process can lead to frustration, delays, and unexpected costs. By being aware of a few common pitfalls, you can ensure a smooth and successful project from start to finish. Taking the time to vet your options thoroughly will pay off in the long run, giving you a beautiful, functional space you’ll enjoy for years.

Skipping Your Homework on Past Work

Before you pick up the phone, start with some online research. A builder’s digital footprint can tell you a lot about their work and reputation. Look for a detailed portfolio with high-quality photos of completed projects, especially outdoor kitchens. Do their past projects reflect the quality and style you envision for your own home? A reputable company will be proud to showcase their masonry skills and previous builds. Don’t just glance at the photos; examine the details, like the stonework, appliance integration, and overall finish. This initial step helps you create a shortlist of builders who have proven experience in creating the kind of space you want.

Accepting a Vague Contract or Estimate

A handshake and a simple quote on a piece of paper are not enough to protect your investment. A professional builder will provide a detailed, written contract that clearly outlines every aspect of the project. This document should specify the full scope of work, a breakdown of labor and material costs, the brands and models of appliances, a payment schedule, and an estimated timeline. A comprehensive written estimate should cover all the bases, including contingencies for unexpected issues. Vague agreements leave room for misunderstandings and surprise costs later on, so make sure everything you’ve discussed is put in writing before any work begins.

Ignoring Poor Communication

Pay close attention to how a potential builder communicates with you from the very first interaction. Are they responsive to your calls and emails? Do they listen to your ideas and answer your questions clearly and patiently? If a contractor is difficult to get in touch with or dismissive of your concerns before you’ve even hired them, those communication issues will likely only get worse once the project is underway. A great construction partner will keep you informed about progress, schedule changes, and expenses. You’re building a relationship as much as you are building a kitchen, so choose a team you can trust to be transparent and accessible.

Forgetting to Check for a License and Insurance

This is a non-negotiable step that protects you, your home, and the workers on your property. Always verify that your outdoor kitchen builder is licensed to work in your area and carries adequate insurance. Ask for proof of both general liability insurance, which covers property damage, and worker’s compensation, which covers injuries to their crew. A professional company that handles complex projects like swimming pool installations and outdoor living spaces will readily provide these documents. Hiring an unlicensed or uninsured contractor might seem cheaper upfront, but it puts you at significant financial and legal risk if something goes wrong.

How to Budget for Your Outdoor Kitchen

Creating a budget is one of the most important first steps in planning your outdoor kitchen. It’s a significant investment in your home, and having a clear financial plan helps you make decisions confidently and ensures the final result matches your vision without any surprises. A well-thought-out budget acts as a roadmap for your entire project, from choosing materials to selecting the perfect appliances. It allows you to prioritize what matters most to you, whether that’s a top-of-the-line grill or expansive countertop space for entertaining. By understanding the costs involved, you can work with your builder to create a beautiful and functional space that fits your financial comfort zone.

What Influences the Final Price?

The cost of an outdoor kitchen can range from around $10,000 for a simple setup to over $50,000 for a fully equipped culinary space. This wide range depends entirely on the size, features, and materials you choose. A small, straightforward grill island will cost less than a large, L-shaped kitchen with a bar, sink, and refrigerator. The complexity of running utility lines for gas, water, and electricity also plays a big role. Adding custom features like a pizza oven, extensive lighting, or a beautiful pergola for shade will also influence the final price. Defining your must-haves early on will help you and your contractor establish a realistic budget.

Breaking Down Material and Appliance Costs

Investing in durable, weather-resistant materials is essential for an outdoor kitchen that lasts for years. For the structure, options like natural stone or brick from a skilled masonry designer offer timeless beauty and strength. Countertops made from granite or porcelain are popular because they stand up to the elements without staining or fading. For cabinetry, stainless steel is a classic choice that resists rust and corrosion. Appliances are another major part of your budget. While a high-end grill might be your centerpiece, you can also add refrigerators, sinks, and side burners. Choosing quality materials and appliances from the start will save you money on future repairs and replacements.

Understanding Payment Schedules

Clear communication about finances is key to a successful project. Before any work begins, your contractor should provide a comprehensive written estimate that details the costs for labor, materials, and any potential contingencies. This document ensures everyone is on the same page. Most builders use a payment schedule tied to project milestones. You’ll typically pay an initial deposit to secure your spot and cover initial material orders, followed by periodic payments as construction progresses. The final payment is usually due after a final walk-through confirms you are completely satisfied with the work. Always make sure this schedule is clearly outlined in your contract.

The Lasting Value of a Custom Outdoor Kitchen

An outdoor kitchen is so much more than a place to grill burgers. It’s a true investment in your home and your lifestyle, transforming your backyard from a simple patch of grass into the heart of your home. Think of it as a permanent upgrade to how you entertain, relax, and connect with family and friends. A well-designed outdoor kitchen becomes a natural gathering spot, pulling people outside and creating a seamless flow between your indoor and outdoor living areas. It’s the kind of feature that doesn’t just add convenience; it creates an entirely new atmosphere for your property.

When you build a custom outdoor kitchen, you’re not just adding appliances. You’re creating a complete environment. This can be part of a larger vision for your backyard, integrating beautifully with other features like a custom swimming pool or a cozy patio. The right design, built with expert masonry and high-quality materials, ensures your kitchen is both beautiful and durable enough to withstand the Long Island weather. It’s a project that pays you back with countless memories and adds significant, lasting value to your home.

Expand Your Living and Entertainment Space

One of the biggest benefits of an outdoor kitchen is how it extends your home’s functional footprint. Suddenly, your backyard becomes a fully equipped room without walls, perfect for hosting everything from casual family dinners to larger celebrations. You’re no longer running back and forth between the grill outside and the kitchen inside. Instead, everything you need is right there, allowing you to cook, serve, and socialize without missing a moment of the conversation. This creates a more relaxed and enjoyable experience for you and your guests, turning your patio into the ultimate destination for outdoor entertaining.

Increase Your Home’s Value

Beyond the immediate lifestyle benefits, a custom outdoor kitchen is a smart financial decision. A professionally designed and installed outdoor kitchen is a highly sought-after feature for homebuyers, and it can significantly increase your property’s resale value. In many areas, you can see a substantial return on your investment. This is especially true when you use durable, high-end materials that stand the test of time. Choosing quality finishes like porcelain and natural stone for countertops and patios not only looks incredible but also assures potential buyers that they are getting a premium, lasting addition to the home.

Get More Use Out of Your Backyard

How often do you really use your backyard to its full potential? For many homeowners, the answer is not often enough. An outdoor kitchen changes that by giving you a compelling reason to spend more time outside. It makes hosting parties and family gatherings easier and more appealing, encouraging you to take full advantage of your property. Your backyard can transform from an occasional weekend spot into a vibrant, central part of your daily life. When paired with a shaded pavilion or pergola, your outdoor kitchen becomes a comfortable and functional space you can enjoy for months on end.

Related Articles

Frequently Asked Questions

How long does it take to build an outdoor kitchen? The timeline for building an outdoor kitchen can vary quite a bit depending on the project’s complexity, the permit approval process, and even the weather. A simple grill island might be completed in a few weeks, while a more elaborate kitchen with extensive masonry and utility lines could take a couple of months. A professional builder will provide you with a detailed and realistic schedule upfront so you know exactly what to expect.

Can an outdoor kitchen be built on my existing patio? In many cases, yes, but it’s not a simple yes or no answer. A professional builder will need to inspect your current patio to make sure its foundation is strong enough to support the weight of the new structure and appliances. They will also assess how to best run the necessary gas, water, and electrical lines to the location. It’s a crucial first step to ensure the new kitchen is both safe and built to last.

What is the most important thing to consider when choosing materials? The single most important factor is durability against the elements. Unlike your indoor kitchen, every surface outside is exposed to sun, rain, and changing temperatures. You need to choose materials specifically rated for outdoor use, from non-porous countertops that won’t stain or fade to weather-resistant cabinetry that won’t warp or rust. This focus on durability ensures your investment looks great and functions properly for many years.

How much maintenance does an outdoor kitchen require? A well-built outdoor kitchen is designed to be low-maintenance, but it does require some simple care to keep it in top shape. This usually involves routine cleaning of countertops and appliances, covering your grill and furniture during the off-season, and occasionally sealing natural stone surfaces to protect them. Think of it as the same light upkeep you’d do for any other valuable part of your home.

Why should I hire a specialized outdoor kitchen builder instead of a general contractor? While a general contractor has broad knowledge, an outdoor kitchen specialist brings a very specific set of skills to the table. They have deep experience with weather-resistant materials, understand the unique requirements for outdoor plumbing and electrical work, and know how to design a layout that works in an open-air environment. This expertise is key to avoiding common issues like poor drainage, material decay, or inefficient layouts.

Share this page:
A finished vinyl inground pool installation with a modern patio and landscaping.

How Long to Install a Vinyl Inground Pool? A Full Timeline

Let’s be honest: a pool installation means your backyard will be a construction zone for a little while. It’s a reality that makes many homeowners ask, “how long to install a vinyl inground pool?” Understanding the step-by-step process makes the temporary disruption feel much more manageable. The active build, from excavation to liner installation, typically takes between four and eight weeks. However, the total timeline also includes the crucial pre-construction phases of design and permitting. Knowing what to expect each week helps you see the progress and feel confident that the temporary mess is leading to a beautiful, permanent oasis for your family.

Key Takeaways

  • Look Beyond the Construction Window: Remember that the four to eight week construction estimate is just one piece of the puzzle; the total project timeline also includes the initial design phase, permit approvals, and final landscaping to complete your backyard oasis.
  • Permits and Weather Are the Wildcards: The two factors most likely to affect your installation schedule are out of your contractor’s direct control: the time it takes for your town to issue permits and unpredictable Long Island weather. Factoring in this reality helps set clear expectations.
  • Early Planning Is Your Best Tool: You can set your project up for success by starting the process well in advance, ideally in the fall or winter. This gives you plenty of time to finalize your design and secure a spot with a trusted professional, ensuring a more relaxed and organized experience.

How Long Does Vinyl Pool Installation Take?

One of the first questions on every homeowner’s mind is, “How long will my yard be a construction zone?” It’s a great question, and the answer depends on a few moving parts. While a vinyl inground pool is one of the quickest types to install, the full process from design to your first swim involves several distinct stages.

Understanding the timeline helps you plan your summer and manage your excitement. The good news is that with a clear plan and an experienced team, the process can be surprisingly smooth. Let’s look at the typical schedule and the key factors that can influence your project’s completion date.

Understanding the Typical Timeline

From the day we break ground, you can generally expect the construction of your vinyl liner pool to take between four to eight weeks. This timeframe covers the major steps: excavation, assembling the pool structure, plumbing, electrical work, and installing the liner. It’s a faster build compared to concrete pools, which is a major reason why so many Long Island families choose vinyl. This estimate focuses on the active construction phase, so it’s important to remember that the initial design and permitting stages happen before any digging begins. Think of it as a well-orchestrated project with a clear finish line in sight for your new swimming pool.

Key Factors That Influence Your Project’s Duration

While four to eight weeks is a solid estimate, several things can affect your specific timeline. The biggest variable is often securing permits from your local town, which can take anywhere from a few weeks to a couple of months. The complexity of your design also plays a role; a custom shape with a built-in spa or waterfall will naturally take longer than a standard rectangle. Unforeseen site conditions, like rocky soil or a high water table, can also add time to the excavation phase. And, of course, Mother Nature has a say. A string of rainy days can pause progress, but an experienced construction team knows how to work efficiently around these challenges.

Your Vinyl Pool Installation: A Step-by-Step Guide

Seeing your dream pool come to life is an exciting process, and it helps to know what to expect along the way. While every project is unique, the installation of a vinyl inground pool follows a predictable path from the initial concept to your first cannonball. Think of it as a series of milestones, each one bringing you closer to your perfect backyard oasis. We’ve broken down the entire journey into five clear steps so you can feel prepared and confident.

This guide will walk you through everything from designing your pool and securing permits to the final construction and finishing touches. Understanding this sequence helps you plan your schedule, coordinate with your installation team, and feel confident as you watch your vision take shape. Each phase has its own timeline and set of tasks, but they all work together to create a beautiful, lasting addition to your home. Let’s get started with the first, and arguably most creative, step.

Step 1: Design and Planning

This is where the fun begins. The journey to your new pool starts with a detailed design and planning session where we map out the perfect layout, size, and shape for your space. We’ll also discuss all the exciting features you want to include, from custom steps and lighting to a surrounding patio or even an outdoor kitchen. Once we’ve perfected the design together, you’ll typically provide a deposit, which officially gets your project on our installation schedule. This initial phase ensures your new swimming pool is everything you’ve imagined.

Step 2: Permits and Approvals

Before we can break ground, we need to get the green light from your local municipality. Obtaining the right permits is a critical step that ensures your pool is built safely and up to code. The timeline for this can vary quite a bit, sometimes taking just a few weeks or, in some cases, several months depending on your town’s specific requirements and workload. It’s a waiting game that requires a little patience, but it’s a non-negotiable part of the process. We handle the paperwork and submissions to keep things moving as smoothly as possible for you.

Step 3: Excavation and Site Prep

With permits in hand, it’s time for the action to start in your backyard. The excavation phase is when your pool begins to take physical form. Our crew will arrive to dig the hole according to the precise specifications of your design, which is often the moment it feels real for homeowners. This stage usually takes about one to two weeks, depending on the size of the pool and the conditions of your property. We also prepare the site for any masonry work, like the foundation for your new patio, during this time.

Step 4: Pool Build and Liner Installation

Once the hole is dug, our team gets to work building the pool’s structure. This phase typically takes between four and eight weeks. We’ll assemble the wall panels, pour the concrete footing, and smooth out the pool floor to create a perfect base. After the structure is complete, we install the plumbing and electrical systems before carefully fitting the vinyl liner. This is one of the biggest advantages of a vinyl pool, as the construction timeline is often much faster than that of a concrete pool, getting you into the water sooner.

Step 5: Finishing Touches and Startup

The pool is built, but we’re not done yet. This final step is all about bringing the entire backyard vision together. We’ll complete the surrounding patio, add any custom lighting, and integrate beautiful landscape design to create a cohesive outdoor living space. Once the finishing touches are in place, we’ll fill the pool with water, start up the equipment, and balance the chemistry. This phase can take another one to four weeks, but the result is a stunning, swim-ready backyard that’s ready for you to enjoy.

A Closer Look at the Design and Planning Phase

This is where your dream pool starts to take shape. The design and planning phase is arguably the most important part of the entire process. It’s a collaborative effort where we combine your vision with our expertise to create a detailed blueprint for your backyard oasis. Taking the time to get every detail right at this stage ensures the rest of the installation goes smoothly and results in a pool you’ll love for years. This initial phase typically takes one to two weeks, depending on how quickly decisions are made.

Your Initial Consultation and Site Measurement

Everything begins with a conversation. During your initial consultation, one of our design experts will visit your home to walk the property with you. We’ll discuss your ideas, how you plan to use the pool, and your overall budget. This is also when we take precise measurements of your yard, noting any slopes, existing structures, or access points. This detailed site assessment is crucial for creating a functional and beautiful swimming pool design that fits perfectly within your space. We’ll answer all your questions and make sure we have a clear understanding of your goals before we start designing.

Developing Your Custom Pool Design

Once we have all the information from our initial meeting, our team gets to work creating a custom design for your vinyl liner pool. We’ll present you with a visual plan that shows the pool’s shape, size, and placement in your yard. This is the fun part where you can really see it all come together. We can also discuss how the pool will integrate with other backyard features, like a new patio or landscape design. We’ll work with you to refine the design until it’s exactly what you envisioned, clearing up any questions you might have about vinyl pools along the way.

Selecting and Finalizing Materials

With the design finalized, the last step in this phase is choosing your materials. One of the best things about vinyl liner pools is the incredible variety of liner patterns available, from classic blue ripples to modern geometric designs. You’ll also select the coping that frames the pool’s edge and the material for the surrounding patio or deck. We offer a wide selection of beautiful and durable options, including elegant porcelain and natural stone pavers. Making these selections helps us create a precise quote and prepare for the next step: securing permits.

What Can Cause Delays in Your Pool Installation?

Even with the best planning, some things can pop up that affect your pool installation timeline. Knowing what these potential hurdles are ahead of time can help you set realistic expectations and feel more prepared. Most of these are completely normal parts of any major construction project, and an experienced team knows exactly how to handle them. Let’s walk through the most common reasons a project might see a delay.

Weather and Seasonal Setbacks

Here on Long Island, we know the weather can be unpredictable. A week of heavy rain can turn an excavated site into a muddy pit, making it unsafe and impractical to work. A sudden cold snap can prevent concrete from curing properly, and extreme heat can be tough on the crew. While we build a buffer into our timelines for typical weather, a prolonged storm or an unusual weather event can pause progress. Pausing work during bad weather isn’t just for comfort; it ensures the quality and safety of your new swimming pool for years to come.

Unexpected Soil or Groundwater Conditions

What lies beneath your lawn is often a mystery until the excavation begins. We might encounter unexpected conditions like large boulders, exceptionally soft soil, or a high water table. These discoveries aren’t necessarily problems, but they do require a change in strategy. For example, large rocks may need to be broken up and removed, or special drainage might be needed to manage groundwater. Our team has the masonry and construction expertise to handle these situations, but they can add time to the excavation phase of the project.

Permit and Inspection Hold-Ups

Before any work begins, we need to secure permits from your local town or village. This process is a critical step, but it’s one we don’t have direct control over. The time it takes to get a permit can range from a few weeks to a few months, depending on the municipality’s workload and specific requirements. Similarly, required inspections at various stages of the build can sometimes face scheduling delays. We manage all the paperwork and communication, but it’s important to recognize that administrative slowdowns can and do happen.

Material Sourcing and Availability

Your pool is built from many different components, from the steel walls and vinyl liner to the pumps, filters, and surrounding patio pavers. While we order materials well in advance, supply chain issues can occasionally cause delays. A specific liner pattern might be on backorder, or a particular type of natural stone paver could have a longer lead time than expected. We always keep you informed about material status and can suggest excellent alternatives if a delay becomes significant, ensuring your project keeps moving forward without compromising on style.

Site Accessibility Challenges

Getting heavy equipment and materials into your backyard is a key part of the installation process. If your property has a narrow side yard, steep slopes, or established trees and gardens, access can be tricky. These challenges don’t stop a project, but they do require more careful planning and execution. We might need to use smaller machinery, build a temporary access road, or bring in materials by hand, all of which can extend the timeline. We identify these potential issues during our initial site visit and incorporate them into our overall landscape and construction plan.

Breaking Down the Permit and Excavation Timeline

This is where your project moves from a paper plan to a tangible reality. While the permitting and excavation phase can feel like it moves at a snail’s pace, it’s foundational to a smooth and successful installation. Understanding the steps involved helps set clear expectations for what’s happening in your yard and why. Let’s walk through what this critical stage looks like.

How Long Do Permits Usually Take?

Before any dirt can be moved, we need the green light from your local town or village. Securing building permits is a non-negotiable step, and the timeline can vary quite a bit. Depending on your specific location in Long Island, this process can take anywhere from a few weeks to several months. It all comes down to the local municipality’s current workload and specific requirements. While it might feel like a waiting game, this step ensures your new swimming pool is built safely and up to code. The good news is that an experienced partner handles all the paperwork and follow-up for you, so you can relax while the administrative details are sorted out.

The Excavation and Site Prep Process

Once the permits are in hand, the real fun begins. This is the day the machinery arrives and your backyard officially becomes a construction site. The excavation and site preparation phase typically takes about one to two weeks. During this time, our team will carefully dig the hole for your pool, following the precise dimensions of your design. We also prepare the ground to ensure a stable and level foundation for the structure. It’s a messy but exciting process because you can finally see the physical footprint of your future oasis taking shape right before your eyes. This careful prep work is essential for a long-lasting installation.

Assembling the Pool’s Framework

With the hole perfectly excavated, the next step is to build the pool’s skeleton. For a vinyl liner pool, this part of the process generally takes about three to four weeks. Our crew will assemble the wall panels that form the perimeter of your pool and secure them in place with a concrete footing. We then carefully shape and smooth the pool floor, creating the perfect base for the liner. This is a period of rapid, visible progress where the structure of your pool truly comes together. It’s the foundational work that supports all the beautiful masonry and finishing touches that will follow.

What to Expect During Construction and Liner Installation

This is the part of the process where you’ll see your backyard vision truly come to life. After the groundwork is laid and the pool’s structure is in place, our team moves into the construction and installation phase. This stage is all about the technical details that transform a shell into a fully functional swimming pool. It involves carefully installing the plumbing and electrical systems that will keep your water clean and clear, fitting the beautiful vinyl liner that defines your pool’s look, and setting up all the essential equipment.

While this phase involves a lot of moving parts, our Gappsi team coordinates every step with precision. We focus on quality craftsmanship to ensure your pool is not only stunning but also built to last. You’ll see specialists working on different components, from electricians to our liner installation experts. We manage the entire process, keeping you informed as we hit key milestones. This is where the structure in your yard starts to look and feel like the oasis you’ve been dreaming of. It’s a period of significant activity, but it’s also incredibly rewarding as you watch the final pieces come together. Our goal is to make this phase as smooth and transparent as possible, so you can feel confident and excited about the progress.

Installing Plumbing and Electrical Systems

Before the liner goes in, we install the circulatory and nervous systems of your pool. Think of plumbing as the veins and arteries, carrying water to and from the filtration equipment to keep it sparkling clean. Our team strategically lays a network of pipes for the main drains, skimmers, and return jets. At the same time, licensed electricians run the necessary wiring for your pool’s pump, lighting, and any special features like heaters or automated covers. Getting the swimming pool plumbing and electrical right is critical for safety and performance, so we take meticulous care to ensure everything is installed correctly and up to code.

Fitting and Securing the Vinyl Liner

This is one of the most exciting moments in the installation process. Your custom-made vinyl liner, chosen during the design phase, is now ready to be installed. Our crew carefully unfolds the liner and hangs it from the top of the pool walls. Using specialized vacuums, we suck all the air out from behind the liner, creating a tight, smooth, and wrinkle-free fit against the pool’s structure. This step requires a great deal of precision. A perfectly fitted liner not only looks fantastic but also ensures the longevity and durability of your pool’s surface. Once it’s secured, your pool’s interior is officially complete.

Setting Up and Testing Pool Equipment

With the plumbing and liner in place, the final construction step is to install and connect your pool equipment. This includes the pump, filter, heater, and any sanitization systems you’ve chosen. We set up all the components on a sturdy equipment pad, typically located in a discrete spot near the pool. Once everything is connected, we perform a series of tests to make sure the entire system is running efficiently and effectively. This quality check confirms that your pool equipment is ready to go, ensuring a seamless transition when it’s time to fill your pool with water and start it up for the first time.

How to Set Your Project Up for Success

A new vinyl pool is a fantastic addition to your home, but a smooth installation process doesn’t happen by accident. Success isn’t just about the beautiful final product; it’s also about having a positive experience along the way. It takes a bit of foresight and the right team to bring your vision to life without unnecessary stress or costly surprises. By planning ahead, choosing a trusted professional, understanding the realities of the construction process, and knowing what to expect, you can ensure your project goes off without a hitch. This proactive approach helps manage your budget, timeline, and expectations, turning a potentially overwhelming project into an exciting one.

Think of it like building a strong foundation. When you invest time in the initial stages, the rest of the project flows much more smoothly. You’ll feel more in control and confident in your decisions, from the liner pattern to the patio pavers. A well-planned project also minimizes disruptions to your daily life and ensures the final result perfectly matches your family’s needs and lifestyle. Let’s walk through a few key steps that will put you on the path to a successful and timely pool installation, so you can focus on the fun part: enjoying your new backyard oasis.

Why You Should Start Planning Early

When it comes to installing a pool, the early bird truly gets the worm. Kicking off the planning process well in advance gives you a buffer to handle potential delays, which often come from things like securing town permits or getting on a builder’s schedule. Starting early also gives you more time to thoughtfully consider your swimming pool design and material choices without feeling rushed. You can explore different shapes, sizes, and features to create a pool that truly fits your backyard. An early start means you can book your preferred installer during their peak season and have a much more relaxed and enjoyable experience from start to finish.

Choosing the Right Pool Installation Professional

Your choice of installer is the single most important decision you’ll make for your pool project. A reputable professional does more than just dig a hole; they ensure the job is done safely, correctly, and up to local codes. Look for an experienced team with a proven track record in Long Island. A great contractor will guide you through every phase, from initial design to the final walkthrough, and will handle all the complex logistics. Entrusting your project to a seasoned home improvement company gives you peace of mind that your investment is built to last and will be a source of joy for years.

Setting Realistic Timeline Expectations

While it’s exciting to imagine swimming in your new pool, it’s important to have a realistic grasp of the installation timeline. On average, a vinyl inground pool installation takes about 8 to 12 weeks from the first day of excavation to the final fill. However, this can vary based on permit approvals, weather, and the complexity of your project. A good contractor will provide a detailed schedule and keep you informed of progress. This clarity helps you plan for other backyard elements, like new masonry for your patio or landscaping, creating a cohesive outdoor living space.

Common Installation Myths, Debunked

Let’s clear up a few misconceptions about vinyl liner pools. One common myth is that they are difficult to maintain. In reality, modern vinyl liners are incredibly durable and easier to care for than other pool surfaces. Another myth is that you can save a lot of money by installing the pool yourself. While it might seem tempting, a DIY installation is incredibly complex and risky. Professional installation is essential for ensuring the pool’s structural integrity, proper plumbing, and electrical safety. Plus, a professional build protects your warranty, which is a safety net you don’t want to give up.

The Final Stretch: Finishing and Pool Startup

With the heavy machinery gone and the pool structure in place, you’re on the home stretch. This final phase is all about transforming the construction zone into your personal backyard retreat. It’s where all the details come together, from the surrounding landscape to the crystal-clear water, making your new pool officially ready for its first splash.

Installing Your Deck and Landscaping

Your beautiful new pool deserves an equally stunning setting. This is where we move beyond the pool itself and build out the surrounding environment. The decking or patio is installed, creating the perfect spot for lounge chairs and sunny afternoons. This stage can take anywhere from one to four weeks, as it often involves detailed masonry work with materials like natural stone or porcelain pavers.

We’ll also complete the landscaping, adding plants, lighting, and maybe even a water feature to complete the oasis feel. This is the step that truly integrates the pool into your backyard, making it feel like it has always been there. It’s all about creating a cohesive and inviting space for you to enjoy.

Filling the Pool and Balancing the Water

Seeing your pool fill with water for the first time is a major milestone. Once the vinyl liner is perfectly fitted, we begin filling it up. But before you can jump in, the water needs to be just right. This involves carefully balancing the water chemistry, a crucial step for both safety and the longevity of your pool.

Properly balanced water is comfortable for swimmers, preventing skin and eye irritation. It also stops problems like algae growth and equipment corrosion before they can start. Our team handles all the testing and adjustments, ensuring your swimming pool is perfectly balanced and ready for you to enjoy from day one. It’s the final touch that makes the water clear, safe, and inviting.

Your Final Inspection and Project Handover

Before we officially hand over your new backyard paradise, we conduct a thorough final inspection. This is our chance to walk through every detail of the project, ensuring that the installation meets all local codes and our own high standards for quality and safety. It’s a critical step that gives you complete peace of mind.

Once the inspection is complete, we’ll walk you through everything you need to know. We call this the project handover. We’ll show you how to operate your new pool equipment, explain the basic maintenance schedule, and answer any questions you have. Our goal is to make sure you feel confident and prepared to care for your investment. After that, there’s only one thing left to do: grab your swimsuit and enjoy.

How to Prepare for a Smooth Installation

A little preparation goes a long way in making your pool installation feel seamless. By thinking ahead about a few key details, you can help the entire process run on schedule and minimize surprises. From choosing the right season to getting your backyard ready for the crew, taking these steps will set your project up for success and get you swimming sooner. Let’s walk through what you can do to prepare for a smooth and exciting construction phase.

Picking the Best Time of Year to Build

Timing is everything, especially when it comes to outdoor construction on Long Island. The time of year can affect how long you wait for pool builders to start your project. Factors like weather and high seasonal demand can influence scheduling. Many homeowners aim for a spring installation to enjoy their pool all summer, which makes it the busiest season. To get ahead, consider starting your planning in the fall or winter. This gives you plenty of time for design and permits, so you can be first on the schedule when the ground thaws. An off-season start often means a more flexible timeline and a completed swimming pool ready for the first warm day.

Planning Your Budget and Financing

Vinyl liner pools are a fantastic choice, offering a great mix of affordability, beauty, and function. When you plan your budget, it’s helpful to think beyond the initial installation cost. Consider ongoing maintenance expenses and any upgrades you might want to add to create your perfect backyard oasis. This could include a beautiful new patio, ambient lighting, or lush landscaping around the pool area. Planning for these extras from the start helps you create a comprehensive budget. Many homeowners choose to enhance their new pool with elegant porcelain pavers for a durable and stylish finish that completes the look.

Getting Your Property Ready for Construction

Your pool installation involves several key stages, and getting your property ready can really help streamline the process. Before the crew arrives, take some time to clear the designated pool area of any furniture, toys, or decorative items. It’s also important to ensure there is a clear and wide path for construction equipment to access your backyard. This might mean temporarily removing a section of a fence. We will handle marking utility lines, but knowing where your septic system or sprinkler lines are is also very helpful. A little prep work on your end makes a big difference for the construction team and helps keep your project on track.

What to Expect Day-to-Day

Once construction begins, you can expect a structured timeline with specific tasks happening each day. The process is methodical, starting with the big job of excavation and then moving on to assembling the pool walls, plumbing, and electrical work. After that, the team will carefully install the vinyl liner and fill the pool. While it’s an exciting process, it’s also a construction zone. You can anticipate daily activity and noise in your backyard, but a professional team will work to keep the site as tidy as possible. You can even watch our team in action to get a better sense of the day-to-day progress and craftsmanship involved in bringing your pool to life.

Life During the Installation: What to Know

Having a construction crew in your backyard is a unique experience. While the end result is a stunning new pool, the process involves noise, equipment, and activity. Knowing what to expect makes the installation period much smoother. It’s all about clear communication, understanding the project’s rhythm, and looking ahead to life as a pool owner. By staying informed, you can watch your backyard transform with confidence, knowing every step is leading toward your dream oasis. Let’s walk through what daily life looks like during the build.

Communicating with Your Installation Team

Open communication is the key to a stress-free installation. It’s normal to have questions, especially since homeowners can face confusing information about different pool types. Your installation team is your best resource, so don’t hesitate to ask for clarification on anything from the daily schedule to specific materials. A professional crew provides regular updates and is available to address your concerns. We believe in a partnership approach, ensuring you feel heard and informed. Building a great relationship with your swimming pool installation team turns the process into a collaborative creation of your perfect backyard.

Tracking Milestones and Quality Checks

A vinyl pool installation follows a clear sequence of events, often taking four to eight weeks. Your project manager will provide a timeline with key milestones to watch for, including excavation, wall assembly, plumbing, and liner installation. Following along helps you see the progress firsthand and understand what’s happening. Our team performs quality checks at every critical point to ensure the work meets our high standards. You can see examples of our process on the Gappsi YouTube channel, which can help you visualize each exciting phase of the build and know what to expect.

Understanding Post-Installation Pool Care

As the project wraps up, our focus shifts to preparing you for pool ownership. Before the final handover, we’ll walk you through your new equipment and explain the basics of water chemistry and routine maintenance. Understanding how to care for your pool from day one is essential for its longevity. While a vinyl liner will eventually need replacement, proper care extends its life significantly. Think of it as learning the simple routines that will keep your pool sparkling. We also offer services to keep your entire patio area looking its best, including professional restoration and sealing.

Related Articles

Frequently Asked Questions

What is the total timeline I should expect, from signing the contract to my first swim? While the active construction in your yard typically takes four to eight weeks, the entire process from design to completion is longer. You should plan for a total of about three to five months. This includes the initial design phase, the time it takes to secure permits from your town (which can be the most variable part), the actual build, and the final landscaping and finishing touches.

What is the most common cause of delays, and is there anything I can do about it? The most common hold-up is waiting for building permits to be approved by your local municipality, a process that can take anywhere from a few weeks to a couple of months. Since this is out of everyone’s control, the best thing you can do is start the planning process early. Beginning in the fall or winter gives you a generous buffer to get all the necessary approvals in place so construction can start as soon as the weather allows.

When is the best time of year to start planning for a new pool? The ideal time to begin planning your pool project is in the fall or early winter. This gives you plenty of time to finalize your design and get your permit applications submitted before the busy spring rush. By getting ahead of the curve, you can secure a spot on your preferred installer’s schedule and have your pool ready to enjoy for the entire summer season.

Will my entire backyard be off-limits during the installation? The immediate area around the new pool will definitely be an active construction zone and should be considered off-limits for safety, especially for children and pets. However, depending on the size and layout of your yard, other areas may still be accessible. Your installation team will establish a clear work zone and access path for their equipment to minimize disruption to the rest of your property.

What are my responsibilities once the pool installation is complete? After the final inspection and handover, you become the proud captain of your new pool. Your main responsibilities will be simple, routine maintenance tasks. This includes testing the water chemistry a couple of times a week and keeping the skimmer baskets clear of debris. We will give you a complete tutorial on how to operate your equipment and a straightforward maintenance schedule, so you’ll feel confident and prepared from day one.

Share this page: