Your backyard should be a true extension of your home, a place for relaxing, entertaining, and making memories. Creating that perfect outdoor oasis starts with a solid foundation. While materials like wood and natural stone have their charm, they often come with demanding upkeep. Porcelain pavers offer a better way, giving you the sophisticated look of natural materials without the constant sealing and maintenance. The key is finding a partner who can help you explore all the possibilities. As one of the largest porcelain pavers Suppliers on long island ny, Gappsi provides an unmatched selection and the design expertise to help you craft a beautiful, functional, and worry-free space that perfectly suits your lifestyle.
Key Takeaways
- Choose porcelain for lasting beauty and easy care: Porcelain pavers are a smart investment because they are incredibly durable, resistant to stains and weather, and require very little maintenance, giving you a beautiful patio without the constant upkeep.
- Partner with a full-service expert: The best results come from working with a supplier who offers a local showroom to see materials firsthand, provides professional design guidance, and manages the entire installation with their own skilled team.
- Start with a clear plan and a realistic budget: Begin your project by visiting a showroom to get samples and a detailed quote. A complete estimate should include the cost of the pavers, site preparation, and professional installation so you have a full financial picture.
How to Find the Best Porcelain Paver Supplier on Long Island
Finding the right supplier for your porcelain pavers is the first step toward creating a beautiful and lasting outdoor space. On Long Island, the best partners offer more than just materials. They provide expertise, design guidance, and a seamless installation process. When you start your search, look for a company that can support your project from the initial idea to the final paver being set. This ensures you not only get high-quality materials but also the professional support needed to bring your vision to life.
Why a Full-Service Supplier Matters
Choosing a supplier that also handles installation can make your project significantly smoother. When one company manages both material supply and construction, you have a single point of contact and a cohesive team working toward your goal. This eliminates the hassle of coordinating between a retailer and a separate contractor, which can lead to miscommunication and delays. A full-service partner ensures the team installing your pavers is intimately familiar with the product. Gappsi offers both porcelain paver supply and expert installation, giving you a streamlined experience and peace of mind that every detail is handled correctly.
The Benefit of a Local Showroom
While browsing online is a great way to gather ideas, nothing compares to seeing materials in person. Colors and textures can look different on a screen, and feeling the finish of a paver can help you make a confident decision. A local showroom allows you to compare different styles side-by-side and see how they look in natural light. At the Gappsi Store, you can explore a wide selection of porcelain pavers and get personalized advice from experts who understand Long Island’s unique climate and style. Visiting a showroom is a crucial step to ensure the pavers you choose are exactly what you envision for your home.
Look for Decades of Design Experience
A great supplier does more than just sell pavers; they help you design a space that is both beautiful and functional. Look for a company with a long history of successful projects and a strong portfolio. Ask to see examples of their previous work, as this is the best way to gauge their craftsmanship and design capabilities. An experienced team can offer valuable insights on everything from paver patterns to drainage solutions. With decades of masonry design and construction experience, a seasoned supplier can help you create a truly exceptional patio, walkway, or driveway that stands the test of time.
Gappsi: Your All-in-One Porcelain Paver Partner
Gappsi brings together all the elements of a top-tier supplier right here on Long Island. We are a full-service company, providing an extensive selection of premium porcelain pavers and handling the entire installation process with our own skilled team. Our showroom is the perfect place to start your journey, offering inspiration and expert guidance. We pride ourselves on our deep design experience and a portfolio filled with stunning local projects, which you can see on our YouTube channel. From selecting the perfect style to completing the final installation, we partner with you every step of the way to ensure your project is a complete success.
What Porcelain Paver Styles Can You Choose From?
One of the best parts about choosing porcelain pavers is the incredible range of styles available. You aren’t limited to a single look. Instead, you can find a design that perfectly matches your home’s aesthetic, whether you’re aiming for rustic charm, modern minimalism, or timeless elegance. Porcelain’s versatility means you can get the appearance of high-maintenance materials like wood or natural stone without the demanding upkeep. This allows you to create a truly personalized outdoor space that reflects your style and fits your lifestyle. Let’s explore some of the most popular options you’ll find.
The Warmth of Wood-Look Porcelain
If you love the classic, inviting look of a wood deck but dread the thought of splinters, staining, and sealing, wood-look porcelain is the perfect solution. These pavers capture the natural grain and warm tones of different wood species, from oak to walnut, giving your patio or walkway a beautiful, organic feel. They are ideal for creating a seamless transition from your indoor living spaces to your backyard oasis. Unlike real wood, these porcelain pavers won’t rot, warp, or fade from sun exposure, giving you a stunning wood aesthetic that lasts for decades with minimal effort.
The Elegance of Natural Stone-Look Porcelain
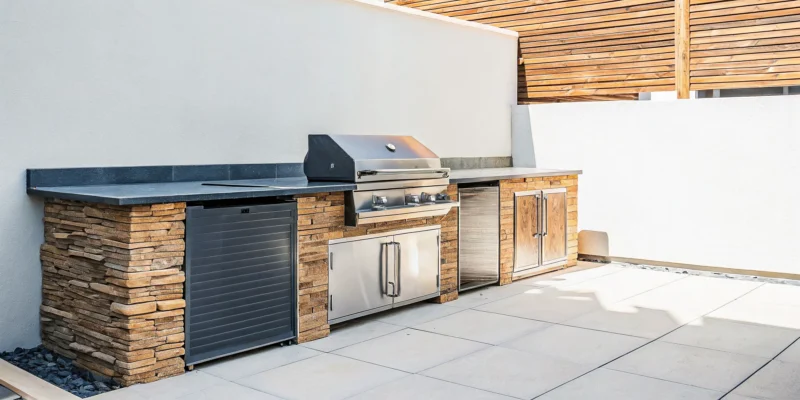
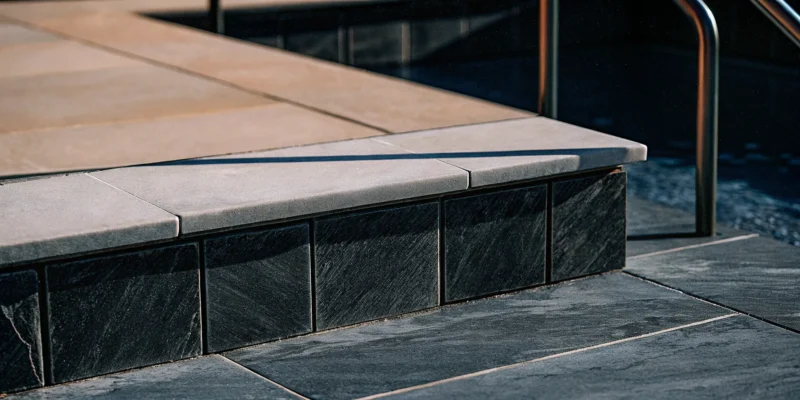
Natural stone like bluestone or travertine offers a sophisticated, high-end look, but it often comes with a high price tag and requires regular sealing to prevent stains. Natural stone-look porcelain gives you that same luxurious appearance without the drawbacks. You can choose from styles that mimic the subtle veining of marble, the earthy texture of slate, or the soft tones of limestone. This option provides a consistent color and pattern that can be difficult to achieve with quarried stone. It’s an excellent choice for pool surrounds and outdoor kitchens, as it resists stains, chemicals, and moisture, keeping its elegant look through every season.
The Modern Appeal of Concrete-Style Porcelain
For a clean, contemporary, and slightly industrial vibe, concrete-style porcelain pavers are an outstanding choice. They provide the minimalist aesthetic of poured concrete but with far greater design consistency and durability. These pavers won’t crack or stain like traditional concrete, and they come in various shades of gray and other neutral tones to complement a modern design palette. This style works beautifully for creating sleek patios, walkways, and pool decks that feel both sophisticated and understated. It’s the perfect foundation for modern outdoor furniture and bold landscaping, creating a chic, gallery-like outdoor setting.
Exploring Textures and Large Format Pavers
Beyond color and pattern, you can also choose from different textures and sizes to add another layer of customization to your project. Many porcelain pavers come with a textured surface that not only adds visual depth but also increases slip resistance, a key safety feature for pool decks and walkways. Large format pavers are another popular trend, as their size can make a smaller patio feel more spacious and open by reducing the number of grout lines. Using larger pavers creates a clean, uncluttered look that is central to many modern landscape designs.
A Look at Available Sizes and Finishes
The creative possibilities with porcelain are nearly endless thanks to the wide array of available sizes, shapes, and finishes. You can find everything from large square pavers to smaller rectangular planks that can be laid in creative patterns like herringbone or basketweave. Finishes range from a smooth matte look to a more structured, textured feel, each creating a different effect. This variety allows you and your designer to craft a truly unique outdoor surface. Whether you’re designing a cozy patio or an expansive entertainment area, you can find the perfect combination at the Gappsi Store to bring your vision to life.
Why Choose Porcelain Pavers for Your Patio?
When you’re planning a new patio, the material you choose is one of the biggest decisions you’ll make. You want something that looks beautiful, stands up to Long Island’s weather, and fits your lifestyle. That’s why so many homeowners are turning to porcelain pavers. They offer a perfect combination of sophisticated style, incredible strength, and easy living. If you’re looking for a material that will give you a stunning outdoor space without demanding constant upkeep, porcelain is an excellent choice. Let’s explore the specific benefits that make it a top contender for any patio project.
Unmatched Durability and Weather Resistance
One of the biggest advantages of porcelain is its sheer toughness. These pavers are built to last. Because they are fired at extremely high temperatures, they become incredibly dense and non-porous. This means they absorb very little water, which is a huge benefit for us here on Long Island. When water can’t seep in, there’s no risk of it freezing, expanding, and causing cracks during the winter. Gappsi’s porcelain pavers are frost-resistant, fade-resistant, and strong enough to handle heavy patio furniture and constant foot traffic without showing wear and tear. You get a patio that looks brand new for years.
The Appeal of Low-Maintenance Living
Let’s be honest, you want to spend your time enjoying your patio, not cleaning it. Porcelain pavers make that possible because they are one of the lowest-maintenance options available. Unlike natural stone or concrete, they never need to be sealed to protect them from stains or water damage. Spills from a summer barbecue, like wine or grease, can be wiped away easily without leaving a permanent mark. For routine cleaning, a simple sweep and a quick wash with mild soap and water are all it takes to keep them looking pristine. This saves you both time and money on the long-term upkeep of your patio.
Prioritizing Safety with Slip-Resistant Surfaces
Safety is always a top priority, especially for families with children or for areas around a pool. While some people assume porcelain’s smooth finish makes it slippery, that’s a common myth. Outdoor-rated porcelain pavers are specifically manufactured with a textured, slip-resistant surface that provides excellent traction, even when they’re wet. This makes them an ideal and safe choice for pool surrounds, walkways, and any patio space where people will be walking. You can have peace of mind knowing your beautiful patio is also designed to prevent slips and falls, letting everyone enjoy the outdoors safely.
Eco-Friendly Materials and Cooler Surfaces
If making sustainable choices is important to you, you’ll be happy to know that porcelain pavers are an eco-friendly option. They are typically made from natural clay and often include recycled materials in their composition, reducing their environmental footprint. Beyond their green credentials, they also offer a practical benefit during our hot summers. Lighter-colored porcelain pavers reflect more sunlight and stay cooler to the touch compared to darker materials like asphalt or certain types of stone. This makes your patio a more comfortable place to relax and walk barefoot on a sunny day.
Long-Term Value and Cost-Effectiveness
Investing in a new patio is a significant home improvement, and you want to know your money is well spent. While the initial cost of porcelain pavers can be comparable to other high-end materials, their long-term value is exceptional. Their incredible durability means you won’t be spending money on repairs or replacements down the line. Add in the savings from not needing to seal them every few years, and the cost-effectiveness becomes clear. A Gappsi masonry project using porcelain pavers is a smart investment that pays off with decades of beauty and performance.
How to Choose the Right Porcelain Paver Supplier
Finding the right porcelain paver supplier is about more than just getting a good price. It’s about finding a true partner for your project. The right company won’t just sell you materials; they will guide you through the entire process, from design to installation, ensuring your new patio, walkway, or pool deck is exactly what you envisioned. A great supplier acts as your resource, offering deep product knowledge, technical expertise, and a commitment to quality that protects your investment for years to come. This partnership approach transforms a potentially stressful renovation into a smooth and enjoyable experience.
When you start your search, think about the complete experience. Does the supplier have a physical location where you can see and touch the products? Do they have a team of designers and installers who can bring your vision to life? A full-service supplier can streamline your project, saving you the headache of coordinating with multiple contractors. They should be able to answer all your questions, from which porcelain and natural stone pavers are best for a high-traffic area to how to properly care for them. Choosing a supplier who offers comprehensive support is the first step toward a beautiful and lasting outdoor space that you and your family will enjoy for decades.
Verify Product Quality and Sourcing
The beauty of porcelain pavers lies in their quality, but not all pavers are created equal. Pictures online can be deceiving, so it’s essential to see the products in person before making a decision. Visiting a showroom allows you to feel the texture, see the true colors, and compare different styles side-by-side. This hands-on experience ensures there are no surprises when the materials arrive at your home. Don’t hesitate to ask where the pavers are sourced from and what quality standards they meet. A reputable supplier will be transparent about their products and confident in their durability, helping you make an informed choice for your home.
Ask About Installation and Technical Skill
The most beautiful, high-quality pavers can fail if they aren’t installed correctly. A proper installation is critical to the longevity and performance of your porcelain patio or walkway. Before you commit to a supplier, ask about their installation process. Do they have their own experienced crews, or do they subcontract the work? It’s always a good idea to verify that any installer is fully licensed and insured. You can also protect your investment by reading recent customer reviews. A supplier who provides expert masonry services or partners with trusted installers demonstrates a commitment to a successful outcome for your project.
Evaluate the Showroom and Design Support
A supplier’s showroom is more than just a store; it’s a hub of inspiration and expertise. When you visit, pay attention to the level of support you receive. Are the staff knowledgeable and eager to help? A great supplier offers valuable design support, helping you select pavers that complement your home’s architecture and your personal style. They can help you explore different patterns, color combinations, and paver sizes to create a unique look. This personalized guidance is invaluable, turning the potentially overwhelming process of choosing materials into an exciting creative collaboration. This is where a partner with extensive landscape design experience can make a real difference.
Check for Proper Licensing, Insurance, and Warranties
Working with a fully licensed and insured company is non-negotiable. This is your protection against liability for any accidents that might happen on your property during the project. A professional supplier will readily provide you with their credentials. Beyond that, ask about warranties. There should be a manufacturer’s warranty on the porcelain pavers themselves, which covers defects. You should also ask about a workmanship warranty for the installation. A company that stands behind its work with a solid warranty gives you peace of mind that you’re making a secure investment in your home.
Find a Partner with Local Market Expertise
Choosing a local Long Island supplier offers distinct advantages. A local company understands the specific challenges of our climate, from freeze-thaw cycles to salt air exposure, and can recommend products best suited for our environment. They are also familiar with local building codes and design trends. Plus, working with a local business means you get more personalized attention and often quicker delivery times. A supplier with deep roots in the community, like Gappsi, is invested in its reputation and is more accessible for any follow-up questions or future projects you may have.
What’s the Cost of Porcelain Pavers on Long Island?
When you start planning a new patio, walkway, or pool surround, one of the first questions that comes to mind is about the budget. It’s completely normal to want a clear picture of the investment before you get too far into picking out styles. The total cost of a porcelain paver project is shaped by a few key factors: the specific pavers you choose, the complexity of your design, the size of the area, and the cost of professional installation. Understanding how these elements work together will help you set a realistic budget and create the outdoor space you’ve been dreaming of without any surprises along the way.
Porcelain is a fantastic choice because it offers the luxurious look of natural stone but often at a more accessible price point. However, the final price tag is more than just the cost of the tiles. Think of it like baking a cake; you need more than just flour. You also have to account for the skilled labor required to prepare the ground correctly, the base materials that ensure a stable foundation, and the time it takes to lay each paver perfectly. A simple, small patio will have a very different budget from a large, multi-level space with intricate patterns. At Gappsi, we help you see the full picture, offering a wide selection of beautiful porcelain and natural stone pavers and the expertise to bring your vision to life.
Understanding Local Price Ranges
On Long Island, the material cost for porcelain pavers is quite competitive, making them a popular choice for homeowners looking for durability and style. Generally, you can expect the pavers themselves to range from $7 to $9 per square foot. This price point makes them an attractive alternative to other premium materials, giving you a high-end look without the most premium price tag. It’s important to remember that this is just the cost for the material. The final project total will also include installation, base materials, and any necessary site preparation. Shopping at a direct supplier like the Gappsi Store can help you explore high-quality options and find a style that fits comfortably within your budget.
How Material and Design Choices Affect Cost
The specific style of porcelain paver you select will definitely influence the material cost. Porcelain is incredibly versatile and comes in a wide range of colors, sizes, and finishes, from warm wood-look planks to sleek, large-format tiles that mimic natural stone. More intricate designs or premium finishes may fall at the higher end of the price spectrum. Beyond the material itself, the pattern you choose for installation affects labor costs. A simple running bond pattern is more straightforward to lay than a complex herringbone or a custom design with multiple paver sizes. These more detailed patterns require more cuts and time from your masonry design team, which is reflected in the installation price.
Professional Installation vs. DIY
While a DIY project might seem like a great way to save money, installing porcelain pavers correctly requires specific skills, tools, and experience. Professional installation costs on Long Island typically range from $5 to $10 per square foot. This fee is an investment in the longevity and beauty of your project. It covers the expertise needed to build a stable, level base, ensure proper drainage, and perfectly place each paver for a flawless finish. Attempting this yourself without the right knowledge can lead to an uneven surface, poor drainage, or cracked pavers, resulting in costly repairs down the road. You can see examples of stunning professional work on the Gappsi YouTube channel.
Factoring in Project Size and Site Prep
The overall size of your project is one of the biggest factors in determining the final cost. A larger patio will naturally require more materials and more labor, increasing the total price. Beyond just the square footage, proper site preparation is a critical part of your investment that ensures your new patio lasts for decades. This process includes excavating the area, grading it for proper water runoff, and installing a compacted base of aggregate. If your yard has a significant slope, poor soil, or needs an old patio removed, the site prep costs may be higher. A full-service landscape design company can manage this entire process for you, ensuring a solid foundation for your beautiful new space.
How to Start Your Porcelain Paver Project
You’ve decided that porcelain pavers are the perfect fit for your new patio, walkway, or pool deck. That’s a fantastic choice. Now, how do you turn that vision into a reality? Starting a home improvement project can feel like a big undertaking, but breaking it down into simple, manageable steps makes all the difference. It’s all about doing a little homework upfront to ensure a smooth process and a beautiful result you’ll love for years.
From seeing the materials in person to asking the right questions, each step helps you make confident decisions. Think of it as building a foundation of knowledge before the first paver is even laid. This approach not only protects your investment but also ensures the final product truly matches your home’s style and your family’s needs. Let’s walk through the first few steps you should take to get your porcelain paver project off the ground. We’ll cover everything from visiting a design center to knowing what to ask a potential supplier, so you can feel prepared and excited to get started.
Visit a Showroom and Design Center
Pictures online are helpful, but they don’t always tell the whole story. The best way to truly understand the color, texture, and scale of porcelain pavers is to see them in person. Visiting a showroom lets you touch the materials and see how they look under different lighting. At Gappsi, we always encourage homeowners to explore our Long Island showroom. It’s a chance to get a feel for the wide variety of porcelain and natural stone options available. Seeing the pavers firsthand is a critical step in making a choice you’ll be happy with for the long haul. It helps you visualize the final look and feel of your outdoor space with much greater clarity.
Request Material Samples and Project Quotes
Once you’ve narrowed down your choices at the showroom, the next step is to see how they look at home. Ask for samples of your top contenders to take with you. This allows you to see the pavers in your own space, next to your home’s exterior, and in the natural light of your yard. At the same time, it’s the perfect opportunity to request a free price estimate for your project. Having a clear quote helps you create a realistic budget and understand all the costs involved. This simple step of gathering samples and quotes from the Gappsi Store is essential for planning effectively and avoiding any surprises down the road.
What to Prepare Before Contacting a Supplier
Before you sign any contracts, it’s smart to do a little research to protect your investment. A reputable supplier will be fully licensed and insured, and they should be happy to provide you with proof. Take some time to read recent customer reviews and look at examples of their completed work. This gives you a sense of their craftsmanship and customer service. Checking out a company’s portfolio, like the projects on our YouTube channel, can give you confidence in their ability to deliver high-quality results. Doing this homework ensures you’re partnering with a trustworthy and experienced team that will bring your vision to life correctly.
Key Questions to Ask Your Supplier
When you’re ready to talk specifics, having a list of questions prepared will help you get all the information you need. Start by asking to see a portfolio of their past porcelain paver projects. This will give you direct insight into their experience and the quality of their work. You should also ask about their installation process and what makes it right for the Long Island climate. For example, you could inquire about the best paver material and installation technique for a gravel driveway versus a pool patio. A knowledgeable supplier will be able to explain their methods clearly and help you understand why they make certain recommendations for your specific project.
Related Articles
- 5 Largest Porcelain Pavers Suppliers on Long Island NY
- Top 5 Porcelain Paver Installers on Long Island
- Best Porcelain Pavers Showroom Long Island NY
- Porcelain Driveway and Walkway Pavers Supplied & Installed | Long Island NY – Gappsi Group
Frequently Asked Questions
How do I clean porcelain pavers, and are they really stain-proof? Keeping your porcelain pavers looking great is surprisingly simple. For everyday dirt, you can just sweep them or rinse them with a garden hose. Because they are non-porous, they are highly resistant to stains from things like spilled wine, grease, or fallen leaves. Most spills can be wiped away with a damp cloth without leaving a mark, especially if you get to them quickly. They don’t require any special sealers to maintain this resistance, which is a huge part of their low-maintenance appeal.
Will porcelain pavers get too hot to walk on in the summer? This is a great question, especially for families who love to be barefoot in the backyard. Lighter-colored porcelain pavers actually stay much cooler under the sun compared to darker materials like bluestone or concrete. They reflect more solar radiation instead of absorbing it, which keeps the surface temperature more comfortable for your feet. If you’re planning a patio or pool surround that gets a lot of direct sun, choosing a lighter shade is a smart way to ensure the space is comfortable all summer long.
Are porcelain pavers a good choice for a pool deck? Porcelain pavers are an excellent choice for pool decks for a couple of key reasons. First, they are manufactured with a textured surface that provides great slip resistance, which is a critical safety feature for wet areas. Second, their extremely low water absorption rate means they stand up beautifully to splashes from chlorinated or salt water without staining or deteriorating. They give you the elegant look of natural stone without the worry of water damage or chemical reactions.
How do porcelain pavers compare in cost to other popular materials like natural stone? When you look at the initial price, porcelain pavers are often competitive with many types of natural stone. The real savings, however, come from their long-term value. Many natural stones require regular sealing to protect them from stains and water damage, which adds to their lifetime cost. Porcelain never needs to be sealed. When you factor in the money and time saved on maintenance over the years, porcelain proves to be a very cost-effective investment for a high-end look.
Can porcelain pavers be installed over an existing concrete patio? In many cases, yes, you can install porcelain pavers over an existing concrete slab. This can be a great option that saves on the cost and mess of demolition. The key requirement is that the underlying concrete must be structurally sound, meaning it’s stable and free of major cracks or heaving. A professional installer will need to assess your current patio to confirm it’s a suitable base and ensure proper drainage can be established for a successful and long-lasting installation.