


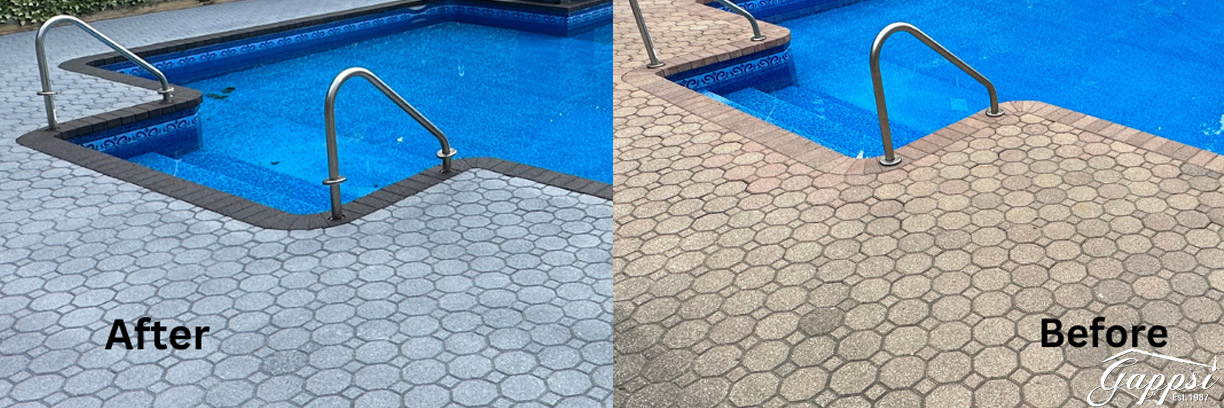
Are you looking at your patio and feeling like its color is stuck in the past? Many Long Island homes have pavers in shades of pink, peach, or brown that no longer fit a modern aesthetic. Instead of tearing everything out, you can achieve a complete transformation by changing the color. Staining allows you to shift from warm, earthy tones to sophisticated cool grays and charcoals, instantly updating your entire backyard. This process gives you the power to customize your space without the expense of a full renovation. Seeing the paver stain before and after photos shows just how powerful a color change can be. Let’s explore how to choose the right products and techniques to give your pavers a fresh, new identity.
https://youtu.be/KD7E9iipEKo
View Gappsi’s YouTube Channel for Videos on Staining and Restoring Brick Pavers | Long Island, NY
Bring life back to your driveway or patio pavers by staining and restoring brick. Few things add so much to a landscape than a beautiful set of pavers, whether installed in your driveway, around the pool, or on your patio. One of the things that makes them so popular is the countless ideas of patterns and even colors you can choose from.
What To Do if Your Paver Color is Faded or Ugly?
Brick pavers must be maintained and sealed regularly to protect them from obvious staining. What might not be obvious to most is their gradual fade. If pavers are not sealed, they can fade to look like bare cement in as little as seven years!
Staining pavers can help protect them from water damage and erosion and increase their lifespan. Stains can also restore faded pavers to look almost new again. Some say that staining pavers is easy and affordable. It can transform a patio into a beautiful extension of a home. Here are some reasons why you might want to stain your pavers:
- Protect from water damage—Water can cause pavers to crack and stain over time. Sealing pavers with a water-repellent sealer can help keep water from penetrating the surface, reducing the likelihood of damage and prolonging the life of the pavers.
- Restore faded pavers—If pavers aren’t sealed, they can fade to look like bare cement in as little as seven years. Staining can restore faded pavers to look almost new again.
- Longer-lasting color—Stains penetrate into the concrete rather than just building up on the surface like paint, resulting in a longer-lasting color that won’t fade as quickly.
- Better look – Stains can give pavers depth of color, making them look better than paint and less fake. The stain won’t be all one consistent color, so some darks or lighter colors will still be visible.
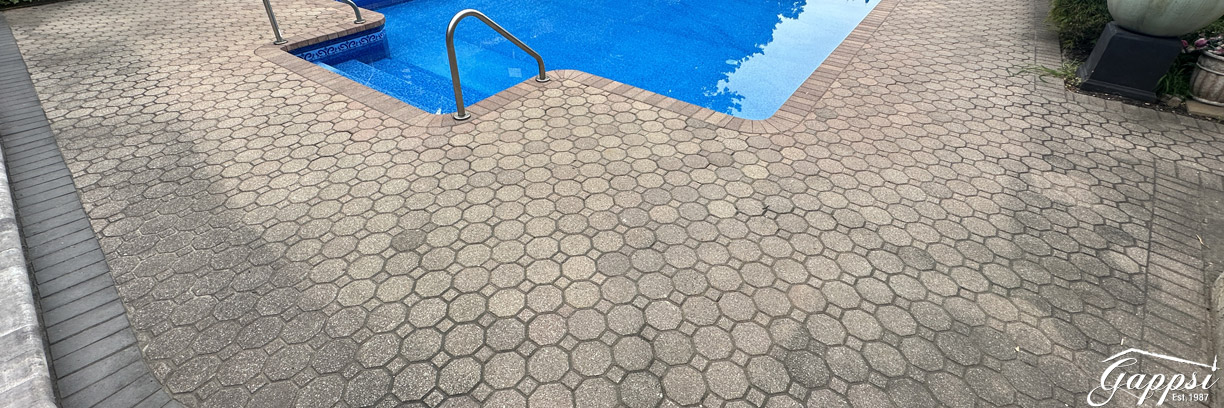 Paver Staining – Power Washing & Polymetric Sand
Recently, Gappsi completed a patio paver stain from Crab Orchard (pink/peach color) from Nicolock to gray. The client chose to stain the pavers in gray and the coping in black, changing the color of the backyard to a gray tone.
The paver staining process starts first by pressure washing the stones. Then, new gray polymeric sand is added and swept between the joints. Polymeric sand is a mixture of sand and additives that can fill the joints between pavers and other hardscape materials. It can be a good choice for paver joints because it has many benefits, including:
- Durability – Polymeric sand is more durable than regular sand and can help increase the lifespan of your hardscape. It’s also resistant to erosion from heavy rain and water runoff.
- Weed and insect prevention – Polymeric sand can help prevent weeds like moss, grass, and dandelions from growing between pavers, and it can also deter ants from burrowing into cracks.
- Easy application – Polymeric sand is quick and easy to apply, and it doesn’t require perfectly dry pavers.
- Aesthetics – Polymeric sand comes in many colors, so choose a shade that matches your pavers or walkway.
- Polymeric sand can cost more than regular sand, but it is worth the investment in the long term. With proper care, polymeric sand can last up to 15 years.
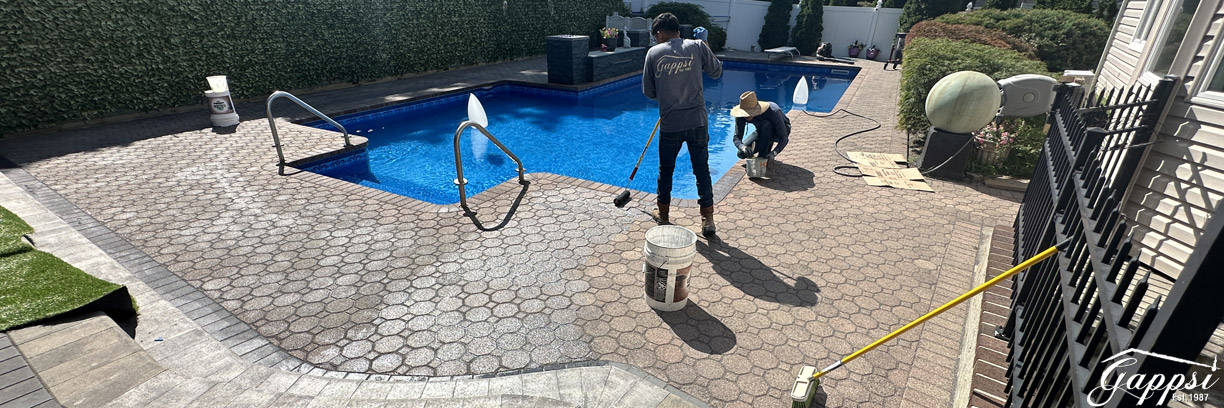 Paver Staining – First Coat of Color Sealant
Once the polymetric sane has dried, we apply the first coat of colored sealer. It takes a few passes to achieve the gray color we want. It is going to be a huge transformation. Changing the color from a beige pink to a gray stone is a challenge. With each pass, we increase the color we apply as we add to the multiple coats. We are putting an extra coat of black on the coping.
Before You Begin: Planning Your Paver Project
Seeing a paver transformation take shape is exciting, but a successful project starts long before the first coat of stain is applied. Proper planning is the key to getting results you’ll love for years to come. Think of it as creating a roadmap for your project. You need to consider your budget, the timeline, the specific materials your pavers are made of, and the weather. While some small DIY paver staining jobs can be a great weekend project, restoring an entire patio or driveway is a significant undertaking. For larger spaces or intricate designs, working with professionals can ensure a flawless and lasting finish. Experts can help you manage the complexities of product selection and application, ensuring your investment not only looks beautiful but is also properly protected. A professional restoration and sealing service can save you time and prevent costly mistakes.
Understanding Project Timelines and Costs
One of the best things about staining pavers is that it can be a very budget-friendly way to refresh your outdoor space. A simple walkway refresh can be a small, affordable project. However, the cost will naturally scale with the size and complexity of the area. When planning your budget, remember to account for cleaning supplies, the stain itself, a quality sealer, and any application tools you might need. For a larger area like a driveway or an entire pool surround, the investment will be greater, but so will the impact on your home’s curb appeal. Think of it as an investment in the longevity and beauty of your masonry, protecting it from the elements while giving it a fresh, modern look.
Weather Considerations for Application
Here on Long Island, we know how unpredictable the weather can be. When it comes to staining pavers, timing is everything. You’ll need to plan your project for a stretch of clear, dry weather. The entire process, from cleaning and drying to staining and sealing, requires several consecutive dry days. Applying stain or sealer when it’s about to rain can lead to a washed-out, uneven finish, wasting both your time and money. The products need adequate time to penetrate the pavers and cure properly without moisture interference. Aim for a clear forecast with moderate temperatures for the best possible results.
Choosing the Right Products for Your Pavers
The products you choose will make or break your paver project. It’s not as simple as grabbing any can of stain off the shelf. The best choice for your project is a semi-transparent stain that is rich in color pigment. This type of stain adds a beautiful layer of color but is sheer enough to let the natural texture of the pavers show through. This avoids the flat, painted-on look that can make a surface look artificial. A quality stain enhances the material, giving it depth and dimension. Understanding the different types of porcelain and natural stone options available can also help you appreciate why specific products are recommended for different surfaces, ensuring a compatible and beautiful finish.
Is Staining Suitable for Your Paver Type?
Before you get your heart set on a specific color, it’s critical to identify what your pavers are made of. Staining is specifically designed for porous surfaces like concrete pavers, which can absorb the pigment. If you have clay brick or natural stone pavers, they will not absorb the stain correctly. Attempting to stain these materials will likely result in a blotchy, uneven mess that’s difficult to fix. For non-porous surfaces like clay or stone, a specialized tinted sealer is the appropriate product to use. This is a crucial distinction that ensures you’re using the right method for your specific material.
Paver Stain vs. Paver Sealer: What’s the Difference?
People often use the terms “stain” and “sealer” interchangeably, but they serve very different functions. A paver stain is all about color. It contains pigments that penetrate deep into the pores of the concrete. Because the color becomes part of the paver itself rather than just sitting on top, it results in a much more durable, long-lasting finish that won’t chip or peel like paint. A sealer, on the other hand, is a protective clear coat. Its primary job is to form a barrier on the surface to protect against moisture, UV rays, and wear and tear. You often apply a sealer after staining to lock in the new color and give it an extra layer of defense.
What to Look for in a Quality Sealer
Once your pavers are stained and you’re happy with the color, the final step is to protect your work with a high-quality sealer. Not all sealers are created equal. For the best protection, look for a sealer that has a high acrylic content, ideally 25% or more. This robust formula provides superior defense against fading from the sun and damage from foot traffic or vehicles. This is especially important for high-use areas like driveways and main walkways. Investing in a premium sealer is the best way to ensure your beautifully stained pavers stay vibrant and protected for as long as possible, making the entire restoration project a lasting success.
Preparing Your Pavers for Staining
Proper preparation is the most important step to ensure your paver stain looks great and lasts for years. Think of it like painting a room; you wouldn’t just slap a new color on a dirty wall. The same principle applies here. Taking the time to prep the surface correctly will prevent peeling, ensure even color absorption, and give you a professional-looking finish. Before you even think about opening a can of stain, you need to get your pavers ready for their makeover. This involves a few key checks and cleaning steps that you absolutely cannot skip. A little bit of effort now will save you a lot of headaches later and make the final result something you can be proud of.
Checking for Existing Sealer
Before you start, you need to figure out if your pavers already have a sealer on them. An existing sealer can prevent the new stain from penetrating the paver surface, leading to a blotchy and uneven finish. Luckily, there’s a simple way to check. Just pour a small amount of water onto a few different pavers. If the water beads up or sits on the surface for a while before soaking in, you likely have a sealer. If the water absorbs into the paver almost immediately, the surface is probably unsealed and ready for the next step. If you do find an old sealer, it will need to be stripped before you can apply a new stain, which can be a tough job. For projects like this, calling in a professional for restoration and sealing services can ensure the job is done right.
Treating Efflorescence Before You Stain
Have you ever noticed a white, chalky powder on the surface of your pavers? That’s called efflorescence. It’s a natural phenomenon caused by mineral salts migrating to the surface as water evaporates from the paver. While it’s harmless, it’s not very attractive and it will prevent your stain from adhering properly. You must remove it completely before staining. The most effective way to get rid of efflorescence is with a pressure washer. A strong stream of water will typically wash the salt deposits away. Make sure the pavers are completely clean and free of this white powder before you move on to applying any stain. This ensures the color penetrates deeply and evenly across the entire surface for a flawless look.
Specific Cleaning Requirements
A thoroughly cleaned surface is your best friend when it comes to paver staining. Start by removing any weeds or moss growing between the joints. A stiff-bristled brush can help with this. Next, sweep away all loose dirt, leaves, and debris. Once the area is clear, it’s time for a deep clean. For general grime, a pressure washer is often sufficient. However, if you have stubborn stains from things like oil, grease, or fallen leaves, you may need to use a specialized paver cleaner or degreaser. Applying stain over a dirty paver is a recipe for disappointment, as the color will look uneven and won’t last. A pristine surface is the foundation for a beautiful, long-lasting finish.
A Note on Newly Installed Pavers
If you have brand-new pavers, you might be eager to stain and seal them right away. However, it’s best to be patient. We recommend waiting at least 60 to 90 days after installation before applying any stain or sealer. This waiting period is crucial for a couple of reasons. First, it allows the pavers to fully cure and settle. Second, it gives time for any potential efflorescence to appear and be cleaned off. Staining too soon can trap moisture and salts within the pavers, leading to discoloration and sealer failure. When we complete a new masonry project, we always advise our clients on the proper timeline for care to ensure their investment looks beautiful for years to come.
Always Test Your Stain Color First
You would never paint an entire room without testing the color on a small patch of wall first, right? The same rule applies to paver stain. The final color can look different depending on the original shade and porosity of your pavers. To avoid any surprises, always test the stain on an inconspicuous area, like a corner of your patio or a spot that’s usually covered by furniture. Apply the stain just as you would for the full project and let it dry completely to see the true color. This simple step allows you to confirm you love the shade before committing to the entire surface. It’s a small bit of effort that guarantees you’ll be happy with the final transformation.
Application Process and Technique
Staining your pavers is a manageable project that can completely transform their look. The process starts with a deep clean to get rid of any dirt, grime, or old sealer. Once the surface is prepped and dry, you can begin applying the stain. The key is to apply a specialized masonry stain that penetrates the paver, followed by a protective sealer to lock in the new color and shield it from the elements. While many homeowners tackle this themselves, achieving a flawless, long-lasting finish requires precision. For larger patios or driveways, or if you simply want to guarantee a professional result, our team has the tools and expertise to restore and seal your pavers perfectly.
Keeping the Stain Mixed for a Consistent Finish
One of the most important tips for getting an even, consistent color is to keep your stain mixed throughout the entire application. The color pigments in the stain are heavier than the liquid and can settle at the bottom of your container. If you don’t mix it regularly, you might start with a rich color and end with a much lighter, diluted shade. As one expert source notes, “If using a sprayer, shake the stain often to make sure the color stays even.” This advice holds true whether you’re using a sprayer, a roller, or a brush. Give the container a good shake or stir every few minutes to keep those pigments suspended and ensure your patio has a uniform, beautiful finish from edge to edge.
How Many Coats of Stain Should You Apply?
The number of coats you’ll need depends on the color depth you’re aiming for. Generally, one coat will provide a subtle tint, while multiple coats will create a richer, more saturated look. If you want a deeper color, you can add more layers, but it’s best not to apply more than three. Applying too many coats can cause the stain to build up on the surface instead of soaking in, which might prevent it from sticking well over time. After your final coat of stain has completely dried, applying a high-quality sealer is the final step. This not only protects the pavers but also enhances the depth of the new color, giving it a vibrant, finished appearance that will last for years.
VISIT OUR KITCHEN & BATHROOM CLEANING & SEALING PAGE TO LEARN MORE
How to Stain Pavers?
To stain pavers, you can use either sprayers or brushes. A brush can provide better penetration of the coloring agents, but you must be careful not to leave brush marks. Remember to protect surrounding areas to prevent unintentional stains.
You can feel compelled to stain your pavers in a different color for several reasons. Let’s list below some of them:
- You can create unique patterns using different colors.
- Staining your pavers in different colors can add that new, fresh look you’re looking for in your landscape.
- The result has a more natural look than painted pavers.
- It is relatively easy compared to other options (replacing pavers).
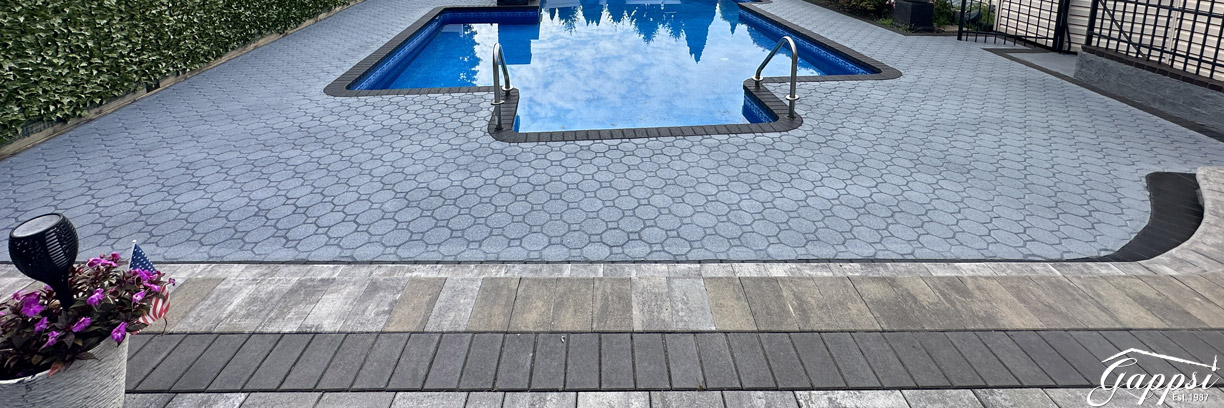 We will blend it in with the existing Cambridge patio. The color staining for this backyard in Smithtown NY has been completed. We transformed the color of the patio and the coping from the crab orchard, a combination of beige brown and peach colors, to a light gray for the patio and charcoal for the borders.
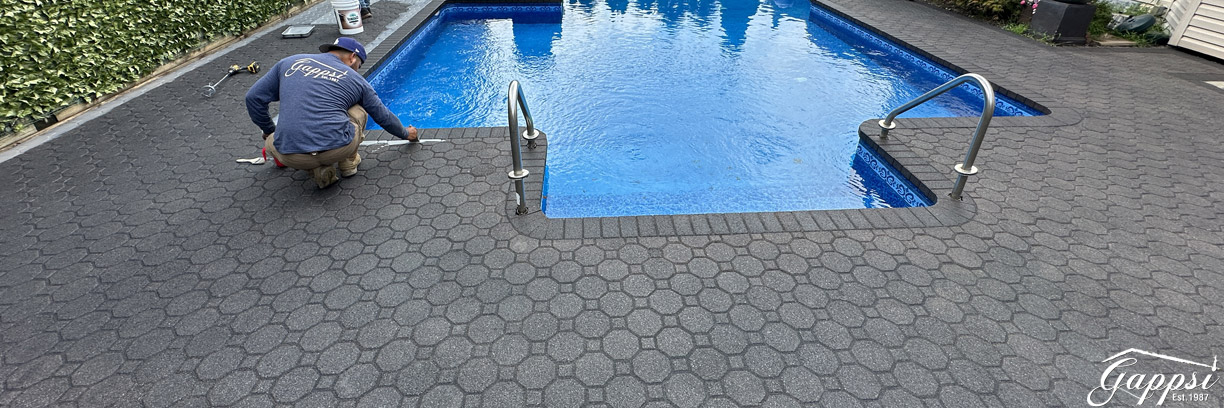 The homeowners have changed the color of the backyard to be more gray-toned throughout the years. The existing old patio did not match the style, so they decided to color stain the pavers to blend in. This color that we used is also a sealer that stains the stones. This is the latest stone staining project done by Gappsi in Smithtown, NY.
Aftercare and Long-Term Maintenance
Durability and Lifespan of Paver Sealers
Think of paver sealant as a shield for your beautiful patio or driveway. It’s an essential step that protects the stone from stains, harsh UV rays that cause fading, and water damage from Long Island’s unpredictable weather. Without it, your pavers are exposed and can quickly show signs of wear. Regular sealing is the key to keeping your outdoor space looking pristine and ensuring your investment lasts for many years. A professional restoration and sealing service not only applies the product correctly but also ensures the surface is perfectly prepped, which is crucial for the sealer to bond effectively and provide maximum protection.
Your Paver Resealing Schedule
So, how often do you need to reapply this protective layer? A good rule of thumb is to reseal your pavers every two to three years. However, this can vary. The type of sealant used plays a big role; glossy, film-forming sealants might need attention sooner than penetrating sealers, which soak into the paver itself. Instead of just marking a date on the calendar, it’s smart to observe how your pavers are holding up. If you notice water is soaking in rather than beading on the surface, or if the color looks a bit dull, it’s probably time to think about resealing.
Factors That Affect Sealer Longevity
Several factors influence how long your paver sealant will last. The local climate is a major one; Long Island’s combination of strong summer sun, heavy rain, and freezing winters puts any outdoor surface to the test. The amount of traffic your pavers receive also matters. A driveway or a main walkway will see more wear than a secluded garden path. Even the type of sealant and how often you clean the area can affect its lifespan. Understanding these elements helps you create a realistic maintenance plan to keep your pavers in top condition.
The Final Step: Applying Joint Sand Correctly
After cleaning and sealing, there’s one final, crucial step: applying joint sand. Using polymeric sand between your pavers is a game-changer. This special sand mixture hardens to lock pavers firmly in place, which prevents shifting and wobbling over time. It also creates a durable barrier that stops weeds from sprouting and deters ants from making a home in the cracks. Proper application is everything. The sand must be swept carefully into the joints and activated with just the right amount of water. When done correctly, it provides a clean, finished look and can last for years, making it an essential part of any professional paver restoration project.
SCHEDULE A MEETING TODAY WITH GAPPSI
Frequently Asked Questions
My pavers are a dated pink color. Can I really stain them gray? Yes, you absolutely can. Staining is a fantastic way to completely change the color of your concrete pavers from warm, earthy tones like pink or peach to modern cool shades like gray and charcoal. The stain penetrates the paver, creating a rich, durable color that looks natural, not painted on. It’s a transformative process that updates your entire outdoor space without the cost and hassle of a full replacement.
What’s the difference between staining and sealing my pavers? Think of it this way: stain is for color, and sealer is for protection. A stain contains pigments that soak into the pores of the concrete to change its color from the inside out. This is why it lasts so long and doesn’t chip. A sealer is a clear, protective topcoat applied after staining. Its job is to shield the pavers from water, UV rays, and stains, locking in the new color and making it last.
How do I know if staining is right for my type of pavers? Staining works best on porous materials like concrete pavers because they can absorb the pigment. If you have non-porous pavers, such as clay brick or certain types of natural stone, the stain won’t soak in correctly and will likely look blotchy. An easy way to check is to pour a little water on them; if it soaks in quickly, they are porous and good candidates for staining.
How long will the new stain color last on my patio? When done correctly with high-quality products, a paver stain can last for many years. The color itself becomes part of the paver, so it won’t peel or flake like paint. The key to longevity is finishing the job with a high-quality sealer and reapplying that sealer every two to three years. This protective layer is what defends the color against fading from sun exposure and general wear.
Can I do this project myself, or should I hire a professional? Staining pavers can be a DIY project, especially for a small area like a walkway. However, for larger spaces like a full patio or driveway, hiring a professional is often the best choice. Proper preparation, including deep cleaning and potentially stripping old sealer, is critical for a good result. Professionals have the right equipment and expertise to ensure the application is even and the finish is durable, saving you from costly mistakes and ensuring a beautiful, long-lasting transformation.
Key Takeaways
- Staining offers a modern update without replacement: You can completely change the look of your patio or driveway by staining the pavers. This is a cost-effective way to shift from dated, warm colors to contemporary grays and charcoals, avoiding the expense of a full renovation.
- Proper preparation is the most critical step: For the stain to look professional and last for years, you must start with a thoroughly prepped surface. This involves pressure washing, removing any old sealer, treating white mineral deposits (efflorescence), and always testing the stain color in a small, inconspicuous area first.
- Product selection is key to success: Use a semi-transparent stain specifically designed for porous concrete pavers to ensure the color absorbs correctly. After staining, apply a high-quality sealer with at least 25% acrylic content to protect the new color from fading and wear, ensuring a durable, long-lasting finish.