


A sloped yard can feel like a wasted opportunity, a tricky space that’s hard to mow and even harder to enjoy. A retaining wall is the perfect solution, transforming that difficult grade into level, usable areas for patios, gardens, or play spaces. But before you can start planning your new outdoor oasis, you need to answer the big question: what is the actual building a retaining wall on a slope cost? The answer isn’t a simple number. It depends on your property’s unique challenges, the materials you choose, and the wall’s size. This guide breaks down all the factors, from permits to drainage, so you can create a realistic budget for your Long Island home improvement project.
Key Takeaways
- Plan for engineering if your wall is over four feet tall: This height is a common threshold that requires building permits and a licensed engineer’s design. Factoring these professional services into your initial budget is essential for a safe, compliant, and structurally sound wall.
- Prioritize drainage to prevent wall failure: The single most important factor for a long-lasting retaining wall is a proper drainage system. Investing in gravel backfill and pipes prevents water pressure from building up, which is the primary cause of cracks, bulges, and collapse.
- Your property’s specific conditions determine the final cost: The steepness of the slope, soil type, and site accessibility all directly influence the project’s price. Because of these variables, an on-site consultation with a professional is the only way to get a truly accurate quote.
How Much Does a Retaining Wall on a Slope Cost?
Figuring out the budget for a retaining wall on a slope can feel tricky because there isn’t a single, flat-rate price. The final cost depends on your property’s unique layout, the materials you choose, and the wall’s size. Think of it less like buying a product off the shelf and more like commissioning a custom piece of functional art for your yard. To give you a clearer picture, let’s break down the main factors that influence the price tag, starting with how contractors typically measure and quote these projects.
Cost per Linear Foot
When you get a quote, you will likely see costs broken down by either the linear foot or the square foot. A linear foot measures the wall’s length, while a square foot measures its face (length times height). Generally, you can expect professional installation to range from $40 to $360 per linear foot. If pricing by the square foot, the cost is often between $20 and $50. This wide range accounts for different materials and the complexity of the job. A simple, straight wall will be on the lower end, while a curved wall made from premium stone will be higher. Our expert masonry services can provide a precise quote based on your specific design.
Cost by Wall Height
The height of your retaining wall is one of the biggest factors in its final cost. Walls under four feet tall are typically more straightforward and affordable. However, once a wall exceeds four feet, the project becomes much more involved. Taller walls must withstand significantly more soil pressure, requiring professional structural engineering, special permits, and extra reinforcement. While a standard retaining wall might cost between $3,500 and $10,000, a large, engineered wall can easily reach $15,000 to $25,000 or more. The necessary engineering and permits alone can add thousands to the initial budget before construction even begins. The porcelain and natural stone you choose will also influence this final number.
Cost by Slope Steepness
The steepness of your yard directly impacts the project’s complexity and expense. A steeper slope requires a more robust foundation and greater reinforcement to ensure the wall is stable and secure for years to come. This often means more excavation, more materials, and more labor. For very steep grades, building a single tall wall isn’t always the best solution. Instead, a series of shorter, stepped walls, known as terracing, is often recommended. This approach distributes the pressure more effectively and can create beautiful, usable garden beds or patios. This is a key part of a thoughtful landscape design that balances function with aesthetics.
What Factors Affect Your Retaining Wall Cost?
When you start budgeting for a retaining wall, you’ll quickly find that the final price depends on more than just the materials you choose. Several key factors related to your specific property will influence the total cost. Understanding these variables will help you get a clearer picture of your project’s scope and budget. From the wall’s dimensions to the ground it’s built on, each element plays a role in the design, labor, and materials required to build a structure that is both beautiful and built to last.
Wall Height and Length
The size of your retaining wall is one of the most significant cost drivers. As a wall gets taller, its price increases substantially, and not just because it requires more material. Taller walls must withstand greater pressure from the soil behind them, which means they need stronger, deeper foundations and more reinforcement to ensure stability. For many projects on Long Island, any wall over four feet tall also requires a building permit and a formal design from an engineer. Our expert masonry team accounts for these structural needs from the start, ensuring your wall is safe and compliant.
Slope Steepness
The grade of your yard is another critical factor. Building on a steep slope is more complex than working on a gentle incline. A steeper yard demands a more robust design to safely hold back the earth. This often involves more extensive excavation, stronger foundations, and additional reinforcement to prevent failure. In many cases, an engineer’s guidance is necessary to create a safe and effective plan. The increased complexity naturally leads to higher labor and material costs, but it’s a necessary investment to properly manage your landscape and prevent erosion.
Soil Conditions
The type of soil on your property can have a surprising impact on your retaining wall’s cost. Different soils behave in different ways, especially when wet. For example, the heavy clay soil common in many parts of Long Island tends to hold water and expand, putting immense pressure on a wall. If your site has challenging soil, your project will require a more thoughtful design. This may include deeper foundations and a more comprehensive drainage system to channel water away from the wall. Properly addressing your site’s specific soil conditions is key to preventing future issues like bulging or cracking.
Site Access and Excavation
How easily can workers and equipment get to the construction area? If the site is hard to reach, perhaps located in a tight backyard with no direct entry for machinery, it can increase labor costs. When materials have to be moved by hand and excavation requires more manual work, the project takes more time and effort. Easy access allows our team to use efficient equipment for digging, moving materials, and setting stones, which helps keep the project on schedule and within budget. We always assess site access during our initial consultation to give you an accurate and transparent estimate.
Local Labor Costs in Long Island
Labor is a major component of any construction project, and rates can vary based on your location. In areas like Long Island, skilled labor comes at a premium, reflecting the high level of expertise required for these projects. Factors like a steep, rocky, or hard-to-reach site will increase the amount of work needed for digging, leveling, and stabilizing the ground. This directly translates to higher labor costs. Investing in a professional home improvement company ensures the job is done right by experienced craftsmen who understand local building codes and environmental factors, giving you peace of mind.
Comparing Retaining Wall Material Costs
Choosing the right material for your retaining wall is one of the biggest decisions you’ll make. It influences not just the final price tag, but also the wall’s appearance, durability, and how long it will last. From the classic beauty of natural stone to the modern efficiency of concrete blocks, each option has its own set of benefits and costs. At Gappsi, our masonry experts help you find the perfect fit for your Long Island property, ensuring your new wall is both functional and beautiful for years to come. Let’s break down the most common materials and their associated costs.
Interlocking Concrete Blocks
Interlocking concrete blocks are a very popular and practical choice, typically costing between $20 and $55 per square foot. These blocks are engineered to fit together securely, creating a strong and stable wall without needing mortar. Their uniform shape makes installation relatively straightforward, and they come in various colors and textures to match your home’s style. This material strikes a great balance between structural integrity and aesthetic flexibility, making it a reliable option for many sloped landscapes on Long Island.
Natural Stone
If you’re aiming for a timeless, organic look, nothing compares to natural stone. With costs generally ranging from $30 to $50 per square foot, stone walls offer unmatched beauty and incredible longevity, often lasting more than 50 years. Each stone is unique, giving your wall a custom character that blends seamlessly with the natural environment. Because of the material’s weight and the skill required to fit irregular shapes together, it’s often best suited for shorter walls. The result is a stunning feature that adds significant curb appeal to your property.
Poured Concrete
For maximum strength and durability, a poured concrete wall is an excellent, though more expensive, option. With prices starting around $40 and reaching $100 or more per square foot, this material is one of the strongest available. The process involves building forms and pouring concrete to create a solid, seamless structure. While highly effective for tall walls or challenging slopes, the installation is labor-intensive and requires specialized expertise, which contributes to the higher cost. A professionally installed poured concrete wall provides unparalleled stability for the most demanding projects.
Timber and Wood
Timber is the most budget-friendly material for a retaining wall, with costs usually falling between $10 and $40 per square foot. It offers a rustic, natural look that can work well in certain garden settings. However, the lower upfront cost comes with a trade-off. Wood has a much shorter lifespan compared to stone or concrete and is vulnerable to rot and insect damage, especially in Long Island’s wet and humid seasons. For this reason, it’s generally not the best choice for supporting significant slopes or for homeowners seeking a long-term, low-maintenance solution.
Segmental Retaining Wall Blocks
Segmental retaining wall (SRW) blocks are a favorite for residential projects, and for good reason. Priced between $20 and $35 per square foot, they offer a fantastic combination of durability, affordability, and style. Like interlocking blocks, they are designed for easy, mortar-free installation, but they often come in a wider array of decorative faces and colors. These blocks are engineered to create a strong, flexible system that can last for 50 years or more, making them a smart and attractive investment for creating level, usable space on your property.
Does a Steeper Slope Always Mean a Higher Cost?
It’s a fair question, and the short answer is yes, a steeper slope almost always leads to a higher cost. The price increase isn’t just about needing more blocks or stones. Building on a significant grade introduces a host of complexities that demand more intensive labor, specialized equipment, and robust engineering to ensure your wall is safe and durable. While a retaining wall on a gentle slope might cost between $3,500 and $10,000, a project on a steep hill can easily climb to $20,000 or more. The final price depends on a few key decisions and site conditions that directly impact the design and construction process.
Terracing vs. a Single Tall Wall
For properties with a very steep grade, building one massive wall isn’t always the best or most affordable solution. Instead, your designer may recommend terracing. This approach involves creating a series of shorter, stepped walls that follow the contour of the slope. Terracing effectively distributes the immense pressure from the soil, making each individual wall more stable and simpler to construct. While it might sound like more work, this method can reduce the need for heavy-duty engineering. It also creates beautiful, usable garden beds or flat areas, turning a challenging slope into a stunning landscape feature. A professional landscape designer can help you determine if terracing is the right strategy for your yard.
Foundation and Reinforcement Needs
The height of your retaining wall, which is directly influenced by the slope’s steepness, plays a huge role in its structural requirements. As a general rule, any wall over four feet tall requires a building permit and plans from a licensed engineer. This is a crucial safety measure. Taller walls must withstand incredible force, so they need much stronger foundations and additional reinforcement to prevent bowing or collapse. This often involves digging deeper footings and incorporating steel rebar or geogrid mesh into the structure. These necessary steps add to the project’s complexity and overall cost, but they are absolutely essential for building a wall that is secure and built to last.
How Soil Type Impacts Design
The type of soil on your property is another critical factor that affects your wall’s design and cost. For example, Long Island’s clay-heavy soils tend to expand and contract as they absorb and release water. This movement exerts significant pressure on a retaining wall. To counteract this, your wall will need a deeper foundation and a robust drainage system. Trapped water is the number one enemy of a retaining wall, so proper drainage isn’t optional. Installing solutions like gravel backfill and weep holes adds to the initial cost but is vital for preventing catastrophic failure and far more expensive repairs in the future. Properly managing water is a key part of our masonry construction process.
Hidden Costs to Budget For
When you get a quote for a retaining wall, it usually covers the basics: materials and the labor to build it. But a few other expenses can pop up along the way. Thinking about these potential costs from the start helps you create a realistic budget with no surprises. Planning for these items ensures your project runs smoothly and that your final wall is not only beautiful but also safe and built to last.
Permits and Engineering Fees
Before any digging begins, you need to handle the paperwork. Most towns on Long Island require a building permit for retaining walls over a certain height, typically four feet. This process ensures the wall is built to code and is safe for your property. For taller or more complex walls, you will likely need a licensed engineer to create and approve the plans. This isn’t just red tape; an engineer’s stamp of approval confirms the design can handle the pressure from the soil and water, which is critical on a slope. These professional services are a key part of a successful masonry project and protect your investment.
Drainage and Backfill
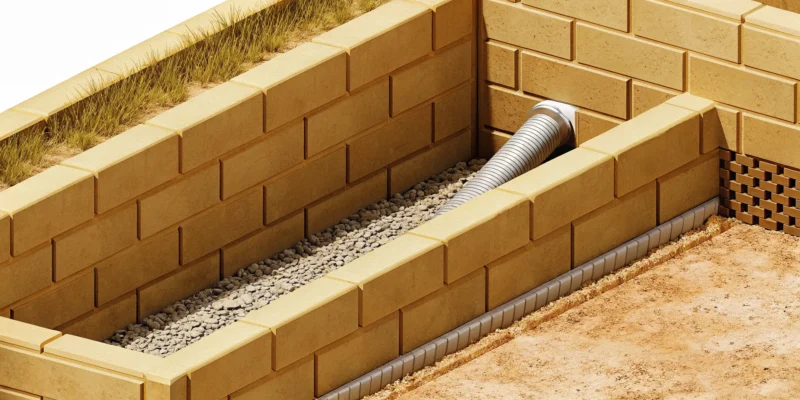
Water is the number one enemy of a retaining wall. Without a proper way for water to escape, pressure builds up behind the wall and can cause it to bulge, crack, or even fail completely. That’s why planning for drainage is not an option, it’s a necessity. This involves installing systems like a French drain, weep holes, and using specific backfill material like gravel to allow water to flow away freely. While it adds to the initial cost, investing in a solid drainage solution is the single best thing you can do to ensure your retaining wall stands strong for decades.
Site Prep and Soil Testing
Getting your site ready for construction is a major step that can influence your budget. The process involves clearing vegetation, excavating soil to create a level base, and ensuring the crew has easy access to the area. If your property has a very steep slope or is difficult to reach with equipment, the labor costs for preparation can increase. For particularly tall walls or in areas with questionable soil, an engineer might recommend a soil test. This analysis determines the soil’s stability and load-bearing capacity, which helps inform the foundation design and ensures your wall is built on solid ground.
Landscape Restoration
A new retaining wall can transform your yard, but the construction process can be tough on the surrounding landscape. Once the wall is complete, you’ll want to budget for restoring the area. This might involve laying new sod, planting shrubs, or adding mulch to blend the new structure seamlessly into your yard. Think of it as the finishing touch that completes your outdoor vision. This is also the perfect time to integrate the wall with other features, like a new stone patio or walkway, as part of a larger landscape design that enhances your entire property.
Contingency for Delays
Even with the best planning, unexpected issues can arise. A week of heavy rain can halt progress, or the excavation crew might uncover a massive boulder that needs to be removed. These kinds of surprises can lead to delays and increase labor costs. That’s why it’s always a smart idea to build a contingency fund into your budget, typically around 10% to 15% of the total project cost. This buffer gives you peace of mind, ensuring that you can handle any unforeseen challenges without derailing your project or your finances.
Why Drainage Can Make or Break Your Retaining Wall
When you picture a retaining wall, you probably think about the visible blocks or stones. But the most critical part of a successful wall is something you’ll never see: the drainage system behind it. Water is the number one enemy of a retaining wall. Without a proper way to escape, rainwater and groundwater get trapped in the soil behind the wall. This creates something called hydrostatic pressure, which is just a technical term for the immense force of water-logged soil pushing against your wall. It’s this pressure that causes walls to bow, crack, and eventually fail. In fact, a staggering 80% of all retaining wall failures are caused by water problems. Water-soaked soil can become two to three times heavier than dry soil, creating a relentless force that your wall was not designed to handle.
Ignoring drainage is like building a boat with a hole in it; it might look fine at first, but it’s destined to sink. Over time, this constant pressure will find the weakest point. You might see the wall start to lean, bulge in the middle, or develop cracks. By the time these signs appear, the structural integrity is already compromised, and a simple fix is usually off the table. That’s why our approach to masonry always prioritizes a robust drainage plan from day one. Investing in proper drainage is not an upsell; it is the only way to protect your investment and ensure your wall stands strong for decades, preventing costly and dangerous collapses down the road.
The Risk of Poor Drainage
Think of the area behind your retaining wall as a giant, un-draining bucket. Every time it rains or the ground becomes saturated, that bucket fills up. With nowhere to go, the water soaks into the soil, making it incredibly heavy and turning it into a thick, muddy slurry. This immense weight exerts constant, powerful pressure on your wall. At first, you might not notice anything, but this force is always at work, pushing and testing the structure. Eventually, the wall will begin to show signs of stress, leading to a failure that can happen gradually or, in some cases, quite suddenly. This is why a well-built wall is more than just what you see on the surface.
Effective Drainage Solutions and Costs
The good news is that preventing water damage is straightforward with the right techniques. An effective drainage system gives water an easy path to escape. This typically involves a combination of a perforated pipe at the base of the wall, a layer of clean, crushed gravel for backfill, and sometimes weep holes that allow water to pass through the face of the wall. The gravel lets water flow freely down to the pipe, which then channels it safely away from the wall’s foundation. While adding a professional drainage system can add to the initial cost, it’s a small price to pay to avoid the much higher expense of a complete wall rebuild and potential landscape restoration.
Choosing the Right Backfill
The material you place directly behind your retaining wall is just as important as the drainage pipe. Using the excavated dirt or dense topsoil is a common and critical mistake. These materials hold water like a sponge, which defeats the purpose of a drainage system and increases hydrostatic pressure. The correct approach is to use a clean, crushed angular stone or gravel as backfill. The gaps between the stones create a clear path for water to travel down to the drainage pipe at the base. To keep soil from mixing with the gravel and clogging the system, we also install a special filter fabric between the gravel and the surrounding earth, ensuring your drainage works perfectly for years to come.
How Wall Height Affects Permits, Engineering, and Price
When you’re planning a retaining wall, its height is more than just a design choice. It’s a key factor that directly influences the project’s cost, timeline, and complexity. Taller walls need to withstand much more pressure from the soil behind them, so they fall under a different set of rules for safety and stability. Understanding how height affects the need for permits, professional engineering, and your overall budget is crucial before breaking ground. It helps you plan properly and avoid unexpected expenses and delays down the road. Let’s walk through what you need to know.
The “4-Foot Rule”
In the world of construction, there’s a well-known guideline called the “4-foot rule.” Simply put, any retaining wall you plan to build that is over four feet tall will likely require a building permit and a design from a licensed engineer. This isn’t just red tape; it’s a critical safety measure. A wall of this height holds back a massive amount of soil, and a failure could be catastrophic. The rule ensures your wall is properly designed to handle the pressure, has a solid foundation, and is built to last. Thinking about this rule from the very beginning helps set realistic expectations for your project’s scope and budget.
When You Need an Engineer and Permits
Crossing that four-foot threshold means your project moves into a new phase of planning. An engineer becomes a necessary part of your team. They will assess your property, especially for tricky slopes or questionable soil conditions, to make sure the ground can support the wall’s weight. They provide the official drawings and plans required for your permit application. This professional oversight does add to the cost. You should budget for permit fees, which can vary, and the cost of the engineering plans themselves. While it’s an added expense, working with an engineer ensures your wall is structurally sound and compliant with all safety codes, protecting your investment and your property.
Long Island’s Local Regulations
While the “4-foot rule” is a great starting point, it’s important to remember that your local town or village on Long Island has the final say. Municipalities in Nassau and Suffolk County have their own specific building codes that might be even more stringent. These local regulations will dictate the exact requirements for permits, engineer approvals, foundation depth, and the type of reinforcement needed for your wall. This is where local expertise becomes invaluable. A team that has extensive experience with masonry construction on Long Island will understand these nuances and can manage the entire permitting process for you, ensuring your project is built correctly and legally from the start.
Common Retaining Wall Mistakes That Cost You More
Building a retaining wall is a fantastic way to add usable space and beauty to your sloped Long Island property. But it’s also a project where small mistakes can lead to big, expensive problems down the road. A failing wall isn’t just an eyesore; it’s a safety hazard that can cost a fortune to repair or replace. Knowing the common pitfalls ahead of time is the best way to protect your investment and ensure your new wall stands strong for decades. Let’s walk through the most frequent missteps and how you can avoid them.
Ignoring Site Prep and Drainage
If there’s one mistake that guarantees a retaining wall will fail, it’s poor drainage. When water gets trapped in the soil behind a wall, it creates immense hydrostatic pressure that pushes outward. Without a way for that water to escape, it’s only a matter of time before the wall bulges, cracks, or completely collapses. Proper drainage, using features like perforated pipes and clean crushed gravel for backfill, is absolutely vital. Skipping this step to save a few dollars upfront will almost certainly lead to total wall failure later. A solid foundation is just as important, requiring careful excavation and compaction to create a stable base that won’t shift over time.
Using the Wrong Materials
It can be tempting to choose your wall material based on aesthetics or the initial price tag, but this is a critical error. You need to pick materials that are strong enough for your wall’s height and the pressure from the slope. A short, decorative garden wall has very different requirements than a tall wall holding back a steep hillside. While beautiful, some natural stones may not be suitable for significant structural loads without expert installation. A professional can help you select the right porcelain and natural stone or concrete blocks that provide the necessary strength for your specific project, ensuring your wall is both beautiful and structurally sound.
Misjudging the Slope
Not all slopes are created equal, and trying to hold back a very steep one with a single, tall wall is a recipe for disaster. For very steep grades, it’s often much safer and more effective to build several shorter, stepped walls. This technique, called terracing, distributes the pressure and creates stable, level areas for planting or patios. A single tall wall on a steep slope requires deep excavation and significant reinforcement, which drives up the cost and complexity. A professional landscape design can transform a challenging slope into a stunning, multi-level feature that is both safe and functional.
DIY vs. Professional Help
While a small, decorative garden wall can be a manageable DIY project, anything more significant requires a professional. You absolutely need an expert for any wall over three feet tall, if you have heavy clay soil, or if the wall is located near your home’s foundation. These situations involve complex engineering and serious safety risks. Professionals understand local building codes, can secure the necessary permits, and have the experience to handle challenges like poor soil or difficult site access. Hiring a qualified masonry company isn’t just an expense; it’s an investment in your property’s safety and value.
Is a Retaining Wall on a Slope a Good Investment?
When you look at a sloped yard, you might see a challenge. But with a retaining wall, that slope becomes an opportunity. A retaining wall is more than just a structural fix for your landscape; it’s a strategic investment in your property’s function, beauty, and overall value. By solving practical problems like erosion and creating new possibilities for your outdoor living space, a well-built wall can provide returns you’ll enjoy for years. It transforms a difficult piece of land into a stable, usable, and attractive asset. Before you start, it’s helpful to understand exactly how this investment pays off.
Preventing Erosion
One of the most critical jobs of a retaining wall is to hold back soil and prevent erosion. On Long Island, rain and runoff can slowly wash away your landscape, threatening your home’s foundation and creating an unstable yard. A professionally designed wall provides a powerful barrier against this force. Since water-related issues cause the vast majority of retaining wall failures, proper construction is key. Our expert masonry team ensures your wall has the correct drainage and reinforcement to handle the immense pressure of water-soaked soil, protecting your property from costly damage down the line.
Gaining Usable Outdoor Space
A sloped yard often means unusable space. A retaining wall completely changes that dynamic by creating flat, functional tiers. That tricky hillside can become the perfect spot for a beautiful stone patio, a lush garden, or a safe play area for your kids. By leveling out sections of your property, you can finally install the outdoor features you’ve been dreaming of, like a cozy fire pit area or even a stunning pavilion. This is one of the most exciting benefits, as it directly expands your living area and allows you to get so much more enjoyment from your home.
Improving Curb Appeal and Property Value
A retaining wall is a project that delivers on both form and function, which is a winning combination for property value. It solves a major landscaping problem while adding significant visual appeal. A thoughtfully designed wall built with high-quality natural stone can become a beautiful focal point in your yard, seamlessly integrated into your overall landscape design. This improvement in both usability and aesthetics makes your home more attractive to potential buyers, with some estimates suggesting a well-executed retaining wall can increase property value substantially. It’s an investment that enhances your daily life and pays you back in the long run.
Get an Accurate Quote for Your Long Island Retaining Wall
After exploring all the variables, you can see why a simple online calculator won’t cut it for a sloped retaining wall. The only way to get a truly accurate cost is to have a professional contractor visit your property. An expert can evaluate your specific slope, soil conditions, and project goals to give you a realistic number. For especially tall walls or difficult slopes, an engineer may need to perform a soil inspection to ensure the ground can safely support the structure. This is a critical step for long-term stability and safety.
When you’re ready to gather estimates, a good rule of thumb is to get multiple quotes. Reach out to at least three qualified hardscape contractors and ask for their ideas and a detailed, written price plan. This approach allows you to compare not just the final price but also their proposed solutions and level of expertise. It’s a great way to find a partner you trust for your project.
Remember to ask about permits. In many areas, including here on Long Island, walls over four feet tall typically require building permits and plans approved by a licensed engineer. A full-service company like Gappsi handles this entire process for you. Our team of masonry designers and construction experts provides a comprehensive quote that covers everything from initial design and engineering to final installation, ensuring there are no surprises along the way.
Related Articles
- Learn About Quality Retaining Walls for Your Long Island Backyard – Gappsi Group
- Estimate for reinforced poured concrete footer for retaining walls long island – Gappsi Group
- Backyards Archives – Gappsi Group
- Outdoor Living News: Pools, Fire Pits & Renovations | Gappsi Inc
- The Complete Guide to a Privacy Wall Outdoor
Frequently Asked Questions
Why is there such a wide price range for retaining walls? Think of a retaining wall as a custom-built structure, not an off-the-shelf product. The final cost depends entirely on your specific property and design choices. A short, straight wall on a gentle slope using basic blocks will be on the lower end of the price spectrum. However, a tall, curved wall on a steep hill using premium natural stone will cost significantly more due to the need for more materials, complex labor, and professional engineering.
Do I really need a permit and an engineer for my wall? In most cases, yes, if your wall is over four feet tall. This isn’t just about following rules; it’s about safety. A wall of that height holds back an incredible amount of soil, and a failure can be dangerous and destructive. An engineer ensures the design is structurally sound for your specific site, and the permit confirms it meets local safety codes. A professional contractor will handle this entire process for you.
What is the single most common mistake that leads to a failing wall? Ignoring proper drainage is, without a doubt, the biggest mistake you can make. When water gets trapped behind a wall, it makes the soil extremely heavy and creates immense pressure that can cause the wall to bulge, crack, or collapse. Investing in a drainage system with the right backfill and pipes isn’t an optional upgrade; it’s the most critical step to ensure your wall lasts for decades.
My yard is very steep. Is it better to build one tall wall or several shorter ones? For a very steep yard, building a series of shorter, stepped walls (a technique called terracing) is often the better solution. A single massive wall requires extensive engineering and reinforcement to handle the immense pressure. Terracing distributes that pressure more effectively across several smaller structures, which can be safer and more stable. Plus, it creates beautiful, usable flat areas for gardens or patios.
Can I save money by building the wall myself? While a very small, decorative garden wall under a couple of feet high can be a manageable DIY project, you should always hire a professional for anything structural. If your wall needs to hold back a significant slope, is over three feet tall, or is near your home’s foundation, professional expertise is essential. It’s an investment in your property’s safety and ensures the job is done right the first time, preventing far more expensive repairs later.