There’s a certain elegance that comes with Italian design, a quality that can turn a simple backyard into a luxurious retreat. If you’re dreaming of an outdoor space with that kind of sophisticated, high-end feel, then Granulati Zandobbio porcelain is the perfect choice. Crafted in Italy, this premium sintered stone offers rich colors and realistic textures that mass-produced pavers simply can’t match. It’s an investment in authentic European craftsmanship for your home. At Gappsi, we are proud to be the trusted Granulati Zandobbio Porcelain Products Distributor/Dealer on Long Island NY, bringing these exclusive collections to homeowners in Nassau and Suffolk County and providing the expert installation needed to create a truly stunning outdoor oasis.
Key Takeaways
- Invest in a Low-Maintenance, High-Style Surface: Granulati Zandobbio porcelain combines Italian elegance with practical durability. Its non-porous surface resists stains and frost, giving you a beautiful outdoor space that requires minimal upkeep, even through harsh Long Island seasons.
- Streamline Your Project with an All-in-One Partner: Working with a company that is both the direct supplier and the installer simplifies your entire project. This approach guarantees authentic materials and expert installation from a single, accountable team from start to finish.
- Focus on Features Built for Outdoor Living: Not all porcelain is suitable for the outdoors, so prioritize key technical qualities for your project. Look for an anti-slip finish for safety around pools and confirm the material is frost-resistant to prevent cracking during New York winters.
Why Choose Granulati Zandobbio Porcelain?
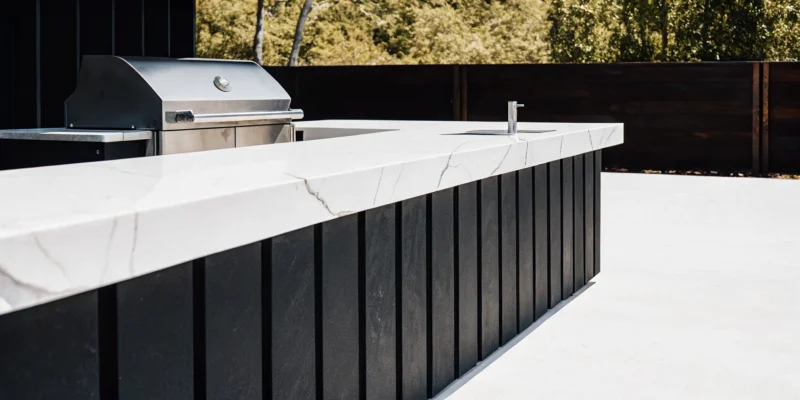
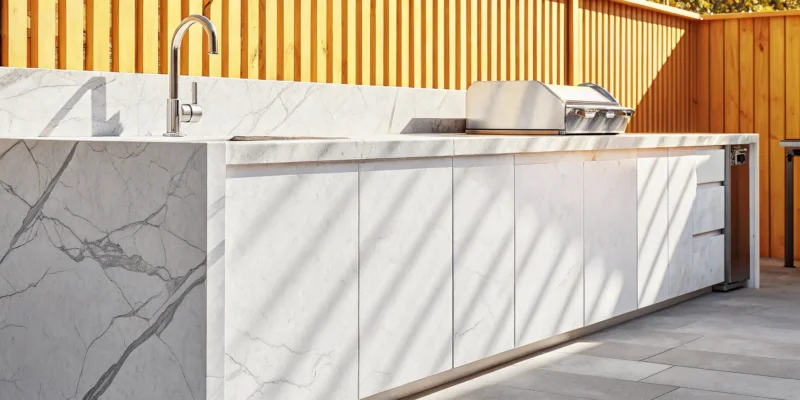
When you’re designing an outdoor space, the materials you choose are everything. They set the tone, define the style, and determine how much time you’ll spend enjoying your patio versus maintaining it. That’s why we’re so passionate about Granulati Zandobbio porcelain. This isn’t just any porcelain; it’s a premium, Italian-made sintered stone that combines stunning aesthetics with incredible performance. For Long Island homeowners, it represents the perfect fusion of luxury and practicality, built to handle our unique climate of hot, humid summers and cold, icy winters.
Granulati Zandobbio has perfected the art of creating beautiful, high-performance materials specifically for landscape architecture. Choosing their products means you’re investing in a surface that will look incredible for years with minimal effort. Whether you’re dreaming of a sleek modern patio, a safe and stylish pool deck, or a seamless transition from your indoor living area to your backyard oasis, this porcelain delivers. It’s a choice that brings peace of mind, knowing your beautiful outdoor space is built to handle everything from summer pool parties to snowy Nor’easters. It stands up to heavy foot traffic, patio furniture, and the general wear and tear of a well-loved backyard, all while maintaining its elegant appearance.
Unmatched Italian Craftsmanship
There’s a reason “Made in Italy” carries so much weight, and Granulati Zandobbio is a perfect example. Every tile is a product of exceptional Italian design and manufacturing, created with a deep understanding of landscape architecture. This isn’t just a surface; it’s a design element crafted to bring sophistication to your outdoor spaces. The company specializes in sintered stone, a high-tech material known for its superior technical and aesthetic qualities. This commitment to quality means you get rich colors, realistic textures, and an overall look that mass-produced pavers simply can’t replicate. When you choose Granulati Zandobbio, you’re choosing authentic European elegance for your home’s porcelain and natural stone surfaces.
Lasting Durability, Low Maintenance
Long Island weather can be tough on outdoor materials, but Granulati Zandobbio porcelain is built to withstand it all. It’s completely frost-resistant, so you won’t have to worry about cracking or damage during harsh winters. For poolside areas, its R11 slip-resistance rating provides excellent traction and safety for your family and guests. It’s even strong enough to be used on driveways. Beyond its strength, one of the biggest advantages is how easy it is to care for. The non-porous surface resists stains, mold, and mildew, so spills wipe away easily. You can forget about the annual power washing and sealing required by other materials and just enjoy your beautiful, low-maintenance outdoor living space.
Sustainable and Eco-Friendly
Creating a beautiful home and being mindful of the environment can go hand in hand. Granulati Zandobbio porcelain is a sustainable choice you can feel good about. As a sintered stone, it’s made from a blend of natural clays, sands, and minerals that are fused together using intense heat and pressure. This process mimics the way natural stone is formed but in a fraction of the time. It avoids the use of the harsh chemicals, resins, and binders found in other manufactured products. By choosing this 100% Italian-made porcelain from the Gappsi Store, you are selecting a durable, long-lasting material that is as kind to the planet as it is beautiful in your backyard.
Your Local Granulati Zandobbio Experts
When you’re investing in premium materials like Granulati Zandobbio porcelain, you want a partner who knows the product inside and out. As your local Long Island experts, we provide more than just materials. We offer the guidance, design expertise, and skilled installation needed to bring your vision to life. Our team is deeply familiar with Granulati Zandobbio’s collections and can help you select the perfect style for your home’s aesthetic and functional needs. Choosing a local expert means you get personalized service from a team that understands our Long Island communities.
Long Island’s Authorized Distributor
We are proud to be the authorized distributor for Granulati Zandobbio on Long Island. This official partnership means we have a direct relationship with the manufacturer, ensuring you receive authentic, first-quality porcelain pavers every time. You get access to their complete catalog of stunning Italian-made products without worrying about imitations. This designation is a mark of trust and quality, guaranteeing that the materials for your project meet the highest standards of craftsmanship. It’s our commitment to bringing world-class materials right to your doorstep.
Proudly Serving Nassau and Suffolk County
Our roots are firmly planted here on Long Island, and we proudly serve homeowners across both Nassau and Suffolk County. From the initial design consultation to the final installation, our team is dedicated to providing exceptional service to our neighbors. We understand the local landscape and architectural styles, allowing us to offer tailored recommendations that enhance your property. Whether you’re creating a chic poolside patio or a welcoming walkway, we supply and install premium porcelain and natural stone with a focus on quality and customer satisfaction.
Seamless Design and Installation
One of the biggest advantages of working with us is our integrated approach. Gappsi is both the direct supplier and the installer, which simplifies your project from start to finish. You won’t have to coordinate between a separate materials dealer and a contractor. Our in-house teams handle everything, ensuring a smooth, cohesive process and flawless execution. This allows for better quality control and a single point of contact for your entire project. Our expert masonry professionals ensure your porcelain is installed with precision and care.
Explore the Granulati Zandobbio Collections
Granulati Zandobbio offers several distinct porcelain collections, each designed to bring a specific vision to life. Whether you’re dreaming of a rustic wood-look patio or a sleek, modern pool deck, there’s a style that fits your project. Understanding the unique features of each collection can help you make the perfect choice for your Long Island home. As your local experts, we can walk you through these beautiful options and find the one that matches your aesthetic and functional needs.
L’ALTRA PIETRA: High-Thickness Sintered Stone
If you’re looking for the best of the best, L’ALTRA PIETRA is it. This is Granulati Zandobbio’s most exclusive collection of high-thickness sintered stone. Sintered stone is created by fusing minerals under intense heat and pressure, resulting in a material that is incredibly dense and durable. This makes it a fantastic choice for any outdoor application, from elegant walkways to stunning patios. Its superior strength and premium finish provide a luxurious foundation for your outdoor living spaces, ensuring they look incredible for years to come.
HARDSCAPE PORCELAIN: Modern Outdoor Style
For those who love a clean, contemporary look, the HARDSCAPE PORCELAIN collection is a perfect match. This line offers a versatile range of sintered stone products designed specifically with modern outdoor style in mind. Its sleek surfaces and sophisticated color palette are ideal for creating minimalist patios, chic pool surrounds, and streamlined walkways. This collection integrates beautifully into any modern landscape design, providing a polished and cohesive look that feels both fresh and timeless. It’s an accessible way to bring high-end, contemporary design to your backyard.
OUTDOOR WOOD 2 CM: The Look of Natural Wood
Do you love the warm, inviting look of wood but dread the constant maintenance? The OUTDOOR WOOD 2 CM collection is your solution. This is the only high-thickness sintered stone line from Granulati Zandobbio that is entirely dedicated to replicating the natural beauty of wood. You get the rich textures and grain patterns of real wood planks without worrying about staining, sealing, or rot. It’s an ideal material for patios and pool decks, giving you a comfortable, slip-resistant surface that stands up to the elements beautifully.
Classic Porcelain Stoneware
Beyond its specialized collections, Granulati Zandobbio is a leader in producing classic porcelain stoneware for all types of landscape architecture. This includes a wide variety of pavings, claddings for walls, and other decorative products that can complete your outdoor project. Whether you need a durable surface for a high-traffic driveway or elegant stone for custom masonry features, their classic offerings provide reliable performance and timeless appeal. This range ensures you can find a high-quality porcelain solution for nearly any aspect of your home’s exterior design.
How to Use Granulati Zandobbio Porcelain
Granulati Zandobbio porcelain is incredibly versatile, offering elegant and durable solutions for almost any space you can imagine. Its unique combination of Italian style and technical performance opens up a world of design possibilities for your property. Whether you’re planning a simple patio update or a large-scale commercial project, this material provides a high-end finish that lasts. Here are a few of the most popular ways we use Granulati Zandobbio porcelain to transform Long Island homes and businesses.
Patios, Pool Decks, and Walkways
Granulati Zandobbio porcelain is a fantastic choice for creating beautiful and functional outdoor spaces. Its incredible durability makes it ideal for high-traffic areas like patios and walkways. Around the pool, its anti-slip surface provides peace of mind, giving you a safe and stylish deck that stands up to splashes and sun. Because these pavers are designed specifically for landscape architecture, they blend perfectly with natural surroundings while offering superior performance. We can help you select the perfect style to build stunning porcelain and natural stone surfaces that will be the centerpiece of your backyard for years to come.
Seamless Indoor-Outdoor Living
One of the most popular design trends is creating a smooth transition from your indoor living areas to your outdoor spaces, and Granulati Zandobbio makes this easy. Their high-thickness sintered stone slabs can be used both inside and out, creating a continuous, flowing look from your kitchen to your patio. This material is completely weatherproof and frost-resistant, so you don’t have to worry about the harsh Long Island winters damaging your beautiful floors. This allows for a true sense of continuity between your home’s architecture and the surrounding landscape. It’s a simple way to make your living space feel larger and more connected to nature, perfect for any home remodeling project.
Residential and Commercial Applications
The strength and elegance of Granulati Zandobbio porcelain make it suitable for more than just backyard projects. We’ve used it to create stunning driveways, entryways, and courtyards for large residential properties. Its resilience also makes it a smart option for commercial settings, including restaurant patios, hotel pool decks, and public plazas that see constant foot traffic. As a direct importer and installer, Gappsi manages the entire process for projects of any scale. We supply the materials and provide expert masonry services to ensure a flawless installation, whether you’re updating your home or a commercial property.
What to Look for in Premium Porcelain
When you’re investing in your home, you want materials that look beautiful and perform exceptionally well. Not all porcelain is created equal, and knowing what to look for ensures your new patio, walkway, or pool deck will stand the test of time. For outdoor spaces here on Long Island, three features are absolutely essential: safety, weather resistance, and durability. Premium porcelain, like the collections from Granulati Zandobbio, is engineered to deliver on all three, giving you a surface that’s as practical as it is stunning.
Anti-Slip for Outdoor Safety
Safety is always the top priority, especially in outdoor areas that see a lot of activity. When choosing porcelain for pool decks, patios, or walkways, look for a dedicated anti-slip surface. This is crucial for preventing falls when surfaces get wet from rain or splashes from the swimming pool. Granulati Zandobbio designs its outdoor porcelain with a textured, high-traction finish that provides a secure grip underfoot, even in damp conditions. This gives you peace of mind, allowing you and your guests to relax and enjoy your outdoor living space without worrying about slippery surfaces.
Frost-Resistant for NY Winters
Long Island winters can be tough on outdoor materials. The constant freezing and thawing can cause lesser materials to crack, chip, and degrade over time. That’s why frost resistance is a non-negotiable feature for any outdoor porcelain paver. Granulati Zandobbio’s products are specifically engineered to be frost-resistant, with an R11 slip resistance rating that makes them a reliable choice for year-round outdoor use. This durability ensures your investment is protected from the elements, so your beautiful masonry work looks just as good after a harsh winter as it did on the day it was installed.
High Strength and Stain Resistance
Your outdoor space is for living, which means it needs to handle everything from heavy patio furniture to accidental spills during a barbecue. Premium porcelain should have high mechanical strength to prevent cracks under pressure and excellent stain resistance to keep it looking pristine. Granulati Zandobbio’s porcelain stoneware is known for its incredible durability and non-porous surface, which makes it extremely easy to clean. Spills like wine, oil, or dirt can be wiped away without leaving a permanent mark. This low-maintenance quality means you can spend more time enjoying your patio and less time worrying about upkeep.
Find Granulati Zandobbio at Gappsi
Once you’ve decided on premium Italian porcelain for your home, the next step is finding a local partner you can trust to bring your vision to life. At Gappsi, we make it simple to access the finest materials from Granulati Zandobbio right here on Long Island. We combine world-class products with our deep local expertise, ensuring your project is beautiful, durable, and perfectly suited to your home. We are your direct source for authentic Italian porcelain and expert installation.
Your Certified Long Island Dealer
Gappsi is proud to be a certified dealer of Granulati Zandobbio products. This means we have a direct relationship with the manufacturer and a complete understanding of their entire collection. When you work with us, you can be confident you’re getting authentic, high-quality materials every time. Our team specializes in offering a wide selection of their stunning porcelain and natural stone pavers, and our expert masonry teams have the design and installation expertise to match. We’ll help you choose the perfect pavers and ensure they are installed with precision for a flawless, lasting finish.
Visit Our Smithtown Showroom
We always recommend seeing and touching materials before making a final decision, and our Smithtown, NY, showroom is the perfect place to do it. We invite you to come explore the full range of Granulati Zandobbio pavers in person. You can see the subtle color variations and feel the unique textures for yourself, which makes visualizing your new patio or pool deck so much easier. Our friendly team is always here to answer your questions, offer design ideas, and provide guidance. We believe that making the right choice for your home should be an enjoyable and inspiring process, and we’re here to help you every step of the way.
Get Expert Design and Installation
Choosing a beautiful, high-quality material like Granulati Zandobbio porcelain is the first step. The real magic, however, happens during installation. A flawless finish requires skill, precision, and an eye for design. At Gappsi, we provide a complete experience, from selecting the perfect pavers to installing them with expert care. Our integrated approach means one trusted team handles your entire project, ensuring your vision becomes a stunning reality without the stress. We manage every detail so you can enjoy the process.
Our Expert Masonry and Hardscaping Teams
The quality of your patio or walkway depends on the team that builds it. Our in-house masonry and hardscaping crews are masters of their craft, with years of experience installing porcelain pavers across Long Island. We understand the unique properties of high-end materials and use proven techniques to ensure a perfect, level surface that stands up to New York weather. From the foundation to the finishing touches, our team’s attention to detail guarantees your new outdoor space will be both beautiful and durable.
The Custom Design Process
Creating your dream outdoor space should be an exciting process. We highly recommend visiting our Smithtown showroom to begin your design journey. Seeing and touching the materials in person makes all the difference. Our designers will guide you, helping you explore different collections and find the perfect porcelain and natural stone for your home. We listen to your ideas and help create a custom plan that reflects your personal style, ensuring the final result is exactly what you envisioned.
Integrate Porcelain into Your Landscape
Granulati Zandobbio porcelain is incredibly versatile, making it a fantastic choice for a cohesive outdoor environment. These high-thickness sintered stone slabs are perfect for more than just patios; they can be used for walkways, pool surrounds, and outdoor kitchens. Our team specializes in creating a seamless flow throughout your property. We can integrate these materials into a complete landscape design, connecting different areas of your yard with a consistent, elegant look. This approach turns a simple project into a fully realized outdoor living space.
Start Your Granulati Zandobbio Project
Feeling inspired to bring the beauty of Italian porcelain to your home? Getting started is simpler than you might think. We’ve streamlined the process to make it easy and enjoyable for you, from the first design idea to the final installation. Here’s how you can begin your project with our team.
Schedule a Design Consultation
The first step is a simple conversation. We want to hear all about your vision for your space, whether it’s a modern patio, a chic pool deck, or a seamless indoor-outdoor transition. You can easily reach out to us to get a price estimate, set up a meeting, or even send a quick text to get the ball rolling. This initial consultation is the perfect time to ask questions and explore how Granulati Zandobbio’s stunning porcelain and natural stone can fit into your home’s design. Our team is here to listen and provide expert guidance without any pressure.
What to Expect at Our Showroom
While pictures are great, nothing compares to seeing and feeling these materials in person. We always recommend a visit to our Smithtown showroom. Here, you can walk through displays of outdoor paving stones and indoor tiles for kitchens, bathrooms, and living areas. Seeing the textures and true colors up close makes all the difference. Our designers will be there to help you compare collections and find the perfect match for your project. Visiting the Gappsi Store is a fantastic way to gather inspiration and make confident decisions for your home.
Plan Your Porcelain Installation
One of the biggest advantages of working with us is that we handle everything from start to finish. Gappsi is a direct importer and supplier of Granulati Zandobbio porcelain, and we are also the installers. This means we oversee the quality of your project from the moment you select your materials until the last paver is perfectly placed. Our integrated approach ensures a smooth, efficient process and a flawless result. You can trust our expert masonry and hardscaping teams to bring your design to life with precision and care.
Related Articles
- Guide to Rooftop Porcelain Pavers in Long Island
- Porcelain and Natural Stone Pavers Long Island NY – Gappsi Group
- A Guide to Long Island’s Largest Porcelain Pavers Suppliers
- Porcelain Driveway and Walkway Pavers Supplied & Installed | Long Island NY – Gappsi Group
- 5 Largest Porcelain Pavers Suppliers on Long Island NY
Frequently Asked Questions
What makes Granulati Zandobbio porcelain a better choice than other pavers? Granulati Zandobbio porcelain stands out because it combines high-end Italian design with incredible technical performance. Unlike many traditional pavers, it’s a sintered stone, meaning it’s extremely dense and non-porous. This gives you a surface that resists stains, mold, and fading without needing to be sealed every year. You get a far more durable and low-maintenance patio or walkway that maintains its beauty for years.
How well does this porcelain actually hold up to Long Island winters? It performs exceptionally well. This material is engineered to be completely frost-resistant, which is a critical feature for our climate. Because it doesn’t absorb water, there’s no risk of it cracking or chipping during the constant freeze-thaw cycles we experience. It’s built to endure harsh New York winters and look just as good when the snow melts.
Is porcelain a safe choice for a pool deck? Yes, it’s an excellent and safe choice. Granulati Zandobbio’s outdoor collections are designed with an R11 anti-slip rating. This means the surface has a texture that provides reliable traction, giving you a secure footing for your family and guests even when the deck is wet from splashes. It offers peace of mind without sacrificing style.
I love the look of a wood deck but hate the maintenance. Is there a porcelain option for that? Absolutely. The OUTDOOR WOOD 2 CM collection was created for exactly this reason. It beautifully replicates the warm, natural appearance and grain of real wood planks. However, since it’s porcelain, you never have to worry about it rotting, splintering, or needing to be stained and sealed. You get the inviting look of wood with the lasting durability of stone.
Why should I work with Gappsi for both the materials and the installation? Working with us simplifies your entire project. As the authorized Long Island distributor and the installer, we manage everything from start to finish. This integrated approach ensures a smooth process, better quality control, and a single point of contact for you. You won’t have to juggle a separate supplier and contractor; our expert teams handle the design, materials, and installation for a seamless and stress-free experience.