How to Remove Sealer From Pavers: A Simple Guide

  How-to-Strip-and-Remove-Paver-Sealer-Long-Island-NY Before and AfterCan a poor application of driveway sealer be corrected?  Depending on the severity of the problem, it may require saturation, aggressive scrubbing, and repeated applications to re-emulsify the sealer.

That cloudy, white film ruining your beautiful pavers? It’s not a permanent stain. It’s usually just trapped moisture from a failed sealer, a frustrating issue we see on everything from a brick driveway to new concrete pavers. The good news is you can absolutely fix it. This guide gives you the exact steps on how to remove sealer from pavers and strip away that hazy layer for good. We’ll also touch on common safety questions, like “are paver sealers toxic?”, so you can feel confident tackling this project. Let’s get your pavers back to their original, vibrant color.
1-poor-sealing-job---how-to-strip-and-remove-paver-sealer-long-island-nyWhiting happens when your pavers have been sealed with a xylene or acrylic (solvent-based) sealer or sealed during imperfect weather conditions or application. The trapped moisture is caused by hydrostatic pressure, which brings the moisture up through the pores of the pavers and traps it under the sealer. Once your pavers have “turned white”, there is only one way to rectify the problem. The sealer must be completely stripped off and re-sealed with the correct type of sealer. When a failed coating needs professional correction, Gappsi’s paver cleaning and sealing services on Long Island can restore the surface and prepare it for the right finish.
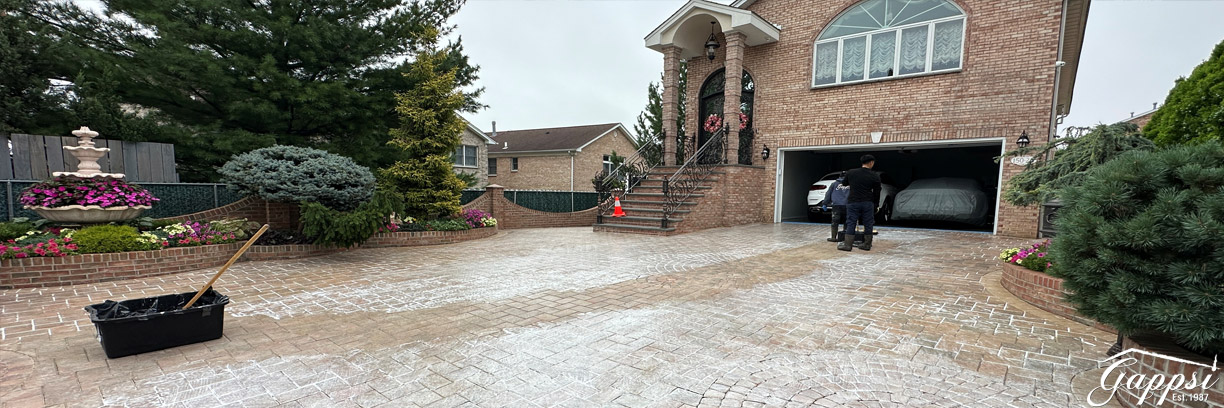
2-applying-sealer-stripper_removers---how-to-strip-and-remove-paver-sealer-long-island-nyRemoving and Stripping Old Sealant Off Driveway Pavers

The first step in this job is to strip and remove all the old sealer from the paving stone driveway. Unfortunately, the previous contractor did not complete the job properly the first time. Through time many additional layers of sealer were applied and magnified the patchy poor paver color “whiting” issues.  There are a few different layers of sealer, the latest application seems to be an acrylic sealer.  It gives a shiny look to the stones, the issue over the years has made the problem worse and more noticeable.

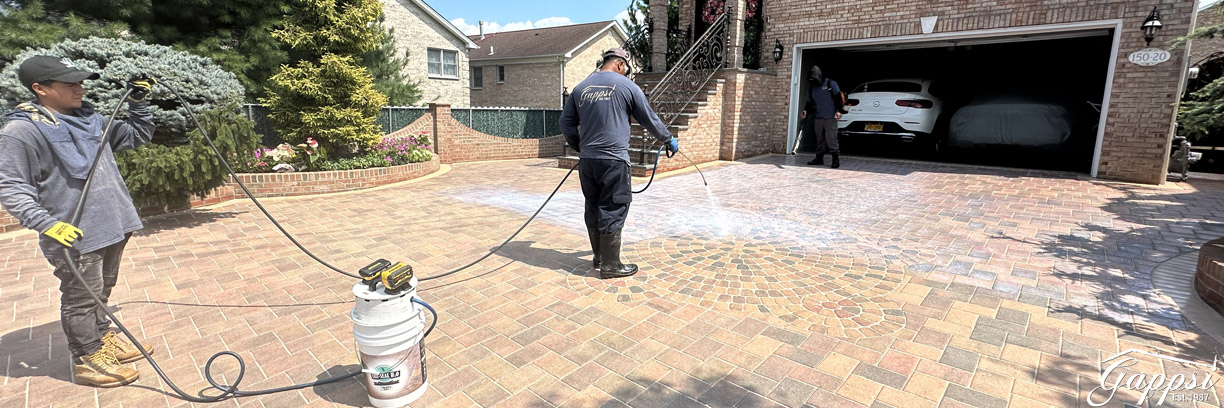
We are applying the sealer remover. It is a stripper. We will finish applying the sealer and let it sit for a few minutes.  Then we start the process of pressure washing it off from the top of the pavers.

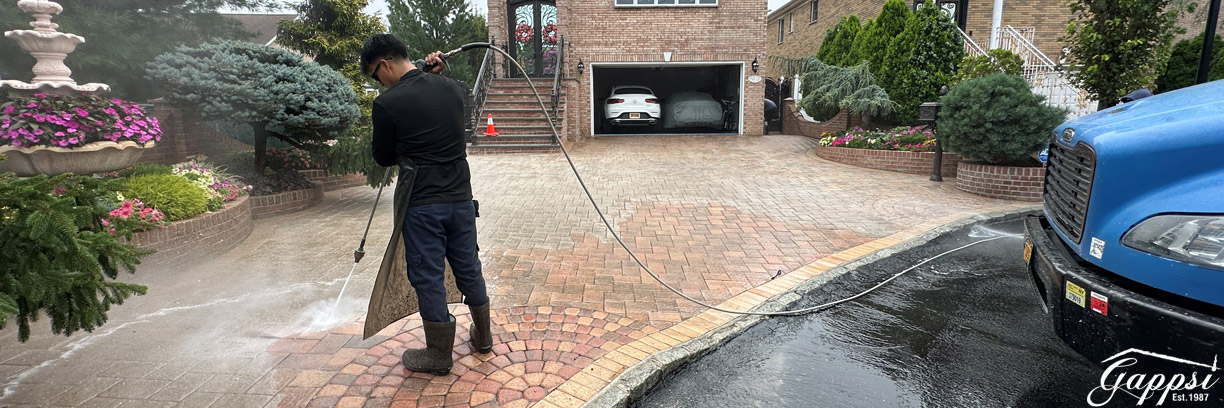
We have started removing the sealer. The stripper soaks in and makes it possible to remove the sealant layers. We are using the turbo nozzle with high pressure and hot water.  Then we pressure washed the surface of the pavers with hot water, low pressure.  As we strip the driveway each layer of the old sealer is removed.
3-pressure-washing-stripper-sealer-remover-with-hot-water-pressure-washing-system---how-to-strip-and-remove-paver-sealer-long-island-nyWhat type of sand material fills the joints between pavers?

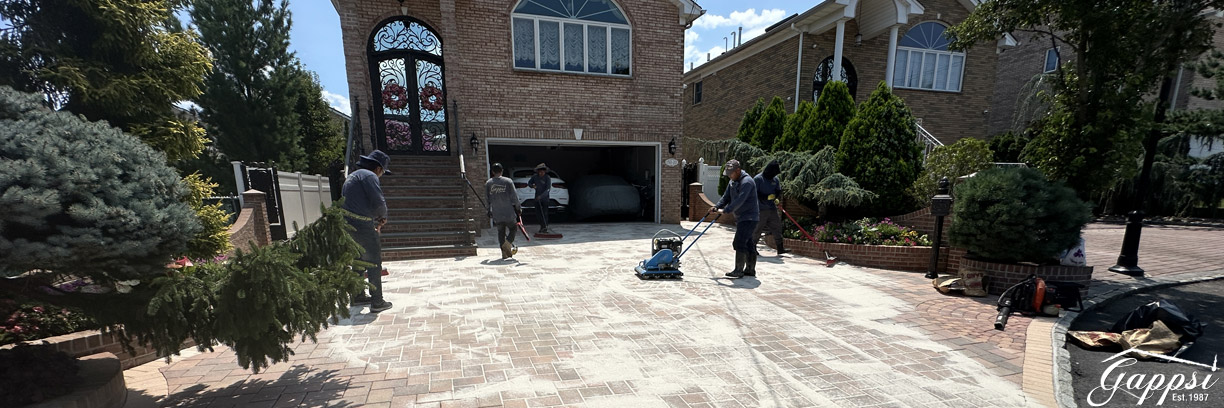
We add sand to the stone pavers. Then we are in the process of spreading the sand in the joints. We are using white silica sand, which works well with the urethane sealer, it absorbs the sealer and gets very hard. It also is very dry and falls into space very easily. We are compacting the sand with a vibratory roller. The compactor has rolls under it to prevent it from scratching the stones. Then we apply the sand once, vibrate it respread the sand, and vibrate it a second time. We are doing the final touches with the sand. We are blowing the extra sand from the top of the stones without removing it from the joints.

Polymeric sand is best to use to fill the joints in between pavers. High-quality polymeric sand will not leave any stains on the surface. Gappsi vibrates the pavers while sweeping which allows the sand to fill the joints tight and also helps the sand harden. Sweeping the excess sand off the pavers before wetting the sand is also very important. This prevents the glue that is in the sand from smearing the surface of the pavers. Most importantly, applying a good urethane sealer will further help the sand to harden and prevent ants from digging into the paver joints and weeds from growing on patios.
4-reaending-paver-joints-with-silica-sand---how-to-strip-and-remove-paver-sealer-long-island-nyWhat is the best sealer for concrete pavers?

After the sand is vibrated into place in the driveway pavers we apply urethane sealer. It is going to be a HUGE transformation given how extreme this driveway was.

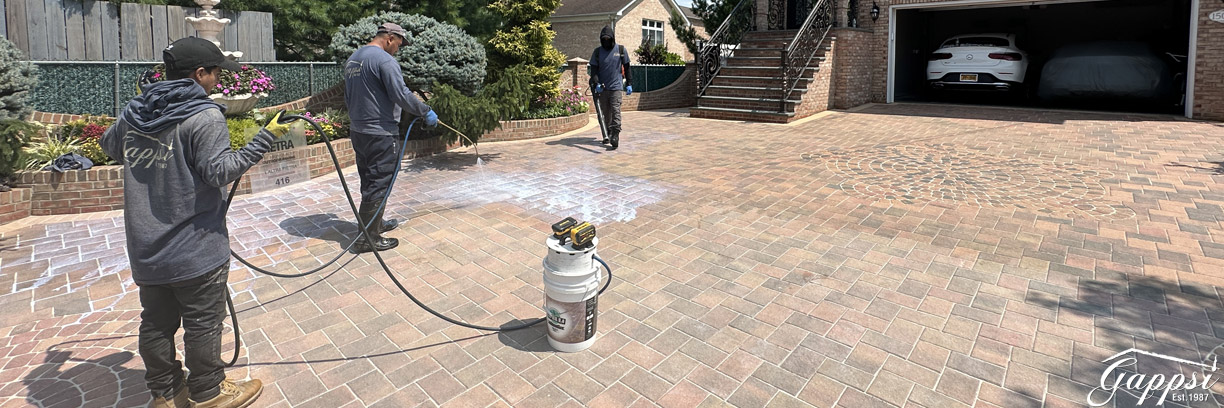
This is the process of the first application of driveway sealer to the pavers. We spray the sealer and allow it to sink into the joints. This will soak into the sand and get hard from the urethane. We use a blower to help the sealer spread uniformly. This coat is a flood coat.  A second layer of sealant is applied primarily to seal the stones. This first coat is absorbed into the sand in between the joints. We apply the second coat of sealer and final which gives the stones the color enhancement. We don’t float the surface of the stones with this coat because the pavers will not absorb as much as the first coat. However, we still have to move the sealer around because it can dry on top of the surface unevenly.
5-applying-first-coat-of-sealer-on-driveway-pavers---how-to-strip-and-remove-paver-sealer-long-island-nyThe sealer creates a very strong bond to the paving stone surface and over the sand particles in between the joints.

There are many manufacturers of sealers, from solvents to acrylic urethane. Epoxies, acrylic, and urethane sealers come in water-based versions and solvent-based versions, including combinations of both. The biggest difference between the two is the VOC content. The sheen and life of the product determine how often it lasts before needing to be reapplied. Solvent-based acrylics tend to yellow over time and don’t allow the concrete to breathe. Epoxies are the strongest sealers but are best used for smoother surfaces and more for indoor or warehouse floor applications.
6-applying-second-coat-of-sealer---how-to-strip-and-remove-paver-sealer-long-island-nyThe best sealers for paving stones are water-based urethanes

  • They are algae and mold inhibitors
  • Allow for superior joint stabilization,
  • Environmentally safe
  • Their UV Protection will not harm vegetation
  • VOC Compliant in all 50 States.

When you choose Gappsi you can guarantee a well-trained Gappsi personnel will apply correctly the paving stone sealer products achieving the best results.

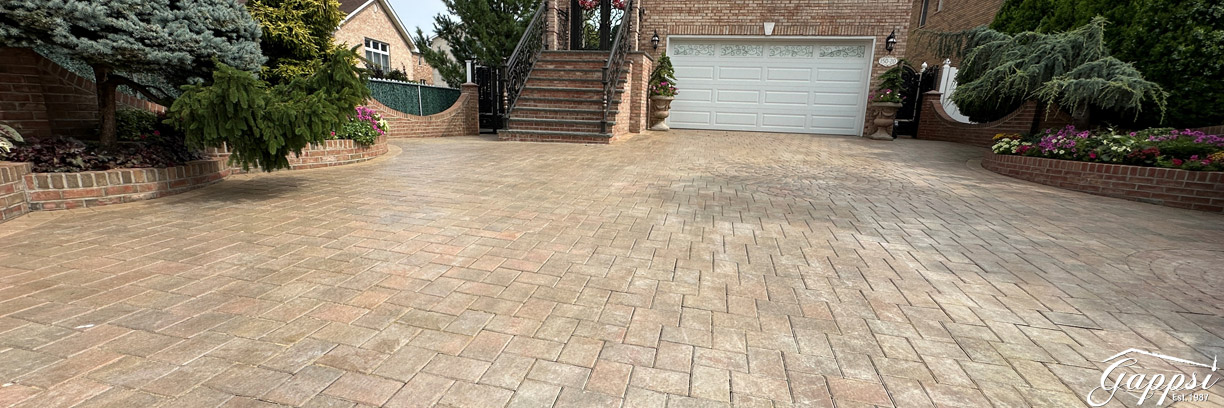
This driveway was installed over 20 years ago. The paving stones are by Nicolock in the color Bayberry Blend in a 6×9 Rustico and Sante Euro Circle.
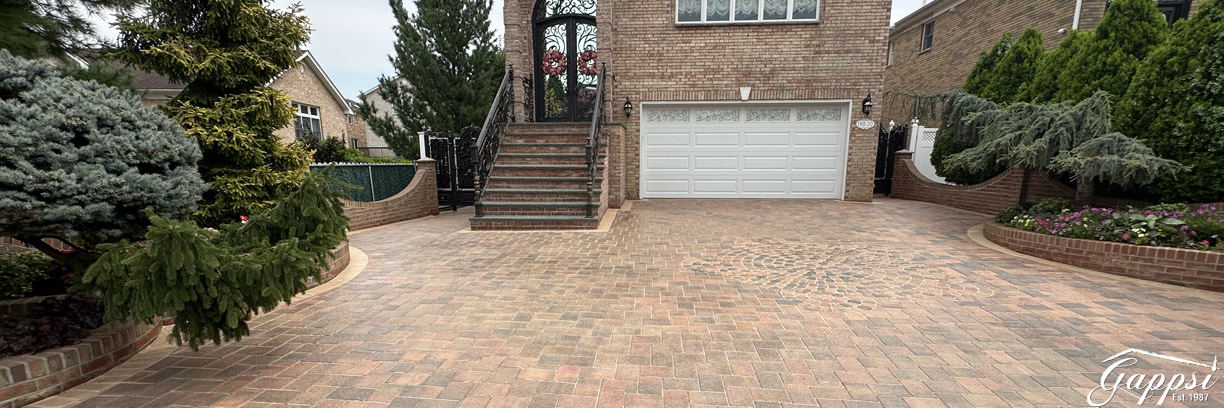
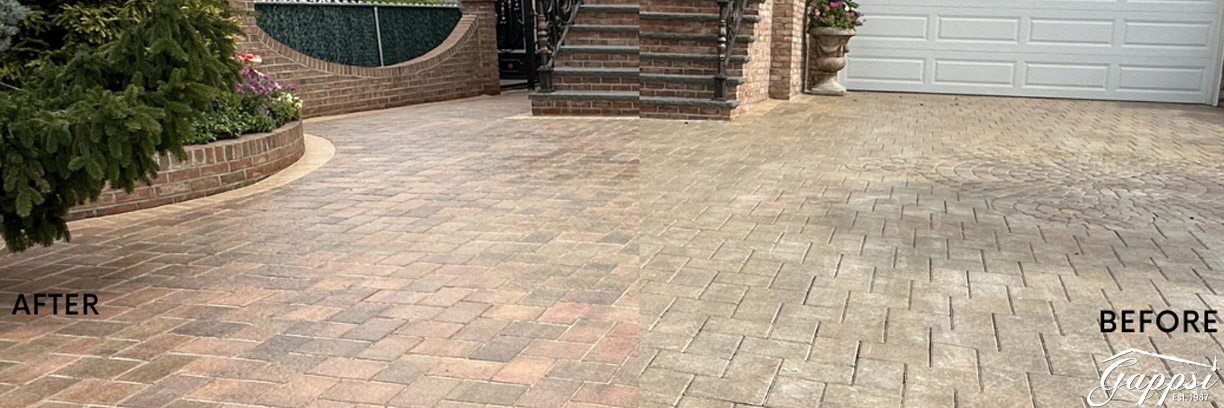
7-complete-stripped-and-sealed-driveway--in-whitestone-long-island-nyGappsi brought back the color of the stones to look better than they did when they were originally installed. The colors are very vibrant and uniform now that the sealer is applied correctly. You can see the color variations of the Bayberry Blend, the shades of gray, beige, and peach color even after 20 years.

Surface color enhancement and polymeric sand replacement in between the joints for this paving stones driveway was completed over 24 hours. This is the latest paving stone driveway restoration cleaning and sealing done by Gappsi in Whitestone NY.

To view our Interior Cleaning and Sealing options and to learn more about the application of driveway sealer visit our page Sealing Stone Patios, Driveways, and Interiors Stone.

Why Paver Sealer Fails

You’ve invested in beautiful pavers for your patio or driveway, and you applied a sealer to protect them. So why do they now look cloudy, patchy, or covered in a strange white film? When paver sealer fails, it can be incredibly frustrating, but understanding the cause is the first step toward fixing it. Most failures aren’t random; they usually trace back to a handful of common issues related to moisture, surface preparation, or the product itself. The good news is that even a bad sealer job can be corrected. It just requires stripping the old sealer and starting fresh with a proper application.

The most common sign of a failed sealer is a milky or white haze known as “whiting.” This happens when moisture gets trapped beneath the sealer’s surface. Other issues include peeling, flaking, or a blotchy appearance where the sealer didn’t adhere correctly. These problems not only look bad but also mean your pavers aren’t getting the protection they need from stains, weather, and wear. Before you can restore your pavers to their original beauty, you need to identify what went wrong so you can avoid making the same mistake twice.

Trapped Moisture

If your sealed pavers have developed a cloudy, white haze, you’re likely dealing with trapped moisture. This issue, often called “whiting,” is one of the most frequent reasons for sealer failure. It occurs when water vapor rises from beneath the pavers and gets stuck under a non-breathable, solvent-based sealer. This can happen if the sealer was applied when the pavers weren’t completely dry, if it was applied in very humid conditions, or if there’s a source of moisture coming up from the ground. The result is a milky film that obscures the true color and texture of your beautiful natural stone pavers.

Applying Sealer Over Efflorescence

It’s easy to confuse whiting with efflorescence, but they are two different issues. Efflorescence is a natural phenomenon where soluble salts from within the concrete or stone are carried to the surface by water and left behind as a white, powdery deposit. If you apply a sealer directly over pavers with efflorescence, you are essentially trapping that white powder under a clear coat. This makes the salty residue impossible to simply wash away and permanently clouds the appearance of your pavers. A proper paver installation and cleaning process should always address any efflorescence before a sealer is even considered.

Using a Low-Quality Sealer or Too Many Coats

Not all sealers are created equal. Using a low-quality, cheap acrylic sealer can lead to premature failure, as these products often yellow, peel, or break down quickly under UV exposure and foot traffic. Another common mistake is applying too many coats over the years without properly stripping the old layers first. Each new coat adds to a thick, plastic-like film that can easily trap moisture and dirt. Over time, this buildup magnifies any existing issues, resulting in a patchy, discolored surface that completely hides the beauty of the pavers underneath. Eventually, the only solution is to strip it all off.

Improper Surface Cleaning

Applying sealer to a dirty surface is a recipe for disaster. The paver surface must be meticulously cleaned before sealing to ensure proper adhesion. Any dirt, grime, oil stains, or organic matter left on the pavers will prevent the sealer from bonding correctly. This can lead to the sealer peeling, flaking, or bubbling up shortly after application. A thorough cleaning with a pressure washer and appropriate paver cleaner is a non-negotiable first step. Skipping this crucial preparation phase almost guarantees that the sealer will fail, wasting both your time and money.

Preparation and Safety Before You Begin

Before you even think about opening a bottle of chemical stripper, it’s essential to focus on preparation and safety. Working with these products requires your full attention, as they are powerful chemicals that can be harmful if handled improperly. Taking the time to set up your workspace and wear the right gear will not only protect you but also ensure the project goes smoothly. The area can become extremely slippery once the stripper starts working, so being mindful of your footing is critical. A little prep work upfront prevents accidents and protects the areas of your yard you don’t want to be affected by the stripping process.

Your goal is to remove the sealer from the pavers, not from your skin or your prize-winning roses. Start by clearing the area of any furniture, planters, or decorations. Then, lay down plastic sheeting to protect nearby grass, garden beds, walls, and light fixtures from any accidental splashes or overspray. This is also the perfect time to do a final sweep of the paver surface to remove any loose leaves or debris. Remember, the stripper needs a clean, dry surface to work effectively, so this final cleanup is an important part of the process.

Essential Safety Precautions

When you’re working with a chemical paver sealer stripper, safety should always be your top priority. These products are designed to dissolve tough acrylic and solvent-based coatings, which means they are caustic and can cause skin and eye irritation. Always read the manufacturer’s instructions and safety warnings before you begin. Make sure you have good ventilation, especially if you are working in a covered or partially enclosed area. Keep pets and children away from the work zone until the entire process is complete and the area has been thoroughly rinsed and dried.

Wear Personal Protective Equipment (PPE)

This is not the time to skimp on safety gear. At a minimum, you should wear chemical-resistant gloves, safety glasses or goggles to protect your eyes from splashes, and closed-toe shoes with good traction. It’s also a smart idea to wear long sleeves and pants to protect your skin from accidental contact with the stripper. The chemicals can be harsh, so creating a barrier between you and the product is the best way to stay safe throughout the project.

Prevent Slips and Falls

Once the sealer stripper is applied and begins to break down the old sealer, the surface of your pavers will become incredibly slippery. The dissolved sealer creates a slick, gel-like residue that can be hazardous to walk on. Be extremely careful as you move around the work area. Wearing sturdy, slip-resistant shoes is essential. Walk slowly and deliberately, and try to avoid stepping directly on the wet, treated areas as much as possible while you work.

Preparing the Work Area

A well-prepared work area is the foundation of a successful sealer stripping project. Before you start, take a thorough look at the entire space and identify anything that could be damaged or get in your way. This includes not just the obvious things like patio furniture but also smaller items like sprinkler heads, outdoor lighting, and downspouts. A few minutes of preparation can save you hours of cleanup or costly repairs later on. Your primary goals are to isolate the paver surface and ensure it’s in the ideal condition for the stripper to work.

Protect Surrounding Plants and Structures

Chemical sealer strippers can harm or kill plants and can stain or damage other surfaces like siding, wood decks, or painted walls. Use plastic sheeting and painter’s tape to cover and protect anything adjacent to your pavers. For delicate plants and lawns, it’s a good idea to lightly water them before you start and rinse them off immediately if any stripper accidentally splashes onto them. This helps dilute the chemical and minimize potential damage.

Test the Stripper on a Small Area

Never apply a chemical stripper to your entire patio or driveway without testing it first. Choose a small, out-of-the-way spot, like a corner behind a planter, to test the product. Apply the stripper according to the directions and let it sit for the recommended time. This will confirm that the product effectively removes your specific type of sealer without discoloring or damaging the pavers themselves. It’s a simple step that can prevent a major catastrophe.

Ensure the Paver Surface is Clean and Dry

For a chemical stripper to work its magic, it needs to be applied to a completely dry surface. Any water on the pavers will dilute the stripper and reduce its effectiveness. If you’ve recently washed the area or if it has rained, wait at least 24 to 48 hours for the pavers to dry out completely. You should also do a final sweep to remove any leaves, dirt, or other debris that may have accumulated on the surface.

The Step-by-Step Guide to Stripping Paver Sealer

With your safety gear on and your workspace prepped, you’re ready to begin the process of stripping the old, failed sealer. The key to success is to be patient and methodical. Don’t rush the process; give the chemical stripper adequate time to do its job. It’s also much more effective to work in small, manageable sections rather than trying to tackle the entire area at once. This allows you to maintain a wet edge and ensures you can rinse away the dissolved sealer before it has a chance to dry and re-adhere to the surface. While it can be a labor-intensive job, seeing your pavers restored to their original, clean state is incredibly rewarding.

If the process seems too demanding, remember that you can always call in professionals. Companies that specialize in restoration and sealing services have the commercial-grade equipment and expertise to handle the job safely and efficiently. However, if you’re committed to the DIY route, following these steps carefully will guide you toward achieving the best possible results and preparing your pavers for a fresh, beautiful new coat of sealer.

Choosing the Right Product and Method

The first decision you’ll need to make is what product to use. Most home improvement stores carry a variety of paver sealer removers, often labeled as PSR or acrylic sealer strippers. It’s important to choose a product specifically designed for this purpose, as general-purpose cleaners or solvents are unlikely to be effective. Read the product labels carefully to ensure it is compatible with your type of paver and the type of sealer you believe is on them. If you’re unsure, a product that works on both water-based and solvent-based sealers is a safe bet.

Types of Chemical Strippers

Most paver sealer strippers are formulated to remove a wide range of coatings, including latex, acrylics, and epoxies. They are available in different strengths, so if you know you have multiple thick layers of old sealer, you may want to opt for a heavy-duty or professional-grade formula. These products work by chemically softening and lifting the sealer from the paver’s surface, turning it into a semi-liquid state that can then be washed away. Always follow the specific application instructions for the product you choose.

Alternative Removal Methods

While chemical strippers are the most common and effective method, some people look for alternatives. Unfortunately, for tough acrylic sealers, there are few effective non-chemical options. Sandblasting or grinding the surface can remove the sealer, but these methods are highly aggressive and will permanently damage the surface texture of your pavers. For the removal step after the chemical has worked, a pressure washer is best, but vigorous scrubbing with a stiff brush and a strong degreaser can also work if you don’t have access to one.

Cleaners That Won’t Work on Acrylic Sealers

It can be tempting to try and remove old sealer with common household products, but you’ll likely be wasting your time. Household cleaners like vinegar, baking soda, or even muriatic acid are generally ineffective at dissolving durable acrylic paver sealers. These products might clean the surface, but they won’t break down the chemical bond of the sealer itself. Stick to a product specifically formulated for sealer removal to get the job done right the first time.

Applying the Sealer Stripper

Once you’ve chosen your product and tested it, it’s time for the main event. The application process is straightforward but requires you to work efficiently. The goal is to apply a thick, even coat of the stripper over your chosen section and keep it wet until it has had enough time to work. Using the right tools will make this process much easier and help you get consistent coverage, which is key to ensuring all the old sealer lifts off evenly. Remember to keep your safety gear on throughout this entire stage.

Application Tools and Coverage Rates

The best tool for applying sealer stripper is a chemical-resistant, garden-style pump sprayer. This allows you to apply the product quickly and evenly over the surface. You can also use a roller with a solvent-resistant nap. Check the product’s label for the recommended coverage rate, which is typically around 75 to 100 square feet per gallon. This will help you calculate how much stripper you need to purchase for your entire project so you don’t run out midway through.

Work in Manageable Sections

Do not try to apply the stripper to your entire driveway or patio at once. The product will dry out before you have a chance to remove it. Instead, divide the area into small, manageable sections, such as a 10×10 foot square. Apply the stripper to one section, let it dwell, and then remove the sealer completely before moving on to the next section. This ensures you can control the process and get the best results.

Removing the Old Sealer

This is the most critical and satisfying part of the process. After letting the stripper dwell, you will physically remove the old, softened sealer from the paver surface. This step requires some elbow grease and the right equipment. The goal is to completely clear away the stripper and the dissolved sealer residue, leaving behind a clean, bare paver surface. Be thorough during this stage, as any residue left behind can interfere with the new sealer application. You’ll know you’re done when the rinse water runs clear.

Let the Stripper Dwell

Patience is key. After applying the stripper, you must let it sit on the surface and do its work. The recommended dwell time is usually between 20 and 30 minutes, but it can vary depending on the product and the thickness of the sealer. The sealer should start to bubble, wrinkle, or soften. It’s important to keep the surface wet during this time; if it starts to dry out, apply a light mist of additional stripper to reactivate it.

Using a Pressure Washer

A pressure washer is the most efficient tool for removing the softened sealer. A machine with at least 3,000 PSI is recommended for good results, and a hot water pressure washer is even better. Use a fan-tip nozzle and hold it at a consistent angle a few inches from the surface. Work from one end of the section to the other, systematically blasting away the gooey residue. Be careful not to dislodge the jointing sand between the pavers.

How to Remove Sealer Without a Pressure Washer

If you don’t have a pressure washer, you can still get the job done, but it will require more physical effort. After the stripper has dwelled, you’ll need to vigorously scrub the entire section with a stiff-bristled deck brush or broom. This will help loosen the dissolved sealer. Then, use a garden hose with a high-pressure nozzle to thoroughly rinse the area. You may need to alternate between scrubbing and rinsing a few times to remove all the residue.

When a Second Application is Needed

For pavers with many thick layers of old sealer or a particularly stubborn case of “whiting,” one application of stripper may not be enough. After rinsing the first section, let it dry and inspect it carefully. If you still see shiny, sealed patches or a persistent white haze, you will need to repeat the process. A second application on the tough spots should be enough to remove the last of the old sealer and get your pavers ready for their new finish.

SCHEDULE A MEETING TODAY WITH GAPPSI

View Gappsi’s YouTube Channel for Videos on How to Correct a Poor Application of Driveway Sealer on Paving Stones | Long-Island NY

https://youtu.be/zBkmJK4XOK0

Frequently Asked Questions

Why did my paver sealer turn white and cloudy? That frustrating white film is almost always caused by moisture getting trapped underneath the sealer. This can happen if a non-breathable, solvent-based product was used, if the pavers weren’t completely dry before sealing, or if the sealer was applied over natural salt deposits (efflorescence). It’s not a stain on the stone itself, but rather a sign that the protective layer has failed and needs to be removed.

Can I just apply a new coat of sealer over the old, failed one? Applying a new coat of sealer over a failing one is not a good idea. It essentially traps the problem, whether it’s cloudiness or peeling, underneath a new layer. This often makes the original issue look even worse and can lead to a thick, plastic-like buildup that is much more difficult to remove later. The best approach is to strip everything off for a clean slate.

How long does the stripping and resealing process typically take? The timeline really depends on the size of your project and how many layers of old sealer need to be removed. For an average driveway, you should plan for the project to take at least two days. This allows for the time needed to apply the stripper, pressure wash the surface, let the pavers dry completely, add new joint sand, and then apply the new coats of sealer with proper drying time in between.

Are the chemical strippers safe to use around my lawn and garden? These are powerful chemicals, so you need to be careful. You can protect your surrounding lawn, garden beds, and other surfaces by covering them with plastic sheeting. It’s also wise to lightly water your plants before you begin and rinse them immediately if any stripper splashes on them. Always keep pets and children away from the work area until the job is finished and the surface has been thoroughly rinsed.

Once the old sealer is gone, how do I make sure the new sealer doesn’t fail too? The key to a long-lasting finish is proper preparation and using the right product. Start with a surface that is perfectly clean and completely dry. Choose a high-quality, breathable sealer, like a water-based urethane, which allows any underlying moisture to escape. Finally, apply the sealer according to the manufacturer’s directions, paying close attention to the weather; avoid applying it in direct, intense sun or when rain is in the forecast.

Key Takeaways

  • Identify the cause of sealer failure: That milky haze on your pavers is usually moisture trapped under a non-breathable sealer. Figuring out what went wrong, whether it was a damp surface or a poor-quality product, is the key to making sure your next application looks great.
  • Commit to a thorough stripping process: To fix the problem, you must remove all the old sealer. This means applying a chemical stripper, giving it time to work, and using a pressure washer to remove the residue, tackling one small section at a time for the best results.
  • Reseal with the right materials: Once your pavers are clean and dry, fill the joints with quality sand and apply a breathable, water-based urethane sealer. This combination provides a durable, beautiful finish and helps prevent moisture from getting trapped again.

Related Articles

Share this page:

How to Clean and Seal Driveways and Patio Stones in 5 Steps

Do you know how to clean and seal driveways and patio stones? Let the professionals at Gappsi show you the process!  

complete-polymeric-sand-and-sealer-application
Complete Polymeric Sand and Sealer Application – Dix Hills NY

Gappsi cleaning and sealing season for driveways and patio stones has started!   Our first driveway is located in Dix Hills NY. Over 10 years ago Gappsi installed this granite paver driveway and now we are cleaning and sealing it.

STEP #1 Cleaning Driveways and Patio Stones

step-2-removing-sand-and-debris-from-driveway-and-patio-stones
Step 1 Removing All Polymeric Sand and Debris from Paver Joints

First, we clean the granite pavers and remove most of the sand in between the joints.  Our new surface cleaners are also extractors. We wash the surface of the pavers and also remove the old polymeric sand.  Also, the debris that has collected underneath the joints is washed out.

This year Gappsi added a new pressure washing system. The machine is a high volume low-pressure hot water system.  The pressure washing system can go to 250 degrees Fahrenheit in hot water. It also comes with a soft wash system for areas where we don’t need pressure.

Our team started the process of cleaning the pavers. The driveway floor was pretty dirty so we completed a few passes starting with a turbo nozzle.  The initial process is to clean the stones, and then remove the old polymeric sand in between the joints.  This allows the new sand to be put in between the joints.  We are using 200 degrees Fahrenheit of hot water. 

STEP # 2 Removing Sand and Debris From Driveways and Patio Stones

step-1-cleaning-driveway-and-patio-stones
Step-2 Cleaning Driveway and Patio Stones

In the second step, we will clean the entire area with the extractor surface cleaner that will remove any sitting material in between the stone joints.

STEP #3 Applying New Polymeric Sand

step-3-applying-polymeric-sand-to-driveway-and-patio-stones
Step-3 Applying Polymeric Sand to Driveway and Patio Stones

The third step in sealing the pavers is filling the joint space with new polymeric sand.  We are using white beige silica sand.  This sand will absorb the sealer and get extremely hard; harder than polymeric sand.   Using a vibratory compactor specifically made to vibrate sand into the joints.  The Poly sand must be vibrated into the joint, as we want the sand as tight as possible in the paver joint.  The rollers have white rubber rollers specifically made for these kinds of applications and will not scratch or mark the stones.

STEP #4 Sealing the Driveway Pavers and Patio Stones

Step-4-sealing-the-pavers
Step-4 Sealing the Driveway Pavers and Patio Stones

Step #4 is the process of applying the sealer.  We mix urethane sealer part A and part B in combination with water in a two-to-one solution. We apply the sealer through sprayers flooding the joints.  This allows the sealer to penetrate the sand and absorb it deep down to get hard. Using a blower to move the extra sealer around, we prevent it from settling on top of the stones and further draining into the sand.  Since these are granite pavers, they won’t absorb much of the sealer, but the sand will get very very hard. 

Which Sealer is Right For Your Stones?

Gappsi uses several types of sealers different for each stone type from granite to marble, travertine, or concrete pavers. In addition, there are color enhancers or natural look sealers.  We apply the proper sealer to the different types of stone surfaces or materials based on what is needed. Each stone absorbs differently and each application is different. Whether there is a top coating sealer or a penetrating sealer depends on the customer selection.  Also, we offer suggestions for the type of material we are protecting or enhancing.

STEP #5 Slip Resistant System Application

step-5-applying-slip-resistant-sealer-with-mop-driveway-and-patio-stones
Step-5 Applying Slip-Resistant Sealer with Mop Driveway and Patio Stone Sealing

Step #5 After the team has completed sealing the entire driveway we apply an anti-slip resistance that will be the final process adding one more coat.  This application is applied with a floor mop while the sealer is wet.  The two coats bond together and it adds texture to the surface preventing it from getting slippery. 

The sealing process takes 2 to 3 days to complete allowing time to dry.  We allow the sealer to harden and keep the cars off the paver for about a week. The driveway was designed with granite pavers that are an inch and a quarter thick.  The sealer needs to be hardened a little longer as a result of the paver size.  The sand in between the joints has absorbed all the sealer and it became very hard. The color of the driveway looks like the first day the pavers were installed. The sealer enhancer used brings back the natural original color of the stones. It does not have a shiny look, it is more of a color enhancer. We also used slip resistance mixed with the sealer, this gives better traction when walking on the stones.

This is the latest sealing project done by Gappsi. The original granite installation Gappsi completed was over 10 years ago and the stones were selected from the Gappsi Natural Stone and Porcelain Collection showroom. 

Gappsi provides restoration, cleaning, and sealing of all types of stones and surfaces installed on patios, driveways, and walkways installed outdoors as well as indoors. 

SCHEDULE A MEETING TODAY WITH GAPPSI

View Gappsi’s YouTube Channel for Videos of How to Clean and Seal Driveways and Patio Stones in 5 Steps

We serve all of Nassau and Suffolk County Long Island NY, in all the following towns:
NASSAU COUNTY LONG ISLAND

Town of Hempstead Atlantic Beach Baldwin Bellerose Terrace Bellmore Bethpage Cedarhurst East Meadow East Rockaway Elmont Floral Park Franklin Square Freeport Garden City Hempstead Hewlett Inwood Island Park Lawrence Levittown Lynbrook Malverne Merrick Mineola New Hyde Park North Lynbrook North Valley Stream North Woodmere Oceanside Point Lookout Rockville Centre Roosevelt Seaford South Hempstead Uniondale Valley Stream Wantagh West Hempstead Woodmere Town of North Hempstead Albertson Carle Place Floral Park Glenwood Landing Great Neck Greenvale Kings Point Manhasset Mineola New Hyde Park North New Hyde Park Old Westbury Port Washington Roslyn Roslyn Heights Sands Point Westbury Williston Park Town of Oyster Bay Bayville Bethpage Brookville East Norwich Farmingdale Glen Head Glenwood Landing Greenvale Hicksville Jericho Locust Valley Massapequa Massapequa Park Mill Neck Old Bethpage Old Westbury Oyster Bay Plainview Sea Cliff Syosset Woodbury City of Glen Cove City of Long Beach.

SUFFOLK COUNTY LONG ISLAND

Town of Babylon Amityville Babylon Copiague Deer Park Lindenhurst North Amityville North Babylon West Babylon Wyandanch Town of Brookhaven Bellport Blue Point Brookhaven Calverton Centereach Center Moriches Coram East Moriches East Patchogue Eastport East Setauket Farmingville Holbrook Holtsville Lake Grove Manorville Mastic Mastic Beach Medford Middle Island Miller Place Moriches Mount Sinai North Patchogue Patchogue Port Jefferson Port Jefferson Station Ridge Rocky Point Ronkonkoma Selden Shirley Shoreham Sound Beach Stony Brook Upton Wading River Yaphank Town of East Hampton Amagansett East Hampton Montauk Sag Harbor Wainscott Town of Huntington Centerport Cold Spring Harbor

Commack East Northport Greenlawn Huntington Huntington Station Lloyd Harbor Melville Northport Town of Islip Bayport Bay Shore Bohemia Brentwood Brightwaters Central Islip East Islip Great River Hauppauge Holbrook Holtsville Islandia Islip Islip Terrace Oakdale Ocean Beach Ronkonkoma Sayville West Islip West Sayville Town of Riverhead Aquebogue Calverton Jamesport Laurel Manorville Riverhead South Jamesport Wading River Town of Shelter Island Shelter Island Shelter Island Heights Town of Smithtown Commack Hauppauge Kings Park Nesconset Saint James Smithtown Town of Southampton Bridgehampton Eastport East Quogue Hampton Bays Quogue Remsenburg Sagaponack Sag Harbor Southampton Speonk Water Mill Westhampton Westhampton Beach Town of Southold Cutchogue East Marion Fishers Island Greenport Laurel Mattituck New Suffolk Orient Peconic Southold

Share this page:

Get a Perfect Gravel Driveway with Gravelfix

gravel-driveways-make-a-big-comeback-with-gravelfix1

Forget everything you think you know about gravel driveways. The old image of a messy, rut-filled path is a thing of the past. Today, contemporary gravel driveways are making a huge comeback, and for good reason. The secret? A stabilization system that solves all the old problems. While unstabilized gravel migrates and creates ruts, a solution like Gravelfix keeps your stones locked in place. This creates a solid, beautiful surface whether you choose a crushed limestone driveway or a crushed rock driveway. You get all the charm without any of the classic headaches.

The benefits of installing gravel driveways using Gravelfix begin with the ease of installation.

Your Style Won’t Suffer

The aesthetic of a gravel driveway is nearly unmatched. Aside from gravel, you can choose from a wide variety of aggregates for your driveway. Limestone, Blackstar, crushed granite, or any type of angular gravel will work. Even if you’re in the middle of the suburbs, this affords you unmatched style, diversity, color choices, and unique charm.

If you want to stand out from the crowd or if your house would look better without an asphalt driveway, there’s no better way to mix it up and introduce some natural beauty to your home than with a gravel driveway.

Gravel driveways offer a unique alternative to traditional asphalt or concrete surfaces. With a variety of shapes, colors, and textures, they can be customized to fit the aesthetic of any home or landscape.

While considering durability, cost, and maintenance plays a significant role in deciding what type of driveway to install, it is essential to understand the pros and cons of laying a gravel driveway.

gravel-driveways-make-a-big-comeback-with-gravelfix2Gravel driveways can be visually appealing, adding a rustic charm to your home’s exterior. They are available in various colors and sizes, allowing you to customize the appearance to complement your property. Additionally, gravel driveways can be relatively easy to install and require less time to complete compared to other driveway materials, like concrete or asphalt.
Key Benefits of a Gravel Driveway

One of the key benefits of gravel driveways is their permeability. Unlike solid surfaces, gravel allows water to drain through, reducing the risk of water pooling or causing flooding. This can be particularly useful if your property is located in an area prone to heavy rainfall or where drainage is a concern.

It’s Time to Make the Switch to a Gravel Driveway Give Gappsi a Call Today @ 631.543.1177

Maintenance for gravel driveways is generally low, requiring only periodic raking to keep the stones in place and ensure a neat appearance. If your driveway develops low spots or potholes, you can simply add more gravel to level the surface. However, over time, you may find the stones displaced by vehicle movement or washed away during heavy rainfall, which eventually requires replenishment.

As with any driveway material, there are some drawbacks to consider. Gravel driveways may not be the best choice for areas that experience extreme weather conditions, as snow removal can be challenging, and ice can cause the gravel to shift.

PROS of Installing a Gravel Driveway

  • Low Cost
  • Aesthetic Appeal
  • Easy Install
  • Permeability
  • Compacts Well
  • Gravel Can Be Replenished

CONS of Installing a Gravel Driveway

  • Gravel Can Wash Away
  • Difficult to Snowplough
  • Risk of Weeds
  • Noise

gravel-driveways-make-a-big-comeback-with-gravelfix3Choosing The Right Gravel For The Area

When choosing gravel for your driveway or space, it’s essential to consider the size and texture of the rocks. The size and texture of the gravel can significantly affect the appearance, durability, and ease of maintenance.

There are two overarching categories of gravel that each type can be sorted into crushed stone and naturally formed gravel. There are several differences between the two, although they’re easily distinguishable based on appearance. ♦  Crushed stone has a jagged edge due to the manual crushing process. ♦  Naturally formed gravel has a smoother look due to natural weathering over time.

There are various sizes of gravel available, ranging from small pea gravel to larger coarse gravel. Pea gravel, as the name suggests, is the size of peas and is typically smooth in texture. This type of gravel creates a visually appealing driveway surface and is easier on your feet when walking on it. However, pea gravel may not be the best choice for a driveway with a lot of traffic or heavy vehicles, as it can shift and become displaced more easily than larger rocks.

Coarse gravel, on the other hand, is made up of larger rocks with a rougher texture. These rocks are less likely to shift under heavy loads, making coarse gravel a more durable option for driveways with more traffic. Additionally, the rough texture of coarse gravel can provide better traction for vehicles, especially during wet or icy conditions.

Why Invest in Gravelfix on Your Gravel Driveway

Investing in Gravelfix for your driveway comes with a plethora of advantages. To start, Gravelfix effectively stabilizes your driveway surface. There is no need to worry about gravel shifting or sinking, as these mats maintain a flat and uniform surface for you to drive or walk on. Gravelfix reduces the likelihood of tire rut formation, which can be a concern with gravel driveways. By providing a stable foundation a vehicle’s tires move smoothly across the surface without causing unsightly ruts or damaging the driveway. Another notable benefit of having Gravelfix is its effectiveness in preventing weed growth. By acting as a barrier between the gravel and the ground, it prevents invasive weeds from growing through, ensuring your driveway remains low maintenance and visually appealing. gravel-driveways-make-a-big-comeback-with-gravelfix

Gravelfix Benefits

  • It ensures a 100% draining paving
  • It’s a completely recyclable product, made with high-quality Polypropylene, 100% pure
  • Suitable for all applications, pedestrians, light and heavy traffic, motorbikes, bicycles, and wheelchair
  • An economic paving option that keeps its color unchanged for years.
  • The structure suppresses the growth of weeds and holds marble chips or pebbles
  • It can be easily cut and adapted to all environments
  • It is unaffected by cold and freezing temperatures
  • GRAVELFIX structure stops footprints and tire tracks

Main Gravel Application Areas

  • Public and private parking
  • Balconies and rooftop gardens
  • Alleys and cycle paths
  • Driveways
  • Cemetery areas and avenues
  • Playgrounds
  • Parks and Gardens
  • Residential gardens

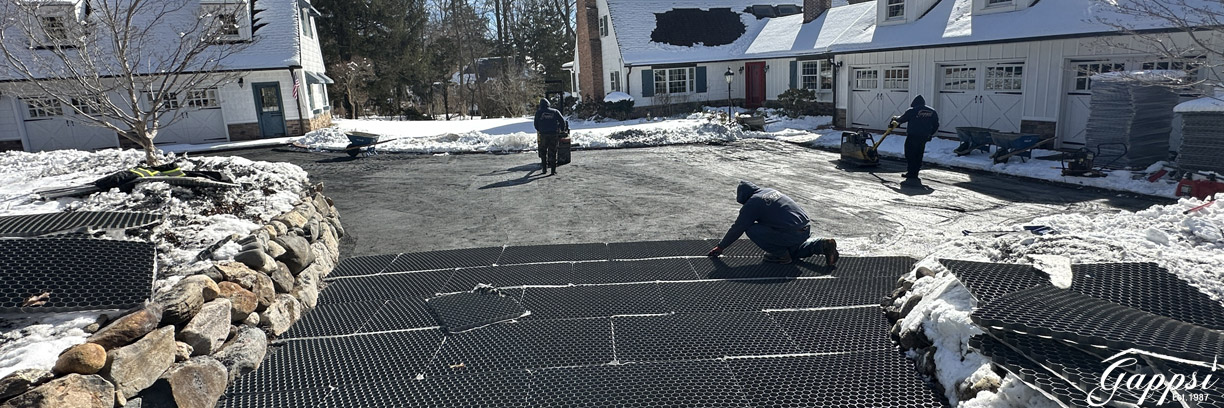
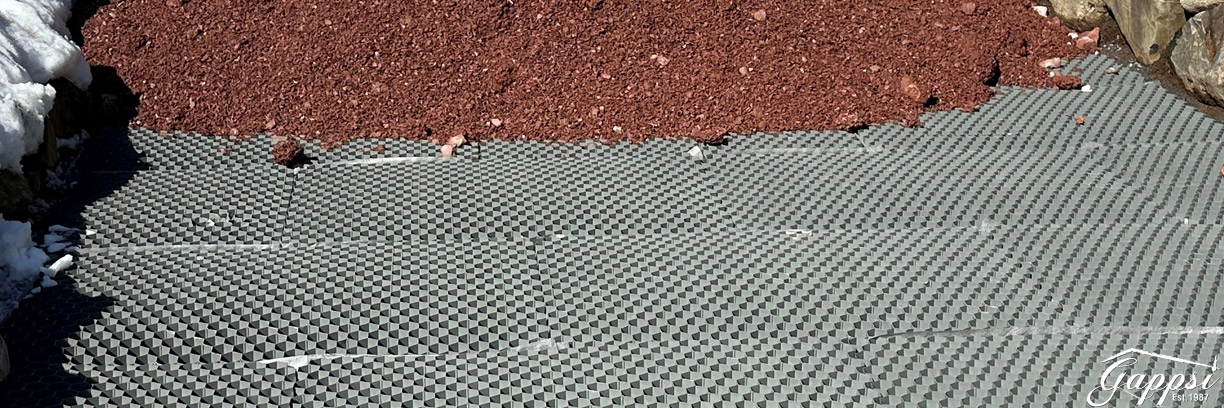
In this video, we show the process of preparing the base for this new gravel driveway with red angel stone gravel. We are preparing the final coating and compacting and flattening the bluestone screening base. We are moving on to install the Gravelfix System to contain the gravel.

This system has a honeycomb shape made out of polypropylene and a fiber mesh shedding attached on one side.  The fiber mesh prevents the rock from underneath coming to the surface and mixing with the finished stones of the driveway.  In addition, it holds the gravel that is installed in it and creates a better surface for the car tires to grab on and traction. The system also slows down the water runoff.  In particular, in some driveways, it makes a big difference.  This driveway is a very large area that is sloped towards the house.  A lot of water coming from the street also comes into the driveway and runs towards the house.  Through many heavy rain showers so far the homeowner has been very happy with the results.   He has noticed a big difference since the Ggravelfix System was installed under the gravel.

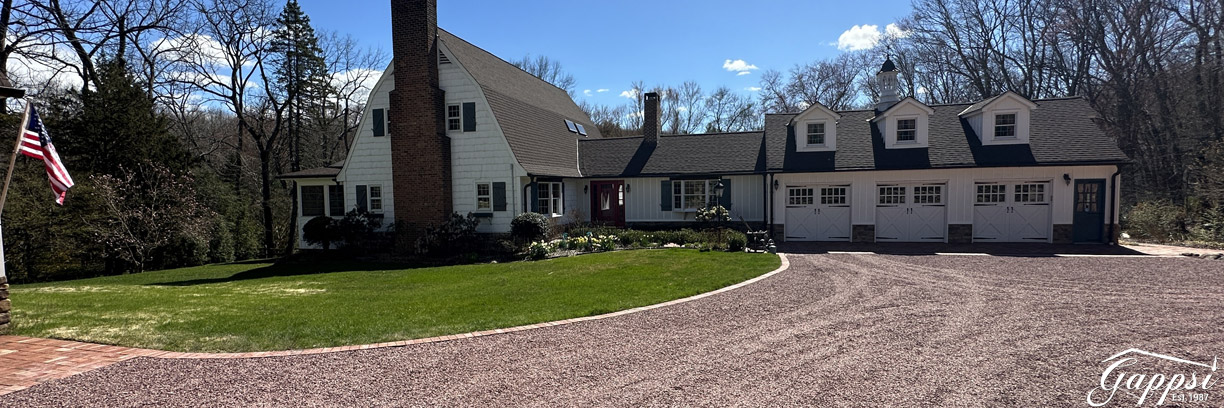
The final part is the installation of gravel.  We are filling the Gravelfix System with Red ⅜ Pennsylvanian stones.  Gappsi carries a large selection of stones and glass gravel that we import from Italy.   We display all our gravels and products at the Gappsi showroom. On the driveway, we also installed the Gappsi split-face Limestone Belgium paver as the driveway apron. This is the latest Gravelfix driveway installed by Gappsi in Laurel Hollow, NY

Budgeting for Your Gravel Driveway

Planning your budget is one of the first steps in any home improvement project, and a new driveway is no exception. The good news is that a gravel driveway is often a more cost-effective choice than traditional asphalt or concrete, both in terms of initial installation and long-term upkeep. While the upfront cost is typically lower, the real value comes from modern installation techniques that create a durable, stable surface. By understanding the full scope of the investment, you can plan for a beautiful driveway that fits your budget and enhances your home’s curb appeal for years to come.

Understanding the Investment

A gravel driveway is a smart investment, especially when you consider the long-term benefits. While the initial cost is appealing, modern stabilization systems like Gravelfix are what truly make it a lasting solution. This technology prevents common issues like gravel migration, ruts from tires, and washout after heavy rain, which means you’ll spend less time and money on maintenance down the road. Instead of constantly replenishing stones or dealing with an uneven surface, you get a consistently smooth and attractive driveway. This approach transforms a simple gravel path into a durable, high-performance gravel driveway that adds lasting value to your property.

Working With a Professional Team

To get the most out of your investment, working with a professional team is essential. An experienced installer ensures the foundation is properly prepared and that the right materials are used for your specific needs, from the base layer to the top gravel. Professionals can help you select the perfect stone to complement your home and landscape, ensuring the final result is exactly what you envisioned. More importantly, expert installation of systems like Gravelfix guarantees a stable, long-lasting surface that resists wear and tear. Collaborating with a skilled team like Gappsi means your project is completed efficiently, correctly, and with a level of craftsmanship that protects your investment for the future.

A Closer Look at Gravelfix Specifications

Now that you understand the benefits of stabilizing your gravel driveway, let’s look at the technology that makes it possible. Gravelfix isn’t just a simple plastic grid; it’s an engineered system designed for superior performance and longevity. The specific features of its design are what allow it to solve the common problems associated with traditional gravel surfaces, like rutting, weed growth, and poor drainage. Understanding these specifications will show you why this is such a smart investment for your property. It’s the details that transform a loose gravel path into a durable, high-performance driveway that lasts for years.

Built for Strength and Durability

A driveway needs to withstand the daily pressure of vehicles, foot traffic, and the changing seasons without failing. Gravelfix was created with this in mind, using materials and a structure that provide incredible resilience. Its honeycomb-shaped cells are key to its strength, distributing weight evenly across the surface to prevent the gravel from shifting or sinking under load. This structural integrity ensures your driveway remains smooth and stable, whether you’re parking a small car or a heavy-duty truck. This is the core function that prevents the ruts and potholes that plague unstabilized gravel driveways, giving you a consistently reliable surface.

Material Strength and Load Capacity

So, what makes it so tough? The Gravelfix system is engineered to handle immense weight, with a load capacity of over 250 tons per square meter when filled. To put that in perspective, it can easily support the weight of multiple large SUVs, delivery trucks, and other heavy residential vehicles without breaking a sweat. This incredible strength comes from its unique honeycomb design, which locks the gravel in place and creates a solid, interconnected surface. This means no more sinking tires or displaced stones, just a consistently firm and even driveway that maintains its pristine look and function day after day.

Performance in Extreme Temperatures

Here on Long Island, we experience the full range of weather, from scorching summer heat to freezing winter cold. A driveway material needs to handle these temperature swings without cracking or warping. Gravelfix is designed to perform flawlessly in temperatures ranging from -4°F to 149°F. This means it won’t become brittle and crack during a deep freeze, nor will it soften or lose its shape during a summer heatwave. This all-weather resilience ensures your investment is protected year-round, providing a stable and reliable surface no matter what the forecast holds.

Materials, Colors, and Dimensions

Beyond its strength, the physical makeup of the Gravelfix system is designed for versatility and sustainability. The materials used are chosen not only for their durability but also for their environmental impact and ease of installation. The system comes in manageable panels that our team at Gappsi can easily cut and shape to fit the unique layout of your property, whether it’s a winding driveway, a garden path, or a parking area. This adaptability allows for complete creative control, ensuring the final result perfectly matches your vision for your home’s exterior.

Eco-Friendly Material Options

If sustainability is important to you, you’ll be happy to know that Gravelfix is made from 100% recyclable polypropylene. This makes it an environmentally responsible choice for your home improvement project. By choosing a product made from recyclable materials, you are helping to reduce waste and support a more circular economy. This commitment to sustainability doesn’t come at the expense of quality; polypropylene is a robust and long-lasting material, ensuring your eco-friendly driveway is also a durable one that will serve you well for many years to come.

Product Sizes and Cell Dimensions

The Gravelfix system is available in different panel sizes, making it adaptable to projects of any scale. The two main options, Gravelfix Pro and Gravelfix Smart, allow for efficient installation across large areas or intricate pathways. The Pro panels are approximately 3.8 feet by 2.5 feet, ideal for covering large driveways quickly. The Smart panels are smaller, making them perfect for curved edges or smaller spaces. This flexibility ensures a custom fit for any design, minimizing waste and ensuring a seamless, professional finish for your project.

Advanced Weed and Water Management

Two of the biggest headaches with traditional gravel are constant weeding and poor drainage. Gravelfix addresses both of these issues with its integrated design. Attached to the bottom of the honeycomb grid is a high-quality geotextile fabric. This layer serves a dual purpose: it acts as a formidable barrier to prevent weeds from growing up through your gravel, and it allows water to pass through freely. This means you get a low-maintenance surface that also provides excellent water drainage, preventing puddles and reducing stormwater runoff from your property.

Installation and Design Flexibility

One of the best parts about choosing a gravel driveway is the sheer variety available. Forget the image of a plain, gray, dusty path. Modern gravel driveways are visually stunning, adding a unique rustic charm to your home’s exterior that you just can’t get with asphalt or concrete. Because the stones come in so many different colors, shapes, and sizes, you have complete creative control to customize a look that perfectly complements your property’s style. Whether your home is a classic colonial or a modern masterpiece, there’s a gravel option that will enhance its curb appeal. This design flexibility allows you to create a truly bespoke entrance that feels both natural and sophisticated, setting your home apart from the rest of the neighborhood.

More Than Just Gravel

A beautiful driveway is one thing, but a functional one is essential. That’s where a stabilization system like Gravelfix comes in. Investing in this system for your driveway offers a host of advantages that address the common concerns associated with traditional gravel surfaces. Gravelfix works by creating a stable foundation that holds the gravel in place, so you don’t have to worry about stones shifting, sinking, or creating unsightly ruts from your car’s tires. This means your driveway remains a flat, uniform surface that’s easy to walk and drive on. The system provides a solid base that keeps everything looking neat and tidy while ensuring your driveway can handle daily traffic without constant maintenance.

Finishing Touches: The Role of Edging

To achieve a truly polished and long-lasting result, edging is a crucial finishing touch. Using a quality edging solution, like ALUBORD, alongside the Gravelfix system helps create clean, defined borders for your driveway, pathways, or garden beds. This not only looks professional but also enhances the structural integrity of the entire surface. Edging keeps the gravel contained, preventing it from spilling over into your lawn or landscaping. It makes the entire installation more stable and durable, even if you’re working with elegant curved shapes in your design. It’s a simple step that makes a huge difference in the overall appearance and longevity of your project.

Guidance Every Step of the Way

Choosing the right materials can feel overwhelming, but you don’t have to do it alone. At Gappsi, we guide you through the entire process, from design to installation. We offer a massive selection of stones and glass gravel, including beautiful options imported directly from Italy, giving you plenty of choices to find the perfect match for your home. You can see and feel these materials for yourself at our showroom, which makes the decision-making process much easier. Our team is here to provide the expertise you need to create a stunning and durable gravel driveway that you’ll love for years to come.

SCHEDULE A MEETING TODAY WITH GAPPSI

View Gappsi’s YouTube Channel for Videos of Gravel Driveways Make a Big Comeback with Gravelfix

[/vc_column_text]

[/vc_column][/vc_row]

Frequently Asked Questions

How does a stabilized gravel driveway handle Long Island snow and ice? This is a great question and a valid concern for our area. Because the Gravelfix system holds the stones securely in place, you can use a snowblower or even a plow without worrying about scraping up your driveway. We recommend setting the blade just slightly higher than the surface. The driveway’s natural permeability also helps meltwater drain away more effectively, which can reduce ice buildup compared to non-porous surfaces like asphalt.

Will I still have to pull weeds all the time? You can finally retire your weeding gloves. The Gravelfix grid has a durable geotextile fabric bonded to the bottom. This layer acts as a physical barrier, preventing weeds from growing up from the soil beneath. While an occasional airborne seed might sprout on the surface, the constant battle of pulling weeds from deep within the gravel is a thing of the past.

What does maintenance really look like for a driveway with Gravelfix? Unlike traditional gravel driveways that require regular raking to fix ruts and frequent top-offs to replace scattered stones, a stabilized driveway is incredibly hands-off. Since the gravel is locked in place, the surface remains smooth and even. Your main task will simply be to clear away leaves or other organic debris as you would with any other driveway.

Can I use any style of stone with the Gravelfix system? While you have a wide range of colors and types to choose from, angular crushed stone is the best choice for maximum stability. The jagged edges of stones like crushed granite or limestone interlock neatly within the system’s honeycomb cells. This creates a firm, solid surface that’s ideal for vehicles. Smoother, rounded stones like pea gravel can be used, but they won’t provide the same level of interlocking performance.

Is a gravel driveway still noisy with the stabilization grid? Yes, you still get that classic, satisfying crunch when a car pulls in, which is a feature many homeowners appreciate for security. The sound is different from that of a deep, loose gravel path, however. Because the stones are held in a single, stable layer, the sound is more crisp and consistent, without the loud grinding noise of stones shifting and displacing under the weight of tires.

Key Takeaways

  • Stabilization is Non-Negotiable for Modern Gravel: To get a beautiful, low-maintenance gravel driveway, a stabilization system is essential. Products like Gravelfix use a grid structure to lock stones in place, preventing the classic problems of ruts, sinking, and messy gravel migration.
  • Choose a System that Solves Multiple Problems: The best stabilization grids do more than just hold gravel. A quality system is engineered to support heavy vehicles, includes a built-in fabric to block weeds, and allows water to drain through, preventing puddles and runoff.
  • Pair Your Aesthetic Vision with Professional Installation: You have complete creative control to choose the perfect stone color and texture for your home. To ensure it lasts, rely on a professional team for proper site preparation and expert installation of the stabilization system for a flawless, long-term result.

Related Articles

Share this page: