


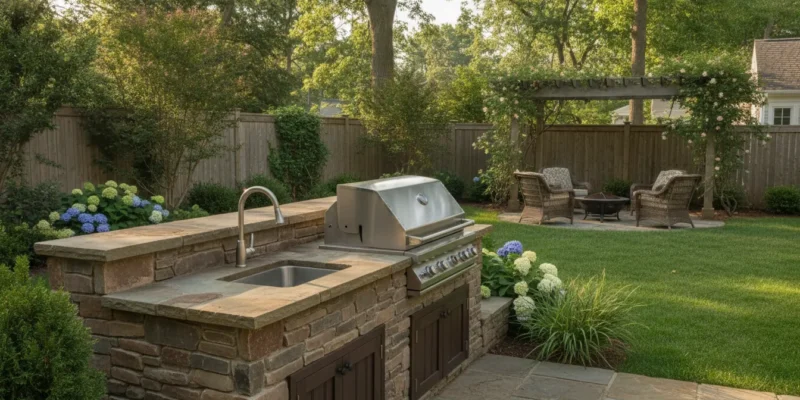
An outdoor sink is a small fixture with a large effect on how an outdoor kitchen works. It gives you a place to rinse produce, wash hands, fill containers, and manage cleanup without carrying everything indoors. On Long Island, the decision also involves seasonal freezing, water and drain routing, counter space, grading, and access for future service.
Contact Gappsi through our contact page
The right outdoor kitchen sink balances the way you cook with the available counter and cabinet space. Choose materials suited to the setting. Include a plumbing plan that can be shut off and drained before winter. Treat the sink as part of the kitchen design rather than an accessory added after the island is built.
Start by defining what the sink needs to handle on a typical day. That practical answer will guide the basin dimensions, landing space, and installation details that make the first design decisions easier.
How Do You Choose the Right Outdoor Kitchen Sink Size?
The right sink size depends less on a standard dimension than on how you expect to use the station. Start by separating food preparation from cleanup. If you mainly need to rinse produce, wash your hands, fill a glass, or clean a few utensils beside the grill, a compact basin may be practical. If you plan to wash platters, grilling tools, and larger cookware outside, you will need more basin width, depth, and clear counter space around it.
Think about the largest item you regularly expect to place in the basin. A shallow sink can work for quick rinsing, but a deeper basin gives you more room for soaking tools and containing splashes. Depth also affects comfort, especially when the sink will be used by several family members during a gathering. Ask whether the faucet, drain, and any accessories will reduce usable basin space rather than judging capacity from the outside dimensions alone.
Compact sinks for focused prep
A compact format can preserve valuable counter area in a smaller cooking island or a layout with a grill, refrigerator, and serving surface. Product listings provide examples such as 15 by 15 inch, 15 by 20 inch, and 15-inch sink formats. These are product examples, not universal sizing standards. A small sink may be appropriate when indoor cleanup remains part of the routine. Or when the outdoor station is intended primarily for handwashing, rinsing ingredients, and light prep.
Installation style can also influence the fit. Listings include both topmount and undermount configurations. A topmount or drop-in design may be useful when the countertop and cabinet plan favor a visible rim, while an undermount installation can create a continuous counter edge. Confirm the selected model’s required cutout, rim dimensions, faucet-hole layout, and cabinet clearance before ordering. The sink’s listed length and width are not necessarily the same as the opening that must be cut.
Workstation formats for cooking and cleanup
A workstation sink may make sense when you want prep functions integrated into one area. Examples in product listings include 21 by 20 inch and 29 by 20 inch formats, with some combining an ice chest and sink. That extra width can support a cutting board or other accessory, but it also consumes counter and cabinet space. Decide whether those features will be used often enough to justify the larger footprint.
Before finalizing the layout, measure the base cabinet width, interior clearance, countertop depth, backsplash or rear clearance, faucet reach, and drain location. Leave a usable landing area beside the sink so washed items do not sit in a traffic path. Also check door and drawer swings, grill clearance, and access for future maintenance. A coordinated plan for the island, plumbing route, drainage, and surrounding patio helps prevent a sink from fitting on paper but working poorly in daily use. For the broader layout sequence, review this guide to Long Island outdoor kitchen planning.
Which Materials Work Best for an Outdoor Kitchen Sink?
Material selection should account for more than appearance. An outdoor kitchen sink is exposed to rain, sun, temperature changes, food residue, and, on many Long Island properties, salty coastal air. The right choice depends on the sink’s location, the surrounding counter, how you plan to use it, and how easily the fixture can be covered or serviced.
Stainless steel is the most common starting point because it works with many outdoor kitchen designs and is available in both topmount and undermount formats. Product listings commonly use 304 and 316, also called T-316 or marine-grade, as examples of outdoor sink construction. One retailer describes 304 stainless as suitable for rust resistance in most climates, while 316 adds corrosion protection for salty coastal air because of its molybdenum content. That distinction can be relevant for homes near the North Shore, South Shore, or exposed waterfront areas. But it is not a universal rule that one grade is best for every installation. Review the manufacturer’s specifications and the actual exposure at your property.
Listings also show outdoor sinks made with 16-gauge T-316 stainless, including compact workstation and ice-chest configurations. These examples demonstrate how material and function can be combined, rather than establishing a required gauge for every project. A standard basin may suit handwashing, produce, and cleanup, while a workstation model can include a fitted cutting board or related accessories. Some sink stations also offer drying racks or integrated soap dispensers. Choose those features only if they support the way your household cooks and entertains.
Granite composite and stone-look options can help coordinate the sink with a granite, bluestone, porcelain, or other outdoor counter. Ruvati identifies stone, ceramic, and plastic alongside stainless steel as common outdoor sink material categories. Each option should be reviewed for food-safe use, cleaning requirements, installation method, and the manufacturer’s guidance for outdoor exposure. Do not select a material solely because it matches the counter. The sink cutout, edge detail, mounting system, drainage access, and serviceability all need to work together.
| Planning choice | Best fit | Confirm before ordering |
|---|---|---|
| Compact basin | Handwashing, rinsing, and light prep | Landing space and cabinet clearance |
| Workstation sink | Prep with an integrated cutting board | Accessory footprint and cutout template |
| Topmount or drop-in | A visible rim and straightforward counter fit | Rim dimensions, faucet holes, and support |
| Undermount | A continuous counter edge | Counter construction, edge detail, and service access |
Accessories can change the role of the fixture. A fitted cover may help keep leaves and debris out when the basin is not in use. A cutting board can create a compact prep station, while an insulated ice chest can combine cold storage with a sink in a larger entertaining area. Product listings include 15-by-20, 21-by-20, and 29-by-20 ice-chest or workstation examples, so confirm the required cabinet and counter space before choosing one. Pair the fixture with an outdoor-rated faucet, then plan access for shutoffs and winterization.
The sink base matters as much as the bowl. Review the guide to weatherproof outdoor cabinets when coordinating the cabinet material, counter support, and plumbing access. A coordinated design makes it easier to protect the sink, reach connections, and maintain a consistent appearance across the kitchen.
What Water Supply and Drainage Does an Outdoor Sink Need?
An outdoor kitchen sink is only as practical as the utility plan behind it. The fixture generally needs a dependable water supply and a drainage connection, but the best arrangement depends on the sink location. The distance to existing plumbing, the finished counter, and how the kitchen will be used. A site review should happen before cabinets, masonry, or countertops are finalized.
Cold-only or hot and cold water?
A cold-only supply may be suitable for rinsing produce, washing hands, filling containers, or handling quick cleanup near a grill. A hot and cold arrangement adds flexibility for washing greasy tools, cookware, and dishes. It also affects the faucet, supply lines, shutoff locations, and the route back to the home’s plumbing. Product options include compact sinks paired with a hot and cold outdoor faucet, but the product choice should follow the actual utility plan rather than determine it.
Make the water shutoff accessible from the cabinet or service area. A shutoff hidden behind permanent stonework is difficult to use when the sink needs maintenance or seasonal preparation. The plumbing layout should also leave room to inspect connections, disconnect lines if required, and protect the sink base from unnecessary exposure to leaks.
Plan the drain route before installation. An outdoor sink drain may connect to an approved existing drainage arrangement, or the project may require a different site-specific solution. The route should account for the trap, cleanout or service access where appropriate, pipe transitions, and the distance to the connection point. A trap holds water, so its location matters in an outdoor installation that may be exposed to freezing conditions. Do not assume that a convenient-looking discharge point is acceptable without professional review.
Drainage also involves the ground around the kitchen. The counter should direct splash toward a controlled surface rather than into cabinet seams. The patio or surrounding hardscape needs enough slope and runoff planning to keep rainwater from collecting beneath the sink base or flowing toward the house. Grading, nearby planting beds, pool areas, and existing drainage can change the practical route for both plumbing and surface water. These details are especially important when planning on Long Island, where seasonal weather and freeze exposure need to be considered together.
Connecting to existing plumbing may require additional fittings or modifications, depending on the home’s layout and the outdoor kitchen’s position. A plumber should confirm supply capacity, drain routing, trap treatment, access, and the project’s applicable requirements. Coordinate that review with the broader outdoor kitchen installation so masonry, cabinets, utilities, and finish materials are designed as one system.
Contact Gappsi through our contact page
Where Should an Outdoor Kitchen Sink Go?
The best location is usually the point where food preparation, cooking, and cleanup overlap. Place the sink close enough to the grill for rinsing tools and handling ingredients. But not so close that the grill blocks access or exposes the faucet to unnecessary heat. A sink at the end of a counter run can work well when it leaves a clear prep surface between the basin and the cooking equipment.
Think through the full movement of a meal. Ideally, the refrigerator or ice chest should be within a few steps of the sink and prep counter. That arrangement lets you remove ingredients, rinse them, prepare them, and move them to the grill without crossing the main entertaining area. Review the relationship between the sink, grill, refrigerator, and storage as a single workflow rather than selecting each appliance separately. The guide to outdoor kitchen appliances can help organize those decisions.
Protect the work zone from traffic
Do not place the basin where guests naturally walk between the house, patio, pool, or seating area. A person washing dishes should not have to stand in the primary passage, and an open cabinet door should not narrow the route to the pool. Leave a clear landing surface on at least one side of the sink for plates, produce, and wet utensils. If the design includes a cutting board or drying rack, account for that accessory in the counter layout before finalizing the sink cutout.
For a poolside kitchen, keep the sink and its work surface convenient to the cooking area without turning the plumbing zone into a bottleneck around the pool deck. The same principle applies to patios and outdoor dining areas. The sink should support entertaining while remaining visually and physically integrated with the hardscape.
Account for sun, wind, and the house connection
Sun and wind affect comfort as much as distance does. A sink facing strong afternoon sun may become unpleasant to use, while prevailing wind can carry spray toward seating or blow leaves into an uncovered basin. Use the house, walls, pergolas, and planting as part of the layout conversation, but avoid creating a damp, inaccessible corner. A location with practical shade, reasonable visibility, and protection from direct exposure is often easier to maintain.
Placing the outdoor kitchen nearer to the house can simplify access and make it easier to coordinate water, drainage, and electrical routes. However, the shortest route is not automatically the right route. The design still needs sufficient counter depth, cabinet access, service clearance, and a drainage plan. Confirm how the sink will connect to the property plumbing and where discharge will go before the masonry is built. Site-specific plumbing, grading, and permit questions should be reviewed by the appropriate professionals.
Coordinate grading and drainage with the hardscape
An outdoor kitchen sink should be planned together with the patio grade, nearby planting beds, pool deck, and existing drainage. Surface water should not collect beneath the cabinets or flow toward the house. The counter, sink base, and surrounding paving need to work as one system, with access preserved for shutoff components and future service.
That coordination is especially important on Long Island properties where Nassau and Suffolk sites can have different grades, existing hardscape conditions, and connections to work around. Gappsi Group combines outdoor kitchen planning with masonry design and construction, so the sink position can be reviewed alongside patios, pool areas, grading, drainage, and the overall material plan.
How Do You Winterize an Outdoor Kitchen Sink on Long Island?
Seasonal freezing makes winterization part of the installation plan for an outdoor kitchen sink in Nassau or Suffolk County. The goal is to remove standing water from the supply and drain components before cold weather arrives. General outdoor-sink guidance recommends draining water and disconnecting plumbing when the fixture will be exposed to winter conditions. The exact procedure depends on the faucet, shutoff arrangement, drain design, and whether any components occupy an unheated cabinet or other exposed space.
Use the following sequence as a planning checklist. It is general freeze-protection guidance, not a statement of Long Island plumbing code. A licensed plumber should confirm the details of your specific installation.
- Shut off the water supply. Close the dedicated shutoff serving the sink, if one is installed. If the sink shares a branch line, identify the correct valve before shutting it down. Do not assume that closing the faucet handle isolates the pipe. The supply must be turned off upstream of the outdoor fixture.
- Open the faucet and any accessible valves or spigots. With the supply closed, open the faucet to release pressure and let water move out of the line. If the installation includes a separate drain valve, low-point drain, or hose connection, open it according to the plumbing design. Follow the fixture manufacturer’s instructions rather than forcing a valve.
- Remove hoses and detachable accessories. Disconnect garden hoses, spray attachments, quick-connect fittings, and other removable water connections. Store them in a dry location. Leaving a hose attached can retain water at the connection and make it harder for the line to drain completely.
- Drain residual water from the supply and faucet. Let the faucet remain open while the line drains. Some installations may need an appropriate blowout procedure or disconnection of plumbing, but that work should be performed with the correct equipment and professional guidance. Never introduce compressed air into a system without confirming that the components can safely handle it.
- Review the trap, drain, and unheated spaces. Inspect the P-trap or other trap arrangement for retained water, and ask the plumber how it should be emptied or protected. Pay particular attention to pipes, filters, valves, and traps inside an unheated cabinet, beneath the counter, or along an exposed route. General winter guidance identifies these locations as needing specific freeze protection. Do not use antifreeze or another treatment unless the product and plumbing professional specifically support it.
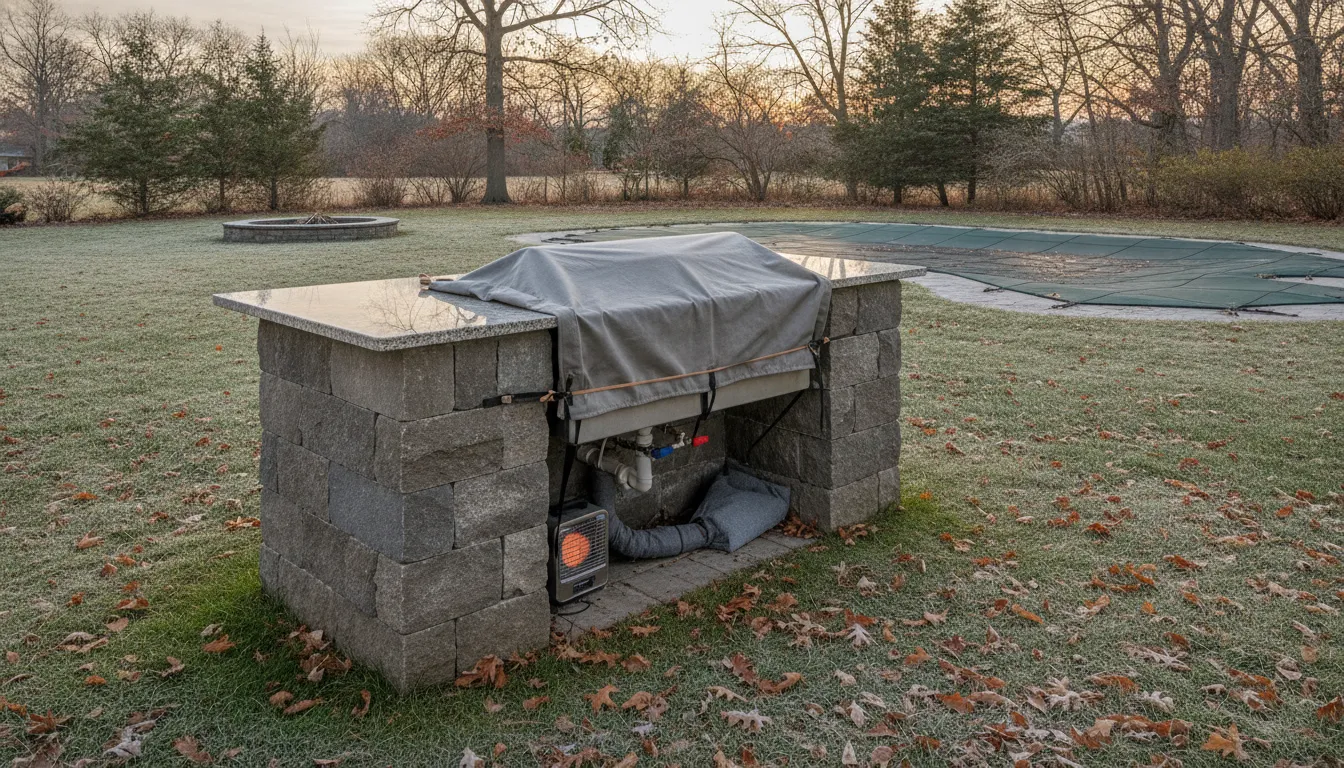
- Preserve access and plan the spring restart. Keep cabinet panels, cleanouts, shutoffs, and service openings accessible. Do not fill the cabinet with stored items that prevent inspection. In spring, check for cracked fittings, loose connections, or visible damage before reopening the water supply. Open the valve gradually, inspect every connection for leaks, and run the faucet briefly before returning the sink to normal use.
Building this checklist into the original design is easier than trying to reach hidden plumbing after the countertop and cabinets are complete. On Long Island, winterization should be discussed alongside cabinet access, drainage. And the location of the water shutoff so the sink can be serviced without disrupting the rest of the outdoor kitchen.
What Should Long Island Homeowners Confirm Before Installation?
A well-planned outdoor kitchen sink should be coordinated with the entire cooking island, patio, and landscape rather than added as an isolated fixture. Before installation begins, review the following checklist with your designer, contractor, and plumber.
- Design visualization: Ask to see how the sink, faucet, grill, refrigerator, counter landing areas, and seating will work together. A 3D visualization can help you evaluate sightlines, circulation, proportions, and the relationship between the kitchen and the rest of the yard before construction starts.
- Material samples: Compare the sink finish with the selected counter and hardscape materials. Bring home or review samples of granite, marble, travertine, bluestone, porcelain, or stone veneer in the actual outdoor setting. Check how the colors and textures relate to the patio, pool area, and house exterior.
- Exact dimensions: Confirm the sink’s overall dimensions, basin depth, rim or flange, cabinet opening, and required cutout. Do not rely on a product name or nominal size. The installer should work from the manufacturer’s template, including faucet-hole placement and clearances for doors, drawers, plumbing, and accessories.
- Water and drain route: Decide whether the sink needs cold water only or hot and cold service. Confirm where the supply will enter, where shutoff access will remain, and how the drain will connect to the approved destination. Existing plumbing may require fittings or modifications, so have a qualified professional review the site-specific setup rather than assuming a route will work.
- Permit questions: Ask which portions of the outdoor kitchen, plumbing, electrical work, gas service, or related masonry require review in your municipality. Permit coordination should be addressed before materials are ordered. Local requirements can vary, and the project team should confirm the applicable rules for your property.
- Grading and drainage: Make sure the sink area is coordinated with finished grades, patio slopes, splash zones, and stormwater flow. Gappsi’s landscape services include grading and drainage planning, which can help integrate the kitchen into the wider outdoor space instead of directing water toward the house, cabinets, or walkways.
- Freeze plan: Discuss how the supply, faucet, drain, trap, and exposed connections will be protected or drained before freezing weather. Include a practical shutoff and access plan in the design, especially if plumbing will sit in an unheated cabinet or isolated island.
- Cabinet access: Verify that doors or removable panels provide enough room to install, inspect, shut off, disconnect, and service the plumbing. Leave usable access after the counter and appliances are in place.
- Construction coordination: Confirm the sequence for base construction, utilities, cabinets, countertops, sink installation, appliance placement, grading, and final surface work. Gappsi serves Nassau and Suffolk Counties and offers 3D visualization, drawings, permit coordination, material selection, and complete project coordination for outdoor living projects.
For a project that connects the kitchen to the wider property, review Long Island landscape and drainage planning alongside the sink layout. That broader review can identify access, runoff, and grade decisions before they become costly changes during construction.
Contact Gappsi through our contact page
Frequently Asked Questions
What is the best sink for an outdoor kitchen?
The best choice depends on how you will use the station, the counter space available, and the plumbing you can reach. Choose a basin that supports your regular prep and cleanup tasks, then confirm that its material, faucet, mounting style, and cabinet cutout suit outdoor exposure. Stainless steel, stone, ceramic, and plastic are common categories, but the product specifications matter more than the label alone.
Should I put a sink in my outdoor kitchen?
A sink can be worthwhile if you regularly wash hands, produce, utensils, or grilling equipment outdoors. It reduces trips into the house and gives messy tasks a dedicated place. If the kitchen is used only occasionally or extending water and drainage would create an impractical route, compare that construction work with your expected use before deciding.
What kind of sink is best for outside?
Look for a sink specifically designed for outdoor conditions, with materials and finishes suited to rain, sunlight, temperature changes, and your level of exposure. Marine-grade stainless steel is one product category marketed for corrosion resistance, while stone or ceramic may coordinate more closely with a masonry counter. A cover can also help protect the basin between uses.
Does an outdoor kitchen sink need hot water?
Not always. Cold water may be sufficient for rinsing produce, washing hands, or cleaning tools, while hot and cold water can make food preparation and cleanup more convenient. Decide based on your routine, then have the supply route, shutoff access, faucet compatibility, and site-specific plumbing reviewed before installation.
How do I protect an outdoor sink from Long Island winters?
Plan to shut off the outdoor water supply, disconnect hoses, open valves, and drain residual water before freezing weather. The trap and any plumbing in an unheated cabinet or exposed area also need review. Winterization details depend on the installation, so confirm the procedure with the plumbing professional and keep shutoff access usable.
Ready to Plan Your Outdoor Kitchen Sink?
A sink works best when its size, water supply, drainage, and winterization plan are considered alongside the rest of the outdoor kitchen. Gappsi Group can help you discuss the design, coordinate the plumbing details, and plan the installation for your Long Island property.