Applying sealer stain to a bluestone patio to remove brown spots.

Fix Brown Spots on Bluestone with Sealer Stain

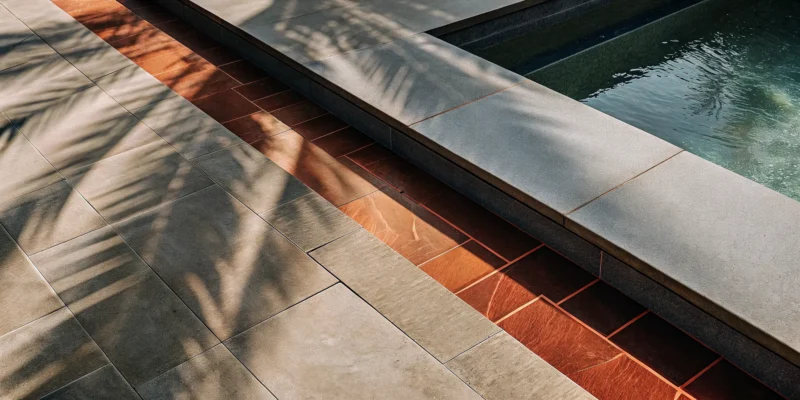
Have you tried everything to get rid of those stubborn brown spots on your bluestone, only to watch them return? Many homeowners reach for a pressure washer or harsh cleaners, but these methods often make the problem worse by damaging the stone’s surface. The issue isn’t on the surface; it’s within the stone itself. Iron deposits are oxidizing and creating rust stains from the inside out. To truly solve the problem, you need a solution that addresses the root cause. This article provides a step-by-step tutorial on How to Remove Brown Spots from Bluestone Copings and Patios with Sealer Stain, the professional-grade solution for a flawless result.

Key Takeaways

  • Identify the Real Culprit: Understand that brown spots on bluestone are a natural result of iron oxidation, not a product defect, which means the problem can be managed with the right approach.
  • Choose the Correct Treatment: Skip the pressure washer and harsh chemicals that can damage your stone; instead, use a specialized sealer stain that penetrates the surface to even out color and block moisture.
  • Prioritize Proper Application: For a flawless, long-lasting finish, always start with a thoroughly clean and completely dry surface, test the product in an inconspicuous spot, and apply the stain in several thin, even coats.

Why Does My Bluestone Have Brown Spots?

If you’ve noticed unsightly brown or rust-colored spots appearing on your beautiful bluestone patio or walkway, you’re not alone. It’s a common issue that can leave homeowners feeling frustrated, wondering if they chose the wrong material or if something is wrong with their stone. The good news is that these spots are rarely a sign of a defective product. Instead, they are usually the result of a natural process happening within the stone itself.

Bluestone is a stunning and durable choice for outdoor spaces, which is why it’s so popular for everything from pool surrounds to elegant patios. However, its natural composition makes it prone to developing these specific types of stains over time. Understanding what causes these spots is the first step toward fixing them and preventing them from coming back. The culprit is a chemical reaction involving iron, water, and air. Once you know why it’s happening, you can take the right steps to restore your bluestone’s original beauty and protect your investment for years to come.

The Role of Iron Oxidation

The simple explanation for those stubborn brown spots is rust. Just like a metal garden tool left out in the rain, the iron inside your bluestone can oxidize. Bluestone is a natural material, and it contains varying amounts of iron minerals as part of its geological makeup. When these iron deposits are exposed to oxygen and water, a chemical reaction occurs, creating iron oxide, which we see as rust.

This process isn’t a flaw in the stone; it’s just a part of its natural character. The spots can appear randomly, concentrated in areas where the iron deposits are closest to the surface. This is why you might see them on some pavers but not others. Gappsi has extensive experience working with all types of porcelain and natural stone pavers, and we understand the unique properties of each.

Environmental Factors That Worsen Stains

Moisture is the main trigger for iron oxidation, so environmental factors play a huge role in how and when these brown spots appear. You might notice the spots look darker or more prominent after it rains, and they may seem to fade when the stone is completely dry. This cycle happens because water activates the iron deposits.

On Long Island, our bluestone is exposed to plenty of moisture from rain, humidity, melting snow, and even lawn sprinklers. Acid rain can sometimes accelerate the oxidation process. Runoff from garden beds can also be a factor, especially if you use fertilizers that contain iron. Effectively managing these environmental triggers is key, and professional restoration and sealing services can provide a protective barrier against moisture.

Why Bluestone is So Susceptible

Bluestone is a type of sandstone, a sedimentary rock known for its dense, durable structure and distinctive blue-gray color. Its composition is what makes it both beautiful and susceptible to iron staining. The very minerals that give bluestone its character, including iron, are distributed throughout the stone. This means that almost any bluestone installation has the potential to develop rust spots over its lifetime.

While it can be disappointing to see these spots appear, it’s helpful to view it as a natural characteristic of the material rather than a defect. The durability and timeless appeal of bluestone are why so many homeowners choose it for their masonry projects. Fortunately, you don’t have to live with the stains. With the right treatment, you can manage the oxidation and keep your bluestone looking its best.

Why Traditional Cleaning Methods Fail

If you’ve tried to scrub or blast away those stubborn brown spots on your bluestone, you’ve probably felt the frustration when they barely budge or quickly return. It’s a common experience, and it’s not your fault. The truth is, the usual cleaning methods you’d use for other outdoor surfaces just don’t work for the deep-set mineral stains in bluestone. In fact, some of these popular techniques can do more harm than good.

Regular cleaning only tackles surface-level grime, leaving the underlying cause of the stains, iron oxidation, untouched. To truly fix the problem, you need a solution that addresses the issue from within the stone itself. Let’s look at why your go-to cleaning strategies are falling short and how they might be making the situation worse for your beautiful bluestone patio or walkway.

The Limits of Pressure Washing

Using a pressure washer can be incredibly satisfying, as you watch dirt and grime disappear in an instant. Unfortunately, when it comes to brown spots on bluestone, that satisfaction is short-lived. Pressure washing only removes surface dirt; it doesn’t penetrate the stone to address the mineral stains causing the discoloration. Worse yet, the high-pressure stream can damage the surface of the bluestone, stripping away its natural protective layer. This makes the stone more porous and even more susceptible to future staining and moisture absorption. While it might look better for a week or two, pressure washing is a temporary fix that can lead to bigger problems down the road.

The Problem with Generic Chemical Cleaners

Your local hardware store has an entire aisle of potent-looking chemical cleaners, but most are a poor match for bluestone. Many generic cleaners are acid-based, which can etch, discolor, and permanently damage the stone’s surface. Milder, non-acidic cleaners, on the other hand, typically aren’t strong enough to lift deep-set iron stains. Beyond their ineffectiveness, many of these cleaners leave behind a chemical residue. If you try to apply a sealer over this residue, it can prevent the sealer from bonding correctly, resulting in a streaky, uneven finish that fails to protect your stone. It’s a classic case of the supposed cure causing another problem.

How Improper Cleaning Makes Things Worse

Even if you find a suitable cleaner, the process itself can create new issues if you’re not careful. One of the most common mistakes is applying a sealer before the bluestone is completely dry. Because bluestone is a porous natural material, it holds onto moisture for a long time after being washed. Sealing damp stone traps that water inside, which can lead to a cloudy or hazy appearance under the sealer. This trapped moisture also prevents the sealer from properly absorbing and curing, leading to weak spots and premature failure. Proper restoration and sealing requires patience and a perfectly dry surface to achieve a durable, beautiful result.

Common Myths About Sealer Stains

When people hear the term “sealer stain,” they often imagine a thick, opaque coating like paint that will cover up the natural beauty of their bluestone. This is one of the biggest myths out there. A high-quality sealer stain designed for natural stone is nothing like paint. Instead of sitting on top, it’s a translucent formula that penetrates the pores of the bluestone. It works with the stone’s inherent characteristics to even out the color variations caused by iron stains while allowing the natural texture and pattern to show through. Think of it as a restorative treatment that enhances your stone’s appearance and provides lasting protection, rather than a cover-up.

What You’ll Need for Sealer Stain Application

Getting the right tools and materials together before you start is the secret to a smooth, successful project. Think of it like gathering your ingredients before you start cooking; it just makes everything easier and far less stressful. When you’re tackling a project like restoring your bluestone, this preparation phase is what separates a frustrating experience from a deeply satisfying one. Properly preparing your bluestone and having the right gear on hand ensures the sealer stain can do its job effectively, giving you that beautiful, long-lasting finish you’re picturing.

This isn’t the time to cut corners. A little prep work now will save you a lot of headaches later and give your patio or walkway the refresh it deserves. It also protects your investment. High-quality bluestone is a gorgeous feature for any home, and treating it correctly keeps it that way. By taking the time to assemble everything you need, you’re setting yourself up for a professional-quality result that not only looks great but also extends the life of your stone. Let’s walk through exactly what you’ll need to get started on the right foot.

Essential Cleaning and Prep Supplies

The most common mistake people make is not cleaning the stone surface thoroughly before applying a sealer. Any dirt, grime, or old sealant left behind can prevent the new sealer stain from adhering properly, leading to a blotchy and ineffective finish. To get your bluestone ready, you’ll need a stiff-bristle brush (not wire), a quality stone cleaner, and access to a hose. For tougher grime, a pressure washer on a low setting can be helpful. You should also grab some painter’s tape and plastic sheeting to protect any surrounding surfaces like siding, plants, or other masonry from accidental drips. Proper surface preparation is non-negotiable for a professional-looking result.

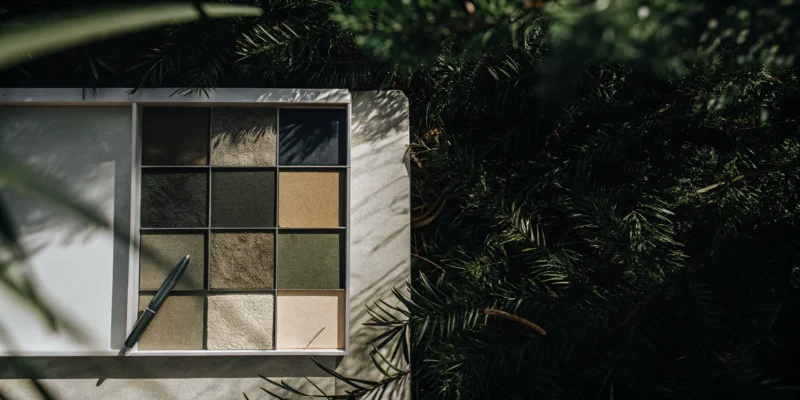
Choosing the Right Sealer Stain

Not all sealers are created equal, especially when you’re trying to correct discoloration. To fix those stubborn brown spots, you need a product that does two things at once: it must even out the stone’s color and provide a protective seal to block water from causing more rust stains. Look for a high-quality, professional-grade sealer stain specifically designed for natural stone like bluestone. These products are formulated to penetrate the stone, providing durable color and protection against stains and weathering. You can find a range of excellent options at the Gappsi Store, where we stock products trusted by our own installation teams for their reliability and superior finish.

Application Tools and Safety Gear

Once your surface is clean and you have your sealer stain, you’ll need the right tools to apply it. A small paint roller with a medium-nap cover works well for the main surfaces, while a good-quality paintbrush is perfect for cutting in along edges and getting into tight corners. You’ll also want a paint tray to hold the sealer. Most importantly, don’t forget your safety gear. You should always wear chemical-resistant gloves to protect your hands and safety glasses to shield your eyes from splashes. Working in a well-ventilated area is also key. Taking these simple precautions ensures the project is not only successful but also safe from start to finish.

How to Apply Sealer Stain to Remove Brown Spots

Ready to tackle those brown spots? Applying a sealer stain is a straightforward process, but the secret to a flawless finish is in the prep work and application technique. Following these steps will help you restore your bluestone’s natural beauty and protect it for years to come. Let’s walk through the process together.

Step 1: Prepare and Clean the Bluestone

This first step is the most important one, so don’t rush it. You need to give your bluestone a deep clean before applying any sealer. Think of it this way: if you don’t remove all the dirt, algae, and grime first, you’ll just be sealing it in, which can make the stains look even worse. Use a pH-neutral stone cleaner and a stiff-bristle brush to scrub the surface thoroughly. After scrubbing, rinse the area completely with a garden hose until the water runs clear. Make sure you remove all the cleaning residue. For stubborn, deep-set grime, you might consider calling in a pro. A professional cleaning and sealing service ensures the stone is perfectly prepped for staining.

Step 2: Test the Stain on a Small Area

Before you commit to staining your entire patio, always test your sealer stain in a small, hidden spot. Every piece of bluestone is unique, and the final color can vary based on its specific mineral composition and porosity. Pick an area that’s usually out of sight, like behind a large planter or under your patio table. Apply the sealer stain exactly as you plan to for the main project and let it dry for at least 24 hours. This gives you a chance to see the true, cured color and make sure you love the result. It’s a simple step that can save you from a big surprise later on.

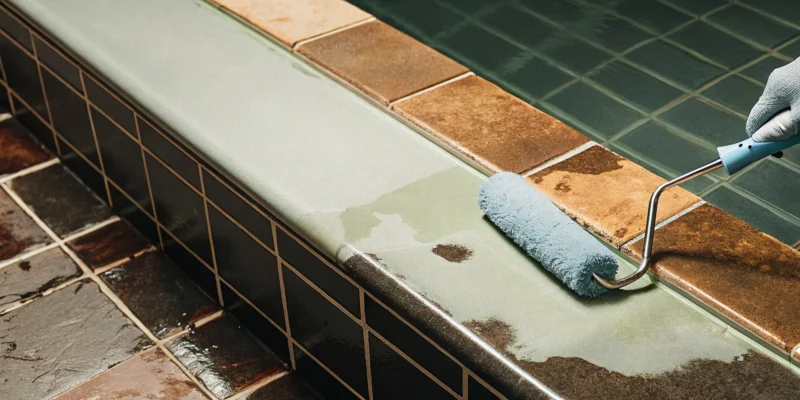
Step 3: Apply Multiple Thin Coats

When it comes to sealer stain, less is more. It’s much better to apply two or three thin, even coats than one thick, heavy layer. A thick coat can look blotchy, take forever to dry, and may not absorb properly into the stone. Make sure your bluestone is completely dry after cleaning before you begin. Applying sealer to damp stone can trap moisture, leading to a cloudy finish or streaks. By building up the color with thin layers, you get a more uniform, durable, and professional-looking result. This careful approach is key to enhancing the beauty of any natural stone and ensuring it looks its best.

Best Practices for a DIY Application

To get the best results, timing and temperature matter. Try to apply your sealer stain on a mild, overcast day. If you work in direct, hot sunlight, the sealer can dry too quickly on the surface before it has a chance to penetrate the stone. This can lead to an uneven finish and poor protection. The ideal temperature is usually between 50 and 80 degrees Fahrenheit. Work in small, manageable sections, maintaining a wet edge to prevent lap marks where your sections overlap. Always follow the manufacturer’s instructions for application, whether you’re using a roller, a brush, or a sprayer. A little patience here goes a long way toward a beautiful finish.

Safety Precautions and Common Mistakes

Let’s talk safety first. Always wear protective gloves and safety glasses when working with sealers and stains. These products contain chemicals that can irritate your skin and eyes. Also, make sure you have good ventilation if you’re working in a covered or partially enclosed area. A common mistake is forgetting to protect the surrounding surfaces. Use painter’s tape and plastic sheeting to cover any nearby siding, plants, or outdoor furniture to shield them from accidental drips and overspray. Taking a few extra minutes to prep your area can save you a lot of cleanup time later. If the project feels overwhelming, remember that our professional restoration team is always here to help.

Long-Term Benefits of a Sealer Stain Treatment

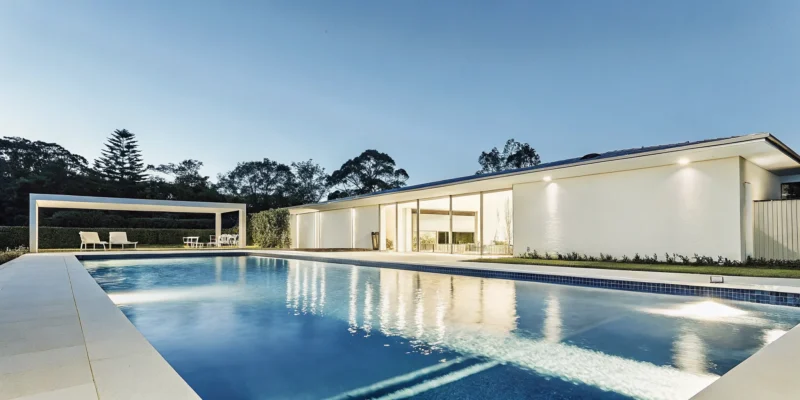
Applying a sealer stain is more than just a quick fix for brown spots. It’s an investment in the beauty and longevity of your bluestone patio, walkway, or pool coping. This treatment offers a comprehensive solution that not only corrects existing discoloration but also provides a strong defense against future issues, keeping your outdoor spaces looking their best for years to come.

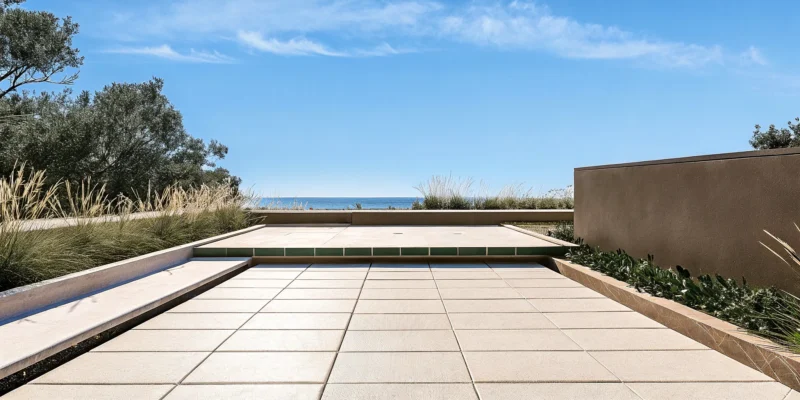
Restore Your Bluestone’s Appearance

A sealer stain treatment is designed to even out the tone of your bluestone, effectively erasing those frustrating brown spots. The goal is to create a uniform color while preserving the stone’s inherent character and texture. Unlike a coat of paint, a quality sealer stain enhances the bluestone’s natural beauty, so it looks refreshed and clean, not artificial. This process revitalizes your investment in high-quality natural stone, making your patio or pool surround look as good as the day it was installed. It brings back the rich, varied colors you loved in the first place, ensuring your outdoor space feels welcoming and well-maintained.

Protect Against Future Staining

The most significant long-term benefit is protection. The sealer stain creates a barrier that penetrates the stone’s surface, preventing water from seeping in. Since water absorption is the primary cause of iron oxidation and rust spots, this sealing action is your best defense against future discoloration. This proactive step makes routine cleaning much easier and reduces the likelihood of stains setting in from spills or environmental exposure. Gappsi’s professional restoration and sealing services ensure your bluestone is properly protected from the elements, giving you peace of mind and a lasting, beautiful finish.

When to Consider a Professional

While it may be tempting to tackle this project yourself, professional application is crucial for achieving a flawless, natural-looking finish. An expert knows how to properly prepare the surface and apply the sealer stain in thin, even coats to avoid a blotchy or painted appearance. If you’re dealing with widespread discoloration, calling a professional can save you time and prevent costly mistakes. Experts who handle masonry projects regularly have the experience to diagnose the specific cause of your staining and apply the most effective treatment, ensuring the results are both beautiful and durable.

How to Maintain Your Treated Bluestone

Once your bluestone is treated, maintenance becomes much simpler. It’s important to avoid harsh cleaning methods like pressure washing or acidic cleaners, which can strip the sealer and damage the stone over time. Instead, a gentle approach is best. Regularly sweep away debris and clean spills as they happen. For a deeper clean, use a pH-neutral cleaner specifically formulated for natural stone. Using the proper cleaning products will preserve the protective seal and keep your bluestone looking pristine without causing harm. This simple routine ensures your restored bluestone stays beautiful for many seasons.

Related Articles

Frequently Asked Questions

Will the sealer stain make my bluestone look fake or painted? Not at all. This is a common concern, but a quality sealer stain is very different from paint. Instead of forming a thick, opaque layer on the surface, it’s a translucent product designed to penetrate the stone. It works by evening out the discoloration from the rust spots while still allowing the natural texture, color variations, and character of your bluestone to show through. The result is a refreshed, uniform appearance that looks natural, not artificial.

Can I just use a regular clear sealer instead of a sealer stain? While a clear sealer is great for protecting stone from moisture, it won’t solve the problem of existing brown spots. A clear sealer is transparent, so it would simply seal the rust stains in, leaving them visible under the protective coat. A sealer stain is specifically formulated to do two jobs at once: its tint corrects the discoloration, and its sealing properties provide the protection needed to prevent new spots from forming.

Will the brown spots come back after treatment? A proper sealer stain treatment is the best defense against the return of brown spots. The sealer creates a protective barrier that significantly reduces water absorption, which is the trigger for the iron oxidation that causes the rust. While no outdoor surface is completely immune to the elements forever, a high-quality application will protect your bluestone for several years. Proper maintenance, like gentle cleaning, will also extend the life of the treatment.

How often will I need to reapply the sealer stain? The longevity of the treatment depends on several factors, including the amount of foot traffic your patio gets and its exposure to sun and rain. Generally, you can expect a professional-grade sealer stain to last for three to five years. You’ll know it’s time for a refresh when you notice water is no longer beading on the surface or if you see any faint discoloration starting to reappear.

What if I’m not comfortable doing this project myself? That’s perfectly understandable. Achieving a smooth, even finish without lap marks or blotches requires careful preparation and technique. If you’re hesitant or simply want to ensure a flawless result, calling a professional is a great option. Our restoration team has the experience and equipment to properly clean the stone, diagnose any underlying issues, and apply the sealer stain for a durable, beautiful finish.

Share this page:
A pool patio showcasing the best paving materials, with natural stone pavers and a clean coping edge.

3 Best Paving Materials for Your Pool Patio & Coping

When you picture your perfect pool day, you probably see friends and family laughing, relaxing, and having fun. The foundation for all those great moments is a safe and comfortable patio. The right surface prevents slips and falls, feels good underfoot, and creates a welcoming environment for everyone. This is why selecting the best paving material for a pool patio and coping is about much more than just aesthetics. It’s about creating a secure space where you can relax without worry. Let’s explore the top materials that deliver on safety, comfort, and style, so you can build the perfect poolside retreat.

Key Takeaways

  • Focus on safety and comfort first: Your best material choice will have a non-slip texture to prevent accidents and a lighter color to keep bare feet comfortable on hot days.
  • Match your material to your home and climate: Select a paver that complements your home’s architecture and is durable enough to withstand pool chemicals and New York’s freeze-thaw cycles for a beautiful, long-lasting patio.
  • Remember that professional installation is key: The right material can fail without proper installation. Critical details like drainage, secure coping, and expansion joints are what make a patio safe, durable, and worth the investment.

What Are the Best Materials for Your Pool Patio?

Choosing the right material for your pool patio is one of the most important decisions you’ll make for your backyard oasis. The surface you select sets the tone for the entire space and plays a huge role in safety and comfort. You want something that looks beautiful, feels good under bare feet, and can stand up to splashes and sunshine. Let’s walk through the top three materials that homeowners love, so you can find the perfect match for your new swimming pool.

Natural Stone

If you’re dreaming of a rich, textured look with timeless appeal, natural stone is a wonderful option. Materials like travertine, bluestone, and flagstone offer unique patterns and colors that create a one-of-a-kind patio. Travertine is especially popular for pool areas because its porous nature helps with drainage and it stays surprisingly cool in the summer sun. While natural stone is a premium choice and can be more of an investment, its organic beauty is unmatched. A tumbled or brushed finish can also add extra grip, making it a safer surface for wet feet.

Porcelain Pavers

For a combination of modern style and incredible durability, porcelain pavers are hard to beat. They are specifically engineered for outdoor use, making them resistant to water, chlorine, salt, and fading from UV rays. This means your patio will look great for years with very little fuss. Porcelain is also a top choice for safety, as it offers excellent slip resistance. Plus, it doesn’t require sealing and is simple to clean. Choosing lighter-colored porcelain and natural stone pavers will also help keep the surface cooler for a more comfortable poolside experience.

Concrete Pavers

Concrete pavers are a fantastic all-around choice, giving you a great balance of style, durability, and value. They offer the strength of solid concrete but come in a huge variety of colors, shapes, and sizes, often designed to mimic the elegant look of natural stone. This versatility makes it easy to find a style that complements your home and landscape design. A key benefit for pool areas is their non-slip surface, which provides a safe and secure footing for family and guests. Concrete pavers are a practical and attractive solution that can bring your vision to life without stretching your budget.

What Makes a Great Pool Paving Material?

Choosing the right material for your pool patio goes far beyond aesthetics. While you definitely want a surface that looks beautiful, the best choices also deliver on safety, comfort, and long-term durability. Think about it: this is where your family and friends will spend countless summer days walking, playing, and relaxing. The right paving material creates a secure and enjoyable environment that can handle everything from cannonballs to cookouts.

When you start exploring your options, you’ll find that the best materials share a few key characteristics. They provide excellent grip, stay comfortable under bare feet, stand up to harsh pool chemicals, and manage water effectively. Let’s look at what makes a paving material truly great for a Long Island pool patio.

Prioritize Slip Resistance for Safety

Safety should always be your top priority around a swimming pool. Wet surfaces can be incredibly slippery, so choosing a non-slip material is essential for preventing accidents. The texture of the paver plays a huge role here. Materials with a slightly rough or matte finish, like tumbled travertine or brushed porcelain, offer much better traction than smooth, polished surfaces. When we design a pool patio, we select materials that meet or exceed industry safety standards for wet walking surfaces. This ensures your pool area is a safe space for everyone, from toddlers taking their first steps to grandparents enjoying the sun.

Ensure Comfort with Heat-Resistant Surfaces

We’ve all done the hot-pavement-dance on a scorching summer day. The material you choose for your pool deck can make the difference between a comfortable stroll and a mad dash for the shade. Dark, dense materials tend to absorb and hold onto heat, becoming uncomfortably hot for bare feet. Lighter-colored pavers are a great choice because they reflect more sunlight. Certain materials, like travertine, are naturally cooler to the touch, making them a popular and comfortable option. A heat-resistant surface ensures your patio remains a pleasant and usable space even during the peak of a Long Island summer.

Find Materials That Withstand Weather and Chemicals

Your pool patio has a tough job. It’s constantly exposed to direct sunlight, chlorinated or saltwater splashes, and the full range of New York’s four-season climate, including freeze-thaw cycles in the winter. You need a material that won’t fade, stain, or crack under pressure. High-quality porcelain and natural stone pavers are specifically designed for this environment. Materials like granite and certain types of concrete are incredibly dense and non-porous, which means they resist damage from both chemicals and weather, ensuring your investment looks great for years to come.

Understand Water Absorption and Drainage

Proper water management is critical for the safety and longevity of your pool patio. You want a surface that discourages water from pooling, which can create slipping hazards and lead to mildew growth. Textured pavers help water drain away more effectively than perfectly flat ones. However, the material itself is only part of the equation. A professional installation with a proper drainage system is just as important. Our masonry and construction teams ensure your patio is graded correctly, so water flows away from the pool and your home’s foundation, protecting your entire outdoor living space.

Comparing Your Top Material Choices

Now that you know what to look for in a pool paving material, let’s weigh the pros and cons of the top three contenders. Each one offers a unique blend of style, durability, and maintenance requirements, so thinking through your priorities will help you land on the perfect fit for your home.

The Pros and Cons of Natural Stone

Natural stone is a classic choice for a reason. Materials like travertine, bluestone, and flagstone bring an unmatched richness and texture to a pool patio. Because each stone is unique, you get a one-of-a-kind look with endless variations in pattern, shape, and color. This makes it easy to find natural stone options that feel like a true extension of your home. The biggest consideration with natural stone is the investment. It’s a premium material, and the cost reflects the intensive process of quarrying, finishing, and transporting it. While some stones like travertine are famous for staying cool on hot summer days, others can absorb more heat, so it’s important to choose wisely for a comfortable poolside experience.

The Pros and Cons of Porcelain Pavers

Porcelain pavers have become a go-to for modern pool patios, and it’s easy to see why. They offer incredible durability and a clean, sophisticated look. We especially recommend textured porcelain pavers because they provide a comfortable, slip-resistant surface that’s perfect for bare feet. One of the best things about porcelain is its resilience. It stands up to water, chlorine, salt, and harsh UV rays without fading or degrading. This means your patio will look great for years with very little effort. In fact, porcelain typically doesn’t require sealing, which is a huge plus for anyone who prefers low-maintenance outdoor living. It’s a practical and beautiful choice for any poolside design.

The Pros and Cons of Concrete Pavers

If you’re looking for a material that balances cost, style, and performance, concrete pavers are an excellent option. They give you the high-end look of natural stone without the premium price tag, making them a very popular choice for pool decks. You can find them in a huge variety of colors, sizes, and shapes, which gives you the creative freedom to design a patio that perfectly matches your vision. Textured concrete pavers also offer a reliable non-slip surface, keeping your pool area safe for family and friends. To get the most out of them, proper sealing and expert installation are key. When done right, they create a durable and stunning poolside retreat that will last for years.

Everything to Know About Pool Coping

Pool coping is one of those details that makes a huge difference in the final look and feel of your backyard oasis. It’s the finishing touch that frames your pool, but it does more than just look pretty. Think of it as the bridge between your pool and your patio. It provides a safe edge, a comfortable seat, and a protective cap for your pool’s structure. Choosing the right coping is a key step in designing a pool area that is both beautiful and functional.

What Is Pool Coping and What Does It Do?

So, what exactly is pool coping? It’s the material used to cap the edge of your pool shell. This cap serves a few important jobs. It protects the pool structure from the elements and prevents water from getting behind the shell, which could cause damage over time. It also creates a smooth, rounded edge that’s safe for swimmers to hold onto. Finally, it helps direct water that splashes out of the pool toward deck drains. Properly installed coping is essential for the longevity and safety of your swimming pool.

Popular Coping Edge Styles to Consider

Coping comes in several edge styles, and your choice influences both the safety and aesthetic of your pool. One of the most popular options is the bullnose edge, which is rounded and smooth. This style is comfortable to sit on and easy to grip, making it great for families. Another option is a rough-cut or chiseled edge, which offers a more rustic, natural look. You could also opt for a cantilevered edge, where the patio material extends slightly over the pool’s edge for a clean, modern finish. The style you select should complement your porcelain or natural stone patio.

How to Match Coping with Your Patio

Your pool coping should feel like a natural extension of your patio, not an afterthought. The key is creating a cohesive design that ties your outdoor space together. You can achieve a seamless look by using the same material for both your coping and your patio. Alternatively, you can create a beautiful visual contrast by choosing a coping material that complements your pavers in a different color or texture. For example, a dark gray coping can create a stunning frame around a light-colored patio. Our masonry design experts can help you find the perfect combination.

Breaking Down the Cost and Maintenance

Creating your dream pool patio is an exciting project, but it’s also a significant investment. To make the best choice for your home and budget, it’s helpful to look beyond the initial price tag and consider the full picture. This includes the upfront cost of materials and installation, the long-term upkeep required to keep your patio looking beautiful, and the importance of avoiding common installation errors that can lead to expensive repairs down the road. Thinking about these factors now will ensure you can relax and enjoy your poolside oasis for many years to come.

Your Initial Investment

The material you choose for your pool patio is the biggest factor in your initial cost. Natural stone, like travertine or bluestone, sits at the higher end of the price spectrum. This is because it’s expensive to quarry, finish, and transport these beautiful, one-of-a-kind materials. On the other hand, concrete pavers offer a more budget-friendly alternative. They give you the sophisticated look of natural stone without the premium price, making them a popular choice for achieving a high-end aesthetic. Exploring a wide selection of porcelain and natural stone options can help you find the perfect balance between your vision and your budget.

Planning for Long-Term Upkeep

To keep your pool patio looking its best season after season, a little maintenance goes a long way. Sealing your pavers is one of the most important steps, especially for natural stone. A quality sealant protects the stone from pool chemicals, stains, and the effects of Long Island’s weather. While most natural stone requires this protective layer, porcelain pavers are a fantastic low-maintenance option that usually doesn’t need sealing. Factoring in periodic cleaning and resealing will protect your investment and preserve its beauty. Gappsi offers professional restoration and sealing services to keep your patio in top condition.

Common Installation Mistakes to Avoid

Proper installation is just as important as choosing the right material. A professional installation prevents future headaches and ensures your patio lasts. One common mistake is mixing different paver sizes and shapes without a cohesive design, which can create a chaotic look. Another critical error is failing to install expansion joints where the pavers meet the pool coping. These joints allow the materials to expand and contract with temperature changes, preventing cracks and damage. Working with an experienced masonry and construction company ensures these crucial details are handled correctly from the start.

Design Tips for a Beautiful and Safe Pool Patio

Once you’ve narrowed down your material choices, it’s time for the fun part: designing a space that’s both stunning and secure. The right design choices go beyond just picking a pretty paver. They create a cohesive look that complements your home and a safe environment for your family and friends to enjoy all summer long. From the color palette to the surface texture, every detail plays a role in building your perfect poolside retreat.

A well-thought-out design ensures your patio is not only beautiful on day one but also functional and durable for years to come. Think about how you plan to use the space. Will it be a quiet spot for sunbathing, a lively area for kids to play, or an elegant setting for outdoor dining? Your answers will influence the layout, the type of pavers you choose, and even the patterns you incorporate. For example, a large, open pattern can make a small space feel bigger, while intricate designs can define different zones for lounging and dining. We help homeowners explore a wide range of porcelain and natural stone options to find the perfect fit for their vision and lifestyle. Getting these details right from the start is the key to creating an outdoor oasis you’ll love.

Choose Colors and Patterns You’ll Love

Your pool patio is an extension of your home, so its color scheme should feel personal and inviting. Pavers come in a huge range of colors, from warm, earthy tones that create a natural, rustic vibe to cool grays and blues for a more modern look. White pavers are a classic choice because they reflect sunlight, helping to keep the surface cooler on hot days. Beyond color, the pattern you choose can add a lot of personality. A simple running bond is timeless, while a herringbone or basketweave pattern can add a touch of custom detail. Think about what style best matches your home’s architecture and your personal taste.

Select the Right Texture for Safety and Style

When it comes to pool patios, safety is just as important as style. A wet surface can be a major slipping hazard, which is why texture is a critical consideration. Pavers with a naturally rough, tumbled, or brushed finish provide much better grip underfoot. Materials like travertine and textured concrete are excellent choices for this reason. They also help water drain away instead of pooling on the surface. This doesn’t mean you have to sacrifice looks for safety. The right texture can add visual depth and character to your patio, creating a rich, layered look that feels both elegant and secure. Our masonry design team can help you find the perfect balance.

Learn How to Seal and Protect Your Pavers

To keep your new pool patio looking its best, a little protection goes a long way. Sealing your pavers is a crucial step, especially for natural stone. A quality sealant protects the stone from stains, harsh pool chemicals, and fading caused by the sun. It also makes cleaning up spills much easier. While most natural stone benefits from sealing, high-density materials like porcelain pavers usually don’t need it, which is a great low-maintenance perk. Applying a sealant is a key part of long-term care that preserves the beauty and integrity of your investment. If you need help, our restoration and sealing services can ensure your patio stays in top condition.

How to Choose the Right Material for Your Long Island Home

Now that you know the top material options, let’s narrow down the perfect choice for your Long Island property. Your home’s location, style, and your family’s safety are all key factors in making a decision you’ll love for years to come. Thinking through these elements will help you select a material that is not only beautiful but also practical for our unique environment.

Consider New York’s Four-Season Climate

Living on Long Island means your outdoor patio has to endure everything from humid summer days to freezing winter nights. The constant freeze-thaw cycle can cause some materials to crack and degrade over time. That’s why it’s so important to choose durable options like dense natural stone or porcelain pavers, which are built to withstand these temperature swings. Beyond durability, think about safety. Materials with a bit of texture, like travertine or brushed concrete, provide better grip around the pool, reducing the risk of slips and falls during a summer splash or after a rainstorm.

Match Your Patio to Your Home’s Architecture

Your new pool patio should feel like a natural extension of your home, not an afterthought. Take a look at your home’s architectural style. Is it a classic colonial, a coastal cottage, or a modern build? The materials you choose should complement that aesthetic. For example, the profile of your pool coping can make a big impact. A rounded bullnose edge creates a soft, traditional look, while a sharp, drop-face edge offers a clean, contemporary feel. Our masonry design experts can help you select colors, patterns, and textures that harmonize with your home’s existing character.

Make Your Final Decision with Confidence

With your ideal material and style in mind, the final step is ensuring a safe and professional installation. Safety around a pool is non-negotiable. Industry standards require a minimum coefficient of friction for wet walking surfaces, a technical detail a professional installer will handle for you. It’s also critical that all pavers, especially the coping around the pool’s edge, are installed securely and perfectly level to prevent tripping hazards. Working with an experienced team on your swimming pool project guarantees that every detail is managed correctly, giving you a stunning and secure patio built to last.

Frequently Asked Questions

Which material is the safest for a family with young children? Safety is all about texture. For a pool area with lots of activity, you want a paver with a non-slip surface that provides excellent grip for wet feet. Textured materials like tumbled travertine, brushed porcelain, and certain concrete pavers are all fantastic choices. They offer much better traction than smooth or polished surfaces, which helps prevent slips and falls and gives you peace of mind.

My backyard gets a lot of direct sun. Which pavers will stay the coolest? To avoid a hot-pavement-dance, your best bet is to choose lighter-colored pavers, as they reflect more sunlight and absorb less heat. White, beige, or light gray options will feel much more comfortable underfoot on a hot day. If you love the look of natural stone, travertine is famous for staying naturally cooler to the touch, making it a premium and very comfortable choice for sunny pool decks.

How much maintenance does a new pool patio really need? The level of upkeep depends on the material you choose. Porcelain pavers are the easiest to care for since they are non-porous and don’t require sealing. Natural stone and concrete pavers, however, benefit greatly from being sealed. A quality sealant protects them from chlorine, salt, stains, and weather damage. Beyond that, regular sweeping and occasional washing will keep any patio looking its best.

Is it better to use the same material for the coping and the patio? There is no right or wrong answer here; it really comes down to the look you want to achieve. Using the same material for both the coping and the patio creates a seamless, uniform design that feels very cohesive. On the other hand, choosing a contrasting coping material, perhaps in a darker or complementary color, can create a beautiful frame around your pool and add a custom design element.

What’s the biggest mistake people make when choosing patio materials? A common mistake is focusing only on appearance while overlooking function. It’s easy to fall in love with a beautiful, sleek paver, but if it gets dangerously slippery when wet or scorching hot in the sun, you won’t be happy with it long-term. The best approach is to find a material that balances the style you want with the safety, comfort, and durability your family needs for a poolside space.

Share this page:
Calculating the average cost of a natural stone patio installation with various stone samples.

What’s the Average Cost of Natural Stone Patio Installation?

One of the biggest concerns for any homeowner starting a major project is the fear of hidden costs. A budget is only useful if it’s comprehensive. When it comes to building a natural stone patio, the price of the stone itself is just one part of the equation. You also have to consider site excavation, base preparation, delivery fees, and the skilled labor required for a flawless finish. Understanding the average cost of natural stone patio installation is essential, but it’s just as important to know what’s included in that number. We’ll break down every potential expense so you can plan your project without any unwelcome financial surprises along the way.

Key Takeaways

  • Your Total Cost Hinges on Four Main Factors: The final price for your patio is determined by the type of stone you choose, the size and complexity of your design, the amount of site preparation required, and the cost of skilled labor.
  • Look Beyond the Price of the Stone Itself: A complete and realistic budget accounts for the entire project, so remember to include necessary costs like local permits, excavation, delivery fees, and the final protective sealant.
  • Prioritize Professional Installation for a Lasting Investment: While getting multiple quotes is wise, hiring an experienced mason is the best way to ensure your patio is built correctly, looks beautiful, and avoids costly repairs down the road.

How Much Does a Natural Stone Patio Cost?

Planning your budget is one of the first, and most important, steps in any home improvement project. When it comes to creating a beautiful natural stone patio, the final price tag can vary quite a bit. The cost depends on the materials you select, the size of your space, and the complexity of the design you have in mind. Understanding these variables will help you set a realistic budget and make informed decisions. Let’s break down what you can expect to invest in your new outdoor oasis, from the price per square foot to the total project estimate. This will give you a clear picture of the costs involved in bringing your vision to life.

What to Expect Per Square Foot

When you start pricing out your project, you’ll find that costs are often discussed per square foot. Generally, you can expect to pay between $16 and $35 per square foot for a natural stone patio, a price that includes both the stone and professional installation. The specific type of natural stone you choose plays a huge role in this range. For example, popular options like bluestone or flagstone can cost anywhere from $5 to $35 per square foot for just the material. This wide range reflects differences in quality, color, and availability, so it’s worth exploring your options to find the perfect fit for your style and budget.

Estimating the Total Project Cost

For an average-sized patio of about 200 to 400 square feet, the total project cost typically falls between $3,200 and $14,000. It’s helpful to know that labor makes up a significant portion of this price, usually around 60% to 70% of the total. This highlights the value of expert masonry work, which ensures your patio is built to last. Think of it as an investment in your home’s future. A well-designed stone patio not only enhances your lifestyle but can also increase your property value by 8% to 12%, often returning a large portion of the installation cost when you decide to sell.

What Factors Drive Up Patio Installation Costs?

Budgeting for a new natural stone patio can feel like a puzzle, but it becomes much clearer when you understand the key pieces that make up the final price. While every project is unique, four main factors consistently influence the overall cost: the type of stone you select, the patio’s size and design complexity, the condition of the installation site, and the labor required to bring it all together. Getting a handle on these variables from the start helps you avoid surprises and ensures your project stays on track.

For example, falling in love with a premium stone is wonderful, but it’s important to know how that choice will ripple through the rest of your budget. Similarly, a simple, elegant design might allow you to allocate more funds toward high-end materials, while a complex, multi-level patio will require a larger portion of the budget for skilled labor. Thinking through each of these elements will help you create a realistic budget and make informed decisions that align with your vision for the perfect outdoor space. Let’s break down what you can expect from each of these cost drivers.

The Type of Stone You Choose

When you start dreaming up your perfect patio, the stone you pick is one of the biggest decisions you’ll make, both for the look and the budget. The world of porcelain and natural stone is vast, with options ranging from classic bluestone to elegant flagstone. Generally, more common stones are easier on the wallet, while rarer or more difficult-to-quarry options will have a higher price per square foot. It’s not just about the initial cost, though. Think about durability and maintenance, too. A slightly more expensive, harder stone might save you money on upkeep in the long run. We can walk you through the pros and cons of each to find the perfect fit for your style and budget.

Your Patio’s Size and Complexity

It makes sense that a larger patio will cost more than a smaller one, but the design’s complexity also plays a huge role. A simple square or rectangular patio is the most straightforward to install. Once you add curves, intricate patterns like herringbone, or multiple levels, the labor involved increases significantly. These custom designs require more precise cuts and careful placement, which adds to the installation time and overall cost. Our expert masonry team loves bringing creative visions to life, but it’s important to remember that these beautiful, detailed features will be reflected in the final project price. A more complex design simply requires more skill and time to execute perfectly.

Preparing the Installation Site

A beautiful patio needs a solid foundation, and preparing the ground is a critical step that can impact your budget. If your yard has a significant slope, is uneven, or has poor drainage, we’ll need to address that before any stones are laid. This can involve excavation, grading the land, and installing a proper base of gravel and sand. The installation method also matters. A ‘dry-laid’ patio set on a gravel and sand base is typically less expensive than a ‘wet-laid’ one set in mortar on a concrete slab. Proper site preparation is non-negotiable for a patio that will last for decades without shifting or cracking.

Labor and Location

Labor is one of the most significant parts of a patio installation budget, often making up more than half of the total cost. This is where expertise truly counts. Skilled masons ensure every stone is perfectly placed, the base is stable, and the final result is both beautiful and durable. Labor rates can also vary depending on your location. Here on Long Island, costs reflect the high level of craftsmanship homeowners expect. While it might be tempting to cut corners on labor, investing in an experienced team prevents costly repairs down the road. A professionally installed patio is an investment in your home’s value and your family’s enjoyment for years to come.

A Closer Look at Natural Stone Prices

Choosing the right material is one of the most exciting parts of planning your patio. The stone you select sets the tone for your entire outdoor space, but it also plays a big role in your budget. Let’s break down some of the most popular natural stone options so you can find the perfect fit for your home and wallet.

Bluestone and Limestone

Bluestone is a timeless choice for patios, known for its beautiful blue-gray hues and durable, non-slip surface. It’s a fantastic option for pool surrounds and walkways. You can expect bluestone to cost between $15 and $31 per square foot. With proper care, it can easily last for more than 35 years, though it does need a sealant to maintain its rich color. Limestone offers a softer, more earthen look, with costs ranging from $16 to $32 per square foot. It’s another long-lasting material, but like bluestone, it requires regular sealing every couple of years to protect it from weathering and stains.

Slate and Sandstone

If you want a patio with a lot of character, slate is an excellent material to consider. It comes in a wide range of colors, from dark grays to greens and purples, and has a naturally textured surface. Slate is incredibly durable, often lasting over 50 years, and it’s naturally resistant to stains. The price for slate typically falls between $18 and $42 per square foot. Sandstone provides a warm, rustic feel with its red, tan, and brown tones. It costs between $18 and $30 per square foot and offers a naturally non-slip finish, but it is more porous than other stones and needs a high-quality sealant for protection.

Granite and Flagstone

For a high-end, incredibly resilient patio, granite is tough to beat. It’s one of the hardest natural stones available, making it highly resistant to scratches and heat. Granite costs between $19 and $32 per square foot and can last for decades with minimal maintenance, making it a great long-term investment. Flagstone is a more general term for flat stones laid on a sand or mortar base, often including varieties like bluestone or slate. It’s known for its irregular shapes that create a charming, naturalistic look. The cost for a flagstone patio generally ranges from $15 to $32 per square foot, depending on the specific type of stone used by your masonry team.

Travertine and Cobblestone

Travertine brings a touch of old-world elegance to any outdoor space. It’s a type of limestone formed near hot springs, giving it a distinctive fibrous and porous appearance. Travertine stays cool to the touch, making it a popular choice for pool decks in sunny climates. It costs between $15 and $30 per square foot. Cobblestone offers a classic, historic look and is exceptionally strong, with a potential lifespan of over 100 years. Because the rounded stones require a skilled hand to set properly, installation can be more intensive. You can expect cobblestone to range from $20 to $50 per square foot.

Are There Hidden Costs to Installing a Stone Patio?

When you get a quote for a new stone patio, it’s easy to focus on the big numbers: the cost of the stone and the labor to install it. But a smart homeowner knows to ask, “What else?” Several additional costs can pop up during a project, and being aware of them from the start helps you create a realistic budget with no unwelcome surprises. Think of it less like “hidden” costs and more like a complete checklist for your project.

From local permits to the final protective sealant, these extra expenses are a normal part of the construction process. A great contractor will be transparent about these potential costs, but it’s always best to be informed. Understanding the full scope of the project, including site preparation, delivery logistics, and long-term care, ensures you’re not just budgeting for a patio, but for a beautiful and lasting outdoor space. At Gappsi, we manage every detail, from initial masonry design to the final cleanup, so you always know what to expect. Let’s walk through some of the common costs that might not be on that initial estimate.

Permits and Inspections

Depending on where you live in Long Island and the scale of your project, you may need a permit from your local town or village. This is especially true if your new patio involves changes to existing structures, grading, or electrical and plumbing lines. Permit fees are determined by your local municipality and are almost never included in a contractor’s initial installation quote. While your contractor will handle the process of filing for the permit, the fee itself is a separate cost you’ll need to cover. It’s a crucial step to ensure your project is up to code and avoids any legal headaches down the road.

Excavation and Site Prep

The condition of your backyard is one of the biggest variables in your total project cost. A perfectly flat, clear, and accessible area is the ideal scenario, but most yards need some work first. Site preparation can involve removing old concrete, leveling a sloped lawn, or digging down to create a stable base for the stones. If your yard has drainage issues or is difficult to access with equipment, the labor and time required for this prep work will increase. This is a critical part of any quality landscape construction project, as a poorly prepared base can lead to a patio that shifts and cracks over time.

Delivery and Equipment Fees

Getting several tons of natural stone from the supplier to your home has its own set of costs. Delivery fees are often a separate line item, so be sure to ask if they are included in your materials quote. Beyond delivery, the installation itself requires specialized tools. While basic supplies like mortar are usually part of the estimate, your project may require renting heavy equipment like a plate compactor to create a solid base or a wet saw for precise stone cutting. A professional team will have all the necessary equipment, but the cost of using and transporting it is factored into the overall project price.

Sealing and Protective Treatments

Once your beautiful new patio is installed, the final step is to protect it. Applying a quality sealant is essential for preserving the color and integrity of the natural stone, protecting it from stains, water damage, and the effects of weather. This is typically considered a finishing step and may be quoted separately from the installation. The cost can range from $2 to $10 per square foot, depending on the type of sealant used. Think of it as an investment in your patio’s future. Proper sealing and restoration will keep it looking its best for years to come and reduce long-term maintenance.

How Does Labor Affect Your Patio Budget?

When you’re planning your new natural stone patio, it’s easy to focus on the beautiful materials you’ll choose. But the cost of labor is just as important and can make up a huge portion of your final bill. The hands-on work of preparing the ground, laying the stones, and finishing the details is a skilled job, and the cost reflects that expertise. Several factors influence the price of labor, from the complexity of the installation to the type of professional you hire for the job.

Understanding these labor costs is key to creating a realistic budget. It’s not just about paying for someone’s time; it’s about investing in the craftsmanship that will make your patio last for decades. A well-built patio requires precision and experience, and the right team will ensure your project is built to withstand Long Island’s weather and years of family gatherings. At Gappsi, our masonry experts have the experience to bring your vision to life efficiently and beautifully.

Different Installation Methods

The way your stone patio is installed has a direct impact on labor costs. For example, setting natural stone pavers like flagstone or slate requires a meticulous process to create a stable, level surface, which naturally takes more time and skill. A dry-laid patio, set on a base of gravel and sand, is typically less labor-intensive than a wet-laid patio, which involves setting the stones in mortar on a concrete slab. The wet-laid method provides incredible durability but requires more materials, preparation, and expertise, increasing the overall project cost. The complexity of this work is why professional installation is so crucial for a lasting result.

Local Labor Rates

Where you live plays a big role in what you’ll pay for labor. Rates for skilled trades can vary significantly from one region to another, and Long Island is no exception. The cost of living, demand for contractors, and local regulations all influence pricing. For natural stone patios, installation costs can range from $15 to $35 per square foot, and a portion of that is determined by local market rates. Working with a local company like Gappsi means you’re getting an estimate that accurately reflects the costs in our area, with no surprises. Our team has a deep understanding of Long Island landscape construction and can provide a clear, comprehensive quote.

Hiring a Contractor vs. a Mason

For a natural stone patio, you’ll want to hire a professional with specific experience in stonework. While a general contractor can oversee a project, a specialized mason brings a level of artistry and technical skill that is essential for working with natural stone pavers. Masons are experts in cutting, fitting, and setting stones to create durable, beautiful patterns. Their specialized labor might come at a higher hourly rate, but their efficiency and expertise often mean the job is done right the first time. Investing in a skilled mason is an investment in the quality and longevity of your patio, preventing costly repairs down the road.

How Do Design Choices Impact the Final Price?

Beyond the stone itself, your design choices play one of the biggest roles in determining the final cost of your patio. The layout, features, and overall size all influence the amount of material needed and the hours of labor required for installation. A simple, straightforward design will naturally be more budget-friendly than a sprawling, multi-level oasis with custom features. This is where working with an experienced team makes a difference. Our masonry design experts can help you find the perfect balance between your dream patio and your budget, ensuring every dollar is well spent. We’ll walk you through how different elements affect the price so you can make informed decisions without sacrificing style. From the initial sketch to the final stone, we focus on creating a space that is both beautiful and practical for your home.

Simple vs. Complex Layouts

The shape of your patio has a direct impact on installation costs. A simple square or rectangular patio is the most cost-effective option because it requires fewer cuts and less intricate labor. When you introduce curves, circular patterns, or multiple levels, the complexity of the project increases significantly. Each curve means a stone must be custom-cut to fit perfectly, which takes more time and skill. This extra labor and the potential for more material waste from the cuts will be reflected in the final price. Think of it this way: a straightforward layout minimizes labor time, while a complex one is a custom art piece that demands more craftsmanship.

The Price of Popular Design Trends

Modern outdoor living is all about creating functional and beautiful extensions of your home. Popular trends often involve more than just a simple stone surface. Features like built-in seating walls, outdoor kitchens, fire pits, and intricate inlay patterns can transform a patio into a true backyard destination. While these additions create incredible spaces for entertaining and relaxing, they also add to the project’s cost. Each feature requires additional materials, specialized labor (like plumbing or gas lines for a kitchen), and more detailed construction. Incorporating these stylish outdoor elements is a fantastic investment in your home’s value and your lifestyle, but it’s important to account for them in your initial budget.

How Patio Size Affects Your Budget

It seems obvious that a larger patio will cost more than a smaller one, and that’s generally true. More square footage means more materials and more hours of labor. However, the relationship isn’t always linear. Sometimes, you can get a slightly better price per square foot on materials when buying in bulk for a very large project. On the other hand, a larger patio can introduce new challenges. A bigger footprint might require more extensive site preparation, such as significant grading or the installation of complex drainage systems to manage water runoff. Your landscape’s existing conditions play a huge role here, as a large patio on a sloped yard is a much bigger undertaking than one on a flat, clear surface.

Common Budgeting Mistakes to Avoid

Creating a budget for your new stone patio can feel like a big task, but getting it right from the start saves you from surprises down the road. It’s easy to focus only on the price of the stone itself, but a successful project budget accounts for every step of the process. Thinking through the entire scope of work, from the ground up, helps ensure your vision comes to life without unexpected costs. Let’s walk through a few common pitfalls homeowners encounter so you can plan with confidence. By understanding where costs can hide, you can create a realistic budget that covers everything your project needs for a beautiful, long-lasting result.

Underestimating Site Prep

One of the biggest budgeting oversights is underestimating the cost of site preparation. A beautiful patio is only as good as the foundation it’s built on. Proper site prep is essential for a durable, level surface that won’t shift or sink over time. This process involves more than just clearing the area; it includes excavating the ground, often digging down six to eight inches, and installing a solid base of compacted aggregate. This foundational work is labor-intensive and critical for drainage and stability. Factoring these masonry services into your initial budget is key to avoiding costly repairs later.

Ignoring Installation Complexity

The type of stone you choose and the intricacy of your design directly influence your total cost. While you might have a price per square foot for the material, the complexity of the installation can significantly affect labor expenses. A simple, rectangular patio will cost less to install than a curved one with an intricate pattern or multiple levels. Certain stones are also more challenging to cut and lay, requiring more time and skill from your installation team. When you’re exploring different porcelain and natural stone options, remember to discuss how your design choices will impact the overall labor budget with your contractor.

Forgetting About Long-Term Costs

Your budgeting shouldn’t stop once the last stone is laid. While natural stone is incredibly durable, it requires some maintenance to keep it looking its best for years to come. Think of it as protecting your investment. Depending on the type of stone and its exposure to the elements, you may need to factor in periodic cleaning and sealing. Sealing helps protect the stone from stains, water damage, and fading. These long-term restoration and sealing services are a minor expense compared to the initial installation cost, but including them in your long-term financial plan ensures your patio remains a stunning feature of your home.

How to Get an Accurate Project Estimate

Getting a clear and accurate project estimate is the key to a smooth process without financial surprises. A trustworthy estimate acts as a roadmap for your project, but to get a reliable quote, you need to know what to ask and how to compare offers. This isn’t just about finding the lowest price; it’s about finding the best value and building a relationship with a company you trust to bring your outdoor living space to life. Let’s walk through how to get an estimate you can feel confident about.

Key Questions to Ask Your Contractor

Before you commit, have a conversation with any potential contractor. Think of it as an interview. Start by asking about their experience: “How many natural stone patios have you installed, and can I see examples of your work?” You should also clarify logistics, like who is responsible for securing permits. A crucial question is, “Does your price include all materials, labor, site preparation, and cleanup?” This helps you avoid hidden fees. Finally, ask about their warranty and payment schedule to ensure you’re protected long after the project is complete.

The Importance of Multiple Quotes

It’s always a good idea to get at least three quotes from different installers. This isn’t just about finding the cheapest option; comparing estimates helps you get a realistic sense of the market rate for the quality you expect. Be cautious of a bid that is significantly lower than the others. An unusually low price can indicate lower-quality materials or less experienced labor. Your goal is to find a fair price from a reputable company that offers excellent value and craftsmanship, like the masonry design and construction Gappsi provides.

How to Read Your Estimate

An estimate should be more than a single number. A professional contractor provides a detailed, itemized document that breaks down all costs. Make sure you know exactly what is and isn’t included. Look for line items covering materials, labor, delivery fees, excavation, and any necessary permits. Don’t move forward without a written estimate, a formal contract, and a warranty in hand. This documentation protects both you and the contractor, creating clear expectations before the first stone is laid. This level of detail is a hallmark of a transparent process.

Smart Ways to Budget for Your Natural Stone Patio

A natural stone patio is a fantastic investment in your home, creating a beautiful space for relaxing and entertaining. While it’s a project that adds significant value, it’s also one you want to plan for financially. With a bit of smart planning, you can create the patio of your dreams without derailing your budget. The key is to understand where your money is going and identify areas where you can make strategic choices to save. From the materials you select to the timing of your project, a few key decisions can make a big difference in the final cost. Thinking through these elements ahead of time helps you set a realistic budget and approach your project with confidence, ensuring the process is as smooth as the beautiful stone you’ll soon be enjoying.

Choosing Cost-Saving Materials

The type of stone you choose is one of the biggest factors in your patio’s total cost. Natural stones like bluestone and flagstone can range from $5 to over $35 per square foot, so your material selection really matters. While premium stones offer a distinct look, you don’t have to pick the most expensive option to get a stunning result. There are many beautiful and durable stones at lower price points. The best approach is to explore a variety of porcelain and natural stone pavers to see what you like. Seeing and feeling the materials in person can help you find a stone that fits both your aesthetic and your budget.

Planning Your Project Timing

While timing doesn’t always guarantee a discount, planning your patio installation during a contractor’s off-season, like late fall or early spring, can sometimes offer more scheduling flexibility. A typical patio installation takes professionals about three to five days, but this timeline can be affected by weather and a contractor’s workload. The biggest benefit of planning ahead is that it gives you more time to save and finalize your design choices without pressure. Rushing the process can lead to last-minute changes or oversights that add unexpected costs. By planning your project well in advance, you give yourself the breathing room to make thoughtful, budget-friendly decisions.

DIY vs. Hiring a Pro: What to Consider

It can be tempting to tackle a patio project yourself to save on labor costs. However, installing a natural stone patio is physically demanding and requires a specific skill set. While a DIY approach saves money upfront, mistakes in excavation, base preparation, or stone laying can lead to costly repairs down the road. Natural stone patios are known for their durability, but their longevity depends on a skilled installation. Hiring a professional ensures the job is done correctly and efficiently, giving you a beautiful, long-lasting patio without the stress and potential pitfalls of doing it yourself.

Related Articles

Frequently Asked Questions

What is the most budget-friendly natural stone for a patio? While prices can fluctuate, options like bluestone, flagstone, and some types of limestone often fall on the more affordable end of the spectrum. The key is to remember that the final cost depends on the specific grade and thickness of the stone you choose. The best way to find a great value is to discuss your budget with our team; we can show you beautiful, durable options that won’t require you to compromise on quality or style.

Will a new stone patio really increase my home’s value? Yes, it’s a solid investment. A professionally installed natural stone patio enhances your home’s curb appeal and creates functional outdoor living space, which is a huge draw for potential buyers. It’s not just about adding a feature; it’s about expanding the usable square footage of your home. This kind of upgrade makes your property more attractive and can lead to a significant return on your investment when it’s time to sell.

How long does the installation process actually take from start to finish? For a standard-sized patio on a relatively flat surface, a professional crew can typically complete the installation in about three to five days. This timeline can extend if your project is larger, has a complex design, or if the site requires significant preparation like grading or excavation. Weather can also play a role, so it’s always good to build a little flexibility into your schedule.

Is a natural stone patio difficult to take care of? Natural stone is surprisingly low-maintenance, which is part of its appeal. The most important step is having it professionally sealed after installation and then resealed every few years. This protects the stone from stains and weathering. Beyond that, regular sweeping and occasional washing with a gentle cleaner are all it takes to keep your patio looking beautiful for decades.

Why is it so important to hire a specialized mason for this job? Working with natural stone is both a science and an art. A specialized mason understands the unique properties of each type of stone and has the skill to cut and fit them perfectly, ensuring a stable and beautiful result. They also have the expertise to prepare the ground correctly, which is critical for preventing shifting, cracking, and drainage problems. It’s an investment in craftsmanship that ensures your patio will last a lifetime.

Share this page:
Rooftop porcelain pavers installed in Long Island, NY, by professional suppliers and installers.

Rooftop Porcelain Pavers: A Long Island Buyer’s Guide

When you’re planning a home improvement project, adding usable square footage is always a top priority. A rooftop deck transforms empty space into a valuable asset for relaxing and entertaining. To get it right, you need a material that is both beautiful and practical. Porcelain pavers provide a sleek, high-end finish without the structural weight or maintenance headaches of traditional stone or concrete. This guide breaks down the entire process, from understanding the costs to the key technical details of a proper installation. We’ll give you the confidence to move forward and help you find the most qualified Roof top porcelain pavers suppliers and installers Long Island ny for the job.

Key Takeaways

  • Opt for porcelain pavers for their winning combination of style and strength: They are lightweight enough for rooftop structures, tough enough for Long Island weather, and incredibly low-maintenance.
  • Your installer is as important as your materials: Hire a licensed and insured professional with specific rooftop experience to ensure proper drainage and compliance with local codes.
  • Plan your budget with the long game in mind: Porcelain’s upfront cost is a smart investment that pays off through years of durability and minimal upkeep, adding lasting value to your home.

Why Choose Porcelain Pavers for Your Rooftop?

If you’re thinking about transforming your unused rooftop into a stunning outdoor living area, porcelain pavers are an excellent choice. They offer a perfect blend of sophisticated style and practical performance, especially for a unique space like a roof. Unlike other materials, porcelain gives you a clean, modern look without the headaches of constant upkeep, letting you spend more time enjoying your new retreat.

The Benefits of a Porcelain Rooftop Oasis

So, what exactly are porcelain pavers? Think of them as a super-powered ceramic tile. They’re crafted from a refined mix of clay and minerals, then fired at extremely high temperatures. This process creates a paver that is incredibly dense, hard, and non-porous. For you, this means you get a surface that resists stains, mold, and mildew, making it a fantastic low-maintenance option for your rooftop oasis. With a wide variety of colors and styles, you can find the perfect porcelain and natural stone to match your home’s aesthetic and create a truly personalized space.

Lightweight Design for Structural Peace of Mind

One of the biggest concerns with any rooftop project is weight. Your building’s structure can only handle so much, which is why material choice is critical. Porcelain pavers are significantly lighter than traditional options like concrete or natural stone. This lightweight design reduces the structural load on your roof, giving you peace of mind that your new deck is both beautiful and safe. Their lighter weight also simplifies the installation process, as the materials are easier to transport and handle, which can be a major advantage for a project several stories up.

All-Weather Durability and Non-Slip Safety

A rooftop is exposed to everything Long Island weather can throw at it, from blazing summer sun to freezing winter ice. Porcelain pavers are built to withstand it all. They are exceptionally durable, resisting scratches from patio furniture and wear from foot traffic. The color won’t fade under harsh UV rays, and because they absorb very little water, they won’t crack during freeze-thaw cycles. Many porcelain pavers also feature a non-slip texture, which is a crucial safety feature for any outdoor area exposed to rain. This makes your rooftop a safer place for family and friends to gather, no matter the weather.

Finding the Best Porcelain Paver Suppliers in Long Island

Once you’ve decided on porcelain pavers, the next step is finding the right partner to bring your vision to life. Choosing a supplier is about more than just picking out tiles; it’s about finding an expert who understands the unique demands of a rooftop project on Long Island. Here’s what to focus on to make sure you find the best fit.

Why Gappsi is Your Go-To Source for Premium Pavers

When sourcing materials, you want a team that sees the big picture. With over 30 years of experience, Gappsi doesn’t just sell pavers; we design entire outdoor living spaces. This means we know how your rooftop terrace should connect with your home’s aesthetic. Our deep knowledge of Long Island’s climate helps us select the perfect porcelain and natural stone products that withstand our specific weather patterns, from summer sun to winter ice. We ensure your rooftop oasis is beautiful and built to last. You can even see our curated selection firsthand at the Gappsi Store.

What to Look for in a Local Supplier

Your supplier should have proven local expertise. Long Island’s weather, with its freeze-thaw cycles, can be tough on outdoor installations. A knowledgeable supplier understands this and will recommend pavers and installation methods designed for durability. They can explain how their masonry techniques create a stable foundation that prevents shifting and cracking. Always prioritize suppliers who are transparent about where they source their materials. High-quality pavers are an investment, and a reputable company will be proud to show you why their products are worth it, ensuring your rooftop space remains a stunning retreat for years.

Key Questions to Ask Before You Buy

Before you commit, have a few key questions ready. Think of it as a mini-interview to ensure you’re working with a professional. Start by asking if they are fully licensed and insured; this is non-negotiable and protects you from liability. Next, inquire about warranties for both the pavers and the installation workmanship. A confident installer will stand behind their work. Finally, ask for a detailed, written estimate to understand all costs and prevent surprises. A trustworthy home improvement company will happily provide clear answers to all these questions, giving you peace of mind.

How to Choose the Right Paver Installer

Selecting the perfect porcelain pavers is only half the battle. The quality of your installation is just as important as the pavers themselves, because a great installer ensures your rooftop oasis is beautiful, safe, and built to last. Choosing your installer carefully is one of the most critical decisions you’ll make. You need a team that not only understands paver installation but also gets the specific challenges of working on a rooftop, especially with Long Island’s unique climate. A proper installation from an experienced team of masonry professionals will prevent issues like shifting, poor drainage, and water damage down the road.

Vet Their Experience with Rooftop Projects

A rooftop paver project isn’t the same as a ground-level patio. It requires specialized knowledge of structural loads, waterproofing, and pedestal systems that elevate the pavers to create a level surface. When you interview potential installers, ask specifically about their experience with rooftop projects. An installer familiar with Long Island’s weather, including its freeze-thaw cycles, will know how to build a system that can withstand the elements without failing. Don’t be shy about asking to see a portfolio of their completed rooftop work. This will give you a clear idea of their capabilities and whether their style aligns with your vision.

Check for Proper Licensing, Insurance, and Reviews

This step is non-negotiable for your protection and peace of mind. Before hiring anyone, confirm they have the proper licensing and insurance. A valid license shows they meet local and state requirements, while adequate insurance protects you from liability in case of accidents on your property. Next, do a little homework by reading online reviews. See what other homeowners in the Long Island area have to say about their experience. A contractor’s reputation is built on their past work, and reviews can offer honest insight into their professionalism, communication, and the quality of the final product.

Ask About Their Installation Process and Foundation Prep

A strong, well-prepared base is the key to a long-lasting paver installation. For a rooftop, this means ensuring the underlying surface is properly waterproofed and that the pedestal system is installed correctly to provide a stable and level foundation. A professional installer should be able to walk you through their entire process, from protecting the roof membrane to ensuring proper drainage. Ask them what kind of pedestal system they use and how they account for water runoff. The right porcelain and natural stone installation is an investment, and understanding the process will help you feel confident you’ve chosen the right team for the job.

Budgeting for Your Rooftop Paver Project

Creating a budget is one of the most practical first steps you can take when planning your rooftop oasis. Understanding the costs upfront helps you make confident decisions and ensures your project goes smoothly from start to finish. The total price tag for a rooftop paver installation is a combination of three main things: the pavers themselves, the professional labor to install them, and any site-specific preparations needed to get your roof ready. By breaking down these costs, you can get a clear picture of the total investment and plan accordingly for a beautiful, long-lasting space.

Understanding Material Costs

When you start shopping, you’ll find that high-quality porcelain pavers typically range from $7 to $9 per square foot. This price reflects the incredible value they offer. You’re not just paying for a tile; you’re investing in a material that is dense, highly durable, and resistant to stains, frost, and fading. The cost also covers the sophisticated designs and finishes available, allowing you to achieve a high-end look. At Gappsi, we offer a wide selection of premium porcelain and natural stone to fit any aesthetic, ensuring you find the perfect match for your home.

Factoring in Labor and Additional Expenses

Professional installation is key to a successful rooftop project, and labor costs generally fall between $5 to $10 per square foot. This range depends on the complexity of your project. A simple, straightforward layout will be on the lower end, while a more intricate design with many cuts or difficult roof access may cost more. Beyond the installation itself, remember to account for other potential expenses. This could include specialized pedestal systems for leveling, waterproofing membranes, or specific drainage solutions. Our expert masonry teams can assess your space and outline any additional requirements.

Estimating Your Total Investment

When you combine materials and labor, you can estimate a total investment of roughly $12 to $19 per square foot. While the initial cost for porcelain might be higher than for basic concrete pavers, it’s a smarter long-term investment. Porcelain’s incredible toughness means you won’t be spending money on frequent repairs or replacements down the line. Its low-maintenance surface also saves you time and money on upkeep. Think of it as a one-time investment for decades of enjoyment, adding both functional living space and significant value to your Long Island home.

Key Technicals for a Rooftop Installation

Turning your rooftop into a beautiful, functional space is an exciting project, but it comes with a unique set of technical requirements that set it apart from any ground-level patio. A rooftop installation needs careful, professional planning to ensure it’s safe, durable, and compliant with local regulations. Getting these details right from the start is the key to a successful project that you can enjoy for years without any worries. This isn’t a weekend DIY job; it’s a serious structural addition to your home that involves complex factors like weight distribution, water management, and weather resistance.

It’s about working with your home’s existing structure, not against it. This isn’t just about following rules; it’s about ensuring your new oasis is a secure and lasting asset, a place where you can relax and entertain without a second thought about what’s happening underneath. Before any design work begins, you and your contractor need to have a clear plan for the structural, drainage, and legal aspects of the build. Let’s walk through the three most important technical considerations you’ll need to address to make sure your rooftop retreat is built to last.

Checking Structural Load Limits

Before you fall in love with a specific paver, the first step is to confirm what your roof can actually handle. Every building has a structural load limit, which is the maximum weight it can safely support. This is a non-negotiable safety check that requires a professional assessment, often by a structural engineer. The great news is that porcelain pavers are an excellent choice for rooftops precisely because they are significantly lighter than concrete or natural stone. This lightweight design often makes them a viable option without requiring extensive structural reinforcement, giving you peace of mind while you create your sky-high retreat.

Planning for Proper Drainage and Waterproofing

Proper water management is absolutely critical for any rooftop project. You need a solid plan for where rain and melting snow will go to prevent pooling, leaks, and long-term damage to your roof’s membrane. An experienced installer will use a pedestal system, which raises the pavers off the roof surface. This method creates a space for water to flow freely to existing drains and allows for air circulation. It also provides easy access for future maintenance or repairs to the roof underneath. This smart installation technique is essential for protecting the integrity of your home and ensuring the longevity of your new outdoor space.

Understanding Local Building Codes and Permits

Every construction project needs to follow local rules, and rooftop installations are no exception. Here on Long Island, our building codes account for specific weather conditions, like our freeze-thaw cycles, which can impact how a foundation needs to be prepared. Working with a contractor who has deep experience in Nassau and Suffolk counties is vital. A local expert will understand the permit process, ensuring your project is fully compliant from day one. This is a critical part of any major home remodeling project, protecting your investment and your home not just from fines, but from the safety risks of improper construction in our unique climate.

Common Rooftop Paver Mistakes to Avoid

A rooftop paver project is an exciting way to transform unused space into a beautiful outdoor retreat. But even the best materials can lead to disappointment if the installation isn’t handled correctly. A few common missteps can turn your dream deck into a costly problem. Knowing what to watch for is the first step toward creating a stunning and durable rooftop oasis that you can enjoy for years to come.

By avoiding these pitfalls, you can ensure your investment is protected and your new space is built to last. From choosing the right team to getting the foundation just right, every detail matters. Let’s walk through the most frequent mistakes homeowners make so you can sidestep them with confidence.

Hiring an Inexperienced Installer

Choosing an installer is one of the most critical decisions you’ll make. It’s tempting to go with the lowest bid, but a lack of experience can lead to major issues down the road. Long Island has unique weather patterns, including freeze-thaw cycles that can wreak havoc on improperly installed surfaces. An installer who understands these local conditions will know how to build a foundation that can withstand the elements. A true professional will have a portfolio of successful rooftop and masonry projects and can explain exactly how they’ll protect your investment from our specific climate challenges.

Skipping Proper Base Preparation

The long-term success of your rooftop deck depends entirely on what’s underneath it. A strong, well-prepared base is the most important part of a lasting installation. For rooftops, this often involves using a pedestal system, which raises the pavers off the roof surface. This method creates a perfectly level deck while allowing for easy drainage and access to the roof membrane for any future repairs. While some paver projects can be laid on sand or grass, a rooftop installation requires specialized preparation to ensure stability and protect the structure of your home. Proper base prep is a non-negotiable step for a safe and beautiful finish.

Forgetting About Drainage and Future Upkeep

Water management is crucial on any rooftop. If water can’t drain properly, it can lead to pooling, leaks, and damage to your home. Using a pedestal system is a smart way to manage this, as it allows water to flow freely underneath the pavers and away from the surface. This setup also makes future upkeep much simpler. If you ever need to access the roof for repairs, you can easily lift a few pavers instead of tearing up the entire deck. Thankfully, porcelain pavers themselves are incredibly low-maintenance. They don’t absorb much water, which makes them naturally resistant to stains and mold.

Debunking Myths About Rooftop Porcelain Pavers

When you’re considering a material for your rooftop patio, you want to be sure you’re making the right choice. Porcelain pavers are a fantastic option, but a few common myths might give you pause. Let’s clear the air and look at the facts so you can feel confident in your decision. Many of these misconceptions come from a lack of familiarity with how modern porcelain pavers are designed and installed, especially for unique spaces like rooftops where every detail matters. It’s easy to hear a rumor about weight or installation and second-guess your plans, but the technology and materials have come a long way.

The truth is, porcelain offers a combination of beauty, durability, and practicality that’s hard to beat for creating a rooftop oasis. From concerns about weight stressing your home’s structure to worries about complicated upkeep, we’ll break down the most persistent myths one by one. These pavers are engineered to perform beautifully in challenging environments, providing a safe, stylish, and functional surface. Understanding the reality behind these pavers will show you why they are a leading choice for creating stunning and long-lasting outdoor living areas on Long Island rooftops. Let’s separate fact from fiction so you can move forward with your project.

Myth: They’re Too Heavy for a Roof

One of the biggest worries homeowners have is whether their roof can handle the weight of pavers. It’s a valid concern, but the idea that porcelain is too heavy is simply not true. In fact, porcelain pavers are significantly lighter than traditional materials like concrete slabs or many types of natural stone. This lower weight makes them an excellent material for rooftop applications where structural load is a primary consideration. Their lightweight nature not only puts less stress on your home’s structure but also makes them easier to transport and install, which is a huge plus for an elevated project.

Myth: Installation is Overly Complex and Costly

You might think that installing pavers on a roof is a complicated and expensive job, but that’s another misconception. Thanks to modern installation techniques, like adjustable pedestal systems, laying porcelain pavers on a rooftop is a streamlined process. These systems allow installers to create a perfectly level surface over a sloped roof while also providing a crucial gap for drainage underneath. While you should always hire a professional with rooftop experience, the installation itself isn’t necessarily more complex than other premium paving projects. Gappsi’s expert masonry team has the experience to handle these specific installations efficiently.

Myth: They’re Difficult to Maintain

If you’re picturing hours of scrubbing and sealing, you can relax. Porcelain pavers are incredibly easy to care for, making them perfect for a low-maintenance lifestyle. Because porcelain is non-porous, it naturally resists stains from spills, mold, and mildew. Unlike natural stone that often requires regular sealing, porcelain keeps its good looks with just a simple cleaning using soap and water. This durability means your rooftop oasis will continue to look beautiful for years with minimal effort. This resistance to the elements is a key reason why so many Long Islanders choose porcelain pavers for their outdoor spaces.

Your Rooftop Paver Project Checklist

With the big decisions made, it’s time to get organized. A clear plan helps ensure your rooftop project runs smoothly from the first paver to the final finishing touch. This simple checklist will guide you through the final planning stages, so you can move forward with confidence and get ready to enjoy your beautiful new outdoor space.

Finalize Your Design and Layout

This is where your vision really starts to take shape. Porcelain pavers are a fantastic, low-maintenance choice for rooftop spaces, offering a stylish look that’s more affordable than natural stone. With so many colors and textures available, you can create a look that’s uniquely yours. Take some time to browse different porcelain and natural stone options to find the perfect match for your home’s aesthetic. Once you’ve chosen your pavers, think about the layout. A simple grid pattern creates a clean, modern feel, while a herringbone pattern can add classic elegance. Sketch out your rooftop area and consider where furniture will go to create a functional and inviting oasis.

Map Out Your Project Timeline

A realistic timeline is your best friend for a stress-free project. Work with your installer to outline each phase, from ordering materials to the final walkthrough. A typical project includes site preparation, foundation work, and paver installation. Remember, a strong, well-prepared base is the most important part of a long-lasting project, so make sure enough time is dedicated to this crucial step. It’s also smart to build a little buffer into your schedule for potential weather delays. Clear communication with your masonry and construction team will help you stay informed and manage expectations.

Plan for Long-Term Care and Maintenance

One of the best things about porcelain pavers is how easy they are to maintain. They don’t absorb much water, which makes them incredibly resistant to stains, mold, and mildew. You won’t have to worry about spilled drinks causing permanent damage. For routine cleaning, all you typically need is a simple sweep and an occasional wash with water and a mild cleaner to keep them looking fresh. Unlike many other materials, porcelain pavers don’t require sealing. While Gappsi offers expert restoration and sealing services for other surfaces, you’ll be glad to know your porcelain rooftop won’t need it. Just plan to periodically check that the pavers are stable.

Related Articles

Frequently Asked Questions

Are porcelain pavers slippery when they get wet? This is a great question, as safety is always a top priority. Many high-quality porcelain pavers are specifically designed with a textured, non-slip surface to provide excellent traction, even in rainy conditions. When you’re choosing your pavers, we can show you options that are rated for outdoor and wet area use, ensuring your rooftop is a secure place for you and your guests to enjoy.

Is the higher initial cost of porcelain pavers really worth it compared to other options? While porcelain pavers can have a higher upfront cost than some basic materials, they are a smarter long-term investment. Their incredible durability means you won’t be spending money on frequent repairs or replacements. Plus, they are so low-maintenance (no sealing required) that you save time and money on upkeep year after year. You are paying for a beautiful surface that will last for decades.

My roof has a slight slope for drainage. How do you create a level surface with pavers? This is a common and important consideration for any rooftop project. We use an adjustable pedestal system that elevates the pavers off the roof’s surface. These pedestals can be individually adjusted for height, allowing us to create a perfectly level and stable floor over the existing slope. This method also has the added benefit of allowing water to drain freely underneath, protecting your roof membrane.

Can I install rooftop pavers myself to save money? A rooftop installation is much more complex than a simple ground-level patio. It involves critical factors like structural weight limits, waterproofing, and specific building codes that protect your home’s integrity. Because of these safety and structural risks, this is one project that should always be left to experienced professionals who understand the unique technical requirements.

How do porcelain pavers handle Long Island’s harsh winters? Porcelain pavers are exceptionally well-suited for our climate. Because they are non-porous, they absorb very little water. This is a huge advantage during our freeze-thaw cycles, as it prevents the pavers from cracking under the pressure of expanding ice. Their durability ensures they will withstand cold winters and hot summers without fading or deteriorating.

Share this page:
Custom swimming pool and backyard patio by East West Pools, a Gappsi Group division.

Your Guide to East West Pools by Gappsi Group

A new swimming pool is the heart of a dream backyard, but creating a truly stunning outdoor oasis involves more than just the water. It’s about how the pool integrates with your patio, your landscaping, and your home’s overall style. Juggling different contractors for masonry, design, and installation can be a major headache. That’s why we offer a complete, all-in-one solution. As a full-service design and construction company, we see the bigger picture. Our dedicated team, East West Pools, Gappsi Group Swimming pool Division, specializes in crafting the perfect pool while our other in-house experts design the surrounding environment, ensuring every element works together in perfect harmony for a cohesive and beautiful result.

Key Takeaways

  • Work with One Expert Team for Everything: Gappsi provides a single, reliable partner for your entire project. Our specialized pool division handles the water, while our comprehensive teams design the surrounding patio, landscaping, and other features for a seamless result.
  • Customize Your Pool to Fit Your Lifestyle: You can choose the right pool type for your family, whether it’s a flexible gunite, versatile vinyl, or low-maintenance fiberglass design. We then help you integrate custom features like waterfalls or safety covers to create a space that is uniquely yours.
  • Enjoy a Stress-Free Construction Process: We manage the entire project from start to finish, which includes securing all necessary permits and providing a clear timeline. This allows you to relax and watch your vision come to life without the usual headaches.

What is East West Pools?

If you’ve been researching pool builders on Long Island, you may have come across the name East West Pools. Simply put, East West Pools is the dedicated, expert swimming pool division of Gappsi. It’s our specialized team of designers, builders, and technicians who live and breathe pool construction. When you partner with us for a pool project, you get the focused expertise of the East West Pools team, backed by the comprehensive home improvement power and reputation of the entire Gappsi family. This structure allows us to provide an incredibly specialized service while still offering a seamless, all-in-one solution for your entire backyard transformation. You get the best of both worlds: a dedicated pool expert and a master backyard contractor.

This approach means you don’t have to juggle multiple companies for one project. Your pool construction is managed under one roof, ensuring clear communication and a cohesive design that integrates perfectly with your patio, landscaping, and other outdoor features. We created East West Pools to give our clients a boutique experience focused solely on creating the perfect pool, while still providing the stability and wide-ranging capabilities that Gappsi is known for. It’s our way of guaranteeing that every detail of your pool, from the initial sketch to the first swim, is handled with the highest level of professional care and attention.

Meet Gappsi’s Expert Pool Division

Our East West Pools team is who you’ll work with to bring your dream pool to life. We design and build custom swimming pools for clients all across Long Island, New York. The process is entirely collaborative. Our expert team works closely with you to create a design that is a perfect fit for your property’s unique layout and your family’s lifestyle. Whether you’re dreaming of a serene retreat for quiet afternoons or a vibrant hub for summer parties and family fun, we tailor every element to match your vision. We handle everything, ensuring your new pool is a beautiful and functional centerpiece for your home.

Over 30 Years of Pool Building Excellence

Experience matters, especially with a project as significant as a new pool. Gappsi has been creating beautiful and functional outdoor living spaces since 1987. With over three decades in the industry, we have established a solid reputation for quality, artistry, and craftsmanship in pool building. This long history means we’ve seen it all and have refined our processes to deliver outstanding results every time. Our commitment has always been to enhance the homes and lives of our clients. That legacy of excellence is the foundation upon which every single Gappsi pool is built, giving you peace of mind and a backyard you’ll love for years.

What Types of Pools Do We Build?

Choosing the right type of pool is one of the biggest decisions you’ll make for your backyard. At Gappsi, we want you to have all the information you need to pick the perfect fit for your family, lifestyle, and property. We specialize in three main types of in-ground pools: gunite, vinyl liner, and fiberglass. Each one offers unique benefits, from complete design freedom to speedy installation and easy upkeep. Our team is here to walk you through the options and help you find the pool that will bring your backyard vision to life. Let’s explore what makes each type special.

Custom Gunite Pools

If you can dream it, we can build it with gunite. These pools are constructed with a rebar framework and a sprayed concrete mixture, giving you unlimited possibilities for shape, size, and depth. This flexibility makes gunite the ideal choice for complex, high-end projects. We often design our custom swimming pools to seamlessly integrate with other backyard features, like attached spas, cascading waterfalls, tanning ledges, and even outdoor kitchens. Gunite pools are incredibly durable and built to last, creating a permanent, beautiful centerpiece for your outdoor living space that will be enjoyed for generations.

Versatile Vinyl Liner Pools

Vinyl liner pools are a fantastic and popular option, offering a great balance of beauty, comfort, and value. These pools are built with a durable vinyl membrane that fits perfectly into a prepared structure, providing a silky-smooth surface that’s gentle on your feet. One of the best things about vinyl liners is the sheer variety of colors and patterns available, allowing you to customize the look of your water. We not only build new vinyl liner pools but also specialize in pool renovations, which can include converting an older gunite pool to a modern vinyl liner system. They are a versatile choice for any Long Island backyard.

Low-Maintenance Fiberglass Pools

For homeowners who want a stunning pool without the extensive upkeep, fiberglass is an excellent choice. These pools are crafted from a pre-molded fiberglass shell that is delivered to your home and set in place, making for a remarkably fast installation, often in just a few days. The smooth, non-porous surface of a fiberglass pool is its superpower. It naturally resists algae growth, which means you’ll spend less time cleaning and more time swimming. This surface also requires fewer chemicals to maintain water balance. You can see examples of our efficient installations on our YouTube channel, where we showcase our projects from start to finish.

Why Choose Gappsi for Your Pool Project?

Choosing the right partner to build your swimming pool is one of the most important decisions you’ll make for your home. It’s not just about digging a hole and filling it with water; it’s about creating a beautiful, functional, and safe centerpiece for your backyard that will bring joy for years to come. A pool is a significant investment, and the process can feel overwhelming. You need a team you can trust to handle every detail with care, from the initial design concepts to the final, sparkling finish. At Gappsi, we understand this completely. We’ve spent over 30 years helping Long Island homeowners create their dream backyards, and we know what it takes to deliver an exceptional experience. We combine our deep expertise with a genuine passion for design and an unwavering commitment to quality that sets us apart. Our approach is built on four key pillars: custom design, seamless project management, high-quality materials, and superior workmanship. By focusing on these areas, we make the entire process smooth, transparent, and rewarding for you. We don’t just build pools; we build relationships and create outdoor living spaces where memories are made.

Custom Designs and Full Backyard Transformations

Your backyard should be a reflection of your lifestyle, and your pool is the main attraction. We don’t believe in one-size-fits-all solutions. Instead, we specialize in creating custom swimming pools that are perfectly tailored to your space and your family’s needs. Whether you envision a classic rectangular pool for swimming laps or a freeform oasis with cascading waterfalls, our design team works with you to bring that dream to life. We look at the bigger picture, designing complete backyard transformations that integrate your new pool with patios, landscaping, and outdoor living areas. The result is a cohesive and stunning environment where every element works in harmony.

Seamless Project Management and Permitting

One of the biggest challenges of any major home improvement project is coordinating different contractors. With Gappsi, that stress disappears. We are a comprehensive design and construction company, which means our in-house teams handle everything from the initial excavation and masonry to the final landscaping touches. This integrated approach ensures a smooth workflow, consistent quality, and a single point of contact for you throughout the project. We also manage the entire permitting process, which can often be complex and time-consuming. Our experience with local regulations means we can secure the necessary approvals efficiently, keeping your project on track and saving you the headache.

High-Quality Materials and Automated Safety

A beautiful pool should also be a safe and efficient one. We build with only the highest quality materials, from durable gunite and vinyl liners to elegant porcelain and natural stone pavers for your pool deck. Our commitment to quality extends to the features we recommend, especially when it comes to safety. We are strong advocates for automatic retractable safety covers, which provide peace of mind for families with children and pets. These covers not only secure your pool when it’s not in use but also help conserve heat, reduce water evaporation, and minimize chemical usage, saving you money in the long run.

Lasting Durability and Superior Workmanship

A Gappsi pool is an investment in your home and your family’s happiness, and we build it to last. With over 30 years of experience, our team’s craftsmanship is second to none. We pride ourselves on our meticulous attention to detail and our unwavering commitment to building structures that stand the test of time. Our clients consistently praise our professionalism, trustworthiness, and the quality of our work. We combine proven construction techniques with modern technology to deliver a pool that is not only beautiful on day one but remains a source of pride and enjoyment for decades.

What Other Services Does Gappsi Offer?

While we’re known for creating stunning swimming pools, our expertise doesn’t stop at the water’s edge. We see your home as a complete canvas, and our goal is to help you create a seamless, beautiful, and functional space both inside and out. Think of us as your single partner for a total home transformation. From lush garden designs to cozy indoor retreats, we offer a full range of services to bring your entire vision to life, ensuring every element works together in perfect harmony.

Landscaping and Outdoor Living

A beautiful pool deserves an equally beautiful setting. We specialize in creating cohesive backyard environments where the pool is the centerpiece of a larger outdoor living area. Our team can design and build everything you need to complete your oasis, including elegant patios perfect for lounging and custom outdoor kitchens for entertaining. We handle all the details of your landscape design, from planting lush gardens to installing ambient lighting, ensuring your new backyard is a true extension of your home. A thoughtful landscape not only frames your pool beautifully but also creates distinct zones for dining, relaxing, and playing.

Home Remodeling and Masonry

Our passion for design and quality craftsmanship extends into your home. We offer comprehensive home remodeling services to create a smooth transition from your indoor spaces to your outdoor retreat. Whether you’re dreaming of a new kitchen that opens onto the patio or a bathroom that feels like a spa, we can make it happen. Our expert masonry team also crafts stunning stone features, including fireplaces, walkways, and retaining walls that add timeless character and value to your entire property. This unified approach ensures the style of your home flows effortlessly from the inside out.

Game Courts and Pavilions

Ready to make your backyard the ultimate destination for fun and relaxation? We design and install custom Sports Games Courts for families who love to stay active, providing a perfect space for everything from basketball to pickleball. To round out your entertainment options, consider adding one of our beautiful pavilions or pergolas. These structures offer a stylish, shaded retreat for hosting gatherings, dining outdoors, or simply relaxing by the pool. They create a defined “outdoor room” that makes your yard more versatile and enjoyable for family and friends throughout the seasons.

Saunas and Restoration

Bring the spa experience home with a personal sauna. We offer a variety of options, from traditional outdoor barrel saunas to modern indoor infrared models, creating a perfect sanctuary for wellness and relaxation right on your property. Beyond new installations, we are also here to care for your existing outdoor features. Our restoration and sealing services can breathe new life into weathered patios and pool surrounds. We also handle major projects like converting gunite pools to vinyl, ensuring your backyard investments remain beautiful and functional for years to come.

How Does Our Pool Construction Process Work?

Bringing a new swimming pool to life is an exciting process, and our goal is to make it as smooth and enjoyable as possible for you. We’ve refined our construction process over decades to ensure every project is managed with precision, transparency, and a deep respect for your home and vision. From the first sketch to the first swim, we handle every detail so you can focus on the fun parts. Our approach is built on clear communication and collaboration, ensuring you’re informed and confident at every stage.

We break the journey down into three main phases: design, planning, and installation. It all starts with a conversation where we listen to your ideas and help shape them into a functional, beautiful design. Next, our team manages all the technical details, including securing permits and creating a realistic project timeline. Finally, our skilled craftsmen get to work, building your pool with the highest quality materials and attention to detail. As a full-service home improvement company, we see your pool as the centerpiece of a complete backyard transformation, and our process reflects that holistic vision. We coordinate everything, so you have one trusted partner from start to finish.

Your Initial Consultation and Design

Everything begins with your vision. During our initial consultation, we sit down with you to understand exactly what you’re looking for in a backyard pool. We discuss how you plan to use the space, your aesthetic preferences, and your budget. As a company that designs and builds custom swimming pools across Long Island, we specialize in creating unique designs tailored to your property and lifestyle. Our designers will help you visualize the final result with detailed plans, showing you how the pool will integrate with your home and landscape. This is also when we’ll explore materials, from the pool’s interior finish to the beautiful porcelain and natural stone options for your patio and coping.

Handling Permits and Project Timelines

One of the most complex parts of any major home improvement project is dealing with the paperwork. We take that entire burden off your shoulders. Our experienced team handles the process of securing all necessary building permits from your local town or village, ensuring your project complies with all safety codes and regulations. Once the permits are approved, we establish a clear and detailed project timeline. We believe in keeping you informed every step of the way, so you’ll always know what’s happening and what to expect next. Our project managers provide regular updates, making the entire process feel organized and completely under control.

Final Installation and Quality Checks

This is where your vision truly comes to life. Our construction crews are masters of their craft, and they work efficiently and respectfully to build your pool to the highest standards. From the initial excavation to the final plumbing and electrical work, every step is executed with precision. Because we are a full backyard design company, we ensure the pool installation fits perfectly within the larger landscape design. Before we consider the project complete, we conduct a series of rigorous quality checks to ensure every feature is working perfectly and the entire installation is flawless. We’ll walk you through your new pool, show you how to operate the equipment, and make sure you are 100% satisfied.

What Pool Features and Upgrades Can You Add?

A swimming pool is the heart of your backyard, but the features you add are what truly bring it to life. Think of your pool as the foundation and the upgrades as the details that reflect your personal style and how you want to live. At Gappsi, we don’t just build pools; we create complete, cohesive outdoor environments. We see every project as an opportunity to design a space that flows seamlessly from your home to your patio and into the water. Whether you dream of a serene, spa-like retreat or a fun-filled family resort, the right features can make all the difference.

From the soothing sound of a waterfall to the convenience of a fully automated system, we can help you explore all the possibilities. We specialize in integrating custom elements that enhance both the beauty and functionality of your swimming pool. This includes everything from dramatic lighting and integrated spas to practical additions like heaters and automatic safety covers. Our design process is all about understanding your vision and then bringing it to life with high-quality materials and expert craftsmanship. We can incorporate unique finishes, built-in sundecks, and even thrilling slides to match your family’s lifestyle. Let’s look at some of the most popular features you can add to create your perfect backyard oasis.

Water Features and Custom Lighting

Water features and lighting are what transform a beautiful pool into a breathtaking one. Imagine the gentle sound of a waterfall cascading over natural stone, or sleek deck jets creating elegant arcs of water across the surface. These elements add movement, sound, and a touch of luxury to your backyard. We can design anything from a thrilling waterslide for the kids to a tranquil sundeck for lounging.

Custom lighting extends the enjoyment of your pool long after the sun goes down. Modern LED systems can illuminate your pool with a spectrum of colors, allowing you to set the mood for a quiet evening swim or a lively backyard party. By combining these features with thoughtful landscape design, we create an immersive experience that feels like your own private resort.

Pool Heating and Automation

Why limit your swim season to just a few months? A pool heater is one of the most practical upgrades you can make, allowing you to comfortably enjoy the water from early spring through late fall. It maximizes your investment and gives you more time to make memories with family and friends.

Pool automation adds another layer of convenience, making pool ownership simpler than ever. With a modern control system, you can manage everything from your smartphone or tablet. Adjust the temperature, turn on the lights, activate the spa jets, and monitor your water chemistry with just a few taps. This technology takes the daily work out of owning a swimming pool, so you can spend less time on maintenance and more time relaxing.

Automatic Safety Covers

An automatic safety cover is one of the most important features you can add to your pool, offering both peace of mind and long-term savings. For families with children or pets, it provides an essential layer of protection by creating a barrier that completely seals off the water’s surface when the pool is not in use.

Beyond safety, these covers are a smart financial investment. They significantly reduce water evaporation, which saves on water bills. They also help retain heat, lowering your heating costs and keeping your pool warmer naturally. By keeping leaves, dirt, and other debris out, an automatic cover reduces the time you spend cleaning and the amount of chemicals you need. It’s a feature that protects your family and your investment.

What Are Our Customers Saying?

Choosing a partner for a major home project like a new pool is a big decision. While we can tell you all about our process and quality, sometimes the most helpful insights come from homeowners who have already worked with us. We’re proud of the relationships we build and the backyards we transform. Here’s what some of our clients have to say about their experience with the Gappsi team.

Our Quality and Attention to Detail

When you invest in a custom pool, you want every detail to be perfect. We believe that exceptional results come from a hands-on approach. Our clients often tell us they appreciate this focus. One homeowner shared, “What was most impressive about working with Gappsi was the level of attention to detail Giuseppe personally put into while his company had many big jobs.” This commitment means we treat every project, big or small, with the same high standard of care, ensuring your final oasis is exactly as you envisioned it. You can read more customer testimonials to see what others have experienced.

Our Commitment to Service and Reliability

A smooth and stress-free process is just as important as the final product. We aim to provide clear communication and dependable service from your first consultation to the final walkthrough. A happy customer noted, “If you’re looking for a company that delivers top-notch workmanship, fair pricing, and exceptional customer service, I highly recommend The Gappsi Group.” For us, great service means being a reliable partner you can trust to bring your vision to life. We manage all the moving parts so you can simply get excited for your new swimming pool.

Ensuring Your Long-Term Satisfaction

Your backyard is meant to be enjoyed for years, so we build our pools and patios to last. We use high-quality materials and proven construction techniques to ensure your investment stands the test of time. One of our long-time clients said, “Gappsi installed my patio and pool deck about 15 years ago and it still looks as good as the day it was installed.” This kind of lasting quality is our goal for every project. We want you to feel confident that your beautiful new space will be the backdrop for family memories for many seasons to come.

How Much Does a Gappsi Pool Cost?

One of the first questions on everyone’s mind is, “What will my new pool cost?” While there isn’t a single price tag, understanding the factors that shape the final cost helps you plan your budget. The total investment for your Gappsi swimming pool depends entirely on your vision. Everything from the pool’s size and shape to the materials for the surrounding patio and any custom features will play a role. We believe in complete transparency and want you to feel confident and informed. Our team is here to guide you through the process, ensuring your project aligns with your financial comfort zone.

What Determines Your Pool’s Price?

Your pool’s final price is a reflection of your personal choices. Key factors include the type of pool you select, its dimensions, and the design’s complexity. The materials for your patio and coping also have a big impact. Beyond the pool itself, the equipment you choose is a significant part of the budget. For instance, Gappsi can provide you financing on all your pool equipment from our house brand, Jandy. Another option to consider is using home equity to fund your project. These choices give you control over the final cost and functionality of your new backyard.

Our Financing and Payment Options

We know a new pool is a significant investment. To make the process more manageable, we offer flexible payment solutions. As we often explain to our clients, Gappsi offers financing options for pool and home improvement projects. This financing allows you to get started on your project without paying the full cost up front. Our goal is to help you bring your vision to life on a timeline and budget that feels comfortable for you and your family, so you can start enjoying your new space sooner.

Ask About Current Promotions

Before finalizing your plans, it’s always a great idea to check in with us about any special offers. We encourage you to ask about current promotions when you connect with our design team. These specials can provide extra savings or unique financing opportunities that make adding that extra feature, like custom lighting or a waterfall, even more attainable. We’re always happy to share the latest deals to help you get the most value from your investment in a beautiful Gappsi pool project.

Do You Offer Pool Maintenance and Renovations?

Absolutely. A swimming pool is a long-term addition to your home, and our relationship with you doesn’t end once the construction is complete. We’re here to help you keep your pool in pristine condition for years to come, whether that means giving it a modern facelift or providing guidance on seasonal upkeep. We believe in protecting your investment and ensuring your backyard oasis remains a source of joy and relaxation for your family.

Pool Renovations and Conversions

Is your existing pool showing its age or no longer matching your style? We specialize in comprehensive pool renovations that breathe new life into outdated designs. We can transform your space with modern features, new finishes, and even structural changes. For example, we can convert an old gunite pool to a beautiful, low-maintenance vinyl liner pool, giving you a fresh look without a complete rebuild. A renovation is also the perfect opportunity to reimagine your entire backyard. We can integrate your updated pool with a stunning new patio, an outdoor kitchen, or lush landscaping to create a completely cohesive and functional outdoor living area.

Seasonal Care and Equipment Service

Proper care is essential for protecting your pool and keeping it clean and safe through every season. We highly recommend automatic retractable safety covers, which are fantastic for keeping out leaves and debris, reducing your cleaning time significantly. They also provide an essential layer of security for your family. To ensure your pool weathers the winter months, it’s important to check on your cover about once a month. Make sure snow or water isn’t accumulating too heavily, and double-check that the cover’s pump is working correctly to drain excess moisture. This simple, proactive approach helps prevent damage and ensures your pool is ready to go when warm weather returns.

Related Articles

Frequently Asked Questions

Do I work with Gappsi or East West Pools for my project? You get the expertise of both. East West Pools is our dedicated swimming pool division, so you’ll work directly with these specialists to design and build your perfect pool. At the same time, your project is managed under the Gappsi name, giving you access to our full range of services and the assurance of our 30-year reputation. This structure provides the focused skill of a boutique pool builder with the comprehensive power of a full-service home improvement company.

How do I choose the right type of pool for my family? The best choice really depends on your priorities. If you want complete creative freedom for a one-of-a-kind shape with features like built-in spas or tanning ledges, a gunite pool is your answer. For a great balance of design variety and value with a smooth, comfortable surface, a vinyl liner pool is a fantastic option. If your main goals are a speedy installation and the lowest possible maintenance, a pre-molded fiberglass pool is an excellent choice.

Why is it better to have one company handle my pool, patio, and landscaping? Using one company for your entire backyard transformation creates a seamless and stress-free experience. It ensures a cohesive design where your pool, patio, and plantings all work together beautifully. More importantly, it means you have a single point of contact. You won’t have to coordinate schedules between a pool builder, a mason, and a landscaper. Our integrated team handles everything, which prevents delays and communication issues, leading to a smoother project from start to finish.

What does the timeline for a pool project typically look like? The total timeline can vary depending on the type of pool you choose, the complexity of the design, and the local permitting process. The initial design and approval phase is the first step. Once permits are secured, the actual construction can begin. A fiberglass pool installation can be quite fast, while a custom gunite project will take longer. We provide a clear and detailed timeline for your specific project once the design is finalized so you know exactly what to expect.

What are the main benefits of an automatic safety cover besides security? While providing peace of mind is its most important job, an automatic cover offers incredible practical benefits. It saves you money by significantly reducing water evaporation and chemical use. It also acts like a giant solar blanket, retaining heat to lower your heating costs and naturally keep the water warmer. Finally, it keeps your pool much cleaner by preventing leaves and debris from falling in, which means you’ll spend a lot less time skimming and more time swimming.

Share this page: