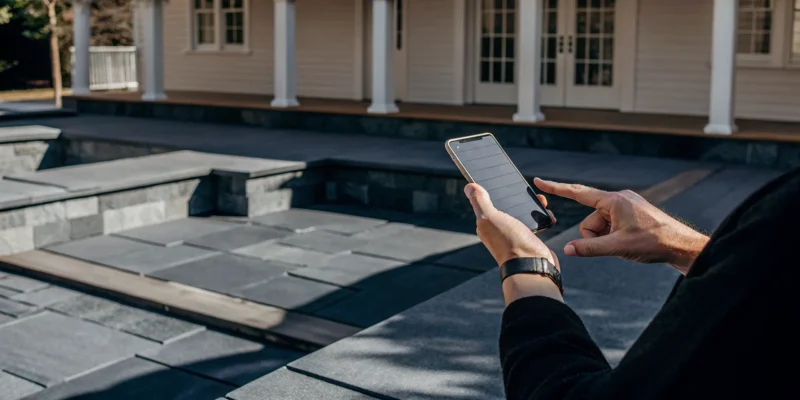
A backyard pool on Long Island should be a source of relaxation, not a constant chore. Yet, many traditional materials struggle with our tough climate, leading to cracks from freeze-thaw cycles, stains from sunscreen, and endless upkeep. This is where two-inch porcelain coping changes the game. It’s engineered to be incredibly dense and non-porous, making it resistant to weather damage, stains, and fading. It delivers a sleek, premium finish without the maintenance headaches. The first step to achieving this low-maintenance luxury is finding trusted two inches thick porcelain coping suppliers on long island ny who provide materials built to last. This guide will show you why this smart, stylish option is the perfect investment for a beautiful and stress-free pool season.
Key Takeaways
- Choose porcelain for its blend of strength and style: This material is engineered to handle Long Island’s weather, resist stains, and provide a safe, slip-resistant surface, all while offering endless design options to match your vision.
- Confirm key installation details upfront: A successful project depends on a solid foundation to prevent shifting and a smart drainage plan to manage water. Discussing these technical points with your contractor is essential for a durable, professional finish.
- Look for value beyond the initial price: When comparing quotes, focus on the quality of the materials, the scope of the installation work, and the warranties offered. The best investment combines a fair price with the expertise of a reputable team.
Why Is Two-Inch Porcelain Coping a Great Choice for Your Pool?
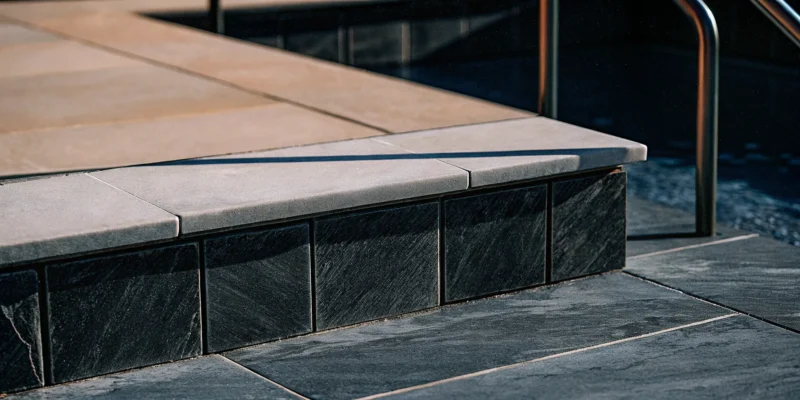
When you’re designing a pool, the details make all the difference. Pool coping, the material used to cap the edge of your pool shell, is one of those crucial details. It’s the part you’ll touch, sit on, and see up close every time you use your pool. While you have many options, two-inch porcelain coping has become a favorite for good reason. Its substantial thickness provides a high-end, modern look that instantly refines your outdoor space.
But it’s not just about looks. This option combines sophisticated style with incredible performance. It’s engineered to handle everything a busy pool area and Long Island’s climate can throw at it, from cannonballs to cold snaps. Choosing the right coping means creating a pool edge that is not only beautiful but also safe, durable, and easy to care for. Let’s get into why two-inch porcelain is such a smart and stylish investment for your backyard oasis.
It Stands Up to Long Island Weather
Here on Long Island, our outdoor materials have to be tough. They face humid, sunny summers and icy, snowy winters. Two-inch porcelain coping is built for this challenge. Because porcelain is fired at extremely high temperatures, it becomes incredibly dense and non-porous. This means it absorbs almost no water, so it won’t crack during freeze-thaw cycles. It’s also resistant to fading from UV rays and damage from salt if you have a saltwater pool. This durable porcelain and stone can handle heavy foot traffic and poolside furniture with ease, looking just as good years from now as it does on day one.
Enjoy More Pool Time with Less Maintenance
Your pool should be a place for relaxation, not constant upkeep. Porcelain coping helps make that a reality. Its non-porous surface is one of its greatest assets because it naturally resists stains, mold, and mildew. Spilled sunscreen, drinks, or fallen leaves won’t seep in and cause lasting marks. A simple spray with a hose or a quick wipe-down is usually all it takes to keep it clean. Unlike many natural stones that require regular restoration and sealing to stay protected, porcelain maintains its beauty without any special treatments, giving you more time to actually enjoy your pool.
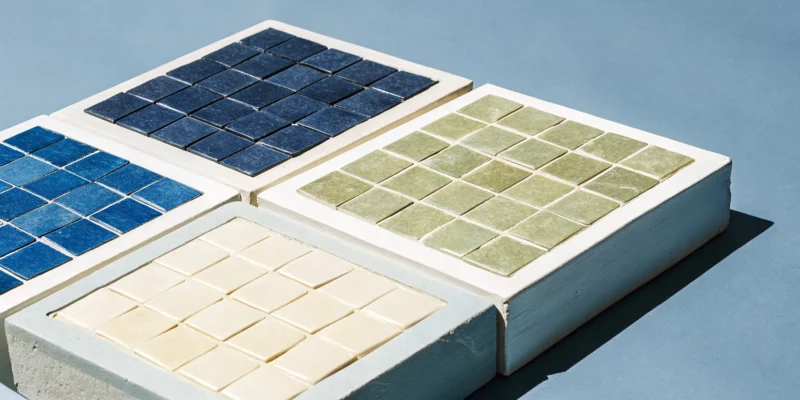
Find a Style That Matches Your Vision
Your pool area is an extension of your home, and you want it to reflect your personal style. Porcelain coping offers incredible design flexibility to bring your vision to life. It comes in a huge range of colors, textures, and finishes, allowing you to achieve almost any look you can imagine. Whether you want the clean lines of modern concrete, the warm look of natural wood, or the classic elegance of travertine, there’s a porcelain option that can deliver. This versatility ensures your coping will perfectly complement your patio, landscaping, and home’s architecture, creating the perfect finishing touch for your dream swimming pool.
Keep Your Pool Area Safe and Stylish
Safety is always the top priority around a pool, especially when you have kids and guests running around. Porcelain coping is manufactured with a slip-resistant texture, providing excellent grip underfoot even when the surface is wet. This gives you peace of mind without sacrificing style. As a bonus, lighter-colored porcelain tends to stay cooler in the direct sun compared to darker materials like bluestone or concrete. On a hot July afternoon, a cooler pool deck makes the entire area more comfortable and safer for bare feet, blending safety and sophisticated design seamlessly.
Why Trust Gappsi with Your Porcelain Coping Project?
Choosing the right partner for your pool project is a big decision. You want a team that not only understands your vision but also has the skill to bring it to life with quality materials and craftsmanship. At Gappsi, we combine deep product knowledge with decades of hands-on experience right here on Long Island. We’re not just contractors; we’re your neighbors, dedicated to creating beautiful, lasting outdoor spaces. From selecting the perfect stone to ensuring a flawless installation, we manage every detail so you can focus on enjoying the result.
Our Deep Expertise in Porcelain and Stone
When it comes to materials, we are incredibly selective. We know that the two-inch porcelain pavers we use are heavier and offer far greater impact resistance than standard tile, ensuring your pool coping will stand up to years of fun. Our team understands the technical specifications of every product we offer, from its breaking strength to its texture. We source high-quality porcelain and natural stones that are specifically designed for outdoor use. This means they can handle everything from freezing winter temperatures to harsh summer UV rays without cracking or fading, keeping your pool looking pristine season after season.
We Handle Everything from Design to Installation
One of the biggest advantages of working with us is our seamless, all-in-one process. You won’t have to juggle different designers, suppliers, and installers. Our team at Gappsi guides you through every step, from creating the initial design to laying the final piece of coping. This integrated approach ensures clear communication, a cohesive aesthetic, and a much smoother project timeline. We believe that building your dream pool area should be an exciting experience, not a stressful one. Our expert masonry and construction team takes care of all the details, guaranteeing the quality of the work from start to finish.
Your Local Long Island Experts Since 1987
We’ve been serving homeowners across Suffolk and Nassau County since 1987, and that experience matters. We understand the local environment, from the soil conditions to the coastal weather, and we know how to build outdoor spaces that last. For Long Island homeowners, porcelain pavers provide a wonderfully versatile option for creating distinctive backyard designs, and we know exactly how to make them shine. Our long history in the community is built on a foundation of trust and countless successful projects. You can see our commitment to quality and local expertise in the work we’ve shared on our Gappsi Group YouTube channel.
Where to Find Two-Inch Porcelain Coping on Long Island
Once you’ve decided on two-inch porcelain coping, the next step is figuring out where to buy it. On Long Island, you have several options, each with its own set of pros and cons. The right choice for you really depends on how involved you want to be in the project. Are you looking for a team to handle everything from design to the final cleanup, or do you prefer to source materials yourself and hire a separate contractor?
Thinking about your project style will help you narrow down your search. You can work with a full-service company that manages the entire process, visit a specialized stone retailer to browse a wide selection, stop by a large home improvement store for basic options, or even shop with an online supplier. Let’s walk through what you can expect from each.
Full-Service Home Improvement Companies
A full-service company is your all-in-one solution. These teams, like us here at Gappsi, offer everything from initial design consultation to sourcing materials and completing the installation. The biggest advantage is simplicity. You have one point of contact, ensuring your vision is carried out perfectly without you having to coordinate between a designer, a supplier, and an installation crew. We provide a curated selection of high-quality porcelain and natural stone that we know performs well in the Long Island climate. This path is ideal for homeowners who value expertise and want a seamless, stress-free experience with a professional finish.
Specialized Stone and Tile Retailers
Specialized stone and tile retailers are experts in one thing: stone. These showrooms have a vast selection of materials, and their staff can offer deep product knowledge. This is a great option if you want to see and touch a wide variety of porcelain coping styles in person. Keep in mind that most of these retailers only sell the material; they don’t typically offer installation services. You’ll need to find and hire your own contractor to do the work. If you already have a trusted installer or want to explore a massive range of options, a specialty store is a solid choice. You can get a similar experience by visiting the Gappsi Store, where you can see our products firsthand.
Large Home Improvement Stores
Big-box stores are convenient and accessible, making them a popular stop for many home projects. You might find some porcelain coping options here, and the prices can be competitive. However, the selection is often limited to more standard styles, and you may not find the specific two-inch thickness or premium finishes you’re looking for. The staff, while helpful, generally won’t have the specialized expertise of a stone professional. This route works best for homeowners with smaller projects or those who are comfortable taking a more hands-on, DIY approach and don’t require a high-end, specific product.
Online-Only Suppliers
Shopping online offers an almost endless selection of products right at your fingertips. You can browse suppliers from all over the country and potentially find unique styles. However, this convenience comes with risks. You can’t see or feel the quality of the porcelain before you buy, and color variations can be dramatic between your screen and the actual product. Shipping heavy materials like stone is expensive, and dealing with returns or damaged items can be a major headache. This option is best for experienced homeowners or contractors who know exactly what they’re looking for and are prepared to manage the logistics and risks involved.
What’s the Cost of Two-Inch Porcelain Coping on Long Island?
Figuring out the budget for your pool project is a big step, and the coping is a key detail you’ll want to get right. The cost of two-inch porcelain coping on Long Island can vary quite a bit, but understanding the factors that shape the price will help you plan effectively. It’s not just about the price per piece; it’s about the total value you get, from the material’s quality to the final installation.
Think of it as an investment in your home’s beauty and safety. A high-quality coping will last for years, require minimal upkeep, and provide a stunning finish to your pool area. Let’s break down what you can expect to pay and what goes into that final number.
Understanding the General Price Range
When you start shopping for two-inch porcelain coping, you’ll notice that prices can range from around $30 to over $150 per piece or square foot. This difference often comes down to the brand, style, and where you buy it from. For example, you might find a functional and attractive option like a porcelain pool coping for about $33 per square foot.
On the other hand, premium designer collections from high-end brands can be significantly more. A unique, pressed porcelain piece with a specialized finish could cost closer to $150 per piece. This wide range is why it’s so helpful to have a clear vision for your project. Knowing the look you want helps you narrow down your options and find a product that fits both your style and your budget.
What Influences the Final Price?
Several key factors determine the final cost of your porcelain coping project. The material itself is the biggest variable; premium brands known for their durability and unique designs will naturally have a higher price tag. The complexity of the design, the color, and the finish also play a role. A simple, standard color will usually be more affordable than a custom pattern or a specialized texture.
Beyond the material, remember to account for installation. The cost of labor, the condition of the surface where the coping will be installed, and the complexity of your pool’s shape can all affect the final price. This is why a simple online price per square foot can be misleading. It doesn’t include the expert craftsmanship needed to ensure your coping is installed perfectly for lasting results.
How to Get a Clear and Accurate Quote
The best way to get a true sense of your project’s cost is to get a detailed, all-inclusive quote from a local expert. While big box stores can give you a general idea of material prices, a full-service company like Gappsi can provide a comprehensive estimate that covers everything from materials and delivery to professional installation. We carry a vast selection of porcelain and natural stone to fit any design vision.
When you request a quote, make sure it’s itemized so you can see exactly what you’re paying for. Ask about the cost of the coping itself, labor, site preparation, and any other necessary materials. A clear, transparent quote ensures there are no surprises down the road and helps you make a confident decision for your home.
Key Questions to Ask Any Porcelain Coping Supplier
Choosing the right supplier is just as important as picking the perfect porcelain. You’re not just buying a product; you’re investing in a partner for your home improvement project. Asking a few direct questions can help you feel confident that you’re working with a team that values quality and stands by their work. It helps you sort through the options and find a company that will deliver the beautiful, long-lasting pool surround you envision. Think of it as a simple checklist to ensure you’re making a great choice for your home and your peace of mind.
“Where do you source your porcelain?”
The origin of the porcelain says a lot about its quality. Reputable suppliers are transparent about where their materials come from because they choose partners known for producing strong, durable, and beautiful tiles. Ask about the manufacturing standards and whether the porcelain is specifically designed for outdoor use and pool environments. A supplier who can confidently discuss their sourcing is one who prioritizes quality. At Gappsi, we select our porcelain and natural stone pavers for their proven ability to handle Long Island’s weather while maintaining their stunning appearance year after year.
“Do you have an in-house installation team?”
This is a big one. When a company uses its own dedicated crew for installation, you get a seamless experience and a single point of contact. There’s no risk of miscommunication between a salesperson and a third-party contractor. An in-house installation team means the people selling you the product are the same ones who know exactly how to install it correctly. This ensures accountability and a smoother process from the initial design conversation all the way to the finished project, giving you a much more cohesive and stress-free experience.
“What does your customer support look like?”
You want to know that your supplier will be there for you if you have questions or concerns during and after the installation. Ask about their process for addressing issues and what their communication looks like throughout the project. A great way to gauge this is by looking at their past work and customer reviews. A company with a long history in the community and a portfolio of happy clients is usually a safe bet. You can often see their completed projects and get a feel for their commitment to quality and customer satisfaction.
“What kind of warranty do you offer?”
A warranty is a supplier’s promise to stand behind their product and their work. Be sure to ask for details on what is covered. There are often two parts to consider: the manufacturer’s warranty on the porcelain itself, which covers defects, and the installer’s warranty on the labor. A comprehensive warranty from a company that has been around for decades provides genuine security. It shows they are confident in both the materials they use and the quality of their craftsmanship for any professional pool project.
Answering Your Top Questions About Porcelain Coping
When you’re planning a pool project, you want to feel confident in every material you choose. Porcelain coping is a fantastic option, but it’s natural to have a few questions before you commit. Let’s walk through some of the most common concerns homeowners have so you can see why it’s such a popular and reliable choice for Long Island pools.
“Is it too slippery for around a pool?”
This is probably the number one question I hear, and it’s a great one to ask. Safety around the pool is always the top priority. The good news is that the porcelain pavers used for pool coping are specifically engineered with safety in mind. They aren’t like the smooth, glossy tiles you might find in a kitchen. Instead, they have a textured, slip-resistant surface designed for wet environments. This means you get that sleek, modern look without sacrificing peace of mind. You and your family can walk around the pool comfortably and safely, even when things get splashy.
“Will the color fade in the sun?”
After investing in a beautiful new poolscape, the last thing you want is for the color to wash out after a few Long Island summers. Fortunately, porcelain is built to last. Unlike some other materials, high-quality porcelain pavers are incredibly resistant to UV rays. The color is baked in during manufacturing, so it won’t fade or become dull over time. Your pool coping will look just as vibrant and rich in five or ten years as it did on the day it was installed, keeping your backyard oasis looking fresh and new season after season.
“Is it difficult to install?”
Porcelain might seem like a complex material, but it’s actually manufactured to make installation straightforward for professionals. Because the pavers are precisely cut and uniform in size, they fit together perfectly for a clean, seamless finish. While it’s not a DIY project, a skilled team can install it efficiently. At Gappsi, our expert masonry designers have years of experience working with porcelain, ensuring the process is smooth and the final result is flawless. This makes it a practical and beautiful choice for your project.
“Is it worth the investment?”
Porcelain coping is a premium material, and it’s fair to ask if the value matches the price. The answer is a resounding yes. Think of it as a long-term investment in your home. Because porcelain is so durable, non-porous, and resistant to stains, fading, and frost, you save money over time on maintenance and repairs. You won’t have to worry about constant sealing or replacing cracked pieces. It combines lasting strength with timeless elegance, adding significant value and enjoyment to your swimming pool area for many years to come.
How to Care for Your New Porcelain Coping
Your beautiful new porcelain coping is designed for durability, but a little care will keep it looking brand new. The great news is that maintaining porcelain is surprisingly simple. You don’t need a complicated schedule or expensive products. A few consistent habits will protect your investment and ensure your pool area remains a stunning centerpiece. Here’s a straightforward guide to keeping your porcelain coping in pristine condition.
Your Simple Weekly Cleaning Routine
Keeping your porcelain looking fresh is as easy as a quick weekly tidy-up. For regular maintenance, start by removing any loose dust and dirt with a soft broom. This prevents debris from getting ground into the surface. Next, wash the tiles with hot water and a microfiber cloth or mop. Most of the time, that’s all you’ll need to lift surface grime and restore that clean look. This simple routine helps prevent buildup and keeps your poolside looking inviting. For a deeper clean, Gappsi offers professional restoration services to keep all your stonework pristine.
Dealing with Spills and Stains
Porcelain is highly resistant to stains, but it’s always best to tackle spills as they happen. For most messes, a quick wipe with a damp cloth is enough. If you have a more stubborn spot, a pH-neutral cleaner mixed with water will usually do the trick. For very tough organic stains or mineral buildup on your porcelain and stone, a diluted Muriatic acid solution can be effective. However, this is a powerful chemical that requires careful handling. If you’re not comfortable using it, it’s always best to call in professionals who can handle it safely.
Tips for Long-Lasting Beauty
Think of your porcelain coping as a long-term investment in your home’s beauty. A simple maintenance plan is the best way to protect it. The key is consistency: stick to your weekly cleaning and address spills right away. It’s also a good idea to avoid harsh, abrasive cleaners and steel wool, as they can scratch the surface. One of the best features of porcelain is that its non-porous nature means you never have to seal it. Following these simple steps will ensure your beautiful pool area remains a source of pride for years to come.
What to Discuss About Installation
Choosing your beautiful two-inch porcelain coping is the fun part, but a flawless installation is what truly brings your vision to life and ensures it lasts for years. A great product can be let down by a poor installation, leading to headaches and costly repairs down the road. When you’re planning your project, it’s essential to talk through the technical details with your contractor.
Before any coping is laid, there are three critical topics to cover: the foundation that will support it, the plan for water drainage, and the value of professional expertise. Getting these three elements right is the key to a stunning and durable poolside. A well-executed installation not only looks better but also protects your investment, giving you a safe, beautiful, and low-maintenance space to enjoy season after season. Let’s walk through what you need to know about each of these crucial steps.
The Importance of a Solid Foundation
Think of the foundation as the unsung hero of your pool project. Two-inch porcelain coping is a substantial, heavy material, and it needs a completely stable base to prevent shifting, cracking, or becoming uneven over time. As industry experts at Daltile note, this thicker porcelain “offers much greater impact resistance and breaking strength properties” than standard tile, but it relies on a robust base to perform its best. This typically means a professionally poured and cured concrete bond beam around the pool’s edge. A solid foundation ensures your coping can withstand Long Island’s weather cycles and the constant activity of a busy pool area, keeping it secure and level for decades. Our masonry team specializes in creating these essential structural bases.
Making a Plan for Proper Drainage
Water is a constant around a pool, and you need a clear plan for where it will go. Without proper drainage, you can end up with standing water that leads to slippery spots, mildew growth, and potential damage during freeze-thaw cycles. A thoughtful drainage plan involves carefully grading the area away from the pool and using the right installation techniques to allow water to escape. As the team at Powerhouse Mason Supply points out, “adhering to these straightforward upkeep practices will help your porcelain pavers retain their aesthetic appeal.” A professional installer will account for this from day one, ensuring your beautiful new coping stays clean and safe, and preventing water from compromising the foundation over time.
Why Professional Installation Matters
While it might be tempting to consider a DIY approach, installing pool coping is a job best left to the experts. There are many small details that make a huge difference in the final outcome. As noted by Buy Tiles and More, “properly installing pool coping stones requires you to be aware of common pitfalls.” Professionals understand how to achieve perfect alignment, use the correct adhesives for poolside conditions, and ensure joints are properly sealed to prevent water intrusion. Hiring an experienced team for your swimming pool project means you avoid these common mistakes and get a polished, professional result that is built to last, protecting your investment and giving you total peace of mind.
Finding the Best Value for Your Project
When you’re investing in your home, finding the best value is about more than just the price tag. It’s about balancing cost with quality, durability, and the expertise of the team you hire. A beautiful new pool coping is a long-term addition to your home, so you want to make sure you’re getting a high-quality product and professional installation that will last for years. The right partner will be transparent about costs and help you understand exactly what you’re paying for, ensuring there are no surprises down the road. This approach helps you make a confident decision that adds lasting beauty and function to your outdoor space.
Look for Seasonal Offers
One of the smartest ways to manage your project budget is to keep an eye out for seasonal promotions. Many home improvement companies offer deals during their slower periods, which can be a great opportunity to get premium materials at a better price. Consider planning your pool project during the fall or winter when demand for outdoor work is lower. You can often find excellent offers on materials like porcelain pavers and coping. A great first step is to browse the inventory at the Gappsi Store to see what’s available. By staying informed, you can time your purchase to get the best possible value without compromising on the quality of your materials.
Smart Questions to Ask About Pricing
To truly understand the value of what you’re getting, you need to ask the right questions. When you receive a price, go beyond the bottom line. Ask for a detailed breakdown: Does the price include materials, delivery, site preparation, installation, and cleanup? Are there any potential extra charges you should know about? It’s also wise to ask about the product itself. Inquire about the quality and origin of the material to ensure you’re getting durable, non-porous porcelain and natural stone that won’t fade. A reputable supplier will be happy to explain what makes their product a great long-term investment for your home.
How to Compare Quotes Fairly
When you have multiple quotes in hand, it’s tempting to go with the lowest number. However, it’s crucial to compare them fairly to see what each one truly offers. Lay the quotes side-by-side and check that they’re for the exact same scope of work and quality of materials. A cheaper quote might be cutting corners by using a lower-grade porcelain or not including essential prep work. A comprehensive quote from an experienced masonry construction company will detail every step, from the foundation to the finishing touches. Look for transparency, a clear warranty, and a team that takes the time to explain the entire process to you.
Related Articles
- Top 4 2-Inch Porcelain Coping Suppliers on Long Island
- Stones & Porcelain Archives – Gappsi Group
- Outdoor Living News: Pools, Fire Pits & Renovations | Gappsi Inc
Frequently Asked Questions
How does two-inch porcelain coping handle Long Island’s winters? This is a great question because our freeze-thaw cycles are tough on outdoor materials. Two-inch porcelain is an excellent choice for our climate because it’s non-porous, meaning it absorbs virtually no water. When water can’t seep in, it can’t freeze, expand, and cause cracks. This makes it incredibly resistant to the kind of winter damage that can affect more porous materials, ensuring your pool edge stays intact and beautiful year after year.
What’s the real difference between porcelain and natural stone coping? While both can be beautiful, the main differences come down to maintenance and consistency. Natural stone, like travertine or bluestone, is porous and requires regular sealing to prevent stains and water damage. Porcelain, on the other hand, is manufactured to be non-porous, so it naturally resists stains and never needs sealing. It also offers perfect consistency in color and thickness from piece to piece, which gives you a very clean, uniform look that can be harder to achieve with the natural variations of stone.
Do I need to seal porcelain coping? No, and that’s one of its best features. Because porcelain is fired at such high temperatures, its surface becomes incredibly dense and non-porous. This means liquids, chemicals, and grime sit on the surface instead of soaking in. You get all the beauty without the recurring chore of sealing it every year or two, which saves you time and money over the life of your pool.
Can porcelain coping be installed over an existing pool edge? This really depends on the condition of your current pool edge. Two-inch porcelain is heavy and requires a perfectly stable and level foundation, which is typically a concrete bond beam. If your existing edge is cracked, uneven, or not structurally sound, it would need to be removed and repaired first. A professional assessment is the best way to determine the right approach to ensure a secure, long-lasting installation.
How long does a typical installation project take? The timeline for installing pool coping can vary based on the size and shape of your pool, as well as the amount of prep work needed for the foundation. For a straightforward project where the base is already in good shape, the installation itself might only take a few days. However, if significant prep work or concrete pouring is required, you should plan for a longer process. We can give you a much more precise timeline after evaluating your specific project.