Backyard Design with Porcelain Patio and Pool in East Setauket, NY | Gappsi

View Gappsi’s YouTube Channel to view Backyard Design with Porcelain Patio and Pool in East Setauket, NY | Gappsi

Transforming a backyard into a luxury retreat takes vision, creativity, and expert craftsmanship.  This latest Gappsi project in East Setauket, NY, is a perfect example. The homeowners wanted a space that was beautiful, functional, and comfortable year-round. Gappsi designed and installed an entire backyard environment that blends modern features, elegant materials, and thoughtful outdoor living spaces. The result is a seamless combination of leisure, entertainment, and architectural sophistication.

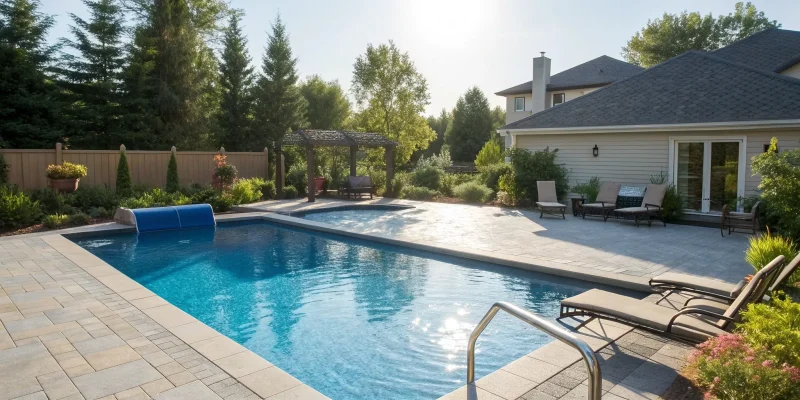
A Custom Vinyl Pool as the Centerpiece

The project began with the installation of a custom vinyl pool featuring concrete walls for exceptional durability and longevity. Measuring 16 feet by 36 feet, the pool offers ample space for swimming, relaxing, and entertaining. Its shape complements the backyard layout, providing space for the surrounding patio, sundeck, and additional landscape features.

A full-width sundeck at the shallow end provides a resort-style element. Gappsi installed two bubblers on the sundeck, creating a soothing, spa-like water feature that enhances the pool’s visual appeal and comfort.

Custom Vinyl Pool as the CenterpieceTo create a clean, elevated look around the perimeter, Gappsi used sandstone coping with rounded edges on the top and bottom. The coping was then sealed to match the porcelain patio, ensuring a cohesive, elegant finish throughout the space. This color-matching technique allowed the natural stone to blend beautifully with the rest of the design.

Porcelain Patio Pavers Throughout the Yard

The entire patio surrounding the pool was installed using high-quality porcelain pavers selected from the Gappsi showroom. The homeowners chose a beige porcelain with white veins, adding a modern yet timeless aesthetic to the outdoor environment. Porcelain is one of the most durable and low-maintenance materials available for outdoor patios.  The porcelain paver is resistant to fading, staining, weathering, and heat.

Porcelain Patio Pavers Throughout the YardThe pavers were installed with precision to create a smooth, flawless surface ideal for lounging, walkways, and outdoor entertaining. Their neutral tones allow all surrounding structures and landscaping features to blend harmoniously.

Synthetic Turf Accents for Clean, Modern Lines

To further elevate the visual design, Gappsi installed a 12- to 14-inch synthetic turf border around the patio. This strip of turf creates a clean line in front of the retaining walls and alongside the home, enhancing contrast while keeping the overall layout neat and contemporary. Synthetic turf is not only visually appealing but also eliminates the need for trimming, watering, or maintenance along those tight boundary lines.

Retaining Wall and Pool Auto Cover Housing

Synthetic Turf Accents for Clean, Modern LinesA custom-designed retaining wall was built behind the pool’s deep end. This wall also serves as the housing area for the pool’s automatic cover system, keeping it concealed and protected. The retaining wall blends seamlessly with the overall design, offering both structural support and visual appeal.

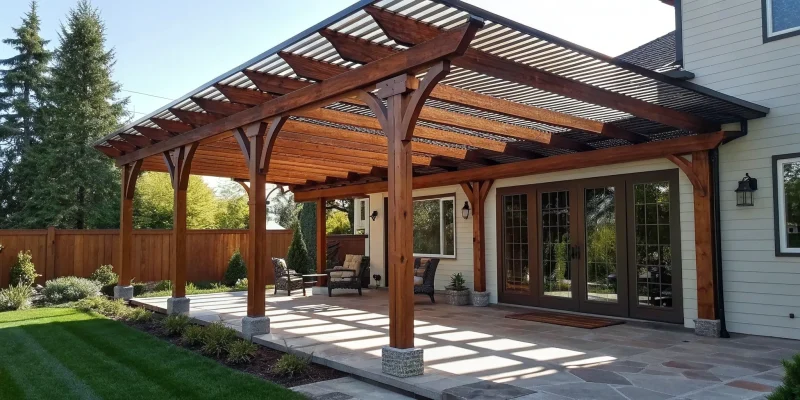
A Custom Pavilion Designed to Match the Home

One of the standout features of this backyard is the custom-built pavilion, thoughtfully designed to mirror the home’s architectural style. Trimmed entirely in Azek moldings, the pavilion features a detailed front peak that ties into the residence’s aesthetic.

The pavilion floor is uniquely delineated with synthetic turf, creating a soft, visually distinct boundary between the shaded structure and the porcelain patio. Under the pavilion, Gappsi created a cozy outdoor living room complete with a gas fireplace, a mounted TV, and comfortable lounge space. The cathedral ceiling enhances openness while providing excellent airflow, and a built-in heater allows the homeowners to enjoy the area even during cooler seasons.

backyard-design-with-porcelain-patio-and-pool-in-east-setauket-ny-gappsiA Premium Outdoor Kitchen Built for Entertaining

No luxury backyard is complete without a well-designed outdoor kitchen. Gappsi installed an L-shaped outdoor kitchen featuring top-tier Twin Eagle appliances, including:

  • A 36-inch grill
  • A 30-inch griddle
  • Summit refrigerator
  • Summit ice maker
  • Stainless steel cabinetry
  • A built-in sink

The kitchen is topped with a leather-finished granite countertop, explicitly chosen to complement the color of the stone walls and porcelain patio. This outdoor kitchen allows for complete meal preparation, making the backyard an ideal space for gatherings, celebrations, and summer cookouts.

Custom Pavilion Designed to Match the HomeA Cohesive and Luxurious Backyard Design

This project reflects Gappsi’s commitment to quality design, precision installation, and personalized outdoor living solutions. Every part of this East Setauket backyard, from the pool and patio to the pavilion and kitchen, was thoughtfully planned and executed to deliver a cohesive, luxurious, and functional environment.

The combination of porcelain pavers, synthetic turf, custom masonry, architectural woodwork, and premium outdoor appliances creates a space that is both modern and timeless. Whether relaxing on the sundeck, enjoying the pavilion in the evening, or hosting a backyard barbecue, the homeowners now have a private retreat that enhances their lifestyle year-round.

This backyard transformation stands as one of Gappsi’s latest and most impressive designs, showcasing their craftsmanship and dedication to delivering beautiful outdoor spaces across Long Island.

Contact Gappsi Today

📍 Serving all of Long Island, NY — Nassau & Suffolk Counties
🌐 www.gappsi.com
📞 Call now for a free consultation and estimate!

SCHEDULE A MEETING TODAY WITH GAPPSI

Synthetic Turf Accents for Clean, Modern Lines

Share this page:
Custom wood pergola with a roof attached to a house over a furnished patio.

Your Guide to a Custom Pergola Attached to House with Roof

There’s a certain magic to a home that flows effortlessly from the inside out. Creating that seamless connection between your living room and your garden is a key goal for many homeowners, but it can be hard to achieve with just a sliding door and a simple patio. You need an architectural element that bridges the two worlds. An attached pergola acts as that perfect transition, creating a sheltered space that is both part of the house and part of the yard. A custom pergola attached to house with roof blurs the lines, offering a comfortable, defined area that encourages you to step outside. It makes your backyard feel like a true extension of your home, turning an undefined space into your new favorite room.

Key Takeaways

  • Create a True Outdoor Room: An attached pergola with a roof does more than add shade; it creates a functional, weather-protected extension of your home. This makes your patio usable for dining or relaxing, rain or shine, effectively increasing your home’s living space and value.
  • Choose Materials That Fit Your Life: The right material is about balancing aesthetics with maintenance. While wood offers classic charm, it requires regular upkeep. Modern options like aluminum and vinyl provide a sleek look with minimal effort, ensuring you spend more time enjoying your pergola than working on it.
  • Prioritize a Professional Installation: Attaching a structure to your home is a complex job that requires expertise in building codes, foundations, and structural integrity. Hiring a professional ensures your pergola is built safely and correctly, protecting your home from damage and guaranteeing a beautiful, long-lasting result.

What is an Attached Pergola with a Roof?

Think of an attached pergola as a beautiful and functional extension of your home that blends your indoor and outdoor spaces. This structure connects directly to an exterior wall, creating a covered area over your patio or deck. Unlike a traditional open-rafter pergola, adding a roof transforms the space into a true outdoor room. It provides reliable shade from the summer sun and shelter from unexpected Long Island showers, making your backyard far more usable throughout the year.

An attached pergola with a roof does more than just provide cover; it defines a space. It can frame your outdoor dining area, create a cozy lounge next to the pool, or serve as a graceful transition from your back door to the garden. These structures are custom-designed to complement your home’s architecture, adding both functional living square footage and significant visual appeal. Gappsi designs and builds custom pavilions and pergolas that are tailored to your home’s specific style and your family’s needs, turning an underused patio into your new favorite spot.

Exploring Attached Pergola Styles

One of the best parts of adding a pergola is that you can tailor it perfectly to your home’s character. Whether your house is a classic colonial, a modern masterpiece, or a rustic cottage, there’s a pergola style to match. You can choose from clean, minimalist lines for a contemporary look or opt for more traditional designs with decorative posts and ends. The material you select plays a huge role in the final aesthetic. Natural wood offers timeless warmth, while sleek aluminum provides a modern, low-maintenance alternative. Vinyl is another durable option that comes in various colors to seamlessly match your home’s trim and siding.

Roofed vs. Open-Top: Which is Right for You?

Deciding between a roofed and an open-top pergola comes down to how you want to use the space. An open-top design with rafters is classic and beautiful, allowing for plenty of sunlight and air circulation—ideal if you want to grow climbing plants. However, for most homeowners, a roofed pergola offers far more practical benefits. A solid or louvered roof provides consistent shade and protects you and your outdoor furniture from the elements. This means you can enjoy your masonry patio for a morning coffee or an evening dinner without worrying about the weather forecast. A roof makes your outdoor space a reliable extension of your home, not just a fair-weather feature.

Why Add a Custom Attached Pergola to Your Home?

If you’re looking for a way to get more out of your backyard, an attached pergola is a brilliant solution. It’s more than just a structure; it’s a seamless transition from your indoor comfort to your outdoor oasis. By connecting directly to your house, it creates a functional and stylish space that feels like a true extension of your home. A custom-designed pergola doesn’t just add shade—it adds character, purpose, and value. Let’s look at some of the key reasons why adding one is one of the best upgrades you can make for your Long Island home.

Extend Your Living Space Outdoors

An attached pergola instantly creates a defined outdoor room, effectively expanding your home’s square footage. This new area becomes the perfect spot for dining al fresco, hosting summer barbecues, or simply relaxing with a book. It provides a comfortable, sheltered zone that encourages you to spend more time outside. Instead of a simple, undefined patio, you get a purposeful space that bridges the gap between your house and your yard. With the right design, you can craft a beautiful and functional outdoor living area that your family will enjoy for years. Gappsi offers a range of custom pavilions and pergolas to perfectly match your home and lifestyle.

Enjoy Your Patio, Rain or Shine

One of the biggest advantages of a roofed pergola is its ability to make your patio usable in almost any weather. A solid or louvered roof offers reliable protection from the intense summer sun and unexpected rain showers, so you never have to cancel plans. This means more family dinners outside and more quiet mornings with coffee on the patio. Modern materials like powder-coated aluminum are incredibly durable and require very little maintenance, standing up to Long Island’s coastal climate without warping or rusting. When you pair your pergola with beautiful, weather-resistant porcelain and natural stone pavers, you create a complete outdoor space that’s ready whenever you are.

Add Value and Curb Appeal

A well-designed attached pergola is a smart investment that adds significant value to your home. It’s a highly desirable feature for potential buyers, who see it as additional, usable living space. Beyond the financial return, a pergola dramatically enhances your home’s curb appeal. It adds architectural interest and dimension to your home’s exterior, breaking up flat walls and creating an elegant, welcoming focal point. A custom design ensures the pergola complements your home’s style, looking like it was always meant to be there. This kind of thoughtful home remodeling not only improves your daily life but also strengthens your property’s long-term value.

Improve Your Home’s Energy Efficiency

An often-overlooked benefit of an attached pergola is its positive impact on your home’s energy consumption. By shading the windows and exterior walls of your house, a pergola can block a significant amount of direct sunlight from entering your home during the hottest parts of the day. This natural cooling effect reduces the workload on your air conditioning system, which can lead to lower energy bills during the summer. According to the U.S. Department of Energy, strategic landscaping and shading can make a real difference in home energy use. It’s a practical advantage that makes your home more comfortable on the inside while you enjoy your beautiful new space on the outside.

Choosing the Best Material for Your Pergola

The material you choose for your attached pergola does more than just define its look—it determines how much time you’ll spend maintaining it and how well it will stand up to Long Island’s four-season climate. Think of it as the foundation of your new outdoor oasis. Each option has its own personality and practical benefits, so it’s all about finding the right fit for your home’s style, your budget, and your lifestyle. Whether you’re drawn to the classic warmth of wood or the sleek, modern appeal of metal, we’ll walk through the most popular choices to help you make a decision you’ll love for years to come.

Wood: Natural Beauty and Charm

There’s something undeniably classic and inviting about a wooden pergola. Materials like cedar and redwood bring a natural warmth and texture to your backyard that blends beautifully with landscaping. These woods are popular for a reason; they have a natural resistance to rot and insects, making them sturdy choices for outdoor structures. A pressure-treated pine is another excellent, budget-friendly option. While wood offers timeless charm, it does require a bit more TLC than other materials. You’ll need to plan on regular staining or sealing to protect it from the elements and keep it looking its best, but for many homeowners, that upkeep is a small price to pay for the authentic beauty that only real wood can provide.

Aluminum: Modern, Durable, and Low-Maintenance

If your style leans more modern and you’d rather spend your weekends relaxing than doing maintenance, an aluminum pergola is a fantastic choice. Aluminum is incredibly strong yet lightweight, and it won’t rust, warp, or rot, which is a huge plus in our coastal climate. It’s the ultimate “set it and forget it” material. You can get a sleek, clean look that complements contemporary home designs, and it comes in a variety of powder-coated finishes that last for decades without needing a touch-up. For homeowners who want a durable structure that looks sharp and requires virtually no upkeep, aluminum is one of the best long-term investments for custom-built pavilions and pergolas.

Vinyl: Weather-Resistant and Versatile

Vinyl offers a wonderful middle ground, giving you a traditional look without the maintenance of wood. It’s a highly durable and weather-resistant material that stands up to sun, salt, and moisture without fading, cracking, or peeling. You’ll never have to worry about termites or rot, and cleaning is as simple as a quick rinse with a hose. Vinyl pergolas come in a range of colors—with crisp white being a classic favorite—and can be designed to mimic the look of painted wood. This versatility makes it easy to match your home’s trim and other exterior features, creating a cohesive and polished look for your outdoor space.

Composite: The Ultimate in Performance

For those who want the rich look of wood without any of the maintenance, composite materials are the perfect solution. Made from a blend of wood fibers and recycled plastics, composite decking and structural pieces offer the best of both worlds. This material is engineered to resist staining, scratching, and fading, and it’s completely immune to rot, decay, and insect damage. It’s an incredibly tough material that delivers high-end performance and longevity. While it can be a larger initial investment, a composite pergola pays for itself over time with its durability and minimal upkeep, making it a smart choice for creating truly premium outdoor living spaces.

How to Customize Your Pergola’s Design

A custom pergola isn’t just a structure; it’s a reflection of your personal style and how you want to live outdoors. This is where the fun begins, as you get to make decisions that transform a standard design into something that feels like it was always meant to be part of your home. From the overall architecture to the smallest finishing touches, every choice helps create an outdoor space that is uniquely yours. By focusing on a few key areas of customization, you can design a pergola that perfectly suits your home’s aesthetic and your family’s needs.

Match Your Home’s Architectural Style

The most successful attached pergolas look like they were built right along with the house. The goal is to create a seamless transition from your indoor to your outdoor space. Take cues from your home’s existing design—whether it’s a classic Colonial, a modern farmhouse, or a coastal cottage. You can match the column style to your front porch posts or align the pergola’s trim with your home’s eaves. This ensures your new addition complements your home’s character instead of competing with it. A well-designed structure helps define your outdoor area, creating a distinct “room” for dining, lounging, or entertaining.

Select Your Ideal Roof: Solid, Louvered, or Retractable

Your pergola’s roof does more than just provide cover; it dictates how you can use the space. A solid roof offers complete protection from sun and rain, essentially creating a year-round outdoor room. For more flexibility, a louvered roof is a fantastic option. Its adjustable slats can be angled to let in the perfect amount of sunlight or closed completely during a surprise shower. If you love the idea of an open-air feel, a retractable canopy gives you the best of both worlds—sun when you want it and shade when you need it. Your choice depends on how much you want to control the elements.

Personalize the Color, Finish, and Size

The details are what make your pergola truly custom. When selecting a color, look to your home’s exterior trim, window frames, and siding for inspiration to create a cohesive look. The finish—from smooth powder-coated aluminum to rustic stained wood—also plays a huge role in the final feel. Size is another critical element. Think about how you’ll use the space. Will it be an intimate seating area for two or a large dining space for family gatherings? Planning for furniture and comfortable traffic flow will help you determine the ideal dimensions for your custom pavilions and pergolas.

Incorporate Privacy Screens and Custom Features

Beyond the basic structure, you can add features that enhance both comfort and functionality. Privacy screens, whether they are fixed panels, lattices, or retractable shades, can create a more intimate and secluded atmosphere while shielding you from neighbors or a setting sun. You can also integrate elements like ceiling fans for a cooling breeze on hot days, built-in heaters for chilly evenings, and integrated lighting to set the perfect mood after dark. These thoughtful additions are what will make your pergola the go-to spot for relaxing and entertaining.

Upgrading Your Pergola with Must-Have Features

A custom pergola is a fantastic starting point, but the real magic happens when you personalize it with features that fit your lifestyle. Think of the structure as the foundation and these upgrades as the finishing touches that transform it into a true outdoor room. Modern pavilions and pergolas are designed to be fully customized, allowing you to create a space that’s as comfortable and functional as any room inside your house. From extending your evenings with beautiful lighting to staying comfortable no matter the season, the right additions make all the difference, turning a simple structure into the heart of your outdoor living area.

These features aren’t just about aesthetics; they’re about maximizing the time you can spend enjoying your backyard. By incorporating elements like climate control, smart technology, and weather protection, you can host dinner parties on cool autumn nights, read a book without worrying about bugs, or simply relax in the shade on a hot summer day. It’s about creating a flexible space that adapts to your needs, whether you’re seeking solitude or entertaining a crowd. We’ll walk through some of the most popular and impactful upgrades that can turn your pergola into your favorite spot at home, ensuring you get the most out of your investment.

Set the Mood with Integrated Lighting

The right lighting can completely change the atmosphere of your pergola, turning it from a daytime shade structure into a captivating evening retreat. Integrated lighting, which is built directly into the beams and posts, offers a clean, seamless look that you can’t get from stringing up lights after the fact. You can layer different types of lighting to create the perfect ambiance for any occasion. Consider soft, recessed LEDs for general illumination, task lighting over a grilling or dining area, and subtle uplighting on the columns to add a touch of drama. With a well-designed lighting plan, your pergola will be a warm and inviting space long after the sun goes down.

Stay Comfortable with Heaters and Fans

One of the best ways to get more use out of your pergola is by adding climate control features. An integrated ceiling fan is a must-have for making those warm, humid Long Island summer days more enjoyable, creating a gentle breeze that keeps the space comfortable. When the weather turns cooler, you don’t have to head back inside. Built-in heaters, such as discreet infrared models, can provide gentle warmth that takes the chill out of the air. This allows you to extend your outdoor season, enjoying crisp spring mornings and cozy fall evenings in your favorite spot. These additions ensure your investment is one you can enjoy for most of the year.

Add Convenience with Smart Controls

Imagine adjusting your pergola’s roof, screens, and lighting with a simple tap on your phone. That’s the convenience of smart controls. Modern pergolas can be equipped with technology that lets you manage every feature effortlessly. If the sun gets too intense, you can close the louvered roof without leaving your chair. If a surprise shower rolls in, you can deploy the retractable screens in seconds. This level of control makes your outdoor space incredibly responsive to your needs and the changing weather. Integrating these smart features is a key part of any modern home remodeling project, blending your indoor and outdoor living spaces seamlessly.

Get All-Weather Use with Curtains and Screens

To make your pergola a truly versatile outdoor room, consider adding curtains or retractable screens. Motorized screens are a game-changer, allowing you to keep pesky insects out while still enjoying the breeze and the view. They can also offer a degree of shade and protection from light wind and rain. For a softer touch and added privacy, outdoor curtains are a beautiful option. They can be drawn to create a more intimate, enclosed setting or tied back to open up the space. Both of these features help you manage sun exposure and create a comfortable, protected environment, making your pergola usable in a wider range of weather conditions.

What to Expect During the Installation Process

Once you’ve designed the perfect attached pergola, you’re probably eager to see it come to life. The installation process is where your vision becomes a reality, and knowing what to expect can make the entire experience smooth and stress-free. A successful installation is all about careful planning and expert execution, ensuring your new outdoor structure is not only beautiful but also safe and built to last.

The journey from design to completion involves several key stages. It starts with a thorough assessment of your home and property to ensure a seamless integration. Next comes the necessary paperwork, like securing building permits, which protects your investment and ensures everything is up to code. Then, the site is prepared by creating a solid foundation for the structure. Finally, the pergola is expertly constructed and attached to your home. While it might sound like a lot, working with an experienced team means you can relax while the professionals handle every detail. At Gappsi, we manage the entire process for our clients, turning a complex project into an exciting home transformation. Our pavilions and pergolas are built with precision and care from start to finish, so you can simply look forward to enjoying your new space.

Assessing Your Space and Structure

Before any work begins, a professional will conduct a detailed site assessment. This isn’t just about measuring the patio; it’s about understanding how the pergola will connect with your home’s existing structure. We’ll examine the attachment wall to confirm it can support the load and determine the best way to work around features like windows, doors, and existing gutters. A common question homeowners ask is, “Can I attach a pergola if I have gutters?” The answer is yes, but it requires a professional approach to ensure proper drainage and a secure fit. This initial evaluation is critical for planning a safe and structurally sound installation that looks like a natural extension of your home.

Understanding Permits and Building Codes

Navigating local regulations is a crucial step in any construction project. Before installation, it’s essential to check with your local Long Island municipality about building permits, zoning rules, and other building codes. This process ensures your new pergola meets all safety and structural requirements, preventing potential issues or fines down the road. While it can seem like a hassle, it’s a non-negotiable part of a professional build. A seasoned contractor will handle the entire permitting process for you, from submitting the plans to scheduling inspections. This way, you can have peace of mind knowing your project is fully compliant from day one.

Preparing the Foundation and Attachment Points

A pergola is only as strong as its foundation. Proper preparation involves two key areas: the ground supports and the house attachment. For the posts that stand on your patio, we create solid concrete footings below the frost line to prevent shifting and ensure stability for years to come. For the side attached to your house, a ledger board is securely bolted to your home’s framing. Attaching a pergola needs careful planning, and this step is best left to professionals. It guarantees the structure is installed safely and correctly, ready to withstand the elements and provide a secure framework for your new outdoor living space.

Professional vs. DIY Installation: What to Consider

While a DIY project can be tempting, installing an attached pergola is a complex job with little room for error. A professional installation is about more than just convenience; it’s about safety and quality. While installing a pergola yourself may seem cost-effective, this often comes with risks like improper installation, which can lead to serious structural issues or damage to your home. Professionals have the right tools, experience, and understanding of structural engineering to ensure your pergola is secure and built to code. Investing in a professional installation gives you a flawless finish, a valid warranty, and the confidence that your beautiful new space is safe for your family to enjoy.

How to Budget for Your Custom Pergola

Planning your budget is one of the most important steps in bringing your dream pergola to life. While it’s easy to get swept up in design ideas, having a clear financial picture from the start ensures a smooth process without any surprises. The final cost of a custom pergola can vary quite a bit, as it depends entirely on your vision, your home’s specific needs, and the materials you choose.

Think of your budget as a roadmap. It helps you and your contractor make key decisions about size, features, and finishes. A well-planned budget allows you to prioritize what matters most to you, whether that’s a high-end wood finish, a state-of-the-art louvered roof, or integrated lighting for evening get-togethers. By understanding the key cost factors, you can create a realistic budget that aligns with your goals and sets you up for a successful project that you’ll love for years to come.

Key Factors That Influence Cost

The single biggest factor influencing your pergola’s cost is the material you choose. Different materials come with different price points, maintenance needs, and aesthetics. For example, custom wood pergolas offer a classic, natural look but are often the most expensive option, ranging from $35 to $60 per square foot. Other popular choices like low-maintenance aluminum or vinyl offer a more modern feel and can fit into different budget tiers. The pavilions and pergolas you select will set the foundation for your project’s overall expense, so it’s a great place to start your planning.

How Size, Complexity, and Features Affect Price

It makes sense that a larger, more complex pergola will cost more than a simple, smaller one. Size directly impacts material and labor costs—the bigger the footprint, the more of each you’ll need. Labor for a standard installation can range from $500 to $3,000, making up a significant portion of the total budget. Adding custom features like intricate post designs, built-in privacy screens, or the need for complex masonry work for the foundation will also increase the price. When you’re budgeting, think about how you plan to use the space to decide which features are must-haves.

Understanding Your Return on Investment

It’s helpful to view your new pergola not just as a cost, but as an investment in your home and lifestyle. An attached pergola literally extends your home’s living space, giving you a comfortable, sheltered area to relax and entertain. This addition can significantly increase your property’s curb appeal and overall value. Potential buyers often see a well-built outdoor structure as a major plus. More importantly, it’s an investment in your own enjoyment, creating a beautiful outdoor retreat you can use for years. It’s a valuable part of any home remodeling project.

Exploring Financing Options

While a DIY pergola project might seem like a way to save money, it comes with serious risks. Improper installation can lead to structural problems, safety hazards, and costly mistakes that you’ll have to pay to fix later. Hiring a professional ensures your pergola is built correctly, meets all local building codes, and is securely attached to your home. This protects your investment and gives you peace of mind. Many contractors can discuss payment schedules or point you toward financing resources to help make your project more manageable, allowing you to get the quality build you want without compromising on safety.

How to Choose the Right Pergola Contractor

Choosing the right design and materials for your pergola is exciting, but finding the right contractor to build it is just as important. This is the team that will turn your vision into a beautiful, functional part of your home. A great contractor ensures the process is smooth and the final result is structurally sound and built to last. Taking the time to vet your options carefully will save you from potential headaches and costly mistakes down the road.

Verify Licenses, Insurance, and Experience

Before you even start talking about design, make sure any contractor you consider has their credentials in order. This is your first line of defense. A valid license proves they meet state and local requirements, while proper insurance protects you from liability in case of accidents on your property. While a DIY approach might seem like a way to save money, it often leads to “improper installation, structural issues, and costly mistakes.” A professional team has the experience to get it right the first time. Look for a company with a strong portfolio of completed pavilions and pergolas, especially projects similar to what you have in mind.

Assess Their Design Skills and Local Knowledge

A great pergola contractor is more than just a builder; they’re a design partner. They should be able to look at your home’s architecture and your backyard layout to help you create a pergola that looks like it was always meant to be there. Beyond aesthetics, they need deep knowledge of Long Island’s local building codes and permit processes. This expertise is critical for handling the technical details. For example, a common challenge “involves existing gutters,” and an experienced contractor will know exactly how to work around them without compromising your home’s integrity. This combination of design sense and local know-how is what separates a good project from a great one.

Essential Questions to Ask Before You Hire

Once you’ve narrowed down your list to a few qualified candidates, it’s time to ask some specific questions to find the perfect fit. This is your chance to understand their process and confirm their expertise. To avoid “common pergola installation mistakes like poor site prep, weak foundations, [and] wrong materials,” you need to know they have a solid plan.

Come to the conversation prepared with questions like:

  • Can you show me a portfolio of attached pergolas you’ve built in my area?
  • How will you prepare the site and foundation to ensure stability?
  • What is your process for obtaining the necessary permits?
  • What is the estimated timeline for my project, from start to finish?
  • Who will be my main point of contact throughout the construction?

Keeping Your Attached Pergola in Top Shape

Your attached pergola is more than just a structure; it’s the backdrop for family barbecues, quiet morning coffees, and relaxing evenings. To keep it looking its best and functioning perfectly for years to come, a little routine care goes a long way. Proper maintenance not only preserves its beauty but also protects your investment and ensures it remains a safe, sturdy extension of your home. When you invest in a beautiful outdoor feature that enhances your daily life, you want it to last. Consistent upkeep is the best way to guarantee that your pergola continues to add value and enjoyment to your property.

The good news is that maintaining your pergola doesn’t have to be a huge chore. The level of upkeep depends largely on the material you choose and the features you’ve included. Whether you have a classic wooden design or a modern aluminum one, a simple maintenance schedule can prevent minor issues from turning into costly repairs. By staying on top of a few key tasks, you can ensure your outdoor oasis remains a favorite spot for relaxation and entertainment season after season. Gappsi offers expert restoration and sealing services that can help keep your entire patio area, including your pergola’s foundation, in pristine condition.

Simple Care Tips Based on Material

The material of your pergola is the biggest factor in its maintenance routine. For classic wood pergolas made from materials like cedar, which is naturally resistant to rot and insects, you’ll still want to inspect them annually. Look for any signs of wear or damage. Applying a fresh coat of stain or sealant every few years will protect the wood from moisture and sun damage, keeping its natural color vibrant and preventing warping or cracking over time.

On the other hand, materials like aluminum, vinyl, and fiberglass are celebrated for being low-maintenance. These modern options are resistant to rust, rot, and pests, so you won’t have to worry about seasonal staining or sealing. For these, a simple cleaning with mild soap and water once or twice a year is usually all that’s needed to wash away dirt, pollen, and other buildup, keeping your structure looking brand new.

Your Seasonal Maintenance Checklist

A great way to stay on top of pergola care is to create a simple seasonal checklist. In the spring, give your pergola a thorough cleaning to wash away winter grime. This is also the perfect time to inspect the structure for any loose bolts or screws, ensuring everything is secure after any harsh weather. Check the attachment points where the pergola meets your house, as well as the foundation, to make sure everything is stable.

In the fall, focus on clearing away leaves and debris from the roof and any integrated gutters. Proper drainage is crucial, especially for an attached structure, to prevent water from pooling against your home’s siding or foundation. A quick check-up before and after the harshest seasons will help you catch any potential issues early.

Long-Term Strategies for Preservation

Thinking long-term starts with the initial design and installation. Choosing durable, high-quality materials like powder-coated aluminum for your pavilions and pergolas can significantly reduce future maintenance. These materials are built to withstand the elements without requiring the regular sealing or staining that wood does, giving you more time to simply enjoy your space.

Ensuring your pergola is installed correctly on a solid foundation is another key strategy for its longevity. A professional installation avoids common mistakes that can lead to instability and premature wear. Regular inspections, even quick visual ones, will help you ensure your pergola remains a strong, beautiful, and lasting feature of your home for many years to come.

Related Articles

Frequently Asked Questions

How long does the entire process take, from design to installation? The timeline can vary quite a bit depending on the complexity of your design and the permitting process in your town. Generally, you can expect the design and material selection phase to take a couple of weeks. After that, securing permits can take anywhere from a few weeks to a couple of months. Once everything is approved, the actual on-site construction is surprisingly quick, often taking just one to two weeks for a professional team to complete.

Do I really need a permit for an attached pergola on Long Island? Yes, almost certainly. Because an attached pergola connects directly to your home’s structure, it’s considered a permanent addition and requires a building permit in most Long Island municipalities. This isn’t just red tape; it’s a process that ensures the structure is built safely and to code, protecting both your home and your family. A reputable contractor will handle the entire permitting process for you, so you won’t have to worry about the paperwork.

Can an attached pergola be built on an existing patio or deck? This is a great question and the answer depends on the condition of your existing surface. If you have a concrete patio that is in good shape, we can often anchor the pergola posts directly to it. For a wood or composite deck, we’ll need to assess its structural integrity to ensure it can support the added weight. In many cases, we will add extra reinforcement or new footings beneath the deck to provide a solid foundation for the pergola.

What’s the most popular pergola material for Long Island’s climate? For homeowners here on Long Island, low-maintenance materials like aluminum and vinyl are incredibly popular, and for good reason. Our coastal climate with its salty air and four distinct seasons can be tough on exterior structures. Aluminum and vinyl won’t rust, rot, or warp, and they require little more than an occasional cleaning. While classic wood is always beautiful, these modern materials offer fantastic durability and let you spend more time enjoying your pergola rather than maintaining it.

How much maintenance should I realistically expect? The amount of upkeep really comes down to the material you choose. If you opt for a wood pergola, you should plan on inspecting it annually and re-staining or sealing it every two to three years to protect it from the elements. If you go with aluminum, vinyl, or composite, your maintenance is minimal. A simple wash with soap and water once a year is typically all that’s needed to keep it looking fresh and clean.

Share this page:
A basketball on a concrete court, a key element in determining the cost per square foot.

What’s the Concrete Slab Cost Per Sq Ft for a Court?

Planning a backyard court on Long Island? You already know our weather and local codes in Nassau and Suffolk counties are unique. This means national cost averages just don’t cut it when you’re trying to create a realistic budget. We’ll break down the real cost of a concrete slab for a backyard sports court per sq ft right here. This guide focuses specifically on local factors, from labor rates to material sourcing, so you can plan for a durable, long-lasting court that stands up to our seasons without any surprise expenses.

Key Takeaways

  • Prioritize a Professional Foundation: The most critical part of your budget should go toward expert site preparation and high-quality concrete. A solid, level base with proper drainage is the best way to prevent costly cracks and ensure your court lasts for decades.
  • Plan for the Complete Project, Not Just the Concrete: Remember to factor in costs beyond the slab itself. Your total budget should include essential elements like basketball hoops, lighting for evening games, local permits, and professional line painting.
  • Balance Court Size with Material Quality to Manage Costs: The easiest way to adjust the project’s price is by choosing the right court size, like a half-court. This allows you to save on square footage without compromising on the high-quality materials needed for a durable foundation.

What’s the Per-Square-Foot Cost for a Backyard Concrete Court?

Figuring out the budget for your dream basketball court is the first step to making it a reality. While the final price tag depends on a lot of moving parts, understanding the cost per square foot gives you a solid foundation for planning. It helps you compare quotes and decide what features are most important for your space and your family. Let’s break down the numbers so you can get a clearer picture of the investment.

Understanding the Average Costs

So, what’s the bottom line? Generally, you can expect the cost to build an outdoor basketball court to fall somewhere between $4 and $16 per square foot. That’s a pretty wide range, I know. The concrete slab itself, which is the foundation of your court, typically runs from about $8 to $18 per square foot, depending on the quality and thickness you choose. To give you a bigger picture, a full-size court can end up costing anywhere from $20,000 to $75,000. Of course, most backyard courts aren’t regulation size, but this gives you an idea of how the costs scale up when planning your home sports court.

How Your Location Affects the Final Price

While those numbers give you a starting point, where you live plays a huge role in the final cost. Building a court here on Long Island will have different costs compared to other parts of the country. Why? It all comes down to local market conditions. The price of materials, the cost of labor, and even local building regulations can vary significantly from one town to the next. A contractor in Suffolk County might have different overhead than one in Nassau. That’s why getting a quote based on your specific location is so important for an accurate budget. It ensures all the local variables are factored in from the start.

The Financial Payoff: Does a Basketball Court Add Home Value?

It’s a question every homeowner asks before a big project: will this actually pay off? When it comes to a backyard basketball court, the answer is a resounding yes, and in more ways than one. Beyond the countless hours of family fun, a well-designed court can significantly increase your property’s market value. In fact, some studies show that adding a feature like a basketball court can raise a home’s value by anywhere from 5% to 30%. In a competitive market like Long Island, having a unique, ready-to-use amenity can make your home stand out to potential buyers, especially those with active families. It’s not just an expense; it’s a strategic addition that adds tangible value and appeal.

The return on your investment isn’t just about resale value. Think of it as an investment in your family’s health and happiness. A home court provides a safe, convenient place for kids to play and for everyone to stay active. It becomes the go-to spot for neighborhood games and family get-togethers. Plus, when you build with durable materials like high-quality concrete, you’re creating a feature that will last for decades with very little maintenance. A professionally installed sports court is built to withstand Long Island’s seasons, ensuring it remains a valuable asset for 20 to 30 years. It’s a long-term investment in your home and your lifestyle.

What Factors Influence Your Court’s Final Cost?

When you start budgeting for a backyard basketball court, you’ll quickly find that the final price isn’t a one-size-fits-all number. Several key factors can significantly influence your total investment. Understanding these variables from the get-go will help you plan a realistic budget and make informed decisions about where to allocate your funds. From the size of the court to the condition of your backyard, each element plays a role in shaping the final cost. Let’s walk through the main components that will impact your project’s price tag.

A Detailed Cost Breakdown

To really understand the final price, it helps to see how the project breaks down into individual stages. Each step has its own costs, from preparing the ground to painting the final free-throw line. Knowing what goes into each phase will help you see where your budget is being allocated and why certain steps are so crucial for a court that will last for years of gameplay.

Site Preparation

Before you can even think about pouring concrete, the ground needs to be perfectly prepared. This involves clearing the area of any trees or debris, leveling the land to create a flat surface, and installing proper drainage to handle Long Island’s rain and snow. This is a critical first step, as a poorly prepared site can lead to cracks and an uneven court down the road. Depending on your yard’s current condition, you can expect site preparation to cost between $5,000 and $15,000. This foundational work is something a full-service landscape construction team can handle to ensure it’s done right.

Base Installation

The concrete slab is the foundation of your court, and its quality will determine the court’s longevity. For a durable playing surface, you’ll want a high-quality concrete slab that is at least four inches thick. The cost for this typically runs between $8 and $18 per square foot, which includes materials and labor. This is where a significant portion of your budget will go, and it’s not an area to cut corners. A professionally installed masonry base ensures your court can withstand years of play and changing seasons without shifting or cracking.

Surface Material and Finish

While a plain concrete slab is functional, adding a specialized surface material can dramatically improve playability and safety. Options like acrylic coatings provide better grip, a more consistent ball bounce, and can even reduce stress on your joints. These finishes also allow you to add color and personality to your court. While this adds to the overall cost, investing in a high-quality surface is a great way to protect the underlying concrete and create a professional-grade playing experience right in your backyard. Many modern sports game courts include these finishes for enhanced performance and durability.

Painting and Line Striping

The final touch is painting the lines that officially turn your slab into a basketball court. This includes the boundary lines, the key, and the three-point arc. Professional line striping ensures the measurements are accurate and the lines are crisp and durable. The cost for this can range from a few hundred to over a thousand dollars, depending on the complexity of the design you choose. It’s a relatively small part of the total budget, but it’s the detail that brings the whole project to life and makes it ready for the first game.

How Size and Design Impact the Price

It makes sense that the bigger the court, the higher the cost. The total square footage directly impacts the amount of materials and labor needed. You can generally expect the construction to run between $4 to $16 per square foot, so a full-court design will be a much larger investment than a half-court or just a free-throw lane. Beyond simple dimensions, a custom layout with unique angles or multiple zones can also increase the price. Our team can help you design a custom game court that fits your space and your budget perfectly.

Don’t Underestimate Site Prep Costs

Before any concrete can be poured, the ground needs to be ready. This is one of the most critical—and often underestimated—costs. Site preparation can involve clearing trees, removing old structures, leveling sloped land, and ensuring the area has proper drainage. Depending on the current state of your yard, this work can add anywhere from $1,000 to $5,000 to your project. While it might seem like a hefty upfront cost, proper site prep is essential for a stable, long-lasting court. Our landscaping and excavation experts handle this foundational work to prevent cracks and shifting down the road.

Demolition of Existing Structures

Before you can build your new court, you might need to clear out what’s already there. This could mean removing an old shed, a cracked concrete patio, or even some overgrown landscaping. The cost for demolition can vary quite a bit because it really depends on the size and complexity of what needs to go. A simple fence removal will be much less expensive than breaking up and hauling away a large, reinforced concrete slab. It’s an important step to budget for, as it creates the clean slate needed for a perfect court foundation.

Retaining Walls for Sloped Yards

Many properties on Long Island aren’t perfectly flat, and a sloped yard can present a challenge for a basketball court. To create a stable, level playing surface, you may need a retaining wall. This structure holds back soil and prevents erosion, ensuring your court’s foundation remains solid for years. Depending on the height and materials required, a retaining wall can add between $5,000 and $20,000 to your project. This is where professional masonry expertise is crucial to ensure the wall is both structurally sound and visually appealing.

Engineering and Surveying Fees

Getting the technical details right from the start can save you major headaches down the road. This is why budgeting for engineering and surveying fees, which typically range from $3,000 to $8,000, is a smart move. An engineer will ensure your court has proper drainage and a solid structural design, while a surveyor will map out the property to comply with local building codes in Nassau or Suffolk County. Think of it as an investment in your court’s longevity, preventing issues like water pooling or foundation cracks before they ever happen.

Choosing the Right Concrete and Thickness

The foundation of your court is the concrete slab, and its quality is not something you want to compromise on. The cost for a concrete slab typically ranges from $8 to $18 per square foot. This price varies based on the thickness of the slab and the quality of the concrete mix used. A thicker, reinforced slab will cost more initially but will provide superior durability against Long Island’s changing seasons and prevent premature cracking. Think of it as an investment in the longevity of your court. High-quality masonry work is key to a court that will last for years of play.

Special Considerations for Long Island’s Climate

When you’re planning any outdoor project here on Long Island, our weather is always a major factor. We experience the full range of seasons, which includes cold winters with frequent freezing and thawing cycles. This constant fluctuation can be tough on standard concrete. As moisture seeps into the slab, it freezes, expands, and puts immense pressure on the material from within. Over time, this process can lead to surface spalling and deep cracks, compromising the integrity and playability of your court. That’s why selecting materials specifically designed to withstand our local climate isn’t just a recommendation—it’s essential for protecting your investment and ensuring your court lasts for years of enjoyment.

Why Air-Entrained Concrete is a Must

To combat the effects of our freeze-thaw cycles, using air-entrained concrete is the best practice. This isn’t just regular concrete; it’s a specialized mix that contains billions of microscopic air bubbles. These tiny pockets act as relief valves, giving water the space it needs to expand when it freezes without putting stress on the concrete itself. As one guide on court surfaces notes, you should “Use ‘air-entrained concrete’ for outdoor courts in cold places to resist freezing.” Investing in this higher-quality material from the start is one of the smartest decisions you can make. It dramatically enhances the durability of your court, ensuring your backyard sports court remains a source of fun, not frustration.

Factoring in Labor and Installation Fees

Building a basketball court correctly requires skill and precision, and labor costs reflect that expertise. Professional installation is a significant part of the budget, often accounting for 40% to 60% of the total project cost. This covers everything from the initial excavation and grading to building the formwork, pouring the concrete, and applying the finishing touches. While it might be tempting to cut corners here, hiring an experienced team ensures every step is handled correctly. This professional oversight guarantees your court is not only level and smooth but also built to withstand years of use.

Full Court vs. Half Court: A Cost Comparison

One of the biggest decisions you’ll make is choosing the size of your court. This choice directly impacts the final price tag, the amount of space you’ll need, and how you’ll use the court for years to come. Whether you envision full-court games with friends or a dedicated space for your kids to practice their free throws, understanding the cost differences is the first step in planning your project. Let’s look at what you can expect for both a full-court and a half-court setup.

How Much Does a Full Court Typically Cost?

If you have the space and the budget for a regulation-size court, you’re looking at a serious upgrade to your property. A full-size outdoor basketball court, which measures 94 by 50 feet, is a major project. The cost can range anywhere from $20,000 to over $75,000. This wide range comes down to a few key variables, including the current condition of your yard and the specific materials you choose. A sloped or uneven site will require more extensive prep work, adding to the cost. This option is perfect for dedicated athletes or families who plan to host neighborhood games and want an authentic playing experience right in their backyard.

What’s the Price Tag for a Half Court?

For most homeowners, a half court is the more practical and popular choice. It offers plenty of room for practice, one-on-one games, and family fun without taking over your entire yard. A typical half-court installation is much more budget-friendly, with costs generally falling between $3,600 and $14,400. The final price depends on the exact dimensions and features you select. This option is a fantastic way to add a dedicated sports game court to your home, giving you a versatile space for recreation that fits comfortably within your property lines and budget.

How to Decide: Balancing Space and Budget

Ultimately, the decision between a full and half court comes down to balancing your budget with your available space. It’s a common misconception that building a backyard basketball court is always a massive expense. The reality is that the project is highly scalable. The simple rule is that the larger the court, the more it will cost in materials and labor. Think about how you and your family will realistically use the space. If you’re focused on shooting drills and casual play, a half court provides everything you need. If you’re training for a league or have a large, active family, the investment in a full court might be worthwhile.

Planning for Those “Extra” Project Costs

When you’re budgeting for a concrete basketball court, it’s easy to focus solely on the cost of the slab itself. But the concrete is just the foundation. To create a functional, long-lasting, and enjoyable court, you’ll need to account for several other key components. These additional expenses are what transform a simple patch of concrete into a true home court ready for action. From the hoops and lighting to the essential prep work happening below the surface, planning for these costs upfront will save you from surprises down the road and ensure your project is a slam dunk from start to finish.

Budgeting for Hoops and Equipment

Your court isn’t complete without a place to score. You’ll need at least one basketball hoop, or two if you’re building a full court. The price for hoops can vary widely based on quality, brand, and features like adjustability and backboard material. A high-quality, in-ground hoop will cost more than a portable one but offers superior stability and durability for serious play. When planning your turf and game courts, be sure to factor in the cost of professional installation to ensure the hoop is secure and set at the regulation height.

Adjustable Basketball Hoops

An adjustable hoop is a fantastic investment, especially for families. While a basic, high-quality hoop might start around a few hundred dollars, premium models with features like easy height adjustment can run into the thousands. The real value comes from its versatility—you can lower it for younger kids just starting out and raise it as they grow, ensuring the court remains a fun challenge for everyone. For a permanent installation, an in-ground hoop provides the best stability and durability, which is crucial for safe and serious play. When we design a custom sports court, we always discuss hoop options to find the perfect fit for your family’s needs.

Rebounders and Multi-Sport Nets

To get the most out of your new court, think beyond just basketball. Adding a rebounder system is a great way to help players practice their shooting solo, while multi-sport nets can transform the space for other activities. With the right setup, your court can easily double as a spot for volleyball, pickleball, or even tennis practice. These additions expand the court’s utility for the whole family. We can also install professional containment netting to keep stray balls from ending up in your neighbor’s yard or the flower beds, making playtime safer and more convenient for everyone.

The Cost of Lighting for Night Games

Want the game to continue after the sun goes down? You’ll need to invest in court lighting. This is a feature that dramatically extends the usability of your court, making it perfect for evening practices or friendly games on warm nights. The cost for a lighting system can range from a couple of thousand dollars to much more, depending on the number of lights, their brightness, and the complexity of the electrical work. Proper landscape design and installation are key to ensuring your court is evenly lit without creating glare for players or neighbors.

Why You Need to Plan for Drainage

What’s underneath your court is just as important as the surface itself. Proper site preparation and drainage are critical for preventing cracks, heaving, and puddles that can ruin your court over time. This step involves clearing and leveling the land and installing a drainage system to manage water runoff. Depending on your property’s slope and soil conditions, this can be a significant expense. Investing in expert masonry and construction for this foundational work protects your entire investment and ensures your court lasts for decades.

Working Permits and Inspections into Your Budget

Before any digging begins, you’ll likely need to secure permits from your local municipality. Building a permanent structure like a concrete court often requires official approval to ensure it meets local zoning laws and safety codes. The cost for permits and subsequent inspections can range from a hundred to a thousand dollars. While it might seem like a hassle, this step is non-negotiable. Working with an experienced contractor can streamline this process, as they will know exactly what paperwork is needed and how to manage the inspections efficiently.

The Finishing Touches: Paint and Coatings

The final touches are what make your court look and feel official. Once the concrete has cured, you’ll need to paint the lines for the free-throw lane, three-point arc, and boundaries. Hiring a professional for this ensures the lines are crisp, accurate, and durable, typically costing a few hundred dollars. You might also consider adding a colorful acrylic surface coating. This not only enhances the court’s appearance but also improves traction, adds a bit of cushion, and can help protect the concrete from the elements, extending its lifespan.

Fencing and Netting Options

Once your court is ready for action, the last thing you want is to spend half your time chasing stray basketballs into your garden or the neighbor’s yard. That’s where fencing and netting come in. This addition is crucial for keeping the game contained and protecting your surrounding landscape. Your options range from classic chain-link, which is durable and cost-effective, to more modern vinyl or composite materials that can match your home’s aesthetic. Another popular choice is a soft-fence or barrier netting system, specifically designed for sports courts to absorb impact and keep the ball in play without being too visually intrusive. Choosing the right fencing not only adds a layer of safety and convenience but also gives your court a more professional, finished look.

Getting the Foundation Right: Site Prep and Concrete

A great basketball court is only as good as the foundation it’s built on. Before you can even think about shooting hoops, you need to focus on what’s underneath. This is the most critical phase of the project, and getting it right ensures your court will last for years of gameplay. Proper site preparation and a professionally poured concrete slab are non-negotiable for a high-quality, durable court that plays true. Let’s walk through the key steps involved in creating that perfect base.

Step 1: Proper Excavation and Grading

First things first: you need a perfectly flat and stable surface. This almost always involves excavating the area for your court, which means removing topsoil, rocks, and roots to create a clean slate. After excavating, the ground is graded to ensure it’s completely level and compacted. This step is crucial because an uneven base can lead to a lumpy court, poor drainage, and eventually, cracks in your concrete. While it can be one of the more significant costs in the project, proper landscape and site preparation is the only way to guarantee a professional-grade result. A solid, level base is the starting point for a court that stands up to Long Island’s weather and years of play.

Step 2: Building a Solid Sub-Base

Once the ground is graded, the next step is to lay a sub-base, which is typically a layer of crushed stone. This provides a stable platform for the concrete and helps with drainage, preventing water from pooling underneath and causing damage over time. The industry standard for the concrete slab itself is a 4-inch thickness. This depth provides the necessary strength and support to handle everything from intense games to the freeze-thaw cycles we experience each year. This solid foundation is essential whether you plan to paint the concrete or install a high-performance game court surface on top. A well-built base prevents shifting and cracking, protecting your investment for the long haul.

The Importance of a Compacted Gravel Layer

That layer of compacted gravel beneath your concrete isn’t just filler—it’s the key to your court’s longevity. It creates an incredibly stable platform that supports the heavy concrete slab, preventing it from shifting or cracking under the stress of intense games. Just as importantly, it manages drainage. This layer allows water to run off effectively instead of pooling underneath, which is what causes major damage during our freeze-thaw cycles here on Long Island. This solid base is what allows the 4-inch concrete slab to do its job, providing a level and durable playing surface for years. Investing in proper masonry and foundation work is what truly protects your court for the long run.

Step 3: Deciding on Concrete Thickness

While 4 inches is a great starting point, the ideal concrete thickness can vary based on a few key factors. Your specific soil conditions and local building codes in Nassau or Suffolk County might require adjustments for long-term stability. For example, some projects benefit from thickened edges, where the perimeter of the slab is poured deeper to provide extra structural support and prevent the edges from crumbling over time. An experienced contractor can assess your property and determine the exact specifications needed for your court. This is where professional masonry and construction expertise becomes invaluable, ensuring your court is built to code and engineered to last.

Step 4: Adding Reinforcement for Durability

Concrete is incredibly strong under compression, but it needs help resisting the tension that can cause cracks. That’s where reinforcement comes in. A grid of steel bars (rebar) or wire mesh is laid out before the concrete is poured. This steel “skeleton” holds the concrete together and distributes weight from impacts and ground movement, dramatically increasing its strength and lifespan. While it might be tempting to cut costs by handling the concrete pour yourself, the quality of the pour directly impacts how the ball bounces and how the court feels underfoot. A professional installation guarantees a smooth, consistent surface that’s ready for serious play from day one.

Step 5: Applying the Right Finish for Grip

Once the concrete is fully cured, it’s time to bring your court to life with the finishing touches. This is where a simple slab transforms into a professional-looking playing surface. The first step is painting the essential lines: the free-throw lane, the three-point arc, and the court boundaries. While you can do this yourself, hiring a professional ensures the lines are crisp, accurate, and applied with durable paint that won’t fade after one season. Beyond the lines, you might consider an acrylic surface coating. This adds a layer of color and texture that not only looks fantastic but also improves traction for safer play, provides a bit of cushion underfoot, and helps protect the concrete from the elements, extending the life of your custom sports court.

Step 6: Incorporating Control Joints to Prevent Cracks

This step might sound technical, but it’s one of the most important for the long-term health of your court. Concrete naturally expands and contracts with the temperature swings we get here on Long Island. Without a way to manage this movement, random, unsightly cracks can form across your beautiful new court. That’s where control joints come in. These are planned grooves strategically cut into the concrete slab shortly after it’s poured. They create weakened lines that encourage the concrete to crack in a straight, predictable way within the joint, keeping the main playing surface smooth and intact. It’s a crucial detail that expert masonry contractors never skip, as it’s the best defense against the natural forces that can damage concrete over time.

Beyond Concrete: Exploring Surface and Foundation Alternatives

While a classic painted concrete slab is a fantastic and durable option, it’s not the only choice for your backyard court. Technology and design have come a long way, offering a variety of surfaces and even foundation methods that can provide different benefits. Maybe you’re looking for a surface that’s easier on the joints, offers superior drainage, or can be installed more quickly. Exploring these alternatives allows you to tailor your court to your family’s specific needs, aesthetic preferences, and property conditions. From high-performance tiles to eco-friendly foundations, there are innovative solutions that can take your home game court to the next level.

Modular Sport Tiles

If you want a high-performance surface with a professional look, modular sport tiles are an excellent option. These interlocking tiles are typically made from a durable polypropylene that snaps together over a concrete slab or other solid base. They create a suspended surface that offers better shock absorption than plain concrete, which is great for reducing stress on knees and ankles during play. Modular tiles also provide superior grip, come in a huge range of customizable colors for logos and designs, and allow water to drain through them, so your court dries quickly after it rains. They are a low-maintenance and incredibly durable choice for a multi-sport court that will look great for years.

Alternative Foundation Options

The foundation is the most critical part of your court, but a standard concrete slab isn’t the only way to build a solid base. Depending on your goals for drainage, environmental impact, or even your budget, there are several other foundation methods worth considering. These alternatives can work beautifully with modular tile surfaces to create a complete court system.

Pervious Concrete

Pervious concrete is an innovative mix that allows water to drain directly through its surface into the ground below. This completely eliminates puddles and reduces stormwater runoff from your property, making it an environmentally friendly choice. Your court will be ready for play much faster after a rainstorm.

Compacted Base with Natural Materials

For a more cost-effective and permeable option, you can use a compacted base of natural materials like crushed stone or gravel. When properly graded and compacted, this type of base provides a stable foundation for modular tiles while allowing for excellent natural drainage.

Panel-Based Systems

Panel-based systems offer one of the fastest installation methods available. These large, prefabricated panels lock together to create a strong and uniform base for your court surface. This can be a great choice if you’re looking for a flexible system that minimizes disruption to your yard during construction.

Common Budgeting Mistakes to Avoid

Creating a budget for your dream basketball court is exciting, but it’s easy for hidden costs to sneak up on you. A detailed plan is your best defense against surprise expenses that can throw your project off track. Thinking through the entire process, from the ground up, helps ensure your initial estimate is as accurate as possible. This isn’t just about crunching numbers; it’s about creating a realistic roadmap that turns your vision into a reality without unnecessary stress. A well-thought-out budget accounts for every phase, from preparing the land to the final coat of paint on the three-point line.

Let’s walk through some of the most common budgeting oversights so you can plan with confidence and avoid any costly curveballs. By anticipating these potential expenses, you can allocate your funds effectively and make informed decisions along the way. This proactive approach keeps you in control of the project, ensuring the final result is exactly what you envisioned. A clear budget empowers you to work with your contractor as a partner, making the construction process a smooth and enjoyable experience from start to finish.

Ignoring the True Cost of Site Prep

Before a single drop of concrete is poured, your yard needs to be ready. This is where site preparation comes in, and it’s often a much bigger line item than homeowners expect. Site prep involves clearing the designated area of any trees, rocks, or debris, followed by professional grading to create a perfectly level surface. This foundational work is critical for the stability and longevity of your court. Depending on the current state of your property, the cost for clearing and leveling the ground can be significant. A professional landscape and masonry team can assess your site to give you a precise quote for this essential first step.

Forgetting to Budget for Permits

Dealing with local regulations is a crucial part of any major home improvement project. Building a basketball court often requires permits from your town or municipality to ensure it meets safety and zoning codes. These fees can vary quite a bit across Long Island, so it’s important to research your local requirements early on. Forgetting to budget for permits can not only add an unexpected expense but also cause delays if you have to halt construction to get the proper paperwork in order. Working with an experienced local contractor is a huge advantage here, as they will understand the specific permitting process in your area and can handle the submissions for you.

Skipping a Proper Drainage Plan

Proper drainage is one of the most important, yet overlooked, aspects of court construction. Without a system to manage water runoff, your court can suffer from standing water, premature cracking, and shifting from freeze-thaw cycles. This is especially important in our Long Island climate. Planning for drainage might involve installing French drains, grading the surrounding landscape, or using a permeable base material. While it adds to the upfront cost, investing in a solid drainage solution protects your court from much more expensive water damage repairs down the road. It’s a smart investment in making sure your court is playable and pristine for years to come.

Choosing Low-Quality Concrete to Save a Buck

When you’re looking at quotes, it can be tempting to choose the one with the lowest material cost. However, the quality of the concrete makes a massive difference in how your court performs and how long it lasts. A higher-grade concrete mix with the right thickness and reinforcement will resist cracking and stand up to years of intense games and harsh weather. The cost per square foot for a court can vary significantly, and a big part of that variation comes down to the quality of the concrete used. Investing in a superior mix from the start means you’ll spend less time and money on repairs and resurfacing later on.

How to Save Money on Your Backyard Court

Building your dream basketball court is an exciting investment, but it doesn’t have to break the bank. With some smart planning and strategic decisions, you can manage the costs effectively without sacrificing the quality of your court. It’s all about knowing where you can be flexible and where it pays to invest in expertise. From scheduling your build during the off-season to making savvy material choices, a few key considerations can make a big difference in your final bill. Let’s walk through some practical ways you can save money on your project and still end up with a court your family will love for years to come.

Time Your Project to Save on Costs

Believe it or not, when you build can affect what you pay. The construction industry has peak seasons and slower periods, just like any other business. Scheduling your court installation during a contractor’s off-season, like late fall or early spring, can sometimes lead to better pricing on labor and materials. Demand is lower during these times, giving you more flexibility and potential savings. It’s always a good idea to discuss timing with your contractor to see if there’s a strategic window for your project that aligns with your budget.

Choose Your Materials Wisely

Your choice of materials and court size are two of the biggest factors in your budget. While you never want to compromise on the quality of the concrete base, you can be strategic. For instance, opting for a half-court instead of a full court can cut costs significantly while still providing plenty of space for practice and games. You can also discuss different finishes and coatings with your builder. Our team can walk you through the options for sports game courts to find a solution that fits your vision and your wallet.

Can You DIY Some of the Prep Work?

If you’re comfortable getting your hands dirty, you might be able to save on labor costs by handling some of the initial site prep yourself. This could include clearing the designated area of any landscaping, small shrubs, or debris before the professional crew arrives. However, it’s crucial to leave the technical work to the experts. Pouring a concrete slab for a sports court requires precision that differs from a standard patio or driveway. For a durable, level surface that ensures proper play, you’ll want to rely on professional masonry services for the excavation, grading, and concrete pour.

Understanding DIY Material Costs

If you’re considering handling some of the prep work, it’s smart to get a handle on the material costs you’ll be facing. The most significant expense by far is the concrete for the slab, which typically runs from $8 to $18 per square foot. The price varies based on the thickness and quality of the mix you choose. Investing in a thicker, reinforced slab is crucial for durability, especially with Long Island’s weather, as it helps prevent cracking. Beyond the concrete, you’ll also need to factor in site preparation costs, which can add another $1,000 to $5,000 for things like land clearing and leveling. Knowing these numbers helps you appreciate what goes into a professional quote and see the value in expert masonry and construction for the critical steps.

What Are the Long-Term Maintenance Costs?

A concrete basketball court is a fantastic, durable addition to your home, but it’s not a “set it and forget it” feature. It needs some attention to stay in top shape. Planning for long-term maintenance ensures your court remains a safe, playable, and beautiful space for years. The good news is that the upkeep is typically more straightforward than maintaining a swimming pool. By staying on top of a few key tasks, you can protect your investment and keep the games going. Most of the work falls into three categories: routine cleaning, occasional repairs, and cosmetic touch-ups.

Expected Lifespan of Your Court

When you’re investing in a backyard basketball court, you want to know it’s going to last. The great news is that a professionally built concrete court is a long-term addition to your home, with an expected lifespan of 20 to 30 years. This impressive durability all comes down to the quality of the materials and the expertise of the installation. A solid foundation is everything, especially with the freeze-thaw cycles we get here on Long Island. While the initial cost for a high-quality concrete slab can range from $8 to $18 per square foot, choosing a thicker, reinforced option is a smart move. It’s an investment in decades of family fun and ensures your home sports court will stand up to the elements without cracking or shifting, making it a valuable and lasting feature of your property.

Your Guide to Regular Cleaning

Keeping your court clean is the easiest way to extend its life. Debris like leaves and dirt can hold moisture against the concrete, leading to stains and mildew. A simple sweep with a push broom every week or two is often enough. For a deeper clean, a power washer can remove built-up grime. A well-maintained court isn’t just about looks; it’s also about safety, as a clear surface prevents slips. If you want to keep your court looking pristine without the extra work, professional restoration and sealing services can handle the deep cleaning for you.

Handling Cracks and Resurfacing Down the Road

Even well-installed concrete can develop small cracks over time, especially with Long Island’s freeze-thaw cycles. Address them early. Sealing small cracks prevents water from seeping underneath the slab, which causes bigger problems. For significant damage, repairs can cost a few hundred to a few thousand dollars. Every five to ten years, consider resurfacing the court. This process applies a new top layer, covering imperfections and restoring a uniform playing surface. It’s a predictable expense that keeps your court in prime condition, and a project our masonry experts can manage perfectly.

Renovation vs. Remodeling Costs

Eventually, you might want to do more than just routine maintenance, and it helps to understand the difference between renovating and remodeling your court. A renovation is all about restoring what you have. Think of it as a major refresh: professionally resurfacing the slab, repainting faded lines, or having experts restore and seal the concrete. These projects bring your court back to its original condition. A remodel, however, changes the court’s function or structure. This is a bigger project, like expanding a half-court to a full court, adding a versatile multi-sport game court surface over the concrete, or integrating it into a completely new landscape design. Remodeling transforms the space and is a more significant investment than a renovation.

When to Repaint and Retreat the Surface

The crisp, white lines on your court will naturally fade from sun and gameplay. Luckily, this is a simple and inexpensive fix. Having the court lines repainted is a quick way to refresh the entire space. This is also a great time to reapply a protective sealant. A quality sealant acts as a barrier against moisture and stains, making the surface easier to clean and preserving the concrete’s integrity. Scheduling this service every few years will go a long way in protecting the slab and keeping your court looking its best.

The Role of a Concrete Sealer

Think of a concrete sealer as a protective topcoat for your court. It’s a clear liquid that’s applied after the concrete has fully cured and the lines have been painted. This sealant creates an invisible barrier that shields the surface from moisture, UV rays, and stains from things like spilled drinks or wet leaves. Here on Long Island, this is especially important because it helps protect the concrete from the damage caused by our freeze-thaw cycles. A sealed court is also much easier to clean, as dirt and grime can be washed away instead of soaking into the porous surface. We always recommend this final step to protect your investment and keep your court looking new. Our professional restoration and sealing services ensure a high-quality application for maximum durability.

Understanding the Project Timeline

Once you’ve decided to build a backyard court, it’s natural to want to start playing as soon as possible. While the construction process itself is relatively quick, building a high-quality court isn’t a weekend project. The total timeline can be influenced by a few variables, including the weather, the permit approval process in your town, and the complexity of your site preparation. However, the most important waiting period, and the one that requires the most patience, happens after the concrete is poured. This phase is all about letting the foundation cure properly, and it’s the secret to a court that will last for decades.

Patience is Key: Concrete Curing Time

This is the hardest part for any excited homeowner: waiting for the concrete to cure. It’s important to understand that curing isn’t the same as drying. It’s a chemical process where the concrete hardens and gains its full strength. While you might be able to walk on the slab after a few days, it needs about 28 days to cure completely before it can handle the stress of basketball games or the application of paint and sealants. Rushing this step is a recipe for a weak court that will crack and chip prematurely. This waiting period is non-negotiable for creating a durable foundation that can withstand years of play and the changing Long Island seasons. Proper curing is a hallmark of professional masonry work and is essential for the longevity of your investment.

How to Get an Accurate Contractor Quote

Once you have a clear vision for your basketball court, the next step is to get a handle on the numbers. The best way to do this is by gathering detailed quotes from a few different local contractors. This isn’t just about finding the lowest price; it’s about understanding what you’re paying for and finding a partner you can trust. A reliable quote should be more than just a final number on a piece of paper. It needs to be a comprehensive, written document that breaks down every aspect of the project.

Look for an estimate that clearly lists the costs for materials, labor, site preparation, and any additional features like lighting or fencing. It should also specify the type and quality of the materials being used, especially the concrete mix. A professional contractor will also provide a clear contract and details about their warranty in writing. This transparency protects you and ensures there are no surprises down the line. At Gappsi, we provide detailed proposals for all our sports court projects so you know exactly where your investment is going.

Key Questions to Ask Your Contractor

Walking into a consultation prepared with the right questions can make all the difference. It shows you’ve done your homework and helps you accurately gauge a contractor’s experience and professionalism. Before you sign any contracts, make sure you have clear answers to these questions:

  • Can I see a portfolio of your previous basketball court projects?
  • Are you licensed and insured to work in Long Island?
  • What is the estimated timeline for the project from start to finish?
  • What kind of warranty do you offer on materials and workmanship?
  • Who will be the main point of contact on-site?
  • What permits are required for this project, and will you be responsible for securing them?

Red Flags to Spot in an Estimate

Just as a detailed quote is a good sign, a vague one can be a major red flag. Be cautious of any estimate that feels too good to be true or lacks specific details. An unusually low bid often means a contractor is cutting corners, likely on the quality of the concrete or the thoroughness of the site prep. If the surface isn’t prepared correctly, your court won’t play right and will be prone to cracking and shifting.

Another red flag is an estimate that isn’t in writing or one that doesn’t clearly itemize costs. A professional company will have no problem putting everything on paper. The quality of the concrete and base materials is critical, so if a contractor can’t explain the specifics, consider it a warning. Your court’s foundation is everything, and our expertise in masonry and concrete work ensures it’s built to last.

Related Articles

Frequently Asked Questions

Why is the cost range per square foot so wide? The broad price range, typically from $4 to $16 per square foot, comes down to a few key variables that are unique to every project. The biggest factors are the current condition of your yard, which determines the amount of site preparation needed, and the quality and thickness of the concrete you select. Labor costs here on Long Island also play a significant role, so the final price is a reflection of your specific property and material choices.

What’s the single biggest cost I might overlook? Hands down, it’s the site preparation. It’s easy to focus on the court itself, but the work required to clear, level, and properly drain the land beforehand is a major part of the budget. This foundational step is absolutely critical for preventing cracks and ensuring your court lasts for decades, so while it can be a significant expense, it’s the most important investment in the entire project.

How long does the whole process take from start to finish? The timeline can vary based on the project’s complexity, the permit process in your town, and of course, the weather. Generally, you can expect the construction of a backyard court to take anywhere from one to four weeks. This includes the initial excavation and grading, pouring the concrete, allowing it to cure properly, and then adding the final touches like painting lines and installing the hoop.

Can I save money by doing some of the work myself? You can definitely trim some labor costs by handling simple prep work, like clearing away small shrubs or debris from the designated area. However, we always advise leaving the heavy lifting to the professionals. The excavation, grading, and concrete pour require precision and expertise to ensure a perfectly level and durable playing surface. Getting this part right is essential for the court’s performance and longevity.

How often will I need to perform major maintenance on the court? A concrete court is quite durable, so you won’t be dealing with constant upkeep. Beyond regular sweeping, major maintenance is infrequent. You’ll want to seal any small cracks as they appear to prevent water damage. As for bigger tasks, you can plan on having the court professionally resurfaced and the lines repainted every five to ten years to keep it in prime playing condition.

Share this page:
A new paver driveway installation and what it costs.

How Much Does Paver Driveway Installation Cost?

When you start planning a new paver driveway, it’s easy to focus on the price of the stones themselves. But those beautiful pavers are only one piece of the puzzle. The true cost of paver driveway installation includes all the essential, unseen work that makes a driveway last for decades—like proper excavation, a solid base, and expert labor. This guide breaks down every single component for you. We’ll cover everything from foundational materials to potential “hidden” costs like permits and drainage, ensuring you have a complete picture of the investment from start to finish.

Key Takeaways

  • Look Beyond the Paver Price Tag: Remember that your total project cost includes more than just the pavers themselves. Your budget should also account for the driveway’s size, the complexity of your chosen design, and essential site preparation work.
  • Prioritize Long-Term Value Over Initial Savings: While pavers may cost more upfront than asphalt or concrete, their durability, simple maintenance, and superior curb appeal often make them the more valuable and economical choice in the long run.
  • Expert Installation is Non-Negotiable: The quality of the installation is what determines the lifespan of your driveway. Investing in a professional team ensures a solid foundation and proper execution, preventing costly issues like sinking or shifting down the road.

What’s the Real Cost of a Paver Driveway?

Let’s talk numbers. When you’re dreaming up a beautiful new paver driveway, one of the first questions that comes to mind is, “What’s this going to cost me?” It’s a great question, and the answer has a few moving parts. Generally, you can expect a professionally installed paver driveway to cost between $10 and $30 per square foot. This price usually covers everything from the pavers themselves to the labor and base preparation required for a flawless, long-lasting installation.

For a typical two-car driveway, this often translates to a total project cost anywhere from $6,000 to $18,000, with many homeowners in Long Island landing somewhere around the $12,000 mark. So, why the wide range? The final price tag depends heavily on your specific choices. The type of paver you select is one of the biggest variables. Your options range from classic concrete pavers to elegant natural stone or modern porcelain pavers, each with its own price point and aesthetic.

Of course, the size of your driveway and the complexity of the design you envision are also major factors. A simple, straight driveway will naturally cost less than one with intricate patterns, custom borders, or a unique layout that requires more cutting and precision work. Think of it as creating a custom piece of functional art for your home; the details are what define both the look and the budget. Our expert masonry team can walk you through all the options to find a solution that fits your style and financial plan perfectly.

What’s the Real Cost of a Paver Driveway?

Paver Materials

The pavers you choose are the star of the show, and their cost can vary significantly. Think of it like picking countertops for your kitchen—there’s a beautiful option for every budget. Concrete pavers are a popular and cost-effective choice, offering a huge variety of colors, shapes, and textures. If you’re aiming for a more luxurious or organic look, you might lean toward natural stone, like granite or bluestone, which carries a higher price tag but offers one-of-a-kind beauty. A fantastic modern option is porcelain pavers, known for their incredible durability and sleek appearance. The cost of your driveway is not a single number; it’s a range based on the many choices you make, and the material you select is one of the most important decisions in defining your project’s final budget.

Labor and Installation

This is one area where you truly get what you pay for. While it might be tempting to cut corners on labor costs, the quality of the installation is what determines the lifespan of your driveway. A professional crew does more than just lay stones; they ensure the ground is properly excavated and graded, the base is perfectly compacted, and every paver is set for maximum stability and longevity. An intricate herringbone pattern or a driveway with sweeping curves will require more time and skill than a simple layout, which will be reflected in the labor cost. Investing in an experienced masonry team ensures your beautiful new driveway won’t sink, shift, or heave, saving you from major headaches and costly repairs in the future.

Site Preparation and Base Materials

Much of the hard work and cost of a paver driveway is hidden beneath the surface. Proper site preparation is the unsung hero of a durable driveway. This process involves excavating the area to the correct depth, hauling away the old material, and building a solid foundation. This base is typically made of several inches of compacted crushed stone or gravel, followed by a layer of sand. The price goes up for larger driveways because they simply need more of these essential materials. This robust foundation is critical for proper drainage and for preventing the pavers from moving over time, especially with the freeze-thaw cycles we experience here on Long Island. You can see the Gappsi team’s meticulous attention to this foundational work in our project videos.

What Factors Influence Your Paver Driveway Cost?

When you start budgeting for a new paver driveway, you’ll quickly find that there isn’t a single, one-size-fits-all price. The final cost depends on a handful of key factors, from the materials you fall in love with to the unique layout of your property. Understanding these variables will help you set a realistic budget and make informed decisions you’ll be happy with for years to come. Let’s break down the main components that will shape your project’s total investment.

How Driveway Size Impacts Your Budget

It probably comes as no surprise that the bigger your driveway, the more it will cost. Pricing is almost always calculated per square foot, which covers both materials and labor. For a paver driveway, you can generally expect costs to fall between $10 and $30 per square foot. The total square footage is the single biggest factor in your final quote, so getting an accurate measurement of your space is the best first step. A larger surface area requires more pavers, more base material, and more time for our masonry construction team to complete the installation, all of which contribute to the bottom line.

Understanding Economy of Scale on Large Projects

While a bigger project logically means a bigger final bill, there’s a great benefit to going large with your driveway: your price per square foot can actually go down. This is a classic example of economy of scale. When we take on a substantial project, we can purchase materials like pavers in bulk, which often secures a better price from our suppliers. Our installation crew also becomes more efficient. Once they’re set up on-site, they can work continuously without the stop-and-start that smaller jobs can require. This streamlined process means that for very large driveways, the cost per square foot often becomes a bit lower, making your investment even more effective.

The Impact of Your Paver and Material Choice

The type of paver you choose has a major impact on your budget. There’s a wide world of materials out there, each with its own price point and aesthetic. Concrete pavers are often the most budget-friendly option, while classic brick pavers typically cost a bit more. If you’re dreaming of a more luxurious look, porcelain and natural stone pavers like travertine or bluestone are at the higher end of the price spectrum. Your choice here is all about balancing the look you want with the budget you have. We can walk you through the pros and cons of each material to find the perfect fit for your home.

Factoring in Design and Pattern Complexity

A simple, straightforward layout will always be more cost-effective than an intricate, complex design. Patterns like a classic running bond are relatively easy to install, while more detailed designs like herringbone or basketweave require more cuts and precision, increasing labor time and cost. If you’re considering a custom design with multiple colors, borders, or a circular inlay, expect that to be reflected in the price as well. While a complex pattern can create a stunning visual, it’s important to factor the added labor into your budget from the start.

Why Site Preparation Matters for Your Budget

Proper site preparation is the foundation of a driveway that lasts. This step is absolutely critical and can vary in cost depending on the current state of your property. The process involves excavating the area, removing any old driveway material, grading the land for proper drainage, and laying a solid base of aggregate. If your property has significant slopes or poor soil conditions, more extensive prep work may be needed, which can increase the cost. This isn’t a corner you want to cut—a solid base ensures your driveway won’t sink or shift over time.

The Role of Site Accessibility

Think about how your contractor will get their equipment and materials to the worksite. Is your driveway easily accessible from the street, or is it tucked behind your house with only a narrow path for entry? The ease of access plays a significant role in the overall cost. If our team and machinery can’t easily get to the installation area, it requires more manual labor and time to move materials, which can increase the project’s price. Obstacles like fences, established gardens, or steep slopes can complicate the process, adding to the labor hours needed to complete the job efficiently and safely.

How Ground Conditions Affect Price

The type of soil on your property is another crucial factor that can influence your budget. Long Island has a variety of soil conditions, and some are more challenging to work with than others. For instance, very wet or unstable soil requires more extensive excavation and additional base materials to create a foundation that won’t shift or settle over time. As one expert noted, difficult ground conditions can significantly increase costs because more work is needed for a strong base. Ensuring a stable foundation is essential for the longevity of your paver driveway, so addressing any soil issues upfront is a necessary investment.

Current Economic Factors

It’s also important to consider the current economic climate, as it can affect material and labor costs. Recently, the prices for many construction materials, including pavers, have seen increases due to supply chain dynamics and inflation. This means that a quote you might have received a year or two ago may not reflect today’s market prices. These external factors are beyond anyone’s control, but they do impact the final cost of home improvement projects. Getting a detailed, current quote from a trusted local company is the best way to understand the true investment for your new driveway in the present market.

Understanding Local Labor Costs

Labor is a significant portion of any paver driveway project, and rates can vary based on your location. Here on Long Island, the cost of professional installation reflects the skill and expertise required to do the job right. A professional crew not only handles the heavy lifting but also ensures every detail, from the base preparation to the final paver placement, is executed perfectly. The complexity of the job, the accessibility of the site, and the overall scope of the project will all influence the final labor costs. Investing in a quality installation from an experienced team is the best way to protect your investment.

Pavers vs. Concrete and Asphalt: Which Is a Better Value?

When you’re planning a new driveway, the choice often comes down to three main contenders: pavers, concrete, and asphalt. While it’s tempting to look at the initial price tag and call it a day, that’s only part of the story. Your driveway is the first impression your home makes, and it needs to withstand Long Island’s weather, from summer heat to winter freezes. Let’s look at how these materials compare not just in cost, but in curb appeal, durability, and long-term value.

The Cost Breakdown: Pavers vs. Concrete

At first glance, concrete seems like the more budget-friendly option. However, the upfront savings can be misleading. A paver driveway commands a higher initial investment, but it pays you back in aesthetics and longevity. Concrete is a single, solid slab, which means if it cracks—and it often does—you’re looking at a noticeable, expensive repair or a full replacement. Pavers, on the other hand, are individual units. If one gets stained or cracked, you can simply pop it out and replace it. This makes driveway maintenance incredibly simple and cost-effective over the years. Plus, with pavers, you get endless design possibilities to create a truly custom look that complements your home.

Considering Stamped Concrete as an Alternative

You might also hear about stamped concrete as a way to get a decorative look for less. This process involves pouring a concrete slab and then imprinting it with a pattern that mimics materials like brick, slate, or stone. While it can be a visually appealing option with a lower upfront cost than pavers, it’s important to understand the trade-offs. Underneath the pattern, it’s still a single, solid slab of concrete. This means it’s susceptible to the same cracking issues, especially with Long Island’s freeze-thaw cycles. When a paver cracks, you can replace one stone. When stamped concrete cracks, the entire pattern is broken, and repairs are almost impossible to hide, often leaving a visible scar that detracts from the overall look.

The Cost Breakdown: Pavers vs. Asphalt

Asphalt is typically the cheapest material to install, which makes it a popular choice for homeowners focused on the initial budget. But what you save upfront, you often spend on upkeep. Asphalt requires regular sealing every few years to protect it from cracking and weathering. It also absorbs heat, making it incredibly hot in the summer. Pavers offer a far more decorative and durable alternative. They don’t require sealing and can last for 50 years or more with minimal care. While the initial cost for pavers is higher than asphalt, their superior lifespan and lower maintenance needs often make them the more economical choice in the long run.

Looking Beyond the Upfront Cost

Choosing your driveway material is an investment in your home’s future. While pavers have a higher installation cost, they offer unmatched long-term value. Their durability means you won’t be facing a full replacement in 10 to 15 years, which is common with asphalt. The ease of repair keeps maintenance costs low, unlike a cracked concrete slab. Beyond the practical benefits, a beautifully designed paver driveway significantly improves your home’s curb appeal and property value. When you partner with an experienced masonry designer, you’re not just installing a driveway; you’re adding a lasting feature that enhances your home for decades.

Estimating Your Paver Driveway Cost by Size

One of the most straightforward ways to get a handle on your potential paver driveway budget is to look at the total square footage. As you might guess, the bigger the driveway, the more it will cost in both materials and labor. Think of these numbers as a starting point, since your final price will also depend on the specific porcelain or natural stone pavers you choose, the complexity of the design, and site prep needs. To give you a clearer picture, let’s walk through the typical cost ranges for small, medium, and large driveways on Long Island. This breakdown will help you align your vision with a realistic budget.

Cost for a Small Driveway (Under 1,000 sq. ft.)

If you have a smaller property or a one-car garage, your driveway likely falls into this category. For a driveway under 1,000 square feet, you can generally expect installation costs to land between $9,000 and $14,000. To put that in perspective, an 800-square-foot project would average around $11,000. This size is perfect for creating a beautiful, high-impact entrance without a massive footprint. Even in a compact space, a well-designed paver driveway adds significant curb appeal and functionality. It’s an excellent way to create a polished look for a townhouse or a home with a smaller front yard, providing a durable and stylish surface that makes a great first impression.

Cost for a Medium Driveway (1,001-2,000 sq. ft.)

This is the sweet spot for most suburban homes in Nassau and Suffolk counties. Medium driveways, which typically measure between 1,001 and 2,000 square feet, are the most common size we see. The cost for a project in this range usually falls between $15,000 and $25,000. This larger area gives you more room to play with design elements, like integrated walkways or flared entrances, and comfortably accommodates multiple vehicles. The driveway installation costs reflect the increased materials and labor needed for the larger surface area, but the investment pays off in both utility and appearance.

Cost for a Large Driveway (Over 2,000 sq. ft.)

For properties with long, winding entrances, circular driveways, or extra parking areas, you’re looking at a large-scale project. Driveways over 2,000 square feet can range from $25,000 to $50,000 or more, depending on the final size and complexity. For example, a sprawling 4,500-square-foot driveway could cost between $35,000 and $50,000. A project of this size is a major landscape feature, offering a grand entrance and incredible design potential. It’s where expert masonry and construction can truly transform the entire front of your property, creating a cohesive and impressive look from the street to your front door.

How Your Choice of Paver Impacts the Budget

The material you choose for your driveway is one of the biggest factors determining the final cost. Think of it like picking countertops for a kitchen—the stone you select sets the tone for both the look and the budget. Pavers come in a wide range of materials, from affordable and versatile concrete to luxurious natural stone. Each option has a distinct price point, aesthetic, and set of benefits.

Your decision will likely come down to balancing your personal style with your budget. A simple, clean look might lead you to concrete, while a grand, old-world entrance could call for natural stone. It’s helpful to understand the cost differences upfront so you can plan your project without any surprises. At Gappsi, we work with a full spectrum of high-quality materials, and our design team can help you find the perfect paver that fits your vision and your wallet.

Breaking Down Paver Material Costs

To give you a clearer idea of how materials affect your budget, let’s look at the typical price ranges for the pavers themselves. Keep in mind that these prices are just for the materials; they don’t include the base, labor, or other site preparation costs. Understanding these numbers will help you see where your budget is going and allow you to make a choice that feels right for both your home and your finances.

Concrete Pavers: $2 to $8 per square foot

Concrete pavers are a fantastic and popular choice for homeowners across Long Island, and for good reason. They are often the most budget-friendly option, allowing you to achieve a durable, high-quality look without a massive upfront investment. But don’t let the lower price fool you; modern concrete pavers are incredibly versatile. They come in a huge variety of shapes, sizes, colors, and textures, capable of mimicking the look of natural stone or classic brick. This versatility makes them a functional and stylish choice that can complement nearly any home design, from modern to traditional.

Clay Brick Pavers: $4 to $15 per square foot

If you’re aiming for a timeless, classic aesthetic, clay brick pavers are an excellent investment. They carry a sense of history and warmth that is hard to replicate, with rich, earthy colors that deepen over time. Brick is generally more expensive than concrete, but it offers exceptional durability and color retention that stands up to harsh weather and heavy use. The traditional look of a brick driveway can significantly enhance your home’s curb appeal, making it a worthwhile choice for those who appreciate classic design and are willing to invest a bit more for that enduring charm.

Natural Stone Pavers: $12 to $30 per square foot

For a truly luxurious and one-of-a-kind finish, nothing compares to natural stone. Options like travertine, bluestone, or granite are at the higher end of the price spectrum, but they deliver an unmatched level of elegance and beauty. Each stone is unique, with its own distinct veining and color variations, ensuring your driveway is a custom work of art. While the initial investment is higher, you can select natural stone pavers that are incredibly durable and can last a lifetime with proper care. They create a stunning first impression that can dramatically improve your home’s value and overall aesthetic.

The Affordability of Concrete Pavers

If you’re looking for a budget-friendly yet durable option, concrete pavers are an excellent choice. They are incredibly versatile and can be manufactured in countless shapes, sizes, and colors, even mimicking the look of more expensive brick or stone. This flexibility allows you to achieve a custom look without the premium price tag. While the material cost is lower, proper installation is still crucial for a long-lasting driveway. A well-laid concrete paver driveway offers a fantastic return on investment by delivering great curb appeal and performance for years.

The Classic Look and Cost of Brick Pavers

For a timeless, classic look, nothing beats brick. Brick pavers bring a sense of warmth and tradition to any home, making them a popular choice for colonial and traditional-style properties across Long Island. They tend to cost more than concrete pavers, but their rich color is baked in, so it won’t fade over time. This durability and lasting beauty are what many homeowners feel justifies the higher initial investment. If you love that classic, welcoming aesthetic, the enduring charm of a brick driveway is hard to match.

The Premium Price of Natural Stone Pavers

For a truly one-of-a-kind, high-end driveway, natural stone is the ultimate choice. Options like granite, travertine, or bluestone offer unique colors and textures that simply can’t be replicated. Because each stone is quarried from the earth, no two pavers are exactly alike, giving your driveway an organic and luxurious feel. This is the most premium paver option, but its unparalleled beauty and incredible durability make it a worthwhile investment for a show-stopping entrance. You can explore a wide variety of natural stone options to find the perfect fit for your home’s character.

The Modern Appeal of Porcelain Pavers

Porcelain pavers are a fantastic modern alternative that combines sleek design with serious strength. They are engineered to be incredibly dense and non-porous, which makes them resistant to stains, frost, and fading. This low-maintenance quality is a huge plus for busy homeowners. Porcelain can be designed to look like other materials, such as natural stone or even wood, but with greater consistency and durability. While they are a premium material, their longevity and minimal upkeep make them a smart, stylish investment for a contemporary Long Island home.

Considering Permeable Pavers

Beyond the traditional paver options, there’s a smart, eco-friendly solution that’s worth a serious look: permeable pavers. They offer the same beautiful aesthetic as conventional pavers but with a major environmental advantage. Instead of letting rainwater pool on your driveway or rush into storm drains, permeable systems are designed to let water filter right through. Special joints and a deeper, layered base allow rainwater to soak naturally back into the ground. This helps reduce local flooding and replenishes our groundwater here on Long Island—a sustainable approach to landscape design that’s both beautiful and responsible.

Composite Permeable Pavers: $10 to $30 per square foot

You might think an eco-friendly option comes with a much higher price tag, but permeable paver systems are very competitive. A complete installation typically ranges from $10 to $30 per square foot, which is in line with many high-end traditional pavers. The cost reflects the more involved installation process, which requires a deeper, specially layered base to ensure proper drainage. While the initial investment is similar to other premium choices, the long-term value is clear. You’re getting a durable, beautiful driveway that actively manages stormwater on your property, potentially reducing the need for other drainage systems and making a positive impact on the local environment.

Does a Complex Paver Pattern Cost More?

The short answer? Yes, the pattern you choose for your paver driveway absolutely affects the final price. Think of it like this: the more intricate the design, the more time, skill, and precision cuts are required from the installation team. This additional labor is what drives up the cost. While a simple, straightforward pattern can be installed relatively quickly, a complex one with lots of angles and curves demands more planning and meticulous work from your masonry contractor.

Choosing a pattern is one of the most exciting parts of designing your driveway. It’s your chance to add personality and curb appeal that reflects your home’s style. A simple pattern can look clean and timeless, while a more elaborate one can turn your driveway into a true statement piece. The key is to balance your aesthetic vision with your budget. Understanding how different patterns impact the bottom line will help you make a choice you’re happy with for years to come. Let’s break down some of the most popular options and see how they stack up in terms of cost.

The Cost of a Herringbone Pattern

The herringbone pattern is a timeless classic that creates a sense of movement and elegance. In this design, pavers are laid at 45 or 90-degree angles to create a V-shaped, interlocking weave. It’s a visually stunning choice that adds a touch of sophistication to any driveway. However, that beauty comes with a higher price tag. Achieving the herringbone look requires significantly more cuts than a simple pattern, and the precise angling demands more time and expertise during installation. This is a design where skilled labor is essential to get the lines just right, which contributes to the increased cost.

The Simplicity of a Running Bond

If you’re looking for a clean, traditional look that’s also budget-friendly, the running bond pattern is an excellent choice. This is the classic staggered pattern you often see in brickwork, where pavers are laid side-by-side with the joints offset from one row to the next. Its simplicity is its greatest strength when it comes to cost. A running bond is a straightforward pattern that minimizes the need for complicated cuts and can be installed efficiently. This ease of installation translates directly into lower labor costs, making it one of the most cost-effective paver patterns available.

Budgeting for a Basketweave Design

The basketweave pattern offers a bit more visual interest than a running bond without getting as complex as herringbone. It’s created by laying pairs of pavers in alternating vertical and horizontal directions, forming a charming, woven-looking square. This design adds a lovely texture and a hint of old-world character to your driveway. Because it involves more precise placement than a running bond, a basketweave pattern is a more intricate design that can increase costs slightly. It’s a great middle-ground option if you want something more decorative but are still mindful of your budget.

The Price of Custom and Circular Patterns

For a truly one-of-a-kind driveway, you might consider a custom or circular pattern. These designs can incorporate sweeping curves, medallions, fans, or unique inlays that transform your driveway into a work of art. As you can imagine, these are the most labor-intensive and therefore the most expensive options. Custom and circular designs require meticulous planning and an expert installation team to execute correctly. The number of intricate cuts and the level of detail involved mean higher labor costs, but the result is a stunning, completely personalized entrance to your home.

Don’t Forget These Potential Paver Costs

When you’re budgeting for a new paver driveway, it’s easy to focus on the price of the pavers themselves. But the total cost involves much more than just the materials you see on the surface. Several other factors can influence your final bill, and being aware of them from the start helps you create a realistic budget and avoid any last-minute surprises. Think of it like baking a cake—the flour and sugar are key, but you also need to account for the eggs, butter, and the pan you bake it in.

A trustworthy contractor will walk you through a detailed quote, but it’s always empowering to understand the process yourself. From preparing the ground to ensuring water flows away correctly, each step is critical for a driveway that not only looks fantastic but also lasts for decades. We’ll break down some of the most common “hidden” costs so you can feel confident when planning your project. These include preparing the site, the foundational materials that support your pavers, drainage solutions, and any necessary local permits.

Excavation and Base Preparation

Before a single paver can be laid, the ground needs to be perfectly prepared. This is the excavation and site preparation phase, and it’s one of the most crucial steps for a long-lasting driveway. The process often involves removing an existing driveway, whether it’s cracked concrete or old asphalt, and digging out soil to the required depth. The area is then graded to ensure a slight slope for water runoff. The cost can vary depending on the condition of your current driveway and the type of soil on your property. A solid, well-prepped foundation is non-negotiable, as it prevents the pavers from sinking or shifting over time. This foundational work is a core part of any quality masonry project.

The Price of Base Materials and Edging

The materials underneath your pavers are just as important as the pavers themselves. A strong base, typically made of compacted gravel and a layer of sand, creates a stable foundation that can handle the weight of vehicles and withstand seasonal changes. Skimping on base materials can lead to a wavy, uneven driveway down the road. In addition to the base, every paver driveway needs edging. Edging restraints, made from materials like plastic, concrete, or metal, are installed along the perimeter to lock the pavers in place and prevent them from spreading apart. The cost of these essential, yet unseen, materials will be part of your total project price.

Why Proper Drainage Is a Must-Have

On Long Island, we see our fair share of rain and snow, which makes proper drainage essential for the health of your driveway. Without a system to manage water, you risk pooling, which can seep into the base layers and cause damage. During the winter, this trapped water can freeze and expand, shifting your pavers out of place. To prevent this, your installation may require drainage solutions like French drains or channel drains, which collect water and direct it away from the driveway. Investing in a good drainage system protects your pavers and foundation, preventing costly repairs and extending the life of your investment.

Factoring in Permits and Local Fees

Depending on where you live in Nassau or Suffolk County, your town or village may require a permit for installing a new driveway. These permits ensure the project complies with local building codes, zoning regulations, and rules about water runoff. While your contractor typically handles the process of securing the permit, the associated fees are passed on to you as the homeowner. These costs can range from under a hundred to several hundred dollars. It’s a necessary step to ensure your project is done correctly and legally, so be sure to ask your contractor about permit requirements in your area early in the planning process.

Budgeting for Contractor Fees and Other Exclusions

When you receive a quote for your paver driveway, it’s important to understand exactly what’s included. While a comprehensive estimate should cover the essentials, some costs might be listed separately or excluded entirely. These aren’t necessarily “hidden” fees, but rather variables that can change from one project to the next. Knowing what to look for helps you compare quotes accurately and ensures your budget covers the full scope of the work. A transparent contractor will always be happy to clarify what their price includes, so don’t hesitate to ask questions before signing on the dotted line.

General Contractor Fees

If your driveway is part of a larger home renovation, you might work with a general contractor who oversees everything. This service comes with a fee, typically adding an extra 13% to 22% to the total project cost for their management and coordination. This fee covers the logistics of scheduling different crews, ordering materials, and making sure the entire project runs smoothly. When you partner with a full-service company like Gappsi, this project management is often built right into our process. Our integrated team of designers and installers handles every detail in-house, which simplifies the process and gives you a single point of contact from start to finish.

Commonly Excluded Costs

A basic installation quote typically covers materials, site prep, and labor. However, there are a few other potential costs you should be aware of. Things like removing and hauling away an old driveway, sales tax on materials, and local permit fees are often itemized separately or excluded from the initial estimate. According to cost estimating tools, these exclusions are standard in the industry. Be sure to ask if your quote includes the cost of demolition, disposal of old materials, and securing the necessary permits for your town in Nassau or Suffolk County. This ensures you have a complete and accurate picture of your total investment.

What to Expect for Labor and Installation Costs

The pavers you choose are a significant part of your budget, but the cost of labor is just as important. Professional installation is what transforms a pallet of stones into a durable, beautiful driveway that lasts for decades. The skill involved in proper excavation, base preparation, and paver laying is what prevents common issues like sinking, shifting, and drainage problems down the road. While it might be tempting to focus only on material costs, remember that you’re also investing in the expertise and efficiency of a skilled team. A professional crew has the right equipment and experience to get the job done correctly and often much faster than a DIY approach, ensuring your driveway not only looks great on day one but also stands the test of time.

How Location Affects Labor Rates

Just like the price of housing or gas, labor costs can vary quite a bit depending on where you live. The cost to pave a driveway is influenced by your location, and here on Long Island, rates will likely differ from those in a more rural part of the country. This is due to a combination of factors, including the local cost of living, regional demand for construction services, and specific insurance or licensing requirements for contractors. When you’re budgeting, it’s helpful to remember that you’re paying for skilled labor in your specific market, which ensures you’re getting professionals familiar with local soil conditions and building codes.

Understanding Regional Price Differences

The cost of labor is a major piece of your project’s budget, and it’s not the same everywhere. Here on Long Island, labor rates are influenced by the local cost of living and the high demand for quality construction services. This isn’t just about paying more; it’s about investing in a higher standard of expertise. Factors like specific insurance and licensing requirements for contractors in our area also contribute to the overall cost. When you hire skilled local professionals, you’re paying for a team that is deeply familiar with Long Island’s unique soil conditions, weather patterns, and local building codes, ensuring your driveway is built to last in our specific environment.

How Project Scope Affects Installation Time

The size and complexity of your driveway design directly influence how much time the installation will take, which in turn affects the final labor cost. A straightforward, rectangular driveway will require fewer hours of labor than a large, circular one with intricate patterns and custom borders. The overall project scope also includes site preparation. If your property needs extensive excavation, grading to fix a steep slope, or the installation of a complex drainage system, these tasks will add to the project timeline and the total cost. A clear plan from the start helps your contractor provide an accurate estimate based on the full scope of work.

DIY vs. Pro: Which Saves You More?

Tackling a paver driveway yourself can seem like a great way to save money, but it’s a labor-intensive project that requires precision. The complexity of the installation process is why a significant portion of the per-square-foot cost goes to labor. An improperly prepared base is the number one reason paver driveways fail, leading to costly repairs. Hiring an experienced masonry contractor ensures the job is done right the first time. To make sure you’re getting a fair price, it’s always a good idea to get a few detailed quotes from reputable companies so you can accurately compare prices and services.

Estimating DIY Material Costs

If you’re leaning toward the DIY route, it’s crucial to map out all your material costs, which go far beyond the pavers themselves. While the pavers are the main event—with concrete options ranging from $2 to $8 per square foot and premium natural stone climbing to $12 to $30 per square foot—the unseen foundation is just as critical. You’ll need to budget for a solid base of compacted gravel and sand to prevent future sinking or shifting. Then, factor in the rental costs for essential equipment like a plate compactor for the base and a wet saw for precise cuts. Don’t forget potential expenses for excavation, removing an old driveway, and installing proper drainage. These items can add up, so a detailed budget is your best tool for a successful project.

Common Budgeting Mistakes to Avoid

Creating a budget is a great first step, but a few common oversights can derail even the most carefully planned project. When you’re investing in something as significant as a new driveway, the last thing you want are surprise costs that push you over your limit. Thinking through the entire scope of the project—from the ground up—is the best way to keep your budget realistic and your installation process smooth.

Knowing what to look out for can make all the difference. From the unseen work that happens before the first paver is laid to the final paperwork, being aware of these potential budget busters helps you plan more accurately. Let’s walk through a few of the most common mistakes homeowners make so you can sidestep them completely.

Mistake #1: Underestimating Site Prep

It’s easy to focus on the beautiful pavers you’ve picked out, but the work done before they’re installed is what guarantees your driveway will last. One of the biggest budgeting mistakes is neglecting site preparation. A durable driveway requires proper excavation, grading for drainage, and a solid, compacted base of aggregate. Skimping on this foundational work can lead to shifting, sinking, or an uneven surface down the road, resulting in much more expensive repairs. When you get a quote, make sure it includes comprehensive site prep from a team that understands the ins and outs of professional masonry.

Mistake #2: Forgetting About Permits

Depending on where you live on Long Island, you may need a permit from your local town or village to install a new driveway. This is an easy detail to overlook, but permit fees can add an unexpected line item to your budget. The cost and requirements vary by municipality, so it’s important to factor this in from the very beginning. A reputable contractor will be familiar with local regulations and can often handle the entire permitting process for you, ensuring everything is done correctly and legally. It’s a small step that prevents big headaches later on.

Mistake #3: Choosing Pavers on Price Alone

While it’s always tempting to go with the lowest-cost option, choosing driveway materials based on price alone is a classic short-term gain for long-term pain. Cheaper pavers may be more prone to cracking, fading, or staining, which means you could be paying for repairs or a replacement sooner than you think. Investing in high-quality materials upfront is an investment in your home’s curb appeal and durability. Options like Gappsi’s premium porcelain and natural stone pavers not only look stunning but are built to withstand traffic and weather for decades, saving you money and hassle in the long run.

Getting the Best Value From Your Paver Driveway

A new driveway is more than just a place to park your car; it’s a major feature of your home’s curb appeal and a significant long-term investment. Thinking beyond the initial price tag can save you headaches and money down the road. By focusing on the right materials, understanding future upkeep, and working with a skilled team, you can ensure your driveway looks beautiful and performs well for years to come. It’s about making a choice that adds lasting value to your Long Island home.

Factoring in Future Maintenance Costs

Every paver material has its own personality, and that includes its maintenance routine. Before you fall in love with a specific look, it’s smart to consider the long-term care involved. Some materials may require regular sealing to protect against stains and weather, while others might need occasional joint sand replenishment to keep weeds at bay. Factoring these future tasks into your decision helps you get a clearer picture of the total cost of ownership. A little foresight ensures your driveway stays in top condition without becoming an unexpected chore or expense.

The Long-Term Payoff of Quality Materials

It can be tempting to choose materials based on price alone, but your driveway is one area where quality truly pays off. Investing in premium pavers, whether they are classic natural stone or durable porcelain, directly impacts both the look and lifespan of your installation. High-quality materials are engineered to withstand Long Island’s weather, from hot summers to freezing winters, resisting cracks, fading, and wear. They not only provide a more elegant and high-end appearance but also contribute to a stronger, more resilient surface that adds tangible value to your property.

How the Right Contractor Saves You Money

The most beautiful pavers in the world can fail if they aren’t installed correctly. The success of your driveway project hinges on the skill of your contractor. An experienced team understands the crucial steps, from excavating and compacting the base to ensuring proper drainage and expertly laying the paver pattern. A professional installation prevents common problems like sinking, shifting, and water pooling. Working with a knowledgeable contractor ensures the job is done efficiently and correctly the first time, giving you a durable, stunning driveway and complete peace of mind.

What to Look for in a Contractor’s Estimate

Your estimate should be a clear roadmap for your project, not just a price tag at the bottom of the page. A reputable contractor will provide a detailed breakdown that outlines every part of the job, from the cost of the pavers and base materials to the specific labor involved. The quote should also clearly spell out the plan for site preparation, including excavation and grading, since that’s the key to a long-lasting driveway. Finally, make sure it accounts for potential costs like drainage solutions, edging, and any necessary permits for your town in Nassau or Suffolk County. A transparent estimate that covers all these bases is a sign you’re working with a pro and helps you avoid any surprises down the road.

Related Articles

Frequently Asked Questions

What’s the bottom line on what a paver driveway will cost me? On Long Island, you can generally expect a professionally installed paver driveway to fall somewhere between $10 and $30 per square foot. For a standard two-car driveway, this often works out to a total between $6,000 and $18,000. The final number really comes down to your personal choices, like whether you opt for classic concrete pavers or a more luxurious natural stone, and how complex your design is.

Why should I spend more on pavers when asphalt seems so much cheaper? It’s true that asphalt has a lower initial price tag, but a paver driveway is a long-term investment in your home. Unlike a solid slab of asphalt or concrete that requires expensive repairs or full replacement when it cracks, pavers can be replaced one at a time. This makes maintenance simple and cost-effective over the decades. Plus, the curb appeal and property value that a beautiful, custom paver driveway adds is something asphalt just can’t match.

What is the single biggest factor that will influence my final price? While several things contribute to the cost, the two most significant factors are the total size of your driveway and the specific paver material you choose. The square footage determines the amount of material and labor needed, making it the primary driver of the total cost. Your choice of paver, from budget-friendly concrete to premium porcelain or natural stone, will also have a major impact on your final quote.

How long will my driveway be a construction zone? The installation timeline can vary, but a professional crew can typically complete an average-sized residential driveway in about three to five days. This includes the full process from excavating the old surface and preparing the base to laying the final paver. Larger or more complex projects with intricate patterns might take a bit longer, and of course, weather can always play a role.

Are paver driveways a lot of work to maintain? You’ll be happy to hear that paver driveways are surprisingly low-maintenance. For the most part, care involves simple sweeping or rinsing with a hose to keep them clean. You might need to pull an occasional weed from the joints or replenish the joint sand every few years, but that’s about it. They are designed to be a durable, long-lasting surface that doesn’t demand a lot of your time.

Share this page:
A beautiful in-ground pool and patio, weighing the installation cost of fiberglass vs. vinyl liner pools.

Spray-On Fiberglass Pool Liner Cost: A Full Breakdown

When you picture your backyard in 10 years, is your pool a source of fun or a constant expense? That’s the real question when choosing between fiberglass and vinyl. A low upfront price for a vinyl liner pool looks tempting, but it hides a mandatory—and expensive—replacement down the road. We’ll compare the total 15-year cost of both options, looking at everything from liner replacements to the potential spray-on fiberglass pool liner cost for a future resurfacing project. This way, you get the full story, not just the initial quote.

Key Takeaways

  • Initial Cost vs. Lifetime Value: A vinyl liner pool’s lower upfront price is offset by a mandatory liner replacement every 10-12 years. A fiberglass pool’s higher initial cost is a one-time payment for a permanent structure that doesn’t require major future replacements.
  • Calculate Your True Maintenance Commitment: The smooth, non-porous surface of a fiberglass pool means less money spent on chemicals and less time spent cleaning. This low-maintenance benefit is a major factor in the total cost of ownership compared to a vinyl liner pool.
  • Fiberglass Pays for Itself in Under a Decade: The money saved on a vinyl liner installation is typically spent on higher maintenance and liner replacement within 7 to 10 years. After that point, the fiberglass pool becomes the more economical choice for every season you own it.

Fiberglass vs. Vinyl Liner: What’s the Initial Price Tag?

When you’re planning your dream backyard, the first question is usually about the budget. The initial installation cost is a major factor, and it varies quite a bit between fiberglass and vinyl liner pools. Understanding these upfront expenses helps you make a choice that feels right for your family and your finances from day one. Let’s break down what you can expect to invest in each type of pool.

What’s the Price for a Fiberglass Pool Installation?

A fiberglass pool installation typically costs between $25,000 and $50,000. This price gets you the pre-molded shell and standard installation. Think of it as the foundation of your project. Fiberglass pools are manufactured off-site and delivered to your home in one piece, which makes the installation process much faster than other pool types. While the initial price tag might be higher than some vinyl liner quotes, you’re paying for a durable, low-maintenance surface that won’t need a major overhaul in a decade. Gappsi offers a wide selection of high-quality swimming pools to fit different backyard styles and budgets.

What’s the Price for a Vinyl Liner Pool Installation?

Vinyl liner pools are known for being a more affordable option upfront, with complete installation packages often ranging from $55,000 to $75,000. The final price depends heavily on the size, shape, and features you choose. The lower initial investment is appealing, but it’s important to remember the long-term picture. The vinyl liner itself will need to be replaced every 10 to 12 years, which is a significant future expense. So, while you might save money at the start, you’re essentially signing up for a recurring maintenance project down the road.

How Pool Size Affects Your Initial Cost

It’s no surprise that the bigger the pool, the higher the price tag. A larger pool requires more excavation, more materials for the shell or liner, and more labor to install. For example, replacing an average-sized vinyl liner pool with a new fiberglass one can cost around $60,000. This gives you a good idea of what a mid-range project looks like. A small fiberglass plunge pool will be on the lower end of the cost spectrum, while a large, custom-shaped vinyl pool with extensive masonry work and decking will be at the higher end.

Beyond the Pool: What Drives Up Installation Costs?

The initial quote for your pool is a great starting point, but it’s rarely the final number. Several factors can influence the total cost of your installation, and it’s smart to know what they are before you begin. Think of it like building a house—the foundation and frame are just the beginning. The real character (and cost) comes from the layout, finishes, and features you choose. From the size and shape of your pool to the specific challenges of your backyard, every decision plays a role in the final price tag. Let’s walk through the main variables so you can create a realistic budget for your dream pool.

How Custom Sizes and Shapes Impact the Price

It’s no surprise that the bigger the pool, the higher the cost. A larger pool requires more materials, more excavation, and more labor. But size isn’t the only design choice that affects your budget. The shape of your pool is also a key factor. While standard rectangular or oval shapes are often more cost-effective, a custom freeform design will add to the price. Vinyl liner pools offer incredible flexibility here, allowing for unique shapes and a wide variety of liner patterns to match your style. When you’re planning your swimming pool installation, consider how a custom shape fits into your overall vision and budget.

How Your Yard Can Add to the Bill

Before any work on the pool itself can begin, your yard needs to be ready. Site preparation is a critical step that can sometimes bring unexpected costs. If your yard has a significant slope, it will need to be leveled. We may also need to clear trees or reroute utility and sprinkler lines. Another major consideration is access. Can we easily get heavy machinery into your backyard? If access is tight, it might require more manual labor or specialized equipment, which can increase the installation cost. A thorough site assessment is the best way to identify these potential expenses early in the landscape design process.

The Price of Pool Features and Upgrades

This is where you can truly personalize your pool and turn it into a backyard resort. While a basic pool is fantastic, many homeowners choose to add features that enhance both its beauty and function. Popular upgrades include tanning ledges (also called Baja shelves), built-in benches, dramatic water features like waterfalls or deck jets, and ambient LED lighting for night swimming. You might also consider an automatic pool cover for safety and convenience or an integrated spa. Each of these additions will increase the initial price, but they also add long-term value and enjoyment to your outdoor living space.

How Local Labor and Permits Affect Your Budget

The cost of professional labor is a significant part of your pool installation budget. According to Angi, hiring a professional crew can range from $10,000 to $20,000, depending on the project’s complexity. This investment ensures your pool is installed correctly, safely, and to code. You’ll also need to account for local permit fees. These can vary depending on your town in Long Island, but they are a necessary step in the process. Working with an experienced company like Gappsi means we handle the entire permitting process for you, making sure all paperwork is filed correctly and your project proceeds without any administrative headaches.

Long-Term Costs: Which Pool Saves You Money?

The sticker price is just the beginning of your pool’s story. While it’s easy to focus on the initial installation cost, the real expenses show up over the years in maintenance, chemicals, and repairs. This is where fiberglass and vinyl liner pools really start to differ. Think of it like buying a car—one model might be cheaper upfront, but if it constantly needs repairs and gets poor gas mileage, is it really the better deal? The same logic applies to your backyard oasis. Understanding the long-term financial commitment for each pool type is key to making a choice you’ll be happy with for years to come. We’ll break down what you can expect to spend on upkeep for both fiberglass and vinyl liner swimming pools so you can see the full picture.

What Does Yearly Fiberglass Pool Maintenance Cost?

If you’re looking for a low-maintenance lifestyle, a fiberglass pool is your best friend. Their secret is the smooth, non-porous gelcoat surface. This finish makes it incredibly difficult for algae to take hold, which means you’ll spend less time scrubbing and more time swimming. It also means you’ll use significantly fewer chemicals to keep the water balanced—often requiring up to 30% less chlorine than other pools. Over the life of the pool, you won’t have to worry about costly acid washing or complete resurfacing projects. A little regular cleaning and water testing is usually all it takes to keep a fiberglass pool looking pristine, saving you both time and money season after season.

The Hidden Cost of Fiberglass: Resurfacing

While fiberglass pools are champions of low daily maintenance, they aren’t completely immune to the effects of time. Far down the road, typically after 15 to 25 years, you may need to consider resurfacing. Think of it less like a constant repair and more like a major renovation project that restores your pool to its original glory. It’s a significant expense that vinyl liner owners deal with more frequently through liner replacements. For fiberglass pool owners, it’s a one-time, long-term investment in the pool’s longevity. Understanding this future cost helps you get a complete picture of what it means to own a fiberglass pool for decades to come.

Why Fiberglass Pools Need Resurfacing

The smooth, durable surface of a fiberglass pool is called the gelcoat. It acts as a protective skin, shielding the underlying fiberglass structure from UV rays and pool chemicals. Over many years of sun exposure and use, this gelcoat can begin to wear down. You might notice the color fading, a chalky residue forming, or even small spider cracks appearing on the surface. Resurfacing addresses these issues by applying a fresh top layer, essentially giving your pool a brand-new finish. It’s a necessary step to maintain the pool’s structural integrity and keep it looking beautiful for another couple of decades.

The Resurfacing Process Explained

Resurfacing a fiberglass pool is a job best left to the pros. The process begins with completely draining the pool. From there, the crew will meticulously sand and prep the entire surface to ensure the new coating will adhere properly. This step is crucial for a smooth, long-lasting finish. Once the surface is ready, a new layer of gelcoat or another specialized coating is applied. After allowing it to cure completely, which can take several days, the pool is refilled, and the water is rebalanced. The entire project typically takes about a week to complete, transforming a worn-out pool back into a stunning backyard centerpiece.

Fiberglass Resurfacing Costs and Material Options

The cost to resurface a fiberglass pool generally ranges from $5,000 to $15,000, depending on the size of your pool and the material you choose. A basic gelcoat application is the most common and cost-effective option, usually falling between $5,000 and $8,000. For a more durable finish, you might opt for an epoxy or polymer coating, which can cost between $7,000 and $12,000. In rare cases where the surface has significant damage, a full fiberglass layer replacement might be necessary, pushing the cost upwards of $12,000. While it’s a significant investment, it’s a key part of the long-term care that keeps your swimming pool in top condition.

What Does Yearly Vinyl Liner Pool Maintenance Cost?

Vinyl liner pools are known for their attractive initial price point, but their long-term maintenance costs are higher. The primary expense to plan for is the eventual liner replacement. While a well-cared-for liner can last for several years, it will eventually need to be replaced, which is a significant investment. The vinyl material is also softer and more susceptible to punctures or tears from sharp objects, pets, or even harsh chemicals. This means you might find yourself budgeting for patch kits or professional repairs to fix leaks. These ongoing maintenance needs are an important part of the total cost of ownership for a vinyl liner pool.

Who Wins on Chemical and Energy Costs?

When you look at your monthly bills, the differences between fiberglass and vinyl really add up. Over a decade, the initial savings from a vinyl liner pool can easily be eaten up by higher chemical and electricity costs. Because a fiberglass pool’s surface is inert and non-porous, it doesn’t absorb chemicals or affect the water’s pH balance the way other surfaces can. This stability means you’ll buy fewer chemicals over the year. This cleaner environment also means your pump and filter don’t have to work as hard to keep the water clear, which can lead to modest savings on your energy bill. These seemingly small monthly savings accumulate into a substantial amount over the life of your pool.

Replacing a Vinyl Liner: How Often and How Much?

One of the most significant long-term costs of a vinyl liner pool is the eventual replacement of the liner itself. Unlike a fiberglass shell, a vinyl liner is not a permanent fixture. It’s a reality every vinyl pool owner will face, so it’s important to understand the timeline and the budget required when that day comes. This planned expense is a major factor when comparing the lifetime cost of vinyl versus fiberglass pools. Knowing what to expect can help you make a more informed decision and avoid financial surprises down the road.

How Long Does a Vinyl Liner Last?

On average, you can expect a vinyl pool liner to last about 10 to 15 years. This lifespan isn’t set in stone, though. Several factors can influence how long your liner holds up. Consistent exposure to harsh sunlight can cause it to fade and become brittle over time. Similarly, improper chemical balancing can wear down the material prematurely. Careful use is also key—sharp objects, like pet claws or broken glass, can easily cause tears or punctures that require patching or even a full replacement. Proper maintenance is the best way to get the most life out of your liner before it needs to be replaced as part of your swimming pool upkeep.

Repairing vs. Replacing: When to Patch a Vinyl Liner

So, what happens when you find a tear in your liner? The big question is whether a simple patch will do the trick or if it’s time for a full replacement. Generally, a repair is a great option if your liner is still relatively new—say, under seven years old—and the damage is small, like a tear that’s less than a few inches long and not near a seam. For minor issues, a patch is a quick and affordable fix. However, if your liner is getting older, closer to that 10-year mark, or showing signs of widespread wear like brittleness, cracking, or pulling away from the walls, a replacement is the wiser choice. Patching an old, brittle liner is often just a temporary solution, and you’re better off investing in a new one to avoid future headaches and potential water damage to your pool’s structure. Understanding the costs of each option can help you make the right call.

What Does It Cost to Replace a Vinyl Liner?

When it’s time for a new liner, the replacement process involves draining the pool, removing the old liner, smoothing the pool floor, and installing the new one. Including the liner and professional installation, you can expect to pay between $7,500 and $8,500 for a standard-sized pool. Some homeowners use this opportunity to upgrade their entire pool structure. If you’re considering a more permanent solution, replacing a vinyl liner pool with a fiberglass unit is a major home remodeling project that typically costs between $50,000 and $65,000. This converts your pool into a lower-maintenance, more durable option for the long term.

Breaking Down the Cost of a New Liner

So, what does a new liner actually cost? According to Angi, homeowners can expect to pay around $2,504 for a full replacement, with most projects falling somewhere between $1,242 and $3,871. This price typically includes the new liner material and the professional labor required for the installation. Another way to estimate is by square footage, which often comes out to about $5 per square foot. While this is a significant investment, it’s a predictable part of owning a vinyl liner pool. Thinking about this recurring expense is crucial when you’re comparing the long-term financial commitment of different pool types from the very beginning.

Additional Factors Affecting Replacement Price

The final bill for your liner replacement can be influenced by several factors beyond the basic installation. The size and shape of your pool are the biggest variables; a larger pool requires more material, and custom shapes like kidney or L-shapes need a specially made liner, which costs more than a standard rectangular one. The type and thickness of the vinyl you choose also play a role. Beyond the liner itself, you’ll need to budget for draining the pool, which can cost several hundred dollars, and then refilling it. Other potential costs include permit fees, if your town requires them, and a disposal fee for the old liner. Factoring these items into your budget ensures you have a complete picture of what’s involved in replacing the liner for your swimming pool.

How Do You Know It’s Time for a New Liner?

Your pool will give you some clear signals when the liner is nearing the end of its life. The most obvious signs are visible cracks, tears, or holes that can lead to water loss. You might also notice the liner is fading significantly or has stains that you can’t remove. Another common issue is wrinkling or stretching, where the liner pulls away from the walls or floor, creating a loose fit. If you find yourself constantly adding water to the pool, you likely have a leak that needs to be addressed. Catching these signs early can help you plan for a replacement before a minor issue becomes a major, costly problem requiring extensive restoration services.

What Are the Most Common Hidden Pool Costs?

The price of the pool itself is just one piece of the puzzle. To create a complete and realistic budget, you need to account for the extra costs that turn a simple pool installation into a beautiful backyard retreat. A transparent contractor will walk you through these, but it’s always best to go into the conversation with your eyes wide open. From preparing the ground to finishing the landscape, several factors can add to your final bill. Thinking about these items ahead of time helps prevent sticker shock and ensures your project stays on track without cutting corners. Let’s break down the most common hidden costs so you can plan with confidence.

What if They Find Rocks or Utility Lines?

Before your pool can go in, the ground has to be prepared. This is where the first variables pop up. Your property’s soil condition, slope, and accessibility for heavy machinery all play a role. If the crew discovers large rocks, a high water table, or poor soil that needs to be replaced, the cost of excavation will increase. The same goes for rerouting unexpected utility lines. While a straightforward dig is priced into your initial quote, complex site challenges require more labor and equipment. This is why the total cost can vary so widely depending on the complexity of the site preparation.

Don’t Forget to Budget for Decking and Landscaping

A pool sitting in a patch of dirt isn’t anyone’s dream. The area around your pool, known as the poolscape, is what truly creates an oasis. This includes the patio or deck, fencing, and surrounding greenery. Decking alone can add anywhere from $3,000 to $12,000 to your project. You’ll need to budget for materials and installation for your pool surround, whether you choose beautiful porcelain and natural stone pavers or another material. You should also factor in the cost of safety fencing, which is often required by local regulations, as well as professional landscape design to bring the whole space together.

What About Future Repairs and Service Calls?

Your financial commitment doesn’t end once the pool is filled. Pool ownership comes with annual operating costs for chemicals, electricity, and water, which can easily add up to around $1,000 per year. You should also set aside funds for eventual repairs, like fixing a pump or replacing a vinyl liner down the road. Many homeowners also opt for professional pool opening and closing services each season. While not a “hidden” cost, it’s an ongoing expense to remember. Proper maintenance, like having your patio professionally cleaned and sealed, also helps protect your investment and prevent more costly restoration work later on.

Why Fiberglass Pools Cost More Upfront (and Less Later)

When you first look at the numbers, it’s true that a fiberglass pool has a higher initial price tag than a vinyl liner pool. It’s easy to see that bigger number and immediately think it’s the more expensive option, but that’s only part of the story. The upfront cost of a fiberglass pool is an investment in long-term savings and a lower-maintenance lifestyle. Think of it less as a purchase and more as a one-time payment for decades of enjoyment without the recurring costs that come with other pool types.

The higher initial price comes from a more complex manufacturing process and the quality of the materials used. However, this upfront investment pays you back over the years. You’ll spend less time and money on chemicals, repairs, and major replacements like new liners. Over the life of your pool, a fiberglass model often ends up being the more economical choice. Let’s break down exactly why that initial cost is higher and how it leads to savings down the road.

How Manufacturing and Shipping Affect the Price

Unlike vinyl liner pools, which are assembled in your backyard, fiberglass pools are built as a single, solid shell in a factory. This controlled environment allows for a precise manufacturing process that results in a durable, high-quality product with a smooth, non-porous finish. The cost of these premium materials and the specialized labor in the factory contribute to the initial price.

Once the pool shell is complete, it has to be carefully transported from the factory to your home on Long Island. This process requires special equipment and logistics to move such a large item, and the shipping costs are factored into the final price you pay. While this adds to the upfront expense, it also means you’re getting a pre-fabricated, structurally sound pool that’s ready for installation the moment it arrives.

How a Faster Install Reduces Labor Costs

One of the biggest advantages of a fiberglass pool is how quickly it can be installed. Because the shell arrives as one complete piece, the installation process is streamlined and efficient. After the excavation is done, the shell is lowered into place, leveled, and backfilled. The plumbing and electrical work can be completed quickly, and your pool can be ready for water in as little as a few days.

This speed is a huge contrast to vinyl liner pools, which can take weeks to build on-site. A shorter installation timeline means significantly lower labor costs, which helps offset the higher material price of the fiberglass shell. Plus, a faster installation means you and your family can start enjoying your new swimming pool much sooner.

How Durability and Warranties Pay Off

The real savings with a fiberglass pool become clear when you look at its lifespan. These pools are incredibly durable and built to last for decades—many are still in perfect condition after 50 years. The gelcoat surface is tough, non-porous, and resistant to algae growth, which means you’ll use fewer chemicals and spend less time on weekly maintenance.

This durability is why fiberglass pools often come with long-term warranties from the manufacturer, giving you peace of mind. With a vinyl liner pool, you have to plan for the major expense of replacing the liner every 5 to 10 years. With a fiberglass pool, that recurring cost simply doesn’t exist. You’re investing once in a pool that will stand the test of time.

Smart Ways to Save on Pool Costs

A new swimming pool is a significant investment in your home and lifestyle, but that doesn’t mean you can’t be strategic about the costs. Beyond choosing between fiberglass and vinyl, there are several practical ways to manage your budget without compromising on the quality of your backyard oasis. A little bit of planning and some savvy decision-making can make a big difference in the final price tag. Whether you’re installing a brand new pool or maintaining an existing one, thinking like a project manager can help you get the most value for your money. Here are a few expert tips to help you save on your pool project.

Time Your Projects for Off-Season Savings

One of the simplest ways to save money is to think about timing. Pool contractors are busiest during the spring and early summer when everyone is rushing to get their backyards ready for the warm weather. If you can plan your project for the off-season, you might find more competitive pricing. Scheduling major work like a new installation or resurfacing during the fall or winter can often lead to better prices from contractors who are looking to keep their crews busy. This requires some forward-thinking, but the potential savings can be well worth the wait. It’s a great strategy to discuss with your pool builder when you’re in the initial planning stages.

Choose Standard Designs Over Custom Patterns

Customization is one of the most exciting parts of designing a pool, but it’s also where costs can quickly add up. This is especially true for vinyl liner pools. While intricate, colorful patterns are beautiful, they come at a premium. According to experts at Angi, opting for a plain, standard liner can save you between $300 to $700 compared to a more decorative option. This same principle applies to other design elements. Sticking with a standard pool shape instead of a complex freeform design can also keep your initial installation costs down. Prioritizing where you want to spend your budget allows you to splurge on features that matter most to you while saving on others.

Opt for Repairs When Possible

For current pool owners, especially those with vinyl liners, it’s important to know when a repair is a smarter financial choice than a full replacement. If your liner is still relatively new—less than seven years old—and has a minor tear or cosmetic issue, a simple patch can often solve the problem for a fraction of the cost of a new liner. It’s always a good idea to consider repair before jumping to a complete overhaul. An experienced professional can assess the damage and give you an honest recommendation. This approach not only saves you money in the short term but also extends the life of your current liner, pushing that big replacement expense further down the road.

Common Pool Cost Myths, Busted

When you start researching pool costs, you’ll run into a lot of opinions that can make it hard to see the full financial picture. It’s easy to get stuck on the initial price tag, but the true cost of a pool unfolds over years of ownership. Let’s clear up some of the most common misconceptions about pool expenses so you can make a decision based on facts, not fiction. Understanding the long-term investment from the start helps you choose a pool that fits your budget and lifestyle for decades to come.

Myth: “Vinyl Is Always Cheaper”

One of the most persistent myths is that vinyl liner pools are the undisputed budget-friendly choice. While it’s true they have a lower upfront cost, often starting around $50,000, that initial price is just the beginning of the story. Think of it as a down payment. The vinyl liner itself is a temporary component that you’ll need to replace every 10 to 12 years, and that’s a significant future expense. A fiberglass swimming pool, on the other hand, is a one-time installation. The sticker price is higher, but you aren’t signing up for a mandatory, costly replacement down the road.

The Truth About Pool Maintenance Time and Cost

The conversation about cost often overlooks what day-to-day and year-to-year maintenance actually entails. After just seven to ten years, the initial savings from a vinyl liner pool are frequently spent on repairs, liner patches, extra chemicals, and higher electricity bills. Because vinyl liners are more susceptible to tears, their upkeep is more intensive. A fiberglass pool’s non-porous shell resists algae growth, which means you’ll spend less time and money on chemicals and cleaning. This is a key part of the total cost of ownership that Gappsi helps clients plan for.

Which Pool Lasts Longer and Adds More Value?

A swimming pool should be an asset, not a liability. A well-maintained inground pool can increase your home’s value by about 7 percent, but the type of pool matters. A fiberglass pool is a permanent structural addition to your home, much like a finished basement or a kitchen remodel. A vinyl liner, however, has a limited lifespan. In fact, many homeowners eventually face the decision to replace their entire vinyl pool with a fiberglass unit, a project that can cost around $60,000. Investing in a durable, low-maintenance fiberglass pool from the start adds lasting value that future buyers will appreciate.

The True Cost of Your Pool Over 15 Years

Thinking about your pool’s cost shouldn’t stop once the installation is complete. The real price of ownership unfolds over years of maintenance, repairs, and replacements. When you look at the total investment over a decade or more, the most affordable option upfront isn’t always the most economical in the long run. Let’s break down what you can expect to spend on both fiberglass and vinyl liner pools over a 15-year period to see how the numbers really stack up.

The 15-Year Cost of a Fiberglass Pool

A fiberglass pool is a fantastic example of a “buy it for life” investment. While the initial installation cost is higher, your expenses drop off significantly after that. With a lifespan of 30 to 50 years, the pool shell itself will require very little from you financially over the first 15 years. The non-porous gelcoat surface is incredibly durable and algae-resistant, which means you’ll spend less time and money on chemicals and cleaning. Over 15 years, your primary costs will be routine water care, electricity, and opening/closing services. You won’t have to budget for a major liner replacement, making the long-term financial forecast for a fiberglass pool refreshingly predictable.

The 15-Year Cost of a Vinyl Liner Pool

Vinyl liner pools attract many homeowners with their lower initial price tag. For the first several years, you’ll enjoy your pool with standard maintenance costs for chemicals and electricity. However, the major planned expense is the liner itself. Most vinyl liners need to be replaced every 10 to 12 years. This means that within your 15-year ownership window, you are almost guaranteed to face one full liner replacement, which can be a significant expense. On top of that, vinyl liners are more susceptible to punctures and tears, which could lead to unexpected repair costs. You’ll also likely use more chemicals over time to keep the water balanced compared to a fiberglass pool.

When Does a Fiberglass Pool Pay for Itself?

This is where the long-term value of fiberglass really shines. While you might pay more to get started, the financial break-even point often arrives sooner than you’d think. In fact, many pool experts find that after about 7 to 10 years, the initial savings from choosing a vinyl liner have been completely spent on higher maintenance costs and at least one liner replacement. From that point forward, the fiberglass pool becomes the more cost-effective option. By year 15, you’re well past the break-even point and are actively saving money every season. This makes the higher upfront cost a strategic investment in a lower-maintenance, worry-free future for your backyard.

Which Pool Is the Best Value for You?

Choosing between a fiberglass and a vinyl liner pool comes down to what you value most: upfront flexibility or long-term, hands-off enjoyment. Both are fantastic options that create a beautiful backyard oasis, but they deliver value in different ways. One offers endless customization for a potentially lower initial price, while the other provides decades of durability with minimal fuss. To figure out which pool is the right investment for your Long Island home, it’s helpful to compare them on the factors that matter most: durability, design freedom, and your own long-term plans.

Durability and Performance Head-to-Head

When it comes to longevity, fiberglass pools have a clear advantage. A well-made fiberglass shell is incredibly durable and can easily last the lifetime of your home. Its smooth, non-porous surface is also a major performance perk, as it naturally resists algae growth. This means you’ll spend less time scrubbing walls and more time actually swimming. Vinyl liner pools, on the other hand, depend on a liner that needs to be replaced every 10 to 12 years. Each replacement can cost around $5,000, adding a significant, recurring expense to your long-term budget. While the pool structure itself is sound, the liner is the component that requires consistent care and eventual replacement.

How to Balance Customization and Your Budget

If you have a very specific vision for your pool’s shape and size, a vinyl liner might be the perfect fit. This option offers nearly unlimited design freedom, allowing you to create a custom shape that fits your yard perfectly. You can also choose from a wide variety of liner patterns to achieve the exact look you want. Fiberglass swimming pools are created from pre-fabricated molds, which means you’ll be choosing from a selection of proven shapes and sizes. While the designs are beautiful and modern, you won’t be able to create a one-of-a-kind shape. Both pool types start around the $50,000 mark for installation, so the choice becomes less about the initial price and more about whether you prefer total design control or the simplicity of a pre-designed, durable shell.

Making the Final Decision for Your Family

The best way to decide is to look beyond the initial quote and consider the total cost of ownership. While a fiberglass pool might cost $10,000 to $15,000 more upfront, it often proves to be the better long-term investment. The money you save on a vinyl liner installation can quickly be eaten up by liner replacements, extra chemicals, and more intensive maintenance over the years. Many homeowners who wait until they can afford a fiberglass pool are ultimately happier with their decision because they avoid these recurring costs. Think about how long you plan to be in your home and how you want to spend your time—maintaining your pool or enjoying it. Considering your 15-year plan will help you see the true value and make a choice you’ll be happy with for decades.

Related Articles

Frequently Asked Questions

So, which pool is actually cheaper in the long run? While a vinyl liner pool often has a lower initial price, a fiberglass pool almost always costs less over its lifetime. After about seven to ten years, the money you saved on a vinyl installation is typically spent on higher chemical use, potential repairs, and at least one expensive liner replacement. A fiberglass pool is a one-time investment that saves you money and hassle for decades.

How much work is it to maintain each type of pool? A fiberglass pool is the clear winner for low-maintenance living. Its smooth, non-porous surface makes it very difficult for algae to grow, meaning you’ll spend far less time scrubbing and balancing chemicals. A vinyl liner is more susceptible to algae and requires more careful chemical management. You also have to be mindful of potential punctures or tears, which adds another layer of upkeep.

How often will I really need to replace a vinyl liner? You should plan on replacing a vinyl liner every 10 to 15 years. This timeline can be shorter if the pool gets a lot of direct sun or if the water chemistry isn’t perfectly maintained. When it’s time for a replacement, it’s a significant project that involves draining the pool and a considerable expense.

If I want a custom shape, do I have to choose a vinyl liner pool? Vinyl liners offer the most design freedom, allowing for virtually any shape you can imagine. Fiberglass pools are made from pre-designed molds, so you’ll choose from a wide selection of popular and modern shapes. While you can’t create a completely unique shape, the variety available today fits beautifully into most backyard designs.

Besides the pool itself, what’s the biggest extra cost I should plan for? The area surrounding your pool, often called the poolscape, is the biggest additional expense. This includes your patio or decking, safety fencing required by law, and professional landscaping to complete the look. These elements are what transform your yard into a true outdoor living space, so it’s important to budget for them from the start.

Share this page: