How to Use a Concrete Basketball Court Cost Calculator

A new basketball court is more than just a place to play; it’s a long-term investment in your home and your family’s lifestyle. Like any significant home improvement project, smart financial planning is the key to success. Figuring out the budget can feel like the most challenging part, but it doesn’t have to be. Using a concrete basketball court cost calculator helps you explore different options and understand how your choices impact the bottom line. It empowers you to make informed decisions about your investment, ensuring the final result not only meets your vision but also fits comfortably within your financial goals. Let’s break down the costs so you can build a court that delivers value for years to come.

Key Takeaways

  • Budget for the entire project, not just the concrete: Your total investment includes more than the slab itself; remember to account for essential costs like site preparation, drainage systems, surface coatings, and accessories like hoops or lighting.
  • Prioritize professional installation for long-term value: While a DIY approach might seem cheaper initially, professional installation prevents costly future repairs from issues like cracking or improper drainage, ensuring your court is safe and durable.
  • Use calculators for planning, not for final numbers: Online cost estimators are great for initial budgeting and exploring options, but a formal quote from a contractor after a thorough site evaluation is necessary for an accurate project cost.

What is a Concrete Basketball Court Cost Calculator?

If you’re dreaming of adding a basketball court to your backyard, one of your first questions is probably about the cost. A concrete basketball court cost calculator is an online tool designed to give you a preliminary estimate for your project. Think of it as a starting point to help you budget. It considers factors like materials, labor, and site preparation to give you a general idea of the investment required. For example, a typical outdoor basketball court can range anywhere from $12,500 to over $115,000. That’s a huge range, and it’s because every court is different. The final price depends on the size, materials, and any special features you want to include.

These calculators are great for initial planning, helping you turn a vague idea into a more concrete financial picture before you even pick up the phone to call a professional. By using one, you can get a feel for the numbers involved in creating your perfect home game court. It helps you explore different options and see how they impact the bottom line, making you a more informed homeowner when it’s time to discuss the project with a contractor. It’s the perfect first step in figuring out what’s possible for your space and your budget.

How Do They Work?

These calculators are pretty straightforward. They work by asking you to input specific details about your planned basketball court. You’ll typically enter the court’s dimensions, the type of materials you’re considering, and other features you want to include. The tool then uses this data to generate a cost estimate. To get the most reliable number, it’s important to be as accurate as possible with your inputs. Some common measurement errors include guessing the dimensions instead of measuring, mixing up units like feet and meters, or forgetting to account for a sloped yard. Taking a few extra minutes to gather precise information will give you a much more useful estimate to work with.

Why Use One?

Using a cost calculator is all about smart planning. It helps you understand the financial side of your project right from the start, which is key for effective budgeting. Knowing the potential costs allows you to make informed decisions about what you can realistically afford and which features are most important to you. As the experts at Legendary Sports Construction point out, a basketball court is an “investment in lifestyle,” not just an addition to your property. A calculator gives you the clarity you need to move forward confidently, ensuring your budget aligns with your vision for a fun, active space for your family to enjoy for years to come.

What Makes a Calculator Accurate?

The accuracy of a cost calculator really comes down to two things: the quality of the information you provide and the data programmed into the tool itself. While a calculator is a fantastic starting point, building a high-quality sports court involves a lot of specific expertise. Professionals understand the nuances of site preparation, drainage, and material performance that online tools can’t fully capture. According to CourtMaster Sports, it’s essential for homeowners to understand the specific maintenance needs of their court to ensure its longevity. This kind of expert knowledge is what ultimately turns a simple estimate into a precise, reliable project quote.

What Factors Influence the Cost of a Concrete Court?

When you start budgeting for a backyard basketball court, you’ll quickly find that no two projects are exactly alike. The final price tag depends on a handful of key variables that can swing the cost significantly. Understanding these factors will help you get a more accurate estimate and make informed decisions about your project. From the size of the court to the type of hoop you install, every choice plays a role in the total investment. Let’s break down the main components that influence the cost of building a concrete court.

Court Size and Dimensions

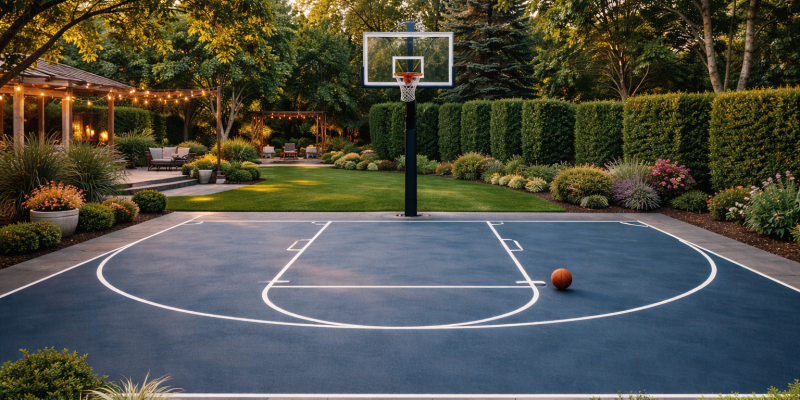
The most straightforward factor affecting your court’s cost is its size. A larger court requires more materials, more labor, and more time to build. Costs are often calculated per square foot, with estimates typically ranging from $4 to $16 per square foot for the concrete slab itself. A small half-court for practice shooting will naturally be much more affordable than a full-sized court designed for 5-on-5 games. Before you decide, think about how you’ll use the space. Do you need a regulation-size key, or is a simple shooting area enough? Defining the court’s purpose will help you and your contractor determine the ideal dimensions for your yard and budget.

Site Preparation and Drainage

Before any concrete can be poured, the ground needs to be properly prepared. This is often one of the biggest and most variable costs of the entire project. If your Long Island backyard is sloped, has poor soil, or is difficult for construction equipment to access, the cost of excavation and grading will increase. Proper site preparation also includes ensuring adequate drainage to prevent water from pooling on the court and causing damage over time. As one expert notes, “If your yard has a big slope or is hard to get to, preparing the ground can be the most expensive part.” This step is critical for the longevity of your court.

Concrete Type and Thickness

The foundation of your court is the concrete slab, and its quality is non-negotiable for a durable, long-lasting playing surface. For a high-performance sports court, a standard pour won’t cut it. Most professional-grade game courts are built over a 4- to 5-inch thick steel-reinforced concrete slab. This thickness, combined with a concrete strength of 3500 PSI, ensures the surface can withstand intense play and changing weather without cracking or shifting. While using a thinner or lower-grade concrete might save a little money upfront, it will likely lead to expensive repairs down the road. Investing in a quality foundation is essential for a court that will last for years.

Surface Finishes and Coatings

The raw concrete slab is just the beginning. To create a safe and playable surface, you’ll need the right finish. A “medium broom finish” is often recommended for the concrete itself, as this texture provides excellent grip for players’ shoes and helps prevent slips and falls. Beyond the texture, you can add acrylic color coatings, game lines for basketball and other sports, and even custom logos. These finishes not only give your court a professional look but also protect the concrete from the elements. Each layer of paint or coating adds to the material and labor costs, but it’s what transforms a simple slab into a true home court.

Optional Features and Upgrades

Finally, the features you add to your court will influence the total cost. A high-quality, adjustable basketball hoop is a must, but you can also incorporate features for other activities. Many homeowners choose to add multi-sport versatility with net systems for tennis, pickleball, or volleyball. Other popular upgrades include rebounder nets, powerful LED lighting for playing after dark, and perimeter fencing for safety and convenience. These optional features and their installation will add to your budget, but they also maximize the fun and functionality of your new outdoor space.

How Much Does a Concrete Basketball Court Cost?

Figuring out the budget for your dream basketball court is one of the most important first steps. The final price tag can vary quite a bit, as it depends on everything from the size of the court to the finishes you choose. Think of it less as a single price and more as a range that you can adjust based on your priorities. Whether you’re planning a simple half-court for family fun or a premium, multi-sport surface, understanding the key cost components will help you plan effectively and avoid surprises down the road. Let’s break down what you can expect to invest in a new concrete court.

The Price of a Basic Court

If you’re looking for a straightforward space to practice your free throws, a basic concrete court is a great starting point. Generally, you can expect the cost to pour a concrete slab to fall between $15,000 and $45,000. This price typically covers a standard-sized half-court, including the concrete itself and the labor for installation. A “basic” court usually means you get a durable, playable surface without extra features like acrylic coatings or high-end hoops. The final cost within this range often comes down to site accessibility and the specific masonry expertise of the team you hire.

The Price of a Premium Court

For those who want to create a truly standout athletic space, a premium court offers endless customization. The cost for these installations is often calculated per square foot, typically ranging from $4 to $16 for outdoor courts. What makes a court “premium”? This is where you can add features like multi-layer acrylic surfaces for better cushioning and ball response, custom colors and logos, professional-grade hoops, and even fencing or lighting. These upgrades transform a simple slab into a high-performance sports game court that’s perfect for serious players and entertaining guests.

How Location Affects Your Budget

Where you live plays a significant role in the overall cost of your basketball court. The final price can vary significantly based on your location due to regional differences in labor rates, material transportation costs, and local building regulations. Here on Long Island, for example, factors like property accessibility and the need for extensive site preparation on sloped or uneven ground can influence the budget. Working with a local contractor who understands the area’s specific challenges and permit requirements ensures a smoother process and a more accurate initial quote for your project.

Factoring in Long-Term Maintenance

One of the best things about a concrete court is its durability. While sports courts generally require minimal upkeep, a little maintenance goes a long way in protecting your investment. To ensure your court has a long and playable life, you’ll want to plan for periodic cleaning to remove debris and prevent staining. Every few years, it’s also a good idea to have the court inspected for any small cracks that need filling and to apply a fresh sealant. These restoration and sealing services protect the concrete from weathering and keep the surface in top condition for years of play.

What to Look For in a Cost Calculator

When you start searching for concrete basketball court cost calculators, you’ll quickly find there are a lot of options out there. But not all of them are built to give you a truly helpful estimate. A good calculator is more than just a simple multiplication tool; it’s a planning partner that helps you understand the variables and make informed decisions. The best ones are detailed, flexible, and easy to use, guiding you toward a budget that reflects your actual project goals.

Think of it as the first step in your project’s blueprint. A vague calculator will give you a vague number, which isn’t very useful when you’re trying to plan. A great one, however, will ask the right questions and allow you to explore different scenarios. It should help you see how your choices, from the size of the court to the type of hoop you install, impact the final price tag. Knowing what features to look for will help you find a tool that gives you confidence in your budget and a clear path forward.

Essential Inputs for an Accurate Estimate

The accuracy of any calculator depends entirely on the information you provide. To get a realistic estimate, you need a tool that asks for specific details, not just generic dimensions. Look for calculators that prompt you for precise length and width measurements, information about the current state of the site, and any potential challenges like slopes or drainage issues. As one source points out, common measurement errors like guessing instead of measuring or forgetting site-specific factors can throw off your numbers significantly. The more detailed the inputs, the more reliable your estimate will be.

Material and Customization Options

A backyard court is a personal project, and a good calculator should reflect that. It should allow you to explore different material and customization options to see how they affect the cost. For example, you should be able to select different concrete thicknesses, surface coatings, and paint choices. Building a high-quality court requires specialized knowledge, and understanding your material options is a key part of the process. This feature lets you weigh your aesthetic preferences against your budget, helping you decide where to invest and where you might be able to save.

Helpful Visuals and Comparisons

Sometimes, numbers on a screen can feel a bit abstract. That’s why calculators with helpful visuals and cost comparisons are so valuable. Seeing a rendering of different court layouts or a side-by-side comparison of various features can make the planning process much more tangible. Some tools provide a rough price range for different tiers of courts, which helps you see where your project might land. This visual context helps you make choices that not only fit your budget but also match the vision you have for your backyard.

A Simple, User-Friendly Interface

Finally, the best calculator is one you’ll actually use. A clunky, confusing interface can be frustrating and may even lead to mistakes in your estimate. Look for a tool with a clean design and a straightforward, step-by-step process. The goal is to simplify the budgeting process, not complicate it. While a calculator is a great starting point, it’s always best to work with an experienced court builder to finalize your plans. A user-friendly calculator makes it easier to gather your thoughts and prepare for that professional consultation.

Common Cost Misconceptions About Concrete Courts

When you start budgeting for a new basketball court, it’s easy to get tripped up by a few common assumptions about the cost. Thinking through these potential pitfalls ahead of time will help you create a realistic budget and ensure your project runs smoothly from start to finish. A beautiful, durable court is a fantastic investment in your home and lifestyle, and getting the finances right is the first step.

Let’s clear up some of the biggest misconceptions so you can plan your project with confidence.

The Myth of “Cheaper is Better”

We all love a good deal, so it’s tempting to jump on the lowest bid you receive for your court installation. But when it comes to construction, a surprisingly low price can be a red flag. A quality concrete slab is a significant investment, and cutting corners on materials or labor often leads to bigger expenses down the road. A poorly poured court can crack, settle unevenly, or drain improperly, resulting in costly repairs.

Instead of focusing only on the initial price, think about the long-term value. A well-built court from an experienced team will last for years with minimal issues. Investing in quality craftsmanship for your sports game courts ensures you get a safe, playable surface that truly enhances your property.

Uncovering Hidden Project Costs

A basic price-per-square-foot estimate rarely tells the whole story. The final cost of your concrete court depends on much more than just its size. Many essential steps can add to the budget, and it’s important to know what they are upfront.

Be sure to ask if your quote includes site preparation, which can involve excavation, grading, and installing a proper drainage system. Other potential costs include local permits, custom line painting, premium surface coatings, and accessories like fencing or lighting. A transparent contractor will provide an itemized estimate that breaks down every expense, so you know exactly where your money is going. This level of detail is standard for professional masonry construction.

Costly Planning Mistakes to Avoid

Building a high-performance sports court requires specialized knowledge. It’s not as simple as just pouring a slab of concrete. One of the most expensive mistakes a homeowner can make is underestimating the technical details involved in the planning phase.

Proper site evaluation is critical to guarantee your court performs well and lasts for decades. An expert will assess your property’s soil conditions, water table, and overall landscape to prevent issues with drainage and stability. They will also help you select the right concrete mix and thickness for Long Island’s climate. Working with a professional from the beginning is the best way to avoid fundamental errors that are difficult and expensive to fix later.

How to Lower Your Concrete Basketball Court Costs

Building a backyard basketball court is an exciting project, but it’s also a significant investment. The good news is that you don’t have to break the bank to create a high-quality, durable court your family will love for years. With some strategic thinking and careful decision-making, you can manage your budget effectively without cutting corners on what matters most. It all comes down to making smart choices with your materials, understanding the value of professional work, and having a solid plan from the very beginning.

Choose Your Materials Wisely

Your choice of materials is one of the biggest factors influencing the final price tag. The concrete slab alone can be a substantial part of the budget, but there are ways to be cost-effective. Opting for a standard, high-quality concrete mix, like 3500 PSI steel-reinforced concrete, provides the perfect balance of durability and affordability for a residential court. While premium finishes and coatings look great, you can start with a simpler finish and plan to upgrade it later. Working with an expert can help you explore all the options for sports game courts and find materials that fit your budget without compromising on safety or performance.

DIY vs. Professional Installation

The idea of a DIY installation can be tempting if you’re looking to save money, but building a basketball court is more complex than it looks. It requires specialized knowledge to ensure proper grading, drainage, and a perfectly level surface. A small mistake in pouring the concrete can lead to cracking, pooling water, and an unsafe playing area, resulting in costly repairs down the road. Investing in professional installation from a team experienced in athletic courts guarantees the job is done right the first time. This not only ensures the longevity and safety of your court but also saves you from the headaches and hidden costs of a DIY project gone wrong.

Save Money with Smart Planning

A well-thought-out plan is your best tool for keeping costs in check. Before any work begins, take the time to finalize your court’s size, location, and features. Making changes mid-project is one of the fastest ways to inflate your budget. Proper site preparation is also crucial; addressing any grading or drainage issues upfront will prevent expensive problems later. Partnering with a design-build firm helps streamline this process, as they can create a comprehensive plan that covers everything from excavation to the final hoop installation. This integrated approach ensures every detail is accounted for, helping you stick to your budget and avoid unexpected surprises.

Concrete vs. Other Surfaces: A Cost Comparison

When you’re planning your dream basketball court, one of the first big decisions is the surface material. While concrete is a popular choice for its durability and performance, it’s helpful to see how it stacks up against other common options, like asphalt. Looking at the numbers is important, but the real story is in the long-term value and how each surface holds up to years of play and Long Island weather. A court is more than just a slab of pavement; it’s an investment in your home and your family’s enjoyment. Let’s break down the costs and benefits to help you make the best choice.

Concrete vs. Asphalt Breakdown

At first glance, asphalt often looks like the more budget-friendly option. An asphalt court can have a lower initial installation cost, which is certainly appealing. However, that upfront price doesn’t tell the whole story. A professionally installed concrete court is a significant project, and its price reflects the quality of materials and labor involved. While the initial investment for concrete might be higher, it’s crucial to think about the costs that come after the installation. Asphalt is more susceptible to weather damage, requiring more frequent and costly maintenance over its lifespan to fix cracks and uneven spots.

Comparing Long-Term Value and Durability

This is where concrete truly shines. A high-quality sports game court is built to last, and that starts with a solid foundation. We build our concrete courts over a 4- to 5-inch thick, steel-reinforced slab using high-strength concrete. This robust construction makes it incredibly resilient against wear and tear, from intense games to harsh freeze-thaw cycles. While asphalt might need patching and resurfacing every few years, a well-built concrete court requires minimal upkeep. This durability means you’ll spend less time and money on repairs and more time enjoying the game, making it a smarter investment for the long run.

How to Get an Accurate Project Estimate

Getting a clear and accurate estimate is one of the most important steps in planning your backyard basketball court. A reliable quote isn’t just a number; it’s a detailed roadmap for your project that prevents surprises down the line. It shows that your contractor understands your vision and has a solid plan to bring it to life. To get a quote you can trust, you need to have a productive conversation with your contractor, understand the site-specific challenges, and use budgeting tools to set realistic expectations from the start. This process ensures everyone is on the same page and helps you feel confident as you move forward with building the court of your dreams.

What to Ask Your Contractor

Your first conversation with a professional installer is your best opportunity to set the project up for success. It’s smart to connect with an expert early on to choose the right materials for a long-lasting court. A seasoned pro can walk you through the pros and cons of different concrete mixes, surface coatings, and hoop systems. Come prepared with questions about their experience, the project timeline, and how they handle material selection. Ask them to explain the installation process from start to finish. This initial discussion will help you find a partner who can build the high-quality sports and game courts your family will enjoy for years.

Planning for Permits and Site Evaluation

Before any concrete is poured, a thorough site evaluation is essential. The unique characteristics of your property play a huge role in the final cost. If your yard has a big slope or is hard to get to, preparing the ground can be the most expensive part. This work often involves moving a lot of dirt, building retaining walls, and ensuring good drainage to protect your investment. You’ll also need to account for local building permits, which vary across Long Island. A professional contractor can assess your property, identify potential challenges, and manage the permitting process for you, ensuring your project complies with all local regulations.

Using a Calculator to Finalize Your Budget

Online cost calculators are a great tool for getting a preliminary budget in place. You can use a calculator to get a quick price estimate, which helps you understand the general cost range for a project like yours. Most concrete courts fall somewhere between $4 and $16 per square foot, but this can change based on your specific design choices. While a calculator gives you a helpful starting point, remember that it’s just an estimate. The final step is to get a detailed, formal quote from your contractor that reflects your specific materials, site conditions, and any custom features you’ve chosen for your home remodeling project.

Related Articles

Frequently Asked Questions

How accurate are online cost calculators, really? Think of an online calculator as a great first step for ballpark budgeting. It can give you a general idea of the costs based on standard sizes and materials. However, it can’t see your backyard. It won’t know if your property has a steep slope or tricky access for equipment, which are details that can significantly affect the final price. Use it to get a foundational number, then talk to a professional for a precise quote based on your specific site.

What’s the biggest unexpected cost I should plan for? Site preparation is almost always the biggest variable. The initial quote for a concrete slab is one thing, but the cost to get the ground ready for it is another. If your yard needs extensive excavation, grading to create a level surface, or a complex drainage system to handle water runoff, this work can add a substantial amount to your budget. It’s a critical step you can’t skip, so be sure to discuss it in detail with your contractor.

Can I save money by pouring the concrete myself? While the DIY spirit is admirable, building a sports court is a project best left to professionals. Pouring a concrete slab that is perfectly level, properly graded for drainage, and finished for optimal playability requires specialized skill and equipment. A small mistake can lead to major problems like cracking, pooling water, or an uneven surface, which are incredibly expensive to fix. Investing in professional installation ensures your court is safe, durable, and built right the first time.

Why is concrete a better long-term investment than asphalt? Asphalt may seem cheaper at first, but concrete offers far better long-term value. A steel-reinforced concrete court is incredibly durable and can withstand intense play and harsh weather with very little upkeep. Asphalt is softer and more prone to developing cracks and low spots, meaning you’ll spend more time and money on repairs and resurfacing over the years. Concrete’s resilience makes it a smarter, more cost-effective choice for a court that will last for decades.

What’s the difference between a basic court and a premium one? A basic court gives you a fantastic, high-quality playing surface. It typically includes the professionally installed, steel-reinforced concrete slab with a standard broom finish for good traction. A premium court builds on that foundation with custom features. This can include multi-layer acrylic coatings for color and improved cushioning, painted lines for various sports like pickleball or volleyball, professional-grade adjustable hoops, and additions like fencing or lighting.

Share this page:
Serene powder coated aluminum cabinets with blue drawers in an outdoor kitchen.

Your Guide to Serene Powder Coated Aluminum Cabinets

Your outdoor kitchen should be a true extension of your home, reflecting your personal style down to the last detail. Standard, one-size-fits-all solutions often fall short, leaving you with awkward gaps or a look that doesn’t quite match your vision. You deserve a space that feels custom-built because it is. With powder coated aluminum outdoor kitchen cabinets | Serene, you get complete design freedom. From a wide range of colors and realistic woodgrain finishes to custom sizing that fits your unique layout perfectly, you can create a kitchen that is uniquely yours. This article will walk you through all the ways you can personalize your space for a truly seamless and beautiful result.

Key Takeaways

  • Choose durability for less maintenance: Serene’s powder-coated aluminum cabinets are built to handle Long Island weather without rusting, fading, or warping, which means you spend less time on upkeep and more time enjoying your kitchen.
  • Design a kitchen that’s uniquely yours: Since every cabinet is made to order, you can personalize your layout, color, and finish to perfectly match your home’s style and create a seamless, functional outdoor space.
  • Invest in your home’s long-term value: A high-quality outdoor kitchen increases your property’s appeal while saving you money on future repairs, making it a smart financial decision that also improves your lifestyle.

Why Choose Serene’s Powder-Coated Aluminum Cabinets?

When you decide to build an outdoor kitchen, you’re creating a space for making memories. You want it to be beautiful, functional, and above all, durable. That’s where the right materials make all the difference. Serene’s powder-coated aluminum cabinets are a fantastic choice because they are engineered specifically for the outdoors. They combine sleek design with incredible resilience, giving you a kitchen that looks great and performs year after year. Let’s look at what makes them stand out.

Built to Withstand Extreme Weather

Long Island weather is anything but predictable. From humid, salty summer air to freezing winter storms, your outdoor kitchen needs to be tough. Serene’s cabinets are built for this challenge. They are made from strong aluminum with a welded frame designed to handle extreme conditions without warping or cracking. This means you can spend less time worrying about your investment and more time enjoying your backyard. Because they are guaranteed not to rust, they maintain their strength and beauty through every season, making them a core part of your outdoor living space.

Enjoy a Rust-Free, Welded Frame

The secret to Serene’s strength lies in its construction. Inside each cabinet is a robust one-by-one-inch welded tube frame that provides incredible stability. Unlike other metals that can corrode over time, this aluminum frame is guaranteed not to rust. This is a huge advantage for outdoor cabinetry, as rust can weaken the structure and ruin its appearance. With a rust-free frame, you get lasting peace of mind knowing your cabinets are built to endure. You won’t have to deal with the constant upkeep that other materials might require, giving you a truly low-maintenance outdoor kitchen.

Install with Ease Thanks to a Lightweight Design

Strength doesn’t have to mean heavy and difficult to work with. Aluminum is surprisingly lightweight, which makes installing your Serene cabinets a much smoother process. This efficiency helps keep your project on track. But the benefits don’t stop there. Aluminum is also waterproof, fire-resistant, and mold-resistant, so you won’t have to worry about water damage or mildew. Its impermeable surface is easy to clean and stands up to spills, ensuring your kitchen remains hygienic and looks fantastic. This makes it an ideal material for any home remodeling project where durability and ease are top priorities.

How Do Serene Cabinets Compare to Steel and Wood?

When you’re designing an outdoor kitchen, the material you choose for your cabinets is one of the most important decisions you’ll make. It needs to look great, function perfectly, and stand up to everything Long Island weather throws at it. Serene’s powder-coated aluminum cabinets are a fantastic choice, but it helps to see how they stack up against other popular options like stainless steel and wood. Each material has its own profile, and understanding the differences will help you create an outdoor space that lasts.

Let’s look at how aluminum compares in terms of maintenance, durability, and overall value, so you can feel confident in your investment.

Aluminum vs. Stainless Steel: A Look at Maintenance

Stainless steel is a common sight in outdoor kitchens, known for its strength and durability. While it’s a solid material, it’s not without its maintenance needs. Both stainless steel and aluminum require regular cleaning to keep them looking their best in an outdoor setting. However, aluminum is a much lighter material, which can make installation easier.

The key difference maker is the finish. A high-quality powder coat finish, like the one on Serene cabinets, provides a protective layer that makes the aluminum incredibly resilient and low-maintenance. While stainless steel is strong, aluminum is softer and can be more susceptible to dents. But with the durable powder coating, Serene cabinets gain an extra layer of defense, helping you create a beautiful and functional outdoor kitchen that complements your stone patio.

Aluminum vs. Wood: Which Lasts Longer Outdoors?

Wood offers a classic, traditional look, but it struggles to hold up against the moisture, humidity, and temperature swings we experience on Long Island. Wood can warp, rot, and attract pests over time, requiring constant sealing and maintenance to prevent damage. In contrast, aluminum is built for the outdoors.

Serene’s aluminum cabinets are naturally waterproof, rust-resistant, mold-resistant, and fire-resistant. They won’t warp or crack when exposed to sun and rain, making them a far more durable and safer option than wood. Plus, since they are constructed without adhesives, you don’t have to worry about formaldehyde. For a truly lasting outdoor kitchen that you can enjoy for years under your custom pergola, aluminum is the superior choice for longevity and peace of mind.

Comparing Cost and Long-Term Value

It’s true that aluminum cabinets can have a higher upfront cost than some traditional wood options. However, it’s important to think about this as a long-term investment in your home. The durability of aluminum means you’ll save significantly on maintenance and replacement costs down the road. You won’t spend your weekends re-staining cabinets or your money replacing warped doors.

Over time, the superior performance and minimal upkeep of Serene’s powder-coated aluminum cabinets provide incredible value. You get a beautiful, hassle-free outdoor kitchen that adds to your property’s appeal and stands the test of time. Choosing durable materials is a smart strategy for any home remodeling project, ensuring you can spend more time enjoying your space and less time working on it.

How Can You Customize Your Serene Outdoor Kitchen?

Your outdoor kitchen should be more than just a place to grill; it should be a true extension of your home and personal style. With Serene cabinets, you aren’t limited to a one-size-fits-all solution. Instead, you get to design a space that is uniquely yours, from the overall look down to the smallest functional details. The beauty of Serene is in its flexibility, allowing you to create a kitchen that perfectly suits your space, your cooking habits, and your aesthetic vision. Let’s look at the specific ways you can tailor these cabinets to create your dream outdoor cooking area.

Find Your Perfect Color and Finish

The first step in personalizing your outdoor kitchen is choosing the right look. Serene offers a wide selection of powder-coated colors and finishes, so you can find the perfect match for your home’s exterior. Whether you want a sleek, modern gray, a classic white, or a bold, statement color, there’s an option for you. You can even choose a realistic woodgrain finish that gives you the warm, inviting look of wood without the constant upkeep. This allows you to create a cohesive design that complements your beautiful porcelain and natural stone pavers. The right finish sets the tone for your entire outdoor entertaining space.

Get the Perfect Fit with Custom Sizing

One of the biggest challenges with outdoor kitchens is making them fit seamlessly into your space. Serene solves this problem because every cabinet is built to order. This means your kitchen is made to perfectly fit your specific patio, deck, or backyard layout, no matter the size or shape. There are no awkward gaps or wasted corners, just a clean, integrated design. This custom approach is ideal for unique spaces or for homeowners who want to maximize every inch of their outdoor area. Our team at Gappsi can help you plan a layout that works with your home’s architecture and any existing masonry features for a truly custom-built feel.

Add Functional Touches like Soft-Close Hinges

A great kitchen isn’t just about looks; it’s about how it functions. Serene cabinets allow you to customize the interior features to match how you cook and entertain. You can select from different door styles, drawer configurations, and helpful additions like pull-out shelves for easy access to pots and pans. Features like soft-close hinges prevent slamming doors and add a touch of quiet luxury to your outdoor space. By planning these details, you can create a highly organized and efficient kitchen where everything you need is right at your fingertips. It’s these thoughtful touches that make your outdoor kitchen, often situated under beautiful pavilions and pergolas, a joy to use.

How Long Do Serene’s Aluminum Cabinets Last?

When you invest in your outdoor kitchen, you want to know it will stand the test of time. After all, this is where you’ll be making memories for years to come. Serene’s powder-coated aluminum cabinets are engineered for exactly that: long-lasting performance with minimal fuss. They are built to handle everything Long Island weather throws their way, from humid summer days to salty winter air. Let’s look at the specifics of their durability, from the warranty that backs them to the simple care that keeps them looking brand new.

Understanding the Five-Year Warranty

It’s always reassuring when a company stands behind its products, and Serene does just that. Their aluminum cabinets come with a five-year limited warranty, giving you confidence in your purchase. This warranty is a promise that the materials and craftsmanship are top-notch and built to last. It covers any defects that might pop up, so you can focus on enjoying your beautiful new outdoor space instead of worrying about its components. This commitment to quality ensures your investment is protected, allowing you to furnish your outdoor living area from the Gappsi Store with complete peace of mind.

How They Hold Up in Harsh Weather

Living on Long Island means our outdoor furniture needs to be tough. Serene cabinets are specifically designed for this environment. They are guaranteed not to rust, which is a huge advantage over many metal alternatives. The secret is their special “coastal powder coat” finish. This isn’t just a layer of paint; it’s a durable coating that protects the aluminum from moisture, salt spray, and intense sun. Whether your home is right on the coast or further inland, these cabinets are made to endure the elements without fading or corroding. They are a perfect complement to other durable outdoor structures like our custom pavilions and pergolas.

Keep Them Looking New with Simple Maintenance

One of the best features of Serene’s aluminum cabinets is how little work they require from you. They are designed for impressive durability with very little upkeep. Forget about the constant sanding, staining, or sealing that wood cabinets demand. Most of the time, a simple wipe-down with mild soap and water is all you need to keep them looking pristine. This low-maintenance design means you get to spend more time cooking and entertaining and less time on chores. It’s a practical choice that fits a busy lifestyle, much like our other services that help you maintain your property, such as our restoration and sealing for patios and driveways.

What Are the Top Benefits of Powder-Coated Aluminum?

When you’re designing an outdoor kitchen, you want materials that look great and can stand up to the elements without demanding constant upkeep. That’s where powder-coated aluminum truly shines. Unlike traditional paint, powder coating is a dry finishing process where a specialized powder is applied to the aluminum and then cured under heat. This creates a hard, durable finish that’s much tougher than conventional paint. For homeowners on Long Island, this means your beautiful outdoor kitchen will be protected from humid summers, salty air, and chilly winters.

Serene cabinets leverage this technology to create a product that is as resilient as it is stylish. The powder coating process ensures a consistent, high-quality finish that completely seals the aluminum, protecting it from moisture and UV rays. This makes it an ideal choice for any outdoor project, from a simple grill station to a full-service kitchen integrated into your patio and landscape design. It’s a smart investment that combines sophisticated aesthetics with practical, long-lasting performance, giving you a beautiful outdoor space you can enjoy for years to come.

Superior Protection from Sun and Rain

One of the biggest challenges for any outdoor fixture is the weather. Serene cabinets are specifically engineered to handle it all. They are built from strong aluminum with a welded frame, which means they are structurally sound and guaranteed not to rust. The powder-coated finish acts like armor, shielding the cabinets from the sun’s harsh UV rays that cause fading and the constant moisture from rain that can lead to corrosion. This level of protection ensures your outdoor kitchen remains vibrant and functional, no matter what the forecast holds. You can have peace of mind knowing your investment is safe, season after season.

Resists Fading, Chipping, and Mold

Durability is about more than just surviving the weather; it’s about looking good while doing it. Serene uses a special “coastal powder coat” designed to handle even the most demanding environments. This finish is thermally bonded to the aluminum, creating a surface that resists chipping, scratching, and peeling. Unlike painted wood or other metals, you won’t have to worry about the color fading over time. Plus, the non-porous surface prevents mold and mildew from taking hold, a common problem in humid climates. This means less time spent on deep cleaning and more time enjoying your beautiful, pristine outdoor kitchen.

Enjoy More Time Outside with Less Maintenance

Your backyard should be a place for relaxation, not constant chores. Serene cabinets are designed to be incredibly durable and last a long time with very little care. The powder-coated aluminum surface is easy to clean; a simple wipe-down with soap and water is usually all it takes to keep them looking brand new. You can forget about the yearly sanding, staining, or sealing that wood cabinets require. By choosing low-maintenance materials, you free up your weekends to actually use your outdoor space for what it was intended for: cooking, entertaining, and making memories with family and friends.

What Kind of Support Can You Expect from Serene?

Investing in an outdoor kitchen is a big decision, and it’s natural to want a team you can rely on from the initial sketch to the final installation. When you choose Serene cabinets through Gappsi, you get more than just a high-quality product; you get a dedicated support system. We understand that a smooth process is just as important as a beautiful result. That’s why we partner with Serene to ensure you feel confident and informed at every stage. Our role is to bridge the gap between Serene’s excellent manufacturing and your unique vision for your Long Island home.

From the moment you start planning your layout to long after your project is complete, our combined expertise is at your service. We’ll help you translate your ideas into a functional design, keep you updated on progress, and ensure your new outdoor space is installed to perfection. This collaborative approach is designed to make the entire experience straightforward and enjoyable. You won’t have to juggle multiple contacts or wonder about the next steps. We manage the details so you can focus on anticipating all the great memories you’ll make in your new kitchen.

Get Expert Help with Design and Engineering

Bringing your dream outdoor kitchen to life starts with a solid plan. Serene makes the design phase simple with a clear, three-step process. First, you’ll work with their engineers to map out the perfect kitchen layout for your space and needs. Next, you get to do the fun part: picking your favorite color and finish to match your home’s aesthetic. Finally, you’ll select your appliances and any custom options. Our team at Gappsi facilitates this entire process, ensuring the final design integrates seamlessly with your overall landscape and masonry plans for a cohesive and stunning result.

Stay Informed Every Step of the Way

Clear communication is the cornerstone of any successful home improvement project. We pride ourselves on being accessible and responsive, and Serene shares that commitment. Customers often mention that the company is easy to work with, always takes their calls, and is dedicated to making sure every detail is perfect. When you work with Gappsi, you can expect that same level of attentiveness. We act as your single point of contact, coordinating with the Serene team and keeping you in the loop from start to finish. You’ll always know what’s happening and what to expect next, without having to chase down answers.

Count on Us for Installation and Warranty Help

Your peace of mind is important. Once your custom cabinets arrive, our expert Gappsi team handles the complete installation, ensuring everything is fitted precisely and functions perfectly. We treat your home with the care it deserves. After the work is done, you can relax knowing your investment is protected. Serene cabinets come with a five-year limited warranty, giving you confidence in their durability and long-term performance. Should any issues arise, you can count on our team to provide support and help you with any warranty claims, making the process simple and stress-free.

Are Serene Outdoor Kitchen Cabinets a Good Investment?

When you decide to add an outdoor kitchen, you’re not just buying appliances and cabinets; you’re investing in your home and your lifestyle. A well-designed outdoor kitchen can become the heart of your backyard, a place for family dinners, and the perfect spot for entertaining friends. But is it a smart financial move? With Serene cabinets, the answer is a clear yes. They offer a powerful combination of long-term value, low maintenance, and accessible financing that makes them a solid choice for any homeowner.

Increase Your Home’s Long-Term Value

An outdoor kitchen is a highly sought-after feature that can significantly increase your property’s appeal and resale value. Potential buyers often see a beautiful, functional outdoor living area as a major bonus. Serene enhances this value because each kitchen is custom-built in the USA to fit your space perfectly, creating a seamless and high-end look. This level of quality and customization signals a well-cared-for home. When you invest in durable, stylish outdoor features, you’re not just improving your daily life; you’re making a strategic upgrade that pays off. It’s a key part of any home remodeling project that adds tangible, lasting worth.

Save on Maintenance Costs Over Time

A smart investment saves you money in the long run, and that’s exactly what Serene cabinets are designed to do. Built with a strong, welded aluminum frame, they are made to withstand tough outdoor weather without breaking down. Unlike wood that can rot or warp and steel that can rust, Serene’s powder-coated aluminum is guaranteed not to rust. This means you can forget about the yearly cycle of sanding, staining, or sealing. These cabinets are designed to be incredibly durable and require minimal care, freeing you up to spend more time enjoying your backyard and less time working on it. Choosing low-maintenance materials is one of the best ways to ensure your outdoor space remains a source of relaxation, not chores.

Explore Your Financing Options

Building the outdoor kitchen you’ve always wanted is an exciting prospect, and flexible payment options can make it even more achievable. While a premium outdoor kitchen is a significant undertaking, it doesn’t have to be a single, large expense. To help you manage the cost, Serene offers financing options that allow you to spread your payments over time. This makes it easier to invest in the high-quality cabinets and features you want without compromising your vision or your budget. By exploring financing, you can move forward with your project and start enjoying your beautiful new outdoor living space much sooner.

What to Know Before You Buy

Getting ready to create your dream outdoor kitchen is an exciting process. To make sure everything goes smoothly from start to finish, there are a few key things to consider before you place your order for Serene cabinets. Thinking through measurements, layout, and delivery ahead of time ensures your new space will be as functional as it is beautiful. Let’s walk through what you need to know to feel confident in your investment.

How to Measure Your Space Correctly

Since every Serene outdoor kitchen is built to order, getting the measurements right is the essential first step. These cabinets are designed to fit your space perfectly, creating a seamless, built-in look. Before we begin, our team will help you measure the designated area, accounting for any existing features like utility lines or uneven surfaces. Precise measurements are the foundation of a great design, ensuring your new cabinets integrate flawlessly with your patio and overall landscape. Taking the time to get this right prevents surprises during installation and guarantees a polished, professional result.

Plan Your Ideal Cabinet Layout

This is where your vision starts to take shape. Planning your cabinet layout is a collaborative process designed to match your cooking style and entertainment needs. We’ll work with you to map out where each cabinet, appliance, and countertop will go. Do you need more storage near the grill? A dedicated space for a mini-fridge? We’ll help you think through the workflow of your kitchen to create a practical and enjoyable layout. This planning stage is a key part of our home remodeling process, ensuring your final design is tailored specifically to you.

What to Expect for Delivery

Once your design is finalized, Serene gets to work manufacturing your custom cabinets. Because they handle everything from design to production, the process is streamlined and efficient. When your cabinets are ready, we coordinate the delivery and professional installation, so you don’t have to worry about a thing. Plus, your investment is protected by a five-year limited warranty, giving you peace of mind. From your first design consultation to the final installation, our goal is to provide a completely stress-free experience, bringing high-quality products from the Gappsi Store directly to your home.

Related Articles

Frequently Asked Questions

How do these aluminum cabinets handle the salty air and harsh winters on Long Island? They are specifically engineered for coastal environments like ours. The cabinets are protected by a special “coastal powder coat” that is thermally bonded to the aluminum. This creates a durable, sealed surface that resists corrosion from salt spray and stands up to freezing temperatures without cracking or warping. Plus, the welded aluminum frame is guaranteed not to rust, so you can trust it to last through every season.

What does “low-maintenance” actually mean for cleaning these cabinets? It means you can spend your time enjoying your kitchen instead of working on it. Unlike wood that needs regular sealing or staining, Serene cabinets just require a simple cleaning with mild soap and water to look their best. The non-porous surface resists stains and prevents mold growth, so you won’t need any harsh chemicals or intense scrubbing to keep your kitchen looking pristine.

Since aluminum is a softer metal, how well does the finish resist scratches and dents? While aluminum itself is a lighter metal, the powder-coating process creates an incredibly tough and resilient finish. This protective layer is much harder than traditional paint and is designed to resist the chipping, scratching, and scuffs that come with everyday use in an outdoor kitchen. It provides a strong defense that keeps the cabinets looking great for years.

Can I really get any color I want, and will it match my existing patio? Absolutely. The goal is to create a kitchen that feels like a natural extension of your home. Serene offers a huge selection of colors, from classic neutrals to bold statement shades. You can even choose a realistic woodgrain finish if you love the look of wood but want the durability of aluminum. We can help you select the perfect option to complement your existing stone pavers, siding, and overall landscape design.

What is the general process from when I decide I want a Serene kitchen to when it’s installed? The process is designed to be straightforward and collaborative. It starts with a design consultation where we help you map out the perfect layout for your space and choose your colors and features. Once the design is finalized, Serene custom-builds your cabinets. When they are ready, our Gappsi team handles the complete professional installation, ensuring everything fits perfectly. We manage the entire project so you can have a seamless and stress-free experience.

Share this page:
A person laying artificial turf by unrolling it over the prepared base.

How to Lay Artificial Turf for a Flawless Lawn

Taking on a big home improvement project can be incredibly rewarding, and installing your own artificial lawn is a challenge you can definitely conquer. While it requires some muscle and attention to detail, the process is straightforward when you have a clear plan to follow. Think of this guide as your expert partner, breaking down each stage into simple, actionable steps. We’ll cover the essential tools you’ll need, the right way to prepare your base, and the techniques for getting those seams perfectly invisible. This is your complete roadmap for how to lay artificial turf, giving you the confidence to create a beautiful, long-lasting lawn yourself.

Key Takeaways

  • Focus on the Foundation First: The success of your entire project depends on proper ground preparation. Taking the time to clear, level, and compact a solid base is the best way to prevent future lumps, sinkholes, and drainage problems.
  • Patience Pays Off During Installation: Don’t rush the process of laying and cutting your turf. Letting the material relax in the sun makes it more pliable, and carefully trimming edges and joining seams is what creates that flawless, professional look.
  • Finish Strong for a Lasting Look: The final steps are just as important as the first. Securing the perimeter, adding infill for stability, and brushing the grass blades upright are essential for achieving a lush, natural appearance that will last for years.

Gather Your Tools and Materials

Before you can even think about unrolling that beautiful green turf, you need to get organized. Having all your tools and materials ready to go will make the entire installation process smoother and a lot less stressful. Think of it as setting yourself up for success. A little prep work now saves you from making frantic trips to the hardware store later. This preparation is the first step toward achieving a professional-looking lawn that you can be proud of.

Essential Tools You’ll Need

To get that seamless look, you’ll need a few key tools. Start with the basics for ground prep: a shovel and a wheelbarrow for moving soil and base materials. A turf cutter can be a lifesaver for removing your old lawn. For the installation itself, a sharp utility knife is crucial for cutting the turf to size, and a hammer will help you secure the edges. The most important piece of equipment is a plate compactor, which you can usually rent. This ensures your base is firm and level, preventing dips and bumps down the road. Having the right installation tools makes the job manageable and gives you a much better result.

Key Materials for a Solid Foundation

The longevity of your new lawn depends entirely on what’s underneath it. First, you’ll need your synthetic turf. Choose a high-quality option that fits the look and feel you want for your yard. Next is your base layer, typically made of crushed rock or a similar aggregate. This is vital for proper drainage and stability. Finally, don’t forget a good weed barrier. This fabric layer goes down before the turf to stop any persistent weeds from growing through. A solid foundation is truly the secret to a beautiful, low-maintenance lawn that lasts for years.

Optional Gear to Simplify the Job

While the essentials will get the job done, a few extra pieces of gear can make your life much easier. A power broom, for example, is fantastic for brushing up the turf fibers after you’ve laid them and added infill, giving your lawn a full, natural look. A carpet kicker can also be helpful for stretching the turf taut to eliminate any wrinkles before you secure it. These aren’t must-haves, but if you’re tackling a large area, investing in or renting these extra supplies can save you a lot of time and effort, helping you achieve that perfect finish with a little less elbow grease.

Prepare the Ground for a Flawless Finish

The secret to an artificial lawn that looks amazing for years isn’t just in the quality of the turf itself, but in the meticulous work you do before you even unroll it. Proper ground preparation is, without a doubt, the most critical part of the entire project. Think of it as building the foundation for a house; if the base isn’t solid, nothing on top will be either. This foundational work is what ensures your lawn stays smooth, drains correctly after a Long Island rainstorm, and won’t develop frustrating lumps or sinkholes over time.

Taking the time to create a stable, well-draining base will pay off with a durable, beautiful lawn that you can enjoy for years to come. While this process requires some muscle and attention to detail, following these steps carefully will set you up for a successful installation. It’s the difference between a lawn that looks professionally installed and one that shows its DIY roots. Of course, if you’re looking for a perfect result without the heavy lifting, our team has years of experience installing flawless synthetic turf and game courts and can handle the entire process for you.

Clear Out Old Grass and Debris

First things first, you need a clean canvas. This means removing every bit of the existing lawn, including grass, weeds, roots, and any large stones. For larger areas, renting a sod cutter is the most efficient way to get the job done. It slices right under the grass, allowing you to roll it up and remove it easily. If you’re working with a smaller patch, a sturdy shovel and some determination will work just fine. You’ll want to dig down about two to four inches to make sure you’ve removed the entire root system. Skipping this step can lead to old organic material decomposing under your new turf, creating an uneven and lumpy surface over time.

Excavate and Grade the Area

With the old lawn gone, it’s time to establish the proper depth and slope for your new turf. You’ll need to excavate the entire area to a uniform depth of about four inches. This creates enough room for the essential base layers that provide drainage and stability. As you dig, focus on grading the area. This means creating a very slight, consistent slope, about a one to two percent grade is ideal, that directs water away from your home’s foundation, patios, or walkways. You can use landscape stakes and a string line to help you maintain a consistent slope across the entire space. This step is absolutely vital for preventing water from pooling on your new lawn.

Lay Your Drainage Base

Now you can start building the foundation that will support your turf. This sub-base layer is crucial for both stability and drainage. We recommend using a crushed aggregate, such as Class II road base, crushed rock, or decomposed granite. You’ll need to fill the excavated area with a three to four-inch layer of this material. Use a wheelbarrow to transport the base material and a landscape rake to spread it as evenly as possible. This rock layer creates channels that allow water to flow through and drain away efficiently, keeping your turf from becoming waterlogged. It’s a similar foundational principle we use for projects like durable gravel driveways, ensuring long-term stability.

Level and Compact the Surface

Once your base material is spread evenly, the next step is to compact it into a hard, smooth surface. This is what prevents the ground from shifting or settling under your turf later on. For the best results, you should use a plate compactor, which you can rent from most home improvement stores. Go over the entire area several times, moving in different directions to ensure every inch is thoroughly compacted. The goal is to create a base that is firm to the touch and doesn’t leave deep footprints when you walk on it. For an even tighter compaction, you can lightly mist the aggregate with a hose before using the compactor.

Add a Weed Barrier

The final preparation step is laying down a weed barrier. This is a high-quality geotextile fabric that you’ll place directly on top of your compacted base. Its job is to stop any persistent weeds or old grass roots from growing up through the drainage holes in your artificial turf. At the same time, the fabric is permeable, so it won’t interfere with drainage. Roll out the fabric, making sure to cover the entire area. If you need to use multiple pieces, overlap the seams by at least six inches to prevent any gaps. Secure the barrier in place using landscape staples every few feet, paying special attention to the perimeter and the seams.

Lay and Cut Your Artificial Turf

Unroll and Position the Turf

Once your base is perfectly prepped, it’s time for the main event. Carefully unroll your artificial turf over the area, making sure the grain of the grass blades all points in the same direction for a uniform look. Don’t worry about wrinkles or stiffness at first; the sun is your best friend here. Let the turf lay out under the sun for at least an hour. This little sunbath helps the material relax, making it more flexible and easier to work with. If you’re working with a large piece, grab a friend to help you position it, as the rolls can be quite heavy. This step is key for a smooth, professional-looking installation of your new synthetic turf.

Measure and Cut for a Perfect Fit

With your turf relaxed and in position, you can start trimming it to size. The golden rule here is to measure twice and cut once. When you make your initial cuts, always leave about four to five inches of extra material around the entire perimeter. This extra turf acts as a safety net, giving you plenty of room to make precise, final trims against sidewalks, patios, or garden beds later on. It’s much easier to trim a little more off than it is to patch a piece that’s been cut too short. Using a sharp utility knife will give you the cleanest cuts for a perfect fit.

Tackle Corners and Curves

Straight lines are simple, but most yards have curves and corners to work around. For these tricky spots, a sharp razor knife is essential. To get a clean edge, it’s best to trim the turf from the back side. This allows you to see your cutting lines clearly and follow the contours of your hardscaping or edging precisely. Many turf rolls come with a black or red manufacturing edge, often called salvage, which you’ll want to trim off completely to ensure your seams are invisible. Taking your time on these detailed cuts is what separates a good DIY job from a great one. A visual guide can be incredibly helpful for this part of the process.

Let the Turf Acclimate

After you’ve done your rough cuts, it’s time for another short break. Before you start securing anything, let the turf lay flat in the sun for at least two hours. This step is called acclimation, and it’s crucial for a flawless result. As the turf warms up, it becomes even more pliable, allowing it to conform perfectly to the shape of your prepared base. This flexibility makes it easier to stretch the turf taut, eliminating any remaining wrinkles and ensuring it lays completely flat before you secure the seams and edges. Patience during this stage will pay off with a lawn that looks lush and natural for years to come.

Secure Your Turf and Hide the Seams

With your turf perfectly cut and settled, it’s time for the finishing steps that truly transform it into a seamless, professional-looking lawn. This is where you’ll secure everything in place, hide any evidence of seams, and give the grass blades that lush, upright appearance. Taking your time here ensures your new lawn not only looks fantastic but is also durable enough to handle everything from backyard parties to family games. These final touches are what make all the difference.

Join Seams with Tape and Adhesive

Creating an invisible seam is the secret to a flawless artificial lawn. Start by carefully folding back the edges of the two turf pieces you need to join. Lay a strip of specialized turf seaming tape on the base layer, right down the center of the gap. Apply a quality turf adhesive evenly across the tape. Then, slowly and carefully, fold the turf edges back down onto the adhesive-coated tape, pressing them firmly together. It’s helpful to have a friend for this part to ensure the pieces meet perfectly without overlapping. This creates a strong bond that will keep your seams hidden and secure.

Secure the Edges and Perimeter

Once your seams are joined, you need to anchor the entire perimeter of your turf. This prevents the edges from lifting and keeps the surface stable and safe. Using 5-inch galvanized nails or U-shaped turf staples, fasten the turf to the base every six to ten inches around the outer edge. You should also add a few along your seams for extra reinforcement. This step is especially important for high-traffic areas or if you’re installing a personal sports game court. Properly securing the edges ensures your lawn stays put, no matter the weather or activity.

Add Infill for Stability

Infill is a crucial component that gives your artificial turf weight, helps the blades stand upright, and provides a soft, cushioned feel underfoot. Spread about one to two pounds of infill material, like silica sand, per square foot across the entire surface. You can use a drop spreader for even distribution. This material settles down to the base of the turf, adding stability and protecting the backing from sun exposure. For homeowners with pets, there are also specialized pet-friendly infills available. You can find high-quality synthetic turf and installation materials to complete your project.

Brush and Groom for a Natural Look

The final step is to brush the turf to bring it to life. Using a power broom or a stiff-bristled push broom, brush against the grain of the grass blades. This action helps the blades stand up tall, creating a full and natural appearance. It also works the infill down into the base of the turf, right where it needs to be. This grooming process removes any flatness from being rolled up and gives your new lawn a pristine, manicured look. A quick brush is all it takes to make your turf look its absolute best.

Keep Your New Lawn Looking Its Best

Now that your beautiful new lawn is installed, a little bit of upkeep will ensure it stays green and gorgeous for years to come. Unlike a natural lawn that demands constant mowing and watering, maintaining artificial turf is straightforward and simple. With just a few routine tasks, you can keep the blades standing tall and the surface looking pristine. Think of it as protecting your investment and ensuring your outdoor space is always ready for backyard barbecues, kids’ playtime, or just relaxing in the sun. We’ll walk through the easy steps for cleaning, handling pet messes, and managing your turf through the seasons.

Simple Cleaning and Brushing

To keep your turf looking lush and natural, give it a good brushing every so often. Using a stiff, non-metal brush, sweep the fibers against the direction they naturally lay. This simple motion helps the blades stand upright, giving your lawn that fresh, vibrant look. Regular brushing also prevents the blades from matting down in high-traffic areas and ensures the infill material stays evenly distributed. It’s a quick chore that makes a huge difference in maintaining the appearance of your synthetic turf installation.

Handle Pet Waste and Debris

If you have furry family members, you’ll be happy to know that artificial turf is incredibly pet-friendly. When accidents happen, simply remove any solid waste and rinse the area with a hose every few weeks to wash away any residue. For extra odor control, you can spread a layer of Zeolite over the base before the turf is installed. This natural mineral helps neutralize pet odors, keeping your yard smelling fresh. A clean lawn means a happy space for both you and your pets to enjoy, making your outdoor living area a true haven.

Your Seasonal Care Checklist

Keeping your artificial lawn in top shape is all about consistency. Make it a habit to periodically clear away leaves and debris with a leaf blower or rake, just as you would with any yard. A regular brushing schedule will keep the grass blades looking perky and full. Think of it as a simple seasonal to-do list that protects the look and function of your lawn over time. Consistent care ensures your turf remains a beautiful, low-maintenance feature of your home for many years, much like our approach to restoring and sealing patios and driveways to preserve their beauty.

Manage Heat on Hot Days

On those hot Long Island summer days, your artificial turf can absorb heat from the sun. While it cools down quickly once shaded, it’s something to be aware of. If you’re in the planning stages, you can select turf made from materials like nylon, which has a higher heat tolerance. Products with a higher face weight and longer pile height can also feel more comfortable underfoot. A quick spray with a garden hose can cool the surface down instantly, making it comfortable for bare feet. Choosing the right turf and game court materials from the start can make all the difference.

Related Articles

Frequently Asked Questions

How long does a typical DIY turf installation take? The timeline really depends on the size of your yard and how much help you have. For an average-sized backyard, you should set aside a full weekend. The majority of your time, probably about 70 percent of it, will be spent on the ground preparation. Clearing out the old lawn and creating a perfectly compacted base is the most labor-intensive part. Laying and securing the turf itself is much quicker, but you don’t want to rush the foundational work.

What’s the single most important step I shouldn’t mess up? Without a doubt, it’s the ground preparation. It might feel like the least glamorous part of the project, but creating a solid, compacted base is what guarantees your lawn will look great for years. If you skimp on this step, you’ll end up with lumps, dips, and poor drainage down the road. A flawless foundation is truly the secret to a professional-looking result that lasts.

Is artificial turf a good choice if I have dogs? Absolutely. Artificial turf is a fantastic solution for pet owners. It’s durable enough to withstand their playing, and you won’t have to worry about muddy paws or brown spots. Clean-up is also very simple. You can pick up solid waste just like you would on regular grass, and a quick rinse with a hose will take care of any liquid messes, keeping your yard fresh and clean.

How does artificial turf handle heavy rain? A properly installed artificial lawn handles rain beautifully. The turf itself has small drainage holes in the backing, and the crushed rock base you install underneath is designed to let water flow through and drain away from the surface. This system prevents puddles from forming, so your lawn stays usable even after a heavy Long Island downpour.

Can I just lay the turf directly on top of my existing soil or grass? I would strongly advise against it. Placing turf directly over soil or grass is a recipe for an uneven, lumpy lawn. The organic material underneath will decompose over time, creating soft spots and an unstable surface. More importantly, you would be skipping the crucial aggregate base layer, which is essential for proper drainage and long-term stability.

Share this page:
Permeable pavers on a modern driveway for managing rainwater and enhancing curb appeal.

Your Guide to Permeable Pavers for Driveways

A driveway that allows rainwater to pass right through it might sound a bit like magic, but it’s actually the result of smart, intentional design. The secret isn’t that the pavers themselves are porous like a sponge. The real innovation lies in the system as a whole, from the small gaps between each stone to the carefully layered foundation of clean aggregate beneath. This structure is engineered to mimic the way the earth naturally absorbs water. When you install permeable pavers for driveways, you’re creating a surface that is both incredibly strong and environmentally functional. It’s a sophisticated system that provides a durable place to park your car while actively managing stormwater right on your property.

Key Takeaways

  • It’s all about the base, not the paver: The real work of a permeable system happens below the surface. Water drains through the small gaps between pavers into a deep, layered stone foundation that filters it back into the soil.
  • Protect your property and the environment: A permeable driveway prevents water from pooling on the surface or running into storm drains. This reduces soil erosion around your home and helps recharge local groundwater, making it a smart choice for your landscape.
  • Expert installation is non-negotiable: The success of a permeable driveway depends entirely on its specialized foundation. Proper installation by a professional is essential to ensure it drains correctly and provides a durable, long-lasting surface for your vehicles.

How Do Permeable Pavers Actually Work?

Permeable pavers might seem like a bit of magic, but their function is based on a really smart, straightforward system. Unlike a traditional asphalt or concrete driveway that creates a solid, non-porous surface, a permeable system is designed to mimic the way natural ground absorbs rainwater. Instead of forcing water to run off into the street, where it can overwhelm storm drains and carry pollutants into local waterways, permeable pavers allow it to soak back into the earth right where it falls. This is a huge benefit for Long Island homeowners who want to protect our local environment.

This process not only helps reduce flooding and erosion on your property but also contributes to recharging our groundwater supply. The entire system, from the pavers on top to the layers of stone beneath, works together to manage stormwater effectively. It’s an elegant solution that combines beautiful design with practical, eco-friendly function. At Gappsi, we specialize in designing and installing these systems, ensuring they are both beautiful and built to last. The secret isn’t in the paver itself, but in the thoughtful engineering of the entire structure. It creates a durable, stable surface that can handle cars and foot traffic while working with nature, not against it. Let’s break down exactly how these components come together.

The Secret to Letting Rainwater Through

It’s a common misconception that the pavers themselves are porous like a sponge. The real genius is in the design of the system. Permeable pavers, which can be made from beautiful porcelain and natural stone, are installed with small, intentional gaps between each one. These gaps are then filled with a special, clean aggregate (tiny stones) that allows water to flow through freely. Instead of sheeting off the surface, rainwater drains directly through these joints and into the base below. This process helps water soak back into the soil, which is great for your surrounding landscape and reduces the strain on municipal drainage systems. It’s a simple yet highly effective way to manage runoff.

What’s Underneath: The Layers of a Permeable System

The pavers you see are just the top of a carefully constructed foundation. Below the surface, a permeable system consists of several layers of different-sized, open-graded stones. This multi-layered base acts as a natural filter and a temporary reservoir for rainwater. As water passes through the joints, these stone layers clean it of debris and hold it while it gradually soaks into the subsoil. A proper permeable installation requires a much deeper base than a traditional one, often needing at least 30% more gravel. This robust foundation is critical for both effective drainage and the long-term stability of your driveway, providing the strength needed to support vehicles. This is why professional masonry expertise is key.

Why Choose Permeable Pavers for Your Driveway?

When you think about upgrading your driveway, you’re probably focused on curb appeal and durability. But what if your driveway could also be an eco-friendly feature that protects your property? Permeable pavers offer a smart solution that looks great, lasts for years, and helps manage rainwater right where it falls. They combine function and style, giving you more than just a place to park your car. Let’s look at a few of the biggest reasons homeowners are making the switch.

Manage Stormwater and Protect Your Landscape

One of the standout benefits of a permeable paver driveway is its ability to handle stormwater effectively. Instead of rainwater pooling on the surface or running off into storm drains, it filters through the joints between the pavers and soaks into the ground below. This natural process helps prevent soil erosion around your property and reduces the amount of polluted runoff entering Long Island’s waterways. By replenishing the groundwater, a permeable system also nourishes your surrounding landscape and reduces the strain on municipal drainage systems, making it a responsible choice for the environment and your home.

Long-Term Value and Potential Savings

Investing in a permeable driveway is a smart move for your property’s future. Not only can a beautifully installed paver driveway increase your home’s value, but it can also lead to long-term savings. Many municipalities have regulations or offer incentives related to stormwater management. By installing a permeable system, you might find you’re compliant with local environmental rules and could even see a reduction in certain fees or property taxes. It’s an investment that pays off by adding significant curb appeal and value to your home while potentially lowering some ongoing costs, all while being kinder to the planet.

Get the Exact Look You Want

Choosing an eco-friendly option doesn’t mean you have to compromise on style. Permeable pavers come in a huge variety of shapes, sizes, colors, and textures, allowing you to achieve the exact aesthetic you envision for your home’s exterior. Whether you prefer the classic look of cobblestone, the clean lines of modern concrete, or the rich tones of natural stone, there’s a permeable option to match. You can create intricate patterns and designs that complement your home’s architecture, proving that sustainable choices can also be the most beautiful ones.

Are They as Durable as Traditional Pavers?

A common question is whether permeable pavers can stand up to the same wear and tear as traditional surfaces. The answer is a resounding yes. Despite their porous nature, permeable paver systems are engineered to be incredibly strong and durable. When installed correctly by a professional masonry team, they can easily handle the weight of heavy vehicles and daily traffic. These systems are designed for longevity, providing a stable and reliable surface that will last for decades. You get all the environmental benefits without sacrificing the strength and performance you expect from a high-quality driveway.

Exploring Your Permeable Paver Options

When you hear “permeable,” you might picture something purely functional, but the reality is so much more exciting. Choosing an eco-friendly driveway doesn’t mean you have to compromise on style. There’s a wide world of materials that can match your home’s aesthetic, from classic and elegant to modern and rustic. Let’s look at some of the most popular choices for Long Island homes.

Interlocking Concrete Pavers

These are one of the most versatile choices available. Permeable interlocking concrete pavers look just like traditional pavers, but the magic happens in the small gaps between them. These joints are filled with tiny stones that let rainwater flow through to a specially prepared base underneath, which filters the water. With a huge variety of shapes, colors, and textures, you can create a custom look that perfectly complements your home’s design. They provide the classic, structured appearance many homeowners love, whether you want a cobblestone feel or a sleek, modern surface.

Porous Asphalt and Concrete

If you prefer the uniform look of a traditional driveway, porous asphalt and concrete are great options. Unlike standard versions, these materials are mixed with a formula that creates tiny, interconnected pores throughout the surface. This allows water to drain directly through the pavement itself, rather than running off the sides. It’s a durable solution that provides a smooth, consistent finish while still offering all the environmental benefits of a permeable system. This makes it a solid choice for homeowners who want a clean, minimalist appearance for their driveway.

Natural Stone and Other Eco-Friendly Choices

For a truly high-end or naturalistic look, nothing beats real stone. You can create a permeable driveway using gorgeous natural stone pavers set with wider, gravel-filled joints that allow for drainage. Another popular eco-friendly option involves grid systems. These grids provide structural support and can be filled with either decorative gravel or even grass for a lush, green driveway. Systems like GravelFix are perfect for creating a stable and beautiful surface that blends seamlessly into your landscape, offering unique textures and a strong connection to the environment.

How to Pick the Best Material for Your Home

Choosing the right material comes down to balancing aesthetics, performance, and local rules. Start by considering your home’s architectural style. A rustic farmhouse might look stunning with a gravel grid system, while a contemporary home may be better suited to sleek pavers. It’s also wise to check with your local town here on Long Island, as many have specific regulations about non-porous surfaces. Adopting a permeable design might even come with incentives. Discussing your vision with a design and construction expert is the best way to weigh all the factors and select the perfect material for your home.

What’s the Investment for a Permeable Driveway?

Let’s talk about one of the most important factors in any home project: the budget. When you’re looking at a permeable paver driveway, it’s helpful to think of it as a long-term investment in your home’s functionality and curb appeal. While the initial price tag can be higher than for a traditional driveway, the final cost includes a sophisticated drainage system built right in. This upfront investment can prevent future headaches and expenses related to water management, making it a smart and sustainable choice for your property. To give you a clear picture, let’s break down what goes into the cost.

A Breakdown of Material and Installation Costs

When you start pricing out a permeable driveway, you’ll see a range of costs. The materials themselves, such as the pavers, can run from about $4 to $12 per square foot. However, the total project cost, which includes the specialized base layers, excavation, and professional labor, typically lands between $10 and $40 per square foot. The reason for this range is that you aren’t just paying for pavers; you’re investing in an entire engineered system. The layers of aggregate beneath the surface are just as important as the beautiful porcelain and natural stone pavers you see on top, as they are what allow water to filter through effectively.

Factors That Influence the Final Price

Several key factors will shape the final quote for your permeable driveway. The specific type of paver you choose is a major one, as costs vary between concrete, clay, and natural stone. The size and complexity of your driveway also play a big role. Beyond that, site preparation is crucial. If your property requires significant grading or excavation to create the right foundation, that will influence the cost. The installation itself requires a specific, non-compacted base, which is different from a traditional driveway. This requires expert masonry and construction knowledge to ensure the system functions correctly for years to come.

Permeable vs. Traditional: A Cost Comparison

It’s true that a permeable paver driveway often has a higher upfront cost than a standard asphalt or concrete surface. But it’s not quite an apples-to-apples comparison. A traditional driveway may require you to install a separate, costly drainage system to handle stormwater runoff. With a permeable system, that solution is built-in, potentially saving you money and hassle. Over time, the durability of high-quality pavers and the reduced risk of water damage can offer significant value. Plus, you’re getting an eco-friendly feature that enhances your landscape and adds a unique, high-end look to your home, similar to our custom Gravel-Fix driveways.

Installation and Care: What to Expect

A permeable paver driveway is a fantastic long-term investment for your home, but its success hinges on getting two things right: a professional installation and simple, consistent care. Unlike a traditional driveway, the real work happens in the layers beneath the surface. When installed correctly, your permeable driveway will manage stormwater and look beautiful for years with very little effort on your part. Let’s walk through what you can expect from the installation process and how to keep your new driveway in top shape.

Why a Professional Foundation is Key

The secret to a permeable driveway that lasts is the foundation. It’s not just about laying pavers; it’s about building a multi-layered system that allows water to filter through. This requires a specific, non-compacted base of open-graded stone that creates voids for water to collect and seep into the ground. This is very different from the compacted base used for traditional pavers. Getting this foundation right is a precise science, which is why professional masonry and construction is so important. An improperly installed base can lead to clogged joints, shifting pavers, and a system that fails to drain, completely defeating the purpose of your investment.

Ensuring Your Driveway Can Handle the Traffic

It’s a common question: can a driveway designed to let water through really be strong enough for cars? The answer is a definite yes. Permeable pavers are engineered to be incredibly strong and durable, easily handling the weight of daily vehicle traffic. The strength comes from two places: the high-quality pavers themselves and the interlocking system that distributes the load across a wide area. The open-graded gravel base also plays a role, providing a stable foundation that can support heavy loads without compacting. When you choose high-quality natural stone or pavers, you can be confident your driveway is built to perform for decades.

Simple Maintenance to Keep It Working Perfectly

One of the best parts of owning a permeable paver driveway is how little maintenance it needs. Your main job is to keep the joints between the pavers clear of debris so water can pass through. This usually just means an occasional sweep with a stiff broom or a rinse with a garden hose to remove leaves, dirt, and sediment. If you have grass pavers, you’ll also need to mow and water the grass as you would with your lawn. For deeper cleaning or to address any stubborn stains, Gappsi offers professional cleaning and sealing services to restore your driveway’s look and function.

Is a Permeable Driveway the Right Choice for You?

Deciding on the right driveway material involves more than just looks. It’s about finding a solution that fits your property, your lifestyle, and your local environment. If you’re weighing your options, here’s a breakdown of key factors to help you determine if a permeable driveway is the perfect fit for your Long Island home.

Considering Your Soil, Property, and Climate

Permeable pavers are designed to be an eco-friendly solution that works with nature, not against it. Instead of letting rainwater run off into storm drains, they allow it to soak through the surface and into the ground below. This process helps replenish local groundwater supplies and filters out pollutants from runoff, which protects our nearby waterways. For homeowners, this means no more puddles or pooling water on your driveway after a heavy rainstorm. This can also help prevent water from collecting near your home’s foundation, reducing the risk of flooding and water damage over time. It’s a smart way to manage the elements while maintaining a beautiful and functional driveway.

Checking Local Regulations and Permits

Before you start any major project, it’s always a good idea to understand local regulations. Many towns across Long Island are putting limits on how much non-porous or “hard” surface area a property can have. Some municipalities even have stormwater fees based on the amount of impervious surface on your lot. Choosing permeable pavers can help you comply with these local codes and could even save you money in the long run. We always recommend checking with your local town or village to learn about their specific rules for permeable surfaces. They can also tell you about any potential tax benefits or incentives available for installing an environmentally friendly driveway.

Making the Final Decision for Your Home

Ultimately, a permeable driveway is a smart, sustainable, and stylish choice for any home. They are just as strong and durable as traditional options, easily handling daily foot and vehicle traffic while adding significant curb appeal. When making your final decision, consider the unique benefits they offer: superior stormwater management, a reduced environmental footprint, and a modern aesthetic. By choosing the right materials, you can create a driveway that is not only beautiful but also a responsible investment in your property and community. If you’re still unsure, talking with a professional can help you weigh the pros and cons for your specific home.

Related Articles

Frequently Asked Questions

Do weeds grow in the gaps between the pavers? This is a common concern, but permeable systems are designed to minimize weed growth. The small, clean stones used to fill the joints don’t provide a great environment for weeds to take root, unlike the sand used in some traditional paver joints. While you might see a stray weed from time to time, regular sweeping is usually enough to keep the surface clear and prevent anything from establishing itself.

How do permeable pavers handle snow and ice in the winter? They actually perform quite well in winter conditions. Because water drains through the surface instead of pooling on top, there is less standing water to freeze when temperatures drop. This can lead to less ice buildup compared to a non-porous surface. You can plow a permeable driveway, but it’s best to use a plow with a protective edge to avoid catching the pavers. When it comes to de-icers, it’s wise to use them sparingly, as excessive salt can be harmful to the system and the local groundwater.

Are permeable driveways strong enough for an SUV or a delivery truck? Absolutely. The strength of a permeable driveway doesn’t come from the pavers alone; it comes from the entire engineered system beneath them. The deep, multi-layered stone base is designed to provide a stable foundation that distributes the weight of heavy vehicles across a wide area. When installed correctly by a professional team, your driveway can easily handle daily traffic from cars, SUVs, and the occasional delivery truck without any issues.

What happens if the joints get clogged with dirt over time? Clogging is rare, especially if you keep up with simple maintenance like sweeping away leaves and debris. The system is designed to handle a normal amount of sediment. If the joints do become significantly clogged after many years, they can be professionally cleaned. A specialized vacuum can be used to remove the old joint material, which is then replaced with fresh, clean aggregate to restore the driveway’s full permeability.

Can I just replace my old asphalt driveway with permeable pavers? Replacing a traditional driveway with a permeable system is a bit more involved than a simple surface swap. The process requires a full excavation of the old driveway and the soil below it. This is done to create the much deeper, specialized base of open-graded stone that is essential for proper water drainage. It’s a complete system build from the ground up, which is why professional design and installation are so important for long-term success.

Share this page:
Custom gunite pool and patio designed by professional Long Island, NY builders.

Find the Best Gunite Pool Builders in Long Island, NY

You have a vision for your backyard: a beautiful, sparkling pool where your family can relax and play all summer long. But turning that dream into a reality is a complex process with many moving parts. The bridge between your idea and a finished, functional oasis is a skilled and reliable builder. A gunite pool offers limitless design freedom, but only an expert can execute that vision flawlessly. This is where your search for the best gunite pool builders in Long Island, NY, truly begins. We’ve created this resource to help you find a partner who can handle every detail, from design to construction, with precision and care.

Key Takeaways

  • Your builder is your most important partner: The success of your project hinges on choosing a contractor with proven gunite experience, proper Long Island licensing, and a strong reputation. Prioritize clear communication and a detailed contract over simply picking the lowest bid.
  • Embrace the design freedom of gunite: Gunite’s key advantage is its complete flexibility. You can create any shape, size, or depth and seamlessly integrate custom features like tanning ledges, waterfalls, and spas to build a pool that truly fits your home and lifestyle.
  • Plan for the entire backyard transformation: A smooth pool build involves more than just the construction itself. Understand the local permit process, plan for a realistic timeline, and create a budget that includes decking, landscaping, and other features to ensure a cohesive outdoor oasis.

Who Are the Top Gunite Pool Builders in Long Island?

Choosing the right builder for your gunite pool is one of the most important decisions you’ll make in your home improvement journey. You’re not just hiring a contractor; you’re selecting a partner who will help bring your vision for the perfect backyard escape to life. Long Island is home to many skilled professionals, but the best builders combine technical expertise with a deep understanding of design, a commitment to quality materials, and a track record of happy clients. They listen to your ideas, offer creative solutions, and manage the project with clear communication from start to finish.

To help you begin your search, we’ve highlighted some of the most reputable gunite pool builders serving Nassau and Suffolk counties. Each of these companies has earned a strong reputation for their craftsmanship and dedication to creating beautiful, lasting swimming pools. Think of this as a starting point to help you find the perfect team to build the backyard oasis you’ve always wanted.

Gappsi: Premier Pool Construction Since 1987

With a legacy of creating exceptional outdoor spaces since 1987, Gappsi is a leader in comprehensive backyard design and construction. We don’t just build swimming pools; we create fully integrated environments. Our expertise is especially evident in gunite pool renovations, where we can completely transform an existing pool into a modern, luxurious retreat. What truly sets us apart is our ability to handle every element of your project, from stunning masonry and coping to lush landscaping and custom water features. This holistic approach ensures your new pool blends seamlessly and beautifully with the rest of your property.

Gibbons Pools

Gibbons Pools has built a strong reputation on Long Island for creating luxury, award-winning custom pools and spas. They are a top choice for homeowners looking for exceptional craftsmanship and a high-end finish. The team at Gibbons handles new construction, renovations, and ongoing service, providing a complete solution for their clients. Their portfolio showcases a commitment to sophisticated design and quality, making them a well-known name in the local pool industry. They focus on delivering a premium product that stands as a centerpiece of any backyard.

Custom Pools Long Island

As their name suggests, Custom Pools Long Island specializes in designing and building one-of-a-kind swimming pools tailored to each client’s home and lifestyle. Their primary focus is on gunite and inground pools, where they excel at turning unique ideas into reality. If you have a specific vision that doesn’t fit a standard mold, their team is dedicated to the creative process. Their commitment to creating luxurious, personalized pools means they work closely with homeowners to ensure the final result is a perfect reflection of their personal style.

Sweeney’s Pool Service

Sweeney’s Pool Service, Inc. is another established builder that constructs and renovates custom gunite pools across Long Island. They are known for their expertise in building durable pools that are made to last for decades. Homeowners who prioritize longevity and solid construction often turn to Sweeney’s for their projects. Their focus on using proven techniques and quality materials ensures that clients receive a beautiful and structurally sound pool that will be a source of enjoyment for many years to come.

How to Choose the Right Gunite Pool Builder

Choosing the right builder is the most critical decision you’ll make for your new gunite pool. This is the team you’ll be partnering with for months, trusting them to turn a significant investment into the backyard oasis you’ve envisioned. To make a confident choice, focus on a few key areas that separate the great builders from the rest. It’s about finding a partner with the right experience, credentials, and communication style to bring your project to life smoothly.

Proven Gunite Construction Experience

Look for a builder with a long and successful track record specifically with gunite pools. An experienced contractor has managed projects of all shapes and sizes, navigating Long Island’s unique terrain and building codes. They can anticipate potential issues before they become costly problems. Ask to see a portfolio of their work, paying close attention to the quality of the craftsmanship and the variety of designs. A deep portfolio demonstrates their ability to handle complex projects and deliver consistently beautiful results. This history shows they not only know how to build a pool but how to build one that lasts.

Proper Licensing and Insurance

Never skip the step of verifying a builder’s credentials. Your contractor must have a valid home improvement license for your specific county in Long Island, as well as comprehensive liability insurance and workers’ compensation coverage. This isn’t just red tape; it’s your protection. Proper licensing ensures they meet local standards, while insurance protects you from financial responsibility in case of accidents or property damage during construction. A professional builder will readily provide proof of their credentials, giving you the peace of mind that you’re working with a legitimate and responsible company.

Custom Design Capabilities

One of the greatest appeals of a gunite pool is the limitless design potential. You need a builder who can translate your ideas into a functional and stunning design. A top-tier builder won’t just offer a few standard shapes; they’ll act as a creative partner. They should be able to discuss and seamlessly integrate custom features like waterfalls, tanning ledges, built-in spas, and infinity edges. Their ability to customize ensures your new pool will perfectly complement your home’s architecture and your family’s lifestyle, creating a truly one-of-a-kind outdoor space.

Strong Customer Reviews and Reputation

A builder’s reputation is built one project at a time. Go beyond the testimonials on their website and look for reviews on independent platforms like Google and Houzz. Pay attention to what past clients say about the entire experience—from the initial design consultation to the final cleanup and post-project support. Don’t hesitate to ask for recent references you can speak with directly. Some companies even have video testimonials that can give you a better sense of their work and client relationships. Consistent positive feedback is a strong indicator of quality craftsmanship and excellent customer service.

Clear Communication and Project Management

A pool build is a complex process with many moving parts. You want a builder who communicates clearly, proactively, and consistently. From the start, they should provide a detailed contract and a realistic timeline, keeping you informed of progress and any potential delays. A great project manager will be your single point of contact, ready to answer questions and address concerns promptly. This open line of communication is the foundation of a low-stress project. It ensures you always know what’s happening on-site and feel like a valued partner throughout the entire construction journey.

Breaking Down the Cost of a Long Island Gunite Pool

Typical Installation Price Range

On Long Island, a typical gunite pool installation costs between $90,000 and $140,000, with total project prices ranging from $50,000 to over $180,000. You can generally expect to budget around $100 to $280 per square foot. This covers the core construction of your swimming pool, but remember that site conditions and design complexity will affect the final number. The best way to get an accurate picture for your yard is to request a detailed quote from a professional builder who can assess your property and discuss your vision.

Factors That Influence Your Final Cost

Gunite pools are a smart long-term investment, and several factors determine the upfront cost. Beyond the obvious—size and depth—your property itself plays a role. A sloped yard or limited access for equipment can increase site preparation costs. Your choice of materials for the pool’s interior finish and the surrounding patio, like beautiful porcelain or natural stone, will also influence the budget. Even the equipment, like pumps and filters, comes in various price points. Each choice allows you to tailor the project to your specific needs and priorities.

Popular Upgrades and Features

This is your chance to personalize your backyard oasis. Popular upgrades can transform your pool’s look and feel. Consider adding a soothing waterfall, an integrated spa for year-round relaxation, or a shallow tanning ledge perfect for lounging. Custom LED lighting sets the mood for evening swims, while a vanishing edge offers a sleek, modern aesthetic. These features add to the cost but create a truly custom experience. They also help integrate your pool into a larger outdoor living design that might include a pavilion or pergola.

Available Financing and Payment Options

Many homeowners finance their gunite pool projects. Common options include home equity loans, personal loans, or financing programs available through your builder. It’s always a good idea to discuss payment options early in the conversation. A professional builder will provide a transparent, itemized quote that breaks down every expense, which is crucial for both your budget and any loan applications. This clarity helps you plan effectively and ensures there are no surprises. When you’re ready to start planning your new swimming pool, ask about the financing process.

Why Choose a Gunite Pool?

When you’re planning your dream backyard, the type of pool you choose is one of the biggest decisions you’ll make. While there are several options available, gunite pools consistently stand out for their incredible flexibility and longevity. They are built on-site using a steel rebar frame and a sprayed concrete mixture, a method that opens up a world of possibilities. From unmatched durability to complete design freedom, a gunite pool is more than just a place to swim—it’s a permanent, high-value addition to your home that can be tailored to your exact vision.

Unmatched Durability and Lifespan

If you’re looking for a pool that will last a lifetime, gunite is the answer. The construction process, which involves spraying a concrete and sand mixture over a grid of steel reinforcement bars, creates an incredibly strong and durable monolithic shell. This robust structure can withstand the test of time, and with proper care, a gunite pool can last for decades, even a century or more. This makes it a true long-term investment in your property. Choosing a gunite pool means you’re building a permanent feature that your family can enjoy for generations, without worrying about frequent replacements or structural failures.

Complete Design Freedom

One of the most exciting benefits of a gunite pool is the unparalleled creative freedom it offers. Unlike pre-molded fiberglass pools, gunite can be shaped into any form you can imagine. Whether you want a classic rectangle, a winding lazy river, or a freeform lagoon that blends into your landscape, it’s all possible. This flexibility extends to features as well. You can easily incorporate custom elements like built-in spas, tanning ledges, waterfalls, and swim-up bars. The finish can also be customized with a variety of materials, including plaster, pebble, or tile, allowing you to create a truly unique backyard oasis that perfectly complements your home’s masonry and overall aesthetic.

Increased Property Value

A beautiful, well-built gunite pool is a significant asset that can increase your home’s value. Because of their durability and custom appearance, gunite pools are seen as a premium upgrade that adds major appeal for potential buyers, especially in areas like Long Island where outdoor living is so desirable. It’s not just an expense; it’s an investment in your property’s marketability. A stunning swimming pool can be the centerpiece of your backyard, transforming it into a luxurious retreat that enhances your home’s overall worth. When you decide to sell, a high-quality gunite pool can be a key feature that sets your home apart from the rest.

Long-Term Maintenance Needs

While gunite pools are built to last, it’s important to understand their long-term care requirements. Like any major home feature, they need routine maintenance to stay in top condition. The primary long-term task for a gunite pool is resurfacing, which is typically needed every 10 to 15 years. This process involves applying a new layer of finish to the pool’s interior to keep it looking fresh and prevent leaks. While this is an added cost to consider in your long-term budget, it’s a predictable part of ownership that ensures your pool remains a beautiful and functional centerpiece. Proper care and occasional restoration will protect your investment for years to come.

Designing Your Dream Gunite Pool

This is where the fun really begins. A gunite pool is a blank canvas, giving you the freedom to create a backyard retreat that is uniquely yours. Unlike standard pools with pre-set shapes, a gunite pool is built on-site, allowing for complete customization. The design process is a collaborative effort to translate your vision into a functional and beautiful reality. Think about how you want to use the space. Is it for hosting lively summer parties, enjoying quiet family afternoons, or getting in a few laps for exercise?

Your answers will shape every decision, from the pool’s footprint to the finishing touches. The right design not only reflects your personal style but also complements your home’s architecture and the natural flow of your landscape. With an experienced builder, you can explore endless possibilities to create a truly one-of-a-kind swimming pool that will be the centerpiece of your home for years to come. Let’s look at the key elements you’ll get to decide on.

Custom Shapes and Sizes

With gunite, you aren’t limited to a simple rectangle or oval. You have the flexibility to design a pool that fits your backyard and your lifestyle perfectly. You might prefer a sleek, modern rectangular pool with clean lines that complements a contemporary home. Or perhaps a relaxed, freeform design with gentle curves feels more organic and natural in your space. The shape can be tailored to fit around existing trees, patios, or other landscape features, making the most of your property’s unique layout and creating a seamless, integrated look.

Integrated Water Features and Lighting

Water features add movement, sound, and a touch of luxury to your pool area. Imagine the tranquil sound of a rock waterfall cascading into the water or the playful splash of deck jets. Features like bubblers on a tanning ledge or a raised spa that spills over into the main pool can create a resort-like atmosphere right in your backyard. At night, lighting transforms the space entirely. Modern LED lights can illuminate your pool with a spectrum of colors, setting the mood for a peaceful evening swim or a vibrant poolside party.

Unique Tile and Surface Finishes

The interior finish of your pool is like the paint on your walls—it defines the overall color and character of the water. Gunite pools offer a wide array of options, from classic white plaster for a crisp, blue look to colored plaster or pebble finishes that can create a deep lagoon-like appearance. You can also add a personal touch with waterline tiles, choosing from countless colors, patterns, and materials. For a truly custom look, consider adding intricate mosaics and stonework to the floor or steps of your pool.

Cohesive Decking and Landscaping

Your pool doesn’t exist in a vacuum; it’s the heart of your entire outdoor living space. Gunite construction allows for the seamless integration of popular features like tanning ledges, beach entries, and built-in benches that blur the lines between the pool and the patio. The surrounding deck and landscape are just as important as the pool itself. Choosing the right masonry and patio materials ensures your pool deck is both beautiful and functional, while thoughtful landscaping provides privacy, shade, and softens the hardscape.

The Gunite Pool Construction Timeline

Knowing what to expect during your pool build can make the entire process feel much more manageable. While every custom project is unique, a gunite pool installation generally follows a predictable path. On average, you can expect the construction to take anywhere from 6 to 12 weeks from the moment the crew breaks ground. This timeline can shift based on the complexity of your design, property conditions, and a few other factors we’ll get into.

An experienced builder will guide you through each step, ensuring you’re always in the loop. The goal is to move your project forward efficiently without cutting corners, transforming your backyard into the oasis you’ve envisioned. At Gappsi, we manage the entire process, from initial sketches to the final fill, to create a seamless and stress-free experience for you.

From Project Start to Finish: The Main Phases

Seeing your pool come to life happens in a few key stages. It all starts with finalizing your design and securing the necessary permits. Once we have the green light, our team gets to work on excavation, carefully shaping the earth to match your pool’s custom form. Next, we install a sturdy steel rebar framework that acts as the skeleton of your pool. Plumbers and electricians then run all the necessary lines for filtration, lighting, and water features. The most exciting part for many homeowners is the gunite application, where a specialized concrete blend is sprayed over the rebar to form the durable pool shell. After the gunite cures, we add the finishing touches: tile, coping, your interior finish, and the surrounding decking and patio.

How Weather and Seasons Can Affect Timing

Here on Long Island, we know the weather can be unpredictable. Rain, snow, or extended periods of freezing temperatures can cause unavoidable delays in a pool construction timeline. The gunite application, for example, requires specific conditions to cure properly, so a week of heavy rain can pause progress. An experienced local builder understands these seasonal challenges and will plan the project schedule accordingly. While we can’t control the weather, we can build a realistic timeline that accounts for potential interruptions and communicate openly with you if any delays occur. This ensures that work proceeds safely and that the final quality of your new swimming pool is never compromised.

The Permit and Approval Process

Before any digging begins, every pool project must go through a permit and approval process with your local municipality. This is a non-negotiable step that ensures your new pool meets all safety regulations and building codes, from fencing requirements to property setbacks. The time it takes to secure a permit can vary quite a bit depending on your town and the complexity of the project. This is one of the first hurdles in the timeline, and it’s a critical one. Working with a seasoned pool builder is a huge advantage here, as they will be familiar with local requirements and can prepare and submit all the necessary paperwork correctly, helping to prevent unnecessary delays right from the start.

Key Questions to Ask Your Pool Builder

Choosing a pool builder is a big decision. You’re not just hiring someone to dig a hole; you’re trusting them with a major investment in your home and your family’s future enjoyment. To make sure you find the right partner, it helps to go into your consultations prepared. Asking smart, direct questions will give you a clear picture of their experience, process, and what it will be like to work with them. Think of it as an interview—you’re the one in charge. These key questions will help you cut through the sales pitch and get the information you really need to hire with confidence.

Can I See Your Portfolio?

This seems obvious, but it’s about more than just looking at pretty pictures. A builder’s portfolio is proof of their craftsmanship and their ability to deliver on different styles. Ask to see examples of pools that are similar in size, shape, and features to what you have in mind. A great builder will be proud to show off their work and might even connect you with past clients. Pay attention to the details in the photos—the tile work, the decking, and the overall finish. You can get a great sense of a company’s quality by exploring their past swimming pool projects and seeing the transformations for yourself.

What Do Your Warranty and Service Agreements Cover?

A swimming pool is a complex system with a lot of moving parts. You need to know what happens if something goes wrong after the crew leaves. Ask for specific details about their warranty. What does it cover? Is it for the structure, the equipment, or the workmanship? How long does the coverage last? A reputable builder will offer a comprehensive warranty because they stand behind the quality of their work. This conversation also opens the door to discussing ongoing service and maintenance, ensuring you have a reliable partner to help you care for your investment for years to come.

What Is the Expected Timeline?

While every construction project can face unexpected delays from weather or inspections, an experienced builder should be able to give you a realistic timeline. Ask for a breakdown of the major phases, from excavation and plumbing to decking and finishing touches. This helps you understand the entire process and sets clear expectations for both sides. A builder who has completed hundreds of projects in the Long Island area will have a firm grasp on local permit processes and seasonal challenges, allowing them to provide a much more accurate and dependable schedule for your new pool.

How Do You Ensure Quality Control?

This question helps you understand a builder’s process and their commitment to excellence. Ask who will be on-site supervising the project each day and how they will keep you updated on progress. Find out what kind of materials they use and why. For example, the choice between different types of porcelain and natural stone pavers can significantly impact the look and longevity of your pool deck. Strong communication and a commitment to using high-quality materials are clear signs of a contractor who prioritizes quality control from start to finish, ensuring your pool is built to last.

Common Mistakes to Avoid When Hiring a Builder

Building your dream pool is an exciting process, but it’s also a major investment in your home. The builder you choose will make all the difference between a smooth, enjoyable experience and a project filled with stress and unexpected problems. To make sure you end up with a beautiful backyard oasis you can enjoy for years, it helps to know what common pitfalls to look out for. By avoiding these frequent missteps, you can hire with confidence and set your project up for success from day one.

Choosing Based on Price Alone

It’s completely understandable to have a budget in mind, but selecting a pool builder based only on the cheapest price can lead to poor quality work and unexpected costs later on. A bid that seems too good to be true often is. It could signal corner-cutting on materials, inexperienced labor, or a scope of work that leaves out essential steps you’ll have to pay for down the line. Instead of focusing solely on the bottom line, look for the best value. A well-built swimming pool from a reputable builder is an asset that will last for decades, making the initial investment worthwhile.

Not Verifying Credentials

Before you sign any contracts, it’s crucial to do your homework on the builder. Don’t hesitate to ask about their experience, especially with gunite pools, which require specialized skills. A professional company will be transparent about their qualifications. You should always verify that they have the proper licensing and insurance for work in Long Island. This protects you from liability in case of accidents on your property. Ask to see a portfolio of their completed projects and for references from past clients. A builder who is proud of their work will be happy to share it.

Overlooking Important Contract Details

The contract is your most important tool for ensuring a successful project. A successful pool construction project relies heavily on clear, consistent communication, and overlooking contract details can lead to major misunderstandings. Your contract should be detailed and easy to understand. Make sure it clearly outlines the full scope of work, a specific payment schedule, a realistic project timeline, and details on material and workmanship warranties. Reading every line might seem tedious, but a thorough contract protects both you and the builder, ensuring everyone is on the same page before any work begins.

Ignoring Communication Red Flags

Strong communication is one of the clearest signs of a reliable pool contractor. From your very first interaction, pay attention to how the builder communicates with you. Do they answer your questions clearly and patiently? Do they respond to your calls or emails in a timely manner? A builder who values communication makes the entire process more enjoyable and less stressful. If you feel like you’re being rushed, dismissed, or given vague answers, consider it a red flag. You’ll be working with this team for months, so it’s essential to choose a construction company you can build a positive relationship with.

What to Know About Long Island Pool Permits

Getting a permit for your new gunite pool might sound like a headache, but it’s a crucial step that ensures your backyard oasis is safe for everyone. A professional builder will handle the paperwork, but it’s smart to understand the key requirements yourself. This process protects your family, your guests, and your investment by making sure everything is built to the highest safety standards.

Local Building Codes and Safety Rules

First things first: any pool in New York that can hold at least 24 inches of water needs a building permit. This isn’t just red tape; it’s about safety. The state has specific pool safety information and regulations designed to prevent accidents. The most important rule involves barriers. Your pool area must be completely enclosed by a fence or other barrier that is at least 48 inches high. Any gates in the fence must be self-closing and self-latching to prevent small children from wandering into the pool area unsupervised. Your builder will make sure your design includes these essential safety features from the very beginning.

Property Setback Regulations

You also need to think about where the pool will sit on your property. You can’t just place it anywhere you’d like. New York has property setback regulations that dictate how far your pool must be from your property lines, your house, and other structures. These rules are in place for a few reasons: they ensure emergency responders can access the area, prevent water drainage issues for your neighbors, and maintain a degree of privacy. Your pool designer will survey your property and create a plan that adheres to all local zoning laws, ensuring your swimming pool installation is fully compliant.

The Inspection and Compliance Process

Once your permits are approved and construction is underway, a local building inspector will visit your property at key stages. They aren’t there to cause trouble—they’re there to verify that the work meets all required codes. The inspector will check everything from the structural integrity and electrical wiring to the plumbing and safety barriers. A reputable builder will coordinate these inspections and ensure every aspect of the project is up to code. Passing these inspections is the final step to getting your pool approved, giving you peace of mind that your beautiful new gunite pool was built correctly and safely.

Related Articles

Frequently Asked Questions

What’s the real difference between a gunite pool and a fiberglass one? The biggest difference comes down to customization and permanence. A fiberglass pool is a pre-made shell that’s lowered into your yard, which limits you to the manufacturer’s available shapes and sizes. A gunite pool is built completely on-site, allowing you to design any shape, size, or depth you can imagine and seamlessly integrate features like spas or tanning ledges. Think of it as the difference between buying a pre-built shed and having a custom guesthouse designed for your property.

How long does the entire process take, from the first call to the first swim? While the on-site construction typically takes 6 to 12 weeks, the full timeline from your initial design meeting to your first swim is usually a bit longer. You should plan for a few weeks upfront for the design and selection process, followed by the permit application phase, which can vary by town. A good builder will give you a clear, all-encompassing timeline that accounts for these preliminary steps so you know exactly what to expect.

Besides the pool, what other project costs should I anticipate? This is a great question because the pool is just one part of your new backyard. You should also budget for the surrounding patio or deck, safety fencing, and landscaping, as these are essential for a finished and functional space. Many homeowners also choose to add features like an outdoor kitchen, a pavilion for shade, or lighting to enhance the area, so it’s wise to think about the entire scope of your dream backyard from the start.

How much work is it to take care of a gunite pool each week? Modern gunite pools are much easier to maintain than you might think. Your weekly routine will generally involve testing the water chemistry, skimming leaves from the surface, and emptying the skimmer baskets. Many of these tasks can be simplified with automatic cleaners and chemical feeders. While there is a commitment, a little bit of consistent care each week is all it takes to keep the water sparkling and ready for you to enjoy.

Can I really get any shape I want? Are there any limitations? Yes, the design freedom with gunite is truly remarkable. You can create everything from sharp geometric designs to flowing, naturalistic curves that fit perfectly into your landscape. The main limitations aren’t from the material itself but from your property’s specific characteristics, like its size, slope, and local setback regulations. An experienced designer will work with you to create a custom shape that not only brings your vision to life but also works beautifully within your specific yard.

Share this page: