Your backyard should be a true extension of your home, a place that reflects your personal style. Finding the right foundation for your patio, walkway, or pool deck is the first step in bringing that vision to life. If you feel limited by the standard options, you’ll love the creative freedom that comes with porcelain. These pavers are design chameleons, able to convincingly mimic the rustic warmth of a wood plank or the elegant veining of natural marble. With a vast range of colors, textures, and sizes, porcelain outdoor pavers / tiles allow you to create a completely custom look that’s both beautiful and built to last for decades.
Key Takeaways
- Porcelain offers lasting strength with less work: Because they are fired at extreme temperatures, porcelain pavers are incredibly dense and durable. This non-porous surface naturally resists stains, frost, and fading, which means you get a beautiful patio without the need for constant sealing or scrubbing.
- Achieve any aesthetic without compromise: Porcelain gives you complete creative freedom. You can get the high-end look of natural stone or wood without the difficult upkeep, choosing from a huge range of colors, textures, and sizes to perfectly match your home’s style.
- Invest in a versatile, long-term solution: While the initial price might be higher, porcelain’s long lifespan and minimal maintenance needs make it a smart financial choice. Its strength makes it suitable for any project, from elegant pool decks and patios to durable driveways and Sports Games Courts.
Why Choose Porcelain Pavers for Your Outdoor Space?
When you’re planning a new patio, walkway, or pool deck, the material you choose is a big decision. It needs to look great, stand up to the elements, and fit your lifestyle. That’s why so many Long Island homeowners are turning to porcelain pavers. They offer a unique combination of sophisticated style, incredible toughness, and surprisingly low maintenance. Unlike some traditional materials that can require a lot of upkeep, porcelain gives you a beautiful outdoor space you can actually spend your time enjoying, not constantly working on. Let’s look at the specific benefits that make porcelain a top choice for any outdoor project.
Enjoy Lasting Durability and Strength
One of the biggest advantages of porcelain is its remarkable strength. Because these pavers are fired at extremely high temperatures during manufacturing, they become incredibly dense and durable, often even stronger than natural stone. This means they can handle heavy foot traffic, patio furniture, and the general wear and tear of outdoor living without chipping or cracking. Think of it as a long-term investment in your home. A properly installed porcelain paver patio can last for decades with basic care, giving you a beautiful, functional space for countless family barbecues and quiet evenings. You can explore a wide selection of high-quality porcelain and natural stone options to find the perfect fit for your project.
Find Your Perfect Aesthetic
Your outdoor space should be an extension of your home’s personality, and porcelain pavers make it easy to achieve the exact look you want. Whether your style is sleek and modern or rustic and traditional, there’s a porcelain paver to match. They are perfect for creating an elegant and luxurious feel for any patio, pool deck, or walkway. The manufacturing process allows for an incredible range of colors, patterns, and finishes, giving you complete creative control. This versatility ensures your new outdoor area will seamlessly blend with your home’s existing architecture and your overall landscape design. You aren’t just building a patio; you’re designing a custom outdoor retreat.
Resists Stains, Fading, and Frost
Here in Long Island, we get everything from scorching summer sun to freezing winter storms. Porcelain pavers are built to handle it all. Their surface is non-porous, which means liquids can’t penetrate it. Spilled wine, greasy drips from the grill, or fallen leaves won’t leave behind stubborn stains. This non-porous quality also makes them resistant to mold and mildew growth. Plus, they are completely frost-proof, so you don’t have to worry about cracking during the freeze-thaw cycles of winter. While other materials might need regular cleaning and sealing to stay protected, porcelain maintains its color and integrity year after year with minimal effort.
Spend Less Time on Maintenance
If you’d rather spend your weekends relaxing on your patio than working on it, porcelain pavers are an excellent choice. They are one of the lowest-maintenance paving options available today. Because they are non-porous and resist staining, you can say goodbye to harsh chemical cleaners and hours of scrubbing. Most of the time, a simple sweep and a rinse with a garden hose are all that’s needed to keep them looking new. Unlike many types of natural stone or concrete pavers, porcelain does not require sealing to protect it from water absorption or stains. This saves you time and money over the life of your patio, giving you a consistently beautiful surface without the constant upkeep.
Your Design Options with Porcelain Pavers
One of the best parts about choosing porcelain pavers is the incredible design flexibility they offer. Forget feeling limited by a small selection of colors or styles. Porcelain opens up a world of creative possibilities, allowing you to design an outdoor space that truly reflects your personal taste. Whether you dream of a rustic patio that looks like aged wood or a sleek, modern pool deck, there’s a porcelain paver to match your vision. You can mix and match colors, textures, and sizes to create a one-of-a-kind look for your Long Island home.
The technology behind porcelain manufacturing means you can achieve almost any aesthetic you can imagine. From rich, earthy tones to cool, contemporary grays, the options are vast. This versatility ensures your new patio, walkway, or driveway will not only be durable but also a beautiful extension of your home’s style. Let’s look at the specific design choices you can make.
Get the Look of Natural Stone and Wood
If you love the timeless appeal of natural materials but worry about the upkeep, porcelain pavers are the perfect solution. Advanced manufacturing techniques allow porcelain to convincingly replicate the look of natural stone, from the subtle veining of marble to the rustic texture of cobblestone. You can find pavers in a range of earthy colors that bring a warm, organic feel to your landscape. Similarly, if you want the cozy look of a wood deck without the constant sealing and staining, wood-look porcelain tiles offer a stunning and practical alternative. You get all the beauty of these classic materials with the superior durability and low maintenance of porcelain.
Explore a Spectrum of Colors and Finishes
Your outdoor space should be a reflection of your style, and porcelain pavers provide a full palette to work with. The color options go far beyond basic beige and gray. You can find pavers in crisp whites, deep blues, and even multi-tonal varieties that add depth and character. This spectrum of colors allows you to create a cohesive design that complements your home’s exterior and landscaping. Beyond color, you can also choose from various finishes. A matte finish offers a soft, contemporary look, while a more textured surface can add rustic charm. The right combination of color and finish helps you set the perfect mood for your outdoor oasis.
Add Texture for Safety and Style
Texture does more than just add visual interest to your patio or walkway; it’s also a key safety feature. Many porcelain pavers are designed with slip-resistant surfaces, making them an ideal choice for areas that get wet, like pool decks and entryways. These “grip” finishes provide extra traction underfoot, giving you peace of mind without sacrificing style. Textured pavers can also mimic the feel of natural materials like slate or travertine, adding a layer of authenticity to your design. This blend of beauty and function ensures your outdoor space is not only stunning but also safe for family and friends.
Choose from Various Sizes and Thicknesses
The size and shape of your pavers play a huge role in the final look of your project. Porcelain pavers come in a wide array of sizes, from smaller 8×8 squares to large-format rectangular tiles like 12×48. Using large pavers can make a small patio feel more spacious, while mixing different sizes can create intricate, eye-catching patterns. Our masonry design experts can help you choose a layout, like a classic running bond or a sophisticated herringbone, that enhances your space. The paver’s thickness is also important, as thicker pavers are recommended for high-traffic areas like driveways to ensure long-lasting strength and stability.
Where to Use Outdoor Porcelain Pavers
Porcelain pavers are incredibly versatile, making them a fantastic choice for almost any outdoor project you can imagine. Their unique combination of strength, beauty, and low maintenance allows them to perform beautifully in a variety of settings. Whether you’re creating a cozy patio for quiet evenings or a durable driveway that can handle daily traffic, porcelain provides a reliable and stylish foundation. At Gappsi, we use porcelain and natural stone pavers to transform outdoor spaces into functional works of art. From poolside lounges to elegant walkways, these pavers offer a practical solution that doesn’t compromise on design. Let’s look at some of the most popular applications for outdoor porcelain.
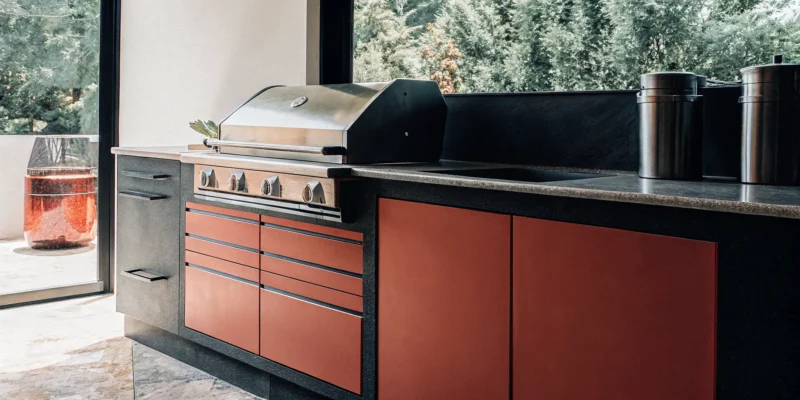
Patios and Outdoor Living Areas
Your patio is the heart of your backyard, and porcelain pavers can make it both stunning and simple to care for. They provide a clean, contemporary look that can seamlessly extend your indoor living space to the outdoors. Because they resist stains from spills like wine or oil, you can host barbecues and family gatherings without worrying about cleanup. As landscaping professionals note, “Porcelain pavers offer a modern, low-maintenance alternative to traditional outdoor materials to create long-lasting outdoor living spaces.” This durability means your beautiful masonry patio will look incredible for years with minimal effort.
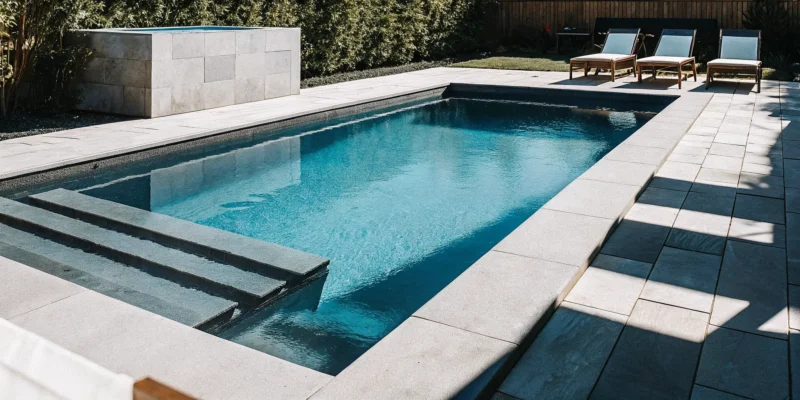
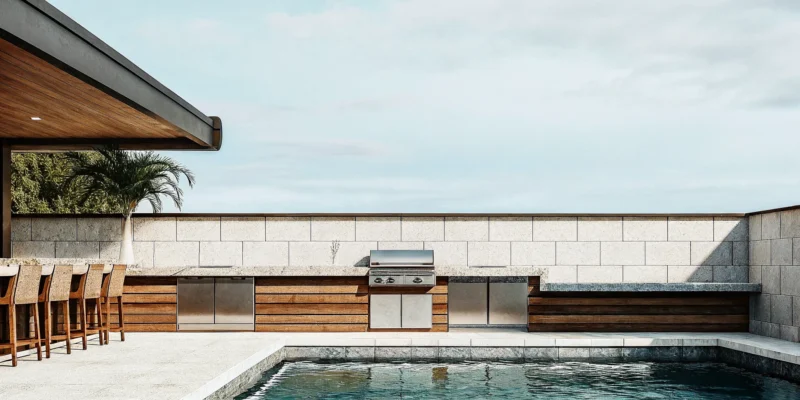
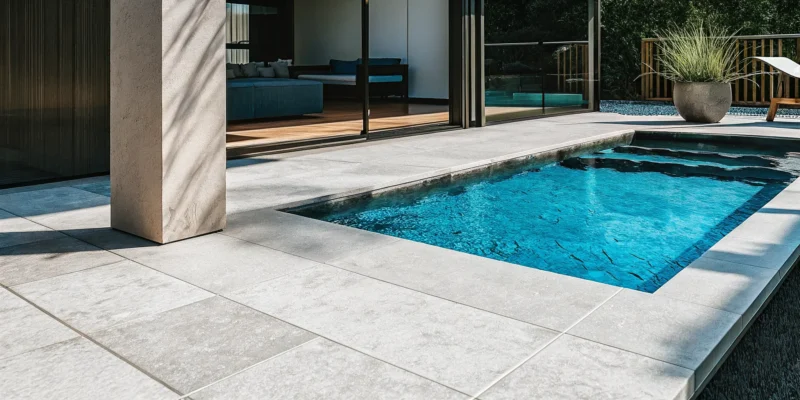
Pool Decks and Walkways
Safety and style are top priorities around a swimming pool, and porcelain pavers deliver on both. Many collections are engineered with textured, slip-resistant surfaces, which is a huge plus for wet areas. This feature provides better grip underfoot, reducing the risk of slips and falls around your swimming pool. Porcelain also resists fading from UV rays and damage from pool chemicals, so your pool deck will maintain its color and integrity. Its low water absorption rate prevents it from warping or cracking, ensuring a safe, beautiful, and long-lasting surface for summer fun.
Driveways and High-Traffic Zones
A driveway needs to be tough enough to handle the weight of vehicles and constant use. Porcelain pavers are an excellent choice for these high-traffic zones because of their exceptional strength. They are “stronger, more durable and denser than natural stones,” making them perfectly suited for driveways and busy walkways. Unlike some other materials that can crack under pressure, high-quality porcelain pavers are built to withstand heavy loads without showing signs of wear. This makes them a smart investment for a durable and attractive entrance to your home that will stand the test of time.
Sports Games Courts and Entertainment Spaces
Porcelain pavers are a fantastic surface for custom backyard Sports Games Courts. Their incredible durability and uniform surface create a reliable and high-performance area for basketball, pickleball, or other activities. Porcelain’s “low water absorption and high breakage resistance ensure its durability,” which means it won’t easily crack or weather from intense activity or changing seasons. This makes it a superior choice over materials that might degrade over time. You can create a professional-quality playing surface that doubles as a versatile entertainment space, perfect for any home with an active family. Explore our synthetic turf and Sports Games Courts to see what’s possible.
Understanding Paver Costs and Performance
Making a smart investment in your outdoor space means looking at both the initial cost and the long-term performance of your materials. Porcelain pavers stand out because they deliver incredible value. While the upfront price might be higher than some alternatives, their durability and low maintenance needs often make them the more economical choice over time. Let’s break down what goes into the cost and what you can expect.
What Affects the Price?
The price of porcelain pavers can vary, and it’s helpful to know what factors are at play. The brand, design complexity, size, and thickness all influence the cost. Pavers that mimic intricate wood grains or natural stone patterns may come with a higher price tag. Larger or thicker pavers designed for driveways will also cost more. Remember that the total project cost includes site preparation and professional installation, which is essential for ensuring your new patio or walkway lasts for decades.
Comparing Long-Term Value
When you look at the big picture, porcelain pavers are a fantastic long-term investment. Their durability means you won’t spend money on frequent repairs. Unlike wood decks that need regular staining or some stones that require sealing, porcelain is a low-maintenance material that saves you time and money. A properly installed porcelain paver patio can easily last 50 years or more with just basic cleaning, helping maintain your property’s value and keeping your outdoor space looking pristine.
Proven Performance and Reliability
There’s a myth that porcelain isn’t as strong as natural stone, but the opposite is often true. During manufacturing, porcelain is fired at extremely high temperatures, making it denser and more durable than many stones. This process gives it a very low water absorption rate, so it’s resistant to frost, cracking, and staining. Its high breakage resistance ensures it can handle heavy foot traffic and harsh weather, making it a reliable choice for any outdoor living area.
What to Know About Installation
Porcelain pavers offer great installation flexibility. They can be dry-laid over sand or gravel, placed on grass for a modern look, or installed over an existing concrete slab. For rooftop decks or uneven surfaces, they can even be installed on pedestal systems. Regardless of the method, correct installation is crucial for performance. Working with experienced professionals ensures the base is properly prepared and the pavers are set correctly, guaranteeing a stable, long-lasting surface.
Common Questions About Porcelain Pavers
When you’re planning a big project, it’s natural to have questions. Porcelain pavers are a fantastic choice for outdoor spaces, but there are a few common myths and queries that pop up. Let’s clear the air so you can feel confident in your decision.
Clearing Up Common Misconceptions
The word “porcelain” might bring to mind delicate teacups, but when it comes to pavers, the reality is completely different. Thanks to a manufacturing process that involves firing fine clay at extremely high temperatures, porcelain pavers are incredibly dense, strong, and durable. In fact, they are often stronger than many types of natural stone. This strength makes them a practical, low-maintenance solution for patios, walkways, and driveways. They are built to handle Long Island weather and daily life without chipping or cracking easily, giving you a beautiful surface that lasts for years.
Do They Get Hot in the Sun?
This is a great question, especially if you’re planning a new pool deck or a patio where your family will be running around barefoot. While any surface will warm up in direct summer sun, porcelain pavers don’t get significantly hotter than other materials. The key factor is actually the color, not the material itself. Lighter-colored pavers reflect more sunlight and stay much cooler to the touch than darker shades. If you’re designing a space for sunbathing or poolside fun, choosing a porcelain paver in a white, beige, or light gray will keep the area comfortable all summer long.
Professional vs. DIY Installation
While some porcelain pavers are marketed for easy installation, achieving a flawless and long-lasting result requires proper groundwork. The base beneath your pavers is critical for preventing shifting, cracking, and drainage issues down the road. A professional installation ensures the site is correctly excavated, graded, and compacted. An expert team has the right tools and experience to handle any challenges your property might present. For a project that adds significant value to your home, trusting a professional masonry team is an investment in getting it done right the first time.
Sustainability and Eco-Friendliness
If being environmentally conscious is important to you, porcelain pavers are an excellent choice. They are made from natural and abundant raw materials like clay and feldspar. Their incredible durability also means they have a very long lifespan, so you won’t need to replace them often, which reduces waste. Furthermore, because porcelain is non-porous, it naturally resists stains, mold, and mildew without the need for chemical sealants. This means fewer chemicals are used during routine maintenance, which is better for your family and the local environment.
Related Articles
- Stones & Porcelain Archives – Gappsi Group
- Porcelain & Stone Patio Pavers on Long Island | Gappsi Inc
Frequently Asked Questions
Are porcelain pavers slippery when they get wet? This is a very common and important question, especially for pool decks and walkways. Many porcelain pavers are specifically designed with safety in mind and feature textured, slip-resistant surfaces. This “grip” finish provides excellent traction even when wet, making them a much safer choice than many smooth natural stones or sealed concrete options for areas where people will be walking with wet feet.
How do porcelain pavers handle the changing seasons on Long Island? Porcelain is exceptionally well-suited for our climate. Because the pavers are non-porous, they don’t absorb water. This means they are completely frost-proof and won’t crack during the winter’s freeze-thaw cycles. In the summer, their dense composition and factory-sealed colors resist fading from harsh UV rays, so your patio will look just as vibrant after many years of sun exposure.
What does “low-maintenance” actually mean for porcelain pavers? It truly means you get to spend more time enjoying your outdoor space and less time working on it. For most messes, a simple sweep and a rinse with a garden hose are all you need. Because porcelain is non-porous, spills from things like wine, oil, or fallen leaves don’t soak in and cause stains. You can skip the annual power washing, chemical treatments, and sealing that other materials often require to stay looking their best.
Is porcelain really strong enough for a driveway? Absolutely. Don’t let the name fool you; these aren’t delicate tiles. Porcelain pavers are fired at extremely high temperatures, which makes them incredibly dense and durable, often even stronger than natural stone. When you choose the appropriate thickness and have them installed professionally, they can easily handle the weight of vehicles and daily traffic without cracking or showing wear.
Why should I choose porcelain pavers if other materials cost less upfront? While some materials might have a lower initial price, porcelain pavers often prove to be the more economical choice over the long run. Their incredible durability means you won’t be spending money on frequent repairs or replacements. Plus, you save significantly on maintenance costs year after year since they don’t require sealing or special cleaners. It’s an investment in a beautiful, worry-free outdoor space that adds lasting value to your home.