Your pool patio is the stage for your summer memories, but its success goes far beyond looks. Safety and comfort are the true headliners. With wet surfaces and bare feet being the norm, the material you choose is your first line of defense against slips and scorching hot surfaces. This decision impacts how freely your family and guests can enjoy the space. Finding the best paving material for a pool patio and coping means prioritizing a non-slip texture and a surface that stays cool under the Long Island sun. This guide will walk you through the top choices that deliver on safety without sacrificing an ounce of style.
Key Takeaways
- Prioritize safety and comfort: Select materials with a non-slip texture for better grip and choose lighter colors or heat-resistant stones, like travertine, to keep the surface cool for bare feet.
- Match maintenance to your lifestyle: Decide if you prefer the timeless look of natural stone, which needs periodic sealing, or the convenience of low-maintenance options like porcelain pavers that require minimal upkeep.
- Protect your investment with expert installation: The best materials perform poorly without proper installation; working with a professional ensures correct drainage and a solid base, preventing costly future repairs and guaranteeing a beautiful result.
What to Look For in a Pool Patio Material
Choosing the right material for your pool patio is about more than just looks. It’s a decision that impacts safety, comfort, and how much time you’ll spend on maintenance. When you’re planning your dream swimming pool, thinking through these key factors will help you select a patio surface that you’ll love for years to come. Let’s walk through what really matters.
Prioritize Safety and Slip Resistance
Safety should always come first around a pool, where surfaces are constantly wet. The key is to choose a material with a non-slip surface to prevent accidental slips and falls. You’ll want to look for pavers that have some texture. Finishes that are rough, tumbled, or brushed provide much better grip for wet feet than smooth, polished surfaces. When we design a pool area, we always guide homeowners toward materials like textured porcelain and natural stone that offer this built-in safety feature. It’s a simple choice that makes a huge difference in creating a secure and worry-free environment for your family and guests.
Consider Comfort for Bare Feet
Think about how often you and your family will be walking around the pool without shoes. Some materials absorb the sun’s heat and can become uncomfortably hot on a summer day. To keep your feet happy, consider materials that stay cooler to the touch. Natural stones like travertine are fantastic because they naturally reflect heat. Lighter-colored pavers also help reduce both heat and glare from the sun. Choosing a comfortable material ensures your poolside experience is relaxing from the ground up, allowing you to enjoy the space without hopping from foot to foot on a scorching surface.
Check for Durability and Chemical Resistance
Your pool patio will face a lot, from constant foot traffic and splashing water to exposure to pool chemicals and changing weather. You need a material that can handle it all without cracking, fading, or staining. Granite with a flamed finish is incredibly tough, and high-quality concrete pavers are known for being sturdy and low maintenance. It’s also important that the material resists damage from chlorine and other pool treatments. Investing in a durable surface means less worry about repairs and more time enjoying your pool. Our masonry experts can help you choose a material built to last.
Plan for Proper Drainage
Proper drainage is critical for keeping your pool deck safe and preventing water damage. Without a way for water to escape, you’ll end up with puddles that create slippery hazards and can harm the patio’s foundation over time. A slight, carefully planned slope away from the pool is essential. Another excellent option is a permeable paver system, which allows water to drain right through the surface and into the ground below. This design prevents slick spots from forming near walkways or seating areas. Ensuring your patio has good drainage is a fundamental part of a professional installation.
Balance Cost with Long-Term Value
While your budget is a major factor, it’s important to think about the long-term value of your investment. Some materials, like natural stone, may have a higher upfront cost but offer unmatched beauty and durability that lasts for decades. Other options, such as concrete pavers, provide a great balance of style, strength, and affordability, making them a popular and practical choice. We recommend thinking about maintenance costs as well. A material that requires frequent sealing or special cleaning might cost more over time. We can help you explore options that fit your budget while delivering the lasting quality your home deserves.
Comparing Popular Pool Patio Materials
Once you know what to look for, it’s time for the fun part: exploring your options. Each material brings its own unique blend of style, function, and feel to your poolside. Let’s walk through some of the most popular choices to help you find the perfect fit for your backyard oasis. From the classic appeal of natural stone to the modern performance of manufactured pavers, the right material will not only look beautiful but also stand up to years of poolside fun.
Concrete Pavers
If you’re looking for a reliable, all-around performer, concrete pavers are a fantastic choice. They offer a great balance of durability, safety, and value. Because they are manufactured, they come in a huge variety of shapes, sizes, and finishes, so you can achieve almost any look you want. One of the biggest practical benefits is that they are low maintenance. If a paver ever gets damaged, you can simply replace that single piece instead of redoing the entire surface. This sturdiness makes them a smart, long-term investment for any busy backyard, handled expertly through professional masonry services.
Travertine
For a touch of timeless elegance, many homeowners turn to travertine. This popular natural stone has a porous surface that naturally absorbs water, which helps keep your patio from getting slippery. Finishes like tumbled or brushed travertine can also add a bit of texture for better grip underfoot. One of its most celebrated features is that it stays remarkably cool, even on hot summer days, making it very comfortable for bare feet. While travertine offers a premium look and great durability, it does come at a higher price point and will need to be sealed periodically to protect it from pool chemicals and stains. You can explore a wide range of natural stone options to find the perfect shade.
Bluestone
Bluestone is another beautiful natural stone that brings a classic, sophisticated feel to a pool patio. It’s known for being incredibly strong and durable, holding up well against the elements. To make it suitable for a poolside setting, you’ll want to choose a finish like thermal or natural cleft. These finishes create a slightly uneven, textured surface that provides excellent grip when wet, which is a huge plus for safety. The rich, deep tones of bluestone can create a stunning visual contrast with the sparkling water of your pool, giving your outdoor space a truly high-end look.
Porcelain Pavers
Porcelain pavers are quickly becoming a favorite for modern pool patios, and for good reason. They are engineered to be extremely dense and non-porous, which means they resist water, stains, and fading. This makes them one of the lowest maintenance options available. Textured porcelain pavers are specifically designed with a high outdoor rating and a slip-resistant surface, making them one of the safest choices for a pool area. With a huge range of styles that can mimic everything from natural stone to wood, you can get a high-end look without the upkeep.
Brick Pavers
There’s something undeniably charming about a brick paver patio. This classic material offers a warm, traditional look that complements many home styles. Bricks are very strong and hold up well to harsh weather, making them a durable choice for your outdoor space. However, there is one major consideration for a pool deck: heat. Brick tends to absorb and retain a lot of heat from the sun, which can make it uncomfortably hot for bare feet on a summer afternoon. While its timeless appeal is a major draw, it’s important to weigh that against its performance in a poolside setting. Proper masonry installation is key to ensuring a long-lasting result.
Which Materials Are Safest and Most Comfortable?
When you’re designing a pool patio, it’s easy to get swept up in the aesthetics. But before you fall in love with a specific look, let’s talk about what matters most for a poolside space: safety and comfort. Your pool area is a high-traffic zone where people will be walking, running, and lounging with bare feet on often-wet surfaces. The right material makes the difference between a relaxing oasis and a space that feels like a hazard.
Choosing a safe and comfortable material comes down to three key factors: texture for grip, heat resistance for bare feet, and the right finish to protect the surface without making it slippery. Some materials naturally excel in these areas, while others might need a little help to be poolside-ready. By focusing on these practical elements first, you can narrow down your options to materials that are not only beautiful but also perfectly suited for years of family fun.
The Importance of Texture for Grip
A slippery pool deck is every homeowner’s worst nightmare. To prevent slips and falls, the texture of your paving material is your best line of defense. Look for pavers with a naturally rough or textured surface that provides traction even when wet. Finishes described as “tumbled” or “brushed” are excellent because they create a slightly uneven surface that gives your feet something to grip. These textures also help water channel away instead of pooling on the surface.
Materials like travertine, certain natural stones, and textured concrete pavers are fantastic choices for creating a non-slip environment. Even the coping, which is the stone edge around the pool, should be considered. A bullnose or rounded edge on your coping provides a safer, more comfortable grip for swimmers entering and exiting the water.
Which Materials Stay Coolest Underfoot?
There’s nothing worse than scorching your feet on a hot patio during a summer heatwave. The material you choose for your pool deck plays a huge role in how much heat it absorbs from the sun. As a general rule, lighter-colored materials reflect more sunlight and stay significantly cooler than dark-colored ones.
Travertine is a champion in this category; it’s famous for staying comfortably cool even in direct sun, making it a top choice for families with kids. Limestone is another great option that reflects heat well, and its lighter tones help reduce glare on bright days. When you’re browsing porcelain and stone options, always consider the color. A beautiful dark slate might look stunning, but it could become too hot to handle in the middle of July.
How Sealing Affects Surface Safety
Sealing your pavers is an important step to protect them from chlorine, salt, stains, and weathering. Most natural stone pavers need a quality sealant to preserve their color and integrity over time. However, not all sealants are created equal, especially for poolside applications. It’s crucial to use a non-slip sealant that won’t create a slick, dangerous film when the surface gets wet. Some sealants even contain additives that can enhance grip.
On the other hand, some materials like porcelain pavers are non-porous and don’t require sealing at all, making them a wonderfully low-maintenance choice. Whether your chosen material needs sealing or not, proper application is key. We always recommend professional restoration and sealing services to ensure your patio is protected correctly without compromising safety.
What Maintenance Does Each Material Really Need?
Your pool patio is the centerpiece of your backyard, but its long-term beauty depends on the upkeep it requires. The reality is that different materials demand different levels of care. Some need just a simple seasonal cleaning, while others require more attention to stay in top shape. Thinking about maintenance now saves you from surprises later, ensuring you choose a material that fits both your aesthetic and your lifestyle. It’s about finding that perfect balance between the look you love and the time you’re willing to spend maintaining it.
Understanding the maintenance needs of each option is key to making a smart investment. Are you looking for a set-it-and-forget-it surface, or are you willing to put in a little work to preserve the unique character of natural stone? This choice impacts everything from your weekend chores to the long-term durability of your patio. In this section, we’ll walk through what you can realistically expect. We will cover how to properly care for natural stone, point you toward some wonderfully low-maintenance alternatives, and clear up a few common myths that might be holding you back. Finally, we’ll discuss why planning for long-term care starts with a professional installation.
How to Clean and Seal Natural Stone
Natural stone pavers, like travertine and bluestone, bring an organic elegance to any pool deck, but they do need some care to maintain their beauty. Most natural stones are porous, which means they can absorb spills and moisture. To protect them, it’s a good idea to apply a sealant after installation and reapply it every few years. Sealing helps prevent stains from poolside snacks and drinks, protects against harsh pool chemicals, and can even enhance the stone’s natural color.
For routine cleaning, a simple sweep to remove debris and a gentle wash with a pH-neutral cleaner is usually all you need. Gappsi offers professional restoration and sealing services to keep your patio protected from the start. Proper sealing is a small step that makes a huge difference in preserving the life and look of your beautiful natural stone patio.
Discover Low-Maintenance Options
If your ideal weekend doesn’t involve a lot of patio maintenance, you’ll be happy to know there are fantastic low-effort options available. Textured porcelain pavers are a top choice for homeowners who want durability without the work. Because porcelain is non-porous, it naturally resists stains, mold, and mildew. It doesn’t require any sealing, and cleaning is as simple as a quick spray with a hose and maybe a gentle scrub for tougher spots.
This durability makes porcelain an incredibly practical choice for a busy pool area. You get the high-end look of natural stone or wood without the associated upkeep. Gappsi offers a wide selection of high-quality porcelain pavers that combine sophisticated style with the low-maintenance freedom you’re looking for, giving you more time to simply enjoy your pool.
Debunking Common Upkeep Myths
When choosing a pool patio material, it’s easy to get tripped up by common myths. For example, many people worry that a beautiful material like marble will be too slippery for a pool deck. However, this is a common misconception. The safety of a stone has more to do with its finish than the material itself. A tumbled or sandblasted finish adds texture and grip, making materials like marble perfectly suitable for poolside applications.
Another myth is that all pavers are difficult to clean or prone to weeds. With professional installation that includes a proper base and jointing sand, weed growth is minimal. Most modern pavers are also designed to be easy to clean. Don’t let these myths steer you away from a material you love; instead, focus on a quality installation and the right finish for your needs.
Plan for Long-Term Restoration and Care
The best way to ensure a low-maintenance patio for years to come is to invest in a high-quality installation from the start. Proper installation of pavers and coping is a skill that takes expertise. When a patio is built on a solid foundation with correct drainage and securely set pavers, you avoid common long-term issues like shifting, sinking, or water damage. This professional approach is your first line of defense against future headaches.
While materials like natural stone may need periodic sealing, think of it as part of a larger care plan. Partnering with an expert team for your masonry ensures the job is done right the first time. This initial investment in craftsmanship pays off by reducing the need for costly repairs and making routine care much simpler down the road.
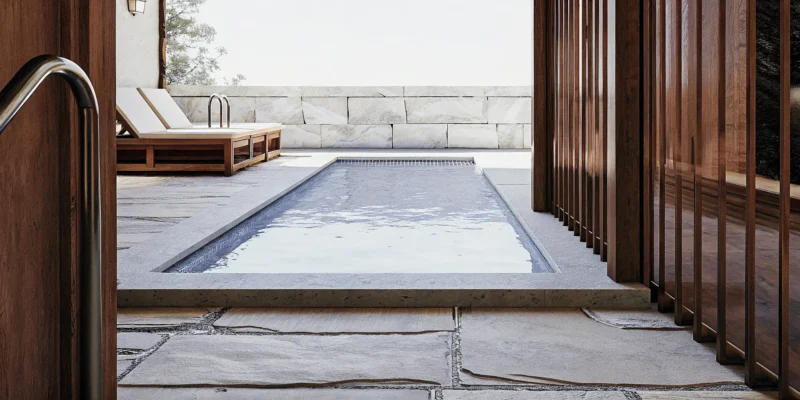
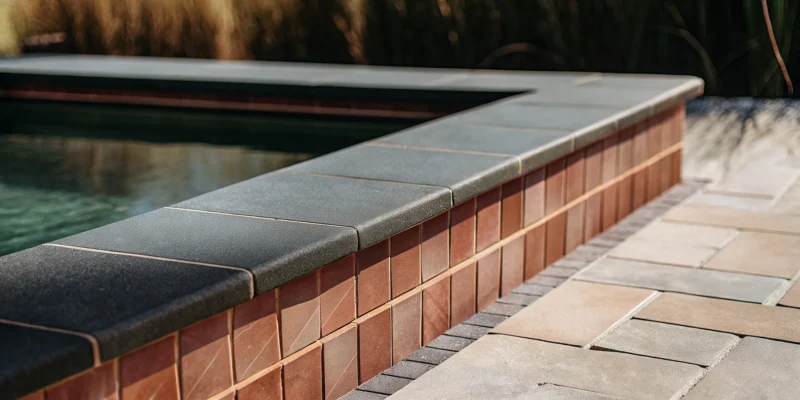
Which Paving Material Is Best for Pool Coping?
Pool coping is the material that caps the edge of your swimming pool shell, and it’s one of those details that makes a huge difference. It’s not just a finishing touch; it’s a critical component that ties your pool to the surrounding patio. Choosing the right material involves balancing aesthetics, safety, and durability. Your coping will be a high-traffic area where people sit, stand, and hold on, so it needs to be comfortable, non-slip, and built to last. Let’s walk through what you need to know to select the perfect coping for your backyard oasis.
Why Coping Deserves Special Attention
Think of coping as the frame for your masterpiece. It’s the first thing you touch when you get in or out of the pool, and it protects your pool structure while giving it a polished look. The right coping material depends on your personal style, your budget, and how you plan to use your pool. It directs water away from the pool shell and prevents it from getting behind the structure, which is essential for longevity. Because it’s such a key feature, it’s worth taking the time to explore your options and find a material that complements your home and enhances your swimming pool’s overall design.
Choose the Right Edge Profile for Safety and Style
The shape of your coping’s edge, known as its profile, is crucial for both safety and comfort. A rounded “bullnose” edge is a popular and smart choice. It’s smooth and comfortable for sitting on and provides a secure, gentle edge for swimmers to hold onto. Materials with a natural texture, like travertine or certain concrete pavers, offer excellent grip, reducing the risk of slips and falls on wet surfaces. When selecting your porcelain and natural stone, consider how the edge profile will feel and function. A well-chosen edge ensures your pool is as safe as it is beautiful, giving you peace of mind while you relax and entertain.
Match Your Coping to Your Patio for a Seamless Look
For a truly cohesive and high-end design, your pool coping should harmonize with your patio material. You can use the exact same material for both for a seamless, unified flow, or you can choose a complementary material that creates a subtle, elegant border. Concrete pavers, for example, are incredibly versatile and come in a wide range of colors and textures, making it easy to find a perfect match. A well-planned design where the coping and patio work together transforms the entire space from a simple backyard to a luxurious retreat. Expert masonry is key to achieving this flawless integration and bringing your vision to life.
Create Your Ideal Poolside Aesthetic
Your pool patio is an extension of your home’s personality. Beyond safety and comfort, the materials you choose are the building blocks of your backyard’s style. Whether you dream of a serene, spa-like retreat or a vibrant, modern entertainment hub, the right pavers, patterns, and finishes will bring your vision to life. A well-designed patio sets the stage for countless memories, from quiet mornings with a cup of coffee to lively weekend gatherings with friends and family.
Achieve a Modern Look with Large-Format Pavers
If you love clean lines and a sophisticated feel, large-format pavers are your best friend. These oversized stones are a popular choice in modern pool designs because they create a sleek, uncluttered appearance with fewer joint lines. This minimalist approach makes your patio feel more spacious and unified. Materials like large-scale porcelain and natural stone are perfect for this, offering a seamless look that flows from your pool deck to your patio. The result is a contemporary aesthetic that feels both luxurious and effortlessly chic, turning your pool area into a true statement piece.
Use Patterns and Tones to Define Your Style
Your patio is a canvas, and you can use color and pattern to create a specific mood. Utilizing neutral and earthy tones can give your pool area a calm, organic feel, perfect for a relaxing oasis. Think soft grays, warm beiges, and rich browns. For a more dynamic look, you can introduce geometric patterns or mix materials to add visual interest. A skilled masonry designer can help you combine different paver shapes or create a contrasting border to define spaces. This personalized touch allows your style to shine through, making your poolside area uniquely yours.
Why Material Quality Matters for Visual Appeal
A beautiful design depends on beautiful materials. The choice of materials, like rich travertine or textured concrete, contributes to the overall aesthetic while also providing essential grip. High-quality pavers will maintain their color and integrity for years, resisting fading from the sun and wear from pool chemicals. Cheaper alternatives might look good at first, but they can quickly show their age with chips, stains, and discoloration, which detracts from your beautiful design. Investing in premium materials from a trusted source like the Gappsi Store ensures your poolside aesthetic remains as stunning as the day it was installed, protecting both its safety and style.
How to Choose the Right Material for Your Pool
Making the final decision on your pool patio material can feel a little overwhelming, but it really comes down to what matters most to you and your family. Think of it as a balancing act. You’re looking for that sweet spot where style, safety, and budget all meet. It’s not just about what looks good on day one, but what will continue to look great and perform well for years of poolside memories.
To find the perfect fit, you’ll want to consider the initial investment against the material’s lifespan and upkeep needs. Some materials offer incredible durability and a timeless look that pays for itself over time, while others provide a beautiful and reliable surface without a hefty price tag. And no matter what you choose, the quality of the installation is what will truly make your investment shine. Let’s walk through the key factors to help you choose with confidence.
Weigh Upfront Cost vs. Long-Term Value
The ideal pool patio material is one that balances style, performance, and cost. It’s easy to focus on the initial price tag, but it’s just one piece of the puzzle. A less expensive material might save you money now, but it could lead to higher maintenance costs or need replacing sooner. On the other hand, a more significant upfront investment in a durable material can mean fewer worries and expenses down the road. Consider the entire lifecycle of the material, including any required sealing, specialized cleaning, or potential for long-term restoration and care. Thinking about this balance will help you make a choice that your future self will thank you for.
Where Natural Stone Pays Off
There’s a reason so many people dream of a natural stone patio. Materials like travertine and bluestone offer a premium, timeless look that simply can’t be replicated. Beyond its beauty, natural stone is incredibly durable and holds its value, making it a true investment in your property. Many types of stone also resist the Long Island climate and stay cooler underfoot on hot summer days, a huge plus for bare feet. While the initial cost is higher, the longevity and stunning aesthetic of the beautiful natural stone options available make it a worthwhile choice for creating a truly luxurious outdoor oasis.
Find Budget-Friendly Options That Last
Creating a gorgeous pool area doesn’t have to break the bank. High-quality concrete and brick pavers are fantastic, sturdy options that are often more budget-friendly than natural stone. Modern pavers are available in a huge variety of colors, shapes, and textures, allowing you to achieve almost any style, from classic to contemporary. They are engineered for durability and are relatively low maintenance. Plus, if a paver ever gets damaged, it can be replaced individually, which is a simple and cost-effective fix. Our expert masonry team can help you explore designs that deliver a high-end look for a practical price.
Partner with a Pro for the Best Results
No matter which material you fall in love with, the success of your project hinges on proper installation. This is one area where you definitely don’t want to cut corners. A professional installation ensures your patio has the correct slope for drainage, the coping is secure, and the final finish is flawless and safe. While high-quality work from an experienced team costs more, it protects your investment and prevents costly problems like shifting pavers or water damage. Partnering with a seasoned expert who can design and build your dream pool from the ground up guarantees the best possible results that will last for decades.
Related Articles
- 3 Best Paving Materials for Pool Patios & Coping
- Pool Patio & Driveway Pavers in Nassau County | Gappsi Inc
Frequently Asked Questions
What is the safest pool patio material for a family with young children? For a family-friendly pool area, your top priority should be a slip-resistant surface. Textured porcelain pavers are an excellent choice because they are specifically engineered with a non-slip finish. Tumbled travertine is another great option, as its naturally porous and textured surface provides good grip for little feet. The key is to look for any material with a finish described as tumbled, brushed, or textured, as this will provide much more traction than a smooth or polished surface.
My backyard gets a lot of direct sun. Which materials will be most comfortable for bare feet? This is a great question because a scorching hot patio can ruin a fun pool day. To keep things comfortable, you’ll want materials that reflect heat instead of absorbing it. Travertine is famous for staying remarkably cool to the touch, even in direct sunlight. Light-colored pavers, whether they are natural stone like limestone or manufactured concrete, will also stay much cooler than their darker counterparts. As a general rule, the lighter the color, the more comfortable it will be for bare feet.
I love the look of natural stone but I’m worried about the upkeep. Is it really that much work? Natural stone does require a bit more attention than some other materials, but the maintenance is very manageable. The main task is sealing the stone every few years to protect it from stains and pool chemicals. This is a straightforward process that preserves the stone’s beauty and integrity. For routine cleaning, a simple sweep and a wash with a gentle, pH-neutral cleaner is all it takes. The trade-off for this minimal work is a timeless, durable surface that adds significant value to your home.
Can I get a high-end look on a more moderate budget? Absolutely. You don’t need the most expensive material to create a luxurious poolside aesthetic. High-quality concrete pavers are incredibly versatile and come in a vast range of styles that convincingly mimic the look of natural stone. By choosing a sophisticated color and a larger format paver, you can achieve a very modern and upscale feel. The key is to focus on a great design and professional installation, which will make any material look its best.
Why is professional installation so important if I’m already using high-quality materials? Think of it this way: even the best ingredients need a skilled chef. High-quality materials are just one part of the equation. A professional installation ensures the patio has a proper foundation to prevent sinking or shifting, correct grading for drainage to avoid puddles, and perfectly set coping for safety. This expert craftsmanship is what protects your investment, prevents future problems, and guarantees your beautiful new patio will last for decades.