What truly separates an average contractor from a premier one? It’s more than just the final product. A premier company offers a comprehensive, seamless experience from the first phone call to the final walkthrough. They bring everything under one roof, with in-house experts for design, masonry, landscaping, and construction, eliminating the stress of coordinating multiple vendors. This integrated approach ensures a cohesive vision and a higher standard of quality throughout your project. When you begin your search for a Hamptons Long Island new york home improvement company, you are looking for this level of professionalism and expertise. It’s about finding a team that not only delivers exceptional craftsmanship but also provides unparalleled service, making the entire process feel organized and effortless.
Key Takeaways
- Vet your contractor thoroughly: Before signing anything, confirm the company has a valid license, proper insurance, and an extensive portfolio of local projects. Look for a pattern of positive reviews that specifically mention clear communication and professionalism.
- Budget for more than the quote: A smart budget includes a contingency fund of 10% to 15% for unexpected issues. You can also protect your budget by involving your contractor early in the design phase and ordering materials upfront to lock in prices.
- Choose an all-in-one team for a smoother process: Working with a single company that handles design, permits, and construction simplifies communication and ensures a cohesive result. This integrated approach is the best way to manage the complexities of a Hamptons home project.
Finding the Best Home Improvement Company in the Hamptons
Finding the right partner for your Hamptons home project can feel like a big task. With so many options, how do you choose a company that will not only do the job right but also make the process smooth and enjoyable? It’s about more than just getting a quote; it’s about finding a team that understands the unique character of the Hamptons and can execute your vision with precision and care. A premier contractor stands out from the crowd, not just for their finished work, but for their entire approach. They act as a true partner, guiding you from the initial design spark to the final, stunning reveal. Whether you’re dreaming of a serene swimming pool or a complete backyard transformation, the best companies offer a seamless experience. They bring a level of professionalism that turns a potentially stressful renovation into an exciting creative process. This means they listen to your ideas, respect your home, and manage every detail so you don’t have to. The goal is to find a company that leaves you with a beautiful space and a positive memory of how it all came together.
What Sets a Premier Contractor Apart
So, what exactly makes a contractor a premier choice? It comes down to a few key things. First, look for a company with comprehensive, in-house expertise. A team that can handle everything from masonry and landscaping to pavilions and pools under one roof eliminates the headache of coordinating multiple vendors. This integrated approach ensures your entire project is cohesive. Second, a top-tier contractor will have an extensive portfolio of local work and a deep understanding of Hamptons aesthetics and building codes. They should be able to show you completed projects that reflect the quality you expect. Finally, they prioritize clear communication and use high-quality materials, ensuring the final result is not only beautiful but also built to last.
Popular Home Improvement Projects in the Hamptons
Living in the Hamptons is all about embracing a lifestyle of comfort, elegance, and relaxation. It’s no surprise that homeowners here invest in projects that turn their properties into personal retreats. From sprawling outdoor entertainment areas to serene indoor wellness spaces, the focus is on creating a seamless blend of luxury and functionality. These popular projects not only enhance your daily life but also add significant value to your home. Let’s look at some of the most sought-after home improvements in the Hamptons.
Outdoor Living and Entertainment Spaces
Creating an inviting outdoor living area is a top priority for many Hamptons homeowners. Think of it as an extension of your indoor space, designed for everything from quiet morning coffees to lively evening gatherings. These projects often include expansive patios made from beautiful natural stone, fully equipped outdoor kitchens, and comfortable lounge areas with fire pits. The goal is to design a versatile space that feels both luxurious and welcoming. A full-service contractor can help you create a cohesive design that flows beautifully from your home’s interior to the outdoors, ensuring every detail is perfect for relaxing and entertaining guests in style.
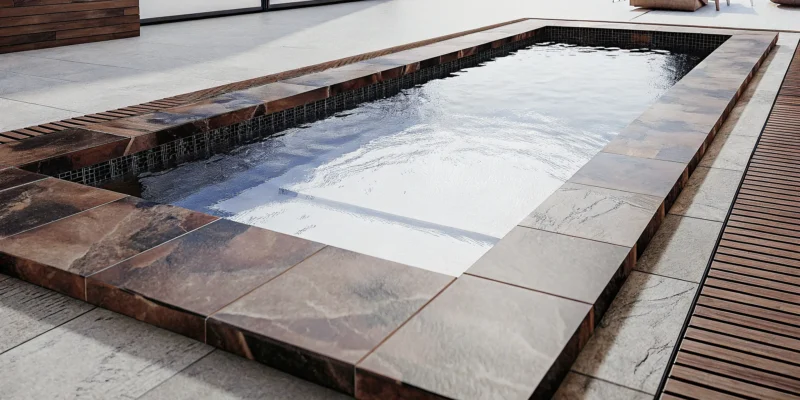
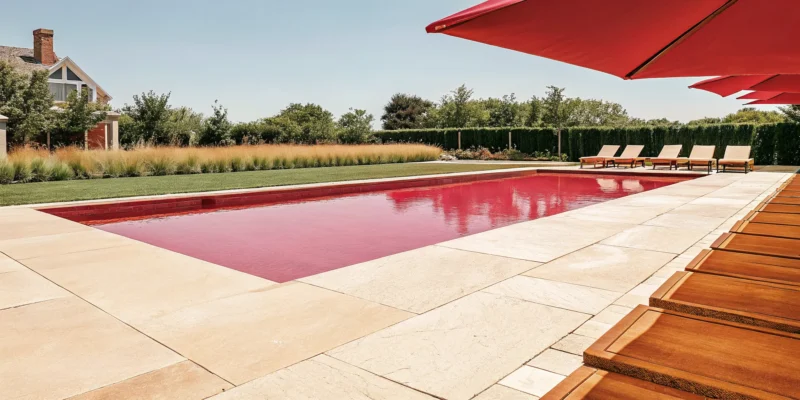
Swimming Pools and Water Features
A swimming pool is often the centerpiece of a Hamptons backyard. It’s more than just a place to cool off; it’s a statement piece that defines the entire landscape. Homeowners are moving beyond basic designs and opting for custom swimming pools that reflect their personal style, whether it’s a sleek, modern infinity pool or a naturalistic lagoon with rock features. Adding water features like cascading waterfalls or elegant fountains can introduce a sense of tranquility and sophistication. Working with a designer who understands how to integrate the pool with the surrounding landscape and outdoor living areas is key to creating a truly stunning and harmonious backyard oasis.
Masonry, Stonework, and Driveways
The right masonry and stonework can ground your property with a sense of permanence and classic beauty. Natural stone is a popular choice for creating everything from elegant patios and winding garden paths to sturdy retaining walls and sophisticated home exteriors. High-quality masonry provides the foundation for your entire outdoor design. Your driveway also makes a critical first impression. Many homeowners are choosing materials like classic gravel or custom-laid pavers to create a grand entrance that complements their home’s architecture. These details work together to establish a cohesive and polished look that elevates your home’s curb appeal from the moment you arrive.
Landscaping and Synthetic Turf
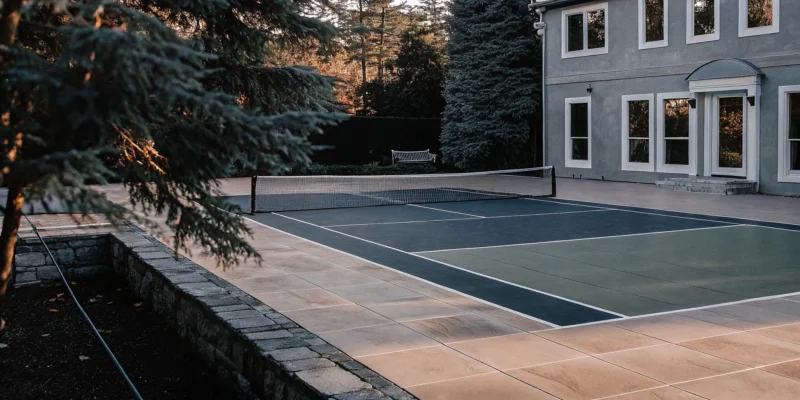
A beautiful landscape is essential for creating a private and serene environment. This involves more than just planting flowers; it’s about thoughtful design that incorporates lush greenery, mature trees for privacy, and elegant garden beds. To keep lawns looking perfect with minimal effort, many homeowners are turning to synthetic turf. It provides a consistently green, manicured look without the constant watering, mowing, and fertilizing. For active families, incorporating custom Sports Games Courts for basketball or tennis is another popular addition, turning the backyard into a hub for fun and fitness. A well-designed landscape combines beauty and practicality for year-round enjoyment.
Pavilions, Pergolas, and Gazebos
Adding a structural element like a pavilion, pergola, or gazebo can instantly define and enhance your outdoor living areas. These structures create “outdoor rooms” that offer shade, comfort, and a beautiful focal point in your yard. A pavilion with a solid roof is perfect for housing an outdoor dining set or kitchen, protecting you from the sun and rain. A pergola with its slatted roof creates dappled sunlight, ideal for a poolside lounge or a cozy seating area. Gazebos offer a charming, sheltered spot to enjoy your garden. These additions provide functional benefits while adding architectural interest and a touch of elegance to your property.
Fences, Netting, and Privacy Solutions
In the Hamptons, privacy is a valuable commodity. A well-chosen fence does more than just mark your property line; it creates a secluded sanctuary for you and your family. Homeowners can choose from a variety of materials to match their home’s style, from classic wood fences that offer a traditional look to sleek aluminum or composite options for a more modern feel. Beyond privacy, specialized fences and netting are essential for enclosing pools and Sports Games Courts, ensuring safety without obstructing views. The right fencing solution is a finishing touch that provides security, privacy, and aesthetic appeal.
Indoor Remodeling and Saunas
While the Hamptons lifestyle is centered around the outdoors, indoor comfort is just as important. Many homeowners are undertaking home remodeling projects to ensure their interiors are as luxurious and functional as their exteriors. This includes updating kitchens and bathrooms, finishing basements to create more living space, and even adding entire home additions. A growing trend is the inclusion of wellness features, with home saunas becoming a popular choice for relaxation and health. Creating a space to unwind indoors, especially a personal sauna, provides a perfect complement to an active, outdoor-focused lifestyle, offering a year-round retreat within your own home.
How to Tell if a Contractor Is Reliable
Finding a contractor you can trust is the most important part of any home improvement project. A great partner will bring your vision to life, while the wrong one can cause headaches, delays, and budget issues. So, how do you spot the difference? A reliable contractor leaves a trail of clues that are easy to follow if you know what to look for. They have a solid reputation built over years of quality work, a professional process that keeps you informed, and a long history of happy clients who are eager to share their positive experiences. It’s not a mystery; it’s a matter of due diligence. By looking for a few key signs of professionalism and expertise, you can feel confident that you’re hiring a true partner who will respect your home, your time, and your investment. Remember, the goal is more than just a beautiful finished product. It’s about having a smooth, transparent, and positive experience from the initial design conversation all the way to the final walkthrough. This section will guide you through the essential checks to ensure you’re choosing the best team for your Hamptons home.
Check for Licensing, Insurance, and Credentials
Before you even talk about design, your first step is to confirm the contractor has the proper licensing and insurance. This isn’t just a formality; it’s a critical safeguard that protects you as the homeowner. A valid license shows they meet local and state standards, while proper insurance, including liability and worker’s compensation, covers any accidents that might happen on your property. A reputable company will be upfront with this information and provide documentation without hesitation. If a contractor is evasive or can’t produce these credentials, consider it a major red flag and walk away.
Review Their Portfolio and Experience
A picture is worth a thousand words, and a portfolio is your window into a contractor’s quality and style. Take the time to carefully review their past work. Do their projects match the aesthetic you’re hoping for? Look for a contractor who has extensive experience with the specific type of project you have in mind, whether it’s installing a custom swimming pool or designing intricate masonry. A strong portfolio demonstrates not just skill but also a consistent track record of successful projects. It gives you a clear idea of their craftsmanship and helps you decide if their vision aligns with yours.
Read Customer Reviews and Testimonials
Reviews from past clients offer honest insight into what it’s like to work with a contractor. Look beyond the star ratings on Google or social media and read the actual comments. Do clients mention the contractor’s ability to stick to the timeline and budget? Do they praise their communication and professionalism? Testimonials can reveal a lot about the customer experience, from the initial consultation to the final walkthrough. A pattern of positive feedback highlighting reliability, clear communication, and respect for the client’s home is a strong indicator that you’ve found a trustworthy partner for your project.
Look for Clear Communication and Personal Service
Great communication is the foundation of a successful project. From your very first interaction, a reliable contractor should be responsive, attentive, and willing to answer all your questions. They should listen to your ideas and provide clear, detailed explanations about the process. You should feel like a valued partner, not just another job number. A contractor who offers personalized service and makes you feel comfortable and informed every step of the way is one you can count on. This open line of communication is essential for ensuring your home remodeling project stays on track and that the final result meets your expectations.
Common Hiring Challenges for Hamptons Homeowners
Embarking on a home improvement project in the Hamptons is exciting, but it’s not without its challenges. Finding the right team and keeping your project on track requires careful planning. Many homeowners worry about finding reliable experts, projects taking longer than expected, communication breakdowns, and costs spiraling out of control. The good news is that you can get ahead of these common issues. By understanding the potential hurdles from the start, you can partner with a contractor who has the experience to guide you through the process smoothly, turning your vision into a reality without the headaches.
Finding Qualified Local Experts
In a high-demand area like the Hamptons, simply finding an available contractor isn’t enough. You need a true local expert with a deep understanding of the area’s style, building codes, and environment. The challenge is sorting through the options to find a team that is not only skilled but also reliable and professional. Look for a company with a long history in the community and an extensive portfolio of completed projects. A premier contractor will be able to showcase a wide range of work, from intricate masonry to complete outdoor transformations. Prioritizing proven experience over a low price tag is the first step toward a successful and stress-free renovation.
Managing Scope Creep and Project Delays
“Scope creep” is what happens when small additions and changes start to pile up, pushing your project beyond its original timeline and budget. It’s a common issue, often paired with unexpected delays from material backorders or discovering hidden issues once construction begins. The best way to manage this is to work with a contractor who establishes a detailed project plan from day one. A clear contract that outlines the exact scope of work is your best defense. While some renovation delays are unavoidable, a transparent partner will communicate proactively about any potential setbacks and work with you to find solutions, keeping the project moving forward.
Avoiding Miscommunication and Unmet Expectations
Nothing is more frustrating than feeling like your vision is getting lost in translation. Miscommunication between you, your designer, and your build team can lead to results that don’t match your expectations. To prevent this, seek out a home improvement company that prioritizes clear and consistent communication. Ideally, you want a single point of contact who can keep you informed and answer your questions. Companies that offer both design and construction services, like Gappsi, can streamline this process, ensuring everyone is aligned from the initial sketch to the final nail. Regular check-ins and written updates help guarantee that you and your team are always on the same page.
Preventing Budget Overruns
Worries about the budget are completely normal. Costs can increase for several reasons, from last-minute changes in materials to uncovering structural problems that need fixing. The key to preventing budget overruns is thorough planning and transparency. Before any work begins, your contractor should provide a detailed, itemized quote that breaks down all the costs. It’s also wise to set aside a contingency fund, typically 10% to 20% of the total project cost, to cover any surprises. This financial cushion gives you peace of mind and ensures that unexpected expenses don’t derail your home remodeling project.
What Does Home Improvement Cost in the Hamptons?
Let’s talk about the numbers. Budgeting for a home improvement project in the Hamptons can feel like a big undertaking, but it doesn’t have to be overwhelming. The key is to go in with a clear understanding of what to expect. Costs here are influenced by the high demand for quality, the specific materials you choose, and the overall complexity of your vision. While every project is unique, knowing the general cost ranges and potential hidden expenses will help you plan effectively and feel confident in your decisions.
Think of this as your starting point for a realistic budget. Whether you’re dreaming of a complete backyard overhaul or a significant indoor update, having a handle on the finances from day one is the best way to ensure your project runs smoothly from start to finish.
Average Cost Ranges by Project
When planning your budget, it helps to think in terms of square footage. In the Hamptons, construction costs generally fall between $800 and $2,000 per square foot. For projects that require a premium level of finish and detail, you can expect that figure to be somewhere between $900 and $1,200 per square foot. The final cost for a new swimming pool or a full home remodeling project will ultimately depend on the scope of work, the quality of materials, and the intricacy of the design you choose.
Hidden Costs to Plan For
The price of materials and labor isn’t the whole story. Many homeowners are surprised by additional costs that can add a significant percentage to the total budget. It’s smart to plan for these from the beginning. These often include soft costs (like fees for architects, engineers, and permits), site development (demolition, grading, and utility connections), and carrying costs (interest on construction loans). Don’t forget to also budget for the beautiful finishing touches, like professional landscaping, outdoor lighting, and smart home technology that truly complete your space.
Why Hamptons Projects Often Cost More
There are a few reasons why home improvement projects in the Hamptons come with a higher price tag. The area’s unique market includes high land values, complex and strict permitting processes, and a strong demand for specialized labor. An underestimated timeline can also drive up your budget through extended loan interest and other carrying costs. Working with an experienced local contractor is so important because they understand how to manage these factors. A team with deep roots in the community knows how to handle the local regulations and has access to the best masonry and construction talent.
Smart Budgeting for Your Hamptons Home Project
Keeping your Hamptons home project on budget doesn’t have to be a source of stress. With a bit of smart planning, you can manage costs effectively and avoid surprises down the road. A successful project is as much about financial foresight as it is about beautiful design. Thinking through your budget from multiple angles protects your investment and ensures a smooth process from start to finish. These strategies are simple, practical, and can make a significant difference in your final costs.
Involve Your Contractor Early
Think of your contractor as a budget co-pilot. Bringing an experienced team into the conversation during the early design phase is one of the most effective ways to control costs. When your contractor collaborates with your designer from the beginning, they can provide real-world feedback on material choices and construction methods. This partnership helps ensure the architectural plans are both beautiful and buildable within your budget. This early collaboration can often trim 10% to 15% off the total cost by identifying potential issues before they become expensive problems. A great contractor offers more than just a quote; they provide the expertise needed for a seamless home remodeling project.
Lock in Material Prices Upfront
Material prices can be unpredictable, but your project timeline doesn’t have to be. One of the smartest moves you can make is to finalize and order major materials as soon as the design is set. Securing items like windows, custom cabinetry, or specific types of stone early on locks in their prices, protecting you from market fluctuations and inflation. This also helps you avoid potential supply chain delays that could stall your project and increase labor costs. By planning ahead for your porcelain and natural stone or other key components, you create a more predictable and reliable construction schedule, which is key to staying on budget.
Build a Contingency Fund
No one likes financial surprises, especially when they come with a big project. That’s why a contingency fund is your best friend during a renovation. We recommend setting aside 10% to 15% of your total construction cost in a separate fund. This isn’t for design upgrades or additions; it’s a safety net for true unknowns. For example, you might find hidden water damage when a wall is opened or need to address unexpected soil issues during excavation for a pool. Having this fund ready gives you peace of mind and the flexibility to handle these challenges without compromising your vision or derailing your budget.
Working with Hamptons Permits and Building Codes
Thinking about permits and building codes can feel a bit daunting, but it’s a standard part of any quality home renovation. In the Hamptons, these regulations are in place to protect your investment, your safety, and the unique local environment. A professional contractor will handle the entire process for you, but understanding the basics helps you know what to expect. The right team makes this process seamless, ensuring your project moves forward without delays or legal issues, so you can focus on the exciting parts of your home transformation.
Why Permits Are Essential in the Hamptons
Obtaining the right building permits isn’t just a suggestion; it’s a legal requirement for any home improvement project in the Hamptons. These permits are your official authorization to begin work and serve as proof that your project plans meet strict local safety standards. In a place like East Hampton, regulations are especially important for addressing environmental concerns like coastal erosion and flooding. A permit ensures your new swimming pool or patio is built correctly and safely, protecting your property and investment for years to come. Think of it as the foundation for a successful, worry-free project.
How to Keep Your Project Compliant
The best way to ensure your project is compliant is to work with an experienced local contractor who has a deep understanding of Hamptons building codes. For example, projects in East Hampton must follow specific New York State building and energy codes, and new homes even require a special energy rating certificate. The application process has also gone digital, requiring submissions through an online portal. A seasoned expert will manage all this for you, from preparing the correct masonry plans to submitting paperwork and scheduling inspections. This expertise keeps your project on track and saves you from costly fines or delays.
Questions to Ask Before You Hire a Home Improvement Company
Choosing the right partner for your home improvement project is the most important decision you’ll make. To feel confident in your choice, you need to ask the right questions from the very beginning. Think of it as an interview process, where you’re looking for a long-term partner who understands your vision and has the expertise to bring it to life. Being prepared with a list of questions helps you compare companies fairly and find the best fit for your Hamptons home.
Questions About Experience and Credentials
Think of this as a job interview, because it is. You’re hiring a team to work on your most valuable asset, so it’s essential to verify their background and expertise. Start with direct questions like, “How long have you been in business?” and “Have you completed projects like mine in the Hamptons before?” A reputable company will be happy to share its history. Ask to see their contracting license and certificate of insurance. These aren’t just formalities; they protect you. Finally, request to see a portfolio of their work. A premier contractor should have an extensive gallery of completed masonry, pool, and landscape projects for you to review.
Questions About Costs and Timelines
Talking about money can be uncomfortable, but it’s crucial for a successful project. Ask for a detailed breakdown of how they estimate costs and what their payment schedule looks like. It’s also important to understand the projected timeline and how they manage potential delays. In the Hamptons, it’s not uncommon for hidden costs to add a significant percentage to an initial estimate, so ask how they handle change orders and unexpected expenses. A transparent contractor will discuss this with you upfront and explain how they work to stay on budget. This conversation is key for complex projects like installing custom pavilions or pergolas, where many variables are at play.
Red Flags to Watch For
While you’re interviewing potential contractors, trust your gut. If something feels off, it probably is. A major red flag is a contractor who is hesitant to provide their license, insurance, or references. Be wary of anyone who uses high-pressure tactics or demands a large cash payment upfront. One of the top challenges homeowners face during a renovation is miscommunication, so pay attention to how they communicate from the start. Are they responsive, clear, and professional? If they are difficult to get a hold of for a quote, imagine how it will be once the project starts. A reliable company will have a clear process for every home remodeling project.
How to Read Quotes and Proposals
A single number on a piece of paper is not a quote. A professional proposal is a detailed document that outlines the entire scope of work. It should clearly list the specific materials to be used, labor costs, a projected timeline, and payment terms. When comparing proposals, don’t just look at the final price. A significantly lower bid might indicate cheaper materials or less experienced labor, which can cost you more in the long run. Ensure the proposal reflects everything you discussed and that the quality of the specified porcelain and natural stone meets your standards. This document will become part of your contract, so clarity is key.
How to Request a Quote or Consultation
Taking the first step toward your dream home project is exciting. Once you have a short list of potential contractors, it’s time to reach out for a quote or consultation. This is your chance to see if a company is the right fit for your vision and budget. A good contractor will welcome your questions and guide you through their process, making you feel confident and informed from the very first conversation. This initial discussion sets the tone for the entire project, so it’s worth preparing for.
What to Prepare for Your First Call
Before you pick up the phone, a little prep work goes a long way. Having a clear idea of what you want helps a contractor provide a more accurate estimate. Start by gathering inspiration, whether it’s photos you’ve saved or a list of must-have features for your home remodeling project. You should also have a general budget in mind. You don’t need a final number, but knowing your comfortable spending range helps the contractor suggest appropriate materials and solutions. Think about your timeline, your goals for the space, and any specific questions you have about their process.
What to Expect During a Consultation
A consultation should feel like a collaborative conversation, not a high-pressure sales pitch. Expect the company representative to ask a lot of questions to fully understand your project, from your design preferences for a new swimming pool to the functional needs of your family. They will explain their process, discuss potential timelines, and walk you through material options. This is your opportunity to gauge their expertise and communication style. A premier contractor will be transparent and ready to help you understand the scope and potential costs involved, ensuring you feel comfortable moving forward.
Your Next Steps After Getting a Quote
Once you have a quote in hand, take some time to review it carefully. A detailed proposal should break down the costs for labor, materials, and any other expenses. Don’t be afraid to ask for clarification on anything you don’t understand. It’s also a great idea to involve your contractor early in the design process, as their feedback can help you save on costs before plans are finalized. As you weigh your options, you can also explore the company’s past work on their YouTube channel to see their craftsmanship firsthand and feel confident in your decision.
Related Articles
- How to Find the Best Hamptons Sports Court Builder
- Hampton Archives – Gappsi Group
- Hamptons-style Archives – Gappsi Group
- East Hampton Gunite Swimming Pool Company – Gappsi Group
Frequently Asked Questions
Is it really better to hire one company for my entire backyard project? Yes, it almost always is. When you work with a single company that has in-house experts for everything from masonry to landscaping and pools, you get a cohesive vision. This approach eliminates the stress of you having to coordinate between different designers, builders, and landscapers. It means there is one team and one point of contact responsible for your project, which leads to a smoother process, better communication, and a more unified final result.
I have a budget in mind, but how do I prevent costs from spiraling out of control? The best way to protect your budget is through planning and transparency. Start by getting a detailed, itemized proposal that clearly outlines all costs. Then, work with your contractor to order and pay for major materials, like stone or windows, upfront to lock in prices. Most importantly, you should always have a contingency fund, about 10% to 15% of your total budget, set aside for any true surprises, like discovering an issue after demolition.
What is the most common mistake homeowners make when starting a renovation? The biggest mistake is choosing a contractor based on the lowest bid without doing proper research. A price that seems too good to be true often means the contractor may be cutting corners on materials, using less skilled labor, or isn’t properly insured. Your home is a huge investment, so it’s critical to select a partner based on their experience, portfolio, client reviews, and professionalism, not just the bottom line.
How long should I expect my Hamptons home improvement project to take? The timeline for any project depends on its complexity, but other factors like the permitting process, weather, and material availability also play a big role. An experienced local contractor can give you a realistic schedule and, more importantly, knows how to manage these variables. For example, they will start the permit process early and order materials well in advance to minimize potential delays and keep your project moving forward efficiently.
I have a lot of ideas for my home, but I feel overwhelmed. Where do I even begin? Feeling overwhelmed is completely normal, but don’t let it stop you. The best first step is simple: start gathering inspiration. Save photos of designs and features you love. Think about how you want to use the space and what your general budget range is. Once you have a basic vision, reach out to a reputable company for a consultation. A good team won’t expect you to have all the answers; they will listen to your ideas and help you refine them into a clear, actionable plan.