For years, homeowners had limited choices for pool coping: natural stone that stains, or concrete that cracks and fades. While these materials have their place, they often come with a long list of maintenance chores. You might love the look of travertine but not the thought of sealing it every year. Today, you don’t have to compromise. Technology has given us a superior alternative that combines the beauty of traditional materials with unmatched performance. It offers the look of stone or wood without any of the drawbacks. The ultimate upgrade for any modern backyard, two inches thick porcelain pool copings and step treads on Long Island ny are changing the game for homeowners who want it all: style, durability, and low maintenance.
Key Takeaways
- Porcelain Offers Unmatched Durability and Safety: Its dense, non-porous surface resists stains, mold, and cracking from Long Island’s freeze-thaw cycles, while textured finishes provide essential slip resistance around the pool.
- Expert Installation is Key to a Lasting Finish: The performance of your porcelain coping depends on professional installation. An expert ensures a proper base, manages drainage, and uses correct techniques to prevent cracks, protecting your investment for years.
- It’s a Smart Long-Term Investment: While porcelain may have a higher upfront cost, its incredible resilience and low-maintenance nature mean you’ll save significant money and time on future repairs, sealing, and cleaning.
Why Two-Inch Porcelain Is the Top Choice for Pool Coping
When you’re designing your dream pool, the coping, which is the material that caps the pool’s edge, is one of the most important choices you’ll make. It’s not just about looks; it’s about safety, durability, and maintenance. For homeowners here on Long Island, two-inch thick porcelain has become a standout favorite for so many reasons. It combines strength and style in a way that few other materials can, making it a smart investment for any backyard oasis. If you want a material that can handle everything from cannonballs to cookouts without demanding constant upkeep, porcelain is definitely worth a closer look.
Built to Last for Years
Your pool area is the heart of your summer, which means it sees a lot of action. From kids running around to lounge chairs being shifted, the coping needs to be tough. Two-inch porcelain is incredibly dense and strong, so it can easily handle heavy foot traffic without showing wear and tear. This inherent strength makes it a reliable foundation for your entire swimming pool area. You won’t have to worry about chips or cracks from everyday use, giving you peace of mind that your beautiful pool edge will stay that way for many years. It’s a choice that provides both beauty and brawn.
Handles Long Island’s Freeze-Thaw Cycles
We all know how unpredictable Long Island weather can be, especially the transition from fall to winter. The constant freezing and thawing can be brutal on outdoor materials. This is where porcelain truly shines. Because it doesn’t absorb water, there’s no risk of moisture getting trapped inside, freezing, expanding, and causing cracks. This resistance to frost damage means your coping won’t become brittle or break down after a harsh winter. It also prevents mold and mildew from growing, keeping your pool area healthier and cleaner. This durability makes it a perfect, low-stress choice for our climate.
The Benefits of a Non-Porous Surface
Let’s be honest, life around the pool can get a little messy. Spilled sodas, drips of sunscreen, and splashes of pool chemicals are all part of the fun. With porous materials like some natural stones, these spills can quickly turn into permanent stains. Porcelain, however, is non-porous. This means liquids sit on the surface instead of soaking in, allowing you to simply wipe them away. This makes cleanup a breeze and ensures your coping looks fresh and new season after season. You can find a wide variety of beautiful porcelain and natural stone options that offer this low-maintenance benefit.
Safety Comes Standard
Safety is always the number one priority around a swimming pool, and the wet surface of the coping can be a major slip hazard. Many two-inch porcelain options are manufactured with a textured, non-slip finish specifically designed to provide better grip underfoot. This added traction can help prevent accidental slips and falls, making the entire area safer for your family and guests. Even with this safety feature, the surface remains smooth and comfortable enough for bare feet, so you don’t have to sacrifice comfort for security. It’s the perfect combination for a family-friendly pool deck.
Versatile Style That Won’t Fade
Your pool coping should complement your home’s overall aesthetic, and porcelain offers endless design possibilities. Whether you love the look of modern stone, rustic wood, or classic travertine, there’s a porcelain style to match. The best part? The color and pattern are baked into the tile during manufacturing, not just printed on the surface. This means it’s incredibly resistant to fading from the sun’s harsh UV rays. The beautiful design you choose for your masonry project will remain vibrant and true for years, even in direct sunlight.
How Porcelain Compares to Other Materials
Choosing the right material for your pool coping is a big decision. It defines the edge of your pool and sets the tone for your entire backyard oasis. While traditional materials like natural stone, concrete, and brick have been popular for years, two-inch thick porcelain is quickly becoming the go-to for homeowners who want the perfect blend of style, safety, and durability. Let’s take a look at how porcelain stacks up against the competition.
Porcelain vs. Natural Stone
Natural stone, like travertine or bluestone, offers a beautiful, organic look that’s hard to resist. However, its porous nature can be a real drawback in a pool environment. Stones can absorb water, spills, and even pool chemicals, leading to tough stains that are difficult to remove. Porcelain, on the other hand, gives you the best of both worlds. Thanks to modern manufacturing, you can get the stunning look of natural stone in a non-porous material. This means water, oil, and other substances sit on the surface, making cleanup simple. For a pristine pool area with minimal fuss, porcelain is the clear winner. You can explore a wide variety of both porcelain and natural stone options to see the difference for yourself.
Porcelain vs. Concrete
Poured concrete coping is often seen as the most budget-friendly option, and it can create a simple, seamless edge for your pool. The issue is that it doesn’t always hold up well over the long term, especially with Long Island’s weather. The constant freezing and thawing can cause concrete to crack, and its color can fade from sun and chemical exposure. Porcelain is a smarter investment for durability. It’s engineered to withstand the elements without cracking or losing its color. While the initial cost might be higher than concrete, you’re paying for a beautiful, resilient coping that will maintain its integrity and style for many years. This approach saves you from future repairs and replacements, which our expert masonry team can tell you all about.
Porcelain vs. Brick
There’s something so classic and charming about a brick-lined pool. It gives off a timeless, traditional vibe that many homeowners love. The downside is that brick, like natural stone, is porous and can require a lot of upkeep. It can be prone to chipping, and the texture can be rough on bare feet and swimsuits. This is where porcelain truly shines. You can find porcelain copings that perfectly mimic the warm, rustic look of brick, right down to the color variations and texture. You get that coveted traditional aesthetic without worrying about the maintenance. It’s a modern solution that lets you achieve a classic style, proving you don’t have to sacrifice performance for looks. You can see many beautiful examples on the Gappsi YouTube channel.
How to Choose the Right Porcelain Coping
Picking the right coping is like choosing the perfect frame for a beautiful painting. It’s the finishing touch that pulls your whole pool area together. With so many options available, it’s easy to feel a little overwhelmed. But don’t worry, I’m here to walk you through it. Focusing on a few key factors will help you select a porcelain coping that is not only stunning but also safe, durable, and perfectly suited to your Long Island home.
Check for Slip Resistance
Safety is always the top priority around a pool, where surfaces are bound to get wet. This is where porcelain coping really shines. Many porcelain options are designed with a special non-slip texture that provides excellent grip underfoot without feeling rough or uncomfortable on bare feet. When you’re looking at samples, run your hand over them and ask about their slip-resistance rating. Choosing a material that helps prevent slips and falls gives you peace of mind, allowing you and your family to relax and enjoy your pool area safely. It’s a simple choice that makes a huge difference.
Consider Thickness and Integrity
When it comes to outdoor materials on Long Island, durability is non-negotiable. For pool coping, thickness is a direct indicator of strength. We always recommend a two-inch thick porcelain paver. This thickness provides the structural integrity needed to withstand heavy foot traffic and the demanding freeze-thaw cycles of our local climate. A thinner material might crack or shift over time, leading to costly repairs. Investing in a substantial, two-inch coping ensures your pool edge remains stable and beautiful for years to come, making it a smart, long-term decision for your home’s outdoor living space.
Explore Color and Finish Options
This is the fun part. Porcelain coping offers an incredible range of styles, so you can truly personalize your space. Whether you love the look of modern stone, rustic wood, or classic travertine, there’s a porcelain paver that can replicate it flawlessly. One of the best features is that the color is baked directly into the material during manufacturing. This means it won’t fade from harsh sunlight or discolor from pool chemicals. You can browse a wide selection of porcelain and natural stone options to find the perfect match that will keep its vibrant look season after season.
Find the Perfect Size and Style
Your pool coping should feel like a natural extension of your home’s overall design. Think about the big picture. Do you have a modern, minimalist backyard or a more traditional, lush landscape? The size and style of your coping can reinforce that theme. Large format tiles can create a sleek, contemporary feel, while smaller pieces might lend a more classic look. You can also choose between different edge profiles, like a rounded bullnose for a soft, traditional finish or a crisp square edge for a modern aesthetic. The goal is to select a coping that complements your patio, landscaping, and home architecture for a truly cohesive design.
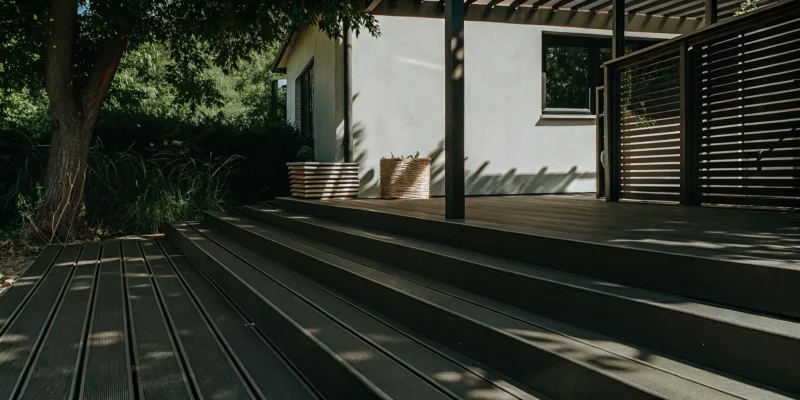
Popular Pool Coping Designs on Long Island
Choosing your pool coping is one of the most exciting parts of designing your backyard oasis. This finishing touch frames your pool, providing a smooth, safe edge while tying the entire patio area together. On Long Island, homeowners are gravitating toward designs that offer a perfect mix of sophisticated style and practical durability. Two-inch thick porcelain, in particular, has become a favorite for its versatility and strength. It allows you to achieve a high-end look that can handle everything from lively pool parties to quiet, relaxing afternoons. The right coping can transform your pool from a simple feature into the stunning centerpiece of your outdoor living space. It connects the water to your decking, landscaping, and even your home’s architecture. Whether you envision a sleek, modern retreat or a rustic, natural escape, the coping you select plays a huge role in setting the tone. With so many options available, you can create a cohesive design that reflects your personal style. Let’s look at some of the most popular design trends that are making a splash in backyards from the Hamptons to Nassau County, helping you find the perfect look for your home.
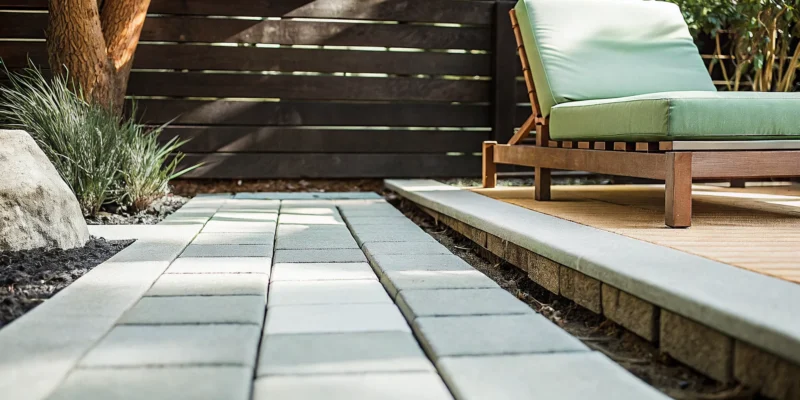
Natural Stone-Look Porcelain
If you love the timeless elegance of natural stone but worry about the maintenance, you’re in luck. Modern porcelain offers the best of both worlds. You can find two-inch thick coping that beautifully mimics the look of classic travertine, sleek bluestone, or even rustic wood grain. This allows you to get a luxurious, organic look without the concerns of staining or sealing that come with porous natural stone. These porcelain and natural stone options provide a sophisticated finish for any pool design, giving your backyard a polished look that feels both natural and refined.
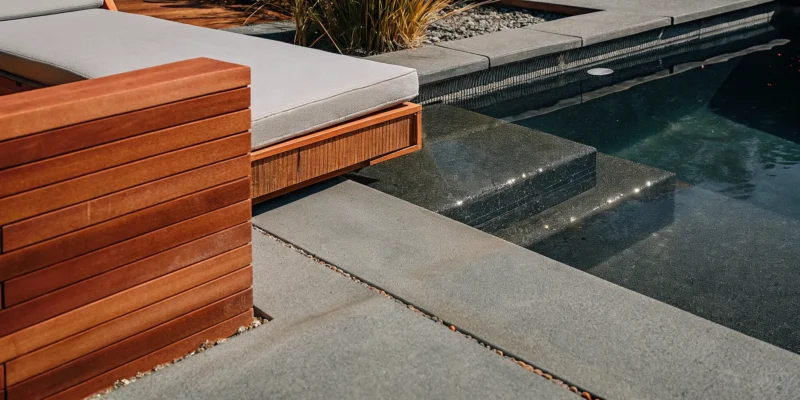
Large Format Tiles
For a clean and contemporary feel, large format tiles are the way to go. Using bigger pieces of coping means fewer grout lines, which creates a seamless, uncluttered look that can make your pool deck feel more spacious. Fewer grout lines also mean less cleaning and maintenance for you. A key benefit of porcelain is that the color is baked into the tile during manufacturing, so it won’t fade over time, even after years of exposure to direct sunlight. High-quality, Italian-made porcelain is especially known for its beautiful designs and exceptional durability, ensuring your pool edge looks pristine for years to come.
Color and Finish Variations
Porcelain coping comes in a vast array of colors and finishes, making it easy to find the perfect match for your home’s style. Whether you prefer warm, earthy tones or cool, modern grays, there is a color that will complement your landscape and patio furniture. More importantly, you can choose a finish with a non-slip texture. This is a critical safety feature for any pool area, helping to prevent slips and falls when the surface is wet. Plus, because porcelain is non-porous, it’s incredibly resistant to stains from spilled drinks or sunscreen and is simple to wipe clean.
Eco-Friendly Options
Making a sustainable choice often means choosing a product that is built to last, and that’s where porcelain truly shines. Its incredible density and strength mean it can withstand heavy foot traffic and the demanding Long Island freeze-thaw cycles without cracking. Because it doesn’t absorb water, it prevents damage from frost and resists the growth of mold and mildew. By choosing a material that won’t need to be repaired or replaced every few years, you are reducing waste and making a smart, long-term investment in your swimming pool and your property.
What Is the Cost of Porcelain Pool Coping?
Investing in a new pool or updating an existing one is exciting, and choosing the right materials is a huge part of the process. When it comes to coping, porcelain is a fantastic choice for its beauty and resilience. Understanding the cost helps you plan your budget effectively, ensuring you can achieve the look you want without any surprises. While porcelain might have a higher initial price than some alternatives, its longevity and low maintenance make it a smart long-term investment for your swimming pool. The final price tag depends on a few key variables, from the specific tile you choose to the details of your project. Let’s break down what you can expect to budget for your porcelain pool coping.
Understanding the Average Price
When you start shopping for two-inch porcelain coping, you’ll find that prices generally range from $35 to $55 per square foot. This price point gives you access to a wide variety of high-quality, durable options. For instance, a clean and modern style like Beton Blanco might be around $41 per square foot, while a popular choice like MSI Arterra Terrazo Glacier could be about $38 per square foot. If you’re looking for a more unique or dramatic design, something like Summit Dark Gray can be closer to $53 per square foot. This range allows you to find beautiful porcelain and natural stone options that align with both your design vision and your budget.
What Influences the Final Cost?
So, why the price variation? Several factors contribute to the cost per square foot of porcelain coping. The brand name often plays a role, as established manufacturers with a reputation for quality may have premium pricing. The complexity of the design is another major factor; intricate patterns, unique textures, and specialized finishes will typically cost more than simpler, more standard styles. Finally, the overall quality of the material itself affects the price. Higher-density porcelain that has undergone more rigorous manufacturing processes will be at the higher end of the spectrum, but it also offers superior durability and stain resistance for your outdoor space.
How to Budget for Installation
The price of the porcelain itself is just one piece of the puzzle. When creating your budget, it’s important to account for additional costs to get a complete picture. Don’t forget to factor in shipping fees and sales tax, as these can add a significant amount to your material total. Beyond that, professional installation is essential for a flawless and lasting finish. The cost of labor will depend on the size and complexity of your pool, for example, a freeform pool with many curves will require more intricate cuts and take more time than a simple rectangular one. Always ask for a detailed quote that separates material costs from labor and other expenses.
Why Professional Installation Matters
You’ve picked out the perfect two-inch porcelain coping, and you’re ready to see your beautiful new poolscape come to life. This is where the expertise of a professional installer becomes invaluable. While high-quality porcelain is incredibly durable, its longevity and performance truly depend on how it’s installed. Think of it like a gourmet meal; you can have the best ingredients in the world, but if the chef doesn’t know how to prepare them, the final dish will fall flat.
Professional installation is more than just laying down tiles. It’s a technical process that accounts for everything from the ground beneath to the weather in your backyard. An experienced team ensures every detail is handled correctly, so your investment not only looks stunning on day one but also withstands the test of time. From preparing the base to managing drainage, every step is critical for a flawless, lasting finish. Entrusting your project to a team of masonry experts is the best way to protect your investment and guarantee a result you’ll love for years.
Proper Surface and Base Preparation
The success of your porcelain coping installation starts from the ground up. The surface and base beneath the coping must be perfectly prepared to create a stable foundation. If the base is uneven, improperly compacted, or made from the wrong materials, it can lead to shifting, cracking, and an uneven surface over time. A professional installer knows that this preparation is the most critical step for ensuring the durability of your entire pool deck. They will take the time to build a solid, level base that can support the coping and withstand ground movement, ensuring your beautiful new pool edge stays that way.
Choosing Between a Mortar or Sand Base
Porcelain coping can typically be installed on either a concrete base with mortar or a compacted sand base. The right choice isn’t always obvious and depends on several factors, including your specific site conditions, the existing pool structure, and the desired final look. A professional will assess your project and explain why one method is better for your situation. For example, a mortar set provides a rigid, permanent bond, while a sand base allows for subtle, natural movement. An expert can walk you through the pros and cons of each, helping you make an informed decision that ensures stability and performance.
Managing Expansion and Temperature
Here on Long Island, we know our weather can be unpredictable, with hot summers and freezing winters. These temperature swings cause materials to expand and contract. If your porcelain coping is installed without accounting for this movement, it can lead to pressure buildup, which may cause cracks or tiles to pop loose. Professional installers use specific techniques to manage this. They incorporate proper expansion joints and use flexible grouts that can safely absorb movement from these freeze-thaw cycles. This foresight prevents future damage and is a key reason why professional porcelain installation is so important.
Ensuring Proper Drainage and Slope
Water is a constant around a swimming pool, and managing it effectively is crucial for both safety and longevity. Professional installers are meticulous about creating the correct slope for your coping. This slope is often so subtle you won’t even notice it, but it works hard to direct water away from the pool and prevent it from pooling on the deck. Proper drainage prevents slippery spots, reduces the risk of water damage to the underlying structure, and helps keep your coping cleaner. It’s a small detail that makes a huge difference in the function and safety of your swimming pool area.
Avoiding Common Installation Mistakes
There’s a myth that porcelain is fragile, but more often than not, any issues that arise are due to common installation mistakes, not the material itself. Amateurs might use the wrong type of adhesive, leave uneven gaps between tiles, or fail to prepare the surface correctly. These errors can compromise the integrity of the entire project, leading to costly repairs down the road. Hiring a professional installer from the start helps you avoid these pitfalls. They have the right tools, materials, and experience to get the job done correctly the first time, ensuring your porcelain coping performs as beautifully as it looks.
Common Myths About Porcelain Coping, Debunked
Porcelain is an incredible material for pool coping, but it’s surrounded by a few persistent myths. If you’re feeling hesitant, let’s clear the air. We’ll look at the facts behind these common misconceptions so you can feel confident in your choice.
“Porcelain is too fragile for pool areas.”
It’s easy to picture delicate china, but outdoor porcelain pavers are a different story. High-quality porcelain coping is engineered for strength and is often more durable than many types of natural stone. It’s built to handle the demands of a busy poolside, from constant foot traffic to active kids. This material resists scratches, chips, and the general wear of outdoor life, so you can relax knowing your beautiful pool surround is tough enough for years of summer fun. The porcelain and natural stone options available today are designed specifically for resilience in outdoor settings, giving you lasting peace of mind.
“It requires too much maintenance.”
This is one of the best myths to bust, because the opposite is true. Porcelain is one of the lowest-maintenance materials you can choose for your pool coping. Its non-porous surface doesn’t absorb water, which means spills, dirt, and algae have a hard time setting in. You won’t have to worry about stubborn stains from spilled drinks or pool chemicals. A simple cleaning with mild soap and water is usually all that’s needed to keep it looking brand new. This frees up your time to enjoy your pool instead of constantly working on it, unlike other materials that may need frequent restoration and sealing.
“All porcelain tiles are the same.”
Thinking all porcelain is created equal is a common mistake. The truth is, quality can vary dramatically. Factors like raw materials, the manufacturing process, and firing temperature all impact the final product’s strength and appearance. For example, Italian-made porcelain is widely recognized for its superior craftsmanship and stunning designs. Choosing a high-quality product from a trusted supplier ensures your investment not only looks better but also lasts longer. When you browse the collections at the Gappsi Store, you’ll see the incredible range of colors and premium finishes that set high-end porcelain apart from the rest.
Caring for Your Porcelain Pool Coping
One of the best features of porcelain coping is how simple it is to maintain. You chose it for its durability and beauty, and with just a little attention, it will look stunning for years to come. Unlike more porous materials that demand constant upkeep, porcelain is incredibly resilient. A straightforward care routine is all you need to protect your investment and keep your pool area looking pristine season after season. Focusing on gentle cleaning, grout maintenance, and quick seasonal checks will ensure your coping handles everything from summer pool parties to Long Island winters with grace.
Clean Gently and Regularly
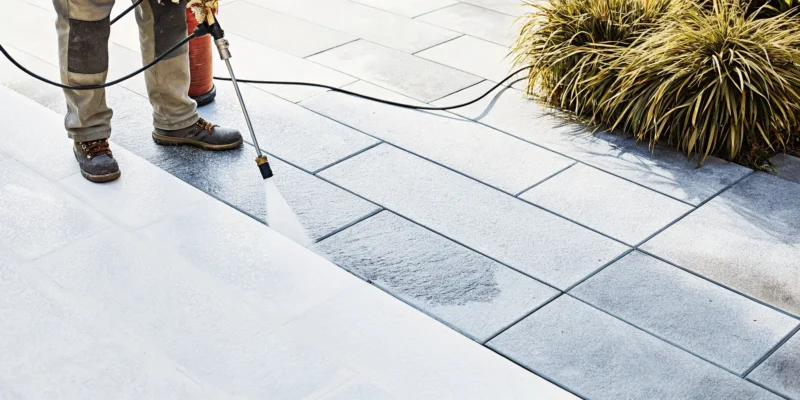
Keeping your porcelain coping clean is incredibly easy. For daily upkeep, simply sweep away leaves, dirt, and other debris with a soft-bristle broom. This prevents buildup and keeps the surface ready for bare feet. For a more thorough cleaning, especially after heavy use, all you need is a bucket of warm water and a mild, pH-neutral soap. Use a soft cloth or mop to wash the surface, then rinse it with clean water. It’s best to avoid harsh chemical cleaners or abrasive scrubbers, as they can damage the finish over time. If you encounter a stubborn stain, our team can help with professional cleaning and sealing services.
Seal Your Grout Lines
While porcelain itself is non-porous and doesn’t require sealing, the grout between the tiles is a different story. Grout is porous, meaning it can absorb water, which may lead to stains, mildew, or cracking, especially during freeze-thaw cycles. We recommend sealing your grout lines after installation and then reapplying the sealant every few years. This simple step creates a protective barrier that repels water and dirt, making the grout much easier to clean and preserving the integrity of your entire pool edge. For a perfect application, it’s always a good idea to have this done by a professional who understands the specific needs of outdoor masonry.
Perform Seasonal Inspections
Living on Long Island means your outdoor spaces endure a full range of weather. A quick seasonal inspection is a great way to make sure your porcelain coping remains in top condition. In the spring, after the snow has melted, walk around your pool and check the grout for any cracks or crumbling sections. In the fall, before you close your pool for the winter, do another check to ensure everything is secure. Catching a small, cracked grout line early is a much easier fix than addressing widespread water damage later. These simple checks help ensure the longevity of your beautiful swimming pool and its surrounding features.
Related Articles
- Porcelain Tiles for Pool Copings: A Buyer’s Guide
- Porcelain Tiles for Pool Copings: A Buyer’s Guide
- Stones & Porcelain Archives – Gappsi Group
- Porcelain & Stone Patio Pavers on Long Island | Gappsi Inc
Frequently Asked Questions
Is two-inch thick porcelain really necessary, or can I use a thinner tile? The two-inch thickness is a key part of what makes this material so perfect for pool coping on Long Island. This substantial thickness provides the structural strength needed to handle heavy foot traffic and, more importantly, our harsh freeze-thaw cycles. A thinner tile simply doesn’t have the same integrity and could be prone to cracking or shifting over time. Think of the two-inch thickness as built-in insurance for a stable, long-lasting pool edge.
Will porcelain coping get too hot to walk on in the summer sun? This is a great question and a very practical concern for any pool owner. While any surface will warm up in direct sunlight, lighter-colored porcelain tiles tend to stay much cooler underfoot compared to darker natural stones or concrete. Porcelain’s dense composition also helps it dissipate heat more effectively. If heat is a major concern for you, I recommend choosing a lighter shade like a soft gray, beige, or white to keep your pool deck comfortable for bare feet.
Can I install porcelain coping on my existing pool, or is it only for new construction? Absolutely, you can use porcelain coping to give your existing pool a major facelift. It’s a fantastic choice for renovation projects. A professional installation team will first assess the condition of your current pool shell and deck. They will then prepare the surface properly, which might involve removing the old coping and creating a new, stable base to ensure the porcelain is installed correctly for a beautiful and durable finish.
You mentioned porcelain can look like wood or stone. Does it feel fake or look printed? Modern manufacturing has come a long way, and high-quality porcelain is incredibly convincing. The designs aren’t just printed on the surface; they are created with varied, textured finishes that mimic the natural material’s feel. The color and veining run through the body of the tile, giving it a depth and authenticity that you can’t get with a simple surface print. It provides the visual warmth of wood or the organic elegance of stone without any of the maintenance drawbacks.
Why is professional installation so important if the material is so durable? The durability of porcelain is only realized when it’s installed correctly. The real skill lies in what happens underneath the tile. A professional ensures the base is perfectly compacted and leveled, creates the proper slope for drainage, and uses the right bonding agents and flexible grouts to manage temperature expansion. These steps prevent future issues like cracking, shifting, or water damage, guaranteeing your beautiful coping performs as well as it looks for years to come.