Planning a backyard renovation often means juggling multiple contractors: one for the pool, another for the masonry, and a third for the landscaping. This approach can lead to miscommunication, delays, and a final result that feels disjointed. A much smoother path is to work with a single, unified team. An outdoor living expert, designer contractor long island ny oversees every aspect of your project, ensuring all the pieces fit together perfectly. From designing a seamless flow between your outdoor kitchen and patio to coordinating all the construction, they handle the complexities so you don’t have to. In this article, we’ll explore the benefits of this integrated approach and what it means for creating your ideal outdoor space.
Key Takeaways
- Hire a holistic expert for a cohesive design: An outdoor living specialist manages your entire project from the ground up. This integrated approach ensures every element, from the pool to the plantings, works together seamlessly, saving you the headache of coordinating multiple contractors.
- Do your homework before signing a contract: Finding the right partner means checking their portfolio and reviews, confirming they are licensed and insured in Long Island, and asking detailed questions about their process, timelines, and warranties.
- Choose a local pro for their insider knowledge: A Long Island-based contractor understands our specific climate and building codes and has access to the best local materials. This expertise leads to a more durable, beautiful result and provides reliable support you can count on.
What Can an Outdoor Living Expert Do for Your Home?
Thinking about your backyard as more than just a patch of grass? That’s where an outdoor living expert comes in. They’re the creative and practical force that can turn an ordinary yard into a true extension of your home. Think of them as a designer, project manager, and builder all in one. Their job is to take your vision, whether it’s a vague idea or a detailed plan, and handle every step to bring it to life.
An expert doesn’t just see a space for a patio; they see an entire environment. They coordinate everything from the ground up, ensuring that your new pool flows seamlessly into the outdoor kitchen and that the landscaping perfectly complements the stonework. They help you choose the right materials for Long Island’s climate, manage all the construction, and make sure every element works together. Instead of you having to hire a separate person for the patio, another for the plants, and a third for the pergola, an outdoor living pro orchestrates the entire project. This integrated approach saves you time and ensures the final result is a beautiful, cohesive, and functional space for you and your family to enjoy.
Pool Design and Installation
An outdoor living expert does more than just install a pool; they create a complete backyard oasis. They’ll work with you to design a custom pool area that fits your space and lifestyle, whether you’re dreaming of a large family pool or a compact plunge pool. Their expertise extends to the entire environment, including the surrounding decking, safety features, and landscaping. They can also integrate other popular features, like a cozy fire pit for cool evenings or an outdoor shower, to make your swimming pool the true heart of your backyard.
Outdoor Kitchens and Entertainment Spaces
Imagine hosting summer barbecues without running back and forth to your indoor kitchen. An outdoor living specialist can design and build a fully functional outdoor kitchen tailored to your needs. This can range from a simple built-in grill and prep station to a complete setup with a refrigerator, sink, and bar seating. They also design the surrounding entertainment spaces, like patios and decks, creating the perfect layout for dining, socializing, and relaxing. These custom areas are built to withstand the elements while matching your home’s style.
Landscaping and Hardscaping
A great outdoor space balances the softness of nature with the structure of well-built features. An expert handles both. Landscaping involves everything green: designing new garden beds, planting trees for privacy, and choosing plants that thrive in our local climate. Hardscaping refers to the non-living elements, like patios, walkways, and retaining walls. A professional can design a beautiful new landscape that combines these elements, creating a yard that is both beautiful and practical. They can even add special features like koi ponds or waterfalls.
Pavilions, Pergolas, and Gazebos
Adding a structure to your yard can define a space and provide welcome shade and style. An outdoor living expert can help you choose the right one for your home. A pavilion offers complete shelter for an outdoor dining room, a pergola can create a beautiful, partially shaded walkway or seating area, and a gazebo provides a charming focal point. A specialist will design and build custom pavilions and pergolas that fit your property’s scale and your home’s architectural style, giving you a comfortable spot to enjoy the outdoors.
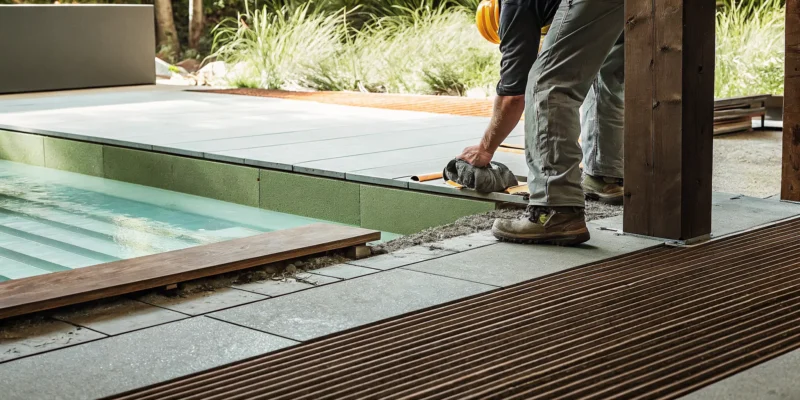
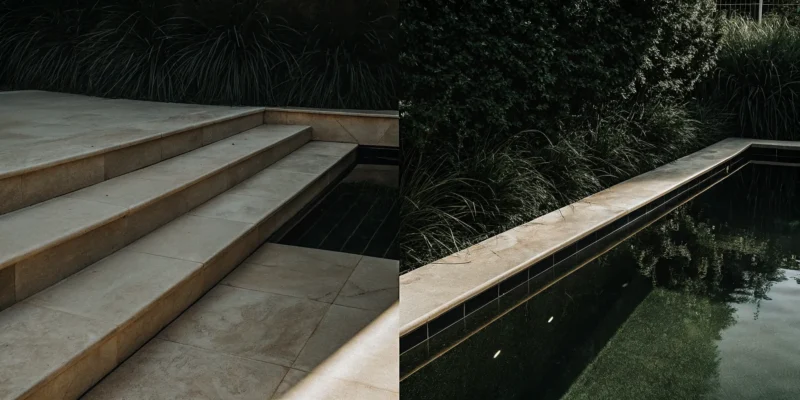
Custom Masonry and Stonework
Natural stone and custom masonry bring a timeless, high-end feel to any outdoor project. An expert uses these materials to build durable and beautiful features that anchor your outdoor design. This includes everything from elegant stone patios and walkways to sturdy retaining walls that add dimension to your landscape. Custom masonry is also key for creating built-in seating, fire pits, and outdoor fireplaces, providing both stunning aesthetics and long-lasting function for your outdoor living space.
Synthetic Turf and Game Courts
If you want a versatile, low-maintenance yard, an outdoor living expert can introduce you to modern solutions like synthetic turf and game courts. High-quality synthetic turf gives you a perfect green lawn year-round without the mowing, watering, or fertilizing. For active families, a specialist can design and install a custom sports court for basketball, pickleball, or tennis. They can even create a personal putting green, turning your backyard into a space for recreation and fun for all ages.
Why Invest in Your Outdoor Space?
Your backyard is more than just the space behind your house; it’s a blank canvas waiting to become your favorite “room.” Transforming it from a simple lawn into a functional, beautiful living area is one of the most rewarding projects you can take on as a homeowner. It’s an investment that pays off in multiple ways, enhancing not only your property’s financial worth but also your daily quality of life. From creating a private retreat to expanding your entertainment options, a well-designed outdoor space offers benefits that you and your family will enjoy for years to come.
Increase Your Home’s Value
Thinking about your home as an investment is always smart, and your outdoor space is a key part of that equation. A professionally designed outdoor living area can significantly increase your property value, with some reports showing a potential return of 15% to 20% here on Long Island. This isn’t just about adding a simple deck; it’s about creating a cohesive and inviting extension of your home that potential buyers will see as a major selling point. Features like a beautifully crafted patio, a functional outdoor kitchen, or a stunning swimming pool make your home stand out in a competitive market. It’s a strategic upgrade that offers both immediate enjoyment and long-term financial gain.
Create Your Personal Getaway
We all need a place to unwind and escape from the daily grind. What if that place was just a few steps from your back door? Homeowners are increasingly focused on creating cozy, inviting outdoor rooms that serve as personal sanctuaries. Imagine spending summer evenings with your family around a fire pit, hosting a quiet dinner under a pergola, or simply enjoying your morning coffee in a peaceful garden setting. Your backyard can become your go-to spot for relaxation and rejuvenation, a private “staycation” destination without the travel. By tailoring the space to your lifestyle, you can build a true retreat that helps you de-stress and make lasting memories.
Expand Your Living Area
If your home is starting to feel a little cramped, the solution might be right outside. Adding a functional outdoor living space makes your home feel bigger and gives you more room to entertain without the cost and disruption of a traditional home addition. A covered patio can serve as a second living room, while an outdoor kitchen becomes the perfect spot for summer cookouts and family gatherings. These additions give you more places to host friends, celebrate milestones, or simply spread out. By using durable and elegant materials like porcelain and natural stone, you can create a seamless transition from your indoor to your outdoor living areas, effectively adding square footage you can use for much of the year.
How to Find the Right Outdoor Living Contractor
Choosing the right contractor is the most important decision you’ll make for your outdoor project. This isn’t just about hiring someone to build a patio; it’s about finding a partner who will help bring your vision to life. The right team will listen to your ideas, offer expert guidance, and manage all the complex details so you can enjoy the process. Taking the time to do your research upfront ensures a smoother experience and a final result you’ll love for years to come. Think of it as building the foundation for a great relationship before you even break ground. A little due diligence now can save you from major headaches later. Here’s a straightforward approach to finding a reliable outdoor living expert in Long Island.
Check Their Portfolio and Reviews
Before you even pick up the phone, start by looking at a contractor’s past work. A picture is worth a thousand words, and a strong portfolio is your first clue that a company can deliver quality results. Look for a gallery of projects that showcases their craftsmanship and style. Do they have experience with the kind of space you’re imagining, whether it’s a sleek modern swimming pool or a rustic stone patio? Beyond their website, check out online reviews on Google and other platforms. Honest customer feedback offers valuable insight into a contractor’s professionalism, reliability, and how they handle the entire construction process from start to finish.
Confirm Their Credentials
Your home is your biggest investment, so you need to know it’s in safe hands. Any professional contractor operating in Long Island should be fully licensed and insured, and they should be able to provide proof without hesitation. This is non-negotiable. Licensing confirms they meet local standards, while insurance protects you from liability in case of accidents or property damage during the project. Choosing the right contractor means evaluating their credentials to ensure they are a legitimate and responsible business. Don’t be shy about asking for this information; a reputable company will expect it and have it ready for you.
Schedule a Consultation to Gauge Communication
Once you’ve narrowed down your list, it’s time to schedule a few consultations. This meeting is about more than just getting an estimate; it’s your chance to see if you have a good rapport with the contractor. A successful project depends on clear and consistent communication. During the consultation, pay attention to how they interact with you. Do they listen carefully to your ideas and concerns? Do they answer your questions thoroughly and explain their process in a way you can understand? Client reviews often highlight a contractor’s communication skills, and your initial meeting is the best way to gauge this for yourself.
Ask for References from Past Clients
A great contractor will have a list of happy clients who are willing to vouch for their work. Asking for references is a standard part of the vetting process and a great way to get an unbiased opinion. Try to speak with homeowners who had projects similar to yours completed. Ask them about their overall experience, whether the project stayed on schedule and within budget, and how the team handled any challenges that came up. Experience is a key factor, and a contractor with years of local experience understands the specific needs of Long Island homes, from the right materials that withstand the climate to navigating local building codes.
Key Questions to Ask a Potential Contractor
Once you’ve narrowed down your list of potential contractors, it’s time for the interview phase. Think of this as a conversation to find the right partner for your project. Asking smart, direct questions now can save you from headaches and unexpected costs later. A professional contractor will welcome your questions and provide clear, confident answers. This is your chance to understand their process, verify their expertise, and see if their communication style is a good fit for you. Being prepared with a list of questions ensures you cover all the important bases and can compare each candidate fairly.
Your goal is to find a team that not only has the technical skills but also shares your vision and respects your home. Don’t be shy about digging into the details. Ask about their team, their suppliers, and how they handle challenges when they arise. The answers you receive will tell you a lot about their experience, professionalism, and commitment to quality. A great contractor will make you feel comfortable and informed every step of the way, turning what could be a stressful process into an exciting collaboration.
Their Experience with Projects Like Yours
It’s one thing for a contractor to say they can build an outdoor kitchen; it’s another for them to have a portfolio full of them. Ask specifically about their experience with projects similar to yours in scope, style, and materials. A contractor with years of local experience understands the specific needs and challenges of Long Island properties, from soil conditions to local building codes. Ask to see photos of completed work or if they can provide addresses of projects in your area you could drive by. This helps you verify the quality of their custom masonry and see their designs in a real-world setting.
Timelines, Payments, and Processes
Understanding the logistics is crucial for a smooth project. Ask for a detailed timeline, including a potential start date, key milestones, and an estimated completion date. You should also get a clear payment schedule. Find out how much is required for a deposit and when subsequent payments are due. A reputable contractor will often tie payments to the completion of specific project phases. You’ll also want to know who your main point of contact will be and how the team will communicate updates. A company that handles the entire project from design to installation can make the process much simpler for you.
Warranties and Ongoing Support
A great outdoor living space is an investment, and you want to know it’s protected. Always ask what kind of warranties a contractor offers on their workmanship and the materials they use. A strong warranty shows that a company stands behind the quality of its work. Some top-tier contractors even offer yearly check-ins to ensure everything is holding up as it should. It’s also a good idea to ask about ongoing support. For example, if you need your patio pavers cleaned and sealed down the line, is that a restoration service they provide?
The Quality of Their Materials
The durability and beauty of your outdoor space depend heavily on the materials used. Ask a potential contractor where they source their materials and why they recommend certain products over others. For long-lasting structures, you’ll want high-quality options like natural stone for patios or durable composites for decking. A great contractor will be transparent about their suppliers and should be able to provide you with samples. Visiting a showroom or a local stone supplier can also help you see and feel the difference in quality for yourself, ensuring you make a choice you’ll love for years to come.
What to Expect: From Design to Done
Once you’ve chosen a contractor, the real fun begins. Transforming your backyard from a simple patch of grass into a beautiful, functional living space is an exciting process, but it helps to know what’s coming. While every project is unique, a professional team follows a structured path to bring your vision to life. This ensures clear communication, high-quality results, and a smooth experience from the first handshake to the final reveal.
Understanding the key phases of a project helps you stay informed and confident in your investment. From the initial brainstorming session at your home to the final sign-off, each step is designed to make sure the finished product is exactly what you dreamed of. Let’s walk through the typical journey of an outdoor living project, so you know precisely what to expect when working with an expert team.
The First Meeting and Site Visit
The process kicks off with an initial consultation, usually right at your property. This is more than just a meet-and-greet; it’s a crucial first step where you share your ideas, goals, and budget. A project manager or designer will walk the space with you, listening to your vision for a new patio, pool, or outdoor kitchen. They’ll also assess the site’s conditions, taking measurements and noting any potential challenges, like grading or drainage. This is your opportunity to ask questions and get a feel for their communication style. A great contractor uses this meeting to understand your lifestyle and ensure their plan fits your family’s needs perfectly.
Creating the Design and Choosing Materials
After the initial meeting, the design team gets to work translating your ideas into a tangible plan. You’ll collaborate with them to create detailed 2D or 3D renderings, allowing you to visualize the final outcome before any ground is broken. This is the stage where you fine-tune layouts, features, and aesthetics. You’ll also select your materials, from the type of porcelain and natural stone for your patio to the finishes for your outdoor kitchen. An experienced designer will guide you through the options, explaining the benefits of different materials and helping you choose ones that match your style and will stand up to Long Island’s weather.
Key Steps During Construction
With a finalized design and materials selected, the construction phase begins. A professional contractor will handle all the logistics, including securing necessary permits, scheduling deliveries, and managing the build team. They should provide you with a clear timeline and keep you updated on their progress. Whether they’re installing intricate masonry or excavating for a swimming pool, the project manager oversees every detail to ensure the work is done to the highest standard. Your property will be an active work site, but a considerate team will work efficiently and keep the area as clean and organized as possible throughout the project.
The Final Walk-Through and Inspection
Once the construction is complete, it’s time for the final walk-through. You and your project manager will inspect every detail of the new space together to ensure it meets your expectations and matches the design plan. This is your chance to point out anything that needs a final touch-up. After you’ve signed off on the work, the team will perform a final cleanup and officially hand the space over to you. They should also provide you with all the necessary documentation, including warranties for materials and instructions for caring for your new outdoor oasis, like how to maintain it with restoration and sealing services.
Budgeting for Your Outdoor Project in Long Island
Creating a budget for your dream backyard is one of the most important steps in the entire process. It helps you set realistic expectations, make informed decisions, and find a contractor who can deliver what you want without surprise costs. A well-planned budget is your roadmap to a beautiful and functional outdoor space that you and your family will enjoy for years. Think of it not just as an expense, but as an investment that adds both value and joy to your home.
What Determines the Final Cost?
The final price tag for your outdoor project depends on a few key factors: the size and complexity of the design, the quality of materials you choose, and the labor involved. A simple stone patio will cost less than a multi-level outdoor living area with a built-in kitchen and a custom swimming pool. While it’s an investment, remember that well-designed outdoor spaces can significantly increase your home’s value. Adding a functional and beautiful outdoor area makes your home feel larger and gives you more room to entertain, ultimately enhancing your property’s appeal and worth.
How to Read an Estimate and Understand Payments
When you receive an estimate, it should be more than just a single number. A professional contractor will provide a detailed, itemized breakdown that lists costs for materials, labor, permits, and any other expenses. Take your time to review portfolios and compare estimates from different companies. Don’t be afraid to ask questions if something isn’t clear. A trustworthy partner will have strong customer feedback and communicate openly. Look for a clear payment schedule in the contract so you know exactly when payments are due throughout the project.
Smart Timing and Budget Planning
Great outdoor projects take time to plan and execute, and the best contractors are often booked well in advance. To get on your preferred expert’s schedule, it’s wise to start planning your project months, or even a season, ahead. This gives you plenty of time to finalize your design and material choices, like beautiful porcelain and natural stone pavers, without feeling rushed. If you’re considering financing, many companies offer options that allow you to check your eligibility without impacting your credit score, making it easier to manage your budget and bring your vision to life.
Where to Find Reputable Local Contractors
Finding the right team for your project can feel like a big task, but knowing where to look makes all the difference. A great contractor will not only have the technical skills but also be a reliable partner throughout the process. Here are a few trusted methods for finding a reputable outdoor living expert right here on Long Island.
Start with Online Reviews and Directories
Your search for a great contractor can begin right from your couch. Websites like Houzz, Google, and even local community forums are excellent places to start. When you browse these sites, pay close attention to what past clients are saying. Client reviews offer genuine insight into a contractor’s reliability, communication style, and the quality of their finished work. Don’t just look at the star rating; read through the comments to understand the full picture. Also, take time to look through their photo galleries. A detailed portfolio of projects, like custom pavilions and pergolas, will show you the quality and style of their craftsmanship.
Look into Professional Associations
Another great way to find qualified professionals is by checking the member lists of professional organizations. Groups like the National Association of the Remodeling Industry (NARI) or the Long Island Builders Institute (LIBI) require their members to meet certain standards and follow a code of ethics. A contractor who belongs to these associations is often more invested in their craft and committed to staying up-to-date on industry best practices. It’s a good sign that they take their business seriously. You can often search for local members directly on these organizations’ websites, giving you a pre-vetted list of potential contractors for your project.
Check with Local Building Departments
This step is absolutely essential. Before you hire anyone, you need to confirm they are properly licensed and insured. In our area, home improvement contractors must be licensed by either the Nassau County Office of Consumer Affairs or the Suffolk County Department of Consumer Affairs. You can usually look up a contractor’s license status online or by calling the office directly. This simple check protects you and ensures the contractor is legally permitted to work on your home. Working with a fully licensed and insured company like Gappsi gives you peace of mind that your project is in capable and professional hands.
The Advantage of a Local Long Island Pro
When you’re planning a major home project, it can be tempting to go with the first contractor you find online. But for something as important as your outdoor living space, choosing a local expert who truly understands Long Island makes all the difference. A local pro brings more than just tools and a team; they bring a deep familiarity with the area’s specific character, climate, and regulations. This insider knowledge is what separates a good result from a great one.
Working with a company that has roots in your community means they have a reputation to uphold and a genuine investment in making your home the best it can be. They’re not just building a patio or a pool; they’re building a relationship with a neighbor. From sourcing the right materials to designing for our unique weather patterns, a Long Island-based expert provides a level of service and insight that a national chain or out-of-town contractor simply can’t match.
They Know Long Island’s Rules and Weather
Every town and village on Long Island has its own set of building codes, zoning laws, and permit requirements. A local contractor is already familiar with these rules, which saves you from the headaches of delays and potential compliance issues. They know exactly what paperwork needs to be filed in Suffolk or Nassau County and can handle the process efficiently. This expertise is especially crucial for complex projects like installing swimming pools. Beyond the paperwork, they understand Long Island’s climate. They’ll design spaces and choose materials that can withstand our humid summers, freezing winters, and salty coastal air, ensuring your investment lasts for years to come.
Better Access to Quality Materials
A local contractor has spent years building relationships with the best suppliers in the area. This network gives them access to high-quality materials that are perfectly suited for our environment. Instead of generic options from a big-box store, you get a curated selection of durable and beautiful products. For example, a local expert will know which porcelain and natural stone pavers will hold up best against freeze-thaw cycles and which woods are resistant to moisture and pests. These established supplier relationships can also lead to better pricing and availability, keeping your project on schedule and within budget while guaranteeing a superior finish.
Local Support You Can Count On
When your project is finished, you want to know that your contractor will still be around to answer questions or handle any issues that might come up. Working with a local company means you have a partner right in your community. They have a vested interest in your satisfaction because their reputation is built on local word-of-mouth. This ongoing support is invaluable, whether you need advice on seasonal maintenance or decide to add another feature to your outdoor space down the road. A local team provides peace of mind, knowing that help is just a phone call away, not several states over.
Related Articles
Frequently Asked Questions
What’s the real difference between hiring an outdoor living expert versus just a landscaper or a pool company? Think of an outdoor living expert as the director of your entire backyard project. While a landscaper focuses on plants and a pool company focuses on the pool, an expert designs and manages how everything works together. They ensure the stonework complements the garden, the outdoor kitchen flows naturally from the patio, and the whole space feels like a single, cohesive design. This integrated approach saves you the headache of coordinating multiple contractors and results in a more thoughtful and unified space.
My backyard isn’t very big. Can I still create a functional outdoor living space? Absolutely. A smaller yard just calls for smarter design, not fewer features. An experienced designer can make a compact space feel incredibly functional and inviting. This might involve creating multi-purpose elements like a retaining wall that doubles as extra seating, using vertical space with a pergola, or choosing a smaller plunge pool instead of a large one. It’s not about the square footage you have; it’s about making every inch count.
How long does a project like this typically take from start to finish? The timeline really depends on the size and complexity of your project. A straightforward patio might be completed in a few weeks, while a full backyard renovation with a pool and custom masonry could take several months. A significant portion of the timeline is dedicated to the design and permitting phases, which happen before any construction starts. A good contractor will give you a clear and realistic schedule during the planning process.
Do I need to worry about getting permits for things like a pool or a pavilion? When you work with a professional, you shouldn’t have to worry about permits at all. A reputable local contractor understands the specific building codes and requirements for towns across Long Island. They will handle the entire process for you, from preparing the paperwork to submitting the applications and scheduling inspections. It’s a crucial part of their service that ensures your project is built safely and legally.
What’s the best way to start if I have some ideas but no concrete plan? The perfect place to start is with a conversation. You don’t need to have a fully formed blueprint before reaching out to a professional. Simply gather any inspiration photos you have and think about how you want to use the space. During an initial consultation, a good designer will listen to your ideas, ask the right questions, and help you refine your vision into a beautiful and practical plan that works for your home and your budget.