Long Island weather is not for the faint of heart, and the same goes for our swimming pools. Any outdoor structure here has to be tough enough to handle the dramatic swing of our seasons, from scorching summer sun to the ground-shifting pressure of a deep winter freeze. When you’re investing in a pool, you need to know its core structure can withstand these challenges year after year. This is where the fundamental differences between Gunite and vinyl become so important. So, when considering a Gunite or vinyl swimming pool what’s the best for Long Island ny weather? This article focuses specifically on durability, comparing how each material resists our climate to help you choose a pool that’s truly built to last.
Key Takeaways
- Choose gunite for ultimate design flexibility: Its custom, on-site construction allows for any shape or feature, making it a permanent and integrated part of your landscape. Vinyl pools offer beautiful, classic designs with a faster installation time.
- Balance upfront cost with long-term expenses: Vinyl pools are more affordable initially but require a significant liner replacement every 7 to 15 years. Gunite has a higher starting price but eliminates this recurring cost, making it a more predictable long-term investment.
- Prioritize durability for our climate: Gunite’s solid concrete shell is built to last for decades and easily handles Long Island’s freeze-thaw cycles. The primary concern with a vinyl pool is protecting its liner, which is more vulnerable to damage from weather and daily use.
Gunite vs. Vinyl Pools: What’s the Difference?
When you start planning your backyard oasis, one of the first big questions you’ll face is what type of pool to build. Gunite and vinyl liner pools are two of the most popular choices for Long Island homeowners, but they are fundamentally different. Understanding how they are built, the design freedom they offer, and how long it takes to install them will help you decide which one is the perfect fit for your family and your home. Each type has its own unique set of benefits, so let’s look at what sets them apart.
How They’re Built
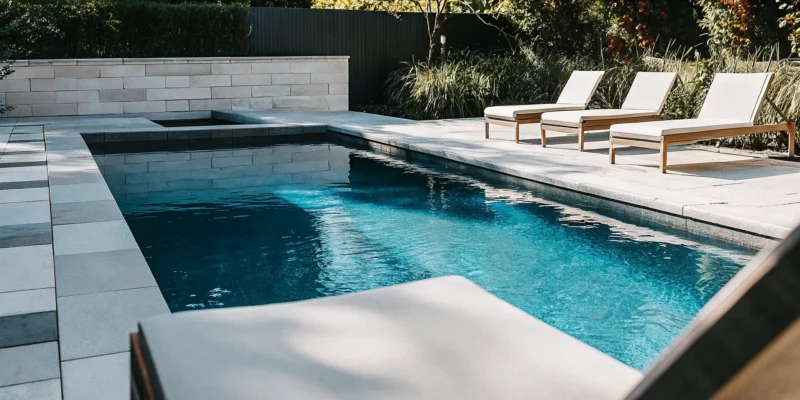
The construction method is the main difference between gunite and vinyl pools. A gunite pool is built to last, created by spraying a mix of concrete and sand over a steel-reinforced frame (rebar). This process forms a single, solid concrete shell that is incredibly strong and durable. After the shell cures, it’s finished with a smooth layer of plaster, tile, or other aggregate finishes. This monolithic structure is what gives gunite pools their reputation for strength.
Vinyl liner pools are built differently. The process starts with excavating the shape of the pool and assembling a frame of wall panels. A custom-made sheet of vinyl is then fitted into the structure, acting as a waterproof membrane that holds the water. The liner attaches to a track along the top edge of the pool. This construction makes the initial installation faster than a gunite pool. Gappsi’s team are experts in building both types of swimming pools, ensuring quality craftsmanship no matter which you choose.
Your Design and Customization Options
If you can dream it, you can probably build it with gunite. This is where gunite pools truly shine. Because they are built on-site, they offer nearly limitless design flexibility. You can create a completely custom shape that flows with your landscape, and add unique features like beach-style entries, built-in benches, tanning ledges, or stunning infinity edges. The interior finish can also be customized with a variety of colors and textures, from classic plaster to beautiful pebble or glass bead aggregates.
Vinyl liner pools offer more limited design choices. While you can select from many standard shapes and sizes, creating a truly freeform design is more difficult. Customization often comes from choosing the liner itself, which is available in a wide range of colors and patterns to mimic the look of tile or stone. While you can still create a beautiful pool, you won’t have the same level of structural customization that you get with a gunite build. You can further enhance any pool design with gorgeous porcelain and natural stone pavers for the surrounding patio.
The Installation Process and Timeline
Patience is key when installing a gunite pool. The construction process is more involved and takes longer, typically anywhere from six to eight weeks, depending on the complexity of the design and weather conditions. After the hole is excavated and the rebar cage is built, the gunite is sprayed on. Then comes the most important part: the curing process. The concrete shell needs several weeks to cure and gain its full strength before the final interior finish can be applied.
In contrast, a vinyl liner pool can be installed much more quickly. Since the components are manufactured off-site, the on-site work is mostly assembly. Once the excavation is complete and the wall panels are in place, the liner can be installed and the pool can be filled with water in a matter of days. For homeowners who want to be swimming as soon as possible, the faster installation timeline of a vinyl pool is a significant advantage.
How Do Gunite and Vinyl Pools Handle Long Island’s Climate?
Living on Long Island means we enjoy beautiful summers perfect for swimming, but it also means dealing with freezing winters and coastal storms. These weather patterns can be tough on any outdoor structure, so your pool needs to be built to last. The material you choose plays a huge role in how well it holds up season after season. Gunite and vinyl pools react very differently to our local environmental stresses. From the ground freezing and thawing to the occasional nor’easter, understanding how each pool type performs is key to making a smart investment.
Handling the Freeze-Thaw Cycle
One of the biggest tests for any pool on Long Island is our winter freeze-thaw cycle. As the ground freezes and expands, it puts immense pressure on a pool’s structure. Gunite swimming pools are built with a strong, reinforced concrete mix that can withstand this cycle, making them much less likely to crack. Their solid shell moves with the ground as one piece. Vinyl liner pools, however, can be more vulnerable. Shifting ground can stretch the liner or damage the walls. If water gets behind the liner and freezes, it can cause significant problems, making the material more susceptible to wear from our harsh winters.
Durability Through Changing Temperatures
Beyond just the winter, Long Island’s temperatures can swing dramatically. We go from hot, humid summer days to frigid nights, and your pool needs to handle it all. This is where the long-term durability of gunite really shines. Concrete pools can last for decades with proper care, making them a resilient choice for our fluctuating climate. The structure itself is incredibly stable. A vinyl liner’s lifespan is more directly impacted by these temperature swings. Extreme heat can make the vinyl pliable, while cold can make it brittle, affecting its fit and integrity over time and leading to eventual replacement.
Facing Storms and High Groundwater
As an island, we’re no strangers to heavy rain and strong winds. These storms can lead to high groundwater levels, which pose a threat to in-ground pools. Gunite pools are more resilient against storms and high groundwater because of their sheer weight and solid construction. They resist the hydrostatic pressure that pushes up from underneath. Vinyl liner pools are more vulnerable to this pressure. Rising groundwater can push the liner inward, causing it to “float” and wrinkle. This often requires professional repairs. Proper site preparation and landscape drainage can help, but the risk is higher than with a solid gunite shell.
What’s the Real Cost of a Gunite vs. Vinyl Pool?
When you’re planning your budget for a new pool, it’s easy to focus only on the initial price tag. But the true cost of ownership goes far beyond the installation day. You also need to think about long-term maintenance, potential repairs, and replacement expenses down the road. Both gunite and vinyl pools have very different cost structures over their lifetimes, so understanding these differences is key to making a smart investment for your Long Island home. Let’s break down what you can expect to spend, both now and in the future.
Upfront Installation Costs
The initial investment is one of the biggest distinctions between gunite and vinyl pools. Generally, a vinyl liner pool has a lower entry price, which makes it an attractive option for homeowners working with a specific budget. The construction process is simpler, which helps keep those initial costs down.
On the other hand, a gunite pool requires a larger upfront investment. Custom-built swimming pools made from gunite can start around $50,000 and go up from there depending on size, complexity, and custom features. While the initial sticker price is higher, you are paying for a permanent, highly durable structure that is built to last for decades.
Long-Term Maintenance Expenses
Over the years, the costs associated with gunite and vinyl pools start to look quite different. With a gunite pool, you’ll need to budget for things like acid washing every three to five years to keep the surface clean and bright. You may also use slightly more chemicals because of the porous nature of the plaster finish.
The biggest long-term expense for a vinyl pool is replacing the liner. Vinyl liners are very tough, but they typically need to be replaced every 7 to 10 years. This is a significant recurring cost that you won’t have with a gunite pool. Factoring in this future expense is essential when comparing the overall financial commitment of each pool type.
Comparing Repair and Replacement Costs
When it comes to durability, gunite has a clear advantage. A gunite pool can last more than 50 years with proper care, so you won’t be thinking about a full replacement. Repairs usually involve patching small cracks in the plaster, which is a specialized but manageable task. Because gunite is so strong, these repairs are often infrequent.
With a vinyl pool, you’ll need to replace the liner every 8 to 15 years, which is a major extra cost over the life of the pool. While you can patch small tears in the liner, a full replacement is an inevitable expense. This is the most significant difference in long-term costs and a crucial factor when deciding which pool is the right financial fit for your family.
Which Pool Lasts Longer?
When you’re planning a major addition to your home like a swimming pool, you want to know it’s built to last. A pool is a significant investment, and its lifespan is a critical factor in your decision. The durability of a pool comes down to its core structure and how well that structure can handle years of use, chemical treatments, and Long Island’s distinct seasons. This is where the differences between gunite and vinyl pools become very clear.
Gunite pools are constructed as a single, solid piece, creating a durable vessel that can stand the test of time. Vinyl liner pools, on the other hand, consist of a separate frame and a liner. While the frame provides support, the liner is the part that holds the water, and it has a much shorter lifespan than the pool structure itself. Understanding how each type ages and what kind of upkeep is required will give you a realistic picture of your long-term commitment. Let’s look at what you can expect from each option over the years.
The Lifespan of a Gunite Pool
If your top priority is longevity, a gunite pool is the clear winner. With proper care, the concrete shell of a gunite pool can easily last for 50 years or more, making it a true generational investment for your family. These swimming pools are built on-site with a steel rebar framework that is then sprayed with a concrete and sand mixture. This process creates a monolithic, incredibly strong structure that becomes a permanent part of your landscape. While the interior plaster finish will need to be redone every 10 to 15 years to keep it looking fresh, the core structure remains sound for decades.
How Often Vinyl Liners Need Replacing
A vinyl liner pool’s lifespan is really determined by its liner. The liner itself typically needs to be replaced every 7 to 10 years. Factors like sun exposure, water chemistry, and accidental tears from pets or sharp objects can shorten its life even further. While the underlying wall panels can last much longer, the liner is the most critical and vulnerable component. This means you should factor in the recurring cost and hassle of a full replacement every decade or so. It’s an important long-term expense to consider when comparing the initial price tag of a vinyl pool to that of a gunite installation.
Resistance to Chemicals and Weather
Gunite pools are exceptionally resilient. Their solid concrete and steel construction makes them incredibly durable against ground shifts and the pressures of our local freeze-thaw cycles. They can handle heavy use and are less prone to scratching or staining from debris after a storm. While the plaster surface is porous and requires diligent water chemistry management, the structure itself is tough. A vinyl liner is more delicate. It can be punctured by storm debris, stained by improper chemical use, or become brittle over time from sun and cold, making it more susceptible to damage during seasonal changes.
What Maintenance Does Each Pool Need in Our Climate?
A beautiful pool is a fantastic addition to your home, but it’s important to understand the upkeep involved. The maintenance needs for Gunite and vinyl pools are quite different, especially with our changing seasons here on Long Island. From balancing water chemistry to getting your pool ready for summer, the tasks you’ll perform depend heavily on the material you choose. Let’s break down the typical maintenance routine for each so you can decide which one fits best with your lifestyle.
Managing Your Pool’s Water Chemistry
All swimming pools require balanced water, but Gunite and vinyl surfaces react to chemicals differently. A Gunite pool’s plaster finish is porous, so you’ll need to be more diligent about managing the water chemistry. If the pH, alkalinity, or calcium levels are off, the water can become acidic and slowly etch the surface, making it rough. On the other hand, vinyl liners are non-porous, but they aren’t immune to chemical damage. Consistently high chlorine or low pH can make the liner brittle and cause the color to fade over time. Both types require regular testing, but Gunite demands a bit more attention to protect its finish.
Preventing Liner Tears and Damage
The primary maintenance concern for a vinyl pool is the liner itself. It’s a durable material, but it can be punctured or torn by sharp objects like fallen branches, pet claws, or broken pool toys. While small holes can often be patched, a significant tear could require a full liner replacement, which is a considerable expense you can expect to face every 10 to 20 years. In contrast, the rugged plaster or aggregate finish of a Gunite pool eliminates this worry entirely. This durability is a major reason why many Long Island families choose custom Gappsi swimming pools for their backyards, offering peace of mind during active summer fun.
Opening and Closing Your Pool for the Season
Seasonal maintenance is a non-negotiable part of pool ownership on Long Island. When opening a Gunite pool for the summer, you’ll likely need to give the walls a thorough brushing to remove any algae that may have settled into the porous surface. Every few years, an acid wash can help remove stubborn stains and brighten the finish. For vinyl pools, the process is often simpler, but it includes a careful inspection of the liner for any damage that might have occurred over the winter. Proper closing procedures are critical for both types to prevent damage from freezing temperatures. For tougher jobs, professional restoration and sealing services can keep your pool surround looking pristine year after year.
How Do the Design and Style Options Compare?
Beyond durability and cost, the look and feel of your pool are what you’ll enjoy every single day. This is where gunite and vinyl pools really show their differences, turning a simple choice into a creative one. While both can create a beautiful backyard centerpiece, one offers nearly limitless freedom, while the other provides a more streamlined approach with proven, popular designs. Your decision will come down to how much you want to personalize your space and how the pool will integrate with your patio, garden, and overall outdoor living area.
If you have a specific vision for a one-of-a-kind oasis, or if your property has unique challenges like a sloped yard or an unusual shape, the material you choose will play a huge role in bringing that vision to life. Think about your ideal backyard. Is it a classic rectangle perfect for swimming laps, or a freeform lagoon with built-in waterfalls and seating? Do you want a finish that sparkles in the sun or a simple, smooth surface? Answering these questions will help you see whether the boundless customization of gunite or the straightforward elegance of vinyl is the right fit for your Long Island home.
Comparing Shapes and Sizes
When it comes to creating a truly custom shape, gunite is in a class of its own. Because gunite is sprayed onto a rebar framework on-site, it means that gunite pools can be any shape you like. This flexibility is perfect for homeowners who want a pool that flows with their landscape, fits into a unique space, or matches a specific architectural style. You can design gentle curves, sharp angles, or a completely organic shape that looks like a natural pond.
Vinyl liner pools, on the other hand, are built using pre-manufactured panels. This means you’ll be choosing from a catalog of established shapes and sizes, like rectangles, ovals, or L-shapes. While there are many beautiful options available, you won’t have the same level of freedom to create a completely original design from scratch.
Finishes and Custom Features
The customization continues with the pool’s interior surface. Gunite offers a wide variety of interior finishes, including different colors and pebble-like finishes with glass or quartz that can shimmer in the sun. This allows you to choose a texture and color that perfectly complements your patio and landscaping. You can also seamlessly integrate features like tanning ledges, built-in benches, and custom steps. These elements are formed as part of the pool shell, creating a cohesive, high-end look that works with your overall masonry design.
Vinyl liners also provide options, offering smooth finishes and a variety of colors and patterns. You can choose a liner that mimics the look of tile or a simple, brilliant blue. While you can’t achieve the same textured feel as a pebble finish, modern vinyl liners are attractive and feel soft to the touch.
Matching Your Long Island Landscape
The unique properties across Long Island often call for creative solutions. Gunite pools are ideal for creating unique designs that fit the specific landscape of your yard, especially in areas with challenging terrain like slopes or irregular lot lines. A gunite pool can be built to hug the contours of your property, making it feel like it was always meant to be there. This adaptability allows you to create a harmonious flow between your home, your pool, and your garden.
A vinyl pool is an excellent choice for more traditional, level backyards where a standard shape fits easily. If your property is relatively flat and you have a clear, open area, a vinyl pool can be installed efficiently and look fantastic. The key is to assess your space and decide whether a custom build or a classic design will better suit your landscape.
How Does Each Pool Affect Your Home’s Value?
A swimming pool is more than just a place to cool off; it’s a major home improvement project. So, it’s smart to think about how this investment will affect your property’s value down the road. The type of pool you choose plays a significant role in its long-term financial impact. Both gunite and vinyl pools can make your home more desirable, but they contribute to its value in different ways, from buyer appeal to the total cost of ownership over time. Understanding these differences will help you see the complete picture of your investment.
Impact on Property Value and Appeal
When potential buyers tour your home, the pool is a major focal point. A gunite pool often makes a stronger first impression. Because of its incredible strength and longevity, gunite is widely seen as the “gold standard” in the pool industry. It’s viewed as a permanent, luxurious addition to the property, not just an accessory. This perception can significantly increase your home’s appeal.
A vinyl liner pool is still a fantastic feature that promises years of family fun. However, because the liner is a replaceable component, some buyers might not view it with the same sense of permanence as a gunite structure. A well-maintained vinyl pool in a beautifully landscaped yard is always a plus, but a gunite swimming pool often carries more weight in a buyer’s mind as a high-end, structural asset.
Calculating Your Return on Investment
Thinking about return on investment (ROI) helps you weigh the cost against the value a pool adds. A gunite pool can increase your home’s value by 5% to 7%, with some reports showing an ROI of around 56%. This means you could potentially recoup a significant portion of the installation cost when you sell your home. The durable, custom nature of gunite contributes directly to this higher valuation.
Vinyl pools have a lower upfront cost, which is a major draw. While they still add value and appeal, the ROI calculation is different. Because buyers know the liner will eventually need replacement, the value-add might be slightly less than that of a gunite pool. The key to maximizing ROI for any pool is creating a complete outdoor oasis. Integrating features like a stunning natural stone patio and thoughtful landscaping turns your pool from a simple feature into a lifestyle upgrade.
The Total Cost of Ownership Over Time
The initial price tag is only one part of the financial story. The total cost of ownership includes maintenance, repairs, and replacements over the pool’s lifetime. This is where the differences between gunite and vinyl become very clear. Vinyl liners typically need to be replaced every 7 to 10 years, which is a recurring expense you’ll need to plan for. While a vinyl pool is often cheaper at first, the cost of liner replacements can add up over time.
In contrast, a gunite pool has a structural lifespan of 50 years or more with proper care. It may need to be resurfaced every 10 to 15 years, but you won’t face the complete replacement of a major component. This long-term durability makes the total cost of ownership more predictable. For a potential buyer, a gunite pool represents a stable, long-lasting feature, while an aging vinyl pool might signal a future expense.
Which Pool Is Right for Your Long Island Home?
Choosing between a gunite and a vinyl liner pool comes down to your personal priorities. There’s no single right answer, but understanding how each option aligns with your budget, lifestyle, and long-term plans will help you make a confident decision. Think about what you want from your backyard oasis, not just for this summer, but for all the years to come. By weighing the key differences, you can find the perfect fit for your family and create the backyard you’ve always imagined.
Your Budget and Timeline
Your budget is one of the most practical starting points. Gunite pools represent a larger upfront investment, often starting at $50,000 or more, due to the custom construction process. However, this cost covers a highly durable, permanent structure. On the other hand, vinyl liner pools are more budget-friendly at the start, making them an accessible option for many homeowners. The main financial consideration with vinyl is the eventual liner replacement, which you can expect to do every 8 to 15 years. This is a significant future expense to keep in mind. Your timeline also matters. A custom gunite swimming pool takes longer to build, while a vinyl pool installation is typically faster.
How You Plan to Use Your Pool
Think about how your family will enjoy the pool day to day. If you’re dreaming of a one-of-a-kind resort-style backyard with unique features like built-in benches, waterfalls, or an attached spa, a gunite pool is your best bet. Its flexibility allows for complete creative control, making it ideal for homeowners who want a true luxury experience. If your goal is a beautiful, comfortable pool for swimming, playing, and relaxing, a vinyl liner pool is an excellent choice. Vinyl liners offer a smooth, non-abrasive finish that’s gentle on feet and swimsuits. Plus, with a wide variety of colors and patterns available, you can still achieve a stunning look that complements your home’s masonry and landscape.
Making the Final Decision
So, how do you choose? Opt for gunite if you want a high-end, custom-designed pool and are prepared for a higher initial cost and a longer installation period. It’s an investment in a permanent, uniquely shaped structure that can significantly add to your property’s value. Choose a vinyl liner pool if your priority is a lower upfront cost and a quicker installation. Vinyl pools are fantastic for family fun and offer beautiful aesthetics, but be prepared for the long-term maintenance of protecting the liner from damage and budgeting for its eventual replacement. Ultimately, the best pool is the one that fits your vision and financial plan for your Long Island home.
Related Articles
- The Best Pool for Long Island Weather: Gunite vs. Vinyl
- The Best Pool for Long Island Weather: Gunite vs. Vinyl
- Gunite To Vinyl Conversion on Long Island – Gappsi Group
- Outdoor Living News: Pools, Fire Pits & Renovations | Gappsi Inc
Frequently Asked Questions
Is a gunite pool really worth the higher initial cost? Think of it as a long-term investment in your property. While the upfront cost for a gunite pool is higher, you are paying for a permanent, steel-reinforced structure that can last for more than 50 years. This durability and the perception of luxury often translate to a higher home value. A vinyl pool costs less to install, but you will need to factor in the significant expense of replacing the liner every decade or so, which can make the total cost of ownership higher over time.
I have an active family with kids and pets. Which pool is more durable for daily use? For a busy backyard, gunite is the tougher choice. The plaster or aggregate finish is incredibly resilient and can stand up to dog claws, dropped pool toys, and general wear and tear without the constant worry of a puncture. While vinyl liners are strong, they are more susceptible to tears or holes from sharp objects, which means you’ll need to be more mindful during active play.
What is the single biggest long-term expense I should plan for with each pool type? The most significant recurring cost is very different for each pool. With a vinyl liner pool, your biggest future expense will be replacing the entire liner, which is typically needed every 7 to 10 years. For a gunite pool, the major long-term maintenance task is resurfacing the interior finish every 10 to 15 years. This refreshes the pool’s appearance, but it’s important to remember the underlying concrete shell remains intact for decades.
My backyard has a unique shape. Does that mean I have to choose gunite? If you want a pool that perfectly follows the curves of your landscape or fits into an unusual space, then gunite is your best option. Its on-site construction method allows for complete design freedom, so you can create any shape you can imagine. Vinyl pools are limited to pre-manufactured shapes, so while there are many beautiful classic designs to choose from, you won’t get that same custom-fit solution for a challenging property.
How much more work is a gunite pool to maintain week to week? The main difference in weekly maintenance comes down to water chemistry. Because a gunite pool’s plaster surface is porous, you need to be a bit more diligent about keeping the pH and alkalinity levels balanced to protect the finish from etching. A vinyl liner is non-porous, which can be slightly more forgiving. However, both pool types require regular testing, chemical balancing, and cleaning to stay sparkling and safe for swimming.