We’ve all seen a neglected basketball court: cracked surfaces, faded lines, and puddles after every rainstorm. These issues often stem from poor planning and construction. Choosing the wrong materials or skipping proper site preparation can turn a dream project into a long-term headache. You can avoid these pitfalls by partnering with a professional from the start. The best basketball courts installers on Long Island ny understand how to build a court that withstands our weather and years of play. They handle everything from permits to drainage, giving you peace of mind and a flawless court that’s ready for action the day it’s finished.
Key Takeaways
- Hire a professional you trust: Your project’s success hinges on your installer. Look for a licensed and insured expert with a strong portfolio who can manage everything from design and permits to the final installation.
- Pick the perfect surface for your family: The right material depends on your budget and how you’ll play. Consider safety and performance when choosing between options like shock-absorbing tiles, classic concrete, or cushioned synthetic turf.
- Get the foundation right from the start: A great court is built on solid planning. A detailed contract, professional site preparation, proper permits, and a maintenance plan are essential for a smooth project and a lasting investment.
Your Guide to Building a Home Basketball Court on Long Island
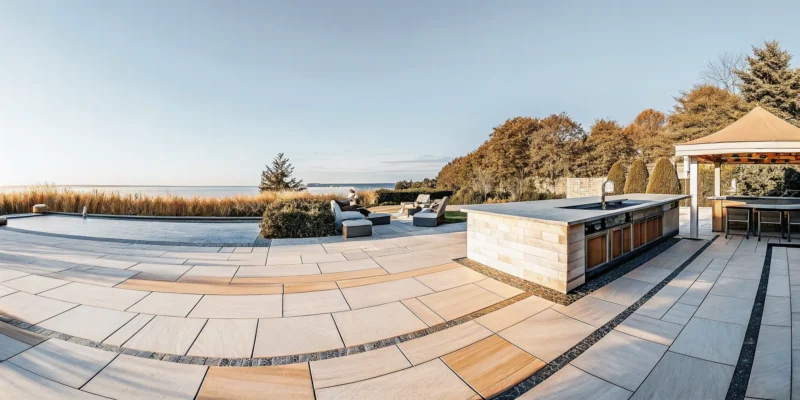
Adding a basketball court to your Long Island home is a fantastic project that offers endless fun and activity. It transforms your backyard into a personal arena for fitness, family time, and friendly competition. But before you start planning your dream court, it’s helpful to understand the benefits and what the building process involves. Let’s walk through what you need to know to get started.
Why Install a Personal Basketball Court?
A personal basketball court is more than just a place to shoot hoops; it’s an investment in your family’s health and happiness. Having a court right outside your door makes it so much easier to get in a quick workout and stay active. It’s also a fantastic way to bring everyone together. Imagine spending evenings playing games with your kids or hosting friendly matches with neighbors, creating memories that will last for years. Plus, it gives your kids and their friends a safe, designated spot to play and burn off energy, giving you peace of mind. A personal court can truly become the heart of your outdoor living space.
What to Expect from the Installation Process
So, what does it take to bring a basketball court to life in your yard? The process is more straightforward than you might think, especially with an experienced team. It all starts with a custom design tailored to your space and preferences. We handle everything from planning to the final installation. One of the biggest hurdles for homeowners can be securing permits, but we take care of the entire permitting process for you. A typical installation takes about two to six weeks. You’ll also have a variety of surface options to choose from, including classic asphalt, modern modular tiles, or even synthetic turf. We’ll help you select the perfect material for your court’s performance and look.
What Services Do Basketball Court Installers Offer?
When you decide to build a basketball court in your backyard, you’re not just hiring someone to pour concrete. You’re partnering with a team of professionals who handle every step of the process, from the initial idea to the final bounce of the ball. A full-service installer offers a complete package, ensuring your project is seamless, stress-free, and results in a court that perfectly suits your home and family. They bring the expertise, equipment, and vision needed to transform a patch of your yard into a premier playing surface.
Think of it as a comprehensive service that covers design, construction, and even long-term care. These installers manage the entire project, so you don’t have to juggle multiple contractors for excavation, paving, and finishing touches. They are your single point of contact for creating a durable, safe, and beautiful home court. From custom designs that fit your unique space to installing professional-grade surfaces and features, a dedicated installer turns your dream court into a reality. Gappsi provides expert installation for a variety of sports games courts, ensuring your project is handled with care from start to finish.
Custom Court Design
The first step with any professional installer is creating a custom design. This isn’t about picking a standard court from a catalog; it’s a collaborative process tailored to your specific needs. An expert will assess your property, discuss how your family plans to use the court, and create a design that fits your yard and your goals. Whether you have a sprawling lawn or a more compact space, they can design a court that maximizes playability without overwhelming your landscape. This design phase is also where you can start personalizing the look, choosing colors and layouts that match your home’s aesthetic. A great installer will ensure the court integrates beautifully with your overall landscape design.
Site Preparation and Grading
A high-quality basketball court starts with a solid foundation. Before any surface is laid, the ground must be professionally prepared. This critical phase involves clearing the designated area, excavating to the proper depth, and grading the land to create a perfectly level and stable base. Proper site preparation prevents future problems like cracking, uneven surfaces, and poor drainage, which can ruin your court and become a safety hazard. Installers use specialized equipment to ensure the base is compacted and ready for construction. This foundational work is something only a professional can guarantee, setting the stage for a court that will last for years. This process often involves expert masonry skills to build a durable sub-base.
Surface Installation
Once the site is prepared, the next step is installing the playing surface. Professional installers offer a variety of high-performance materials, and they’ll help you choose the right one for your needs and budget. Options range from classic asphalt and concrete to modern modular interlocking tiles that provide excellent shock absorption and quick drainage. Each surface has its own benefits for playability and maintenance. An experienced installer has the technical skill to lay these materials correctly, ensuring a true ball bounce and a surface that can withstand Long Island’s changing seasons. Their expertise in handling different pavers and stones translates directly to creating a flawless court surface.
Fencing, Lighting, and Add-Ons
A basketball court is more than just its surface. Professional installers can outfit your court with all the features you need to make it fully functional and enjoyable. This includes installing sturdy fencing and netting to keep the ball in play and protect your surrounding landscape. You can also add lighting systems for games that go on after sunset, adjustable hoops that grow with your kids, and rebounder systems for solo practice. This is also where you can add custom logos and line markings to give your court a professional look. These add-ons are seamlessly integrated into the overall design and construction, creating a complete, ready-to-use athletic space.
Maintenance and Repairs
A reputable installer’s service doesn’t end once the court is built. They also provide guidance and services for long-term maintenance to protect your investment. Different surfaces have different needs; for example, a modular tile court may only need occasional cleaning with a hose, while an asphalt court might require crack filling or fresh paint every few years. Should any issues arise, a professional installer can perform repairs, from fixing a crack to replacing a damaged tile. This ongoing support gives you peace of mind, knowing that help is available to keep your court in top condition. Services like professional cleaning and sealing can extend the life and look of your court for years to come.
What Are the Best Materials for a Home Court?
Choosing the right surface for your home basketball court is one of the most important decisions you’ll make. The material you pick affects everything from player safety and performance to the court’s long-term durability and maintenance needs. There isn’t a single “best” option for everyone; the ideal choice depends on your budget, how you plan to use the court, and the aesthetic you want for your backyard. Think about who will be playing. Are there young kids who might take a tumble, or serious athletes who need a high-performance surface?
To help you find the perfect fit, let’s walk through the most popular materials for home Sports Games Courts. We’ll look at the pros and cons of traditional options like asphalt and concrete, as well as modern solutions like modular tiles and synthetic turf. Each has unique qualities, and understanding them will help you create a space that your family will love for years. Gappsi offers a range of high-quality materials, ensuring you can find a surface that matches both your functional needs and your home’s style.
Asphalt Courts
Asphalt is a very common and reliable choice for outdoor basketball courts. An asphalt court, typically finished with a durable acrylic paint, provides a consistent and familiar playing surface. It’s known for its resilience and ability to stand up to Long Island’s varied weather, from hot summers to icy winters. This durability makes it a practical, long-lasting option.
However, one thing to keep in mind is maintenance. Over time, the elements will cause the painted surface to fade and wear. You can expect to repaint the court every five to eight years to keep it looking fresh and to maintain clear boundary lines. While it requires some upkeep, asphalt remains a solid, cost-effective foundation for a home court.
Concrete Courts
Concrete is another traditional material for building a home court, valued for its incredible strength and longevity. A professionally installed concrete court provides a solid, flat surface that can last for decades with minimal structural upkeep. It’s a true workhorse. If you’re already planning other hardscaping projects, incorporating a concrete court can be a natural extension of that work, creating a cohesive look across your property.
The main drawback is its unforgiving nature. Concrete is very hard, which can be tough on players’ joints during intense games. For families with younger children or those concerned about impact, this is an important consideration. To improve player comfort and safety, you can add special acrylic coatings that provide better grip and a small degree of shock absorption. Our masonry experts can ensure your concrete base is poured perfectly for any future surface you choose.
Modular Interlocking Tile Courts
If player safety and comfort are at the top of your list, modular interlocking tiles are an excellent choice. These modern court surfaces are engineered with performance in mind. The tiles snap together to create a seamless playing area that offers superior shock absorption, which is much gentler on the knees and ankles than asphalt or concrete. This makes them a fantastic option for families and players of all ages.
Another huge benefit is their all-weather performance. The tiles are designed to drain water quickly, so you won’t have to deal with puddles after a rainstorm, and you can get back to playing sooner. They also stay cooler to the touch than dark asphalt in the summer sun. With a wide variety of colors available, you can fully customize the look of your home sports games courts to match your favorite team or your home’s exterior.
Synthetic Turf Courts
For a truly unique and versatile playing surface, consider synthetic turf. While you might associate it with soccer or football fields, modern turf systems are also designed for sports like basketball. A turf court provides a soft, cushioned surface that offers exceptional shock absorption, significantly reducing the risk of injury from falls. It’s a low-maintenance option that eliminates the need for painting and crack repairs.
Synthetic turf also gives you incredible design freedom. You can choose from different colors, integrate custom logos, and create a multi-sport area that blends beautifully with your surrounding landscape. It provides a lush, green look year-round without the hassle of mowing or watering. If you want a court that is as beautiful as it is functional, synthetic turf is a wonderful and innovative solution.
How Much Does a Home Basketball Court Cost on Long Island?
Figuring out the budget for your dream basketball court is a big first step. The final cost for a home
What Affects the Final Price?
Several key elements will shape the final cost of your basketball court. Size is one of the biggest factors, a compact half-court will naturally cost less in materials and labor than a full-sized court. The surface you choose also heavily influences the price. Options range from classic asphalt to high-performance synthetic turf and sports games courts.
Beyond the basics, customizations like painted logos, multi-sport lines, and professional-grade hoops add to the cost. You should also consider features like fencing and netting for safety and convenience, as well as lighting for nighttime games. Finally, site preparation and any necessary permits are essential parts of the budget.
How to Get an Accurate Quote
The best way to understand the true cost of your project is to get a detailed, professional quote. Start by scheduling a consultation with an experienced installer. This allows an expert to assess your property, listen to your ideas, and provide specific recommendations. The more details you can provide about your desired court size and features, the more precise the estimate will be.
When you receive a quote, make sure it’s a comprehensive, itemized document that clearly outlines all costs. A transparent quote leaves no room for surprises. It’s also a great idea to review an installer’s portfolio, like the projects on our Gappsi YouTube channel, to see their quality of work and get inspiration for your own design.
Planning Your Project: Permits and Site Prep
Before the exciting part of building your court begins, there are a couple of essential planning steps to address. Getting the paperwork and the ground ready is just as important as choosing the right hoop. Properly handling permits and site preparation ensures your project starts smoothly and results in a court that lasts for years. A professional installer can guide you through these preliminary stages, making the entire process feel much more manageable. Taking the time to get these details right prevents future headaches and protects your investment.
Understanding Local Permit Requirements
So, do you need a permit to build a basketball court on Long Island? In most cases, the answer is yes. Projects of this scale typically require a building permit from your local town or village to ensure they meet safety and zoning regulations. This might sound like a hassle, but it doesn’t have to be. When you work with an experienced installer, they often handle the entire permit application process for you. This is a huge advantage, as they are familiar with the specific requirements in areas across Suffolk and Nassau County. A team that manages the permitting process ensures everything is done by the book, giving you complete peace of mind.
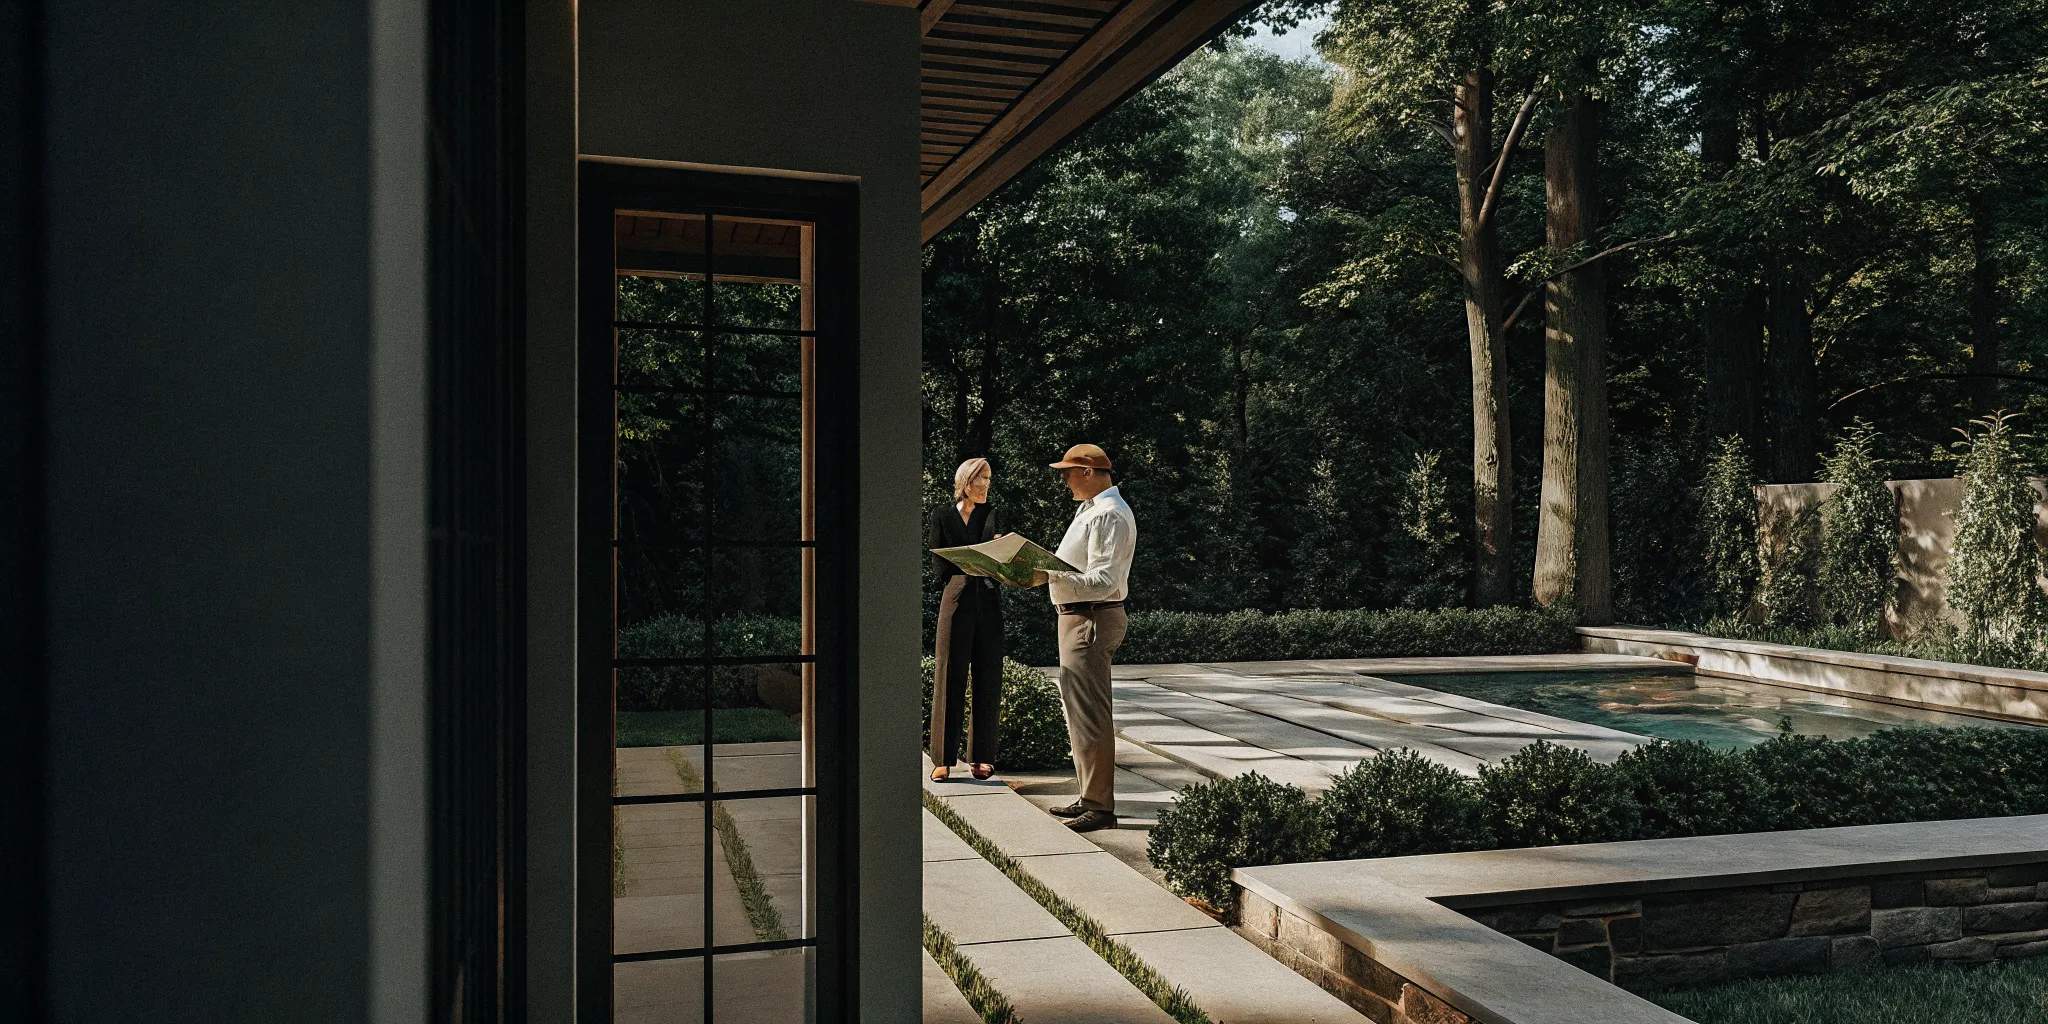
The Importance of a Professional Site Assessment
A professional site assessment is a critical first step for a successful installation. This is where an expert evaluates your property to determine the best location and preparation strategy for your court. Key factors include proper water drainage and soil stability. Without good drainage, you could end up with puddles that damage the surface and create unsafe playing conditions. Likewise, the ground needs to be stable and properly compacted to prevent shifting or cracking down the line. This assessment is foundational to the quality and longevity of all sports game courts, ensuring your court remains a safe and enjoyable feature of your home for many seasons to come.
What to Look for in a Basketball Court Installer
Choosing the right installer is the most important decision you’ll make for your home basketball court project. The right partner will turn your vision into a reality, while the wrong one can lead to headaches and costly repairs. To make sure you hire a true professional, focus on these four key areas.
Experience and a Proven Track Record
You want a team that has done this before, many times. An experienced installer understands the nuances of building in Long Island, from proper ground preparation to selecting materials that withstand our specific climate. A company with a long history has a refined process for managing the project from the initial design to the final hoop installation. They can anticipate potential challenges and solve them efficiently. Look for a specialist who can show you a history of building custom sports games courts and can confidently guide you through every step.
Proper Licensing and Insurance
This is non-negotiable. A professional installer must be fully licensed and insured in New York. This protects you from liability if an accident happens on your property during construction. Hiring an unlicensed contractor might seem cheaper upfront, but it exposes you to significant financial and legal risks, not to mention the potential for subpar work with no warranty. Always ask for proof of licensing and general liability insurance before signing any contract. This simple step gives you peace of mind and ensures you are working with a legitimate and accountable business.
High-Quality Materials
A basketball court is only as good as the materials used to build it. A top-tier installer will source and recommend durable, safe, and high-performance materials for your court’s surface, whether it’s classic concrete or modern modular tiles. They should explain the pros and cons of each option based on your budget and how you plan to use the court. A company’s commitment to quality often extends across all their services, from the porcelain and natural stone they use for patios to the turf on their game courts.
A Strong Portfolio and Positive Reviews
Past work is the best indicator of future results. Before you commit, ask to see a portfolio of their completed basketball court projects. Photos and videos give you a clear idea of their design style and the quality of their craftsmanship. You can often find these on a company’s website or social media channels. Just as important are reviews from previous clients. Testimonials can tell you a lot about the customer experience, communication, and whether they delivered on their promises. Seeing a company’s work in action on platforms like YouTube can provide an even deeper look into their process and results.
Common Mistakes to Avoid When Hiring an Installer
Building a home basketball court is an exciting project, but choosing the right installer is the most critical decision you’ll make. To protect your investment and make sure your project goes smoothly, it helps to know what common pitfalls to look out for. Thinking through these points ahead of time will help you hire a professional you can trust to bring your vision to life.
Choosing Based on Price Alone
It’s always tempting to go with the lowest bid, but this is one of the biggest mistakes you can make. An unusually low price is often a red flag for subpar work, inexperienced labor, or lower-quality materials that won’t stand up to Long Island weather. You might save a little money upfront, but you could face much larger expenses later for repairs or even a complete replacement. A quality installation is an investment in your property’s value and your family’s enjoyment. Focus on the value you receive, which includes durable materials, expert craftsmanship, and a court built to last.
Skipping Research and Reference Checks
Before you commit, it’s essential to do your homework. A reputable installer will be proud to share their work and connect you with past clients. Ask for a portfolio of completed projects and, if possible, a list of local references you can speak with. Seeing a contractor’s work firsthand gives you a clear idea of their quality standards. You can also check online platforms to see projects in action; many installers showcase their process and finished results, giving you confidence in their abilities.
Not Getting a Detailed Written Contract
A handshake and a verbal agreement are not enough for a project of this scale. A professional installer will always provide a detailed written contract that protects both you and them. This document should clearly outline the entire scope of the project, including the specific materials to be used, a project timeline, a payment schedule, and details about site cleanup. It should also specify exactly what is included in the price. A thorough contract prevents misunderstandings and ensures everyone is on the same page before any work begins, creating a foundation for a successful project.
Overlooking Maintenance and Support Plans
Your relationship with an installer shouldn’t end the day the project is finished. A basketball court is exposed to the elements, and Long Island’s freeze-thaw cycles can take a toll. A great contractor will discuss long-term care with you from the start. Ask about warranties on materials and labor, and find out if they offer ongoing maintenance plans. Understanding how to care for your court and knowing you have professional support for future needs, like restoration and sealing, ensures your court remains in top condition for years of play.
Key Questions to Ask Before You Hire
Choosing the right installer for your home basketball court is a big decision. To make sure you find a partner you can trust, it helps to go into your initial conversations prepared. Asking specific, thoughtful questions will give you a clear picture of their experience, work style, and what you can expect from the final result. This isn’t about grilling them; it’s about starting a conversation that builds confidence and ensures you and your contractor are on the same page from day one. A great installer will welcome your questions and provide clear, honest answers. Think of it as the first step in a successful partnership. The following questions will help you cover all the important bases before you sign a contract.
What Does the Full Installation Process Look Like?
Ask for a complete walkthrough of the installation process, from the first day of excavation to the final line painting. Understanding each step helps you know what to expect regarding timelines, noise, and activity on your property. A professional installer should be able to clearly explain their methods for site preparation, base construction, surface installation, and finishing. This conversation gives you insight into their experience and attention to detail. Knowing the full scope of the project ensures there are no surprises and that you feel comfortable with how your custom sports games court will come to life.
What Materials Do You Recommend for My Property?
The surface you choose impacts everything from ball bounce to player safety and long-term maintenance. A knowledgeable contractor will assess your property and discuss the best options for your specific needs. Ask them to explain the pros and cons of different materials, such as asphalt with acrylic paint, modular interlocking tiles, or even synthetic turf. Gappsi offers a wide selection of high-quality materials, including various porcelain and natural stone options for surrounding patios and walkways. Your installer should recommend a solution that fits your budget, intended use, and Long Island’s climate, ensuring your court performs well for years.
What Is Included in the Quote?
To avoid unexpected costs, ask for a detailed, itemized quote that breaks down all expenses. A transparent quote should clearly state what is and is not included in the final price. Does the total cover site grading, all materials, labor, the basketball hoop system, lighting, and site cleanup? A typical court installation can take a few weeks, so confirming the scope of work is essential. Getting everything in writing protects you and ensures the price you agree to covers the entire project. This level of detail is standard for any major home remodeling project and should be expected for your court installation.
Do You Handle Permits and Site Preparation?
Navigating local building codes and permit requirements can be one of the most challenging parts of any construction project. Ask potential installers if they manage this process for you. A full-service company will handle obtaining all necessary building permits and providing the required architectural drawings, saving you time and a major headache. This ensures your project complies with all local regulations from the start. At Gappsi, we manage the entire permitting process for our clients, a key part of our comprehensive masonry and construction services. Confirming your contractor handles this lets you focus on the exciting parts of designing your court.
How to Choose the Right Court Surface
Selecting the right surface for your home basketball court is one of the most important decisions you’ll make. The material you choose affects everything from the project’s cost and durability to player safety and performance. It’s not just about how the court looks; it’s about creating a space that meets your family’s needs for years to come. Thinking through your budget, how you’ll use the court, and our local climate will help you land on the perfect option for your backyard.
Match the Surface to Your Budget
While it’s tempting to let price guide your decision, choosing a court surface based on cost alone can be a mistake. A budget-friendly option might save you money initially, but it could lead to higher maintenance costs or the need for a full replacement sooner than you’d like. Instead, think about the long-term value. A high-quality surface is an investment in durability and performance. At Gappsi, we help you find a solution that fits your budget without compromising on quality, offering a range of materials for our custom Sports Games Courts. We’ll walk you through the pros and cons of each so you can make an informed choice that provides lasting enjoyment.
Think About Player Use and Performance
The ideal court surface depends entirely on who will be using it. Are you building a court for young children to learn the game, or will competitive teenagers and adults be playing on it? The answer changes things. For example, modular tiles offer excellent shock absorption, which is easier on joints during intense play. Concrete, on the other hand, provides a fast, consistent ball bounce favored by serious players. The ultimate guide to basketball court flooring is one that prioritizes both safety and an optimal playing experience. Considering your family’s specific needs ensures you get a court that everyone will love to use.
Consider Long Island’s Climate
Here on Long Island, we get the full range of weather, from hot, humid summers to freezing winters. These conditions are tough on any outdoor structure. The constant freeze-thaw cycles can cause materials like concrete and asphalt to crack and heave if they aren’t installed with expert care. This is why professional site preparation is non-negotiable. We have to consider factors like drainage to prevent water from pooling and freezing beneath the surface. Materials like interlocking modular tiles are often a great choice for our climate because they are designed to expand, contract, and drain efficiently. Our extensive landscape design experience ensures your court is built to withstand Long Island’s specific environmental challenges.
How to Maintain Your Basketball Court Year-Round
Once your dream basketball court is installed, a little routine care will keep it in top shape for years of enjoyment. Proper maintenance ensures your court remains a safe, high-performing surface that looks fantastic. The upkeep varies depending on your chosen material, but the goal is always the same: to protect your investment and keep the games going strong, season after season.
Maintaining Asphalt and Concrete Courts
Asphalt and concrete are classic choices for a reason, they are incredibly durable. To keep them looking their best, your main task is to keep the surface clean. Regularly sweep away leaves, dirt, and other debris to prevent stains and slick spots. It’s also wise to periodically check for any small cracks that may form. Addressing these early prevents them from becoming bigger issues. Given Long Island’s weather, you may find that the painted lines and surface need a refresh every five to eight years. A professional restoration and sealing service can make your court look brand new again.
Maintaining Modular Tile Courts
If you chose a modular tile court, you’re in luck because the maintenance is minimal. These surfaces are designed to be low-effort, making them a favorite for busy homeowners. Most of the time, all you’ll need is a leaf blower or a garden hose to clear away any debris that accumulates. One of the biggest advantages of a tile system is that if a single tile gets damaged, you can simply pop it out and replace it without having to resurface the entire court. This simple upkeep makes modular tiles a practical and long-lasting option for your backyard sports games courts.
Maintaining Synthetic Turf Courts
Synthetic turf offers a unique, cushioned playing experience that’s gentle on the joints. To maintain this surface, you’ll want to keep it free of leaves and debris with a leaf blower or a stiff brush. Regularly brushing the turf fibers helps them stand upright, which ensures consistent ball bounce and player footing. For any spills or dirt, a simple rinse with a hose is usually sufficient. This type of court is a fantastic, low-maintenance alternative that provides a professional feel and keeps players comfortable, helping them play longer without getting as tired.
Integrating Your Court with Other Outdoor Features
Your basketball court doesn’t have to be a standalone feature. It can be the centerpiece of a complete outdoor entertainment zone. Maintaining these integrated features is just as important. For instance, if you have court lighting for nighttime games, check the bulbs and wiring periodically. If you’ve installed fences and netting for safety, ensure they are secure and free of damage. By thinking of your court as part of a larger landscape, you can create a cohesive and functional space with features like adjacent patios, seating areas, and walkways that connect everything beautifully.
Related Articles
- Basketball Court Construction in NY & Long Island | Gappsi Inc
- Long Island Basketball Court Installation – Gappsi Group
- Basketball Court Design and Construction on Long Island | Bridgehampton NY – Gappsi Group
- Basketball Courts Designers in Suffolk & Nassau County, NY
- Basketball Court Construction in Bayshore, NY | Gappsi Inc
Frequently Asked Questions
How long will it take to build my court from start to finish? A typical home basketball court installation on Long Island takes about two to six weeks to complete. This timeframe covers everything from initial site preparation and grading to the final surface installation and line painting. Keep in mind that factors like weather delays or the time it takes to secure local permits can sometimes adjust the schedule, but a professional team will keep you informed and manage the project efficiently.
What if I don’t have enough space for a full-sized court? You can absolutely still have a fantastic home court, even with a smaller yard. This is where custom design makes all the difference. Many homeowners opt for a half-court, which provides plenty of room for practice and games. We can also design custom-sized playing areas or even dedicated shooting zones that fit perfectly within your landscape, giving you a great space for fun and fitness without needing a massive amount of land.
What’s the best court surface for a family with young kids? When safety and comfort are top priorities, modular interlocking tiles are an excellent choice. These surfaces are engineered with shock absorption, which is much gentler on the joints of growing kids (and adults) during play. They also provide great traction and drain quickly after rain. Synthetic turf is another wonderful option, offering a soft, cushioned surface that can significantly reduce the impact and scrapes from falls.
Do I have to deal with getting the permits myself? Not at all. Navigating the permit process with local town and village offices can be complicated, but it’s a standard part of the service when you work with an experienced installer. A full-service company will handle the entire permit application for you, including providing any necessary drawings and ensuring your project meets all local building codes and zoning regulations. This lets you focus on the exciting parts of the project, not the paperwork.
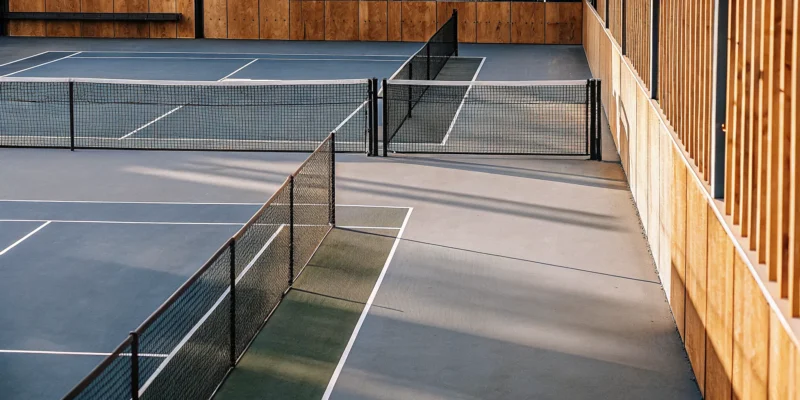
Can the court be used for more than just basketball? Yes, your court can easily become a versatile hub for all kinds of family activities. During the design phase, you can choose to have lines painted for other sports, such as pickleball, volleyball, or shuffleboard. This transforms your basketball court into a multi-purpose Sports Games Courts, maximizing your investment and creating a space that offers something for everyone in the family to enjoy.