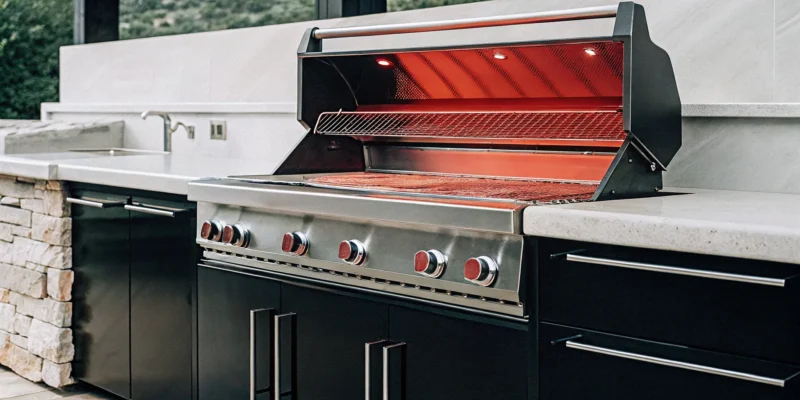
Unfinished basement with exposed brick, a perfect project for affordable basement contractors.

How to Find Affordable Basement Contractors

For homeowners across Long Island, the basement is often a space of untapped possibility. But it also comes with unique challenges, from humidity to the quirks of older foundations. That’s why finding a professional who understands local homes is so critical to the success of your project. A great contractor does more than just build walls; they create a safe, functional, and lasting extension of your home. This guide will walk you through how to find affordable basement contractors right here in Suffolk and Nassau County who have the experience to get the job done right, ensuring your new space is ready for years of enjoyment.

Key Takeaways

  • Your contractor choice is your most important decision: A successful remodel depends on finding the right partner. Be sure to verify their license and insurance, check recent reviews, and speak directly with past clients before signing a contract.
  • Plan for the unexpected with a contingency fund: Basements often hide surprises like moisture issues or foundation cracks. Setting aside 10-20% of your total budget ensures that necessary repairs won’t derail your project or compromise its quality.
  • A detailed quote is a sign of a true professional: Look beyond the final price tag. The best bid will include an itemized breakdown of costs, a clear payment schedule tied to project milestones, and a written warranty for both labor and materials.

What Can a Basement Contractor Do for You?

When you think of a basement contractor, you might just picture someone putting up drywall and laying down carpet. But their skills go so much further than that. A great basement contractor is a project manager, a problem-solver, and a creative partner all in one. They can take a damp, forgotten space and transform it into a functional and beautiful part of your home. From the ground up, they handle the essential work that makes a basement safe, dry, and ready for living.

This includes tackling moisture problems at the source, repairing structural issues in your foundation, and ensuring everything is up to code. Once the groundwork is laid, they can bring your vision to life, whether you’re dreaming of a cozy family room, a sleek home office, or a personal gym. The team at Gappsi, for example, manages comprehensive home remodeling projects that turn underused basements into valuable living areas. A professional contractor coordinates every step, from initial design and permits to the final coat of paint, making the entire process smoother and more predictable for you.

Waterproofing and Moisture Control

Before you can even think about paint colors or furniture, your basement needs to be completely dry. This is where a contractor’s expertise is critical. They start by identifying and fixing any sources of moisture, whether it’s from cracks in the foundation, poor drainage outside, or high humidity. A contractor can implement a full waterproofing system, which might include sealing walls with a waterproof barrier, installing an interior drainage system to channel water away, and adding a sump pump to protect against flooding. This foundational step is non-negotiable; without it, any finishing work you do is at risk of being ruined by water damage, mold, and mildew.

Finishing and Remodeling

This is where your basement’s potential truly comes to life. A contractor can turn a concrete shell into virtually any room you can imagine. Want a home theater, a guest suite with a bathroom, a playroom for the kids, or even a custom sauna? A remodeling professional handles it all. This process involves framing new walls, running electrical wiring for lights and outlets, adding plumbing for a bathroom or wet bar, and installing insulation to keep the space comfortable. They manage the entire build-out, from hanging and finishing drywall to installing ceilings and doors, creating a seamless extension of your home.

Foundation and Structural Repair

Sometimes, a basement project uncovers more serious issues. A skilled contractor is equipped to handle critical foundation and structural repairs that ensure your home’s safety and stability. This can involve fixing significant cracks in the foundation walls or floor, reinforcing bowing walls that are under pressure from outside soil, or addressing problems caused by the house settling over time. These are not DIY tasks; they require an expert understanding of structural engineering and masonry. A contractor ensures these vital repairs are done correctly, giving you peace of mind that your home is secure from the ground up.

Flooring and Egress Window Installation

The final touches are what make a basement feel like a real living space. A contractor will help you choose and install the right flooring that can withstand the unique basement environment, like luxury vinyl plank, tile, or engineered wood. They’ll ensure the subfloor is properly prepared to prevent moisture issues down the line. Additionally, if you plan to add a bedroom, building codes require an egress window for safety. Installing one is a major job that involves cutting an opening in your foundation wall, which is why it’s essential to have a professional handle it. They’ll make sure the window is installed correctly and meets all local safety requirements.

How to Find a Great Basement Contractor

Finding the right person for your basement project can feel like a huge task, but it doesn’t have to be overwhelming. With a clear process, you can confidently choose a contractor who will turn your vision into a reality. It’s all about doing a little homework upfront to ensure a smooth project from start to finish. Let’s walk through the key steps to finding a reliable partner for your home improvement project.

Start Your Search Online

Your search for the perfect contractor will likely begin online. Start by looking for local professionals who specialize in basement projects in the Long Island area. Websites like Thumbtack can provide a list of basement contractors rated by people in your community. Beyond directories, take the time to explore each contractor’s individual website. A professional company will have a detailed portfolio showcasing their work. This allows you to see the quality of their craftsmanship and determine if their style aligns with your own. Building a shortlist of three to five promising candidates is a great first step.

Verify Their Credentials

Once you have a few names, it’s time to dig a little deeper. A reputable contractor will be licensed and insured, and they won’t hesitate to prove it. You’ll want to confirm they have the right licenses for all the work involved, especially if your project includes complex plumbing or electrical updates. Insurance is just as critical—it protects you from liability if an accident happens on your property. Don’t just take their word for it; you can often verify a license through state or local government websites. This step is non-negotiable and gives you essential peace of mind.

Read Reviews and Check References

Online reviews offer a window into other homeowners’ experiences. Look for consistent feedback on the things that matter most: Did they stick to the budget? Did they clean up the site daily? How did they handle unexpected issues? Pay attention to red flags, like multiple complaints about recurring water problems or poor communication. Beyond online reviews, ask your top candidates for a list of recent references. Speaking directly with a past client gives you a chance to ask specific questions about their project and overall satisfaction. It’s one of the best ways to gauge what it’s really like to work with a contractor.

Get Multiple Quotes

You should always get at least three detailed quotes before making a final decision. A good quote is more than just a final number; it should clearly break down the costs for materials, labor, and any necessary permits. This transparency helps you understand exactly what you’re paying for and allows for a fair comparison between professionals. Be wary of any quote that seems unusually low, as it could signal subpar materials or hidden costs down the line. The goal isn’t just to find the cheapest option, but to find the best value and a team you can trust to handle your home remodeling project with care.

How Much Does a Basement Project Cost?

Figuring out the budget is often the first step in any home improvement project, and basements are no exception. The final cost can vary widely depending on what you’re starting with and what you want to achieve. Are you fixing a damp, unfinished space, or are you creating a full-blown entertainment hub? Let’s break down the typical costs for different types of basement work so you can get a clearer picture of the investment required.

Typical Waterproofing Costs

Before you can think about flooring and furniture, you need a dry space. For many Long Island homes, that starts with waterproofing. This essential step prevents moisture from seeping in, protecting your home from mold, mildew, and water damage. On average, you can expect basement waterproofing to cost between $1,670 and $6,775. This price range typically covers sealing foundation cracks, applying waterproof coatings, and installing interior drainage systems. Proper restoration and sealing is a foundational investment that safeguards any further work you do downstairs.

Average Finishing and Remodeling Costs

This is where your vision for a new living area, home gym, or office comes to life. The average cost to finish a basement is around $18,400, but most projects fall somewhere between $12,000 and $34,500. This covers turning concrete walls and floors into a comfortable, finished room with drywall, electrical wiring, lighting, and flooring. A full-scale home remodeling project that includes a bathroom or kitchenette will be at the higher end of that range, but it also adds significant value and usable square footage to your home.

Pricing for Foundation Repair and Sump Pumps

Sometimes, a basement project uncovers deeper issues that need to be addressed. If you have persistent water problems, installing a sump pump is a smart move, typically costing between $730 and $1,100. For more serious structural problems, foundation repairs can cost $15,000 or more. While this can be a significant and unexpected expense, addressing foundation issues is critical for the safety and stability of your entire home. This type of work requires serious masonry expertise to ensure it’s done right.

What Factors Influence the Final Price?

So, what makes one project cost $15,000 and another $35,000? The biggest factors are the size of your basement, the materials you choose, and the amount of labor required. Labor alone can account for 45% to 65% of your total budget. Significant structural changes, like adding plumbing for a bathroom or moving walls, will also increase the price. Your material choices, from flooring to countertops, play a huge role, too. Opting for luxury vinyl tile over carpet or custom cabinetry over stock options will impact the final number.

How to Create a Realistic Project Budget

Before you start dreaming about home theaters and game rooms, it’s time to talk numbers. Creating a realistic budget is the single most important step in any successful basement renovation. It keeps your project on track, prevents stressful financial surprises, and helps you and your contractor stay on the same page. A well-planned budget is your roadmap, guiding every decision from the materials you choose to the features you include. It turns a vague idea into an actionable plan, ensuring your finished basement is a source of joy, not debt.

Set Your Total Budget (and a Contingency Fund)

First, decide on the total amount you’re comfortable investing in your home remodeling project. While costs vary, most basement renovations fall somewhere between $12,000 and $35,000. Once you have your top number, immediately set aside 10% to 20% for a contingency fund. Think of this as your project’s safety net. Basements are notorious for hiding surprises like moisture issues, cracks in the foundation, or outdated wiring. This fund ensures that an unexpected repair doesn’t derail your entire project, giving you the peace of mind to handle whatever comes up without blowing your budget.

Prioritize Needs Over Wants

It’s easy to get carried away with exciting features, so take a moment to separate your must-haves from your nice-to-haves. Your “needs” list should include the essentials for a safe and functional space: proper waterproofing, good insulation, adequate lighting, and safe electrical wiring. Your “wants” list might include things like a custom wet bar, a built-in entertainment center, or luxury saunas. By focusing on the foundational elements first, you ensure the space is sound. You can always add those high-end finishes and special features down the road as your budget allows.

Plan for Permits and Inspections

Don’t forget to account for the administrative side of your renovation. Any project that involves changing the structure or altering electrical, plumbing, or HVAC systems will require permits from your local municipality. These fees can range from a few hundred to a couple of thousand dollars, depending on the scope of your project. A reputable contractor will manage the permit application process for you, but the cost will be part of your overall project price. Factoring this in from the beginning prevents it from becoming an unexpected expense later on.

Look for Ways to Save from the Start

Being budget-conscious doesn’t mean you have to sacrifice quality. One of the best ways to ensure you’re getting a fair price is to get detailed quotes from at least three different contractors. You can also find savings in your material choices. For example, selecting durable and moisture-resistant flooring like luxury vinyl plank can give you a high-end look without the cost of real hardwood. If you’re handy, you can also save on labor by taking on simple tasks yourself, like painting the walls or handling the final cleanup.

How to Compare Contractor Quotes

Once you have a few quotes in hand, it’s tempting to just scan for the lowest number. But the cheapest bid isn’t always the best value. A truly great contractor provides a detailed, transparent quote that clearly explains what you’re paying for. Think of this step as comparing potential business partners, not just prices. A well-structured quote shows that a contractor is organized, thorough, and has a clear plan for your project. It’s your first real glimpse into their professionalism and how they’ll handle your home remodeling project from start to finish. Taking the time to carefully dissect each proposal will help you avoid surprise costs and ensure you’re partnering with a team that respects your home and your budget.

Understand Exactly What’s Included

To make a fair comparison, you need to know that you’re looking at the same scope of work across all quotes. A vague, one-line price is a major red flag. Instead, look for an itemized breakdown that separates the costs of materials, labor, and any necessary permits. This level of detail allows you to compare apples to apples. You can see if one contractor is proposing higher-quality materials or if another has budgeted more hours for labor. A transparent quote empowers you to ask smart questions and understand exactly where your money is going before you sign anything.

Evaluate the Warranties and Guarantees

A contractor’s willingness to stand behind their work speaks volumes about their confidence and craftsmanship. Always ask about the warranties or guarantees they offer on both labor and materials. A reputable company will have a clear policy and be happy to explain what’s covered and for how long. This isn’t just a piece of paper; it’s your peace of mind. Knowing that the contractor will return to fix any issues that arise gives you long-term security in your investment. It’s a key differentiator between a professional outfit and a contractor just looking to finish a job quickly.

Compare Timelines and Material Quality

Beyond the final price, consider the proposed timeline and the quality of the materials. One contractor might offer a lower bid by using builder-grade materials that won’t stand the test of time, while another might specify premium, durable options. Ask for specifics on the products they plan to use so you can do your own research. For example, understanding the difference between various types of porcelain and natural stone can dramatically impact your project’s look and longevity. Also, discuss the project timeline to ensure it aligns with your expectations and that they have a realistic plan for completion.

Review Payment Terms and Contract Details

Never move forward without a detailed written agreement. The contract is the most important document in your project, as it protects both you and the contractor. It should clearly outline the full scope of work, the total cost, a specific payment schedule, and all guarantees discussed. Pay close attention to the payment terms—a professional contractor will typically ask for a deposit upfront, with subsequent payments tied to project milestones, not arbitrary dates. A clear, comprehensive contract ensures everyone is on the same page and minimizes the chance of misunderstandings down the road.

What Hidden Costs Should You Plan For?

Even with a detailed quote in hand, it’s smart to plan for the unexpected. Basements, especially in older Long Island homes, can hide surprises that only reveal themselves after demolition begins. This is why having a contingency fund—typically 10% to 20% of your total project cost—is so important. It’s not about your contractor trying to nickel-and-dime you; it’s about preparing for the realities of a major renovation.

When you start opening up walls and floors, you might uncover issues that need to be addressed before the fun part of the remodel can continue. These aren’t “upgrades” but necessary fixes to ensure your new space is safe, dry, and structurally sound. A transparent contractor will discuss these findings with you immediately, explaining the problem and outlining the costs for the solution. Think of your contingency fund as a safety net that lets you handle these bumps without derailing your entire project.

Unexpected Foundation or Structural Issues

One of the most common surprises in a basement renovation is discovering problems with the home’s foundation. When the existing walls come down, you might find cracks in the concrete that need repair or signs of settling that require professional attention. These issues are critical to fix correctly to protect your home’s structural integrity. An experienced masonry team can assess the situation and recommend the best course of action. Ignoring these problems will only lead to bigger, more expensive headaches down the road, so it’s best to address them as soon as they’re found.

Necessary Electrical and Code Updates

Older homes often have outdated electrical systems that don’t meet current safety standards. Your contractor might discover old wiring, an overloaded panel, or improperly installed outlets that need to be brought up to code. While it’s an added expense, this is a non-negotiable part of any responsible home remodeling project. Ensuring your basement’s electrical, plumbing, and HVAC systems are safe and compliant protects your family and your investment. Licensed professionals must handle this work, which is why it’s crucial to hire a contractor who manages all aspects of the job properly.

Surprise Water Damage or Mold Remediation

Moisture is the enemy of any finished basement. Sometimes, a seemingly dry basement is hiding water damage behind the walls or under old flooring. If your contractor uncovers signs of past leaks, water seepage, or mold growth, it has to be dealt with immediately. This could involve professional mold remediation, installing a better drainage system, or applying comprehensive waterproofing solutions. While waterproofing can add a few thousand dollars to the budget, it’s essential for creating a healthy, comfortable living space that you can enjoy for years to come.

Permit and Inspection Fees

Every major renovation project requires permits from your local town or village to ensure the work is done to code. The cost of these permits can vary widely depending on the scope of your project, typically ranging from a few hundred to a couple of thousand dollars. These fees cover the administrative costs for the municipality to review your plans and conduct inspections at key stages of the project. A reputable contractor will handle the entire permitting process for you, but the fees themselves are a separate line item that should be factored into your overall budget from the start.

How to Save Money on Your Basement Project

A basement remodel is a fantastic investment, but it doesn’t have to drain your savings. With some strategic planning and smart decision-making, you can create an amazing new space while keeping your budget in check. It’s not about cutting corners on quality, but about being intentional with where your money goes. From timing your project to choosing the right materials, a few key choices can make a significant difference in the final cost. Let’s walk through some practical ways to save money without sacrificing the basement of your dreams.

Schedule Your Project for the Off-Season

Contractors, like many businesses, have peak seasons and slower periods. For home remodeling, spring and summer are often the busiest times. If you have some flexibility in your timeline, consider scheduling your basement project during the off-season, like late fall or winter. With fewer projects on their plate, contractors may offer more competitive pricing to keep their crews busy. This can also mean more focused attention on your project and potentially a faster completion time. Planning ahead and being flexible with your start date is one of the simplest ways to get a better deal.

Choose Cost-Effective Materials

Your material choices have a huge impact on the total cost. While it’s tempting to go for the most high-end finishes, there are many durable and beautiful alternatives that are much friendlier to your wallet. For basement flooring, for example, moisture is a major concern. Instead of expensive hardwood or moisture-trapping carpet, consider options like Luxury Vinyl Plank (LVP). It mimics the look of real wood but is waterproof and highly durable. When discussing options with your contractor, ask for a breakdown of different material costs to see where you can make smart substitutions without compromising on style or function.

Tackle Simple DIY Tasks Yourself

If you’re comfortable with a little hands-on work, taking on some of the simpler tasks yourself can cut down on labor costs. Demolition, painting, or installing baseboards are often manageable jobs for a handy homeowner. You could even handle the final cleanup. Just be realistic about your skills and the time you can commit. A poorly done DIY job can end up costing more to fix than it would have to hire a professional in the first place. Always discuss your DIY plans with your contractor beforehand to ensure it fits into their workflow and doesn’t void any warranties.

Bundle Services with a Single Contractor

Hiring one company to manage the entire project, from design to construction, can be more cost-effective than sourcing multiple specialized contractors. A full-service firm like Gappsi can handle everything from waterproofing and framing to electrical and finishing touches. This approach not only simplifies communication and project management but can also lead to a better overall price. Companies that offer comprehensive home remodeling services often have established relationships with suppliers and can get better deals on materials. Plus, having a single point of contact ensures accountability and a cohesive vision from start to finish.

Key Questions to Ask Every Contractor

Once you have a shortlist of potential contractors, it’s time to start the interview process. This is your chance to dig deeper than what you can find online and get a real sense of who you’ll be working with. Going into these conversations prepared with a list of specific questions will help you compare your options fairly and choose a partner you can trust. Think of it as a two-way interview—you’re evaluating them, and they’re learning about your project. A professional contractor will welcome your questions and provide clear, confident answers.

Ask About Their Experience and Specialty

Not all contractors are created equal, especially when it comes to basements. This space has unique challenges, from moisture control to integrating plumbing and electrical systems. Start by asking about their direct experience with projects like yours. You can ask, “How many basement remodels have you completed in the last year?” and “Can I see a portfolio of your finished basement projects?” It’s also critical to confirm they are properly credentialed for the job. A key question is, “Are you fully licensed and insured for all the work required, including any subcontractors you’ll use?” This ensures you’re protected and that every part of your home remodeling project is handled by a qualified professional.

Clarify the Project Timeline and Process

Understanding the timeline is about more than just knowing the final completion date. It’s about managing your expectations and planning for the disruption to your daily life. Ask for an estimated start date and a projected timeline for the entire project. A great follow-up question is, “Can you walk me through the key phases of the project?” A reliable contractor should be able to outline the major steps, from demolition and framing to inspection and the final touches. This conversation will give you a clear picture of the workflow and help you anticipate what’s coming next. You can even see examples of how professional teams manage projects by watching videos of their work in progress.

Discuss Payment Terms and Contracts

Talking about money upfront prevents misunderstandings later. Don’t just ask for a total price; ask for a detailed, itemized quote that separates the costs of labor, materials, and any necessary permits. This makes it much easier to compare bids from different contractors. Before you agree to anything, ask, “What are your payment terms, and what is the deposit schedule?” Most importantly, insist on a comprehensive written contract. It should clearly state the full scope of work, the total cost, the payment schedule, and any specific materials or products from the Gappsi Store that will be used. A solid contract is your best protection and ensures everyone is on the same page.

Understand Their Warranty and Post-Project Support

A contractor’s responsibility doesn’t end when they pack up their tools. A quality professional will stand behind their work. Be sure to ask, “What kind of warranty or guarantee do you offer on your workmanship and the materials you use?” Different elements may have different warranty periods, so get the specifics in writing. It’s also wise to understand their process for addressing any issues that might pop up after the job is done. Ask, “If a problem arises after you’ve left, what is the process for getting it fixed?” Their answer will tell you a lot about their commitment to customer satisfaction and the long-term quality of their work, much like offering ongoing restoration and sealing services.

Red Flags to Watch for When Hiring a Contractor

Choosing the right contractor is the most critical step in any home improvement project. While most professionals are honest and hardworking, knowing how to spot the warning signs of a bad one can save you from headaches, financial loss, and a project that never quite gets finished. Trust your instincts—if something feels off, it probably is. Here are the key red flags to watch for from your first meeting to the final handshake.

Warning Signs During the First Meeting

Your initial consultation is more than just a chance to get a quote; it’s an interview. Pay close attention to how the contractor presents themselves and their business. A major red flag is a refusal or hesitation to provide proof of licensing and insurance. Any reputable professional will have this information ready. You should also be wary of anyone who uses high-pressure sales tactics, like offering a “today only” discount to get you to sign immediately. A true professional will give you the space and time you need to make a thoughtful decision. Also, ask to see a portfolio of their past work. If they can’t provide one or offer references, consider it a warning sign.

Red Flags in the Contract or Payment Plan

The contract is your project’s blueprint and your primary protection. A contractor who offers a vague, one-page agreement or suggests working without one is a serious risk. Your contract should be highly detailed, outlining the full scope of work, specific materials to be used, a clear timeline, and a payment schedule. Another major red flag is a demand for a large upfront payment. While a reasonable deposit (typically 10% to 30%) is standard, you should never pay the full amount before the work is complete. Be cautious of contractors who insist on cash-only payments, as this can sometimes indicate they are operating without the proper insurance or permits, leaving you vulnerable.

Poor Communication or Vague Answers

Clear and consistent communication is the bedrock of a successful project. If a contractor is difficult to get in touch with from the very beginning—dodging calls or taking days to respond to emails—that pattern is unlikely to change once they’ve started the job. When you ask specific questions about the process, materials, or potential challenges, you should receive clear, confident answers. A contractor who gives vague responses or seems annoyed by your questions may lack the necessary experience or simply doesn’t value your input. A great partner will welcome your questions and keep you informed every step of the way, as you can see from the detailed project walkthroughs on the Gappsi YouTube channel.

Related Articles

Frequently Asked Questions

How long does a typical basement remodel take? While every project is different, a standard basement finishing project usually takes between 4 and 8 weeks from the start of construction to the final walkthrough. This timeline can be affected by the complexity of your design, such as adding a bathroom or kitchen, and the time it takes for local permit approvals and inspections. Any unexpected structural or moisture issues that need to be addressed can also extend the schedule.

Do I really need a general contractor, or can I just hire individual tradespeople myself? While you can act as your own project manager, hiring a general contractor simplifies the entire process and protects you from common pitfalls. A contractor coordinates all the moving parts, from scheduling plumbers and electricians to ensuring all work meets building codes. They handle the permits, manage the timeline, and are your single point of contact, which saves you an immense amount of time and stress.

What’s the very first step I should take if my basement is currently damp? Before you even think about design or finishes, your first step should be to have a professional assess the source of the moisture. A basement contractor can identify whether the issue is due to foundation cracks, poor exterior drainage, or high humidity. Solving the water problem is the essential foundation for any successful remodel, as any work you do will be at risk without it.

Will finishing my basement actually increase my home’s value? Absolutely. A properly finished basement adds valuable, usable square footage to your home, which is a major selling point. It can provide a significant return on your investment, especially if you add features like a full bathroom or a legal bedroom with an egress window. The key is to ensure the work is done professionally and to code to maximize its value.

How involved do I need to be in the project once I hire a contractor? Your main involvement will be during the initial planning and design phase, where you’ll make key decisions about the layout, materials, and finishes. Once construction begins, a good contractor should handle the day-to-day management of the project and the crew. They will provide you with regular updates and consult you on any important decisions, but you won’t need to be on-site managing the work yourself.

Luxury outdoor kitchen under a custom pavilion with granite countertops and stainless steel appliances.

Your Guide to the Perfect Outdoor Kitchen Pavilion

Hosting a backyard barbecue often means running back and forth to your indoor kitchen, juggling platters and supplies. Then there’s the weather—a sudden rain shower or intense sun can quickly send everyone inside. An outdoor kitchen pavilion solves these problems for good. It creates a self-sufficient, comfortable, and sheltered space where everything you need is within arm’s reach. Think of it as your dedicated cooking pavilion, a permanent setup that makes entertaining feel truly effortless. This is how you create a pavilion outdoor kitchen that lets you be a relaxed host who actually enjoys the party.

Key Takeaways

  • Plan for Flow, Not Just Footprint: A truly functional outdoor kitchen depends on an intuitive layout. Consider how you’ll move between cooking, prepping, and socializing zones to create an effortless space that makes hosting a joy.
  • Choose Materials for Longevity, Not Just Looks: Your outdoor kitchen must withstand Long Island’s weather. Investing in durable, weather-proof materials like natural stone, porcelain, and stainless steel from the start means less maintenance and a beautiful space that lasts for years.
  • Hire an Outdoor Living Specialist: This is a complex project requiring expertise in masonry, utilities, and outdoor construction. Partnering with a licensed and insured contractor who specializes in outdoor kitchens is the best way to protect your investment and ensure a high-quality result.

What Defines a Luxury Outdoor Kitchen Pavilion?

An outdoor kitchen is more than just a grill on a patio. It’s a complete extension of your home, a place where you can cook, dine, and entertain without sacrificing comfort or style. When you pair a high-end kitchen with a beautifully designed pavilion, you create a true luxury outdoor living experience. This combination transforms your backyard into a destination, blending sophisticated design with practical function. It’s about crafting a space that feels both elegant and effortlessly usable, allowing you to host a dinner party or enjoy a quiet family meal outdoors with all the conveniences of your indoor kitchen. The difference is in the details: premium materials, thoughtful layout, and seamless integration with your home and landscape.

More Than a Grill: The Modern Outdoor Kitchen

A modern luxury outdoor kitchen is a fully equipped culinary workspace designed to withstand the elements while looking incredible. Forget rolling a charcoal grill out from the garage. We’re talking about a permanent, custom-built setup featuring high-performance appliances, from built-in gas grills and smokers to pizza ovens and outdoor refrigerators. The foundation of this luxury lies in the materials. Think durable, gorgeous countertops made from porcelain or natural stone that can handle Long Island weather, paired with custom cabinetry that offers ample storage. A well-designed layout also includes a functional sink, plenty of prep space, and task lighting, ensuring you can cook a gourmet meal as easily outside as you can inside. It’s this level of detail and quality that makes it a worthwhile investment in your home and lifestyle.

Why a Pavilion Creates an All-Weather Oasis

The pavilion is what truly elevates an outdoor kitchen into an all-season entertainment hub. This isn’t just any roof; it’s a permanent architectural feature that provides essential protection from the sun and rain, instantly extending the usefulness of your outdoor space. Modern pavilions and pergolas can be customized with features like adjustable louvered roofs that let you control the amount of sun or shade with the touch of a button. You can also integrate amenities like ceiling fans for hot summer days, infrared heaters for cool autumn nights, and built-in lighting and sound systems to set the perfect mood. By creating a sheltered, comfortable environment, the pavilion ensures your gatherings are never cut short by unpredictable weather, making it the ultimate centerpiece for outdoor living.

A Brief History: From Ancient Gardens to Modern Backyards

The idea of creating a dedicated, sheltered spot to enjoy the outdoors is anything but new. This desire for a beautiful structure in a garden setting actually goes back thousands of years. Structures similar to gazebos appeared in Egyptian gardens about 5,000 years ago and were also mentioned in ancient Chinese and Persian writings. Throughout history, their purpose has remained consistent: to offer a comfortable place for shade, shelter, and rest while enhancing the beauty of the landscape. This long tradition of blending architecture with nature is the foundation for the sophisticated outdoor living spaces we design today, transforming a simple backyard into a personal retreat.

Understanding Pavilions, Gazebos, and Other Structures

While rooted in history, today’s outdoor structures have evolved far beyond simple garden accents. A gazebo is typically a freestanding, often octagonal, structure with a solid roof, perfect for creating an intimate focal point in a garden. A pavilion, however, is usually larger, rectangular, and open on all sides, specifically designed to cover a patio or outdoor kitchen. At Gappsi, we specialize in creating custom pavilions and pergolas that serve as permanent, architectural extensions of your home. Built with durable materials meant to last, these structures provide reliable shelter and a defined space for dining and entertaining, making them the ideal partner for a luxury outdoor kitchen.

Don’t Build Without These Outdoor Kitchen Features

A luxury outdoor kitchen pavilion is more than just a grill under a roof—it’s a fully functional and inviting space designed for cooking, dining, and entertaining. To create a truly exceptional experience, you’ll want to incorporate features that blend high-end performance with comfort and style. Think about how you plan to use the space. Will it be for intimate family dinners, large parties, or quiet morning coffees? Your answer will guide which features are essential for your backyard oasis. From state-of-the-art cooking equipment to materials that can handle Long Island weather, every detail contributes to the final result.

The Best Appliances for Your Cooking Pavilion

The heart of any kitchen is its appliances, and an outdoor kitchen is no different. Go beyond a standard grill and consider a complete cooking setup that rivals your indoor kitchen. This means incorporating high-performance, built-in appliances for convenience and versatility. Think about a professional-grade grill, a dedicated smoker, or a wood-fired pizza oven. Don’t forget essentials like an outdoor-rated refrigerator, a sink for easy cleanup, and stainless steel storage. The beauty of a custom pavilion is that you can design the layout to perfectly house these features.

Materials and Finishes That Withstand the Elements

Your outdoor kitchen needs to look great and stand up to the elements, from summer sun to winter snow. Choosing premium, weather-proof materials is non-negotiable for a lasting investment. For countertops, select durable surfaces like granite, quartzite, or high-quality porcelain pavers that resist stains, heat, and fading. The pavilion structure should be built from robust materials like powder-coated aluminum, cedar, or stone to handle heavy snow and high winds. For cabinetry, marine-grade stainless steel is a popular choice because it won’t rust or warp.

Adding Comfort: Seating, Lighting, and Sound

What truly makes an outdoor kitchen a destination is comfort. You need a space where guests want to linger long after the meal is over. Start with ample, comfortable seating, like bar stools at the counter and a separate lounge area with cushioned chairs. To extend your enjoyment into the evening, incorporate layered lighting, including task lighting over the grill, ambient string lights, and thoughtful landscape lighting. For the final touch, consider entertainment options like a built-in sound system or an outdoor-rated television to create a complete entertainment hub.

Designing for Entertainment: Bars, Islands, and Ice Makers

A great outdoor kitchen is designed for socializing, not just cooking. A large island or a dedicated bar area becomes the natural gathering spot where guests can relax with a drink while you finish grilling. This setup encourages interaction and keeps you from being isolated from the party. Incorporating features like a built-in ice maker, a beverage refrigerator, or even a kegerator means everything you need is right there. No more running inside for ice or cold drinks. A custom-built masonry island provides the perfect foundation for these amenities, creating a functional and beautiful centerpiece for your outdoor entertainment space.

Why Invest in an Outdoor Kitchen Pavilion?

An outdoor kitchen pavilion is more than just a structure; it’s a complete transformation of your backyard. It turns a simple patio or deck into a destination—a place where family dinners feel like a vacation and weekend get-togethers become unforgettable. If you’re thinking about adding this feature to your home, you’re not just considering a beautiful addition. You’re investing in a lifestyle upgrade that offers practical benefits for years to come.

Year-Round Entertaining, Rain or Shine

Imagine hosting a barbecue without worrying about a sudden summer shower or the intense afternoon sun. That’s the freedom a pavilion offers. Modern pavilions and pergolas can be designed with adjustable louvered roofs, giving you complete control over your environment. With the touch of a button, you can let the sunshine in or create a fully sheltered space to protect you and your guests from the elements. This means your outdoor kitchen isn’t just for perfect weather days. It becomes a reliable, comfortable entertainment hub you can enjoy through spring, summer, and fall, making every moment outdoors a pleasure.

Weatherproofing Your Pavilion for All Seasons

A pavilion is the key to turning your outdoor kitchen into a space you can use almost year-round. It’s a permanent architectural feature designed to provide reliable protection from the elements, whether it’s the hot summer sun or an unexpected rain shower. This structure instantly extends the usefulness of your outdoor area, ensuring your plans are never ruined by the weather. Modern pavilions can even be customized with features like adjustable louvered roofs, which allow you to control the amount of sun or shade with the simple touch of a button. This level of control means you can create the perfect atmosphere for any gathering, making your outdoor kitchen a true all-season entertainment hub.

Using Enclosures like Vinyl Curtains for Full Protection

To get the most out of your pavilion, especially during cooler Long Island months, consider adding enclosures. This step transforms your open-air structure into a cozy, protected room you can use even when it’s cold. Clear vinyl curtain enclosures are an excellent choice because they block wind, rain, and snow without obstructing your view of the backyard. These durable curtains are designed to stay flexible even in freezing temperatures, offering reliable protection against harsh weather. By adding a simple enclosure system, you create a flexible and cost-effective way to make your outdoor kitchen pavilion a comfortable retreat all year long, turning it into a true four-season space.

Add Lasting Value to Your Home

An outdoor kitchen pavilion is one of the smartest investments you can make in your property. It’s a high-impact feature that significantly boosts curb appeal and functionality, which is exactly what today’s homebuyers are looking for. In fact, adding a well-designed outdoor kitchen can increase your home’s value by up to 30%. It sets your home apart in a competitive market, showcasing a commitment to quality and a luxury lifestyle. Think of it not as an expense, but as a direct investment in your home’s equity and a feature that will pay dividends if you ever decide to sell.

Extend Your Living Space Outdoors

This addition fundamentally changes how you use your backyard. It creates a central, functional zone that seamlessly blends cooking, dining, and relaxing. No more running back and forth to the indoor kitchen. Everything you need is right where you need it, making outdoor living effortless and more enjoyable. An outdoor kitchen pavilion extends your living space, effectively adding another room to your home. It’s a way to improve your daily life by creating a beautiful, comfortable, and stylish area where you can make lasting memories, whether you’re enjoying a quiet morning coffee or hosting a lively party.

Potential Downsides and How to Address Them

An outdoor kitchen pavilion is a fantastic addition to any home, but like any major project, it’s wise to go in with a clear understanding of the practical side. Being prepared for the investment, ongoing care, and weather considerations ensures you can plan effectively and enjoy your new space without any surprises. The good news is that with thoughtful design and the right materials, these potential challenges are easy to manage.

Understanding the Costs and Maintenance Involved

Let’s be upfront: building a luxury outdoor kitchen is a significant investment, especially when you factor in utilities like plumbing, electricity, and gas lines. The final cost depends heavily on your choice of appliances, materials, and the complexity of the design. However, viewing this as a long-term investment in your home’s value and your lifestyle helps put the expense into perspective. Working with an experienced team can also help you create a detailed budget and avoid unexpected costs. The key is to partner with a company that can handle everything from masonry to utilities, ensuring a smooth process.

Beyond the initial build, you’ll need to plan for some upkeep to keep your outdoor kitchen looking its best. This involves routine cleaning of countertops, grills, and the pavilion structure. The best way to minimize this work is by choosing the right materials from the start. Opting for durable, low-maintenance surfaces like porcelain and natural stone for countertops and flooring will save you time and effort. For long-term protection, professional cleaning and sealing services can also preserve the beauty of your investment, making sure it remains a stunning feature for years to come.

Considering Weather Limitations

While a pavilion provides excellent protection from sun and rain, it’s true that extreme weather might still affect your plans. A heavy downpour with strong winds or a chilly evening could make the space less comfortable. However, this is where modern design comes in. A well-built pavilion is the foundation of an all-season entertainment hub, but you can enhance it further to counter almost any weather. By planning ahead, you can turn your outdoor kitchen into a true three-season oasis that remains comfortable and usable even when the weather isn’t perfect.

To address these limitations, consider integrating climate control features directly into your pavilion design. Adding built-in infrared heaters can make cool autumn nights cozy, while ceiling fans can create a refreshing breeze on hot summer days. For even more protection, you can incorporate retractable screens or vinyl curtains to block wind and rain without obstructing your view. These additions cost more, but they dramatically extend the usability of your outdoor kitchen, ensuring you get the most out of your investment regardless of the forecast. It’s all about creating a space that adapts to your needs and the weather.

Popular Design Styles for Your Pavilion Outdoor Kitchen

Choosing a style for your outdoor kitchen pavilion is one of the most exciting parts of the design process. This is where you get to infuse your personality into the space, creating an atmosphere that’s perfect for how you want to relax and entertain. Whether you’re drawn to clean, contemporary lines or the warmth of traditional materials, there’s a design that will feel like a natural extension of your home. The right style will not only look beautiful but will also complement your home’s architecture and surrounding landscape, creating a truly cohesive outdoor retreat.

The Modern Look: Clean Lines and Simplicity

If you love clean lines, minimalist aesthetics, and smart functionality, a modern design is a perfect choice. These pavilions often feature materials like metal, smooth-finished wood, and polished stone for a sophisticated look. One of the most popular features in modern pavilions and pergolas is an adjustable louvered roof. With the touch of a button, you can open the slats to let the sun in or close them for protection from rain, giving you total control over your environment. This blend of high-tech convenience and sharp design makes a modern pavilion a stunning centerpiece for any contemporary backyard.

The Appeal of Classic, Traditional Charm

For a timeless and inviting feel, you can’t go wrong with a classic design. Traditional pavilions draw inspiration from rustic structures, using natural materials to create a warm atmosphere. Think sturdy timber frames with beautiful joinery that showcase expert craftsmanship. These structures are not only incredibly strong and built to last, but their natural beauty also blends seamlessly into a garden setting. Paired with classic masonry like a stone fireplace or brick accents, a traditional pavilion creates a cozy and elegant space that feels both grand and intimate.

The Craftsmanship of Mortise and Tenon Joints

At the core of this traditional craftsmanship is the mortise and tenon joint, a time-honored woodworking technique that creates incredibly strong and beautiful structures. This method involves fitting a precisely cut projection (the tenon) on one piece of wood into a matching hole (the mortise) in another, forming a tight, interlocking connection without nails or screws. When you admire historic barns or antique furniture, you are often seeing the enduring power of these joints. For a pavilion, this technique not only ensures structural integrity against the elements but also showcases a level of detail that defines high-end construction. It’s a method that connects us to centuries of building traditions where patience and precision were paramount, a true hallmark of quality you can explore further.

Rustic Meets Refined: Mediterranean and Transitional

If your taste falls between modern and traditional, a transitional style offers the best of both worlds. The key is creating harmony between your new pavilion and your existing home and yard. This style often uses natural materials like stone and wood to bridge the gap between the built environment and the natural landscape. A transitional design might pair the clean structure of a modern pavilion with the warmth of wood beams or stone columns. This flexibility allows you to create a personalized look that feels both current and timeless, ensuring your entire landscape design feels connected and thoughtfully planned.

Low-Maintenance Looks: Modern Vinyl Pavilions

For homeowners who love a clean, polished look but don’t want the constant upkeep, a modern vinyl pavilion is an excellent choice. This material is incredibly durable and designed to handle Long Island’s diverse weather without fading, cracking, or peeling. Unlike wood, which requires regular staining or painting to protect it from the elements, vinyl simply needs an occasional wash to look brand new. This low-maintenance quality means you can spend more time enjoying your outdoor kitchen and less time on maintenance. Modern pavilions and pergolas made from high-quality vinyl offer a crisp, clean aesthetic that complements a wide range of home styles, from contemporary to traditional, making it a smart and stylish investment.

How to Plan the Perfect Layout

A beautiful outdoor kitchen is wonderful, but a beautiful and functional outdoor kitchen is a game-changer. The layout is the foundation of your entire project, determining how easily you can move, cook, and entertain. A thoughtful plan ensures your new space isn’t just a showpiece but the true heart of your backyard. It’s about creating an intuitive flow that makes hosting a summer barbecue feel effortless and relaxing.

Before you fall in love with specific appliances or finishes, take a step back and focus on the blueprint. Think about how you’ll carry dishes from your indoor kitchen, where guests will sit and mingle, and how you’ll move between the grill, sink, and prep areas. Getting this right from the start will save you headaches later and make every moment you spend in your new kitchen a joy.

Start by Measuring Your Space

One of the most common missteps in outdoor kitchen design is underestimating the amount of space you actually need. It’s easy to focus on the footprint of the grill and cabinets, but you also have to account for walking paths, open appliance doors, and elbow room for the chef. Start by measuring your intended area and marking it out with stakes and string or even spray paint. This helps you visualize the scale in your actual backyard.

Think through your workstations. You’ll want dedicated zones for hot tasks (grilling), cold tasks (refrigeration), wet tasks (sink), and dry tasks (prep). A frequent mistake is not giving these functional areas enough counter space. Ensure there’s plenty of room on either side of the grill for platters and tools. Proper space planning is a core part of our masonry design and construction, ensuring your kitchen is as practical as it is beautiful.

Freestanding vs. Attached Pavilions

One of the first decisions you’ll make is whether your pavilion should be attached to your home or stand freely in your yard. An attached pavilion creates a seamless extension of your indoor living space, making it feel like a true outdoor room. Because it uses your home for partial support, it can sometimes be a more cost-effective option. However, it requires careful planning to ensure it integrates perfectly with your home’s architecture. A freestanding pavilion offers complete design freedom. You can place it anywhere you like—by the pool, in a garden, or positioned to capture the best sunset view—creating a distinct destination in your backyard. This flexibility allows for more creative layouts and designs, but it does require a full foundation. The best choice depends on your property’s layout and how you envision using your new outdoor kitchen. Exploring different pavilion and pergola styles can help you decide which approach best fits your home.

Plan for Traffic Flow and Functionality

Your outdoor kitchen should feel like a natural extension of your home, not a distant outpost. A poor layout can make cooking and entertaining feel disjointed. One of the biggest mistakes is placing the kitchen too far from the house. Think about all the trips you’ll make back and forth for ingredients, dishes, and forgotten utensils. Keeping it close to a back door makes everything much simpler.

We often apply the classic “work triangle” principle, creating an efficient path between the grill, sink, and refrigerator. This minimizes your steps and keeps everything within easy reach. The layout should also consider guest traffic, creating clear paths so people can move around without getting in the cook’s way. A well-designed space allows the host to socialize while cooking, making the experience more inclusive and fun for everyone.

Make It Look Like It’s Always Been There

Your new outdoor kitchen and pavilion shouldn’t look like an afterthought. The best designs feel completely integrated with the surrounding environment. We achieve this by using materials and architectural styles that complement your home and existing landscape. Using porcelain and natural stone that echoes the materials on your patio or home exterior creates a cohesive and high-end look.

Think of the kitchen and pavilion as the anchor of a larger outdoor living area. How can it connect with other features? Perhaps it overlooks the swimming pool or opens onto a lush garden. Thoughtful landscape design can frame the space with beautiful plantings, while ambient lighting adds atmosphere and extends its usability into the evening. The goal is to create a complete, harmonious environment for relaxing and entertaining.

How to Choose the Right Materials

Selecting the right materials is one of the most critical steps in designing an outdoor kitchen and pavilion that lasts. Your outdoor space will be exposed to everything Long Island weather can throw at it—from hot, sunny days to freezing, snowy winters. The materials you choose need to stand up to the elements without fading, cracking, or warping, ensuring your investment looks beautiful for years to come.

Think of it this way: high-quality materials are the foundation of a low-maintenance lifestyle. Choosing durable, weather-resistant options from the start means you’ll spend more time enjoying your space and less time on upkeep. It’s about finding the perfect balance between stunning aesthetics and practical, long-term performance. From the countertops where you’ll prep meals to the flooring underfoot and the roof overhead, every choice contributes to the overall quality and longevity of your outdoor oasis. This isn’t just about picking what looks good on day one; it’s about choosing materials that will maintain their integrity and beauty through countless family barbecues, holiday gatherings, and quiet morning coffees.

What Are the Best Outdoor Countertop Materials?

Your countertops are the primary work surface in your outdoor kitchen, so they need to be tough. They’ll face everything from food spills and hot pans to direct sun and rain. For a combination of elegance and resilience, natural stone is a fantastic choice. Granite and quartzite are incredibly durable and can handle temperature fluctuations with ease. Another excellent option is porcelain, which offers a sleek, modern look and is non-porous, making it highly resistant to staining and easy to clean. Gappsi offers a wide selection of beautiful porcelain and natural stone options perfect for creating a functional and stylish outdoor cooking space.

The Best Materials for Your Pavilion’s Structure and Floor

The flooring in your outdoor kitchen pavilion needs to be safe, durable, and forgiving. Spills are bound to happen, so you’ll want a surface that doesn’t stain easily and is simple to wipe clean. Porcelain pavers and natural stone are top contenders because they are incredibly dense, resistant to moisture, and hold their color even with constant sun exposure. For the structure of the pavilion itself, materials like powder-coated aluminum, vinyl, or resilient woods like cedar provide the strength needed to support the roof while resisting rot and pests. Our expert masonry team can help you integrate these structural elements seamlessly with stone features for a cohesive, high-end look.

Topping It Off: Roofing and Finishes

The roof of your pavilion is your first line of defense against the elements, providing essential shade and protection from rain. You can opt for a solid roof for complete coverage or choose a more flexible design. Modern louvered roofs are a popular luxury feature, allowing you to adjust the slats with the push of a button to let sunlight in or create a water-tight seal when it rains. This versatility extends the usability of your outdoor kitchen through different seasons and weather conditions. At Gappsi, we design custom pavilions with various roofing systems to match your home’s style and your entertainment needs, ensuring your outdoor space is always ready for guests.

How Much Does a Luxury Outdoor Kitchen Pavilion Cost?

One of the first questions on everyone’s mind is, “What’s the budget for a project like this?” The truth is, there’s no one-size-fits-all answer. Because every outdoor kitchen pavilion is a custom creation, the cost can vary significantly. Think of it like designing an indoor kitchen—your choices in size, materials, and appliances will shape the final price. Generally, you can expect a project to range from $6,000 to over $30,000, with high-end, fully custom builds reaching well beyond that.

The final cost is a reflection of your vision. A simple, elegant pavilion with a high-quality grill and prep space will be on the lower end of the spectrum. A sprawling structure with a full suite of gourmet appliances, premium stone countertops, a fireplace, and integrated lighting and sound systems will naturally require a larger investment. The key is to remember that you’re not just buying appliances and materials; you’re investing in a lifestyle upgrade and a significant asset for your home. A well-planned outdoor kitchen pavilion becomes the heart of your backyard, a place for making memories for years to come. It’s about creating a space that perfectly fits how you want to live and entertain outdoors.

What Drives the Final Cost?

The final price tag for your outdoor kitchen pavilion is influenced by several key elements. The size and complexity of the design are the biggest drivers—a larger footprint with more intricate details will require more materials and labor. The materials you select also play a huge role. For instance, choosing luxurious natural stone countertops and custom masonry will be a different investment than more standard options. Finally, your choice of appliances is a major factor. You can opt for a fantastic built-in grill or create a complete chef’s setup with a smoker, side burners, an outdoor refrigerator, and a pizza oven. Each choice contributes to the overall cost and functionality of your space.

Factoring in Utilities and Permit Costs

Beyond the structure and appliances, you’ll need to account for the practical necessities. Your outdoor kitchen will need utilities like electricity for lighting and appliances, plumbing for a sink, and potentially a natural gas line for the grill. The cost to run these lines from your house to the pavilion depends on the distance and complexity of the job. Additionally, depending on the scale of your project and local Long Island regulations, you may need building permits. A permanent structure often requires official approval. Working with an experienced contractor is the best way to ensure all the necessary permits and plans are handled correctly, so you can avoid any headaches down the road.

Why Skipping Permits Can Be a Costly Mistake

I know it can be tempting to bypass the permit process to get your project started faster, but this step is there for a crucial reason: your safety. Permits ensure your new pavilion and kitchen comply with local building codes, from electrical wiring to structural stability. Building without one can lead to serious headaches, including hefty fines, stop-work orders that halt your project indefinitely, or even being forced to tear down the finished work. Beyond that, unpermitted work can create major problems with your homeowner’s insurance or when you decide to sell your home. This is why partnering with an experienced team that handles the entire process, from design to construction, is so important. They’ll make sure everything is done right, protecting your investment and giving you peace of mind.

Smart Ways to Get the Best Value

An outdoor kitchen pavilion is more than just a beautiful addition to your home; it’s a smart investment. Studies have shown that a well-designed outdoor kitchen can significantly increase your home’s value, with some homeowners seeing a return of up to 30%. In a competitive market, a stunning and functional outdoor living area makes your property stand out to potential buyers. But the value isn’t just financial. You’re investing in your family’s quality of life by creating a dedicated space for gathering, celebrating, and relaxing. This enhancement to your home provides a return in enjoyment and memories that you can’t put a price on.

Cost Examples: Custom Builds vs. Pavilion Kits

When you start looking at costs, you’ll see two main paths: pre-designed pavilion kits and fully custom builds. Some pavilion packages, for example, might have a starting price of around $16,000 to $18,000. While that number seems specific, it often only covers the structure itself, not the foundation, installation, or any of the kitchen components. In contrast, a fully custom project offers a much wider budget range because it’s tailored to your exact vision. A custom build can range from $6,000 for a more modest setup to well over $30,000 for a high-end design with premium materials and appliances. The key difference is that a custom approach integrates every element from the start, ensuring the final space is a seamless and functional extension of your home.

Avoid These Common Pavilion Planning Mistakes

Creating your dream outdoor kitchen and pavilion is an exciting process, but it’s easy to get tripped up by a few common missteps. A successful project isn’t just about picking out a great grill; it’s about thoughtful planning that considers how you’ll use the space for years to come. Taking the time to think through the details now will save you from headaches and costly changes down the road.

From the initial layout to the final finishes, every decision impacts the final result. The biggest mistakes often happen when homeowners rush the design, choose materials that aren’t suited for the outdoors, or forget to plan for weather and upkeep. By being aware of these potential pitfalls, you can ensure your new outdoor living area is as functional and durable as it is beautiful. Let’s walk through the key things to watch out for so you can get it right the first time.

Don’t Rush the Planning Phase

One of the most frequent mistakes is underestimating the amount of space you actually need. It’s crucial to think beyond just the footprint of your appliances. Consider the flow of traffic: how will you and your guests move around the grill, prep counters, and seating areas? A cramped layout can make cooking and entertaining feel chaotic. Before you finalize anything, map out distinct zones for cooking, preparation, and socializing. A well-thought-out masonry design ensures every part of your kitchen is functional and easy to use, preventing logistical issues before they ever start.

Avoid Choosing the Wrong Materials or Contractor

Your outdoor kitchen is an investment, and skimping on materials is a mistake that will cost you more in the long run. Materials that work well indoors often can’t withstand the temperature fluctuations, moisture, and sun exposure of Long Island’s climate. Opt for durable, weather-resistant options like stainless steel for appliances and high-quality porcelain or natural stone for countertops and flooring. Just as important is your choice of builder. An experienced contractor who specializes in outdoor construction will understand the unique challenges, from proper ventilation for grills to ensuring your structure is safe and built to last.

Don’t Forget About Future Upkeep

While a pavilion provides excellent shelter, your outdoor kitchen is still exposed to the elements. It’s essential to plan for weather from the very beginning. This means ensuring proper drainage, selecting materials that won’t fade or warp in the sun, and considering how wind might affect your cooking area. Think about future upkeep, too. Spills are inevitable, so choose non-porous surfaces that are easy to clean and resist staining. Planning for long-term care, like periodic cleaning and sealing for your stonework, will keep your outdoor kitchen looking pristine season after season with minimal effort.

Overlooking Critical Safety Measures

While it’s exciting to choose countertops and appliances, safety is the one area where there’s no room for compromise. A well-designed outdoor kitchen pavilion is not only beautiful and functional but also fundamentally safe for you, your family, and your guests. Overlooking critical safety measures can lead to serious risks, turning your backyard oasis into a potential hazard. From proper ventilation for your grill to secure electrical work for lighting and appliances, every detail must be planned with safety as the top priority, ensuring your space is a source of enjoyment, not worry.

A Warning on Heaters in Enclosed Spaces

As the weather cools, it’s tempting to bring a portable propane heater into your pavilion to keep the party going. However, this is a significant safety risk that should be avoided. Using propane or other open-flame heaters in an enclosed or even partially covered space can lead to a dangerous buildup of carbon monoxide, a colorless, odorless gas that can be fatal. According to the National Fire Protection Association, heating equipment is a leading cause of home fires, and improper use of portable heaters is a major contributor. The risk of fire is also much higher with these types of heaters, especially in a structure that may have wooden elements or nearby flammable materials.

A much safer way to add warmth to your outdoor living area is with electric infrared heaters. These can be professionally mounted on the ceiling or walls of your pavilion, keeping them out of the way and reducing trip hazards. Unlike fuel-burning heaters, infrared models don’t produce any emissions, so there’s no risk of carbon monoxide. They work by heating objects and people directly, providing a comfortable, sun-like warmth that isn’t affected by wind. This makes them an efficient and safe choice for creating a cozy atmosphere on cool evenings, allowing you to enjoy your outdoor space for more of the year without compromising on safety.

This specific issue with heaters highlights a broader point: building an outdoor kitchen pavilion involves complex safety considerations. This is why adhering to local building codes and securing the necessary permits is not just a formality; it’s a crucial step in ensuring your structure is safe. A professional team understands the requirements for proper ventilation, safe electrical and gas line installation, and structural integrity. When you partner with an experienced builder for your home construction projects, you’re ensuring that every aspect of your outdoor kitchen is designed and built to the highest safety standards, giving you complete peace of mind.

How to Choose the Right Contractor for Your Project

Bringing a luxury outdoor kitchen and pavilion to life is a significant investment, and the single most important decision you’ll make is choosing the right team to build it. This isn’t just about hiring someone to lay pavers; it’s about finding a partner who understands your vision, has the technical expertise for complex outdoor projects, and communicates clearly from start to finish. A great contractor will guide you through every step, from initial design to final inspection, ensuring the result is not only beautiful but also functional and built to last.

Your goal is to find a company with a proven track record of creating stunning, high-end outdoor living spaces. Look for a team that handles everything in-house, from masonry and landscaping to installing utilities and structures. This integrated approach prevents miscommunication and delays, leading to a smoother process and a more cohesive final product. Taking the time to vet your options thoroughly will save you from headaches down the road and ensure your new outdoor oasis is everything you dreamed it would be.

Check for Key Qualifications and Experience

When you start your search, focus on contractors who specialize in outdoor kitchens and pavilions. This isn’t a job for a general handyman. Outdoor construction comes with unique challenges, like dealing with Long Island’s weather, selecting durable materials, and properly running utility lines for gas, water, and electricity. A seasoned expert will know which materials stand up to salt air and freezing winters and how to design a space that functions flawlessly.

Always confirm that any potential contractor is fully licensed and insured. This is a non-negotiable that protects you and your home from liability during the project. Don’t be shy about asking for proof. A reputable company will have this information readily available. You’re looking for a team whose portfolio showcases a history of building beautiful and durable pavilions and pergolas, demonstrating they have the specific skills your project requires.

The Benefit of a Full-Service Design-Build Firm

Instead of juggling separate designers, masons, and electricians, consider partnering with a full-service design-build firm. This approach streamlines your entire project by keeping every aspect, from the initial sketches to the final installation, under one roof. When one team manages both the design and construction, the process is significantly smoother. There’s no risk of miscommunication between different contractors, which means fewer delays and a more cohesive final product. This integrated model is especially valuable for outdoor kitchens, which require a blend of skills from expert masonry to landscaping and utility installation. With a single point of contact, you get clear communication and one team that is fully accountable for bringing your vision to life.

Key Questions to Ask Potential Contractors

Once you have a shortlist, it’s time to start asking questions. The way a contractor responds will tell you a lot about their process, expertise, and professionalism. Come to the conversation prepared with a list to ensure you cover all your bases. This is your chance to gauge their experience and see if they’re a good fit for your project and personality.

Here are a few essential questions to ask:

  • Can you show me a portfolio of outdoor kitchens you’ve built in my area?
  • How do you handle the permitting process with local towns in Nassau or Suffolk County?
  • What is your process for communicating updates or potential issues during construction?
  • Who will be the main point of contact for my project?
  • Can you provide references from a few recent clients?

A confident and experienced contractor will welcome these questions. You can also get a great sense of a company’s work by checking out their project videos, which often show the construction process and finished results in detail. Seeing their work on YouTube can give you a better feel for their quality and style.

Understand the Timeline from Start to Finish

A reliable contractor will provide a clear and detailed project plan before any work begins. This document should be more than just a start and end date; it should outline the entire construction sequence, from excavation and foundation work to appliance installation and final touches. Understanding the timeline helps you manage your expectations and plan accordingly.

Ask for a breakdown of project milestones and the corresponding payment schedule. This transparency ensures you know exactly what to expect and when. It’s also important to discuss how potential delays, such as bad weather or material backorders, are handled. A professional team will have contingency plans in place and will communicate proactively. A well-defined plan is the foundation of a successful project and a stress-free experience for you as the homeowner.

Related Articles

Frequently Asked Questions

How long does it typically take to build an outdoor kitchen pavilion? The timeline for a project like this can vary quite a bit depending on the complexity of your design, the permitting process in your town, and of course, the weather. A more straightforward setup might take a few weeks, while a highly custom project with extensive masonry and utility work could take a couple of months from start to finish. A detailed project plan from your contractor will give you the clearest picture of the schedule.

What’s the real difference between a pavilion and a pergola? That’s a great question, as the terms are often used together. The simplest way to think about it is the roof. A pavilion has a solid, fixed roof that offers complete protection from sun and rain. A traditional pergola has a slatted or open-beam roof designed to provide partial shade and support climbing plants. Modern designs, like louvered roofs, can blur the lines by giving you the option to switch between open slats and a solid covering.

Can I really use my outdoor kitchen in the colder months on Long Island? While you probably won’t be grilling in a snowstorm, a well-designed pavilion can absolutely extend your outdoor season. The solid roof provides a crucial barrier against the elements. When you add features like built-in infrared heaters and a stone fireplace, you can create a cozy and comfortable space that’s perfect for crisp autumn evenings and even mild winter days.

How much maintenance does an outdoor kitchen require? The goal is to build a space you can enjoy, not one you have to constantly work on. By choosing high-quality, weather-resistant materials from the start, you minimize future upkeep. Your main tasks will be simple things like covering your grill and appliances when not in use and wiping down countertops. For natural stone, a periodic professional cleaning and sealing will keep it protected and looking its best for years.

Can you build a pavilion and kitchen on my existing patio? In many cases, yes. However, it depends on the condition and construction of your current patio. We would need to assess the foundation to ensure it can safely support the weight of the new pavilion structure and kitchen components. It also needs to be suitable for running any necessary utility lines for water, gas, and electricity. A professional evaluation is the first step to see if your existing space is ready for the upgrade.

Premium Pickleball Court Construction in Commack, NY: A Showcase Project by Gappsi

View Gappsi’s YouTube Channel to view Premium Pickleball Court Construction in Commack, NY: A Showcase Project by Gappsi

Premium Pickleball Court Built in Commack, NY by Gappsi

The demand for pickleball facilities has surged across Long Island, and communities are increasingly seeking high-quality, durable courts that elevate the playing experience. Gappsi recently completed another impressive installation at the Southern Landing apartment complex in Commack, NY.  Delivering a professionally engineered pickleball court that reflects both structural excellence and aesthetic appeal.

This project highlights Gappsi’s expertise in sports game court design, engineering, and finishing. From the base construction to the final striping, every step is handled with precision to ensure long-term durability, player comfort, and visual impact.

A Strong, Stable Foundation: The Key to Long-Lasting Performance

Every great pickleball court begins with a properly engineered foundation. For this project, Gappsi constructed the court on a six-inch oversized recycled concrete base, selected for its strength, stability, and eco-friendly composition. This oversized base ensures the surface withstands heavy use, seasonal weather changes, and natural ground movement without cracking or shifting.

To refine the foundation, the team topped the base with fine, state-approved crushed concrete, a premium-grade material known for its consistent compaction and smooth finish. This step is critical in sports game court construction, as it prepares the surface for paving and prevents imperfections from telegraphing through the asphalt layer over time.

Professional Asphalt Installation for Superior Durability

Once the base was fully compacted and leveled, Gappsi installed 3.5 inches of asphalt in two layers. This dual-layer approach enhances the court’s structural integrity, providing the durability necessary for continuous play in a multi-resident community.

Using two layers of asphalt also allows for a more uniform finish and increased resistance to cracking.  This is an essential factor for any high-traffic outdoor recreational surface. By taking this extra step, Gappsi ensures a longer-lasting court with reduced maintenance requirements.

Advanced Laykold Surfacing: The Gold Standard in Court Coatings

To deliver a cushioned, player-friendly surface with superior traction and color consistency, the court was finished with Laykold coatings, one of the most widely recognized surfacing systems in the sports game court industry.

Gappsi followed a multi-step application process designed to optimize both performance and aesthetics:

  1. First Coat of New Surf – This initial layer creates a uniform texture and prepares the asphalt for resurfacing products.
  2. Two Coats of Resurfacer – These layers refine the surface, filling micro-imperfections and creating a smooth, seamless finish.
  3. Three Coats of High-Quality Paint – Applied in rich blue color combinations to create a striking visual effect on the court.

The final color palette includes:

  • Dark blue
  • Medium blue
  • Light blue

These tones provide excellent ball visibility, a professional appearance, and long-lasting vibrancy under outdoor conditions. Once the painting was complete, the court was striped with accurate, crisp white lines, ensuring regulation-quality play.

pickleball-court-built-in-commack-ny

Court Size and Design: Built for Play and Comfort

The completed pickleball court measures 60 feet by 40 feet. While slightly larger than a standard court, this oversized design was intentional. The Southern Landing apartment complex requested additional space along the sidelines to accommodate spectator seating and player rest areas.

With benches planned for both long sides, the expanded footprint enhances comfort and makes the court more functional for group play, tournaments, and resident gatherings.

This spacious design also supports better player movement and provides a natural buffer zone that enhances safety during intense rallies.

High-Quality Perimeter Fencing for Safety and Containment

To complete the court’s structure, Gappsi installed an 8-foot-tall chain-link fence, fully outfitted with top and bottom rails for enhanced rigidity. This fence height is ideal for pickleball, as it prevents balls from easily leaving the court while maintaining clear sightlines for players and spectators.

The fence ensures:

  • Safe containment of play
  • Reduced ball loss
  • A clean, professional boundary around the court

Its durable construction is designed to withstand Long Island weather and years of active use.

Premium Pickleball Equipment: Dominator Net System

No pickleball court is complete without reliable, high-performance net equipment. For this installation, Gappsi selected a Dominator pickleball net system, featuring sturdy aluminum posts engineered for longevity and minimal maintenance.

The Dominator system is known for:

  • Excellent tension retention
  • Rust-resistant materials
  • A professional appearance
  • Easy adjustability for continued level play

This premium net elevates the court’s overall quality, ensuring players experience consistent bounce, accurate net height, and reliable performance.

Engineered for Community Use and Years of Enjoyment

This Southern Landing installation represents the latest addition to Gappsi’s portfolio of pickleball court projects in Commack, NY, and throughout Long Island. Every detail was executed with long-term value in mind, from the recycled concrete base to the multi-layer Laykold coatings and reinforced fencing.

Because this court will serve an active apartment community, durability was essential. The finished product is built to handle extensive daily use, changing weather conditions, and minimal downtime, ensuring residents will enjoy a top-tier playing experience for many years.

Why Gappsi Is a Leading Builder of Pickleball Courts in New York

Gappsi’s expertise in outdoor construction, sports game court engineering, and premium surfacing sets the company apart in the Long Island market. Clients choose Gappsi because the team delivers:

  • Full-service design, engineering, and installation
  • Industry-leading surfacing systems
  • Precision construction for maximum longevity
  • Expert knowledge of sports game court requirements
  • Aesthetic customization for any property

Whether for residential communities, private homes, schools, parks, or commercial spaces, Gappsi’s pickleball courts are known for high performance, beauty, and durability.

The newly completed pickleball court at Southern Landing in Commack, NY, stands as a testament to Gappsi’s commitment to quality craftsmanship and advanced construction methods. With its solid foundation, professional-grade finishes, bold blue color scheme, and durable equipment, this court provides residents with an exceptional recreational amenity.

As pickleball continues to grow in popularity across Long Island, projects like this highlight the importance of expert design, meticulous installation, and premium materials. Gappsi continues to lead the way in creating long-lasting pickleball courts tailored to each property’s needs.

Contact Gappsi Today

📍 Serving all of Long Island, NY — Nassau & Suffolk Counties
🌐 www.gappsi.com
📞 Call now for a free consultation and estimate!

SCHEDULE A MEETING TODAY WITH GAPPSI

Light ivory travertine pavers create a non-slip patio surface with outdoor seating.

What to Know Before Choosing Travertine Pavers

Your dream backyard—that serene, resort-like oasis—starts from the ground up. The foundation is everything. To get that bright, luxurious feel, homeowners are turning to light ivory travertine pavers. With warm, creamy tones and a soft, natural texture, this stone instantly creates a welcoming and sophisticated atmosphere. This beautiful travertine provides a clean, elegant canvas that makes your landscaping pop and your furniture look chic. It does more than just cover the ground; it sets the entire mood for your personal outdoor retreat.

Key Takeaways

  • Choose a Smarter Surface for Family Fun: Light ivory travertine’s natural texture makes it slip-resistant for poolside safety and keeps it cool to the touch, ensuring comfort during hot Long Island summers.
  • Create a Cohesive, High-End Look: The stone’s warm, neutral tones and classic layouts, like the French Pattern, provide a versatile foundation for any design, seamlessly connecting everything from your patio to your indoor living areas.
  • Protect Your Investment with Smart Planning: A successful travertine project involves more than just the stone; ensure lasting results by selecting a reputable supplier, budgeting for professional installation, and committing to a simple sealing routine.

What Are Light Ivory Travertine Pavers?

If you’ve been dreaming of a bright, elegant outdoor space, you’ve likely come across light ivory travertine pavers. This beautiful material is a top choice for everything from patios to pool decks, and for good reason. It offers a timeless look that feels both luxurious and inviting. But before you start planning your project, let’s get to know this popular stone a little better. Understanding what it is, where it comes from, and what makes it unique will help you feel confident you’re making the right choice for your Long Island home.

Understanding This Beautiful Natural Stone

At its core, travertine is a type of limestone that forms around mineral spring deposits. Think of it as a story written by nature—over thousands of years, layers of minerals and organic matter (like shells) settle and compress to create a dense, durable stone. This process gives each paver its own unique character, with subtle variations and textures that you just can’t replicate with man-made materials. When you choose travertine, you’re choosing a piece of the earth, a truly natural stone that brings an organic, grounded feel to your landscape design.

The Origins of Travertine

The name itself sounds elegant, and it has a history to match. “Travertine” comes from the Italian word “travertino,” which is a nod to the town of Tivoli, near Rome, where this stone has been quarried for centuries. It’s a type of limestone that forms in fresh water, particularly around mineral hot springs. This connection to ancient Roman architecture is part of what gives travertine its timeless appeal. When you install it in your backyard, you’re not just choosing a paver; you’re bringing a piece of classical history and natural artistry to your home. It’s this rich background that makes it such a sought-after material for creating sophisticated masonry designs.

How This Unique Stone is Formed

The creation of travertine is a fascinating natural process. It begins when groundwater, rich with dissolved carbon dioxide, flows over limestone and dissolves it. When this mineral-rich water comes to the surface, the pressure changes, and the carbon dioxide escapes into the air. This change causes the dissolved limestone to re-solidify into layers of calcium carbonate, which slowly build up to form travertine. The stone’s characteristic pits and voids are created by escaping gases and organic matter. Pure travertine is white, but the beautiful light ivory, cream, and tan shades we love come from other minerals mixing in during its formation, giving each piece its unique color and pattern.

Defining Its Signature Warm Ivory Look

The name “light ivory” perfectly captures the color palette of these pavers. They feature a creamy, off-white base with soft, warm undertones of beige and tan woven throughout. This light, neutral color is incredibly versatile and acts as a stunning backdrop for any style, from modern to Mediterranean. It brightens up outdoor living areas, making them feel more spacious and open. The soft, warm tones create a welcoming atmosphere that looks gorgeous in the Long Island sun, providing a clean and sophisticated foundation for your outdoor furniture, landscaping, and masonry features.

What Gives Travertine Its Color?

The beautiful, warm color of travertine isn’t a dye or a stain; it’s a direct result of how the stone is born. As a type of limestone, travertine forms around mineral spring deposits. The primary mineral, calcium carbonate, gives the stone its classic light ivory or white base. But the real magic happens when other minerals get mixed in during this natural process. Think of it like adding spices to a recipe—a little bit of iron can introduce hints of brown or yellow, creating the warm, inviting appearance that homeowners love.

This natural formation is why no two travertine pavers are exactly alike. The subtle swirls and variations in color tell the story of the stone’s creation over thousands of years. This uniqueness is what sets it apart from manufactured materials and gives your patio or pool deck an authentic, organic character. When you choose a natural stone like travertine, you’re not just getting a durable surface; you’re getting a one-of-a-kind piece of art shaped by the earth itself, which adds incredible depth and sophistication to your outdoor living space.

How Does It Compare to Other Travertine?

You might see the terms “paver” and “tile” used when discussing travertine, and it’s important to know the difference. Travertine pavers are specifically cut for outdoor use. They are much thicker—typically around 30mm (or 1.25 inches)—which gives them the strength and durability to handle foot traffic, patio furniture, and changing weather conditions. Travertine tiles, on the other hand, are thinner (around 12mm) and are designed for indoor applications like flooring or bathroom walls. For any outdoor project like a patio, walkway, or pool deck, you’ll want to be sure you’re using travertine pavers.

Is Travertine a Type of Limestone or Marble?

It’s a common question, and the answer is simple: travertine is a type of limestone, not marble. While they are all natural stones, their origins are quite different. Travertine is formed in fresh water, typically around mineral springs, where minerals build up in layers over time. This unique formation process is what creates the characteristic pits and voids you see in the stone’s surface. Marble, on the other hand, is created when limestone is subjected to intense heat and pressure deep within the earth. So, while they are related, think of travertine as limestone’s more textured and porous cousin, perfectly suited for creating a warm, inviting outdoor atmosphere for your Long Island home.

Exploring Different Travertine Finishes

The finish of your travertine paver is about more than just looks; it affects the texture, slip resistance, and overall feel of your outdoor space. Choosing the right finish is key to getting the performance you need, whether it’s for a sun-drenched patio or a busy pool deck. Each finish is created through a different process that treats the stone’s surface to achieve a specific look, from rustic and weathered to smooth and refined. Let’s walk through the most common options so you can decide which one best fits your vision and lifestyle.

Polished

A polished finish gives travertine a glossy, reflective surface that makes the stone’s colors and patterns appear rich and vibrant. This high-shine look is achieved by grinding and buffing the stone until it’s completely smooth. While it creates a stunning, high-end appearance, polished travertine is very slippery when wet. For this reason, it’s almost exclusively used for indoor applications like countertops, backsplashes, or flooring in low-traffic areas. It’s a beautiful choice for an interior project but not the right fit for an outdoor patio or walkway where safety is a priority.

Honed

Honed travertine offers a smooth, flat surface with a matte or satin finish instead of a high gloss. This look is created by stopping the polishing process before the stone becomes reflective, resulting in a more subtle and natural appearance. A honed finish is a fantastic all-around choice because it’s less slippery than polished stone, making it suitable for both indoor and outdoor high-traffic areas. It provides a clean, contemporary feel that works beautifully for patios, walkways, and even indoor-outdoor transitions, offering a perfect blend of elegance and practicality for your home remodeling project.

Tumbled

If you’re aiming for a rustic, old-world charm, a tumbled finish is the perfect choice. To create this look, travertine pavers are literally tumbled in a drum with gravel and water, which softens their edges and gives the surface a weathered, textured feel. This process enhances the stone’s natural character and provides excellent slip resistance, making it the most popular finish for outdoor spaces, especially pool decks and patios. The textured surface feels great underfoot and adds a timeless, comfortable quality to any landscape design.

Split Face

A split face finish is the most natural and textured option available. It’s created by splitting the stone block, revealing a rough, uneven surface that showcases the raw beauty of the travertine. This finish is not meant for walking on; instead, its rugged texture makes it ideal for vertical applications. Think of it for creating a stunning accent wall, cladding an outdoor kitchen island, or adding character to retaining walls and fireplace surrounds. It’s a fantastic way to introduce depth and a dramatic, organic element to your masonry features.

Why You’ll Love Light Ivory Travertine for Your Outdoor Space

Choosing the right material for your patio, pool deck, or walkway is a big decision. You want something that looks incredible but also holds up to daily life—and Long Island weather. This is where Light Ivory Travertine truly shines. It offers a perfect blend of sophisticated style and practical performance that makes it a favorite among homeowners. Its warm, creamy tones create a welcoming and high-end feel, instantly making any outdoor area feel like a private resort.

But its appeal goes far beyond looks. Travertine is a smart investment in your home’s comfort and safety. It’s naturally slip-resistant, stays cool during hot summer days, and is tough enough to handle anything from poolside splashes to winter freezes. When you choose high-quality porcelain and natural stone pavers, you’re not just getting a beautiful surface; you’re getting a durable, low-maintenance foundation for years of outdoor memories. It’s a material that works as hard as it is beautiful, giving you peace of mind and a stunning space to enjoy.

Enjoy a Naturally Non-Slip Surface

When you’re designing an outdoor space, especially around a pool, safety is always top of mind. Light Ivory Travertine offers a naturally slip-resistant surface that’s perfect for wet areas. The stone has a porous texture filled with tiny, naturally occurring holes. These aren’t flaws—they’re a key feature that allows the stone to absorb water quickly, preventing slick spots from forming on the surface. This makes it an ideal choice for swimming pool decks, patios, and walkways where kids might be running around with wet feet. You can relax knowing your beautiful patio is also a safer space for your family and guests to enjoy.

A Note on Tumbled vs. Polished Finishes

When you’re selecting light ivory travertine pavers, the finish is a key detail to consider. For outdoor spaces, a tumbled finish is the most popular and practical choice. This process gives the stone a textured, slightly rustic surface that not only looks beautifully natural but also provides excellent grip. That texture is what makes it slip-resistant, a critical feature for poolside areas and patios where water is a constant. It offers a safe surface for everyone, from kids playing to guests mingling, allowing you to relax and enjoy your space without worry.

On the other hand, polished travertine offers a completely different look. It has a sleek, shiny surface that reflects light, creating an elegant and formal aesthetic. While this finish is undeniably beautiful, it becomes very slippery when wet. Because of this, polished travertine is generally reserved for indoor applications, like grand entryways or bathroom floors, where its sophisticated look can be appreciated without the risk posed by rain or pool water. For an outdoor project, it’s a finish best avoided.

So, while you can find travertine in various finishes, the choice for your outdoor living area is pretty clear. Tumbled travertine delivers that perfect combination of rustic charm and modern safety, ensuring your patio or pool deck is as functional as it is stunning. It preserves the organic beauty of the stone while providing the durability and peace of mind you need for a well-loved outdoor space.

Stays Cool Underfoot, Even in the Sun

We’ve all experienced that frantic hop across a scorching hot patio on a sunny July afternoon. With Light Ivory Travertine, you can say goodbye to burnt feet. Thanks to its light, creamy color and natural composition, travertine reflects sunlight and stays remarkably cool to the touch, even in direct sun. This makes it incredibly comfortable for walking barefoot, lounging by the pool, or letting the kids play on the patio. It’s a small detail that makes a huge difference in how much you can enjoy your outdoor living space during the peak of summer. You can step outside with confidence, knowing your patio will be a comfortable oasis.

Designed to Last Through Every Season

Investing in your outdoor space means choosing materials that can withstand the test of time and weather. Light Ivory Travertine is known for its exceptional durability. This dense, strong natural stone is built to handle Long Island’s demanding climate, from hot, humid summers to freezing winters. It’s resistant to the freeze-thaw cycles that can cause other materials to crack and crumble over time. With professional masonry installation, your travertine pavers will maintain their structural integrity and classic beauty for decades, making them a reliable and long-lasting choice for any outdoor project.

Say Goodbye to Puddles with Great Drainage

After a summer rainstorm, the last thing you want is a patio covered in puddles. The same porous nature that makes travertine slip-resistant also gives it excellent drainage capabilities. Water is absorbed into the stone and dissipates naturally, preventing standing water from accumulating on the surface. This not only keeps your patio cleaner and ready to use sooner after it rains but also helps protect the pavers and the foundation beneath them. For added protection against spills and stains, our restoration and sealing services can ensure your travertine stays looking pristine while maintaining its natural drainage benefits.

Choosing Your Travertine Paver Size and Pattern

Once you’ve decided on light ivory travertine, the next fun part is figuring out how it will all come together. The size of your pavers and the pattern you lay them in are just as important as the stone itself. These choices define the personality of your space, whether you’re aiming for a classic, rustic feel or something more modern and streamlined. Let’s walk through the options to help you find the perfect combination for your project.

Picking the Perfect Paver Size and Thickness

Light ivory travertine pavers offer a wonderful variety of sizes, which gives you a lot of creative freedom. Most commonly, you’ll find them in a set that includes 8×8, 8×16, 16×16, and 16×24-inch pieces. This mix is designed to be laid together in an interlocking pattern. The standard thickness is about 1.25 inches, which is perfect for handling foot traffic around a patio or pool. Having these different sizes to work with means you can avoid a monotonous, grid-like look and create something with more visual texture and interest. Our team can help you explore the full range of porcelain and natural stone options to find the perfect fit.

Classic Layouts: The Timeless French Pattern

One of the most beloved layouts for travertine is the French Pattern, also known as the Versailles pattern. Instead of using a single-sized paver, this design uses the four different sizes I mentioned earlier to create a beautiful, seemingly random arrangement that adds instant character. It’s a timeless choice that feels both elegant and relaxed. The interlocking design is not only visually appealing but also incredibly strong and stable once installed. This makes the French Pattern a fantastic and flexible choice for almost any application, from a sprawling patio to a winding garden path. The right masonry design can truly transform your outdoor space.

Design Ideas for Every Space, Big or Small

The beauty of light ivory travertine is its versatility—it looks right at home in so many different settings. Outdoors, it’s a go-to material for creating stunning, resort-like spaces. Think of elegant driveways, welcoming walkways, and spacious patios perfect for entertaining. It’s especially popular for swimming pool decks because it stays cool to the touch and isn’t slippery when wet. But don’t limit this gorgeous stone to the outdoors! You can also bring it inside to create a seamless flow from your patio to your interior. It works beautifully for bathroom floors, shower walls, and even laundry rooms, adding a touch of natural warmth and luxury throughout your home.

How Your Pattern Choice Shapes the Final Look

Your choice of pattern does more than just fill a space; it sets the entire mood. Because travertine is a natural stone, no two pavers are exactly alike. Each one has subtle variations in color, shade, and texture, which is what gives it so much depth and beauty. Most light ivory pavers come with a tumbled finish, which means the edges are softened and slightly rounded. This process gives the stone a rustic, aged appearance that feels comfortable and inviting from day one. The pattern you choose will highlight these unique characteristics, creating a final look that is completely your own. Proper care, including professional cleaning and sealing, will keep that look pristine for years.

Where Can You Install Light Ivory Travertine Pavers?

One of the best things about light ivory travertine is its incredible versatility. This isn’t a stone that’s limited to just one type of project. Whether you’re planning a complete backyard overhaul or a simple, elegant update, these pavers can fit beautifully into your vision. Their durability and classic look make them a fantastic choice for almost any flat surface, both inside and out. Let’s walk through some of the most popular and impactful ways you can use them to transform your Long Island home.

The Perfect Paver for Your Pool Deck

If you’re dreaming of a luxurious, resort-style pool area, light ivory travertine is your answer. Its naturally porous texture provides excellent grip, creating a non-slip surface that’s safer for wet feet—a must-have for any family with kids. Plus, its light color reflects the sun’s heat, so the ground stays comfortably cool on even the hottest summer days. Imagine stepping out of the water onto a surface that’s soft, cool, and beautiful. It’s the perfect material to frame your swimming pool, adding a touch of elegance that feels both timeless and inviting. This is how you create a backyard oasis you’ll never want to leave.

Design Your Dream Patio Space

Your patio is the heart of your outdoor living space, and light ivory travertine pavers provide the perfect foundation. Their warm, neutral tones blend seamlessly with any style, from rustic to modern, and complement lush greenery and colorful flowers. Because they are so durable, they can easily handle heavy patio furniture, grills, and years of foot traffic from family gatherings. A travertine patio serves as a beautiful, natural extension of your home, creating an ideal spot for morning coffee, evening dinners, or simply relaxing with a good book. It’s a classic choice that forms the backbone of a truly functional and beautiful outdoor design.

Craft Elegant Walkways and Driveways

Want to make a great first impression? Start with your driveway and walkways. Using light ivory travertine pavers for these high-traffic areas instantly adds curb appeal and a sense of refined elegance. This natural stone is incredibly strong and built to withstand the weight of vehicles and constant use, all while resisting the freeze-thaw cycles of Long Island winters. A beautiful travertine walkway guiding guests to your front door or a winding garden path creates a cohesive and polished look throughout your property. It’s a practical upgrade that proves you don’t have to sacrifice style for strength.

Create a Seamless Indoor-Outdoor Flow

For a truly high-end, cohesive design, consider using light ivory travertine both inside and outside your home. Imagine opening your patio doors and seeing the same beautiful flooring flow from your living room or kitchen directly onto your patio. This technique creates a seamless transition that makes your living space feel larger, brighter, and more connected to nature. It’s a sophisticated look that works especially well for homes with large glass doors or an open-concept layout. This approach can tie your entire home remodeling project together, creating a unified aesthetic that is both stunning and unique.

A Stone with a Storied History in Architecture

Travertine is more than just a beautiful material; it’s a stone with a story. Its use in architecture has a rich history that dates back thousands of years. The ancient Romans, in particular, relied on it for some of their most enduring structures. The Colosseum, for example, is the largest building in the world constructed primarily of travertine, a testament to its incredible strength and durability. The stone’s name even comes from its origins near Tivoli, Italy. When you choose travertine for your patio or pool deck, you’re not just selecting a paver. You’re connecting your home to a legacy of timeless design and proven longevity, bringing a piece of architectural history right to your backyard.

How to Budget for Your Travertine Paver Project

Breaking Down the Cost of Travertine Pavers

Planning your budget for Light Ivory Travertine is the first step to bringing your vision to life. The price for the pavers themselves typically ranges from about $4.25 to $5.79 per square foot. This gives you a solid baseline for the material costs, but keep in mind that the final price can vary depending on the specific finish and quality you choose. Think of it like picking out any other home finish—there are different tiers available. At Gappsi, we can walk you through our curated selection of porcelain and natural stone pavers to find the perfect match for your budget and aesthetic, ensuring you get a clear and accurate quote for your project.

Considering Installation and Long-Term Value

Beyond the price per square foot, your budget should also account for installation and future care. A pro tip from installers everywhere: plan on purchasing about 10% more material than your project measurements require. This extra stock covers any cuts, accidental breaks, or tricky corners, saving you from a last-minute scramble for more pavers. To protect your beautiful new patio or walkway for the long haul, consider the value of professional sealing. A quality sealant prevents stains and weather damage, and our team offers expert restoration and sealing services to keep your investment pristine. For everyday cleaning, a simple mix of soap and water is all you need—just be sure to avoid harsh, acidic cleaners.

How to Calculate How Much Travertine You Need

Calculating the right amount of material can feel a bit tricky, but a few key details make it much easier. Remember that travertine pavers are typically sold by the crate or pallet, so you’ll need to round up your order to the nearest full unit. This is an important detail to factor into your total cost. The installation method also plays a role; for example, setting the pavers on a packed sand bed is a common technique that will have its own material and labor costs. Working with our experienced masonry design and construction team takes the guesswork out of the equation. We handle all the precise calculations to ensure you get exactly what you need.

How to Choose a Quality Travertine Supplier

Finding the right travertine pavers is only half the battle; choosing the right supplier is just as crucial for a smooth project. A great supplier doesn’t just sell you stone—they provide expertise, stand behind their product, and ensure you get exactly what you need. When you partner with a company that has a long-standing reputation, you’re not just buying materials; you’re investing in peace of mind. The right partner will guide you through selecting the perfect grade, understanding warranties, and coordinating logistics, making the entire process feel effortless.

At Gappsi, we source and supply a wide range of porcelain and natural stone pavers, ensuring every piece meets our high standards for beauty and durability. We believe that a quality product is the foundation of any stunning outdoor space, and we’re here to help you find the perfect match for your home. By working with an experienced team, you can be confident that your investment is sound and your project will look incredible for years to come.

Where in the World Does Travertine Come From?

This beautiful stone has a rich history that spans the globe, and knowing its origins helps you appreciate its quality. Travertine is a special type of limestone that forms around mineral springs, which is what gives it those unique, porous textures we love. For over two thousand years, Italy was the heart of the travertine world, with quarries near Rome supplying the stone for iconic structures like the Colosseum. While Italy’s legacy is undeniable, the market has since expanded. Today, much of the high-quality travertine you see comes from quarries in Turkey, Mexico, Peru, and Spain. This global sourcing is great for homeowners because it means more variety in colors and patterns. When you choose your pavers, you’re not just picking a material; you’re selecting a piece of natural history from a specific part of the world.

How to Spot High-Quality Travertine

When you start shopping, you’ll notice that travertine comes in different grades. Premium or first-choice pavers will have the most consistent color and the fewest pits or imperfections. Light ivory travertine is prized for its delicate, off-white base with subtle hints of beige and tan, creating a soft, luxurious look. It’s important to remember that since travertine is a natural stone, no two pavers are exactly alike. You’ll see slight variations in shade and texture from piece to piece, which is part of what gives it such a unique and organic character. Embrace these differences—they ensure your patio or pool deck is truly one-of-a-kind.

Finding a Supplier You Can Trust

A reputable supplier will always stand by their products. Look for companies that offer a solid warranty and have a proven track record of excellent customer service. A good warranty protects your investment and shows that the supplier is confident in the quality of their materials. For over 30 years, Gappsi has been a trusted name in Long Island home improvement, building a reputation for quality craftsmanship and reliable service. When you source your materials through the Gappsi Store, you can rest assured that you’re getting premium products backed by a team that cares about your project’s success.

Key Questions to Ask Before You Buy

Before you commit, make sure you have all the information you need. Don’t hesitate to ask your supplier for a detailed estimate that includes the cost of the pavers and shipping. For larger projects, some suppliers may even offer discounts on bulk orders. It’s also a good idea to ask about their inventory, lead times, and return policy. If you have specific questions or a particularly large order, picking up the phone and speaking with a customer care representative can be incredibly helpful. And while you’re at it, ask if they offer installation—a full-service company can streamline your project by handling both supply and masonry construction.

What to Expect from Shipping and Delivery

Logistics are a key part of the process, so plan ahead for shipping and delivery. A great first step is to order a sample. This allows you to see and feel the paver in person and check how the color looks in your space before placing a full order. Once you’re ready to buy, confirm the delivery timeline, which can often be one to two weeks. Find out how the pavers will be delivered—will they be dropped at the curb, or can they be placed closer to your project area? Working with a local, full-service company like Gappsi simplifies this entire step, as we manage the sourcing, delivery, and installation for a seamless experience.

How to Care for Your Light Ivory Travertine

Your light ivory travertine pavers are an investment in your home’s beauty, and with a little care, they’ll look stunning for years. Travertine is naturally durable and stands up well to the elements, but like any natural stone, it needs some attention to maintain its classic charm. Think of it less as a chore and more as a simple routine to protect your beautiful outdoor space. A consistent cleaning schedule prevents dirt from settling into the stone’s porous surface and keeps stains from becoming permanent. Following a few key steps will ensure your patio, pool deck, or walkway remains a pristine and inviting retreat for your family and friends.

This guide will walk you through the simple, effective ways to care for your travertine, from daily upkeep to handling those inevitable spills. It’s all about establishing good habits that will protect your stone and keep it looking as good as the day it was installed. With the right approach, maintenance is straightforward and ensures your outdoor living area is always ready for relaxing or entertaining. We’ll cover everything from the best cleaning methods to the importance of sealing, so you can feel confident in keeping your beautiful pavers in top condition. The goal isn’t to spend every weekend scrubbing, but to implement small, consistent actions that make a huge difference in the long run.

Your Daily and Weekly Cleaning Routine

The best way to keep your travertine looking fresh is with simple, regular cleaning. For patios and walkways, a quick sweep with a broom a few times a week will do wonders. This prevents leaves, dirt, and other debris from getting ground into the surface, which can cause scratches and discoloration over time. You can also “dust mop daily” if your pavers are in a covered or indoor-to-outdoor space. For a deeper clean, simply rinse the area with a garden hose to wash away any loose grime. This small effort is the easiest way to preserve the natural beauty of your stone.

To Seal or Not to Seal Your Travertine?

This is a common question, and the answer is a definite yes. We highly recommend you “seal pavers to prevent stains” and protect them from moisture, dirt, and spills. Sealing creates an invisible barrier on the stone’s surface, making it much easier to clean up messes before they soak in. For the best protection, you should plan to “reseal regularly,” typically every one to two years, depending on how much foot traffic the area gets. If you prefer to leave it to the experts, Gappsi’s professional restoration and sealing services can ensure your pavers are perfectly protected.

Handling Spills and Preventing Stains

Accidents happen, especially when you’re enjoying your outdoor space. The key to preventing a permanent mark is to “clean up stains immediately.” Whether it’s a spilled glass of red wine during a barbecue or some grease from the grill, blotting the spill right away will keep it from setting into the porous stone. It’s also crucial to avoid using “acidic cleaners” like vinegar or citrus-based solutions, as they can etch and damage the travertine’s surface. Stick to gentle, pH-neutral cleaners or a simple mix of mild soap and water for the best results.

Protecting Your Pavers from Acidic Substances

When it comes to keeping your light ivory travertine looking its best, it’s important to know its one major vulnerability: acid. Because travertine is a calcium carbonate-based stone, similar to marble and limestone, it can be damaged by even mild acids. Spills from things like wine, citrus juice, or vinegar can react with the stone and cause etching, which looks like a dull or discolored spot on the surface. This isn’t a stain that sits on top; it’s a physical change to the stone itself, which is why prevention is so important for maintaining that smooth, elegant finish.

To keep your pavers safe, always avoid acidic cleaners. This means steering clear of common household products like vinegar or lemon-based cleaning solutions, which can do more harm than good. Instead, your go-to cleaning solution should be a gentle, pH-neutral cleaner specifically designed for natural stone, or a simple mixture of mild dish soap and warm water. This gentle approach will effectively clean your travertine without stripping its natural luster or causing any surface damage, ensuring it stays beautiful for every season of outdoor enjoyment.

Accidents are a part of life, but they don’t have to ruin your patio. The best defense against acidic spills is to act fast. By blotting spills immediately, you can prevent them from penetrating the stone and causing a permanent etch. For an added layer of defense, professional sealing is a game-changer. Our restoration and sealing services apply a protective barrier that gives you more time to clean up messes, helping to preserve the pristine condition of your investment for years to come.

Tips for Long-Term Travertine Care

Long-term care is all about consistency and using the right products. When you need to tackle a tougher spot, always “avoid harsh cleaning agents” and chemical-heavy products. A gentle scrub with “soap and water for stains” is often all you need. For more stubborn grime, look for a cleaner specifically designed for natural stone. An occasional deep clean with a pressure washer on a low setting can also help, but be careful not to use too much pressure, as it can damage the stone. With these straightforward habits, your light ivory travertine will remain a beautiful centerpiece of your home for a lifetime.

Is Travertine Suitable for Long Island Winters?

This is a big question for any Long Island homeowner, and a valid one. We know our winters can be tough, and you want to choose a material that won’t just survive, but thrive. The great news is that high-quality light ivory travertine is an excellent choice for our climate. This dense, strong natural stone is specifically built to handle demanding weather, from our humid summers to our freezing winters. Its inherent durability makes it resistant to the very issues that cause other materials to fail, ensuring your beautiful patio or walkway remains intact season after season. It’s a material you can count on to maintain its integrity and beauty, no matter what the weather brings.

Understanding Freeze-Thaw Cycles

The term “freeze-thaw cycle” describes winter’s biggest threat to outdoor surfaces. It’s what happens when moisture seeps into the tiny pores of a material, freezes, and expands. When the ice thaws, it contracts, and the cycle repeats, creating stress that eventually leads to cracking and crumbling. Light Ivory Travertine is exceptionally resistant to this damaging process. Its natural composition is dense enough to prevent significant water absorption that leads to structural damage. When paired with professional masonry installation that ensures proper drainage, your travertine pavers will withstand these cycles for decades, making them a smart and reliable investment for your home.

Related Articles

Frequently Asked Questions

Is travertine high-maintenance? Not at all. The best way to care for travertine is with simple, consistent habits. Regularly sweeping away leaves and dirt prevents grime from building up. For a deeper clean, a quick rinse with a garden hose is usually all you need. It’s more about routine upkeep than intense scrubbing, which keeps your outdoor space looking its best with minimal effort.

Will all my pavers look identical? Because travertine is a natural stone, you’ll see subtle variations in color and texture from one paver to the next. This isn’t a flaw—it’s actually one of its best features. These slight differences give the surface a rich, organic character and ensure your patio or walkway is completely unique. It’s a look that man-made materials just can’t replicate.

How well does travertine handle Long Island winters? It handles them beautifully. Light ivory travertine is a dense and durable stone that is well-suited for climates with freezing and thawing cycles. When installed correctly, it resists cracking and damage from the cold, making it a reliable and long-lasting choice for any outdoor project here on Long Island.

Is sealing my travertine pavers really necessary? Yes, I always recommend it. Think of sealant as an invisible shield for your stone. It helps prevent spills from soaking in and turning into permanent stains, making cleanup much easier. Sealing also protects the pavers from the elements and keeps them looking pristine. Plan on resealing every couple of years to maintain that protection.

Can I use these pavers for a project other than a patio or pool deck? Absolutely. Light ivory travertine is incredibly versatile. It’s strong enough to be used for driveways and creates beautiful, welcoming walkways. You can even bring it inside to create a seamless transition from your outdoor space into a mudroom, laundry room, or bathroom for a cohesive and high-end feel throughout your home.

A concrete paver walkway after sealing, with enhanced deep color and a protective shine.

The Cons of Sealing Pavers: Read This Before You Do

Your new paver patio is the centerpiece of your backyard—a place for summer barbecues and quiet morning coffees. But life happens. Spilled wine, falling leaves, and the sun can take a toll. This brings up the big question: should I seal my patio? While sealing offers an extra layer of defense that keeps pavers vibrant, it’s not a simple yes or no. There are real cons of sealing pavers to consider, from the cost to the risk of a finish you don’t love. We’ll walk through all the sealing pavers pros and cons to help you decide if it’s a smart move for your outdoor space.

Key Takeaways

  • Protect Your Pavers from Stains and Fading: Sealing creates a vital barrier against everyday spills, UV rays, and weed growth, keeping your outdoor space looking new and making cleanup much easier.
  • Understand the Long-Term Upkeep: Sealing isn’t a one-time task. It requires reapplication every few years to maintain its protective qualities, so be sure to factor the recurring cost and effort into your home maintenance plan.
  • Decide Based on Location and Lifestyle: Sealing is a smart move for high-traffic areas like pool decks and patios where spills are likely. However, you can skip it for less-used areas if you prefer a natural, weathered look and want to avoid the maintenance.

Should I Seal My Pavers?

If you’ve just invested in a beautiful new paver patio or driveway, you’re probably wondering about the best way to care for it. One of the biggest questions we hear from homeowners is, “Do I really need to seal my concrete pavers?” It’s a great question, and the honest answer is: it depends. While sealing isn’t always a strict requirement, think of it as an insurance policy for your investment. It’s a protective step that can make a huge difference in how your pavers look and how long they last, especially with the changing seasons we get here on Long Island.

The decision to seal comes down to a few key things: where your pavers are located, how much foot (and car) traffic they get, and your personal preference for maintenance. A sealed surface is much better at repelling stains from things like spilled drinks, oil, or fallen leaves. It also helps protect the color from fading under the sun and can prevent weeds from popping up in the joints. Essentially, sealing is a proactive maintenance step. Your masonry work is built to last, but sealing ensures it looks its best for years to come. In this guide, we’ll walk through the pros and cons to help you decide if sealing is the right move for your outdoor space.

What Are Concrete Pavers, Anyway?

Before we get into the sealing debate, let’s quickly cover what concrete pavers are. Simply put, they are individual units made from a mix of cement, sand, gravel, and water, molded into various shapes and sizes. You’ve seen them everywhere—they’re the go-to choice for creating stunning and durable surfaces like driveways, patios, walkways, and pool decks. Their popularity comes from their strength, versatility in design, and the fact that they can handle heavy loads and fluctuating temperatures without cracking like a solid slab of concrete might. They are the building blocks of a beautiful and functional outdoor living area.

The Great Debate: Sealing Pavers Pros and Cons

So, why is sealing even a topic of discussion? Concrete pavers are incredibly durable on their own, which leads many to believe that sealing is an unnecessary expense. And it’s true, your patio won’t fall apart without it. However, sealing is an optional but highly recommended step for protection and maintenance. Think of it like waxing your car. Sealing creates an invisible barrier on the surface that helps protect your pavers from stains, UV rays that cause fading, and everyday wear and tear. It also makes them much easier to clean and can help stabilize the joint sand, keeping pesky weeds at bay.

The Benefits of Sealing Concrete Pavers

Think of paver sealer as a coat of armor for your patio, walkway, or driveway. You’ve invested in creating a beautiful outdoor space, and sealing is one of the best ways to protect that investment. It’s a simple step that offers some pretty significant payoffs, from keeping your pavers looking pristine to making your life a whole lot easier when it comes to maintenance. Let’s get into the specific benefits you can expect.

Protect Your Pavers from Fading and Wear

Your beautiful paver patio has to stand up to a lot—scorching sun, heavy rain, and maybe even a Long Island snowstorm or two. Over time, these elements can take a toll, causing colors to fade and the surface to wear down. Sealing provides a crucial protective barrier against weather, stains, and damaging UV rays. It essentially locks in that “just installed” look for years to come, extending the life of your investment. Proper cleaning and sealing is the key to preserving the integrity and color of your pavers, ensuring your outdoor space remains a stunning feature of your home.

Bring Out Your Paver’s True Color

If you love the rich, vibrant color of your pavers, sealing is your best friend. Applying a sealer can deepen and enhance the natural tones of the stone, often giving it a subtle “wet” look that makes the colors pop. This is especially true for natural stone and porcelain pavers, where the sealer can bring out incredible depth and character. Beyond just aesthetics, this process also shields them from the sun, which can bleach the color out over time. A quality sealer acts like sunscreen for your patio, keeping it from looking faded and tired while adding a clean, polished finish.

Create a Shield Against Stains and Weather

Life happens, especially outdoors. From a tipped glass of red wine during a barbecue to an accidental oil leak from a car on the driveway, stains are a real threat to porous paver surfaces. A sealer creates a non-porous shield that prevents liquids and grime from soaking in. Spills will bead up on the surface, making them easy to wipe away before they can leave a permanent mark. This protective layer also helps inhibit the growth of mold, mildew, and algae, keeping your beautiful masonry work looking clean and fresh.

Simplify Cleanup and Stop Weed Growth

Tired of spending your weekends scrubbing your patio or pulling up pesky weeds? Sealing can drastically cut down on your maintenance time. The smooth, protected surface makes it much harder for dirt and debris to stick, so a simple sweep or rinse with a hose is often all you need. More importantly, a good sealer helps to harden the jointing sand between your pavers. This process, called sand stabilization, locks the sand in place, which is one of the most effective ways to prevent weeds from sprouting up and keeps ants from building nests.

Extend the Lifespan of Your Pavers

Investing in a paver patio or driveway is a big deal, and you want it to last. Sealing is one of the most effective ways to ensure its longevity. Think of it as a shield that stands between your beautiful pavers and the elements. It provides a crucial protective barrier against harsh weather, everyday spills, and the sun’s damaging UV rays, which helps keep that “just installed” look for years. By preventing moisture, grime, and even things like mold and mildew from penetrating the surface, you’re not just preserving the color and integrity of the stone; you’re also making future cleanup much easier. This proactive step is a smart way to restore and seal your investment, significantly reducing the need for extensive repairs and saving you time and money down the road.

The Cons of Sealing Pavers: Why You Might Skip It

As much as I love the look of freshly sealed pavers, I’ll be the first to admit it’s not the right move for every homeowner or every project. Before you commit, it’s important to look at the other side of the coin. Sealing is a commitment of both time and money, and in some cases, the potential drawbacks might outweigh the benefits. From the ongoing costs to the risk of a slippery surface, there are a few key reasons you might decide to leave your pavers as they are. Let’s walk through the potential downsides so you can make a choice you feel confident about.

The Cost: Upfront and Over Time

Let’s talk budget. Sealing your pavers isn’t free, and the costs can add up. First, there’s the price of a high-quality sealer, which is essential for getting good results. Then, you have to consider the cost of labor. While you can do it yourself, hiring a pro ensures it’s done right, but that comes with a price tag. This initial investment is followed by the recurring cost of resealing every few years. It’s a line item you’ll need to factor into your long-term home maintenance budget. Think of it less as a one-time purchase and more as a subscription to keep your patio or driveway looking its best. Our restoration and sealing services can handle the job, but it’s an expense to plan for.

Specific Cost Estimates

To give you a clearer picture, let’s break down the numbers. If you’re thinking of tackling the job yourself, you can expect the materials alone—meaning the sealer itself—to cost somewhere between $0.15 and $0.30 per square foot. For a standard-sized patio, this can be a manageable DIY project. However, if you prefer to have it done professionally to ensure a perfect application, the total cost, including labor, typically falls in the range of $0.50 to $2.00 per square foot. This price can vary based on the condition of your pavers, the type of sealer used, and the complexity of the area. These professional services cover everything from cleaning the surface to applying the sealant, saving you the time and effort while guaranteeing a high-quality finish.

The Commitment of Regular Resealing

Once you start sealing your pavers, you’ve started a cycle of maintenance. This isn’t a “set it and forget it” project. To keep that protective barrier and fresh look, you’ll need to reapply the sealer every three to five years, sometimes more frequently for high-traffic areas or surfaces exposed to harsh weather. The exact timing depends on the type of sealer you use and the material of your pavers. Forgetting or putting off a resealing job can lead to a patchy, uneven appearance as the old sealer wears away. It’s a recurring task on your home maintenance checklist that requires you to stay on top of the schedule to keep your outdoor spaces looking consistently great.

The Risk of a Slippery Finish

One of the biggest concerns with sealing pavers, especially around a pool, is the potential for a slippery surface. While not all sealers create this issue, high-gloss, film-forming options can become slick when wet, which is a serious safety hazard. Choosing the right product is key to avoiding this. Application can also be tricky; if it’s not done correctly, you can end up with a cloudy finish, bubbles, or streaks that are difficult to fix. This is particularly true if the surface isn’t perfectly clean and dry before you start. A poorly applied sealer can look worse than no sealer at all, making the area around your swimming pool a point of stress rather than relaxation.

The Risk of Trapping Moisture

A common fear is that sealer will trap moisture underneath, leading to problems down the road. And it’s a valid concern—if the wrong type of sealer is used or applied improperly, it can happen. A non-breathable sealer can prevent moisture from escaping, which can cause a white, hazy look called efflorescence or even damage the pavers during freeze-thaw cycles in the winter. The key is to use a “breathable” or vapor-permeable sealer that allows moisture to escape while still repelling water from the surface. Proper application on a completely dry day is also critical to prevent this issue. When done correctly, the risk is low, but a mistake can lead to frustrating and costly masonry repairs.

Potential Risks and Drawbacks

While sealing offers many advantages, it’s not without its potential pitfalls. The process isn’t just about applying a coat of liquid and calling it a day; a lot can go wrong if it’s not done with care and expertise. From accidentally making existing stains permanent to creating an unnatural, glossy sheen you didn’t want, the risks are real. It’s important to understand these drawbacks before you decide to seal, as some mistakes can be difficult and costly to reverse. A successful sealing project depends on proper preparation, the right product selection, and correct application—getting any of these steps wrong can lead to disappointing results.

Difficulty Removing Existing Stains

One of the biggest mistakes you can make is applying sealer over a dirty or stained surface. While a sealer is great at preventing new stains, it’s also incredibly effective at locking in old ones. If you have existing oil spots, rust marks, or discoloration from leaves, sealing over them will make them a permanent feature of your patio. The sealer creates a barrier that blocks cleaning agents, making it nearly impossible to lift those deep-set stains later on. That’s why a thorough, professional cleaning is the most critical first step in the entire process. Before any sealing happens, every paver needs to be spotless to avoid preserving the very imperfections you want to hide.

Negative Appearance Changes

The final look of your sealed pavers might not always match your expectations. Some sealants, particularly solvent-based or high-gloss types, can significantly darken the pavers or create an overly shiny, plastic-like finish that looks unnatural. While the “wet look” can enhance the color of some stones, it can make others look permanently damp in a way you might not find appealing. The wrong product can completely change the aesthetic of your outdoor space. This is why it’s so important to test the sealer on a spare paver or an inconspicuous area first to see exactly how it will alter the color and finish of your specific porcelain or natural stone pavers.

Uneven Wear and a Patchy Look

As we’ve mentioned, sealing is an ongoing commitment, and failing to keep up with it can create a new set of problems. Over time, the sealer will begin to wear away, but it rarely does so evenly across the entire surface. High-traffic areas, like the main path from your door to the patio, will show wear much faster than the edges. If you forget or postpone a resealing job, you can be left with a patchy, blotchy appearance where some spots are still protected and others are exposed. This inconsistent look can be more distracting than having no sealer at all, highlighting the importance of sticking to a regular maintenance schedule.

Difficulty of Sealer Removal

What happens if you don’t like the finish, or if the application goes wrong and leaves a cloudy haze? Unfortunately, you can’t just wash it off. Once applied, some sealers can be incredibly difficult to remove and may require harsh chemical strippers and professional equipment. This process is labor-intensive, expensive, and can even damage the pavers if not done correctly. The challenge of sealer removal is a strong reason to be cautious, especially with a DIY approach. It underscores the value of hiring professionals who have the experience to apply it correctly the first time, helping you avoid the headache of a costly stripping and restoration project.

Sealer Won’t Fix Underlying Paver Issues

It’s crucial to remember that paver sealer is a surface treatment, not a structural fix. While it enhances appearance and durability, it’s not a magic solution for underlying problems. If your pavers are uneven, sinking, or shifting because of a poorly prepared base, sealing them will not solve the issue. Similarly, if your patio has drainage problems that cause water to pool, a sealer won’t correct the slope. Applying a sealer to a structurally flawed surface is like putting a fresh coat of paint on a crumbling wall—it might look better for a short time, but it doesn’t address the root cause. Proper masonry installation with a solid foundation is the only true way to ensure the longevity of your paver project.

Choosing the Right Paver Sealer

Walking down the sealer aisle can feel overwhelming. With so many options, how do you know which one is right for your patio or driveway? The truth is, the best sealer depends on your pavers, your goals, and the look you want to achieve. Let’s break down the main types so you can choose with confidence.

Film-Forming vs. Penetrating: What’s the Difference?

Think of film-forming sealers as a protective topcoat. They create a durable layer on the surface of the pavers, which can give them a satin or high-gloss finish and really make their colors pop. This film is great at preventing stains from oil or wine spills. The trade-off is that this layer can wear down over time, especially in high-traffic areas, and will need to be reapplied more often.

Penetrating sealers, also called non-film-forming sealers, work differently. They soak deep into the pores of the paver to protect it from within. Because they don’t form a surface film, they won’t change the look or texture of your pavers, preserving their natural appearance. This makes them incredibly durable and a fantastic choice for busy driveways and walkways.

Water-Based vs. Solvent-Based: Which Is for You?

Sealers also come in two main formulas: water-based and solvent-based. Water-based sealers are generally the more eco-friendly and user-friendly option. They have a low odor, are easy to clean up with just soap and water, and are great at soaking into concrete.

Solvent-based sealers are known for providing a deeper color enhancement and a higher-gloss finish. However, they have a much stronger smell and require more care during application. One important thing to consider is the finish. While a high-gloss look is beautiful, it can make surfaces slippery when wet. For areas around swimming pools or main walkways, a matte or semi-gloss sealer is often a safer choice.

Other Common Sealer Types

Beyond the basic categories, sealers are also defined by their chemical makeup. The three most common types you’ll encounter are acrylic, polyurethane, and epoxy. Each one offers a different level of protection, durability, and finish, making them suitable for different needs and areas around your home. Think of it like choosing paint—you wouldn’t use the same kind for your living room walls as you would for your front door. Understanding the core differences between these formulas will help you select the perfect sealer to protect your investment and achieve the exact look you want for your outdoor space.

Acrylic Sealers

Acrylic sealers are a very popular choice, and for good reason. They’re generally easy to apply and dry relatively quickly, making them a go-to for many homeowners. An acrylic sealer will provide a nice glossy finish that enhances the color of your pavers while offering solid protection against general stains and UV rays. The main thing to keep in mind is their lifespan. Because they form a thinner film, they may need to be reapplied more frequently than other types, especially on a busy walkway or patio that sees a lot of action. They are a great, cost-effective option for keeping your pavers looking fresh.

Polyurethane Sealers

If durability is your top priority, polyurethane sealers are worth a look. They are known for their incredible resistance to wear and tear, creating a tough, thick protective layer that can handle heavy foot traffic and harsh weather with ease. This makes them an excellent choice for high-use areas like your main patio or driveway. While they offer superior protection, they can be a bit more challenging to apply correctly and often benefit from professional installation to get that flawless, even finish. For a long-lasting shield on your masonry surfaces, polyurethane is a fantastic investment.

Epoxy Sealers

When you need the ultimate level of protection, epoxy sealers are the heavy-duty solution. They provide an extremely strong, chemical-resistant finish that’s perfect for areas exposed to oil and grease, like driveways or garage floors. Epoxy creates a hard, glossy surface that is exceptionally durable, but it’s also the most expensive and complex to apply. The surface preparation has to be perfect to ensure the sealer bonds correctly. This is definitely a job where calling in the pros is the best move to guarantee you get the high-performance results you’re paying for and properly restore and seal your pavers.

Matching the Sealer to Your Paver Type

So, how do you put it all together? First, make sure the sealer is compatible with your paver material, whether you have concrete, brick, or natural stone. Next, think about your local Long Island climate. A good sealer should stand up to our hot summers, salty air if you’re near the coast, and freeze-thaw cycles in the winter.

Finally, and this is the most important step, always test your chosen sealer on a small, out-of-the-way paver first. This lets you see exactly how it will look and dry before you commit to the entire surface. Taking this extra step ensures you’ll be happy with the final result of your project.

When Not to Seal: Permeable and Pre-Sealed Pavers

Before you commit to sealing, it’s crucial to know what kind of pavers you have, because some are designed to be left alone. Permeable pavers, for instance, are an eco-friendly option designed specifically to let water pass through them and into the ground below. This helps manage stormwater runoff and prevent puddles. Applying a film-forming sealer to these pavers would clog their porous surface, completely defeating their purpose. You’d essentially be turning your high-tech drainage system into a standard, non-permeable patio. Additionally, some manufacturers sell pavers that come pre-sealed from the factory. Adding another layer of sealer on top can cause a cloudy finish or adhesion issues. If you’re unsure, it’s always best to check with your installer or the paver manufacturer before proceeding.

Impact on Paver Joint Drainage

It’s not just the paver surface that matters—the joints between them play a key role, too. One of the big benefits of sealing is that it can lock the joint sand in place, preventing weeds and erosion. However, this also means that water can no longer drain through the joints as it once did. For a properly installed patio with the correct slope, this isn’t an issue, as water will simply run off the surface. But if your patio relies on the joints for some of its drainage, sealing them could lead to standing water. This is why the initial masonry design and construction is so important; a professional installation will always account for proper water runoff, ensuring that sealing becomes a simple enhancement, not a drainage problem.

How to Seal Your Pavers the Right Way

If you’ve decided that sealing is the right move for your patio or driveway, the next step is applying it correctly. Proper application is what separates a beautiful, protected surface from a streaky, peeling mess. While it’s a project many homeowners can tackle themselves, success comes down to preparation and patience. Getting these steps right ensures you reap all the benefits of a good sealer without any of the headaches. Think of it as a weekend project that protects your investment for years to come.

Step 1: Prep and Clean Your Pavers

You absolutely cannot skip this step. Applying sealer over dirt, oil spots, or mildew will just trap the grime, making it a permanent feature of your patio. In fact, one of the biggest DIY mistakes is not cleaning the surface thoroughly enough before starting. Begin by sweeping away all loose debris like leaves and dirt. Then, give the pavers a deep clean with a specialized paver cleaner or soapy water and a stiff brush. For stubborn stains, a pressure washer can be a huge help. After rinsing everything off, you must let the pavers dry completely. This can take at least 24 hours, so be patient. A pristine surface is the foundation for a flawless finish.

Step 2: Pick the Perfect Day to Seal

Your local weather forecast is your best friend for this project. Sealer is picky about the conditions it’s applied in, so you’ll want to choose a clear, dry day with minimal wind. The ideal temperature range is generally between 50 and 80 degrees Fahrenheit. If it’s too hot, the sealer can dry too quickly, leaving behind streaks and an uneven finish. If it’s too cold, it won’t cure properly. Check the forecast to make sure you have a window of at least 24-48 hours of dry weather after application to allow the sealer to fully set. Planning around the weather ensures your hard work pays off with a durable, long-lasting coat.

Step 3: Apply the Sealer and Avoid Common Mistakes

Before you open the can, read the manufacturer’s instructions carefully, as application methods can vary. Generally, you’ll use a roller, a sprayer, or a combination of both. The key is to apply the sealer in thin, even coats. A thick, heavy coat is more likely to look cloudy, peel later on, or become too slippery when wet. If the product calls for a second coat, be sure to wait the recommended amount of time between applications. Rushing the process won’t do you any favors. For a truly professional result, consider the high-quality products available at the Gappsi Store or leave the job to experts who handle restoration and sealing every day.

Avoiding a White Haze

One of the most common DIY sealing mishaps is ending up with a cloudy, white haze on your pavers. This happens when moisture gets trapped beneath the sealer, a problem known as efflorescence. It’s a valid concern, especially if you’re using a non-breathable, film-forming sealer that doesn’t allow moisture vapor to escape. This is why ensuring your pavers are bone-dry before you begin is so critical. Applying sealer too soon after cleaning or a rain shower is a recipe for trapping that moisture. To avoid this frustrating outcome, always choose a high-quality, breathable sealer and give your pavers more drying time than you think they need. When in doubt, wait another day—it’s far better than trying to fix a hazy finish later.

Application and Safety Concerns

Applying paver sealer involves more than just a roller and a can of sealant; it requires careful attention to safety and your surroundings. The chemicals in many sealers can be potent, so protecting yourself is non-negotiable. You also need to think about protecting the rest of your yard. Overspray from a sprayer can easily drift onto your prized rose bushes or the siding of your house, causing damage. Taking a few extra minutes to prepare your space and gear up properly will ensure the project goes smoothly and safely. It’s about being mindful of not just the pavers themselves, but everything—and everyone—around them.

Personal Safety Precautions

When you’re working with chemical sealants, safety should always come first. These products can release strong fumes and irritate your skin, so it’s important to gear up properly before you start. At a minimum, you should wear safety glasses, chemical-resistant gloves, and a respirator mask to avoid breathing in the vapors, especially if you’re working in a less-ventilated area. It’s also a good idea to wear long sleeves, long pants, and closed-toe shoes. Choose old clothes you don’t mind ruining, because once sealer gets on fabric, it’s not coming out. Proper preparation ensures your DIY project doesn’t end with an unnecessary trip to the doctor.

Protecting Nearby Plants and Landscaping

Your beautiful landscaping is the perfect complement to your paver patio, so the last thing you want to do is damage it during the sealing process. Sealer overspray can be harmful to plants, grass, and flowers. Before you begin, take the time to cover any adjacent garden beds, shrubs, and lawn areas with plastic sheeting or tarps. It’s also wise to spray down any nearby surfaces, like siding or fencing, with water beforehand. This helps prevent the sealer from sticking if any overspray occurs. Choosing a calm, windless day to apply the sealer will also give you much more control and help keep your entire landscape looking its best.

The Time Commitment Involved

Finally, remember that sealing your pavers is not a one-and-done task. The application itself requires a full weekend of your time, but the real commitment is in the upkeep. To maintain that protective layer and keep your pavers looking great, you’ll need to reapply the sealer every three to five years. This frequency can change depending on how much traffic the area gets and its exposure to the elements. This recurring maintenance is a crucial part of the process. If the idea of dedicating a weekend every few years to this project sounds daunting, you can always rely on professional restoration and sealing services to handle the job for you.

So, Should You Seal Your Patio Pavers?

So, what’s the right call for your Long Island patio or walkway? The truth is, there’s no single answer that fits every situation. The decision to seal your concrete pavers comes down to your specific needs, the location of the pavers, and your personal preference. Think about how you use the space, how much maintenance you’re willing to do, and the final look you want to achieve. By weighing the pros and cons for your home, you can make a choice you’ll be happy with for years to come. Let’s break down the scenarios to help you decide.

When Sealing Your Pavers Makes Perfect Sense

Sealing is a great idea if your pavers are in a high-traffic area or a spot that’s prone to messes. Think pool decks, outdoor kitchen areas, or your main patio where you entertain guests. A good sealer acts as a shield, offering protection from stains, mildew, and fading from the sun. It makes cleaning up spills from cookouts or grease from the grill much easier. Sealing also helps lock the sand in between the joints of your pavers, which stabilizes them and makes it much harder for pesky weeds to sprout. If you want to keep your pavers looking vibrant and new for as long as possible, sealing is the way to go.

When It’s Okay to Skip the Sealer

On the other hand, there are times when leaving your pavers unsealed makes perfect sense. If your pavers are in a low-traffic part of your yard that doesn’t see much action, you might not need the extra layer of protection. Some homeowners simply prefer the natural, weathered appearance of unsealed stone and appreciate how it evolves over time. If you love that organic, rustic look and your pavers aren’t at high risk for stains, you can feel confident skipping the sealer. It’s one less maintenance task on your list and lets the natural character of the material shine through.

Should You DIY or Call a Pro?

If you decide to seal, the next question is whether to do it yourself or hire a professional. While a DIY approach can save you some money upfront, the process can be tricky. Applying sealer incorrectly can lead to a cloudy finish or uneven coverage. Professionals have the right equipment and experience to prepare the surface properly and apply the sealer for a flawless, long-lasting finish. If you’re unsure about the process or just want the peace of mind that comes with a job well done, calling in an expert is a smart move. Gappsi offers professional restoration and sealing services to ensure your pavers are protected and look their absolute best.

Related Articles

Frequently Asked Questions

How often should I reseal my pavers? A good rule of thumb is to plan on resealing every three to five years. However, this isn’t a hard-and-fast rule. A driveway that gets a lot of use or a patio that bakes in the sun all day may need attention sooner. A simple test is to see how water reacts on the surface; if it soaks in right away instead of beading up, it’s a good sign that it’s time for a fresh coat.

Will sealing make my patio slippery? This is a great question, especially for surfaces around a pool. The slipperiness really comes down to the type of sealer you use. High-gloss sealers that form a thick film on the surface are the most likely to become slick when they get wet. To avoid this, you can choose a penetrating sealer, which soaks into the paver without changing the surface texture, or use a product with an anti-slip additive mixed in.

How soon after installation can I seal new pavers? It’s important to be patient and wait a bit before sealing a brand-new paver installation. We generally recommend waiting at least 30 to 60 days. This allows time for a natural process called efflorescence to occur, where natural salts can come to the surface as a white haze. Waiting gives you a chance to clean this off before locking it in under a coat of sealer.

What’s the biggest mistake people make when sealing pavers themselves? By far, the most common mistake is improper preparation. People often rush the process and don’t clean the surface thoroughly, or they apply the sealer before the pavers are completely dry. This can trap dirt, grime, and moisture, resulting in a cloudy, blotchy finish that is very hard to correct. A deep clean and a lot of patience are the keys to a great result.

Will my pavers be ruined if I decide not to seal them? Absolutely not. Concrete pavers are manufactured to be incredibly durable and can certainly hold their own without a sealer. Your patio or walkway won’t crumble or fall apart. Think of sealing as an optional step for aesthetic maintenance—it helps protect against stains, keeps colors vibrant, and makes cleaning easier, but it isn’t essential for the structural life of your pavers.