Long Island homeowners often lose their favorite outdoor activities once the sun sets. Adding high-quality illumination makes evening matches possible and safe for every guest. This turns a private court into a hub for late-night gatherings.
Ready to plan a court that stays inviting after sunset? Call Gappsi at 631-543-1177 to discuss bocce court lighting for your Long Island property.
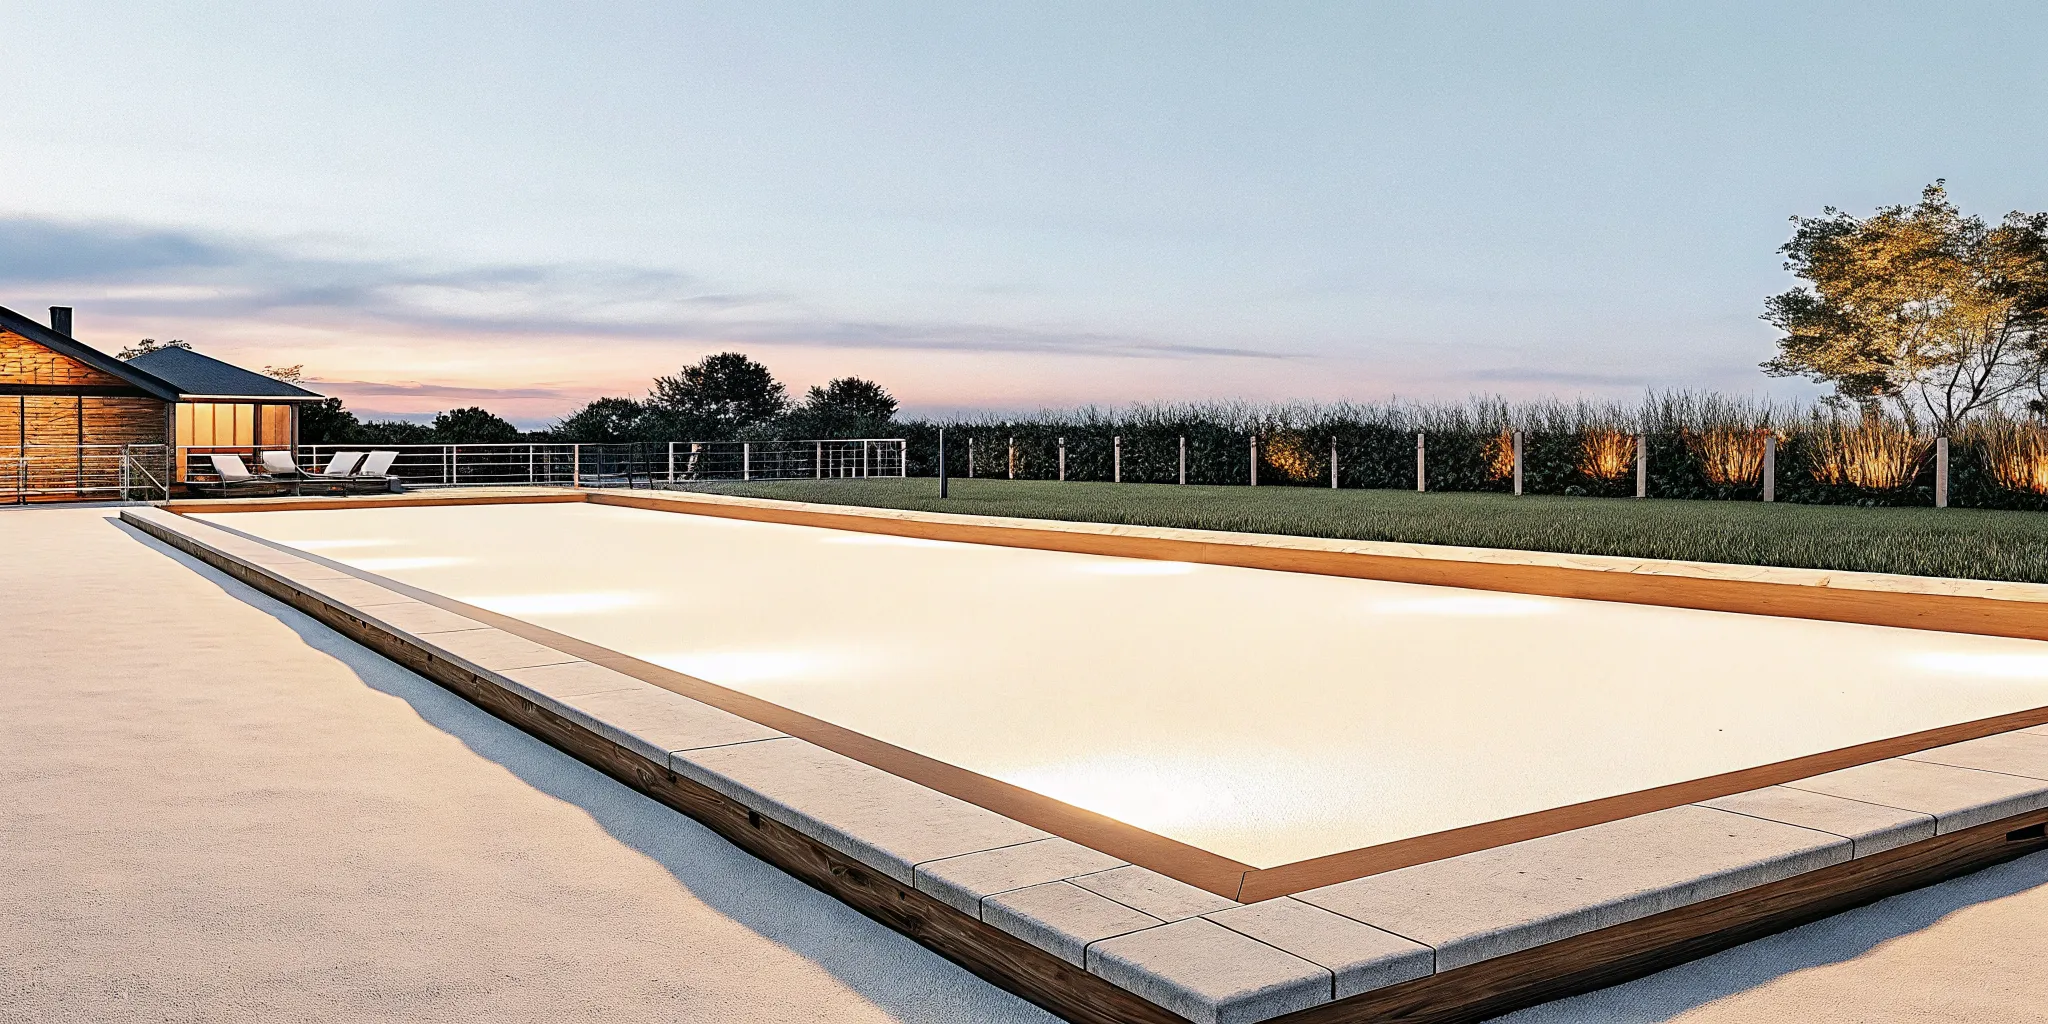
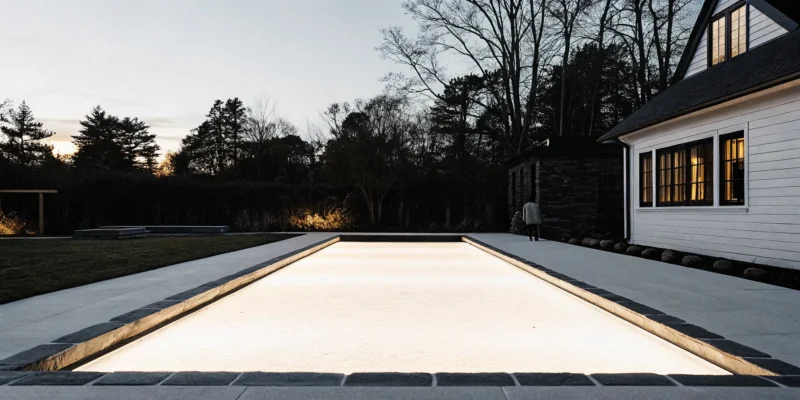
Bocce court lighting is a key part of any Long Island yard that hosts evening games. These systems use low-glare lights to light up the whole playing area without creating dark shadows or blinding the players. According to researchers at Harvard University, well-planned outdoor lighting reduces too much glare and light spills while keeping the area safe. For a standard Sports Games Courts project, the design must balance bright light for seeing with a soft look that fits your home. High-quality LED lights are the top choice because they give off bright light and use very little power. Most owners find that adding good lights increases the use of their outdoor space and lets them play during the cool night hours.
Picking out a few lamps might seem easy, but creating a professional look takes more thought. You must consider where to place poles so they do not block your view. Understanding Why bocce court lighting needs a complete plan helps you avoid common mistakes during the design process. The path begins with
Why bocce court lighting needs a complete plan
A complete bocce court lighting plan coordinates fixture placement, beam direction, electrical routing, controls, court construction, and surrounding landscaping. Planning these elements together creates more even visibility, limits glare and spill, protects the finished design, and makes the court easier to enjoy after sunset.
Planning for bocce court lighting is about more than just adding a few lamps. A full plan ensures that your court is ready for games at any hour while matching your home’s style. For many Long Island homeowners, the backyard is a place to relax and host friends.
By using custom bocce court lighting, you can keep the fun going long after the sun sets. This planning stage helps you find the right balance between light levels and a clean design.
Extend play with evening lighting
Proper lights let you play games in the evening when the air is cool. This is a great way to get more use out of your home’s sports space. Many modern Sports Games Courts now come with built-in lights as a standard part of the build.
Adding light means you do not have to stop a match just because it gets dark. It helps turn your court into a spot for evening play that brings people of all ages together. A good plan looks at where to place poles so they do not block your view or the game.
When you work with a pro team, you can blend the lights into your full yard plan. This creates a clean look for your whole outdoor living area. Gappsi has over 38 years of skill building these spaces across Nassau and Suffolk County.
We know how to set up evening play zones that look great and work well. A smart plan looks at how much light you need to see the balls clearly without making the area too bright.
Visibility and safety for players
Good lighting helps keep every player safe during a game. It must show the whole court surface so you can see where you walk and throw. You want enough light to see the small target ball, but you must avoid bright spots that hurt the eyes.
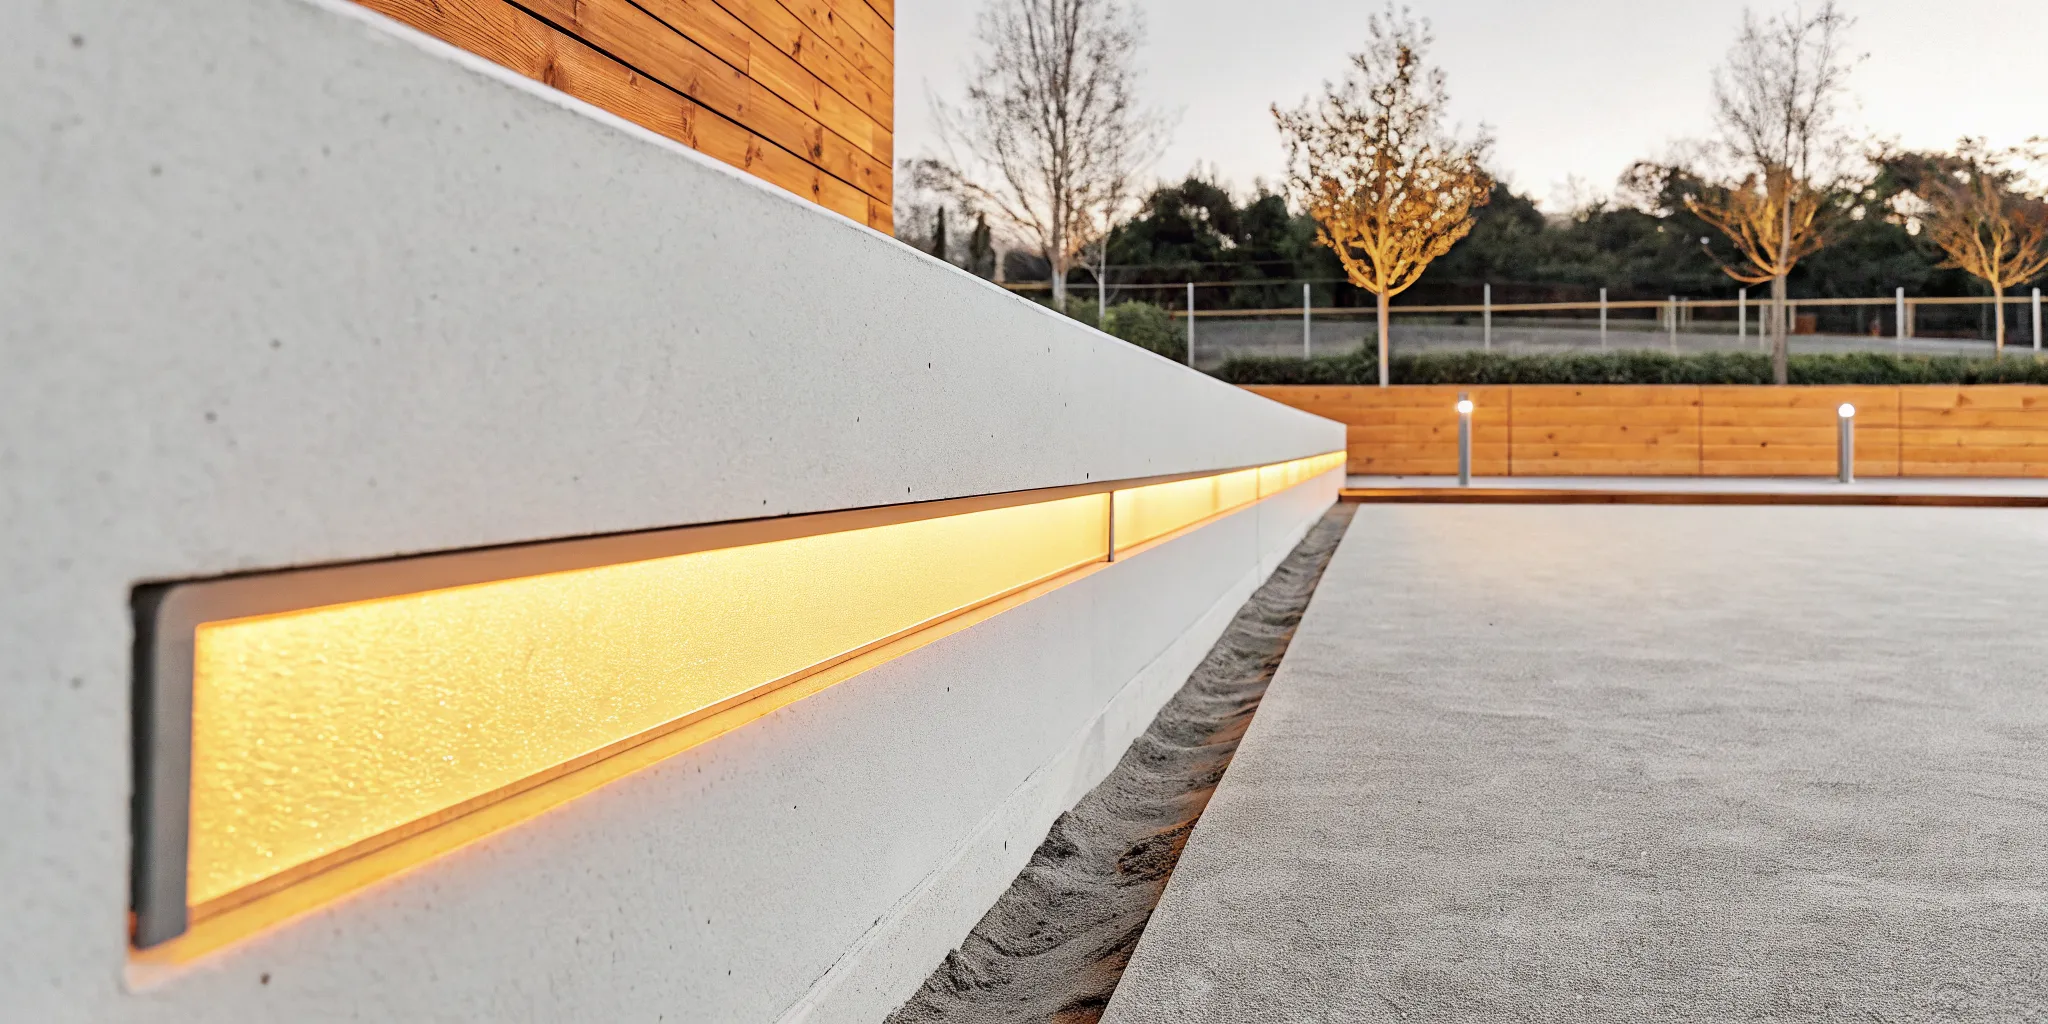
Properly set up lights help reduce glare and keep the light from spilling into other yards. This creates a safe spot for everyone to enjoy the game at night. Using full-cutoff fixtures is one way to increase safety while keeping the court well lit.
Even light across the court is key for a fair game of bocce. If one end is dark, it makes the game hard to play and can lead to trips or falls. A complete plan maps out the light spread to make sure there are no deep shadows.
This focus on detail ensures your Sports Games Courts provide a pro-level feel. High-quality surfaces pair best with lights that show off the court’s texture and color. This makes the space a main point of your backyard design.
Local rules and neighbor care
Before you start a build, you must check local rules for outdoor lights. Many towns on Long Island have codes to prevent light from bothering neighbors. A pro plan helps you follow these rules so you do not have to make costly changes later.
Good lights should help keep the town’s character and protect the night sky. This responsible choice shows care for your town and saves energy at the same time. Planning ahead helps you pick the right gear that meets these local needs.
Your lighting plan should also match the style of your home and gardens. You can choose fixtures that blend in with your stone walls or plants. This makes the lights a part of your home’s overall design instead of just a tool.
When you plan every part of your Sports Games Courts, you get a space that adds real value to your life. It becomes a place for making memories with family and friends for years to come.
Which lighting fixtures work best for a bocce court?
Outdoor-rated LED fixtures with shielded, downward-facing beams generally work best for residential bocce courts. They support efficient operation and controlled illumination. The ideal fixture and mounting approach still depend on court dimensions, nearby homes, trees, architecture, and the level of evening play the homeowner expects.
Picking the right bocce court lighting is key for safe play after the sun goes down. Good lights help you see the balls and the lines without any harsh glare. On Long Island, many owners want a look that blends with their yard. At Gappsi, we use our 38 years of skill to help you find the best match for your space. We focus on lights that give clear sight while keeping your yard looking great.
| Fixture approach | Best use | Planning priority |
|---|---|---|
| Tall pole lighting | Broad, even court coverage | Control beam direction and spill |
| Low-profile landscape fixtures | Supplemental edge and pathway light | Prevent glare at player eye level |
| Integrated lighting | Cohesive new court and landscape projects | Coordinate wiring before construction |
Tall pole lighting for full court coverage
Tall poles are a top choice for large Sports Games Courts. These lights sit high above the ground to spread light over the whole area. They work well if you want a pro feel for your court. High poles help to remove dark spots that might hide the balls during a game. But you must pick the right style to avoid bother for those nearby.
When you set up poles, you must think about where to put them. Placing one at each corner gives the best light spread. You can also use timers to turn the lights off late at night. This saves power and keeps your yard quiet. We help you choose the right pole height so the light stays on the court and not in your windows.
Using full-cutoff lights is a smart move for any home court. These lights point down so they do not spill light into the sky or other yards. This design helps to reduce too much glare and light spill in your area. It keeps the focus on the game and keeps the night sky dark. We often suggest these for large home projects in Nassau and Suffolk County.
Low-profile landscape fixtures
If you want a softer look, landscape lights might be the best path. These lights sit close to the ground and line the edges of the court. They give enough light to see the lines without the look of big poles. This style is popular for people who want their court to feel like a part of their garden. It creates a warm feel for evening games.
Landscape lights are easy to hide among plants and stones. You can use them to show off the beauty of your stonework while you play. Many clients choose this when they want to install custom bocce court lighting that fits a high-end yard. There are several pros to this style:
- They create a soft and warm mood for the court.
- The lights use very little power to run.
- You can hide the wires in the dirt or mulch.
These lights are often LED, which lasts a long time. They are a great way to add both safety and style to your court. This setup works best when you want to keep a low profile in your yard.
How should bocce court lights be positioned?
Bocce court lights should be positioned to create overlapping, even coverage along the full playing surface while keeping beams out of players eyes and neighboring properties. Pole height, setback, beam angle, and landscape obstructions must be evaluated together rather than selected as separate design decisions.
Good lighting for a bocce court is about more than just being bright. You need to put the lights in the right spots so you can see the balls and the court lines. Most people want to play as the sun goes down, but they do not want the lights to shine in their eyes. Proper placement of bocce court lighting helps you play better and makes the game safer at night.
Finding the right pole height
The height of your light poles is a big deal. If the poles are too short, the light will be harsh and cause deep shadows. Short poles also make it hard to see the whole court clearly. Many backyard courts use poles that are 10 to 15 feet tall. Taller poles allow the light to spread out more evenly across the surface. This setup reduces the dark spots that can hide a ball during a close game.
When you plan the height, think about the trees or buildings nearby. You want the light to hit the court but stay away from your neighbor’s windows. Using full-cutoff lights is a smart way to keep the light where it belongs. According to researchers at Harvard, good outdoor lighting at night increases safety and helps protect the home. It also keeps the night sky dark and saves energy.
Controlling glare and shadows
Glare is the enemy of a good bocce game. If a light is right in your line of sight, you will not be able to aim well. You should place the poles on the sides of the court rather than right at the ends. This helps keep the glare out of your eyes as you throw. Putting lights on the side also helps to create a soft, even glow. This makes it easier to judge the distance of each shot.
Shadows can also be a problem if the light comes from only one spot. To fix this, you should use at least two poles. Placing one pole on each side of the long court helps the light overlap. This overlap fills in the dark areas and makes the entire Sports Games Courts area look expert. Gappsi Inc offers several ways to set up evening play for your backyard court.
You also need to keep the lights outside the active play area. No one wants to run into a metal pole while they are playing. Make sure the poles are far enough back from the side walls. This keeps the players safe and protects the lights from hits. Once the spots are chosen, a pro can help with the wires and the final aiming.
- Check the court size. Measure the length and width of the court to see how much light you need for full coverage.
- Pick the pole spots. Choose spots on the sides of the court to prevent glare and keep the play area clear.
- Choose the pole height. Select poles that are high enough to cast an even light without making harsh shadows on the ground.
- Select cutoff lights. Use lights that point down to keep the glow on the court and away from the neighbor’s yard.
- Plan the overlap. Place at least two lights so their beams meet in the middle for smooth sight across the court.
- Hire a pro. Talk to a licensed person to handle the power lines and make sure the setup meets all local codes.
Planning a new bocce court or improving an existing one? Explore Gappsi’s custom bocce court design and installation services for a coordinated court, lighting, and landscape plan.
Choosing brightness and color temperature for evening play
Comfortable evening play requires balanced brightness, consistent coverage, and a color temperature that makes the balls and court surface easy to distinguish. More brightness is not always better. A well-designed system controls glare, avoids harsh contrast, and complements the warm atmosphere of the surrounding outdoor living space.
Good lighting helps you see the ball and the court lines at night. Great bocce court lighting must focus on clear sight. If the lights are too bright, they might cause a glare. This can make it hard to find the space or see where the balls stop.
Balancing light levels for clear sight
Brightness is often measured in footcandles. For a backyard game, you do not need the same power as a pro sports field. You want enough light to spot the small target ball from one end to the other. Most people find that a soft, even light works best. It lets you see the texture of the turf or clay. Proper outdoor lighting for play areas can reduce glare and light spill. This keeps the light on the court and out of your neighbor’s yard.
You should place your lights high enough to avoid shadows. If the light comes from only one spot, the balls may cast long dark lines. This makes it hard to see the court edges. Using a few poles at the corners or sides helps a lot. It also helps players avoid trips or falls during the match.
Picking the right color temperature
Color temperature is measured in Kelvins. This tells you if the light looks warm and yellow or cool and blue. For a home bocce court, many people pick a warm tone. This often falls between 2700K and 3000K. Warm light feels cozy and nice. It makes the court look like a true part of your home. It is great for enjoying bocce courts at night with friends and family.
Some players prefer a cooler light for better focus. Cool white light is usually around 4000K or higher. This light is crisp and clear. It can make colors pop and helps you see fine details. But cool lights can feel a bit cold for a backyard. They might remind you of an office. You must choose if you want a sharp look or a soft feel for your Sports Games Courts.
Planning controls, efficiency, and long-term maintenance
Timers, zones, dimming, accessible components, and outdoor-rated materials make bocce court lighting easier to operate and maintain. Designing these features at the start helps homeowners use only the light they need, protects equipment from Long Island weather, and simplifies service when a component eventually needs attention.
Planning for bocce court lighting in Nassau and Suffolk Counties needs a clear focus. You want a system that is easy to run and stays in good shape for years. Gappsi has built outdoor spaces since 1987. We know how to plan for the wet and salty air on Long Island. Good planning ensures your court is ready for use when the sun goes down.
Smart controls and timers
New systems for bocce court lighting often use smart tools to make things easy. You can set timers so the lights turn on as it gets dark. Some systems let you use a phone app to dim the lights. You can also turn them off from inside your house. This helps you save power and keeps the court ready for a game at any time.
Using smart zones is also a good idea for your Sports Games Courts. You might want bright light on the court but soft light on the seating area. Zoning lets you pick which areas to light up. This is very helpful when you want to set a mood for a party or a quiet night. It also helps to extend evening play without wasting energy in areas no one is using.
Power use and weather protection
Choosing LED lights is the best way to keep your power bills low. LEDs use much less power than old bulbs and last for a long time. In Suffolk and Nassau, lights must stand up to snow, rain, and wind. We use heavy parts like brass or copper that will not rust in the Long Island air.
Proper design also means you must follow local rules for light. Many towns on Long Island have laws to stop light from shining into a neighbor’s yard. We offer custom bocce court lighting that uses full-cutoff fixtures to keep light on your court and out of the sky. This is good for the neighbors and keeps your yard looking great. These fixtures also help to limit glare for players while they are on the court.
Integrating lighting with the full outdoor living plan
Bocce court lighting works best when it is coordinated with patios, walkways, seating, landscaping, and other outdoor amenities. An integrated plan helps guests move safely between spaces, keeps the court visually connected to the property, and prevents fixtures or wiring from feeling like an afterthought.
Planning a backyard project works best when you look at the whole space at once. On Long Island, most owners want a plan that fits. This method treats your bocce court, patio, and lighting as one large job. Our team runs every step from the first sketch to the final stone. Gappsi uses decades of skill to create a yard that covers all your needs from the first day of digging to the last day of work.
Matching site features
A great outdoor space needs more than just a place to play. It needs a layout that links your home to the new court. You might want masonry paths that lead from your back door to the game area. These stone paths guide guests through your gardens and around your pool while keeping everyone safe on your lawn. Adding small lights along the edges helps people walk without trips or falls. It works.
When we build Sports Games Courts, we also think about where people will sit and talk. Seating areas near the court make the game more fun. Using one plan for both the stone work and the court ensures the colors look right together.
Adding a border of plants or a low wall can also help define the court. This makes the space feel like its own room in your yard. Lighting these walls adds depth and beauty to the whole design.
- Better flow between your home and the play area.
- Matching stone and court colors for a clean look.
- Safety for guests walking on paths at night.
- Less stress by using one team for the whole build.
Frequently Asked Questions
Homeowners commonly ask about fixture types, placement, brightness, and project cost before adding bocce court lighting. The right answers depend on the court and surrounding property, but every effective plan should prioritize even visibility, glare control, outdoor-rated equipment, and coordination with the complete landscape design.
How to light a bocce court for evening play?
Adding light to your court lets you play long after dark, so high poles with lights that face down work best. This plan helps spread light over the whole court so you can see the balls as you throw them. You must pick lights that do not shine into the house next door, because good night lights add safety to your yard. A report from NELPAG shows that well-placed lights help keep your home safe while you have fun.
Are there specific outdoor lighting fixtures for bocce courts?
Yes, some lights are made just for game areas, and LED lights are the best pick because they last a long time. You should use full-cutoff lights that point the beam straight down, which stops light from leaking into other spots. It also helps you see the court better without any glare, so you can play the game well at night. Gappsi Inc installs these in their Sports Games Courts to give you a pro look and feel in your own yard.
What are the recommended lighting levels for a bocce ball court?
The best light levels make the court bright but do not hurt your eyes, so you need a smooth glow. This helps you see where to throw the balls with care and cuts down on harsh shadows that hide lines. Using the right bulbs can help fix problems that come from bad lights, which makes the game much more fun. Proper light also makes your court a great place for friends and family to meet at the end of the day.
How much does it cost to light a backyard Sports Games Court?
The price to light your court depends on what you need, and most people add lights when they build the court. This makes it easier to hide the wires and set the poles in place before the ground is finished. The cost will change based on the type of poles and bulbs you use for your own yard layout. To find the real cost, you can call Gappsi Inc to get a price for your new court project.
Plan your Long Island bocce court for evenings
A professionally planned lighting system can turn a bocce court into an inviting evening destination while protecting the look and comfort of the surrounding yard. Gappsi coordinates the court, lighting, materials, and outdoor living details so Long Island homeowners can move from early planning to a cohesive finished space.
A well-designed court should feel as inviting after sunset as it does during the day. Gappsi can coordinate the playing surface, lighting, surrounding masonry, landscaping, seating, and access paths as one complete outdoor living project.
Schedule a design consultation or visit the Smithtown showroom to discuss your property, preferred style, and how you want to use the space. Call 631-543-1177 to start planning your bocce court lighting and outdoor entertainment area.